Continuing with the festive theme, here’s an idea for some stocking fillers; an afternoon’s entertainment for the kiddies; affordable presents for their little friends (or yours for that matter); or a little Christmas cheer to hand out at work.
These little chaps are fun and easy to make, and the best thing is there’s no need for any special equipment, just a little imagination! Even if you don’t have any of that, you can find a link to a template at the end of this post. No excuses!
A quick tip:
Try to time this activity between bursts of central heating, as chocolate doesn’t love an unexpected change in temperature (it’s sort of like your granny in that way). If you have the heating on constantly, that’s ok, but try to do this in the coolest spot in your house.

Things you need:
Chocolate (I used 300g of each milk and white)
Candy chips (for a splash of colour, but read on for more info!)
A couple of piping bags (sandwich bags will work too)
Cellophane or Greaseproof paper
Lolly sticks or equivalent
Step one:
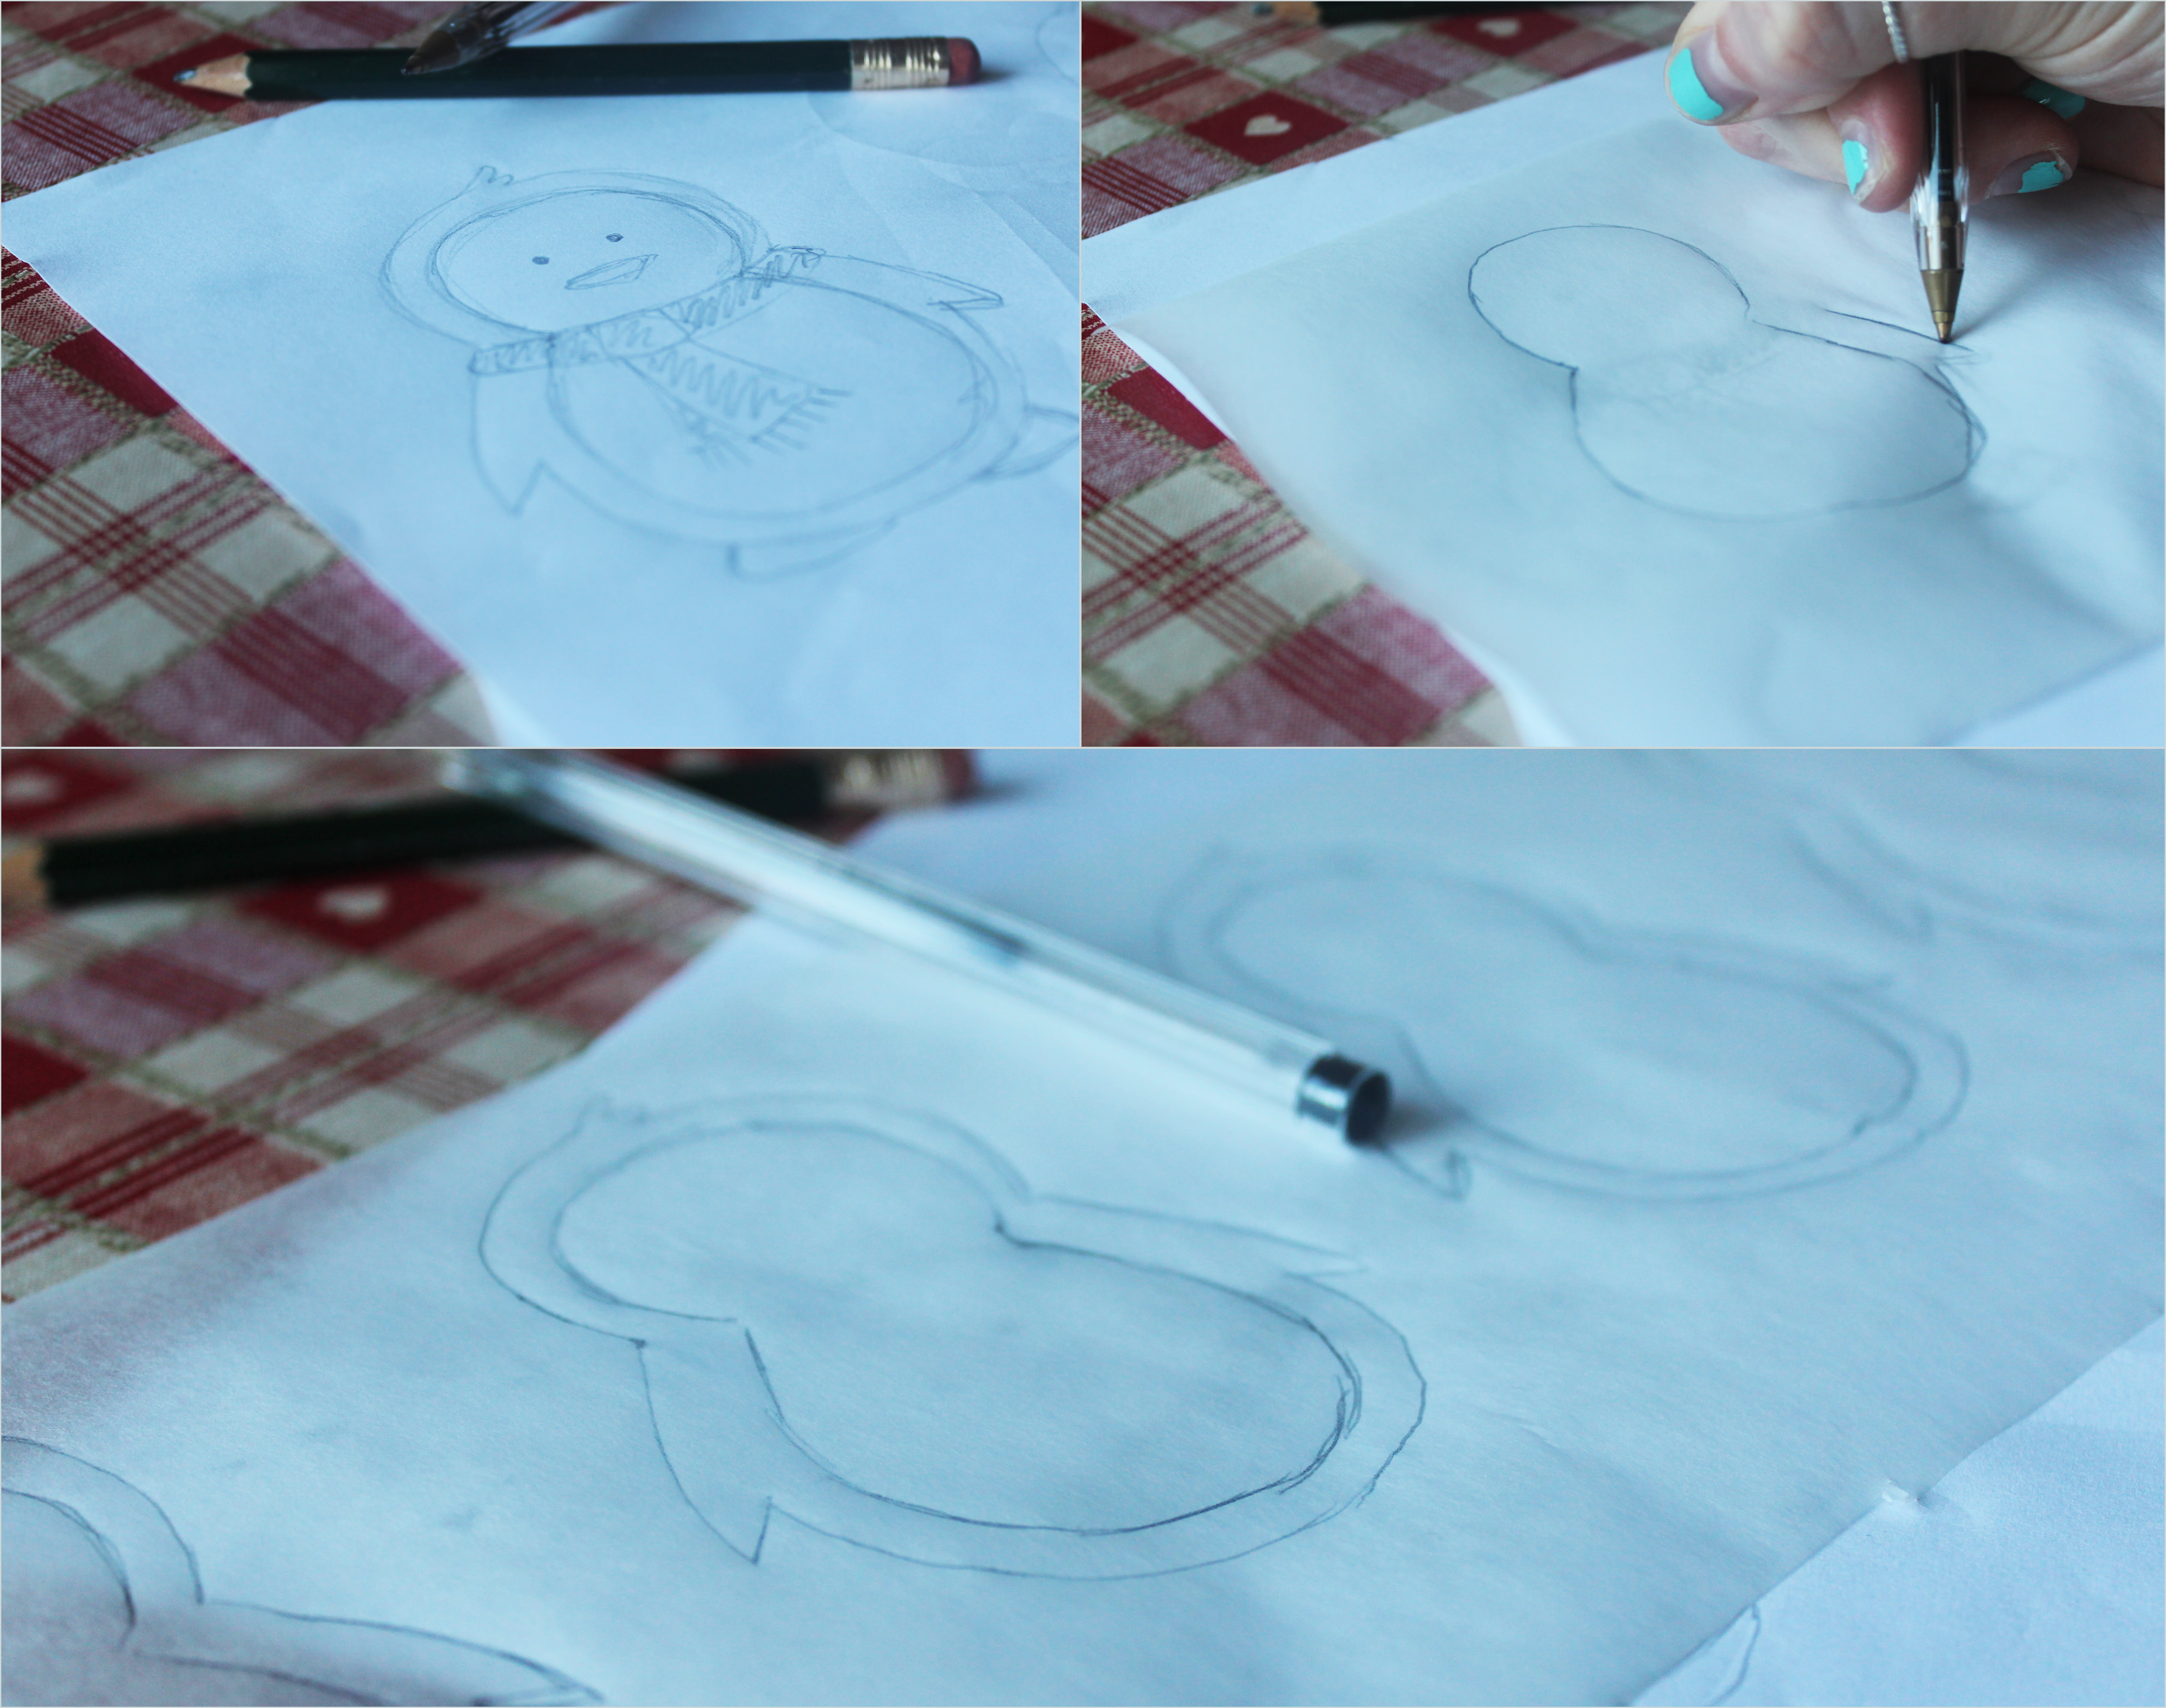
Draw your characters.
This isn’t absolutely essential, you can go freestyle if you prefer, but I’m a touch OCD so I drew mine out first. The more rounded the shapes are and the less you have sticking out the better. The roundness for ease of making, the closer everything is and the less delicate, the lower the risk of arms and legs snapping off.
Once you have a couple of designs you are happy with, trace several copies onto greaseproof paper. Do this in pen so it’s nice and clear.
Either turn the sheet over to make your lollies straight onto the greaseproof, or, if you want a shiny back to your lollies you will need to get your hands on some cellophane/acetate to place over the top. I had a roll of florists wrapping stuff from a previous project, so I used that, but if you can’t find any/don’t want to buy some you can use shiny plastic wallets instead.

Step two:
It’s chocolate time! I got basics bars for 30p a pop. You might want to splash out a little more if you’re doing this for the grown ups, but for littles it makes this a really cheap and cheerful craft, and this way it’s not a problem if more ends up on them/in their mouths than on the lollies!
Hold a little bit back (50g or so), and break the rest up into a microwaveable bowl. It’s not a sin to melt your chocolate in the microwave, and let’s be honest, who can be bothered boiling a pan of water?! You DO need to keep a close eye on it though. Put it on for about 30 secs to begin with, and then 5-10 second bursts stirring in between, don’t get impatient here, it turns so quickly.
Once you have it just melted, chop the other 50g into relatively small chunks and stir until melted, don’t put it back in the microwave – the warmth of the other chocolate will melt it in a couple of minutes.
This is my nod towards tempering (a technique that makes the chocolate shiny and gives it a snap). Don’t worry too much about this, it’s supposed to be fun, if you want to be more precise about tempering then have a google, there’s loads of advice out there, but I won’t bore you any further here.

Step three:
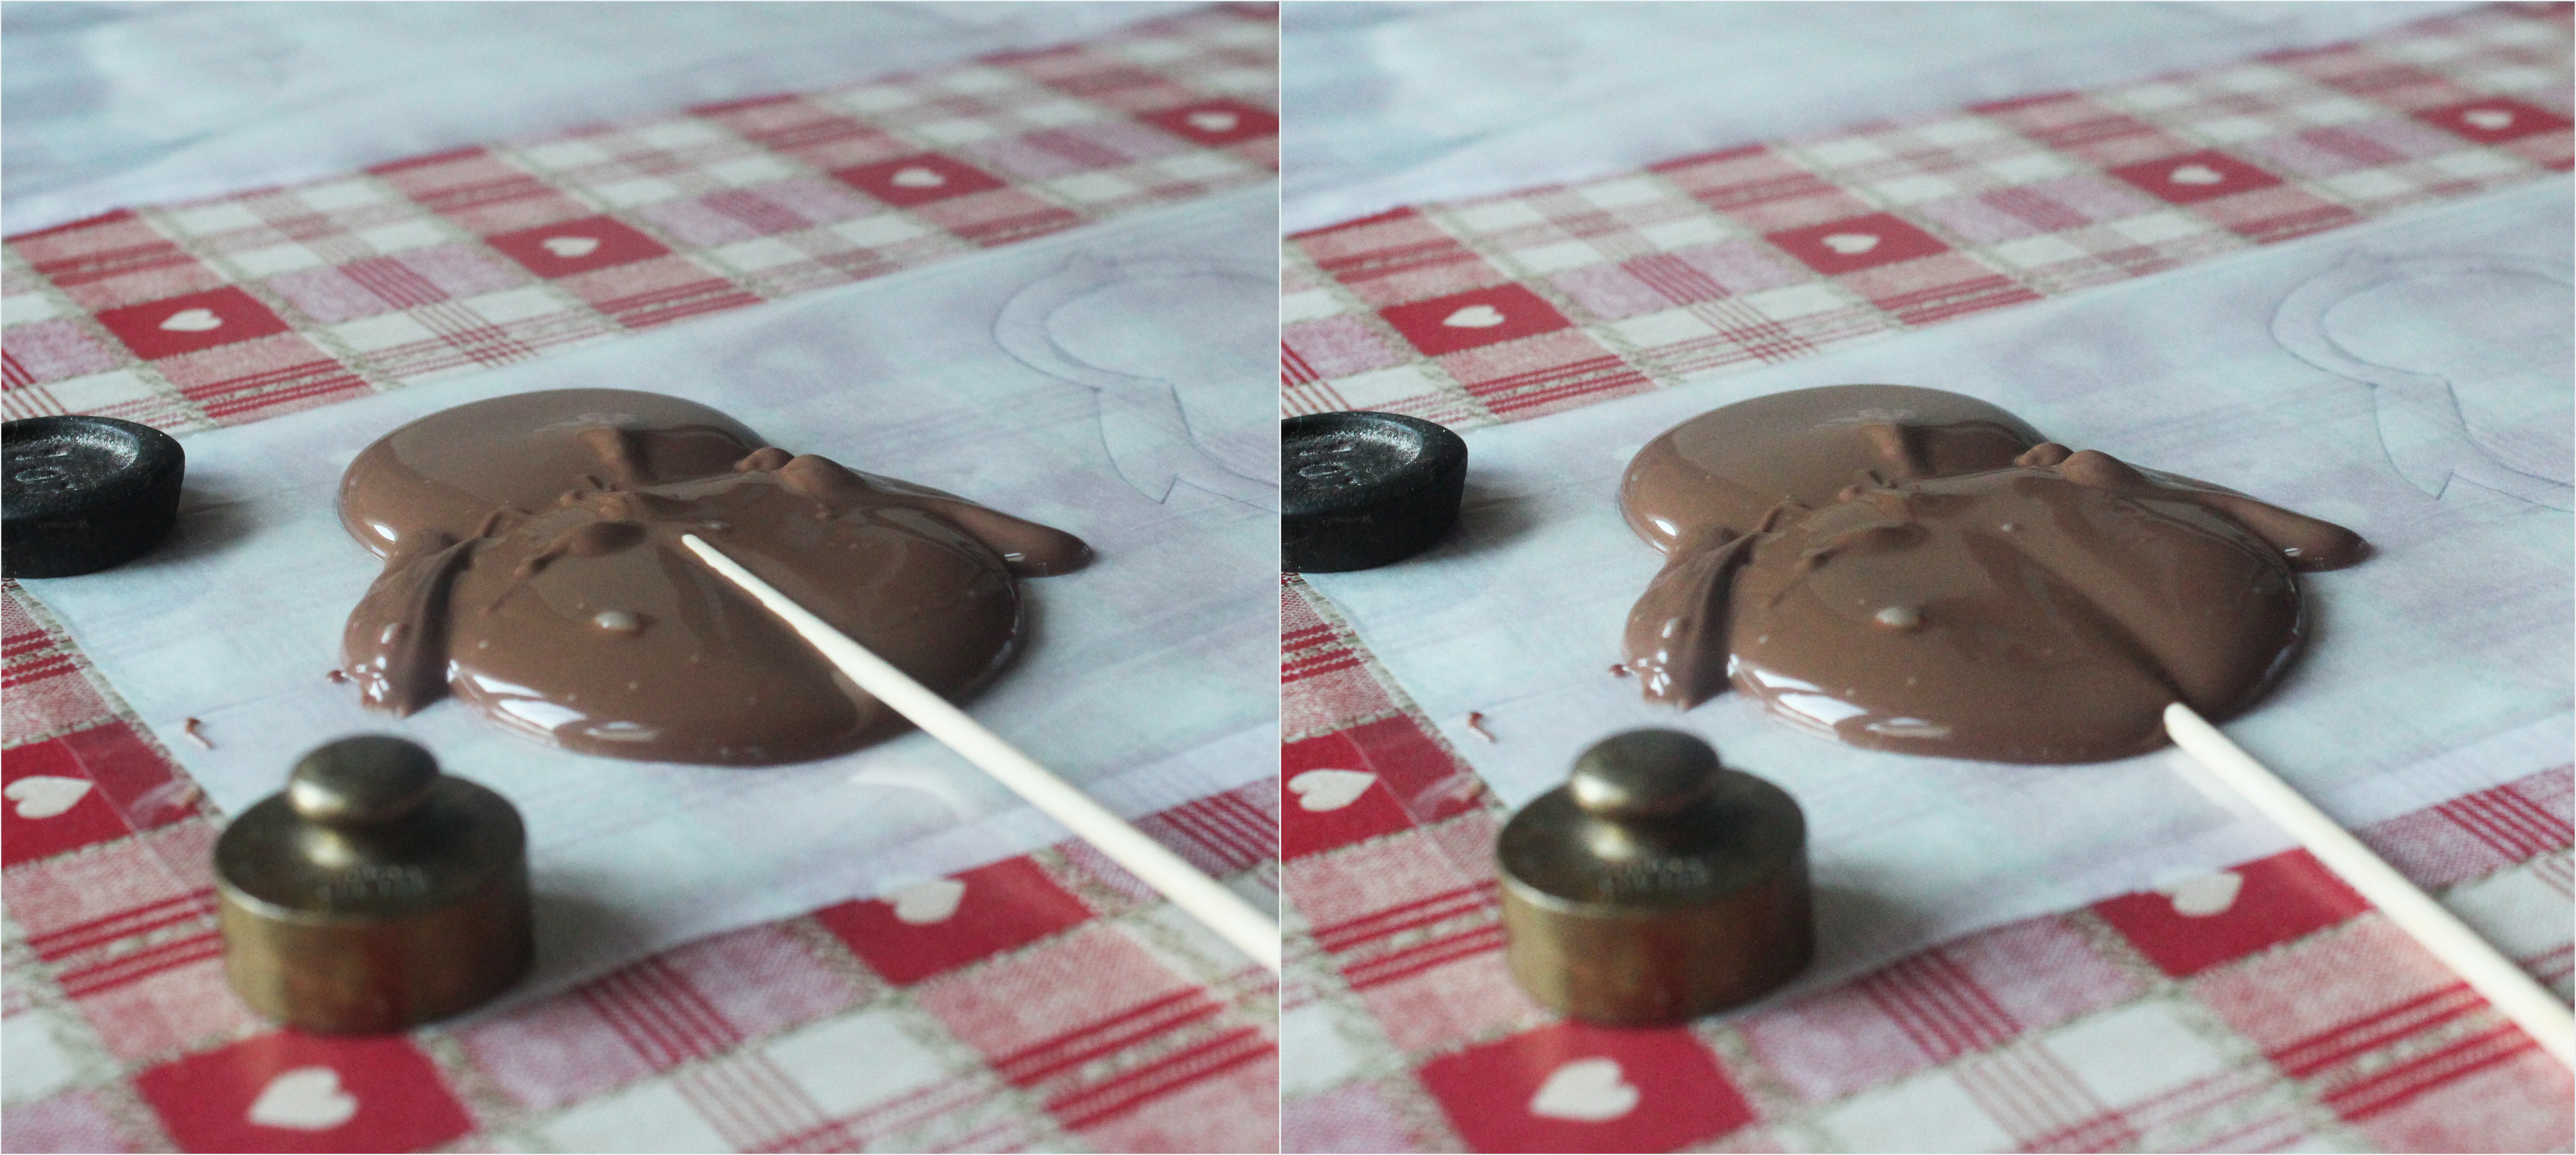
Put your piping bag over the edges of a glass and pour in the chocolate. If you don’t have a piping bag (or don’t know how to make one) then you can use some good quality sandwich bags. The bigger these are the better, and remember you will need to tilt it diagonally to snip off one of the corners so don’t overfill it!
Pick up at the edges and twist to avoid the choc exploding out the wrong end of the bag.

Step four:
Pipe the lollies.
Starting in the middle of each section point the piping bag straight down and squeeze gently. The chocolate should spread out pretty evenly from the centre (hence the better the rounder). Don’t be afraid to use quite a lot for a nice chunky lolly.
Once you’ve got the basic shape and are fairly close to the edges, make a sort of stirring motion in the chocolate to push it out a little bit more until it reaches the sides.
Pipe the wings, be careful not to lift the piping bag too far away from the surface or you will lose control of the flow of chocolate.
Step five:
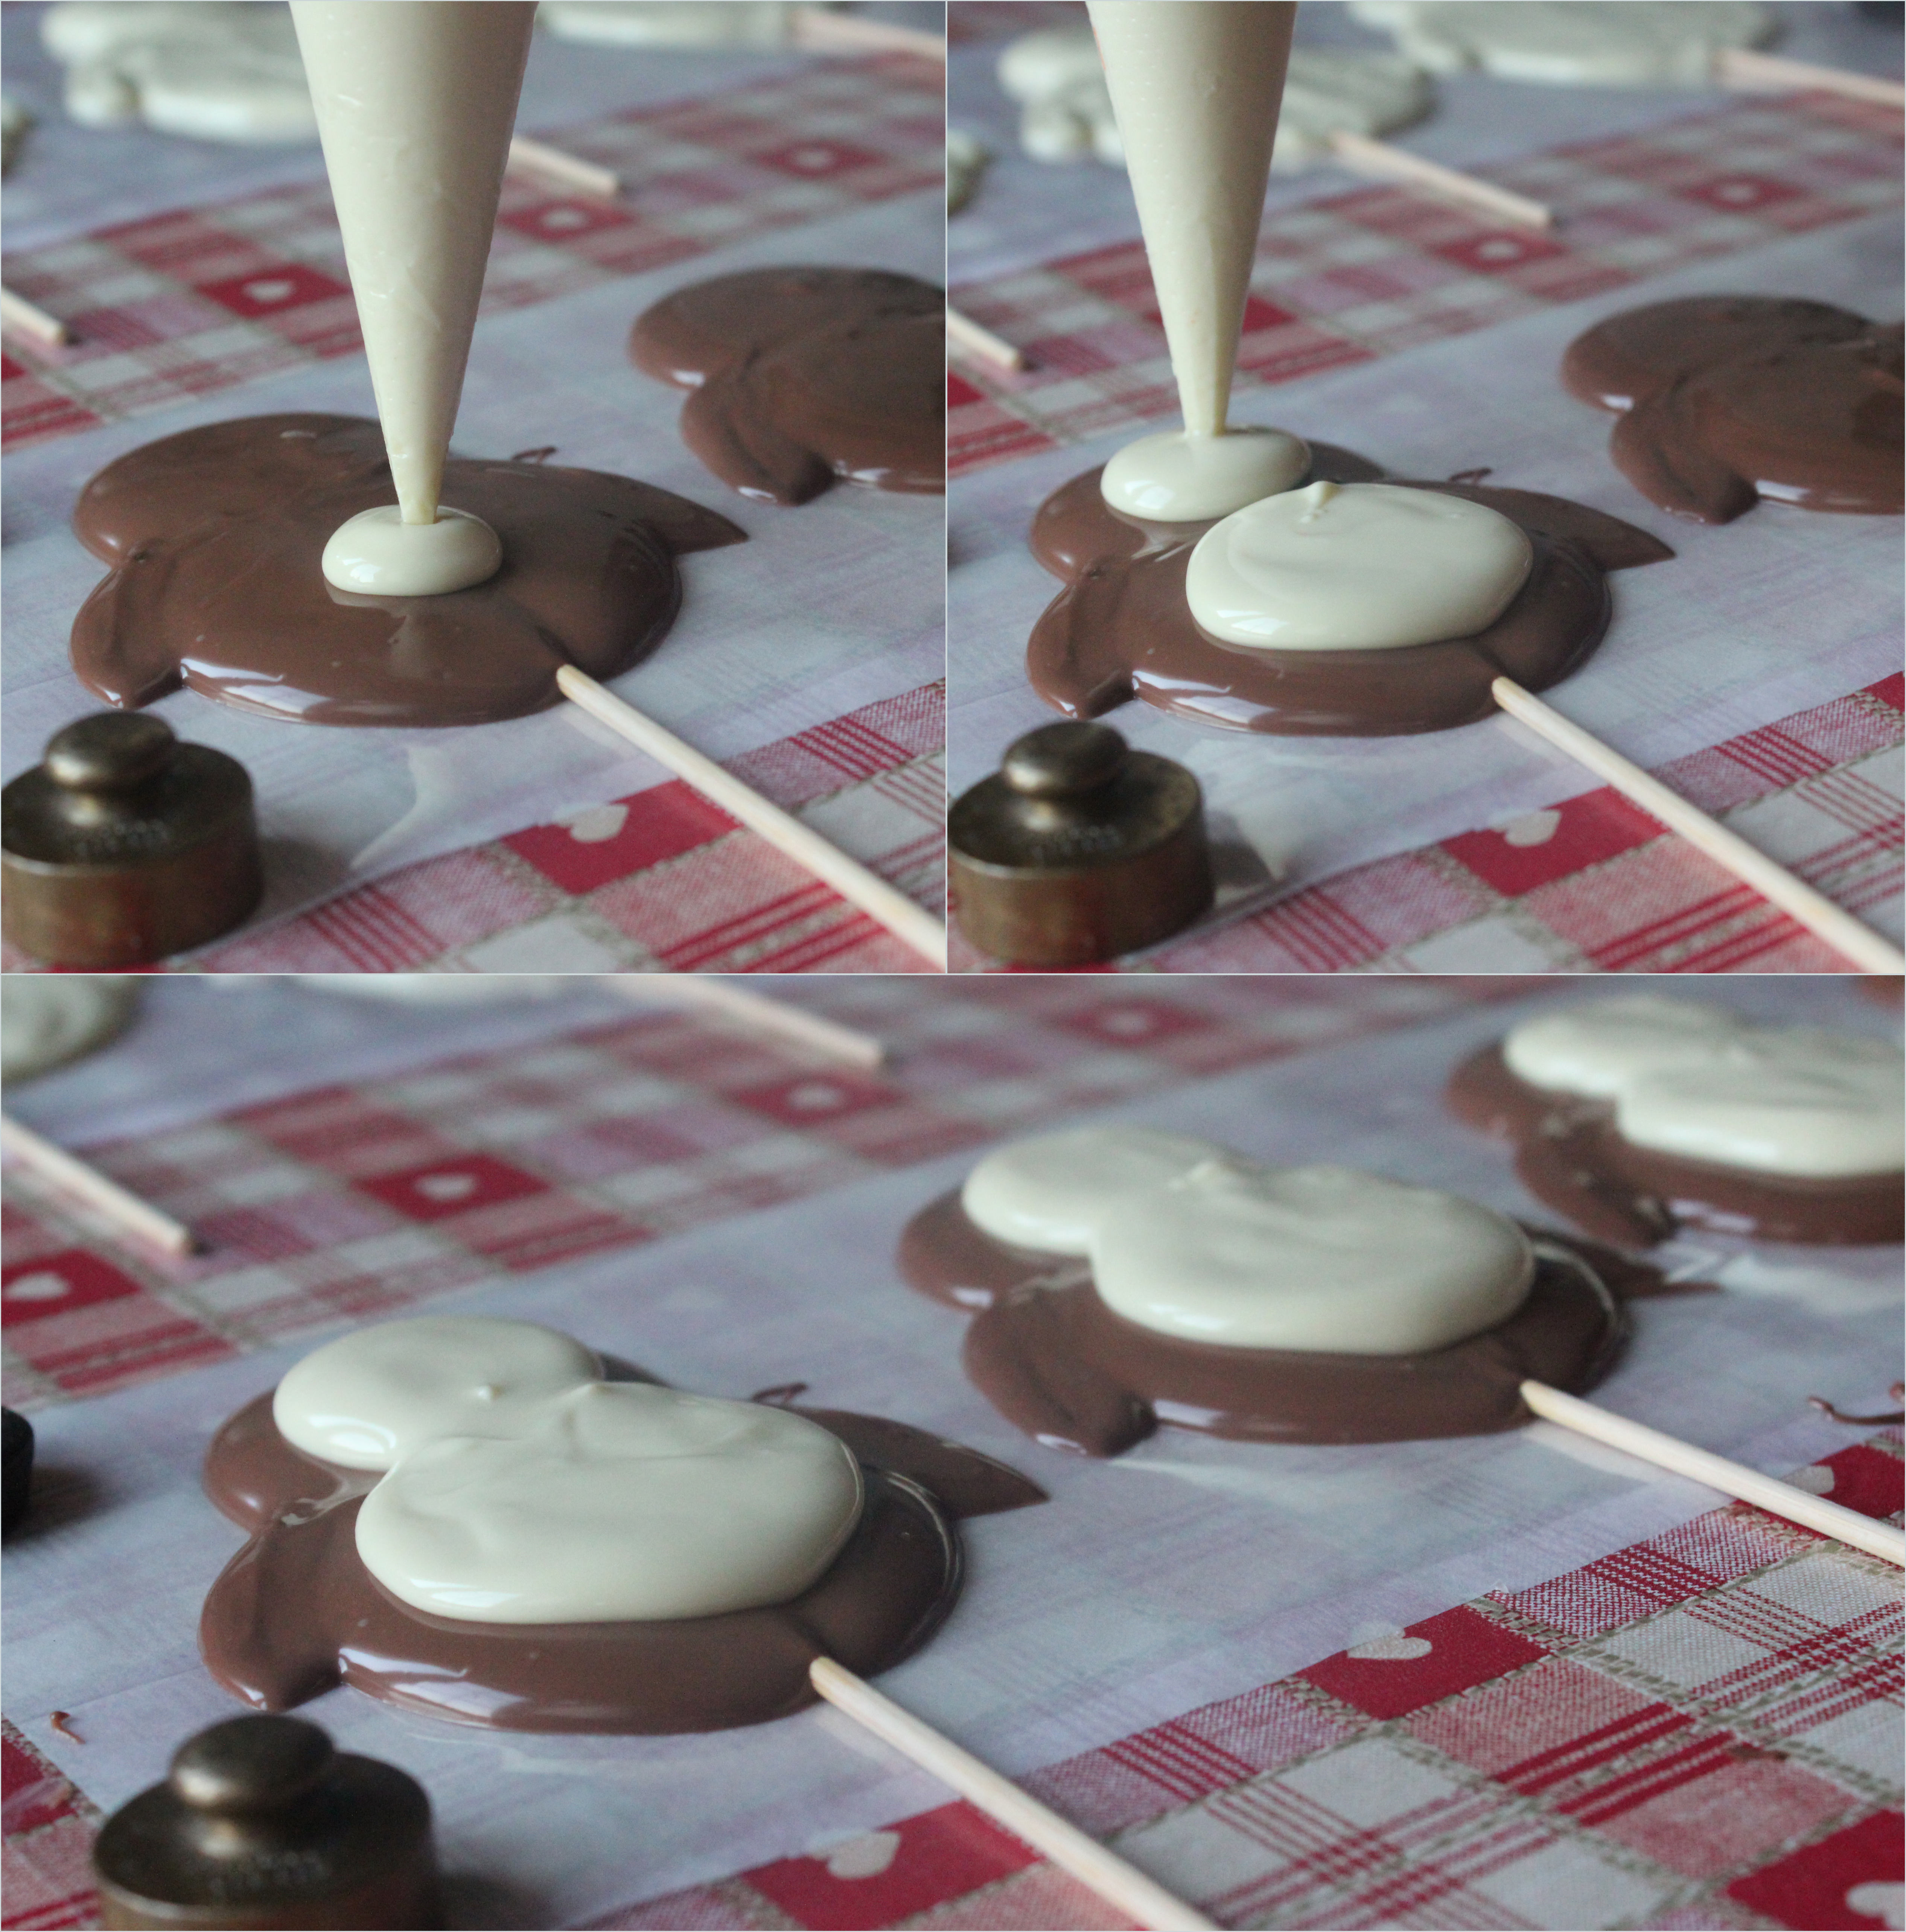
Put the lolly stick in.
Drop onto the thickest part of the shape and twist gently so that it is covered completely.
I used some wooden BBQ skewers that we had left over from the summer, I chopped them in half with branch clippers. Most craft or cooking shops (and even supermarkets) now sell packs of lolly sticks. As ever, you will find them cheaper online if you have the time to order them, or be resourceful with what you have – you don’t have to use sticks at all.

Step six:
Use a cocktail stick to pop any bubbles and tease out any features of your shape that you couldn’t make right with all that chocolate gushing out of the piping bag.
Cocktail sticks are your best friends when it comes to craft of any kind. Seriously.
Step eight:
Leave the milk chocolate to set at room temperature until it is touch dry. That is, when you can touch it gently and nothing comes off on your finger. Now it’s time to pipe on the penguin’s face and belly, using the same techniques as before.
Step nine:
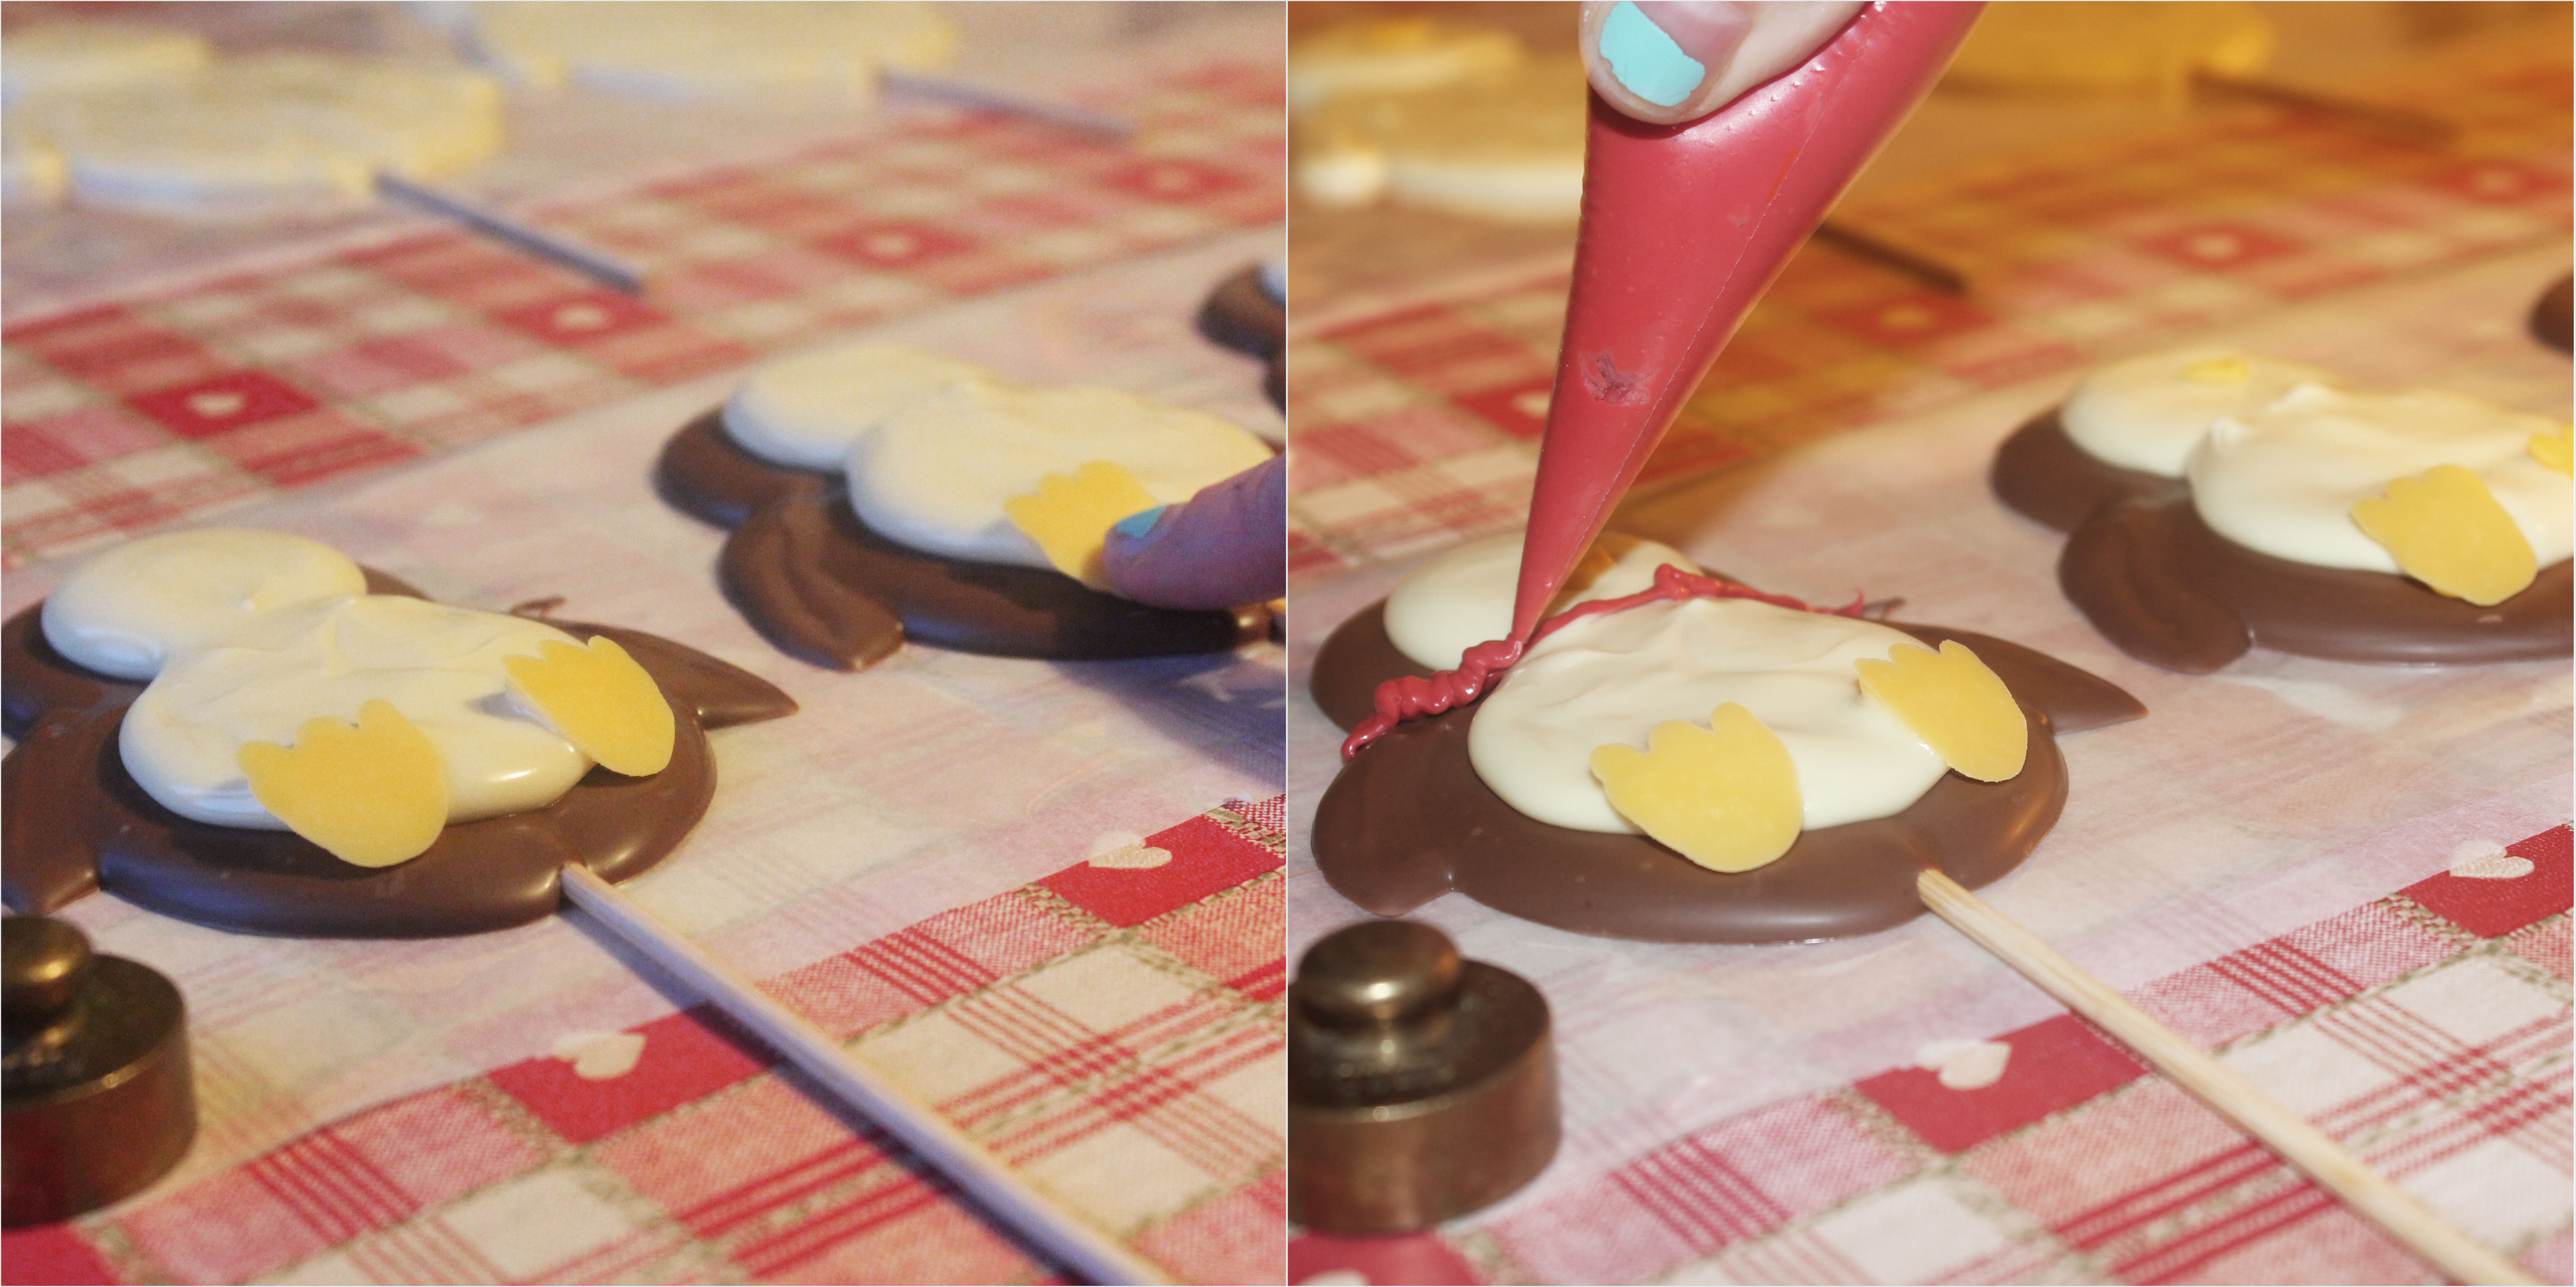
Creature features. Ok, so this is where is all went a bit wrong for me. I’ve seen these candy chips all over the internet, mainly used to cover cake pops and the like, so I thought they’s be perfect for this project. Well after forking out a small fortune, I found them a bit of a nightmare to pipe, hence the rather wobbly scarves and beaks!
A tip – don’t be tempted to put food colouring in your chocolate as an alternative – it either splits it or seizes it up. In most supermarket home baking aisles you can find strawberry and orange flavoured buttons, though you have less colour choice, I have no doubt that they would be a bit easier to work with. Either that or you could use dark chocolate, or perhaps you know something I don’t about working with these chips – answers on a postcard please.
Whatever you choose to use, pipe the feet onto a spare spot on your acetate, they will dry really quickly (part of the problem with piping this stuff). Just flip the little things over and press them onto the white chocolate while it’s still wet. Pipe the scarves straight onto the lollies, you might want to let the chocolate set first.
Step ten:
Wait until the white layer is touch dry and put in the fridge to set completely. It is important you wait for this, so your lollies will be shiny and won’t melt at room temperature – no one wants a melted snowman in their stocking!
Once they have set, tie a little ribbon to the stick and store in a blacked out tin in a cool dry place until you want to re-home them. You might want to get your hands on some cellophane bags to present them in, just put the lolly into the bag face first and tie around the stick.
Oh and one more thing…
I promised you a template didn’t I? Here we are then: Little Penguin Template
Happy making!

2 comments
Comments are closed.