Category: Confectionery

Chick-chick-chick-chick-chicken

Last Monday night I found myself in Sainsbury’s lending a hand with the food shopping. Whilst queuing behind five of the most ridiculous locals in the bakery line, I happened to spot a something in the display case. Now, I don’t know whether I was more amused or horrified to see these little things. There was no way to describe them, so I bought some to show you. See below.

how-to-make-easter-chicks-1

Now, I wouldn’t blame you for wondering what on earth they are. That, my dear friends is one of the ways Sainsbury’s is ringing in the Easter season this year. They’re chicks! I know right? Wow.

So in my slightly obsessive way I hit the chocolate aisle with plans to improve on Sainsbury’s rather bizarre little contribution to Spring.

how-to-make-easter-chicks-3

You will need

A half batch of the fudge from last week’s post. See step one for more info.

(You may prefer to use a favourite truffle or cake pop recipe instead, I just really like fudge)

300g White chocolate

White chocolate buttons

200-300g Candy coating

(optional – substitute with more white chocolate if you prefer/don’t want to buy)

A tub of chocolate beans

(mine were from Dr Oetker)

A couple of squares of dark chocolate

how-to-make-easter-chicks-2

Step one

Make up the fudge as seen in last week’s post. You don’t want to heat it to quite the same temperature though, or you won’t be able to roll it. Go with around 112 degrees C. The white stuff you can see on the board is icing sugar – the fudge was a touch sticky.

Apologies both for skipping the ‘making of’ in this post, and for using the same recipe twice in two weeks. This is just a suggestion, you can use any kind of filling as long as you can roll it into balls.

how-to-make-easter-chicks-4

Step two

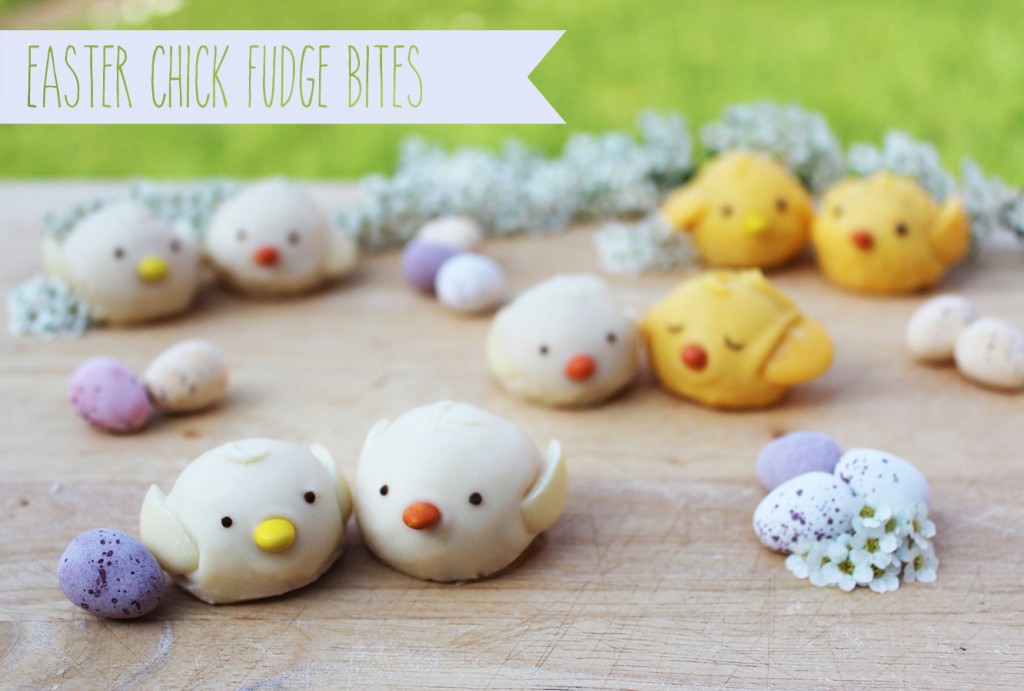
Cut buttons into halves for the little wings, and sort your beans out so you’ve just got the yellow and orange ones for their little beaks.

Step three

Now, this stage was all a bit too much to try and document all on my own, even with the help of self timer, so excuse the jump in photos.

You want to melt the candy coating and white chocolate in the microwave in heat-proof bowls (do one colour in full first then the other).

After my first and bad experience with candy coating I wasn’t thrilled with the idea of take two, but I really wanted yellow chicks and had plenty left over. So I did a little google, only to discover that Wilton’s Candy Coating (the one I have) is pretty much universally hated by all home bakers. Wish I’d known before I forked out £3…still, never mind.

The forum mums and bloggers informed me that this cement mix can be thinned out with some melted shortening (Trex is the best UK substitute), or oil. I didn’t want a whole tub of Trex with no other plans for it on the horizon, so I just used veg oil. It worked fairly well, and at least made the candy dipp-able. I will probably try to source an alternative next time though.

Anyway, you should check out my dipping technique, documented in this post if you’re not sure where to start. You need to dip your fudge, place on greaseproof paper, and straight away stick on the little beak and wings. Feel free to experiment with different positions for the wings and beak so that all your tiny chickens are unique.

Leave to dry.

NB: I also added little swirls and lines for hair with a cocktail stick to give my chicks a bit of extra character, not that they needed any…they’re a little bit bumpy and odd as it is but it all adds to the charm eh?!

how-to-make-easter-chicks-5

Step four

Use a small sharp knife to trim off any chocolate that has pooled to form a base on the greaseproof around the bottom of your chicks. I wish I’d been a little more careful about this, so take your time. If you do it while the chocolate is still a little soft you will get a cleaner cut.

Step five

Melt a couple of squares of dark chocolate and use a cocktail stick to dot on eyes. I made a number of mine sleep with little semi circles and the wonkiest looking one was given glasses…mainly for my sister’s benefit as I knew she would find him endearing.

Step six

Put them on a plate and serve them up to your Easter guests!

They are a bit too cute to eat though. Even if they aren’t quite the polished product I had in mind when I turned my nose up at the Sainsbury’s ones, I hope they bring a little smile to your face.

Happy making!

how-to-make-easter-chicks-7

how-to-make-easter-chicks-6

how-to-make-easter-chicks-8

Fudge for mama

Hello there, apologies for the short blogging hiatus; life happens sometimes, but I appreciate you sticking with me.

This weekend I went to stay with my friend Beth before she goes on her trip. Being as Mother’s Day is so near (this Sunday for those of you in the UK), B and I thought we would make some fudge for our mummys.

Whether or not you have Mother’s Day coming up, I urge you to have a go with making fudge. It’s a bit of a rascal but there’s lots to feel good about when you get it right, I’ve made quite a lot in my life time and so hopefully some of the below will help you avoid some of the fudging pitfalls.

Just a heads up, the batch below is fairly large, so unless you’re making it with a friend or for your Grandma too, you may want to cut the quantities in half.

how-to-make-honey-fudge-8

how-to-make-honey-fudge-1

You will need

1kg/2lb Granulated sugar

280g/10 floz Evaporated milk

120g/4 oz Clear honey

120g/4oz Salted butter

250g/9oz Dried apricots

1tsp of Liquid glucose (if you have it – not essential – but great)

Tray bake tin lined with greaseproof paper

Sugar thermometer (essential)

how-to-make-honey-fudge-2

Step one

Combine all the ingredients (minus the apricots) into a large heavy bottomed pan.

At home I use the pressure cooker, and at Beth’s we discovered this casserole dish worked pretty well. The pan should be quite large as the mixture will bubble up, and the sturdier it is the less likely your fudge is to scorch.

how-to-make-honey-fudge-3

how-to-make-honey-fudge-4

Step two

Melt ingredients on a reeeaaallly low heat.

Seriously. As low as your cooker goes. Impatience will not help you here.

This ensures all the sugar is dissolved before it boils, and should help to prevent sugar crystals forming.

You should stir gently to stop the mixture burning on the bottom of the pan. Pop your thermometer in at this point too.

This was the first outing of my rather swish thermospatula, above, so I could stir and measure the temperature at the same time. I know, I need to get out more.

how-to-make-honey-fudge-5

Step two and a half

Keep the fudge on a low heat, stirring gently.

It will begin to boil as above. Resist the urge to put your face in it, as good as it smells, that won’t end well for you.

This is where the thicker your pan the better, as this boiling stage should take around 10-15 minutes ideally. You want your fudge to reach soft ball stage on the thermometer or 115 degrees. Patience is the key here. You should the fudge thicken up and get darker evenly.

Step three (optional)

Once your fudge has reached 115 degrees pour immediately into an empty saucepan. Some fudge people will disagree with me here, as faffing about with fudge can cause crystallisation in the sugar. However, I’ve found that if I leave it in the original pan it carries on cooking and can become brittle. The trick is to do it straight away and don’t scrape the pan out or stir it once transferred.

Now, DO NOT TOUCH. Don’t allow pets, children or interfering family members near the fudge mix for at least half an hour. Preferably you want to wait until the thermometer hits about 50 degrees, but when I did this for a craft fair a few years ago I didn’t have the time to hang around, and found that half an hour was generally enough.

how-to-make-honey-fudge-6

Step four

While you wait, use scissors to chop the apricots into tiny pieces. These are an optional addition and can be substituted depending on your mum’s tastes. You may want to add a different dried fruit, some chopped nuts, or chocolate instead.

how-to-make-honey-fudge-7

Step five

Get a wooden spoon, summons all your arm power, and beat the mixture. If you have a stand mixer, you’re laughing at this stage, because it can take up to 15 mins sometimes…

About 5-7 minutes into your beating add the apricots (warning, if using chocolate chips you want to add them as late as possible so they don’t melt completely).

Keep going until the fudge becomes very thick, you still need it to be soft enough to spoon into the tin, so try not to take it too far. I didn’t have the chance to photograph this, so you will need to take your best guess. Here’s a clue though, your arm will be hurting you by now.

Step six

Spoon into your lined tin and leave to set.

how-to-make-honey-fudge-9

Ta da! You’ve done it!