When it comes to autumn blogging, I just can’t get away from apple related ideas. It’s a well known fact that toffee flavours go well with apple so I thought I might wheel out the salted caramel recipe for this week’s post.
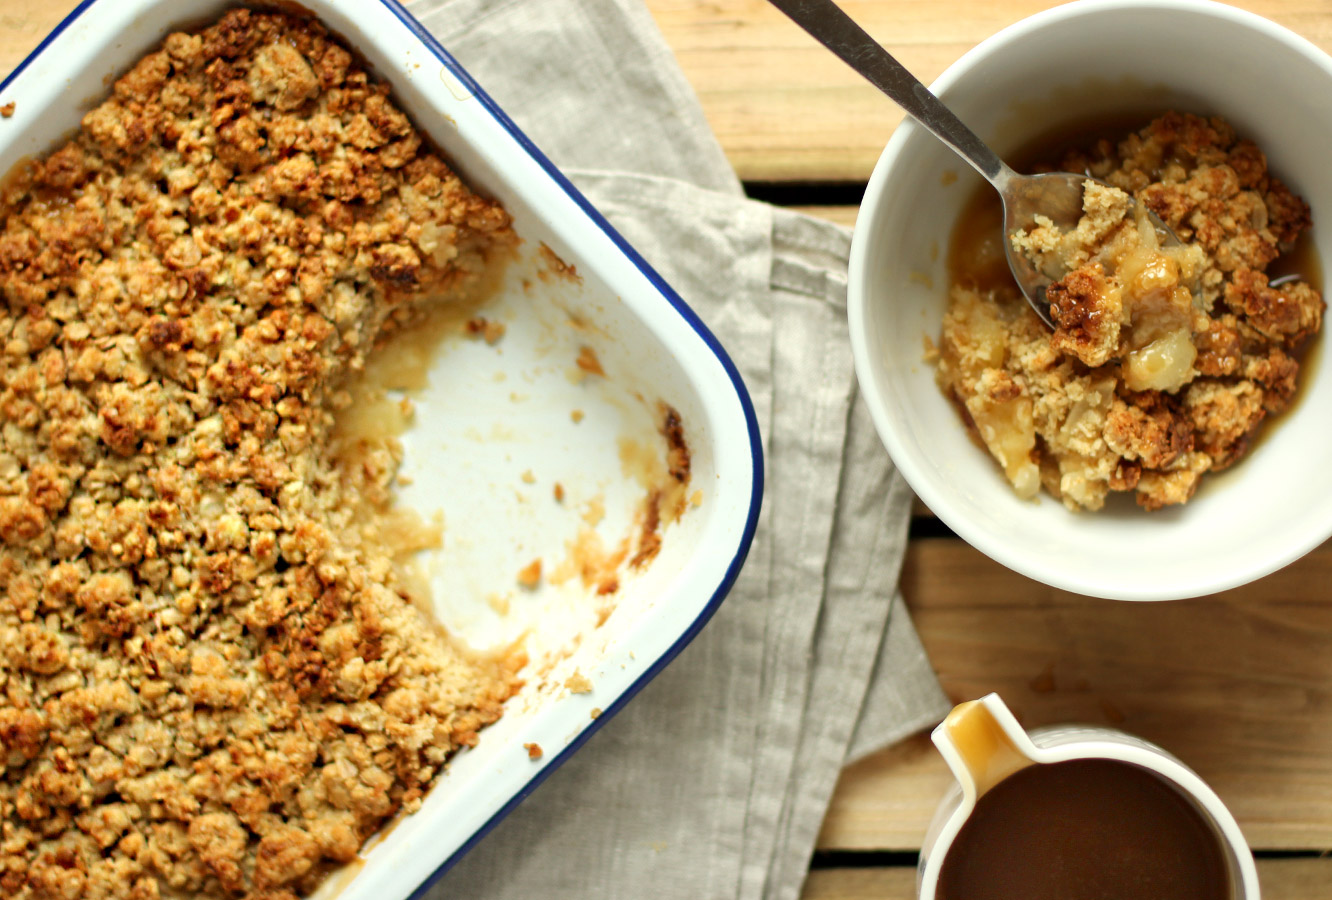
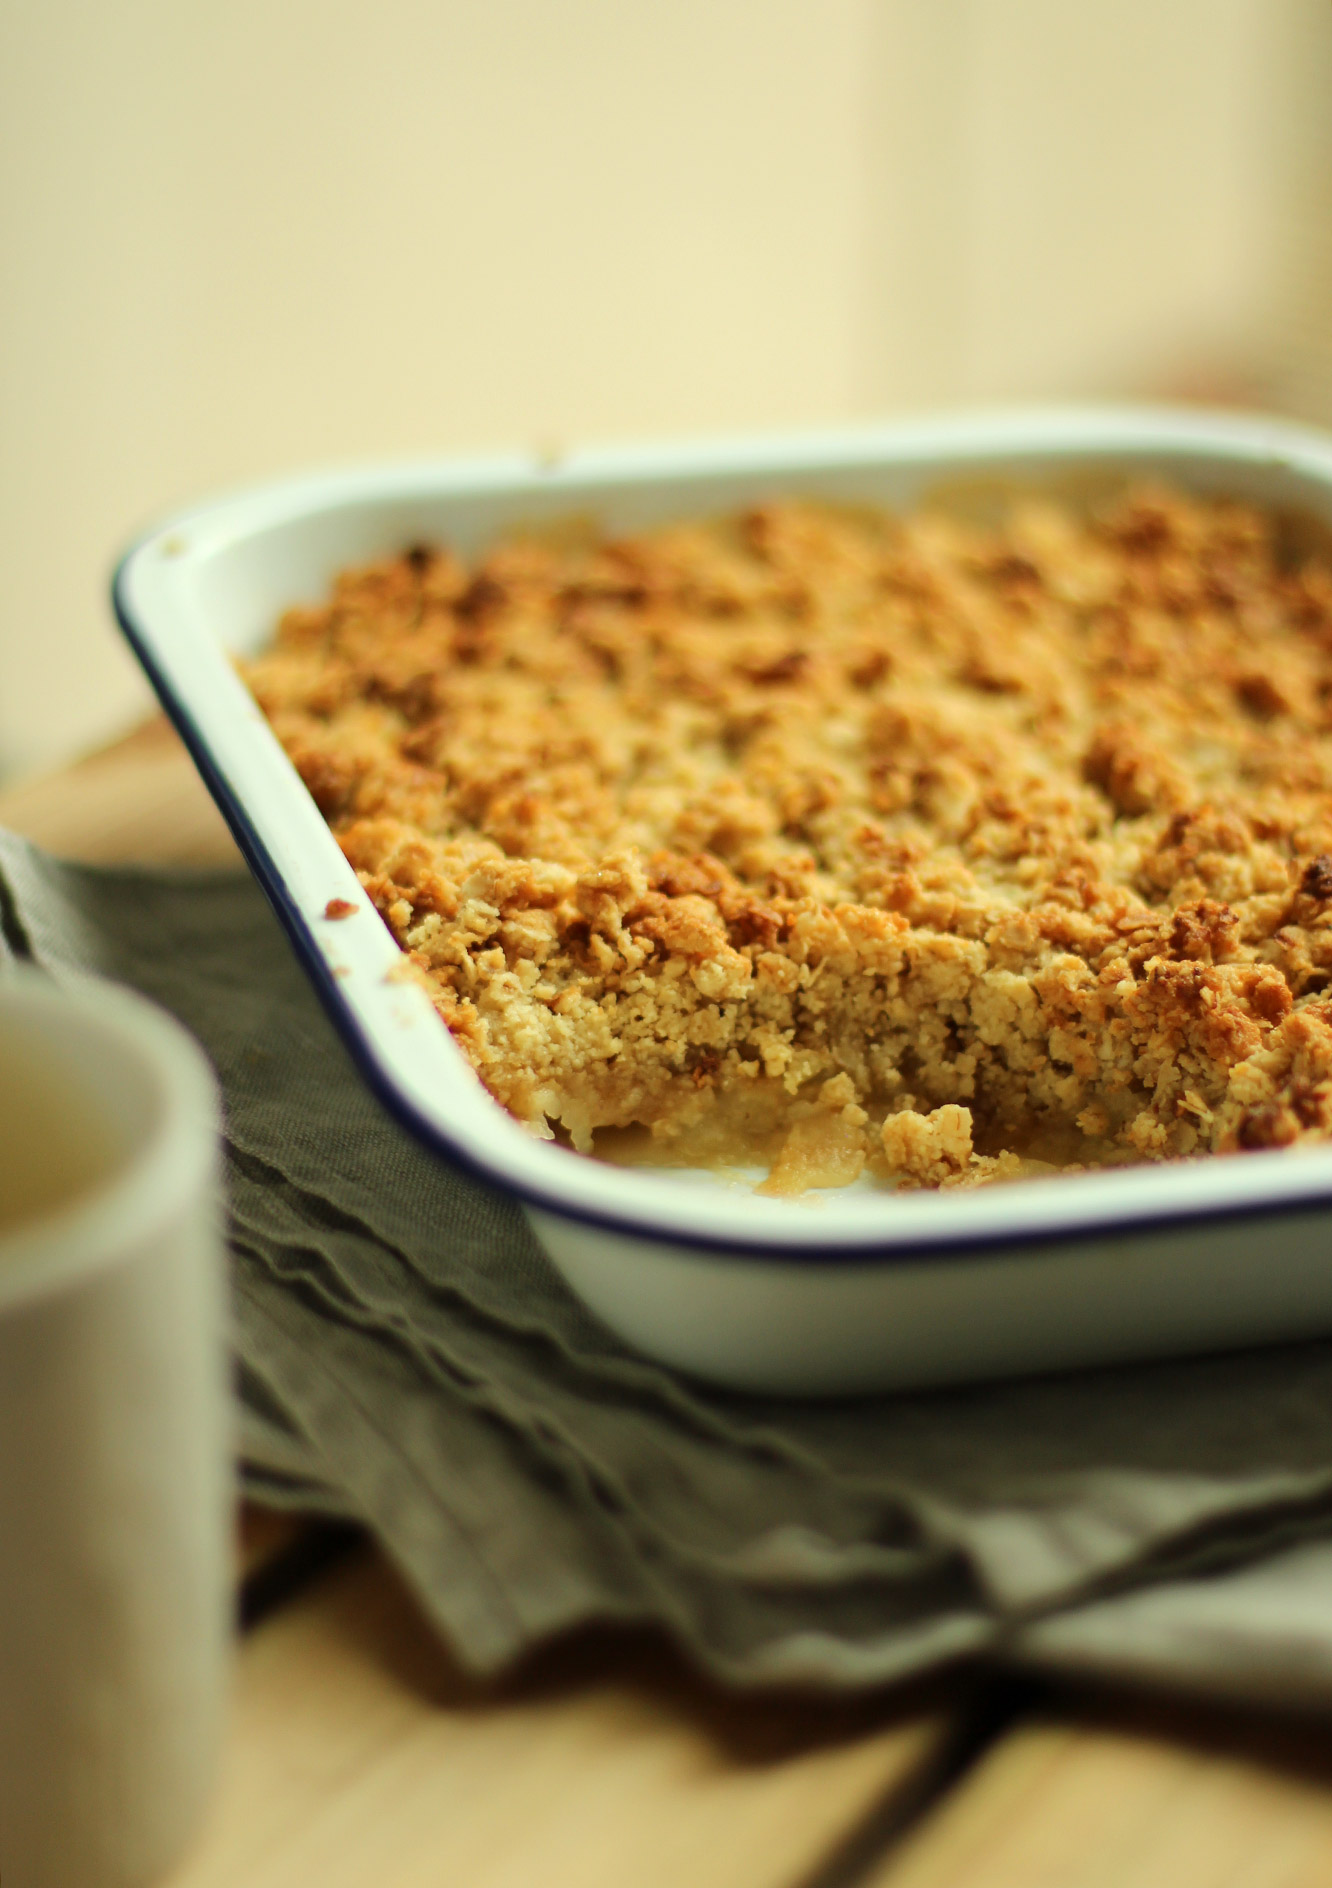
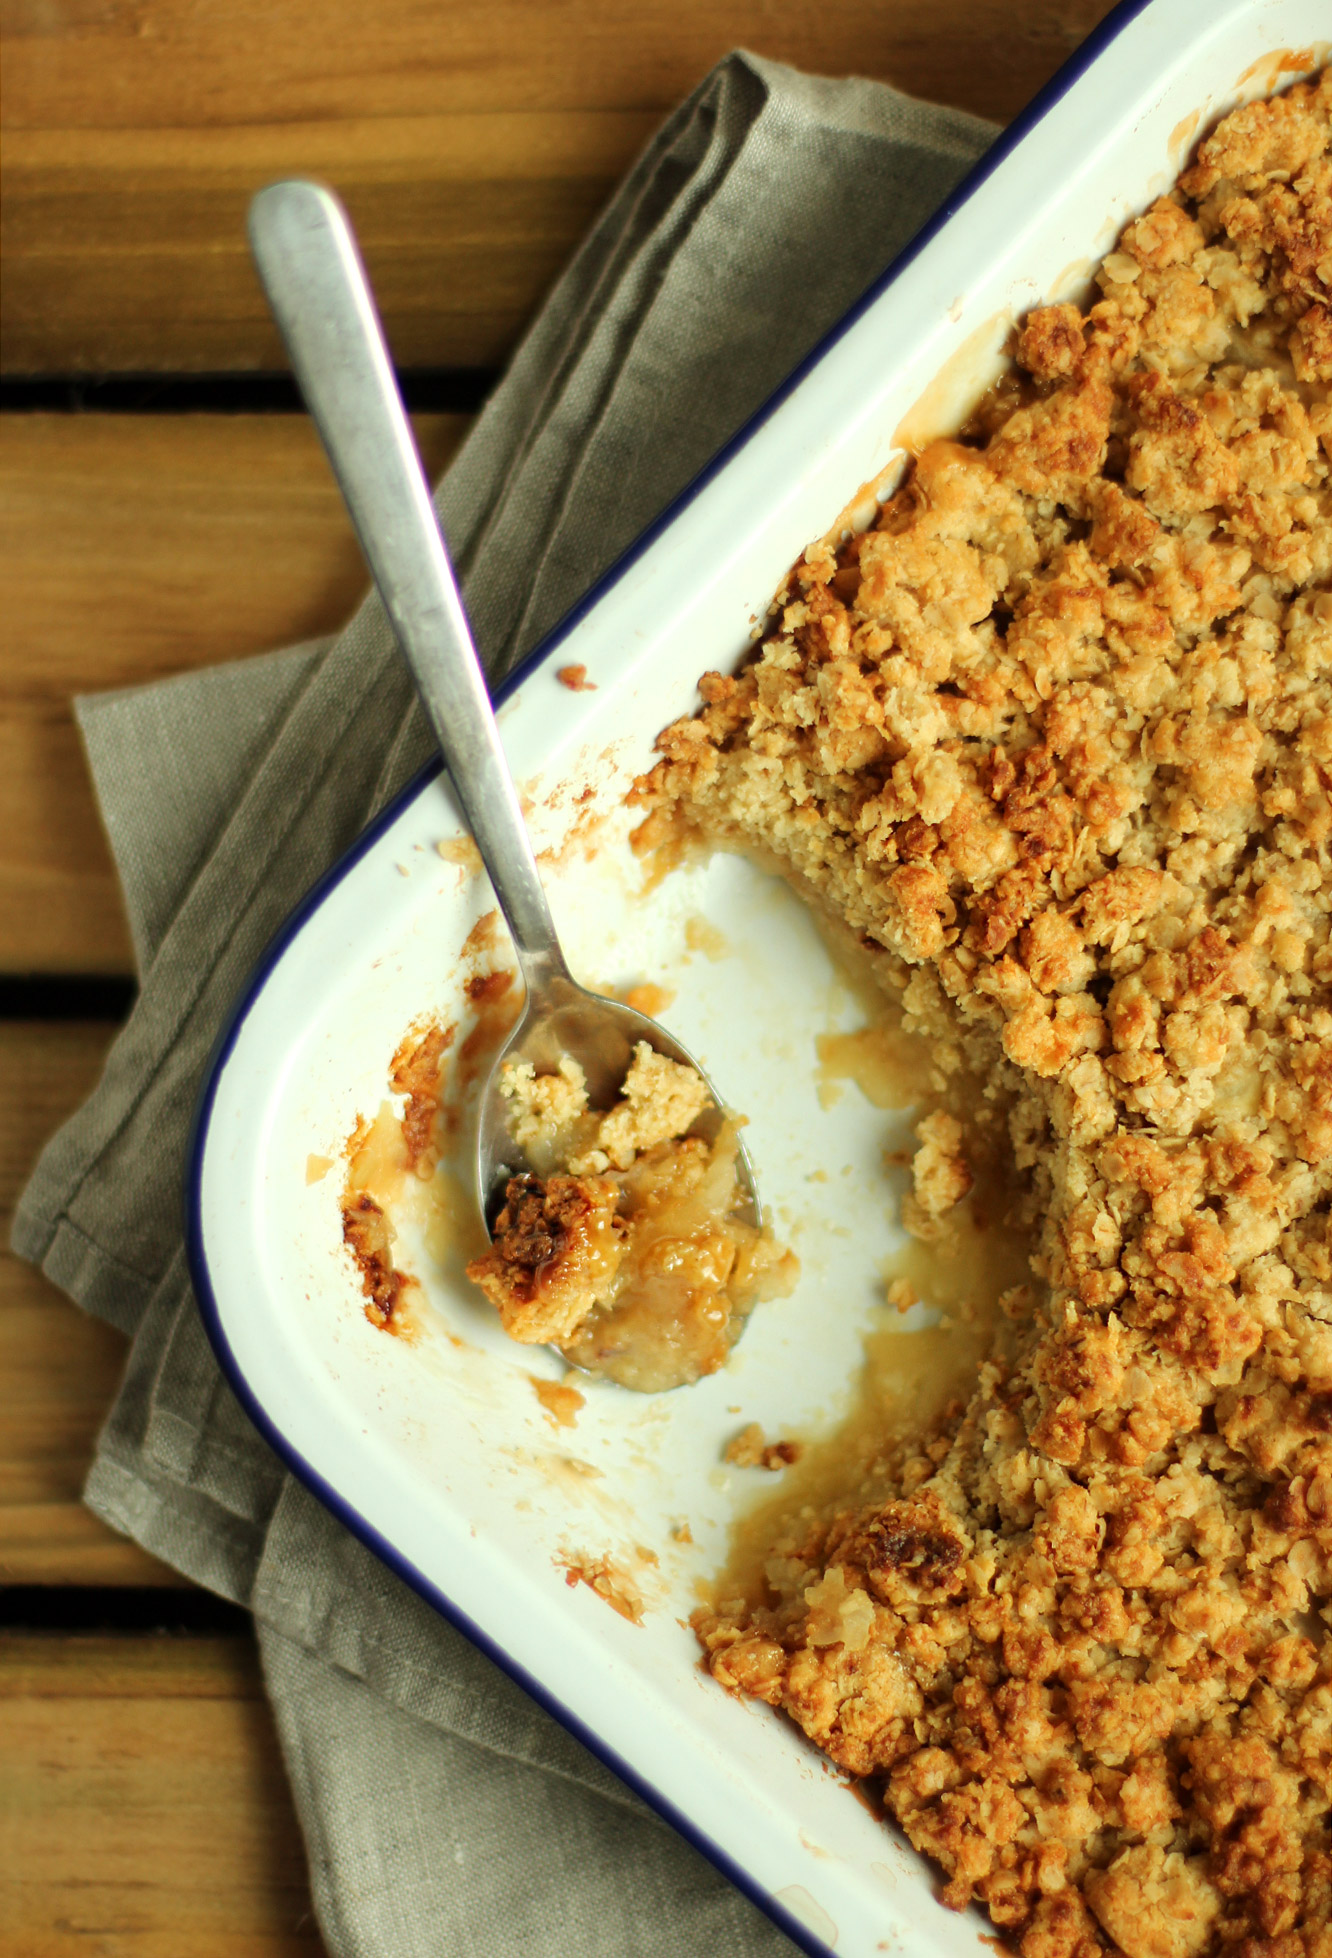
We had this after a large roast on Sunday and it was the perfect pud for a cosy autumn afternoon. One of my housemates (self proclaimed crumble connoisseur) called it “the zenith of desserts”, just saying, perhaps this crumble is not so humble after all.
The great thing about crumble is that it’s so quick to make and you can do it in advance, either cooked or uncooked and pop it in the fridge until you need it.
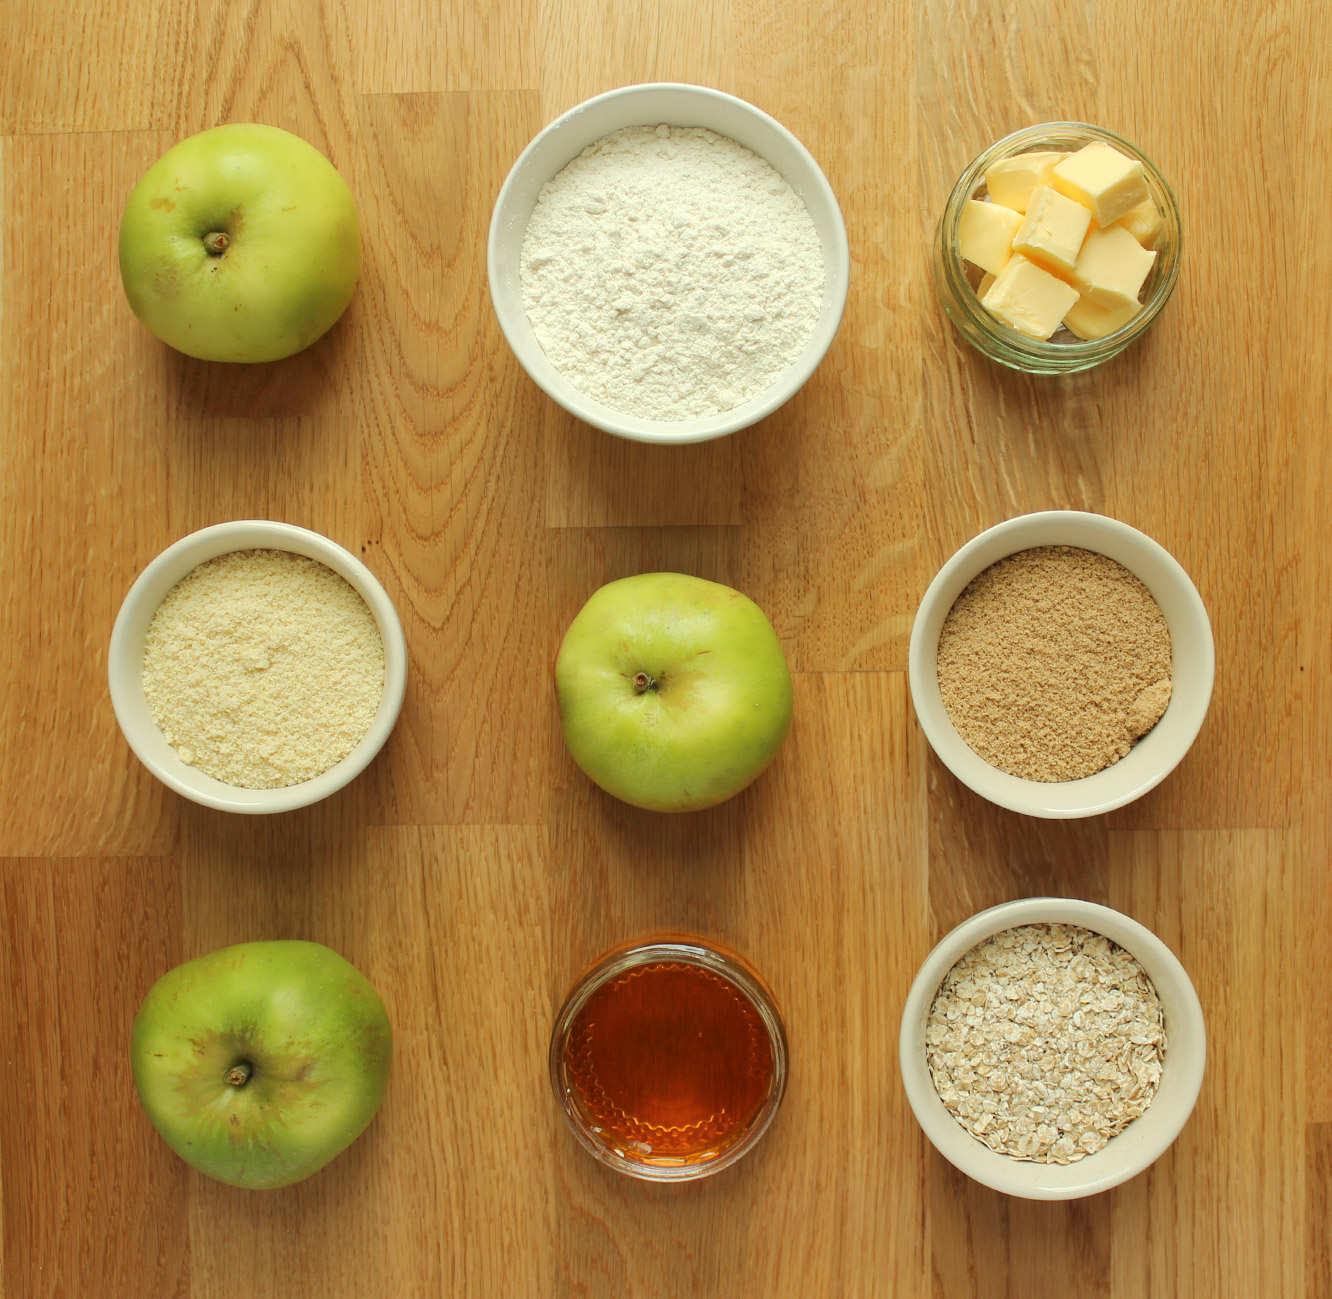
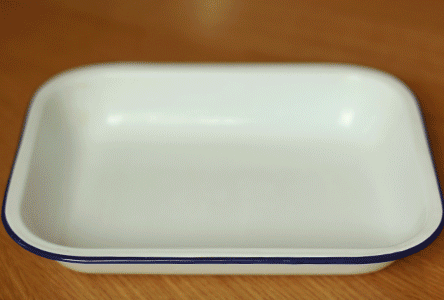
You will need
For the crumble:
140g/5 oz unsalted butter
125g/4.5 oz porridge oats
75g/2.75 oz ground almonds
50g/1.75 oz plain flour
50g/1.75 oz caster sugar
2 tbsp clear honey
4 cooking apples (bramley)
For the salted caramel:
100g/3.5 oz salted butter
80g/3 oz soft brown sugar
100ml/3.5 fl oz double cream
2 tbsp golden syrup
2 tsp salt
(Serves 6)
Apologies to those of you who spotted the missing ingredients list for a while there!
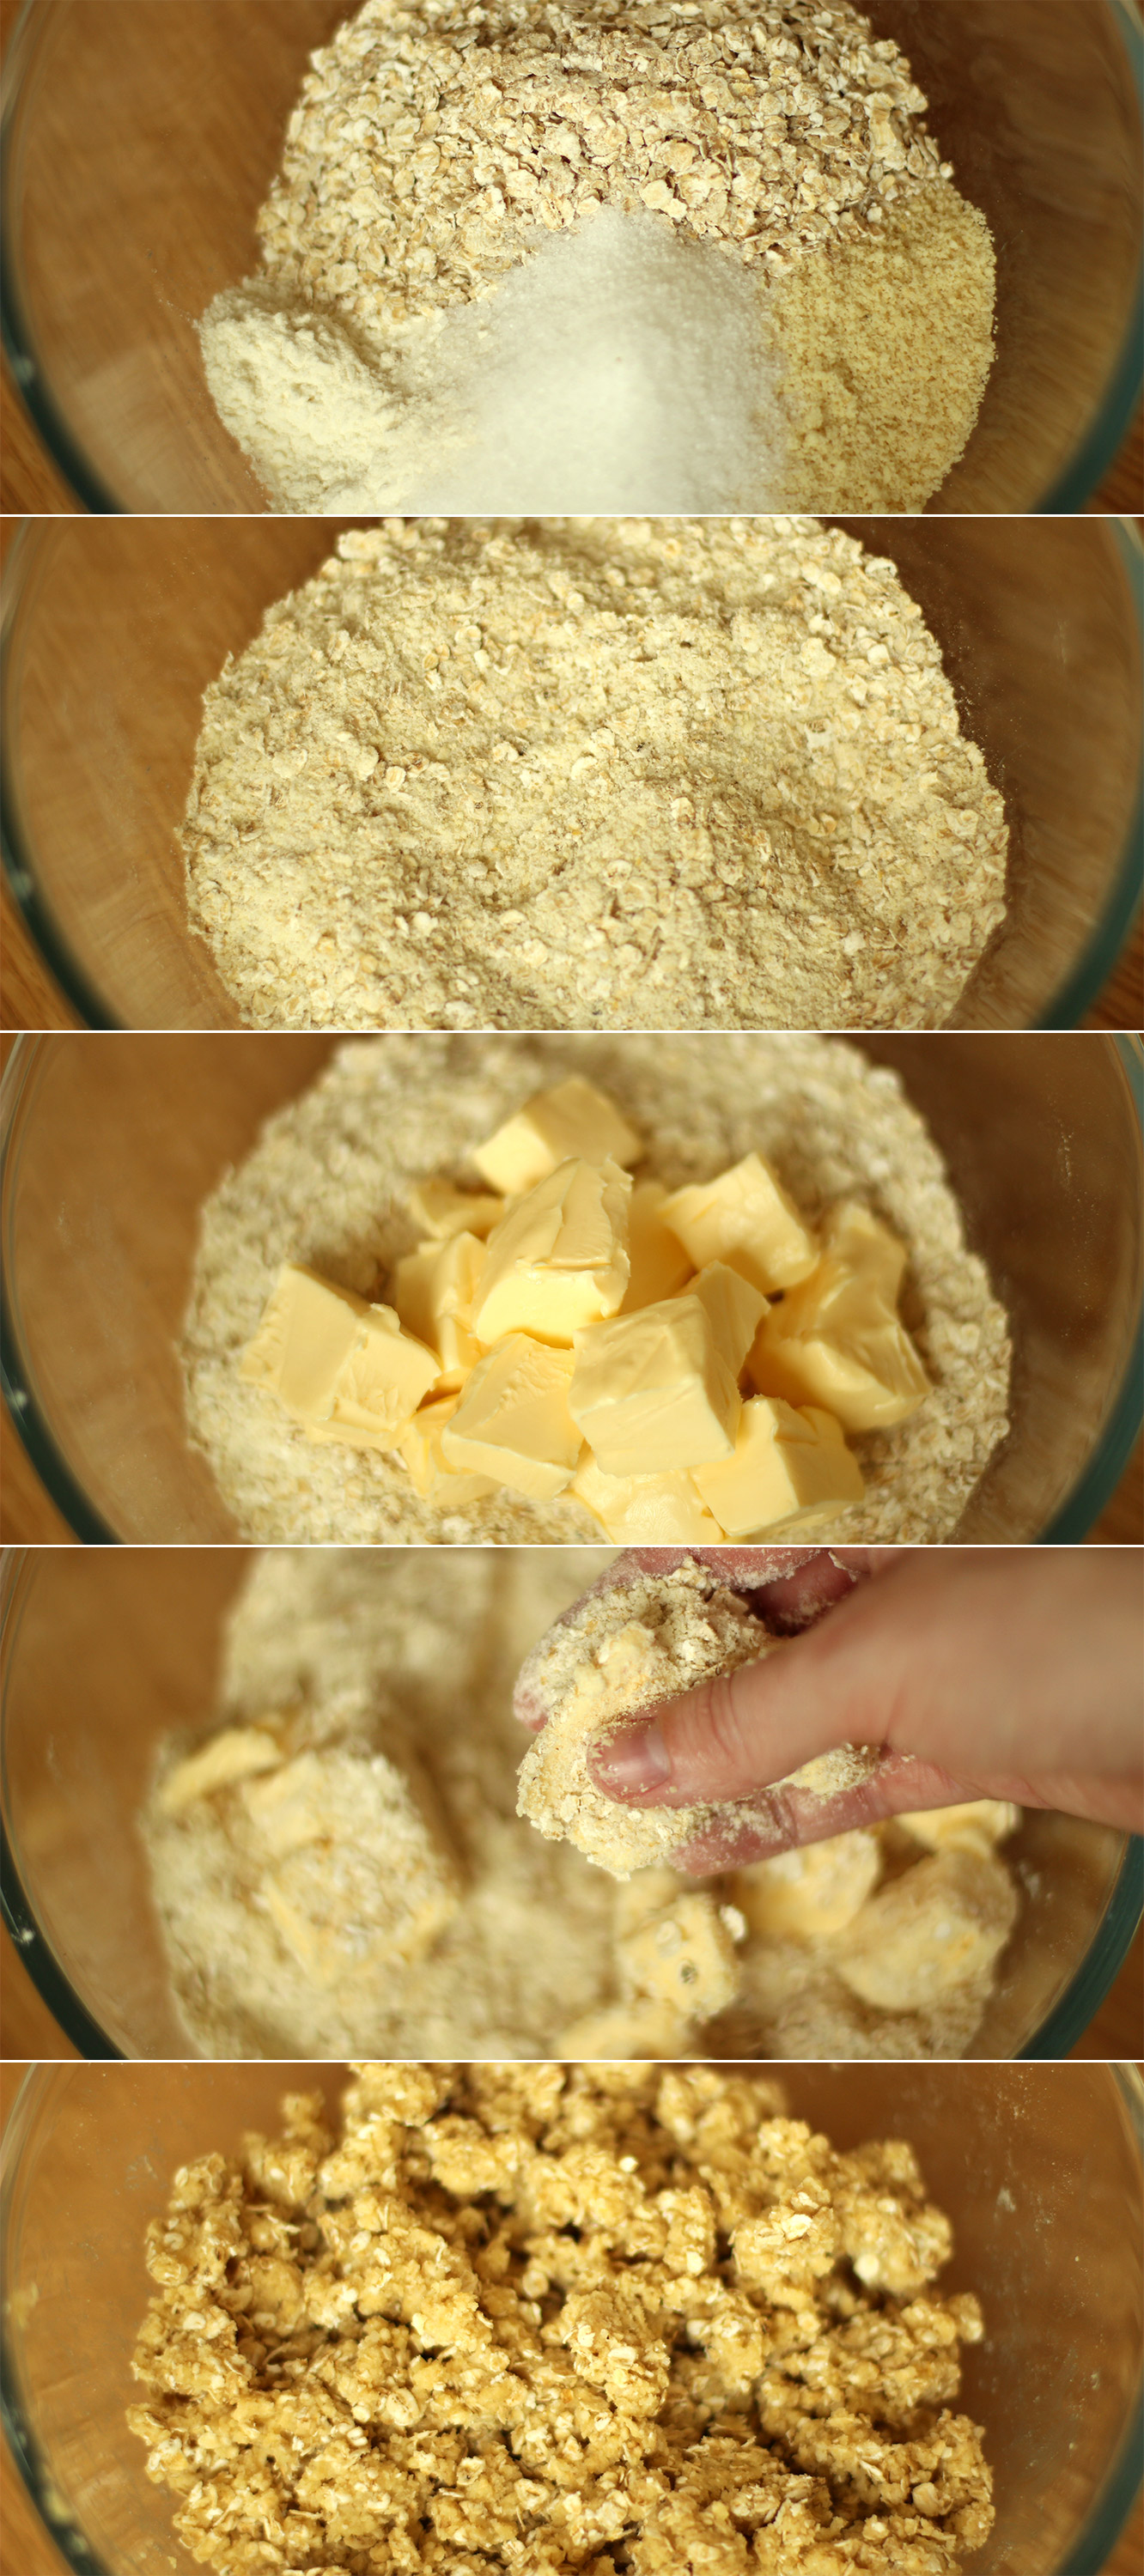
Step one
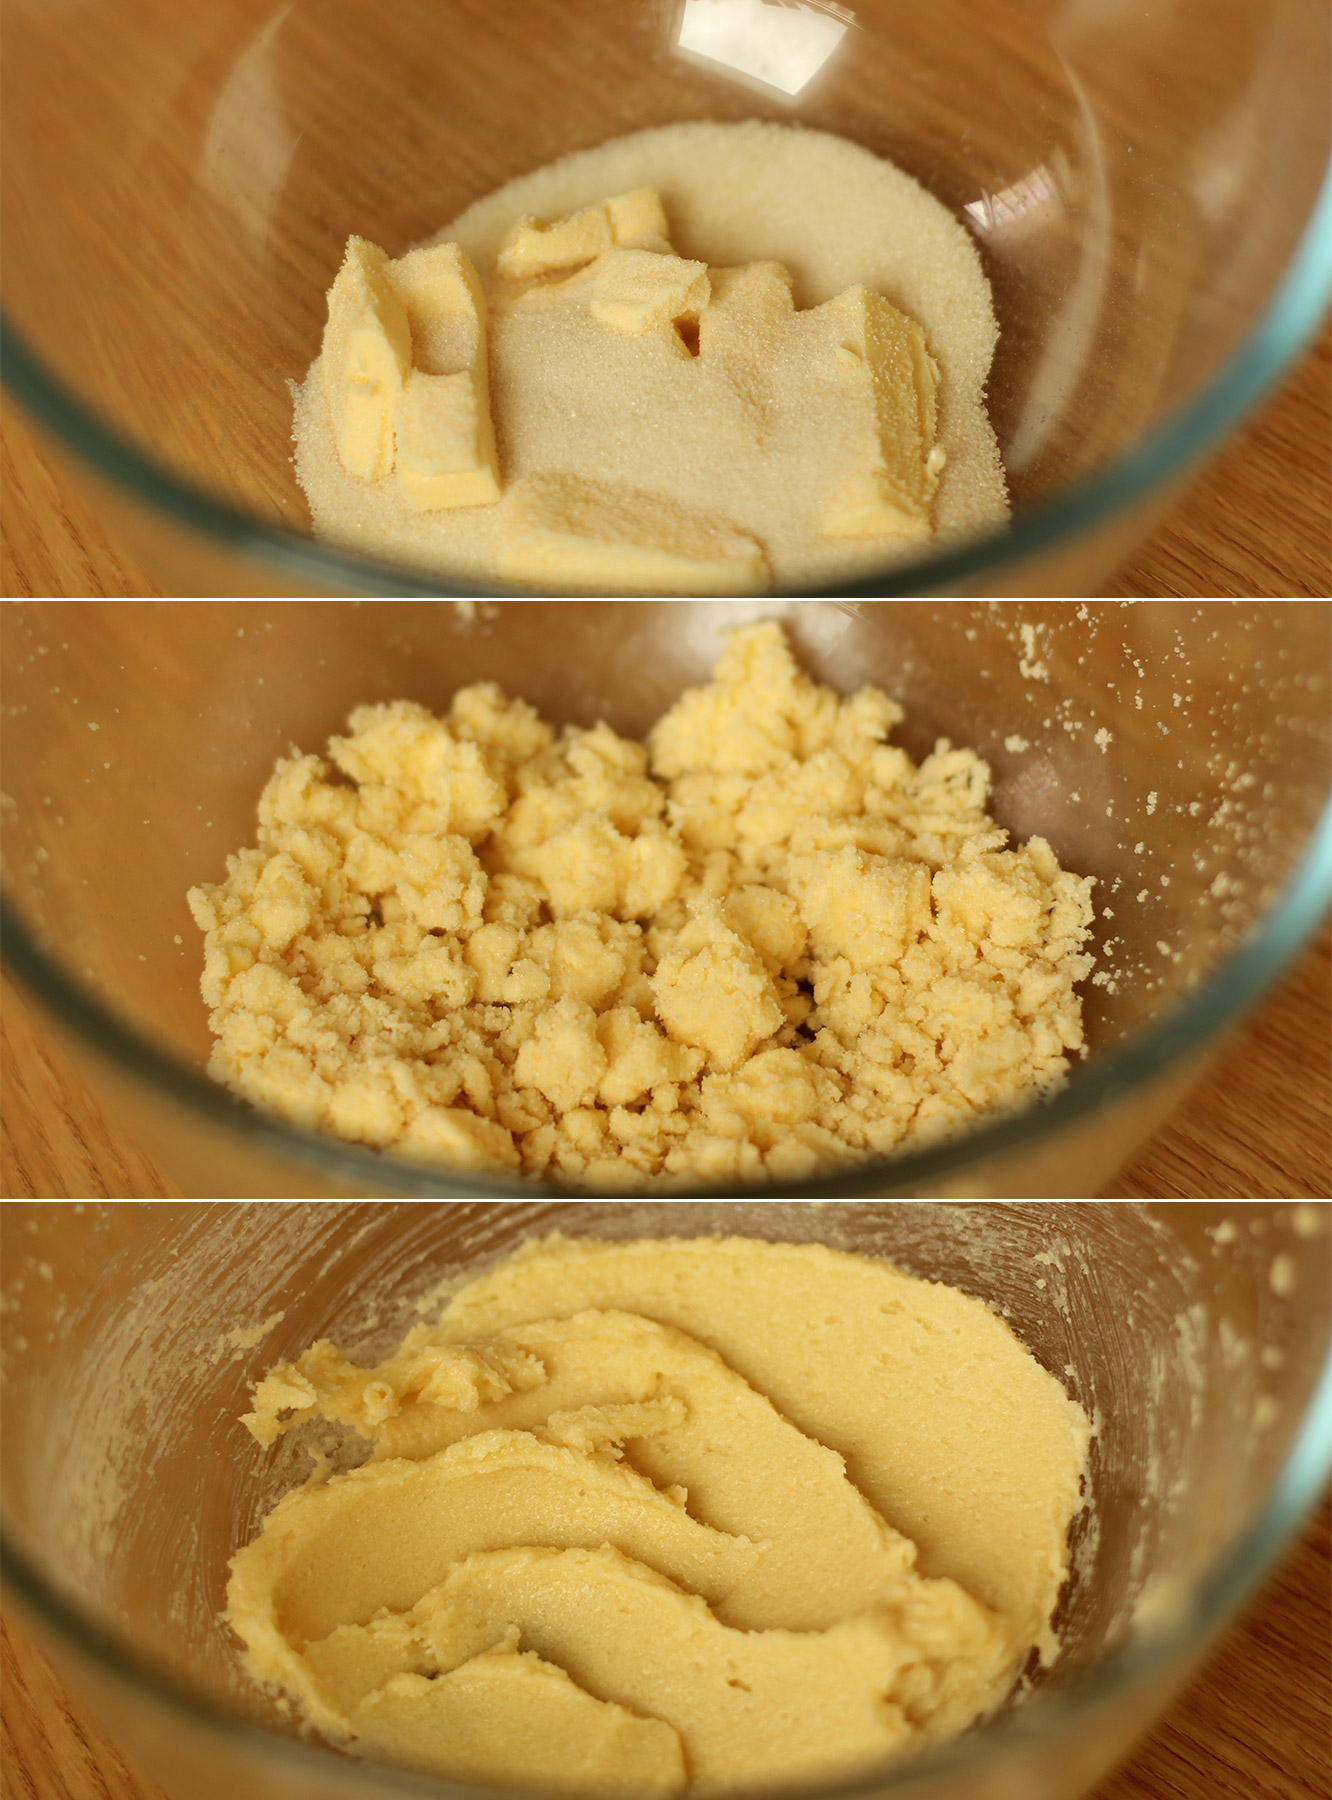
Mix together the dry ingredients for the crumble topping (almonds, flour, oats and sugar).
Step two
Rub in the butter with your hands, it’s better if it’s cold as the mix will breadcrumb a bit more. Mine was a little on the soft side because I got distracted and left it on the counter for a while.
Step three
Add the honey and mix in with a wooden spoon.
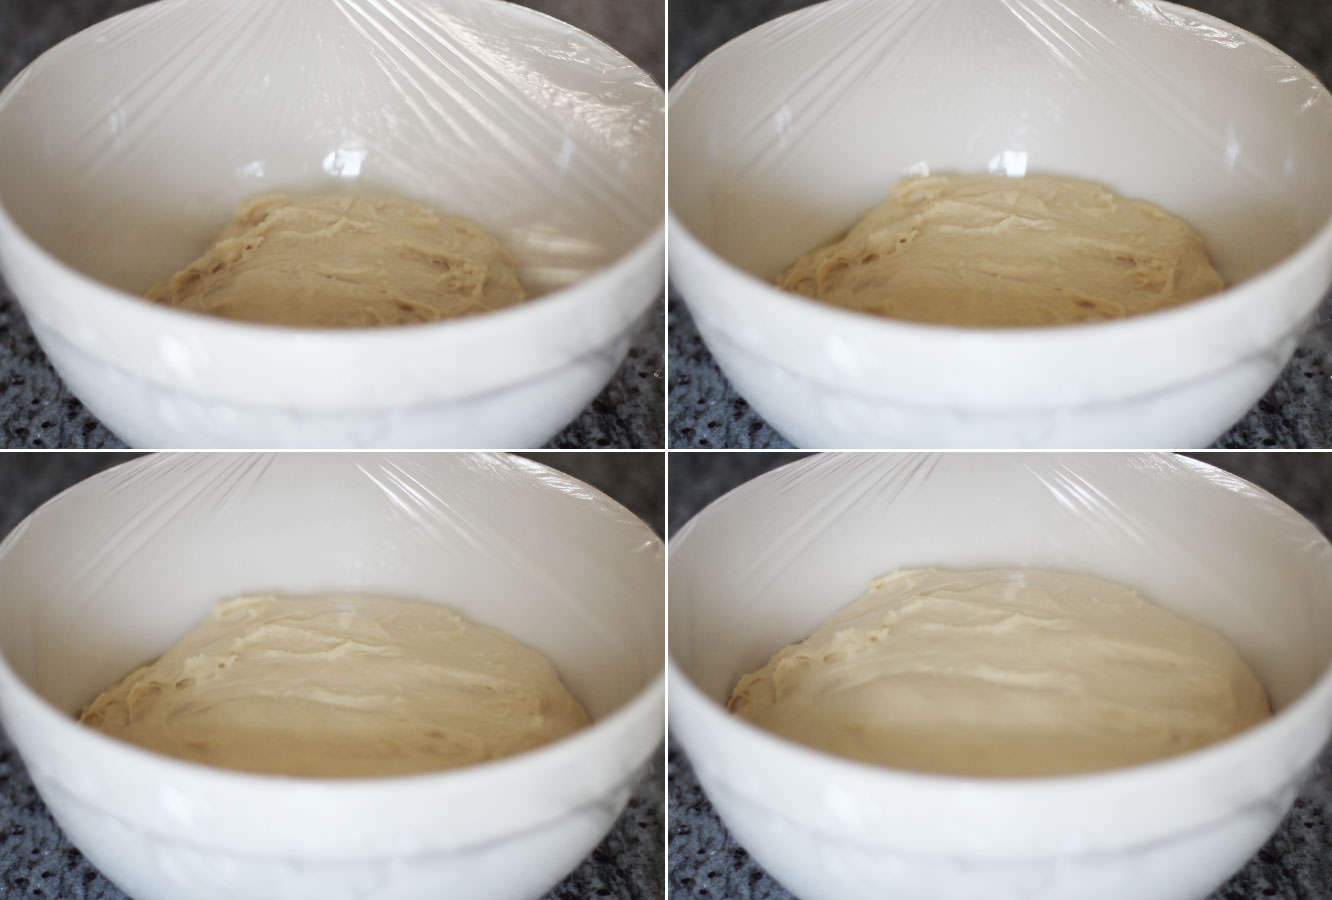
Put it in the fridge until needed.
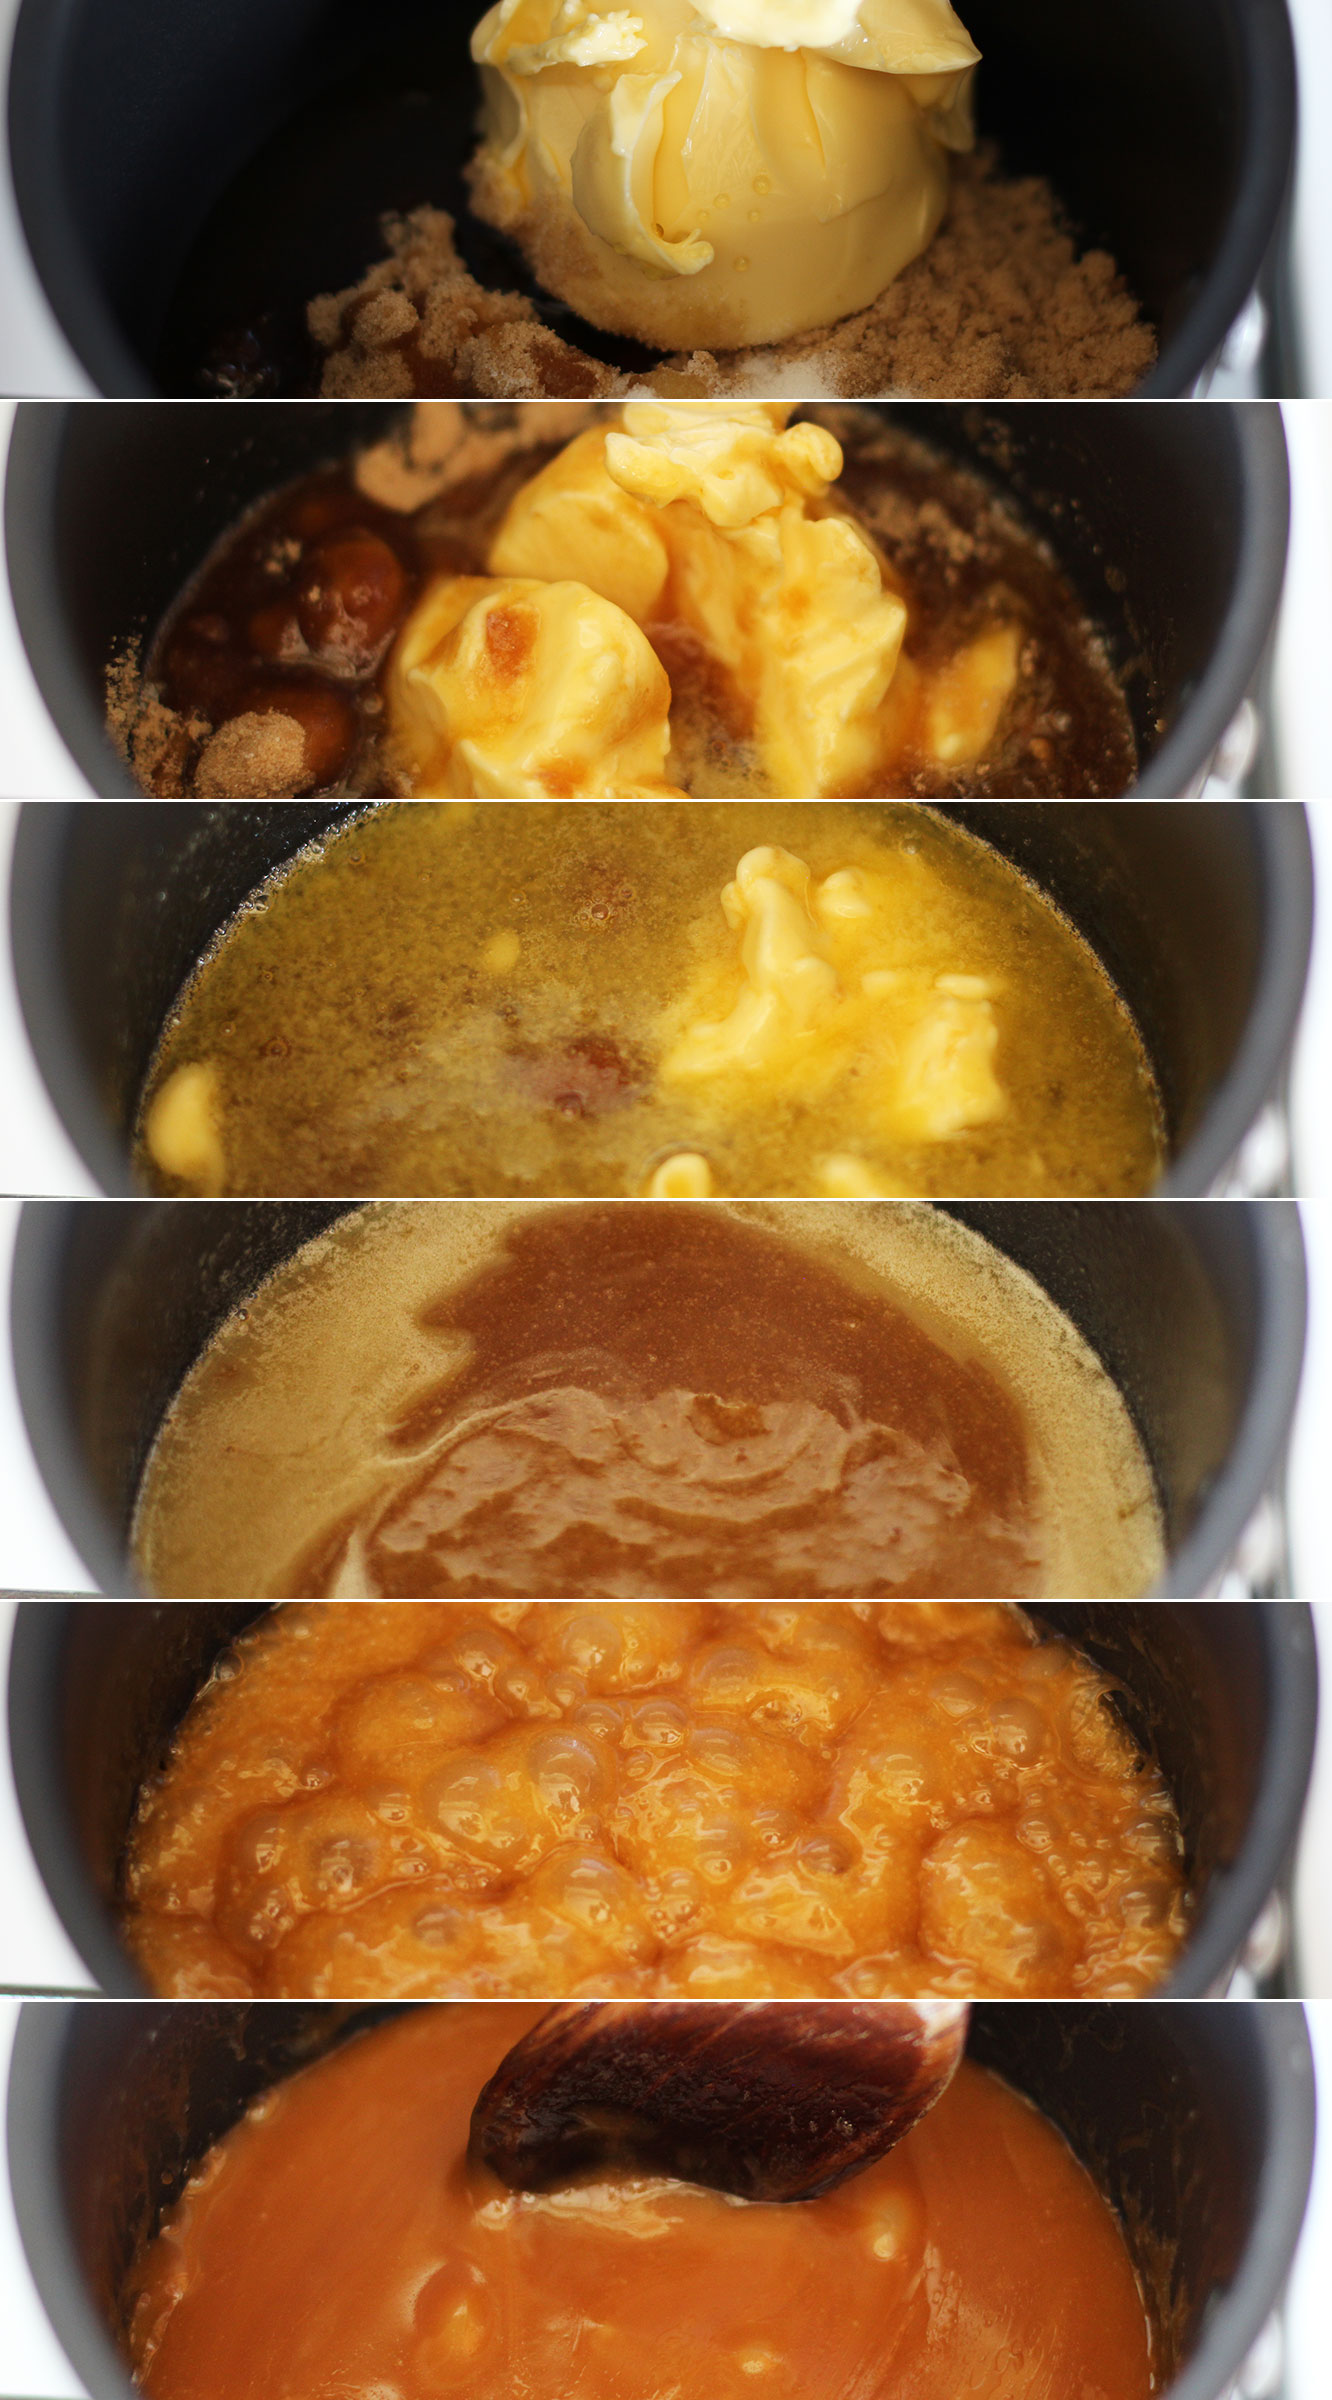
Step four
Place all the ingredients for the salted caramel into a saucepan (minus the cream).
Heat gently until the butter is melted and the sugar dissolved and then bring to a simmer. Simmer for about 10 minutes. Stir regularly so that it doesn’t catch and burn. Leave to cool for fifteen minutes to half an hour.
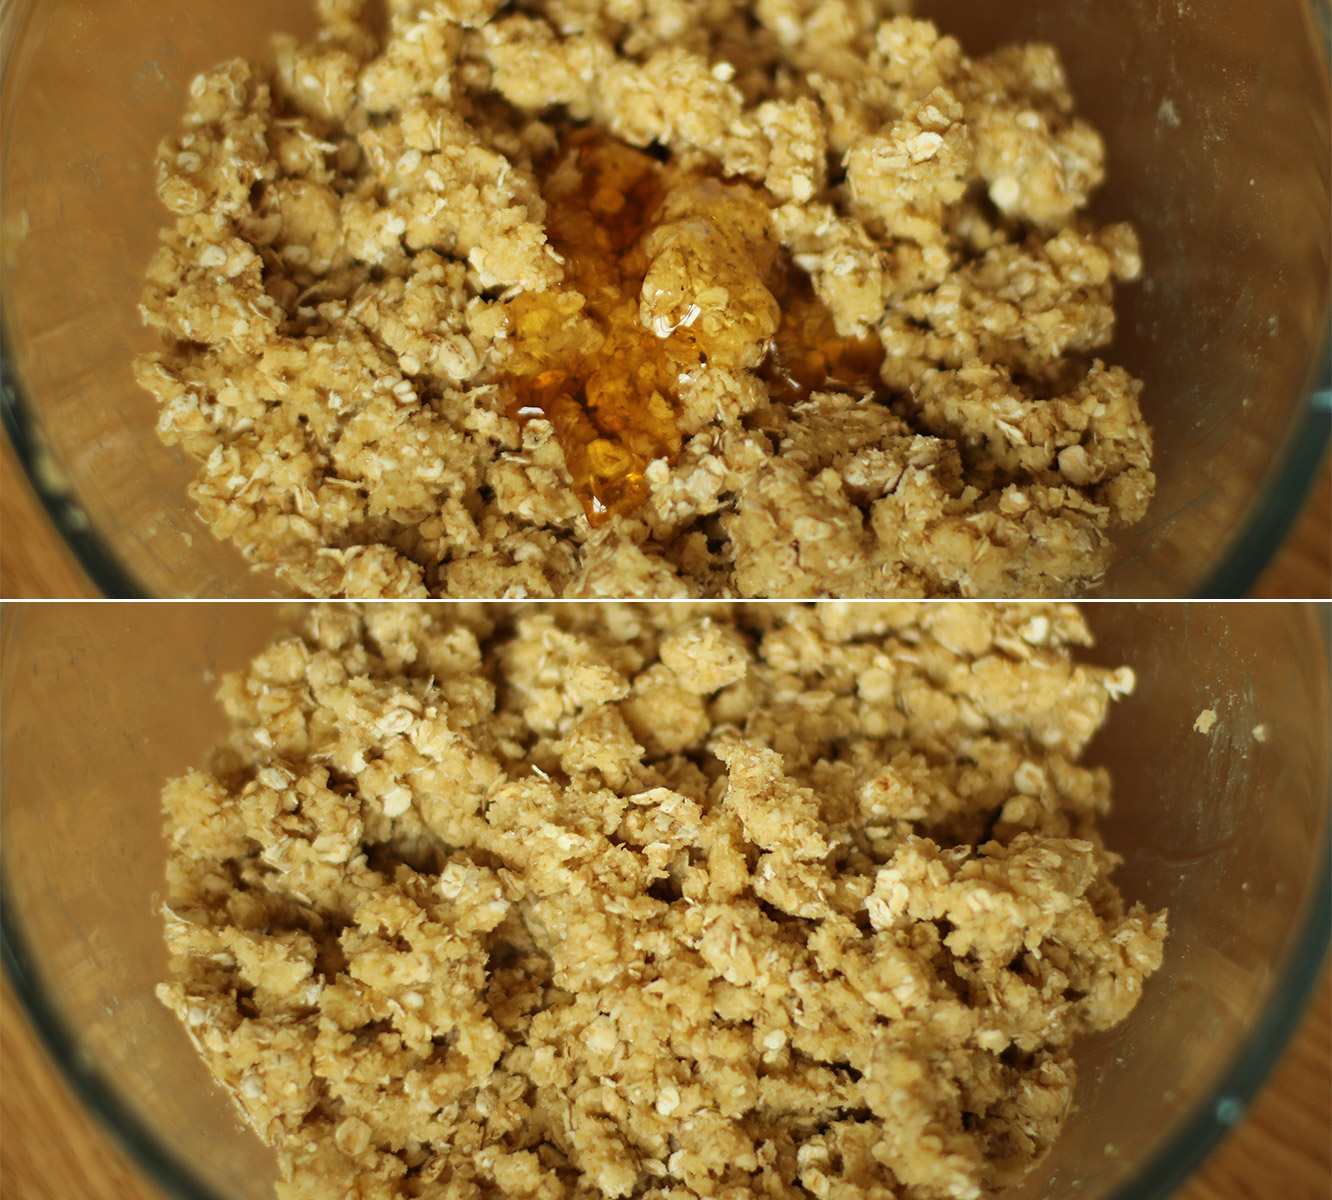
Step five
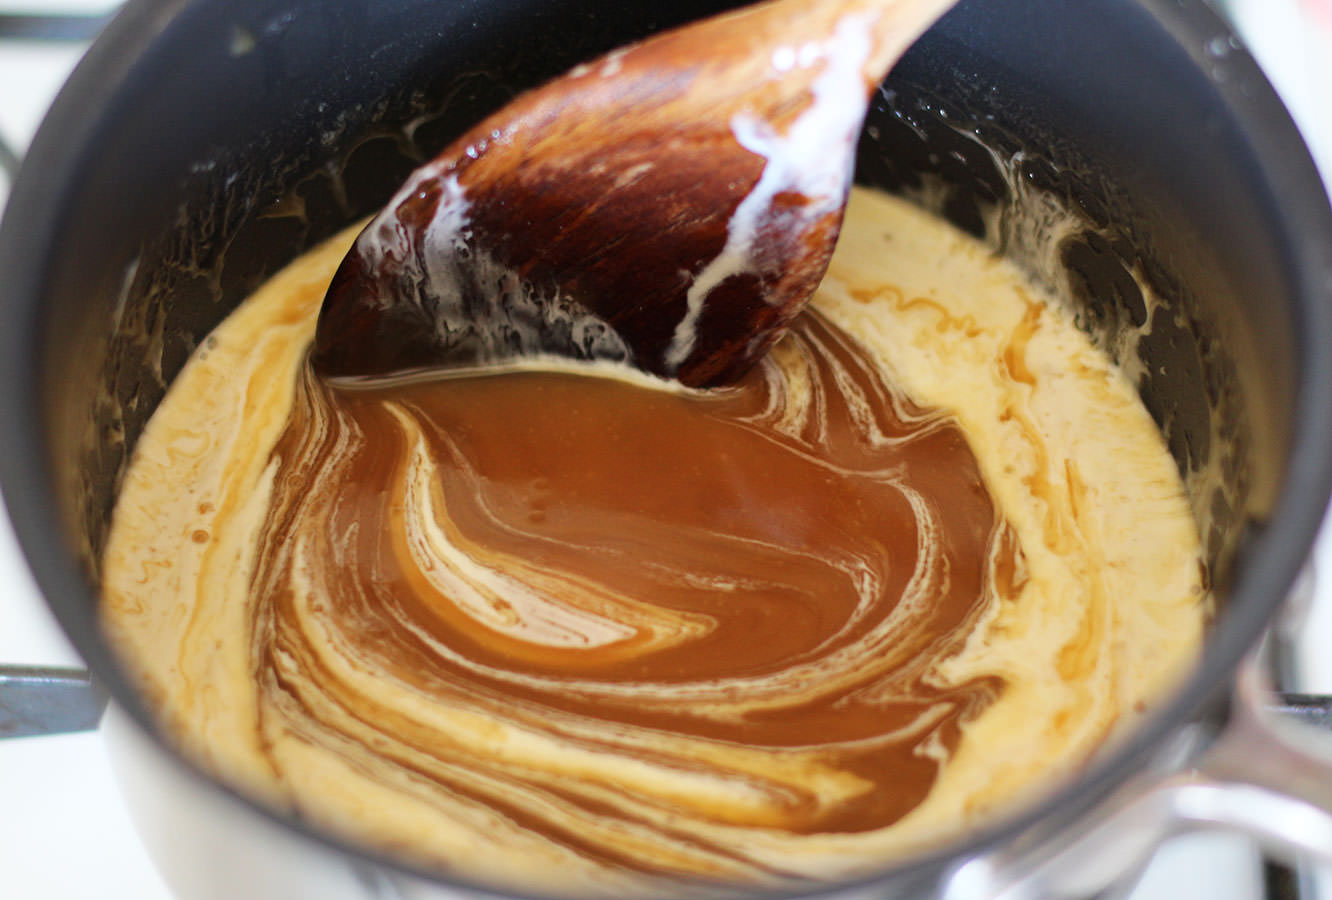
Once the caramel has cooled for a little while add the cream and stir until combined.
Step six
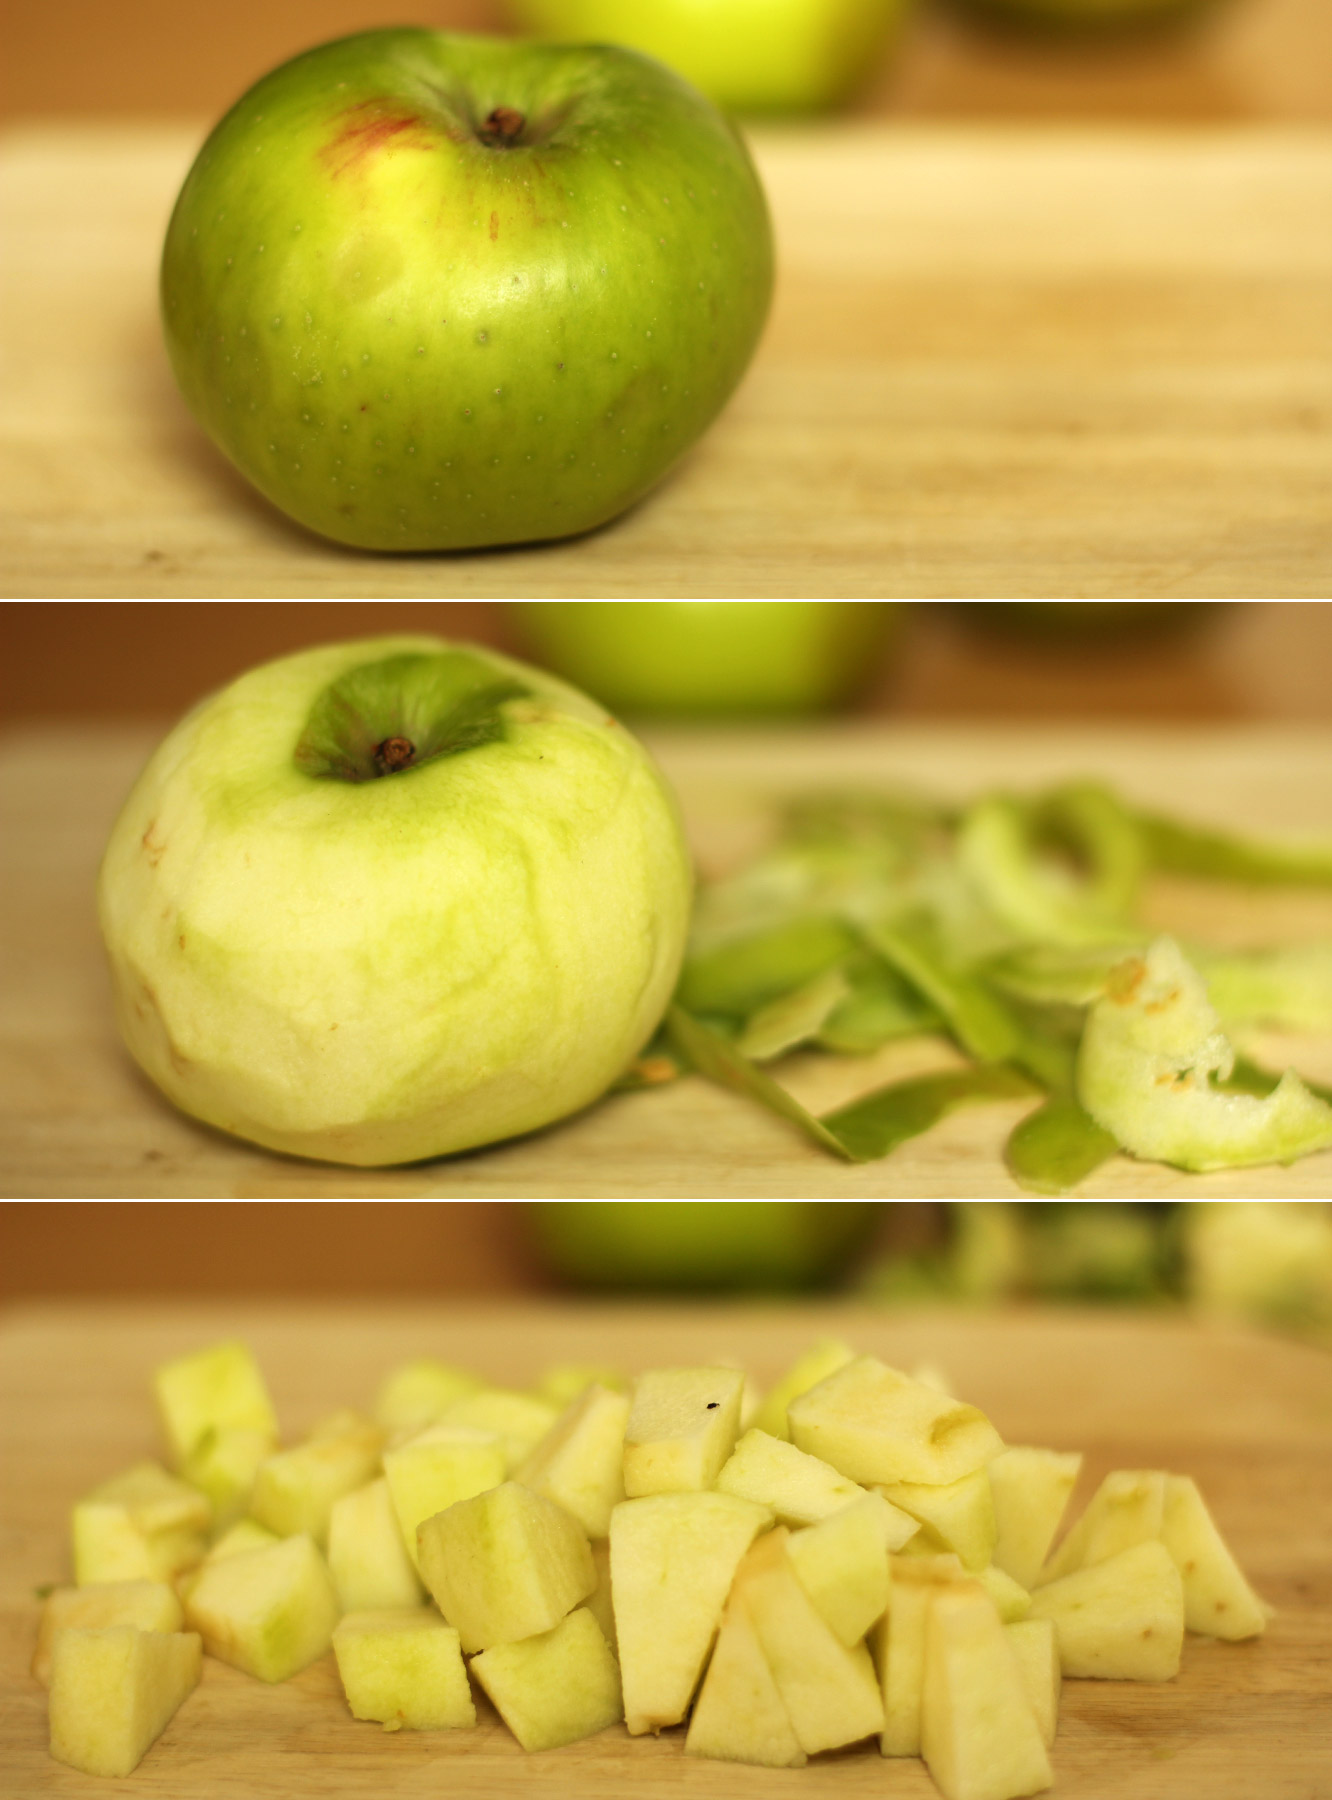
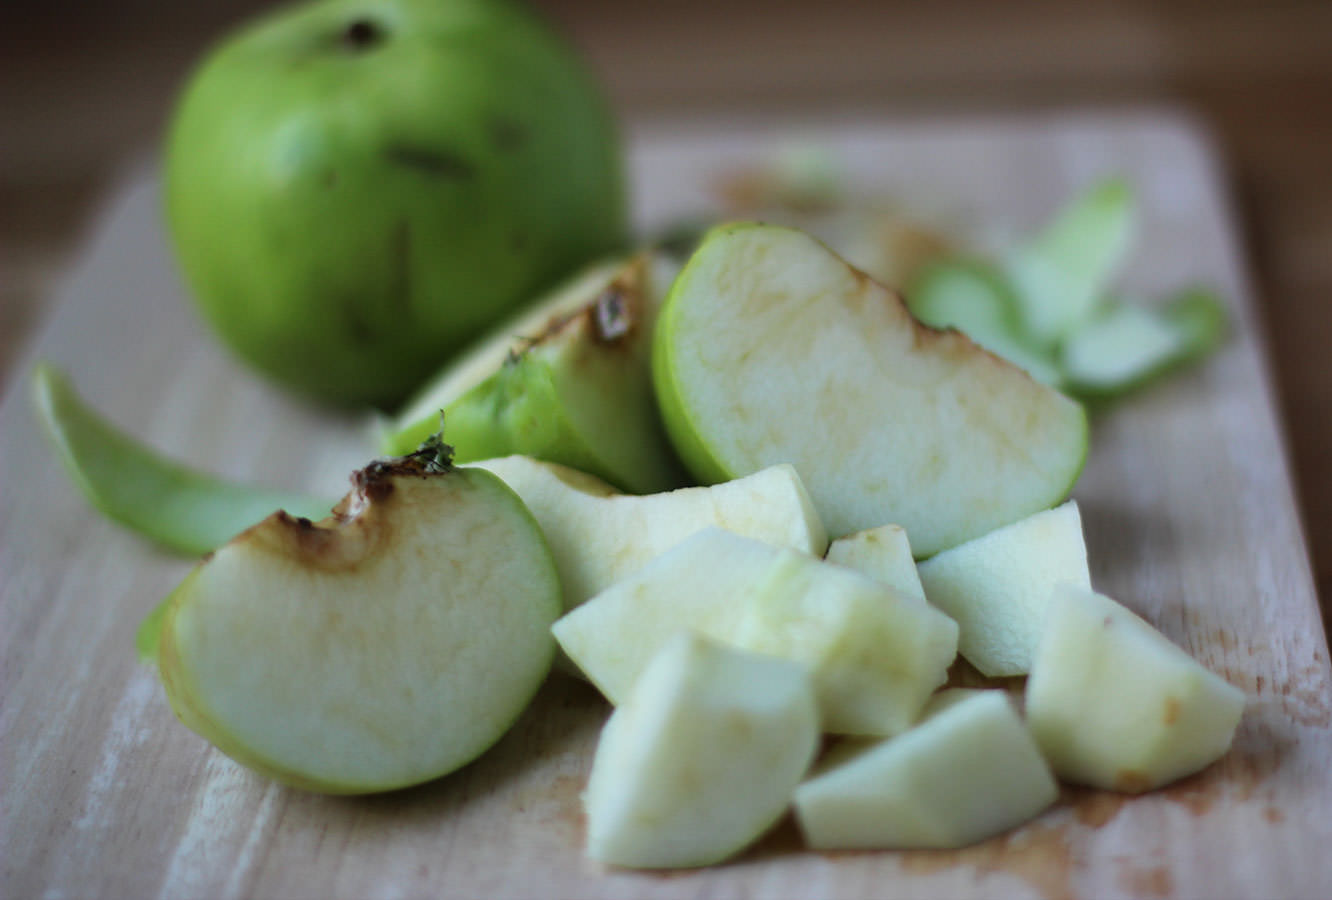
Peel and chop the apples.
Step seven
Put the apples in the bottom of your dish, sprinkle with a little light brown sugar. Pour just a third to a half of the caramel sauce over the apples and cover with the crumble mixture.
I realise it’s been a while since I did something quite fancy, and while people seem to prefer to make the easy ones, there’s definitely some love for the posts with lots of steps too.
With the return of my favourite season (I’m really fair-skinned, so shoot me if I don’t adore summer like the rest of you) and a little dinner party this weekend, I figured the only way to round off my housemate’s uh-mazing main course was with a little homage to the apple.
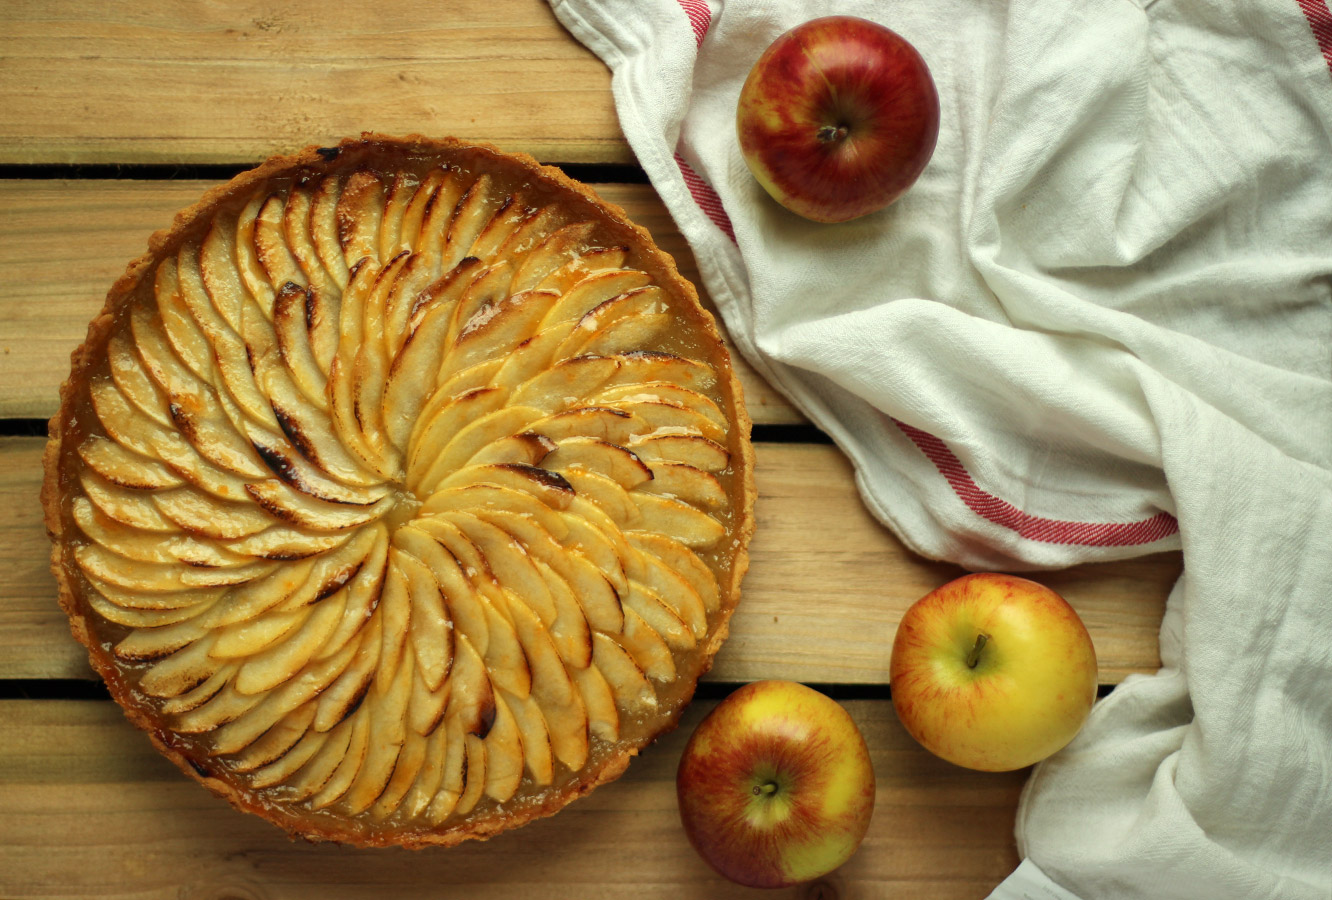
Without further ado here’s a recipe for a rather yummy apple and frangipane tart.
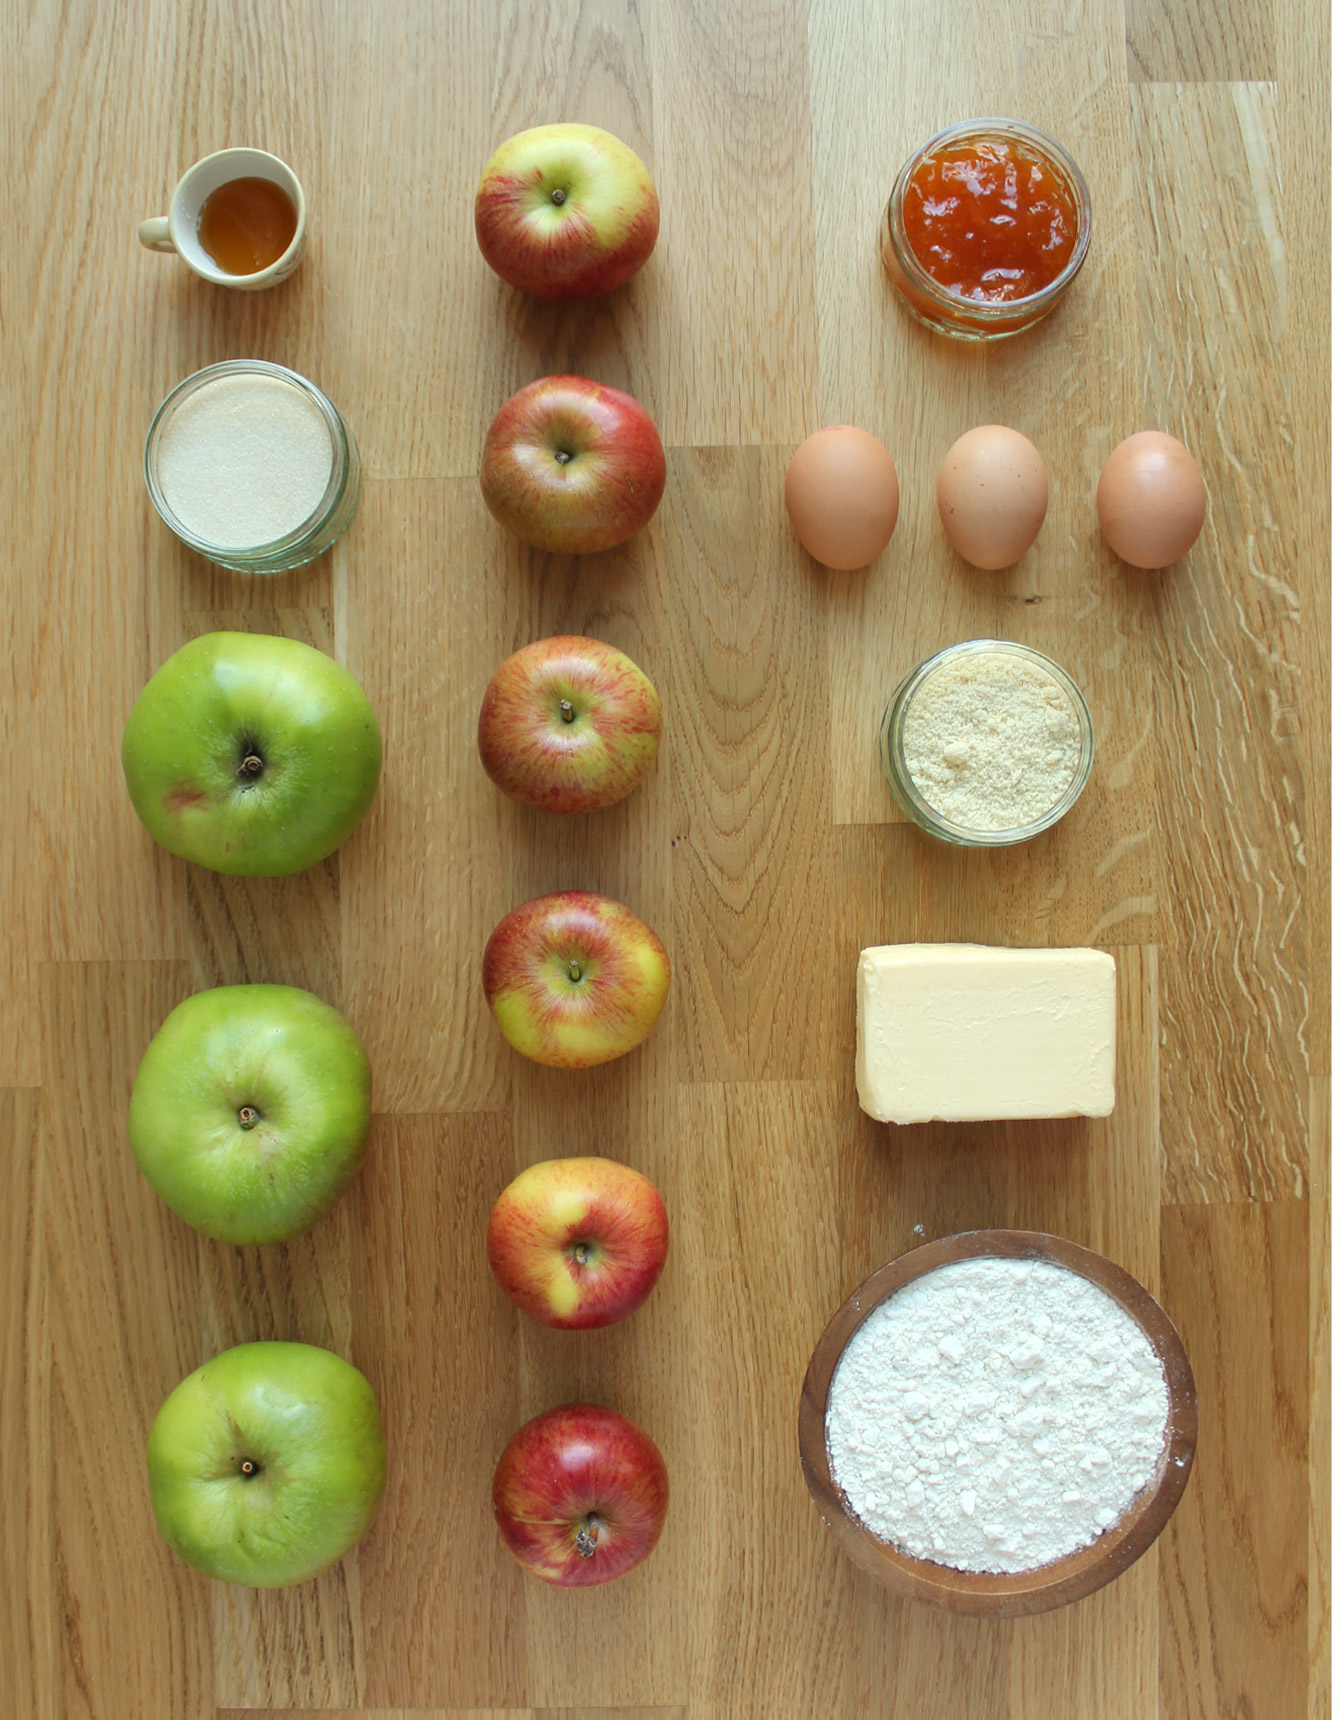
You will need
For the pastry:
300g/10.5 oz plain flour
170g/6 oz unsalted butter
30g/1 oz golden caster sugar
50ml/1.75 fl oz milk
1 egg yolk
A pinch of salt
For the frangipane:
70g/2.5 oz ground almonds
60g/2 oz unsalted butter
50g/1.75 oz golden caster sugar
40g/1.5 oz plain flour
1 egg
1-2 tsp almond extract (optional, but apple will likely overpower the almond a bit)
For the apple filling:
3 bramley cooking apples
100g/3.5 oz golden caster sugar
10g/0.5 oz unsalted butter
50ml/1.75 oz water
2-3 tbsp clear honey
For the topping:
4-5 braeburn apples (probably any eating apples would work)
2-3 tbsp apricot jam (for the glaze)
(My dish was 25cm and for quiches/pies, but there would be enough pastry and filling to do a slightly larger, shallower tart, perhaps up to 29cm or so).
Step one
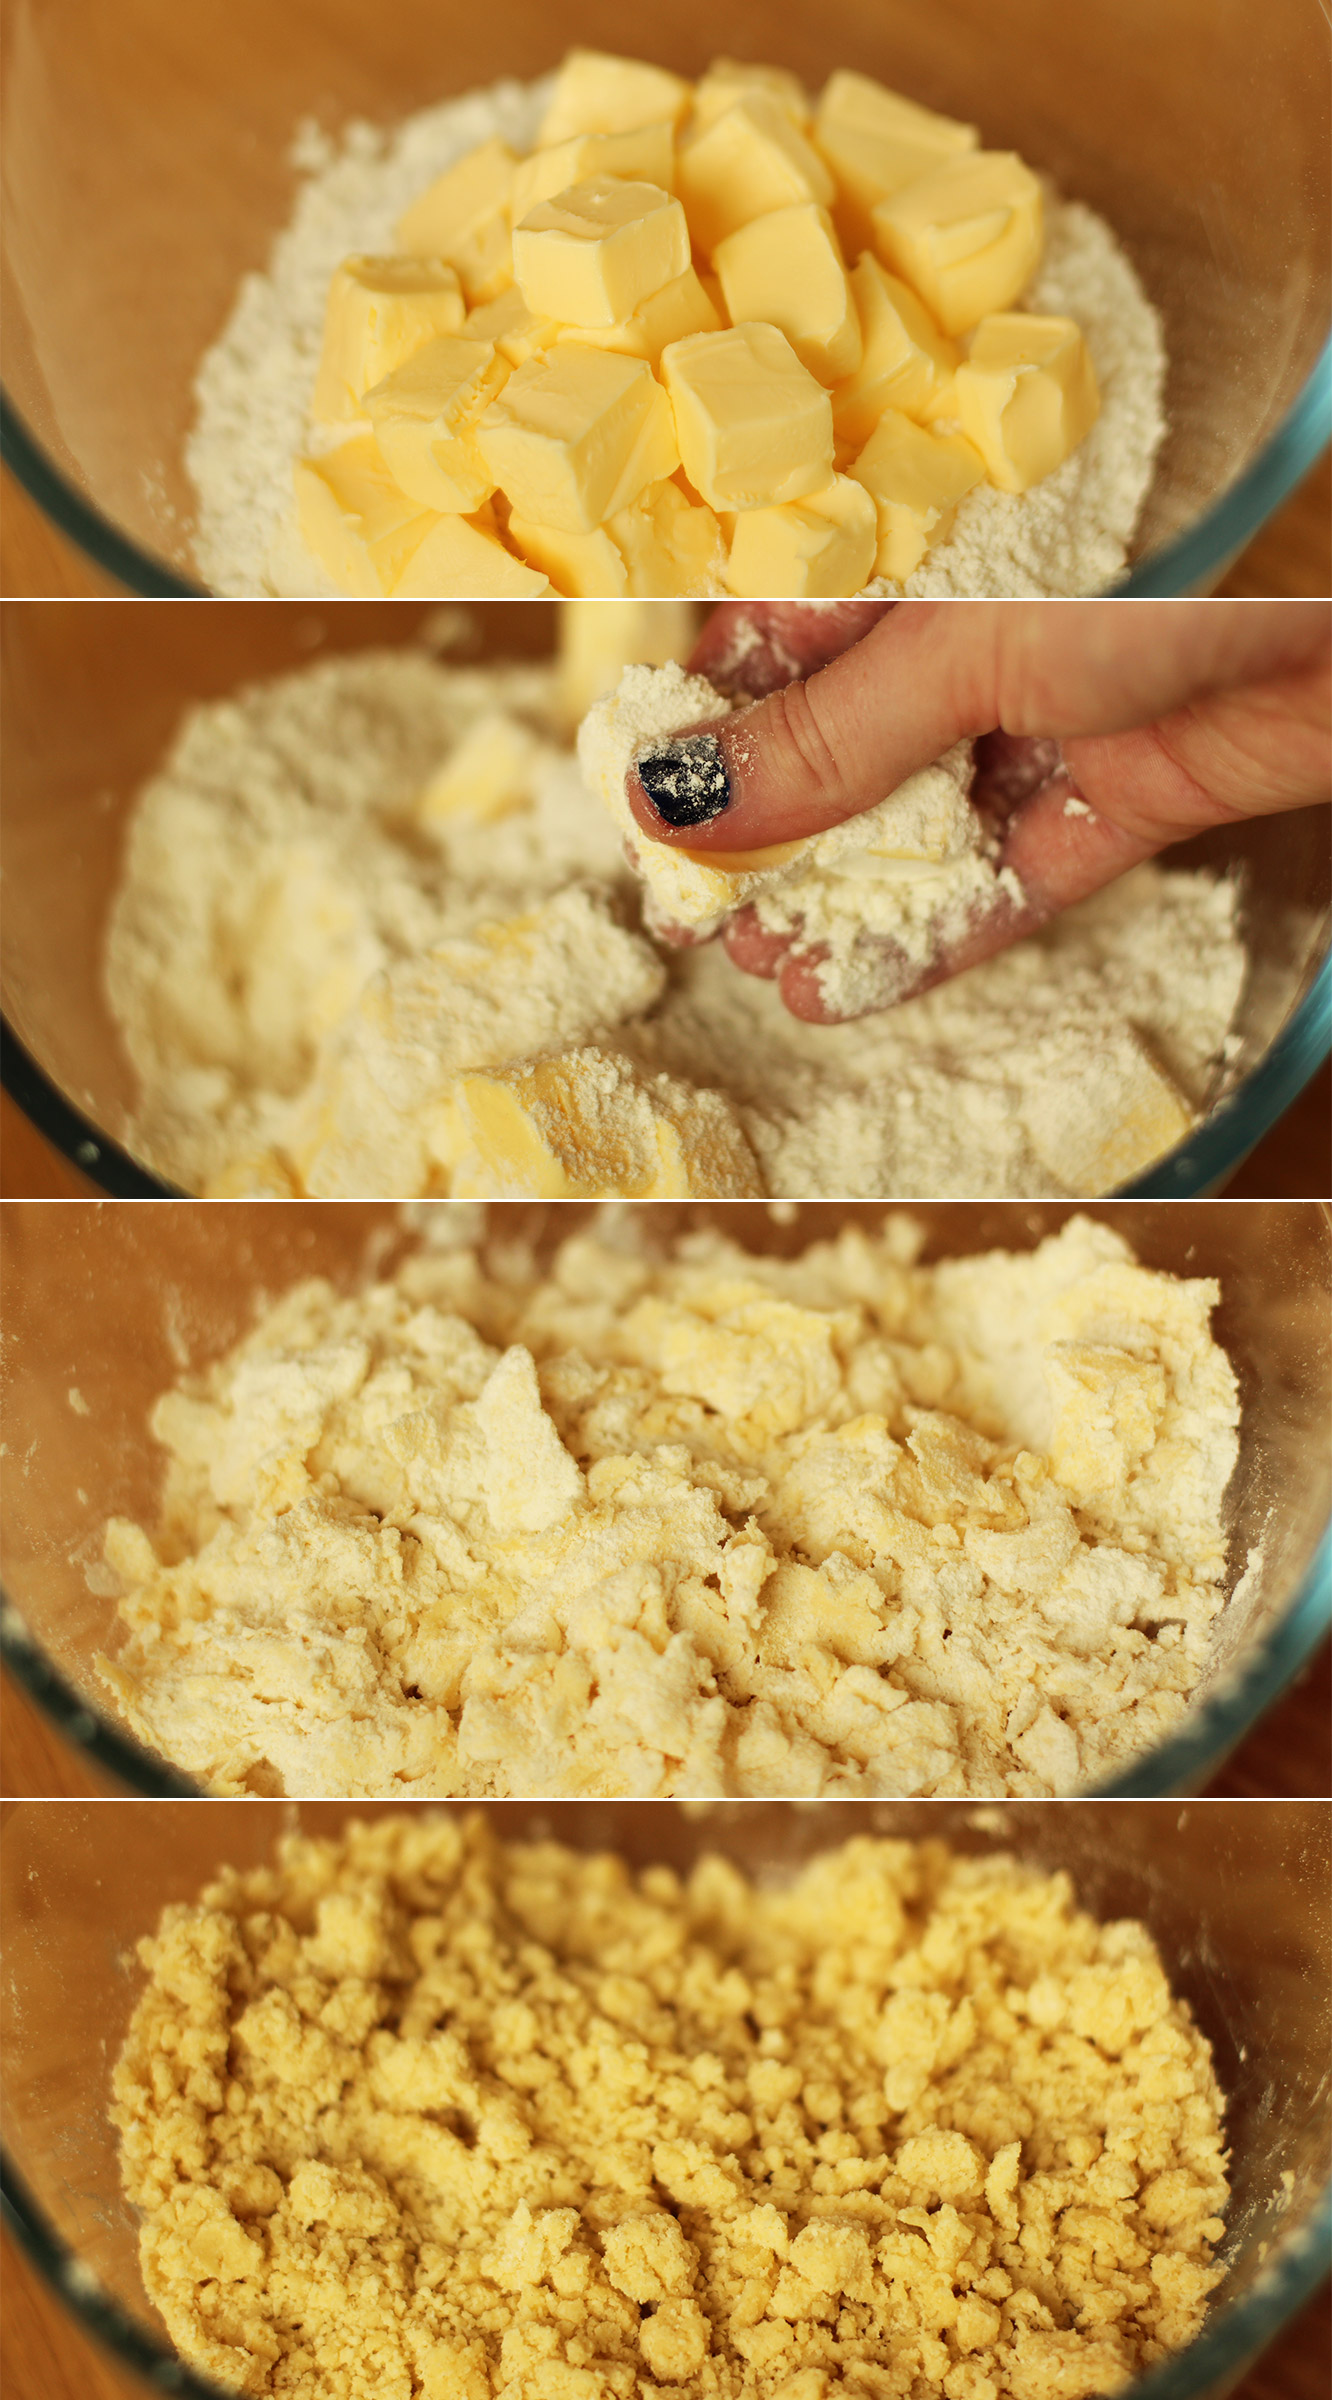
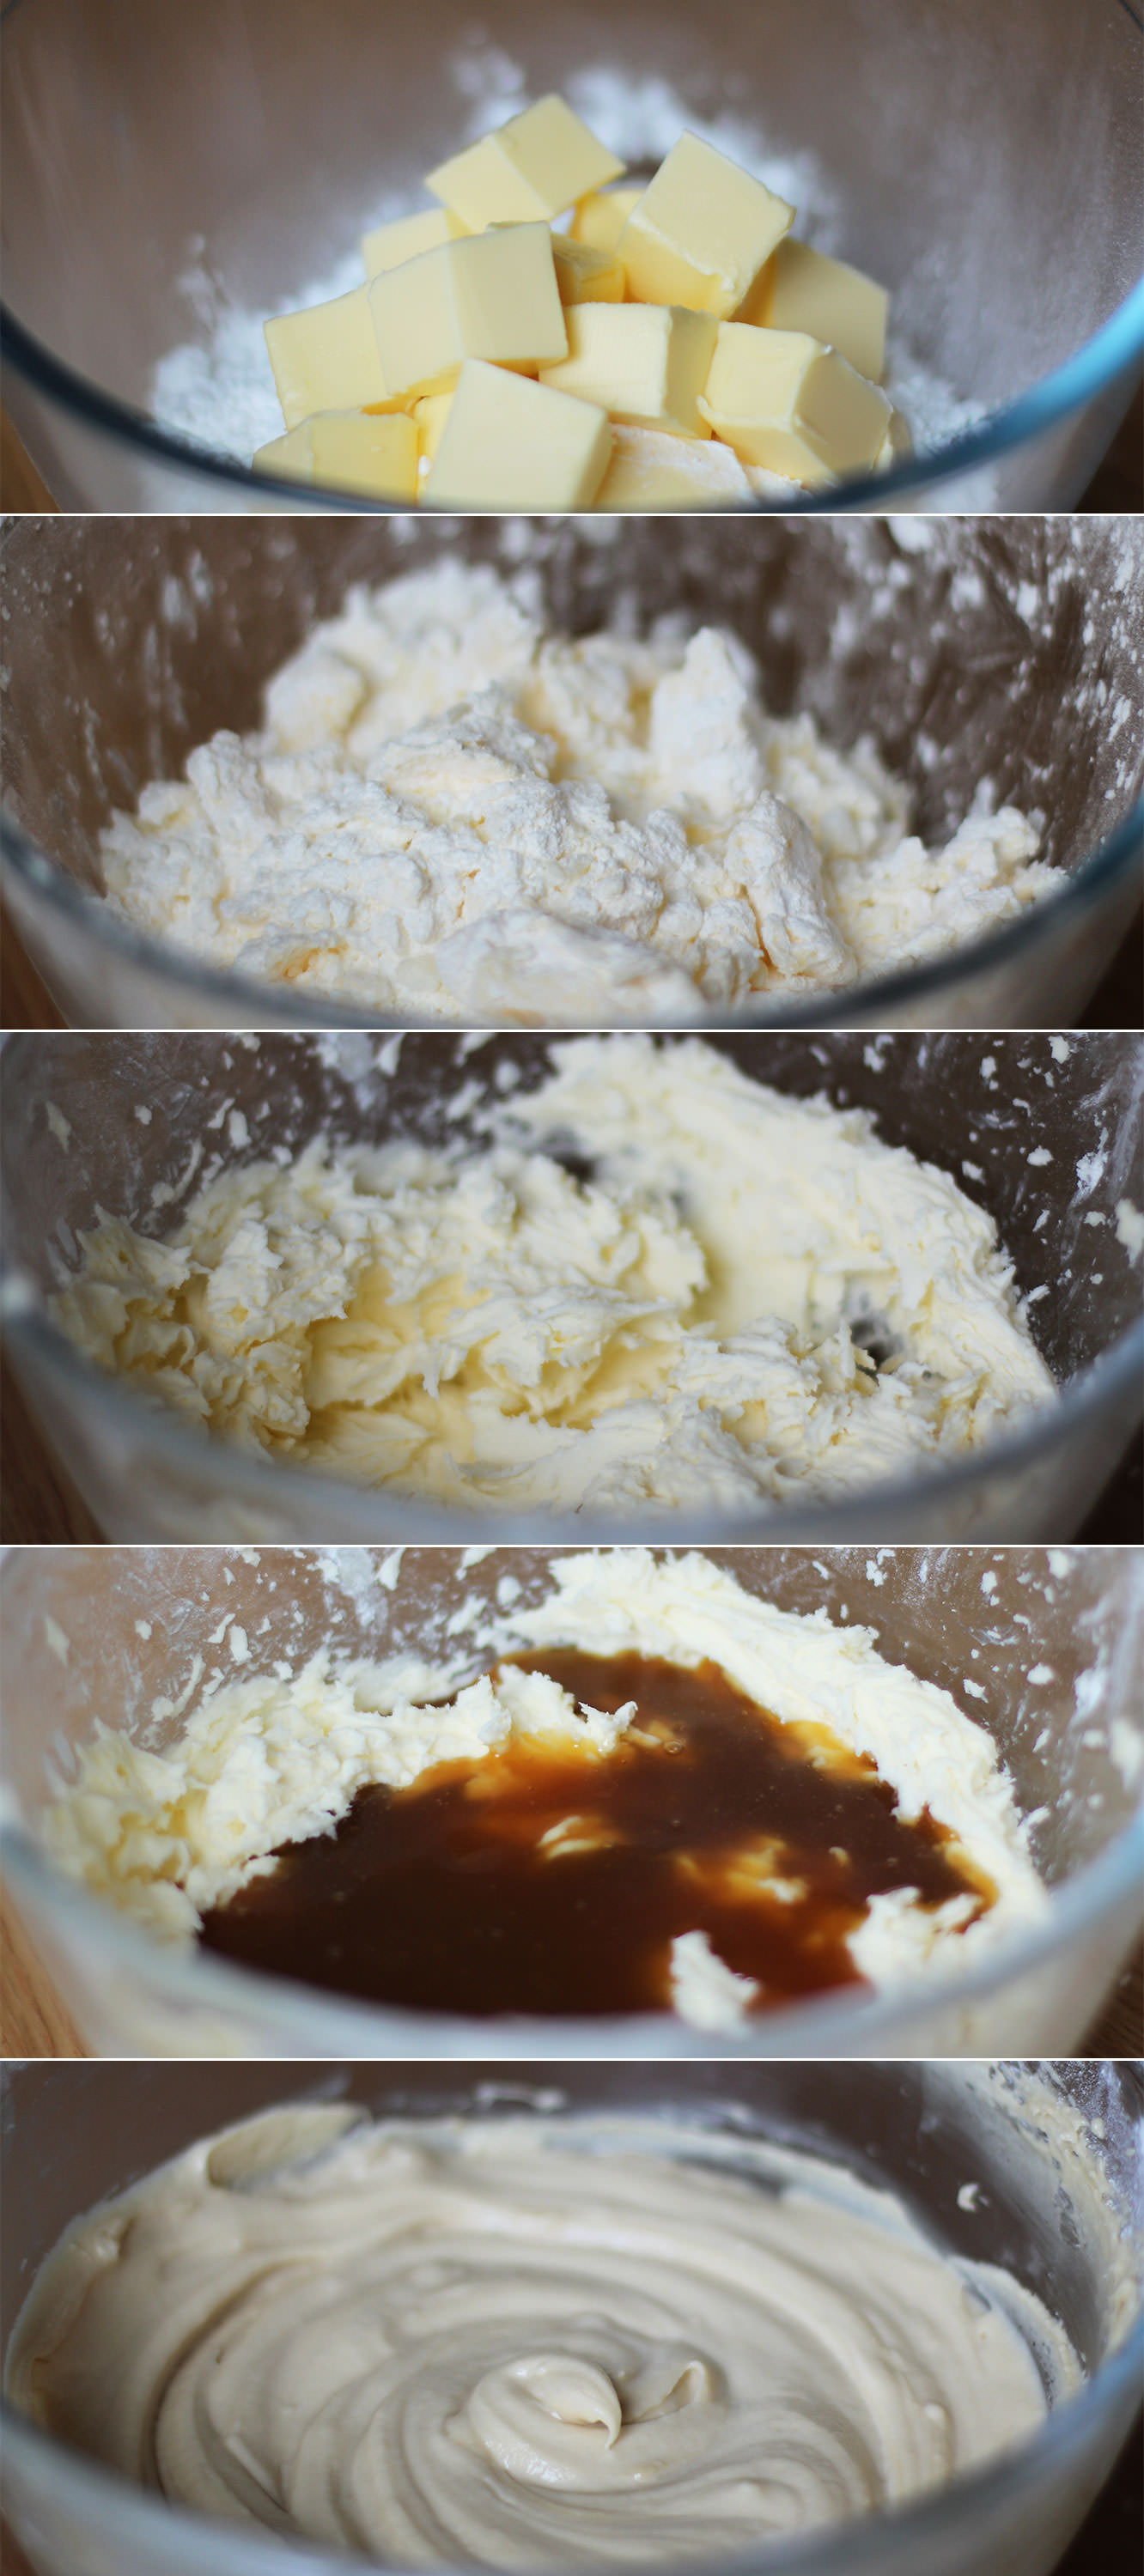
Start by making the sweet shortcrust pastry.
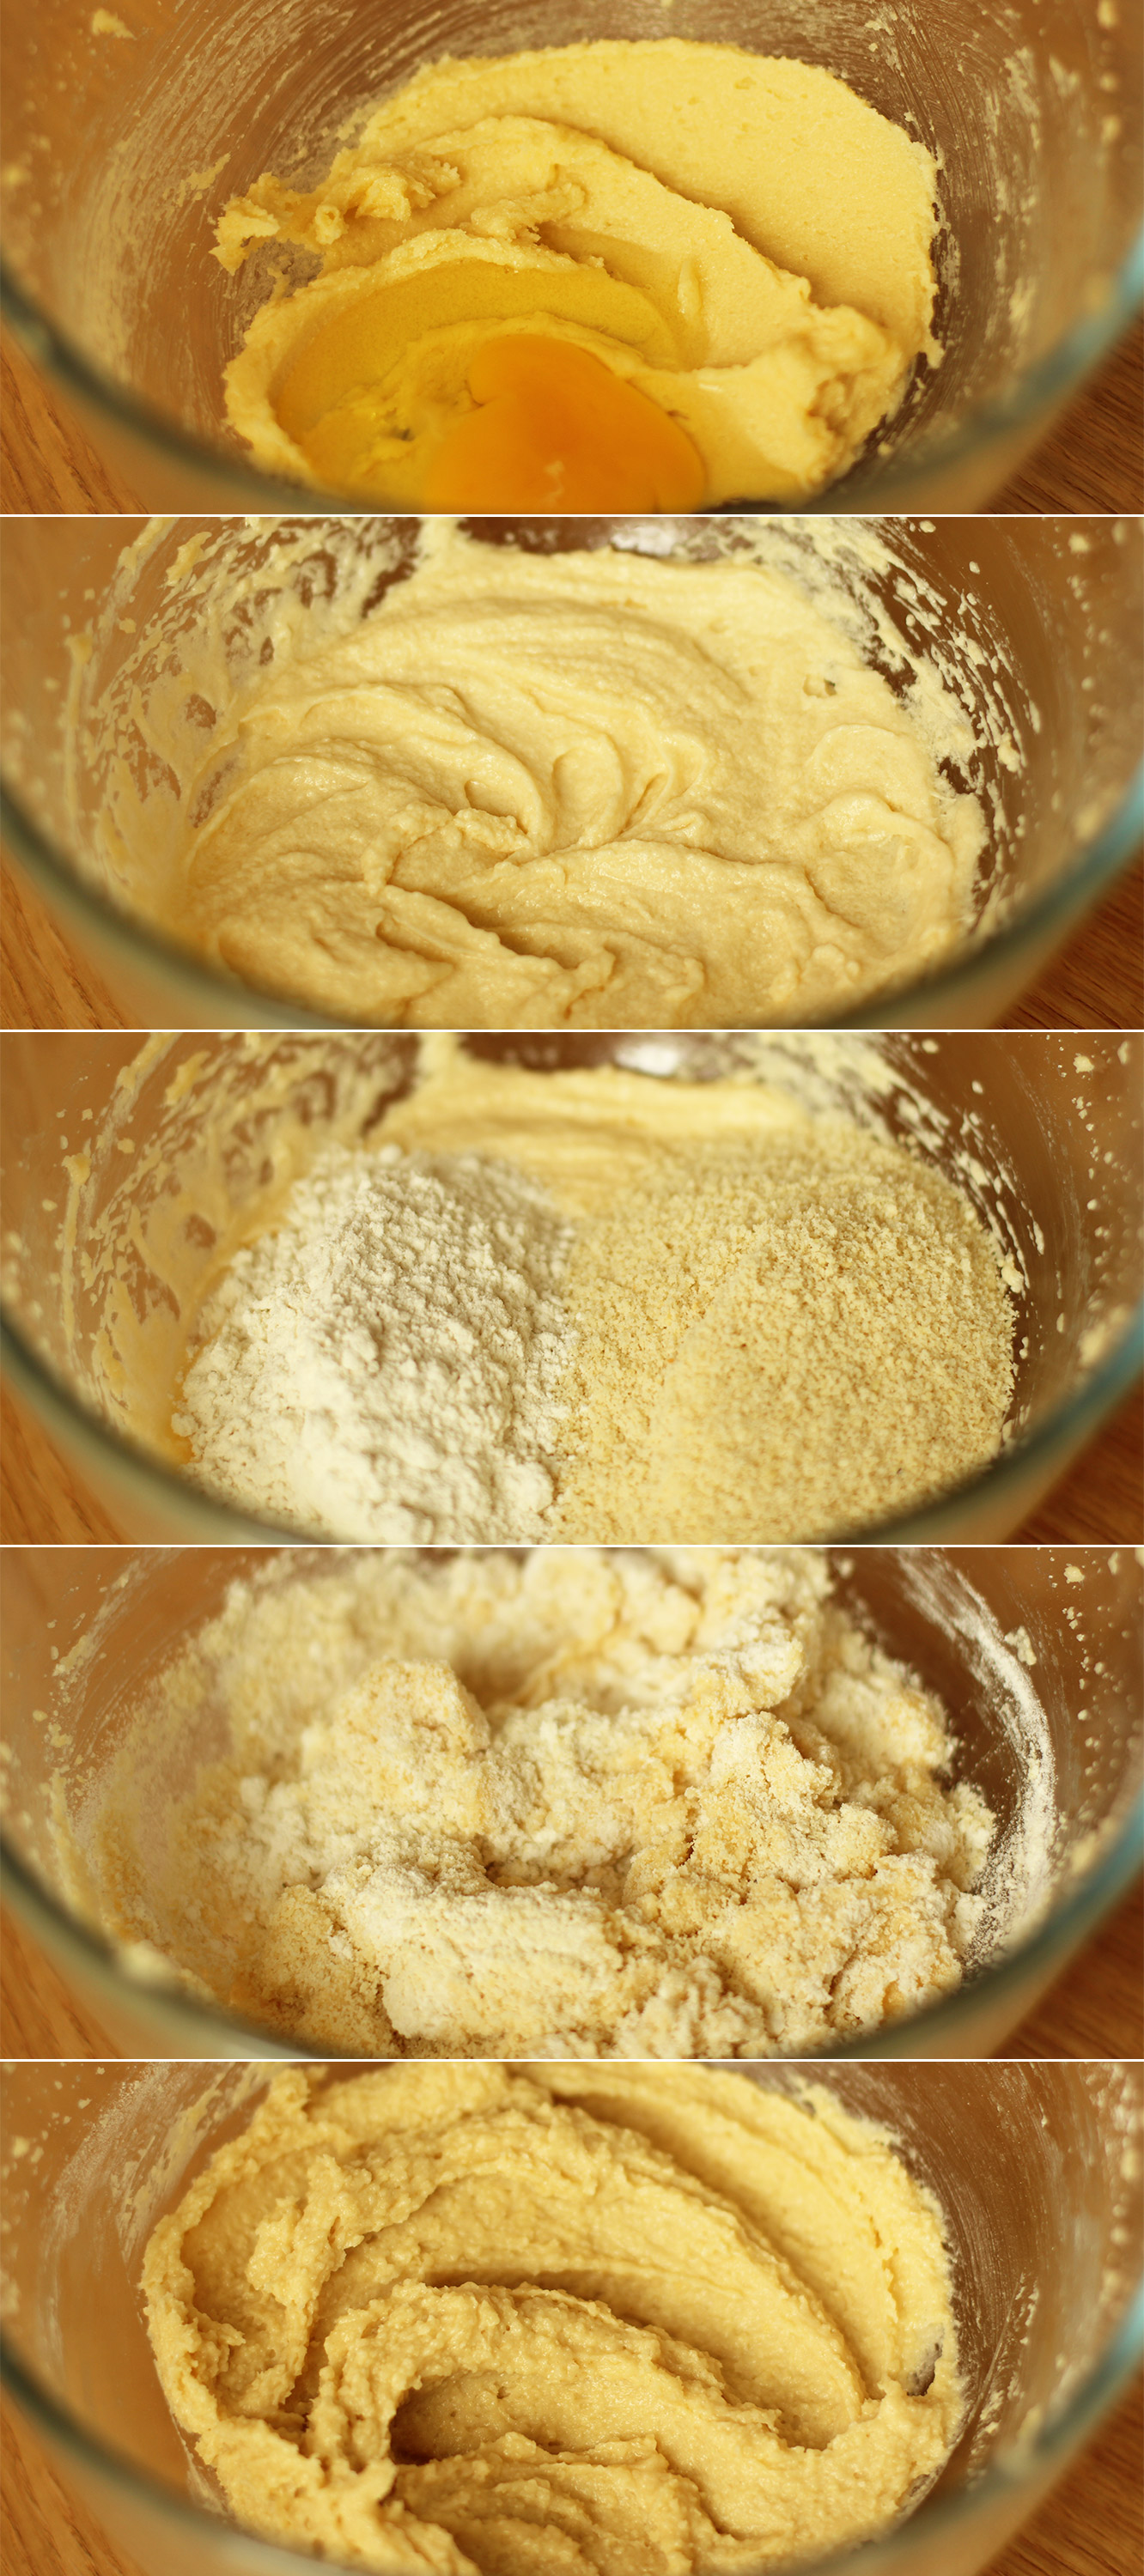
First cube the butter and pop that into the plain flour. Using your fingers, rub the butter and flour together to get a crumb-like texture.
The colder your butter the better and the smaller the crumbs you will be able to get. My house is waaaaaaarm, so as you can see, mine was a tad lumpy at this stage.
If you have a food processor I am led to believe you can do this bit in that very quickly and easily. But we can’t all be posh like you so (clean) fingers are just fine too.
Step two
Stir in the caster sugar.
Step three
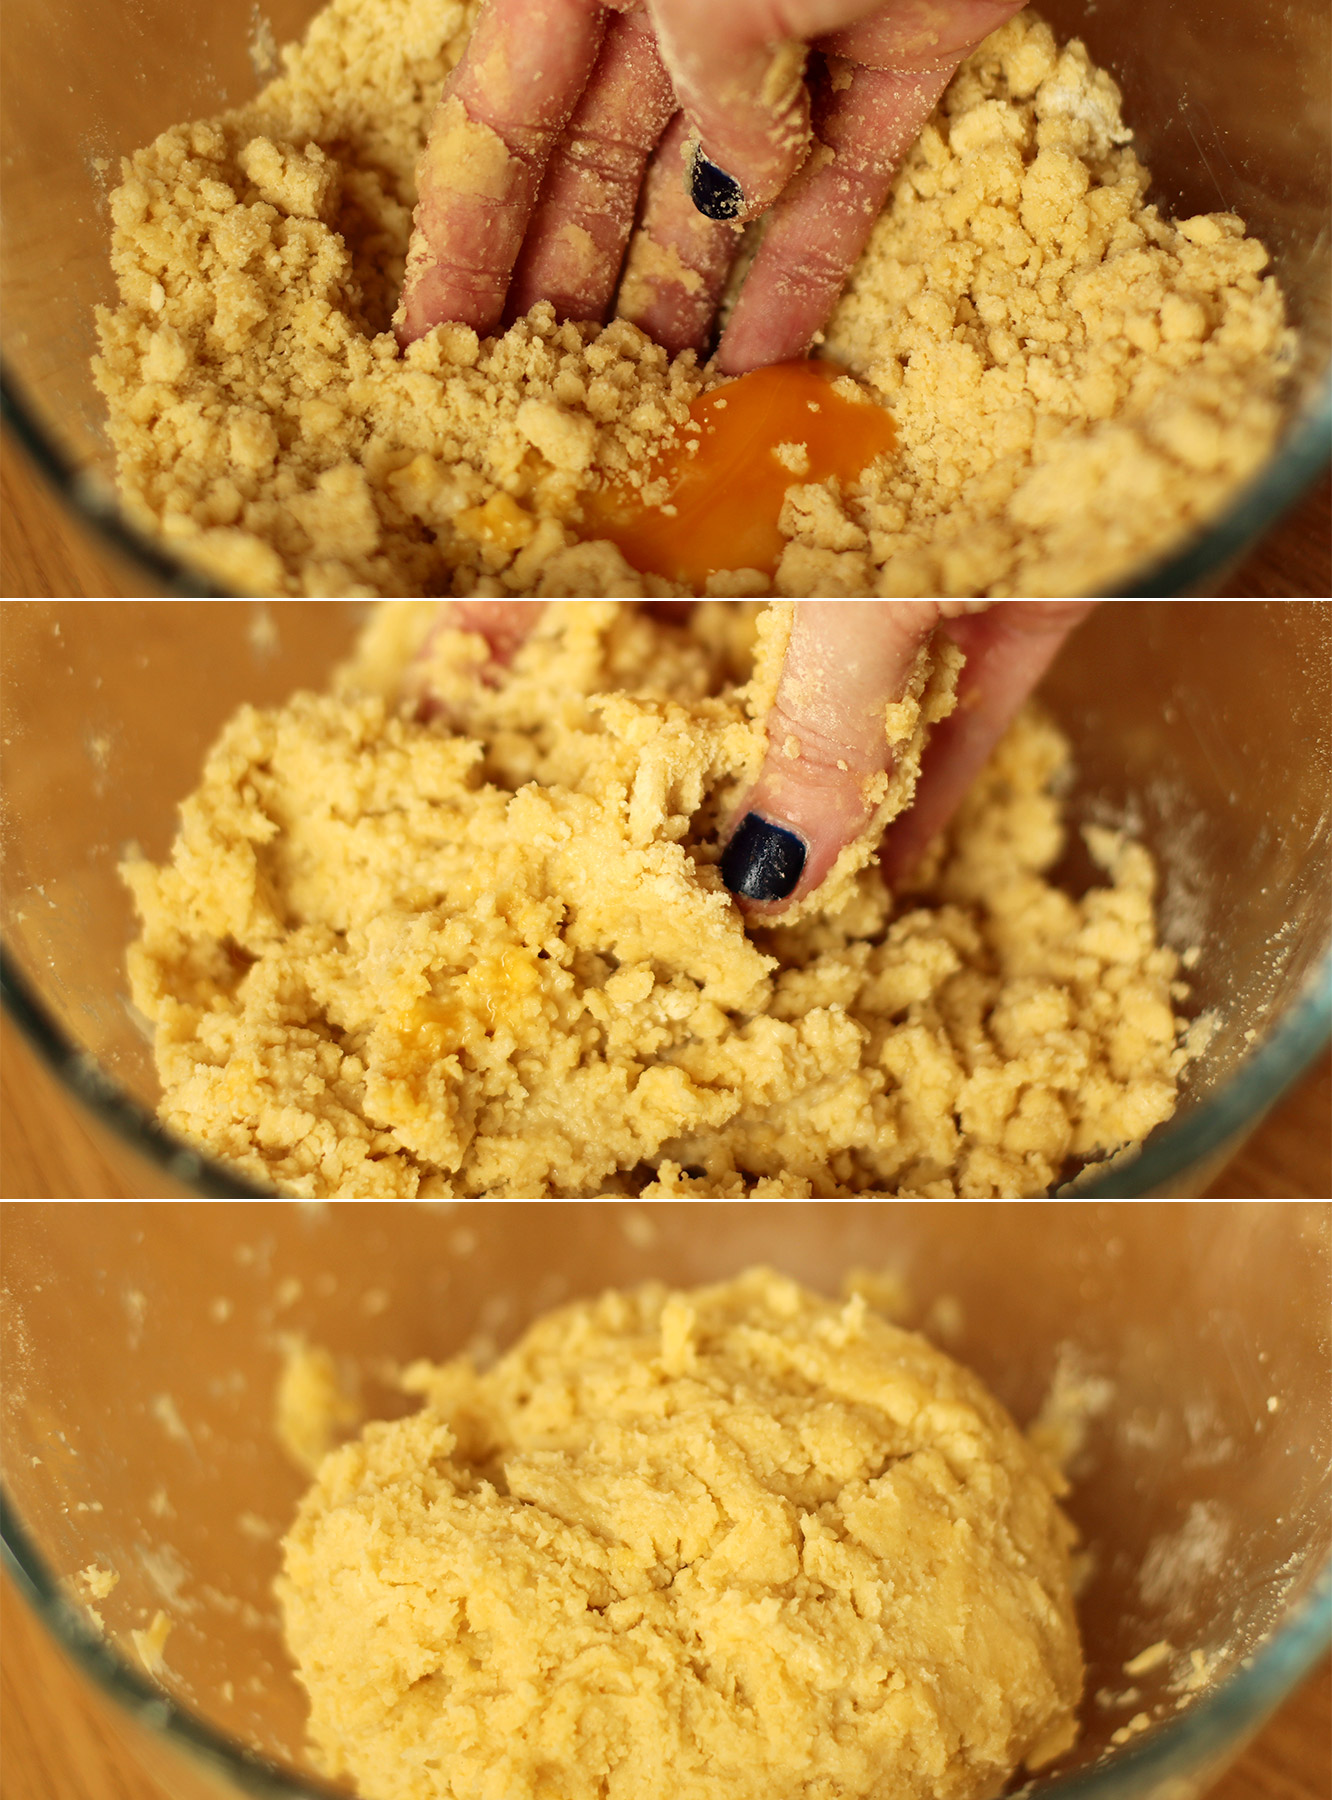
Make a well in the middle for the milk and egg yolk. Fairly sure you can guess what’s next…put yolk and milk in said well.
Bring the mixture together with your hands. It may be a bit crumbly so you can tip it onto a worktop and knead it together slightly to combine, but be careful not to over work it.
Wrap it in clingfilm and put it in the fridge for at least an hour.
Step four
Frangipane making time. Using an electric whisk (or a wooden spoon and some strong arms) beat together the butter and sugar until smooth and fluffy.
Step five
Add the egg and beat again with the whisk.
Stir in the almonds, almond extract and the flour.
Voila. Set aside.
Step six
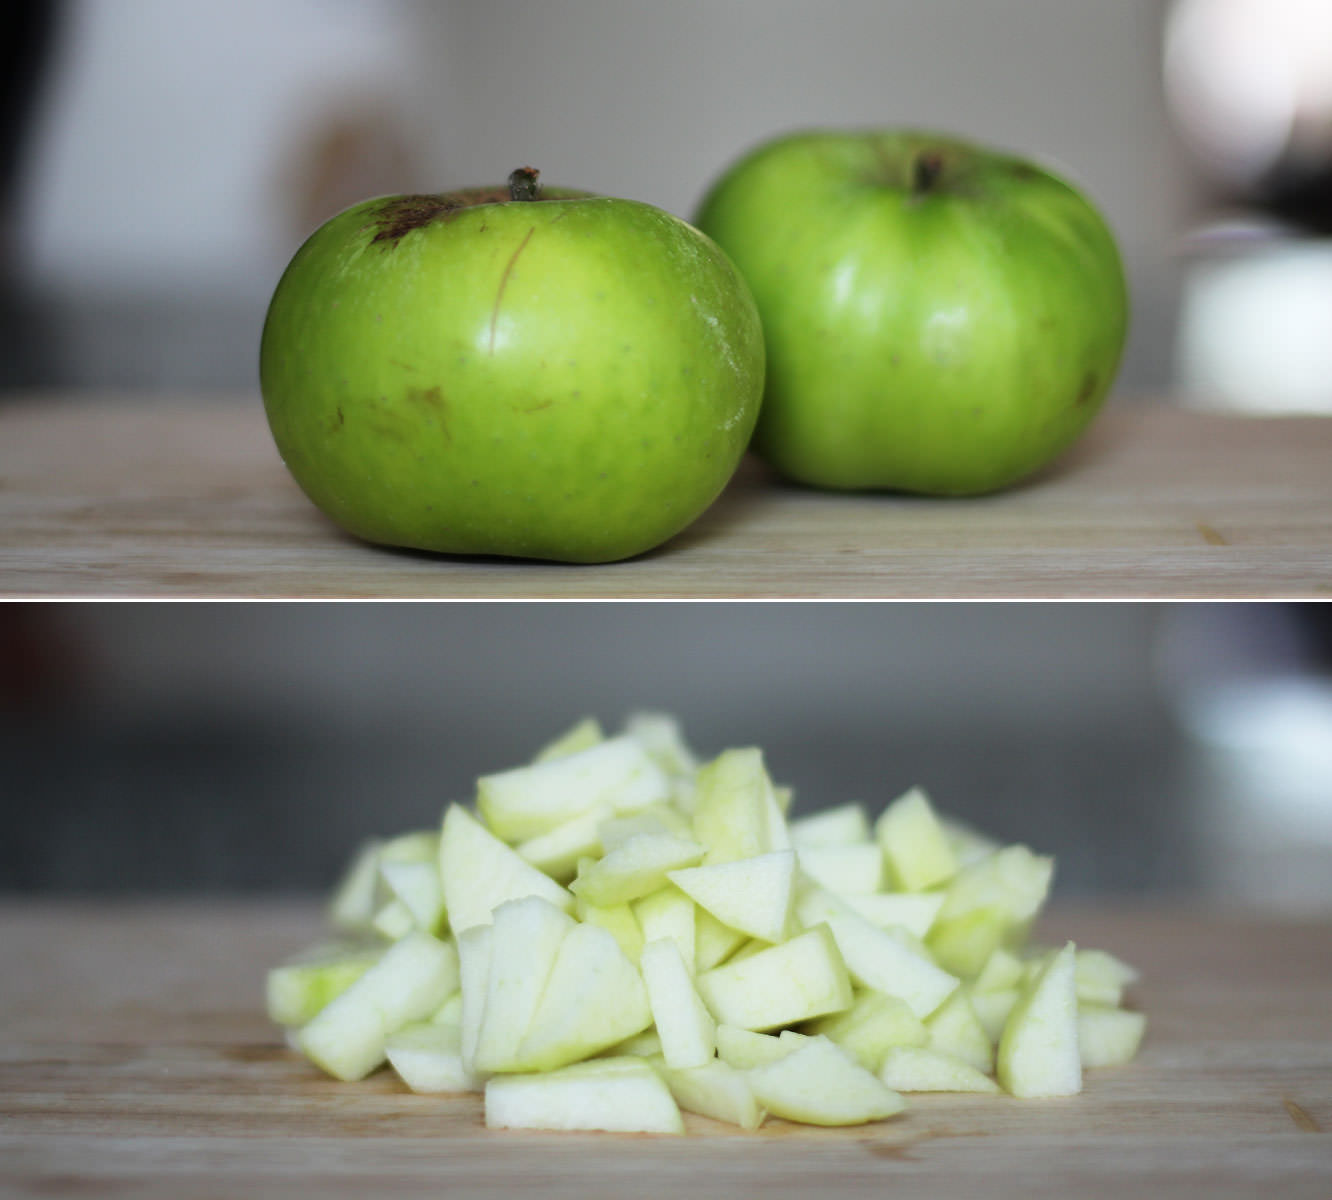
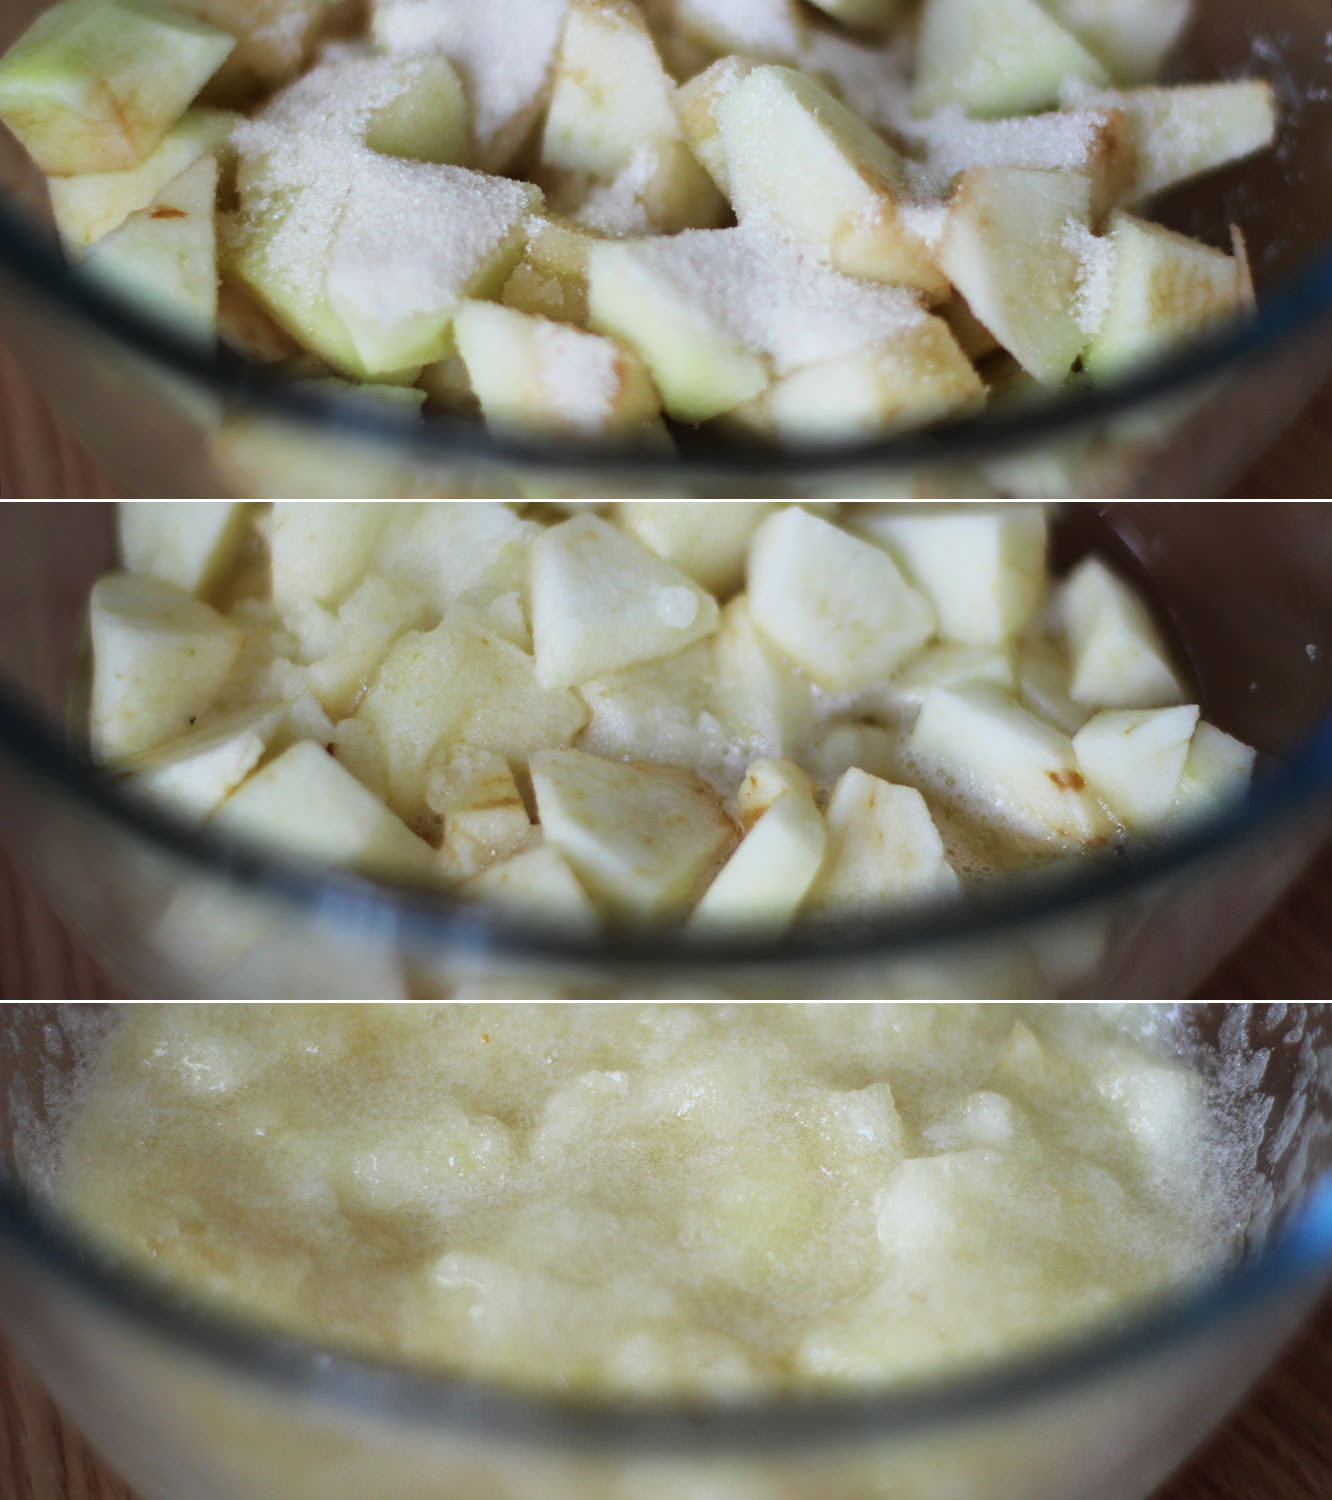
Prepare the stewed apple filling. Being by peeling and chopping the three bramley apples. If you have a bit of lemon juice handy a quick squeeze will keep the chopped ones pale while you see to the rest.
Step seven
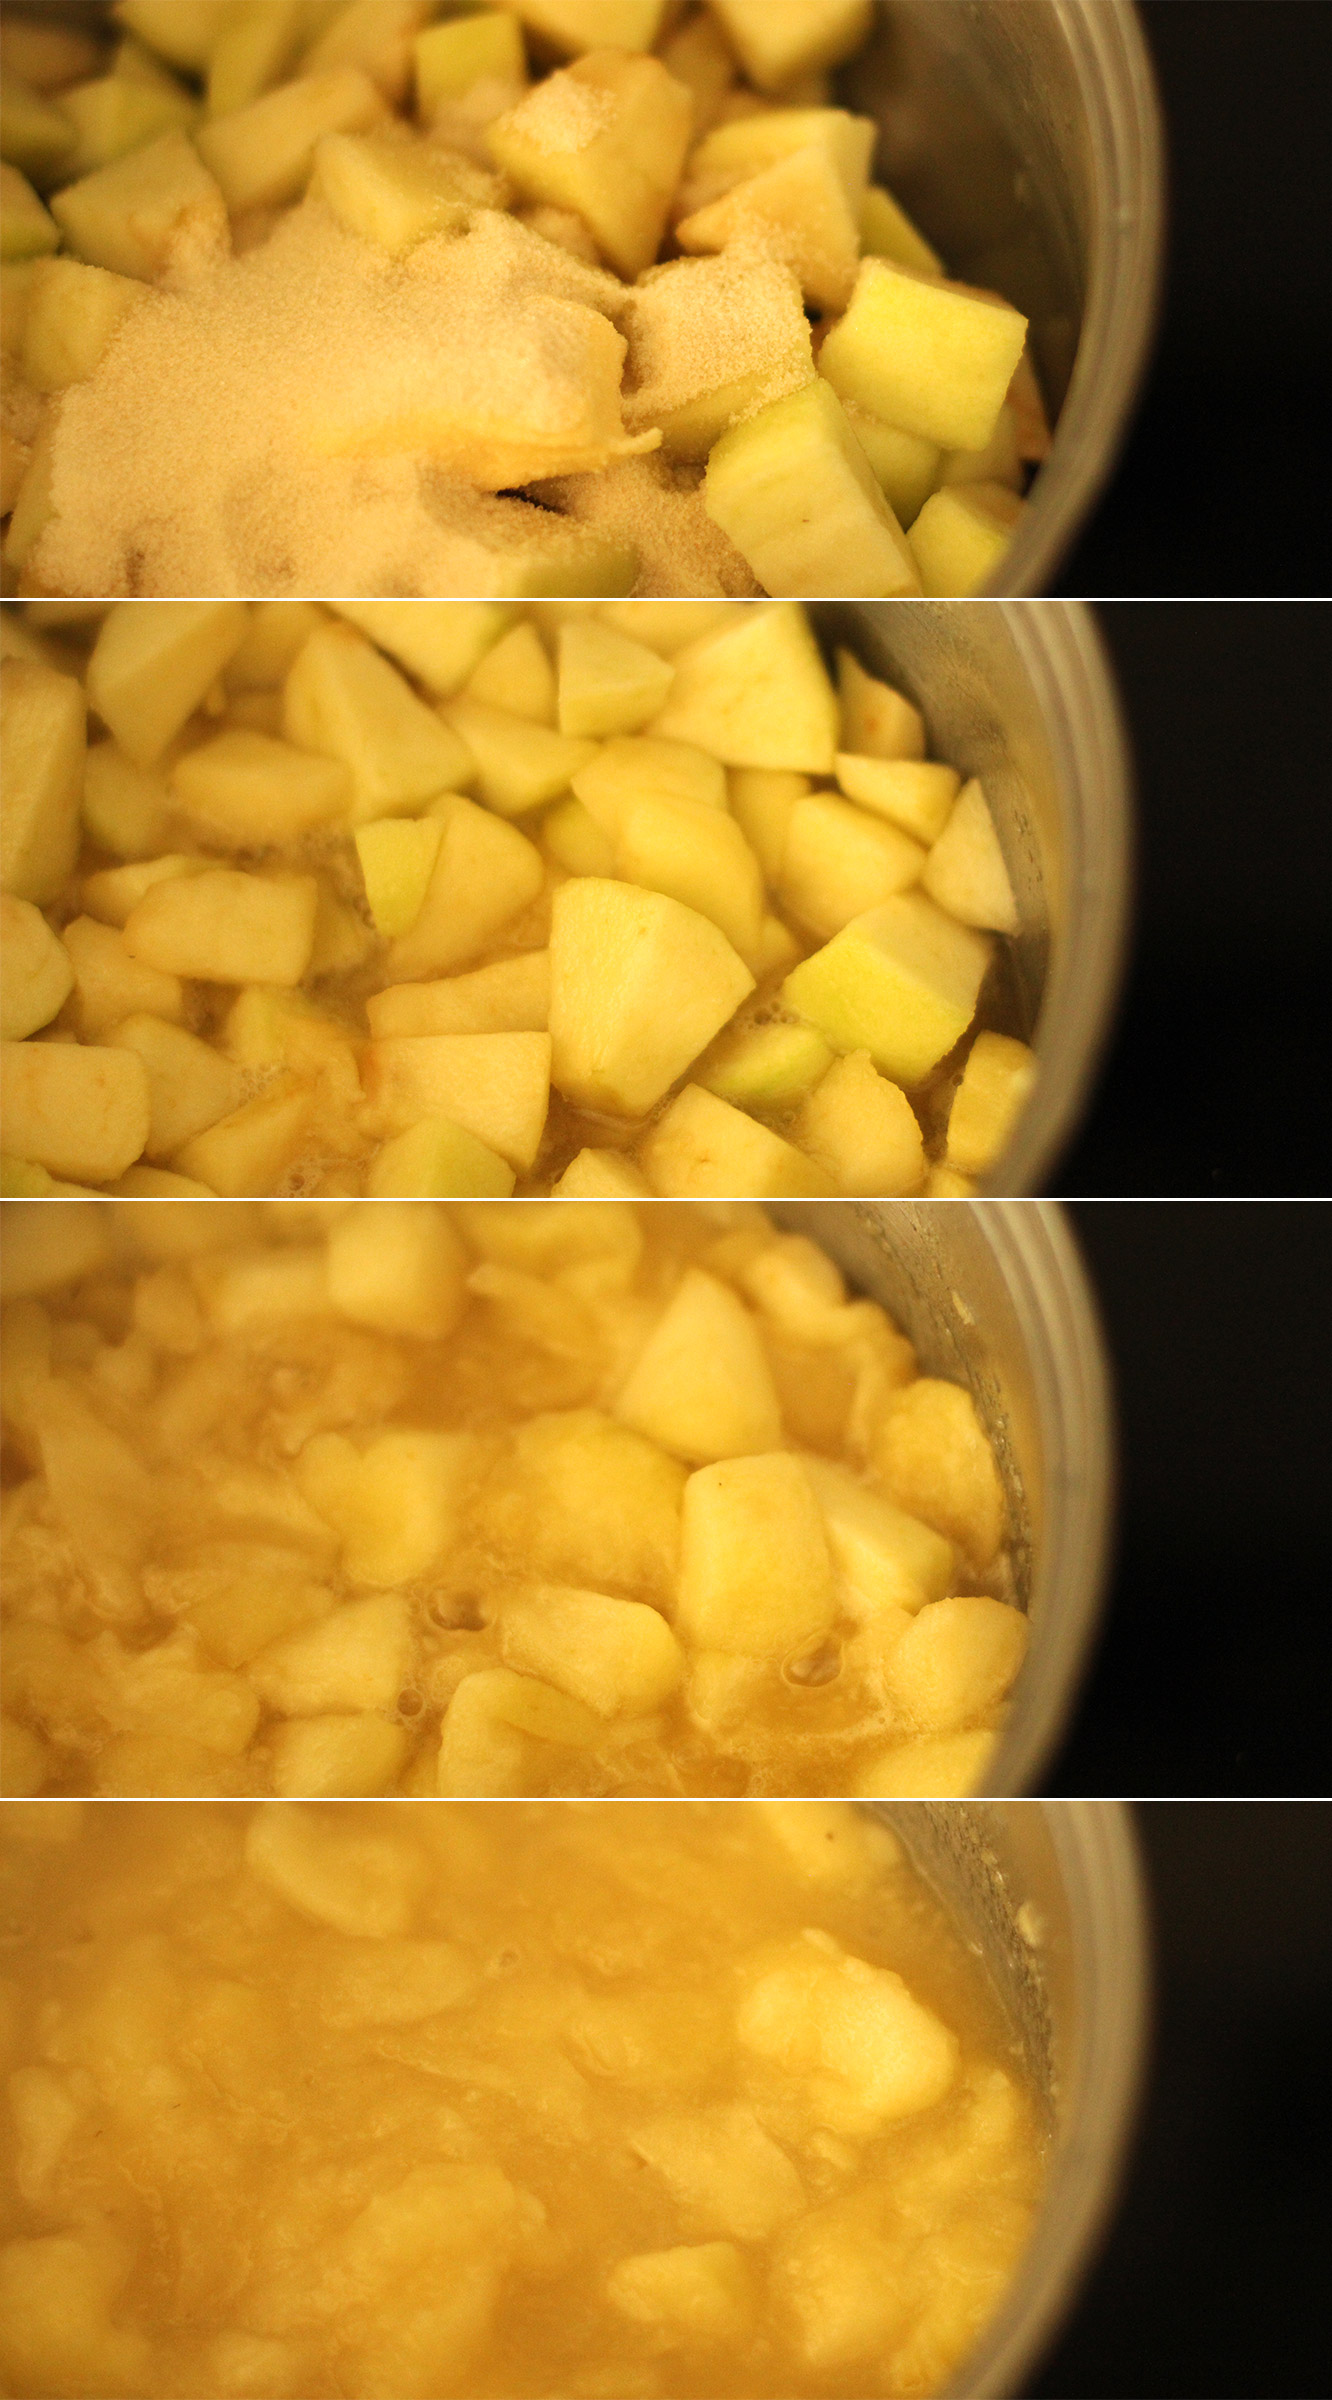
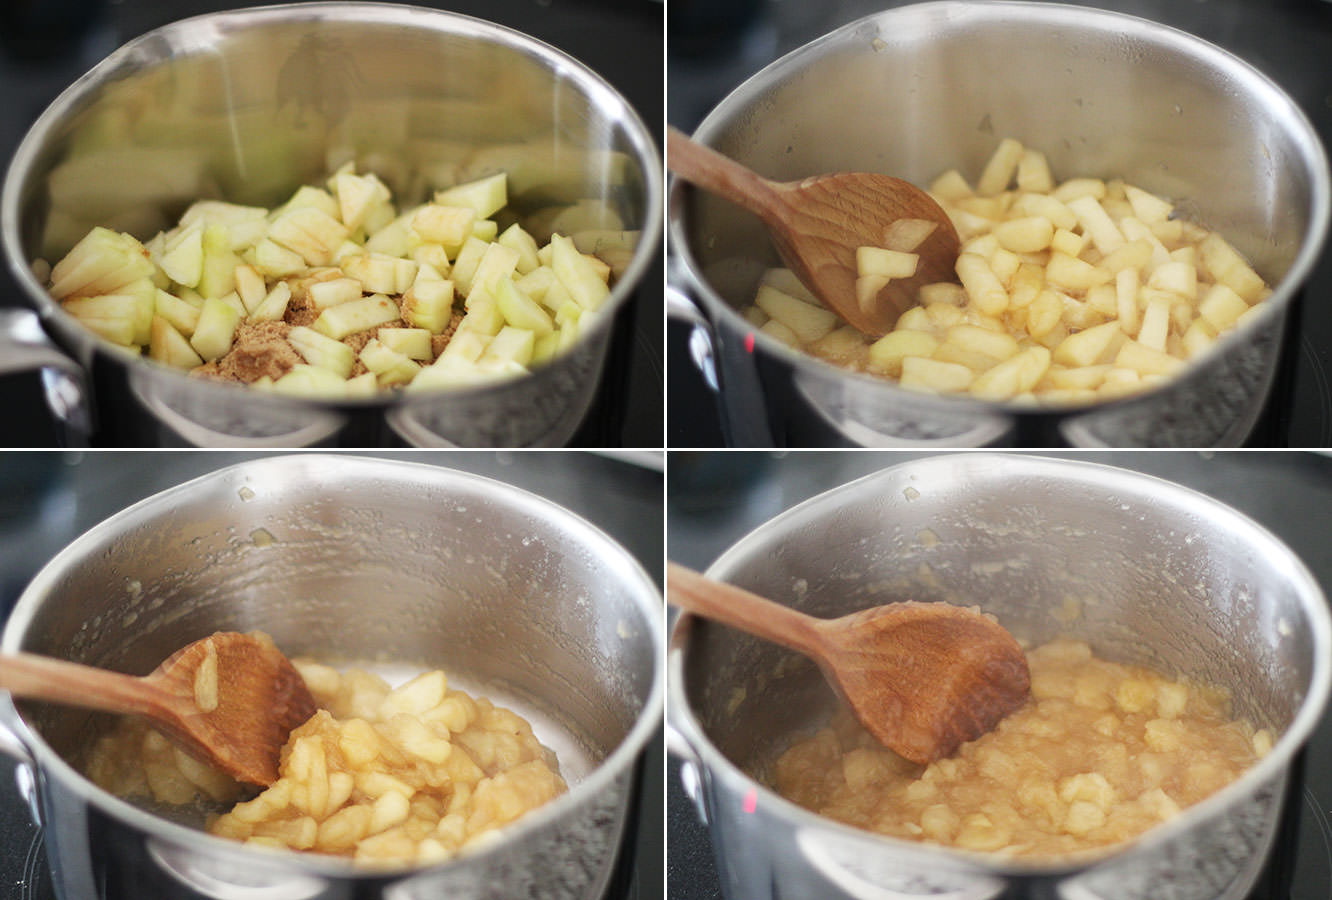
Put the chopped apples in a saucepan with the butter, honey, water and sugar. Bring to a medium-low heat and stir occasionally until the apples are mostly broken down. You want a pulp really (an appetising thought, I know).
Step eight
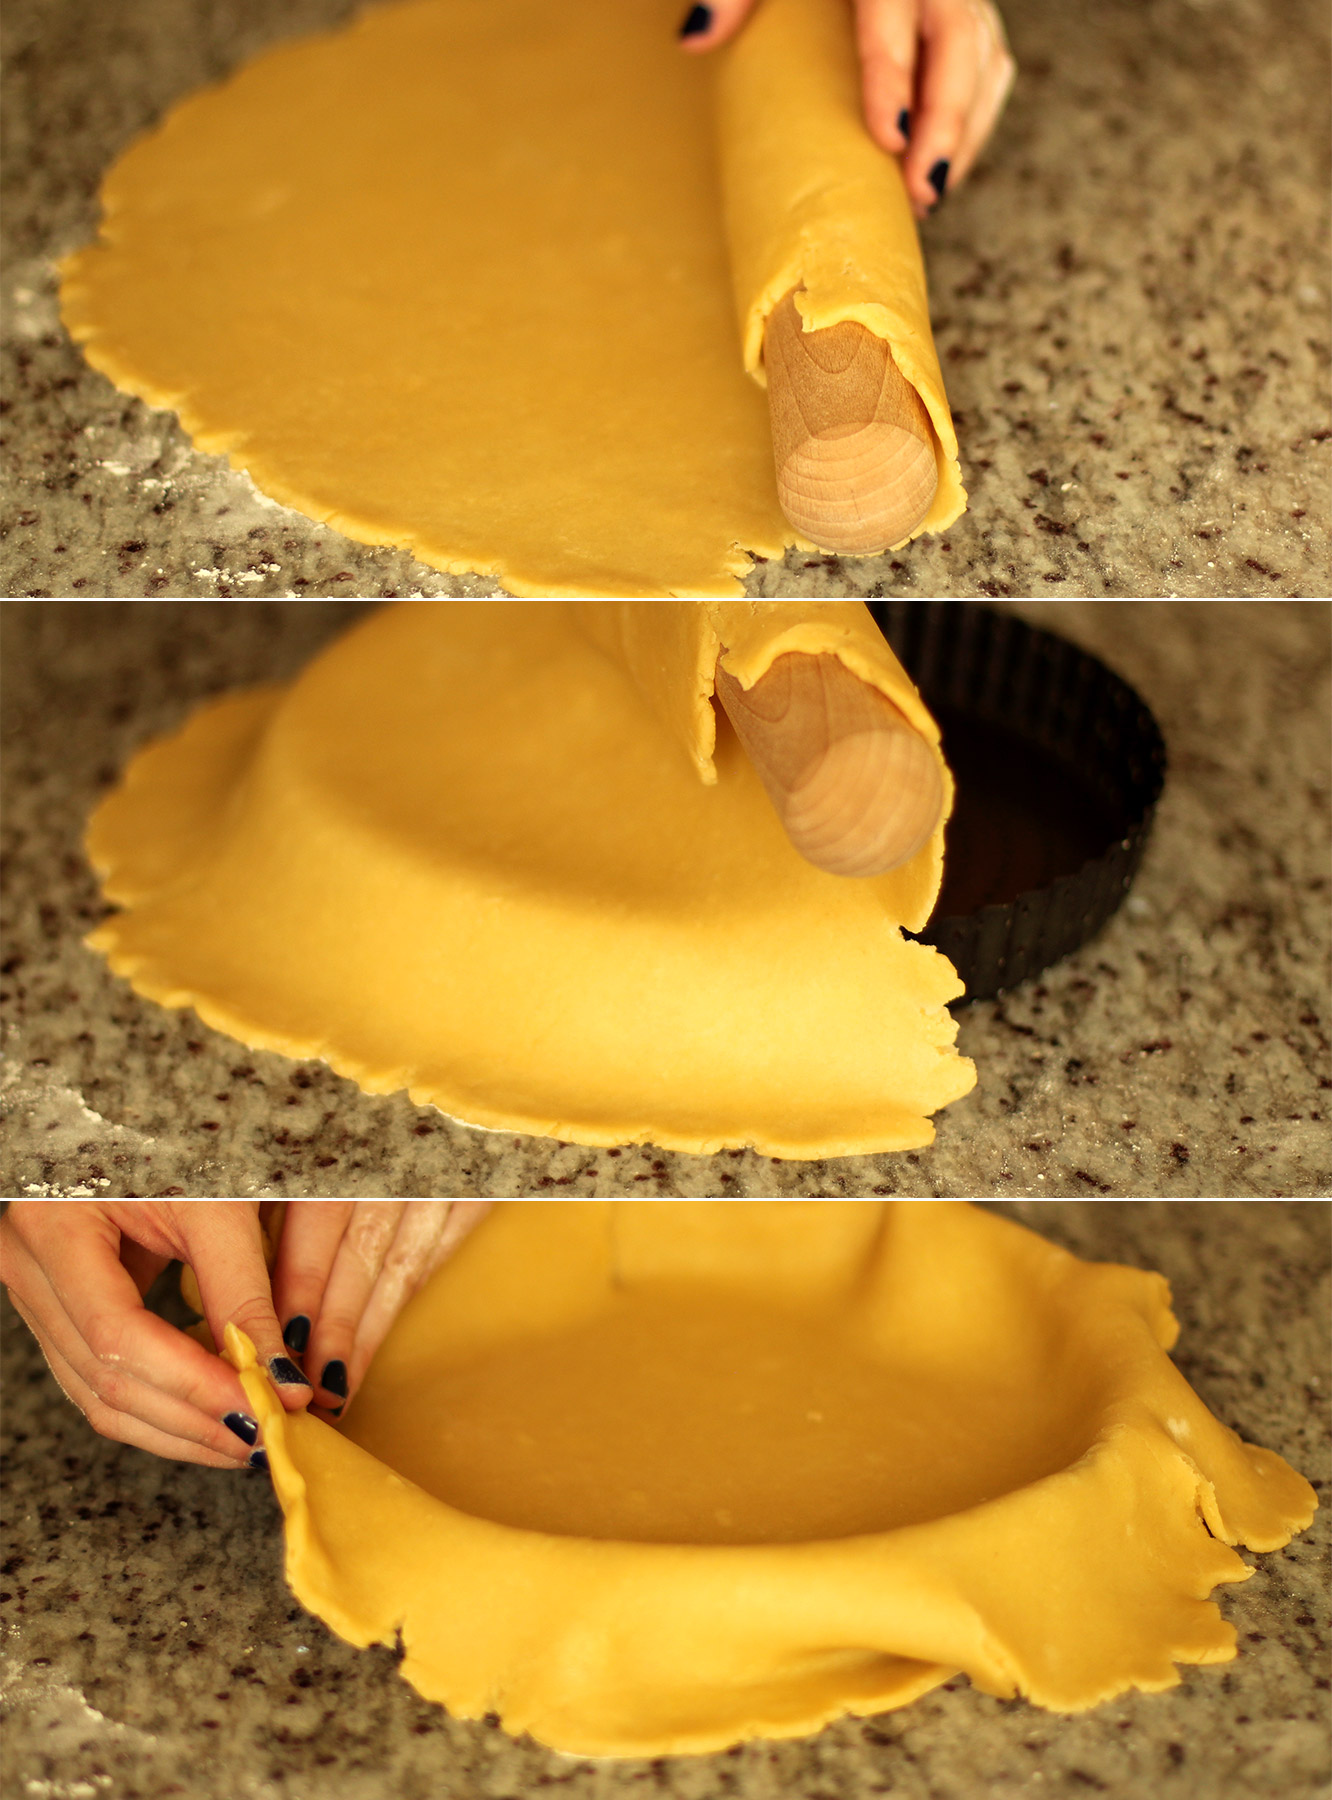
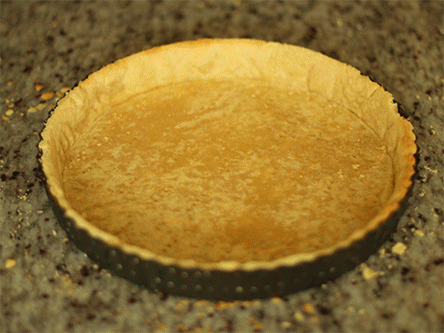
Remove the pastry from the fridge (providing an hour has passed). Place onto a lightly floured surface (you don’t want to add much more flour to the mix if you can help it).
Roll the pastry out as evenly as you can, until your chosen dish can sit in the middle with an inch or two on all sides. You don’t really want your pastry to be thicker than 5mm.
Step nine
Transfer your pastry by rolling it at least half of it up onto your rolling pin and unrolling it over the top of your dish.
I then needed to lift the edges back up and place them back in to tease them better into the corners. Do this gently so as not to tear it. Having said that, I was a bit heavy handed and tears can be fixed quit easily by sticking a bit of excess pastry on top.
Step ten
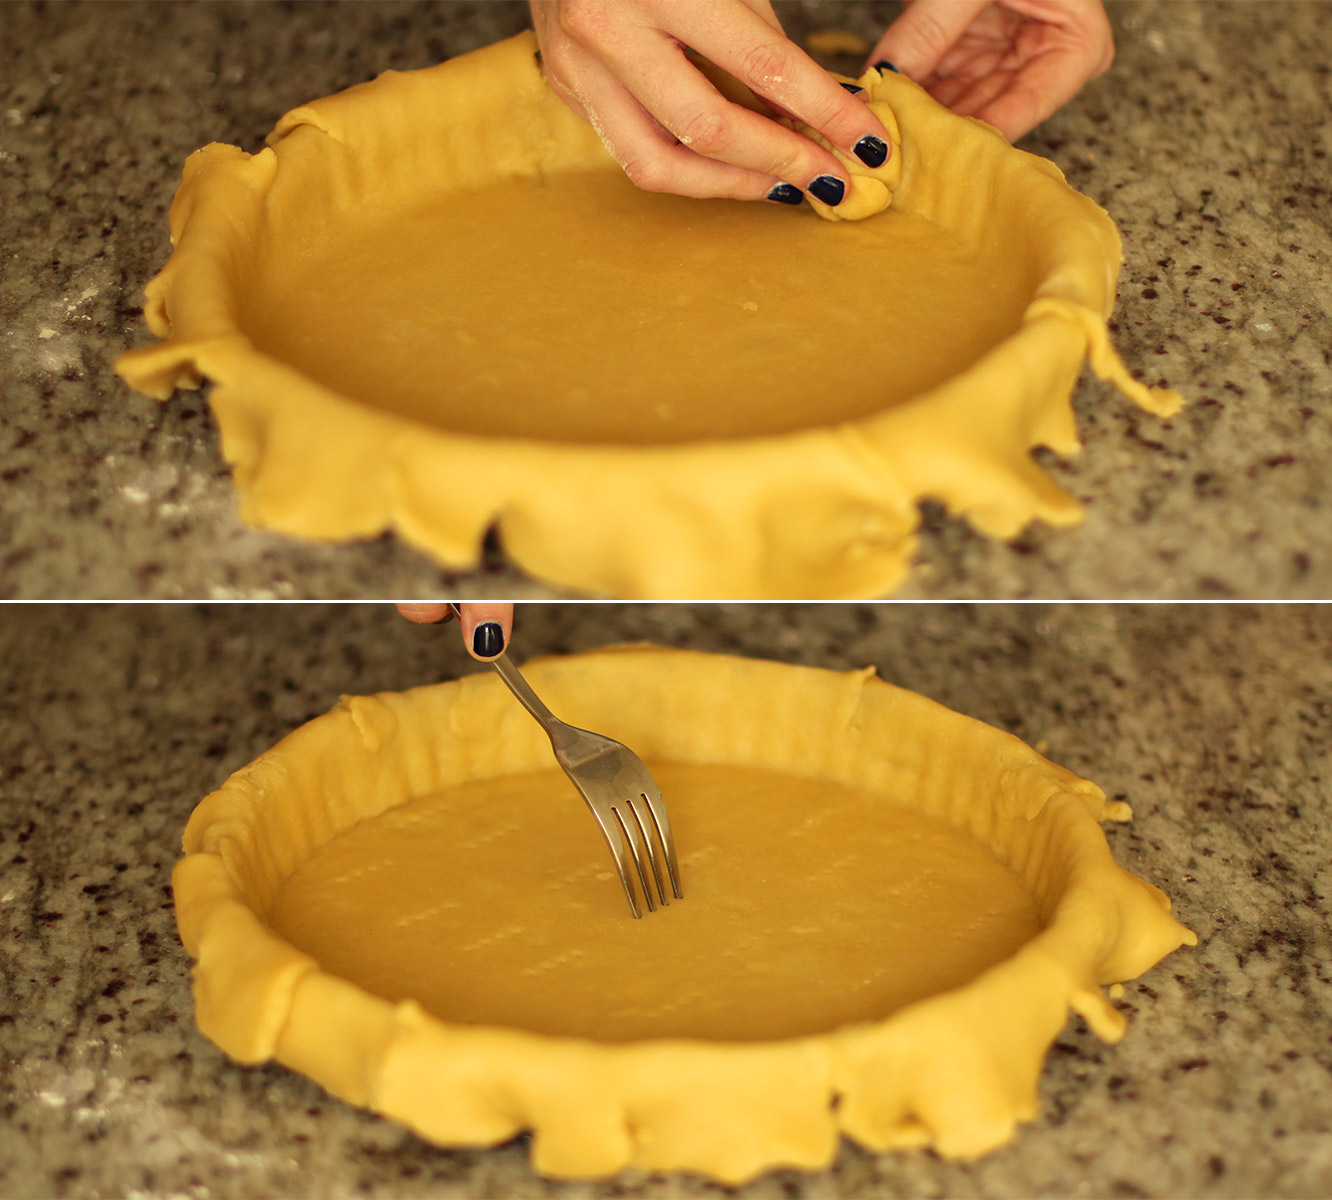
Rip a bit of pastry off the overlap and use it to press the crust further into the crevices.
Use a fork to pierce the base of the pie, this will help the pastry stay flat in the oven.
Pop him back in the fridge for another 20-30 minutes.
Step eleven
While the pastry is chilling again, peel and slice the braeburns/eating apples. You need to do this carefully as it will be the making or breaking of how your pie looks (no pressure). Try to peel nice and evenly and cut the apples as thinly as you can.
Have a large tupperware filled with cold water nearby to put your cut slices into, which will stop them from browning, again, if you have any lemon juice a few drops wouldn’t go amiss but not essential.
Pre-heat the oven to 180C/gas mark 4/350F
Step eleven
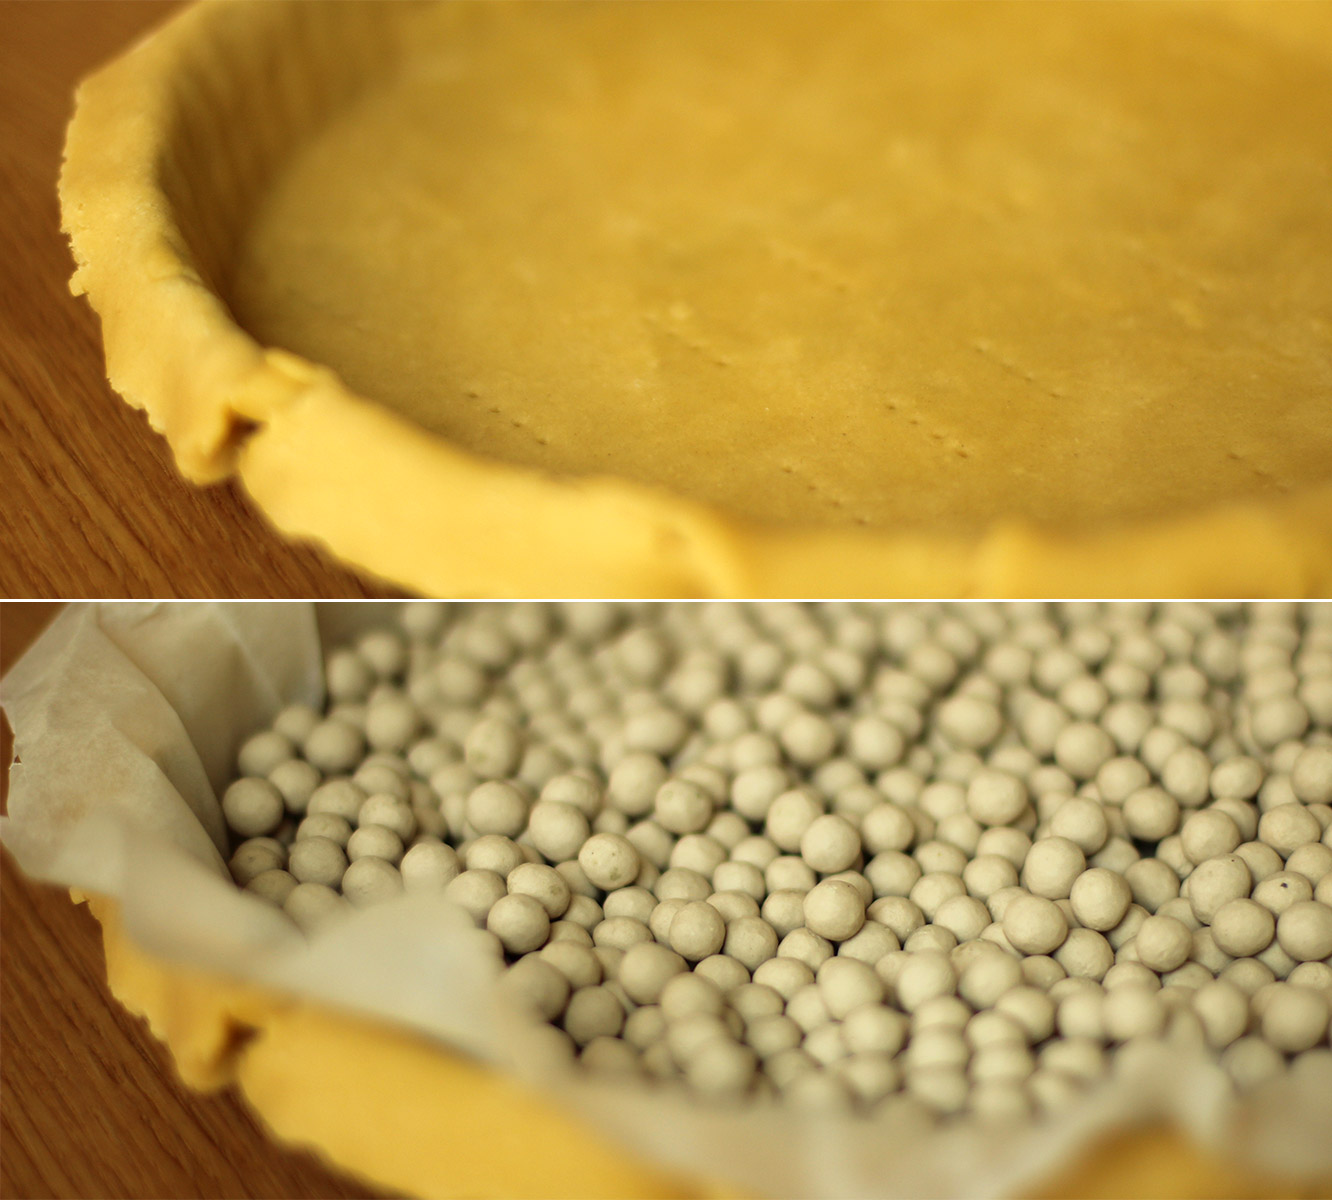
Remove the pie from the fridge and trim some of the excess pastry off the sides but still leave an overlap.
Place some baking paper in the pie and fill with baking beans. If you don’t have any then rice works too, and most dried lentils/pulses really.
Place on a baking tray and bake for 15 minutes.
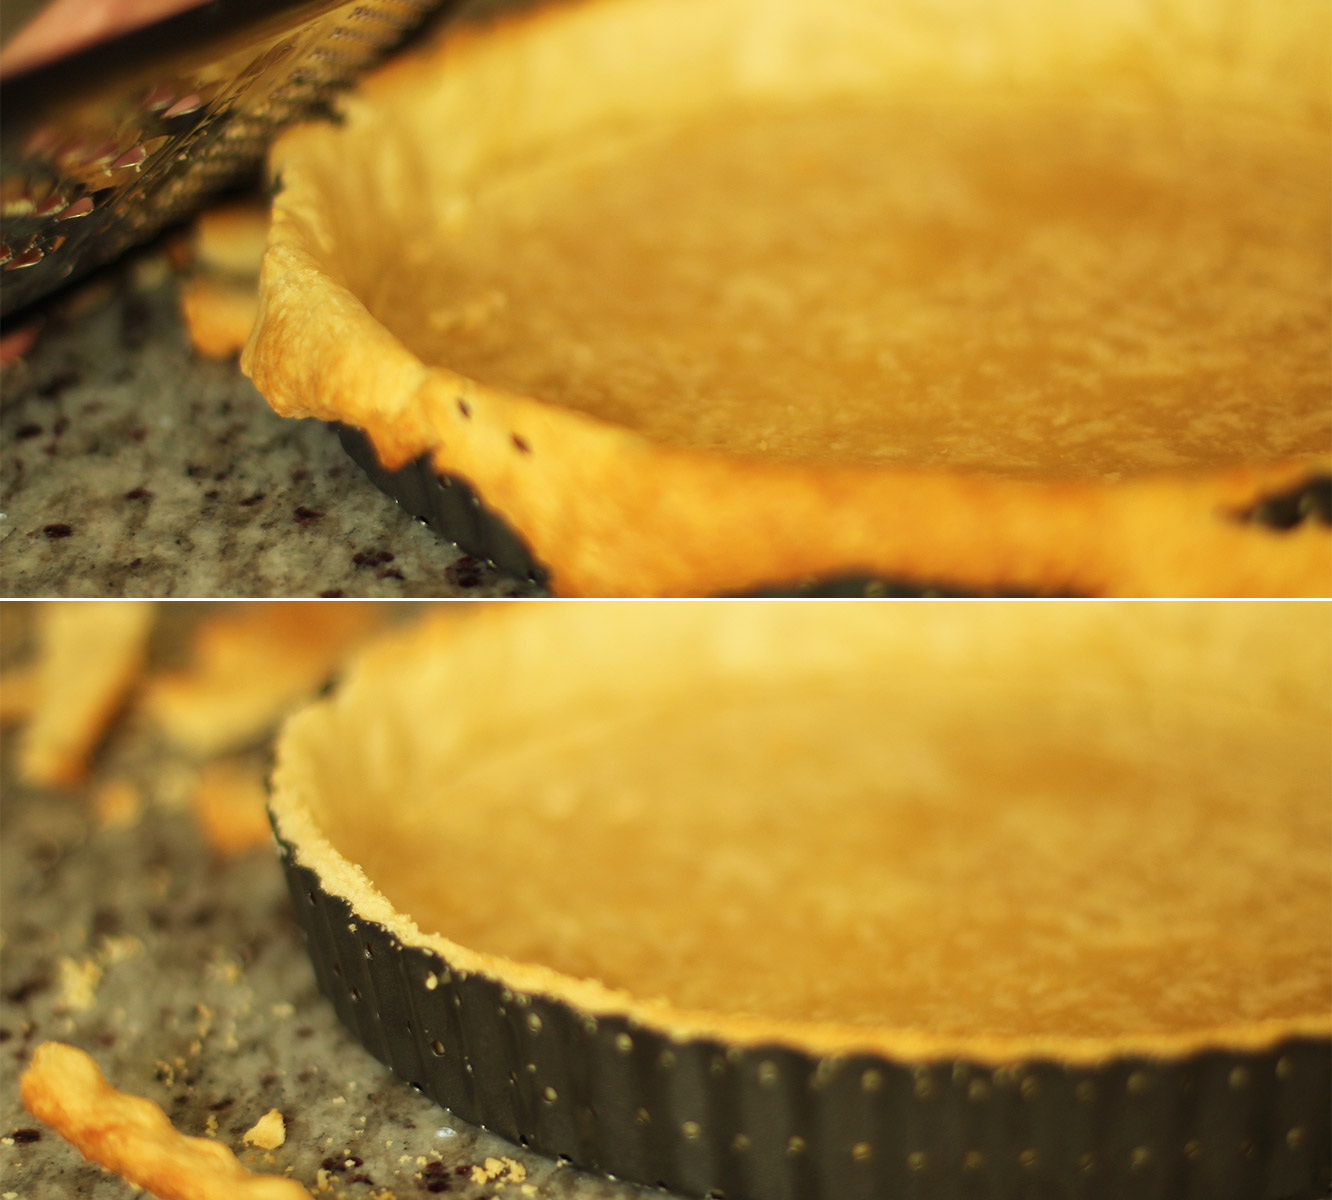
Step twelve
Using a grater remove the excess pastry at this stage. Doing it this way helps to avoid your pastry shrinking in the oven.
Step thirteen
FILL.
First spoon in the frangipane and spread out, followed by the stewed apple puree mixture.
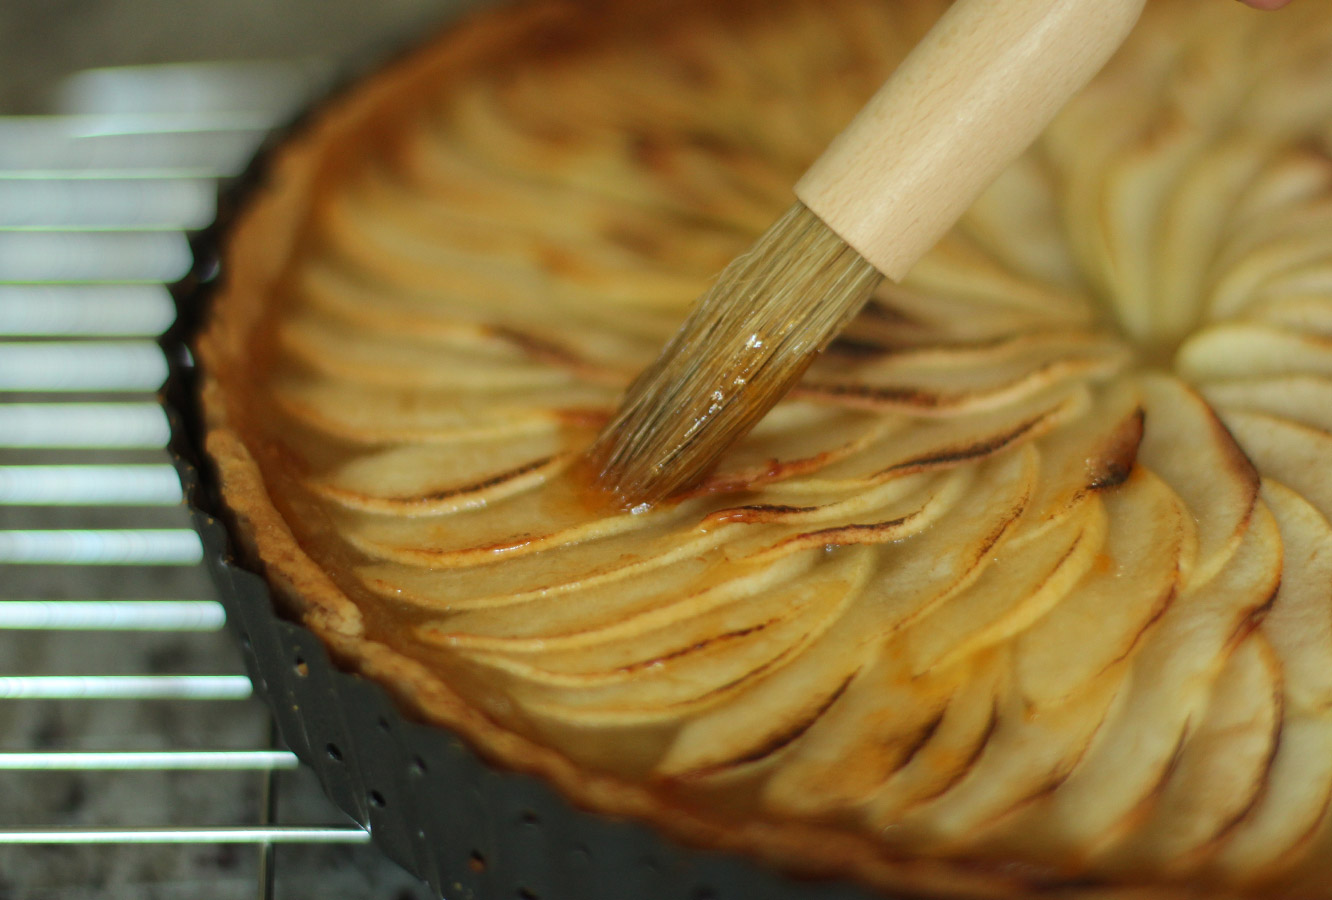
Finally add your eating apples. Start with the outside and work inwards. Make sure your apples overlap each other quite a bit; the cooking process reduces the water so they will shrink and flatten out.
Bake for another hour on 180C/350F/gas mark 4. I advise checking in at regular intervals after 30 minutes as every oven is different.
Step fourteen
Pop a few tablespoons of apricot jam in the microwave for 10-20 seconds (keep your eye on it as it’s sugary and will heat up quickly). Brush over the surface of the tart, being careful not to move the apples around, spoiling your lovely design.
Step fifteen
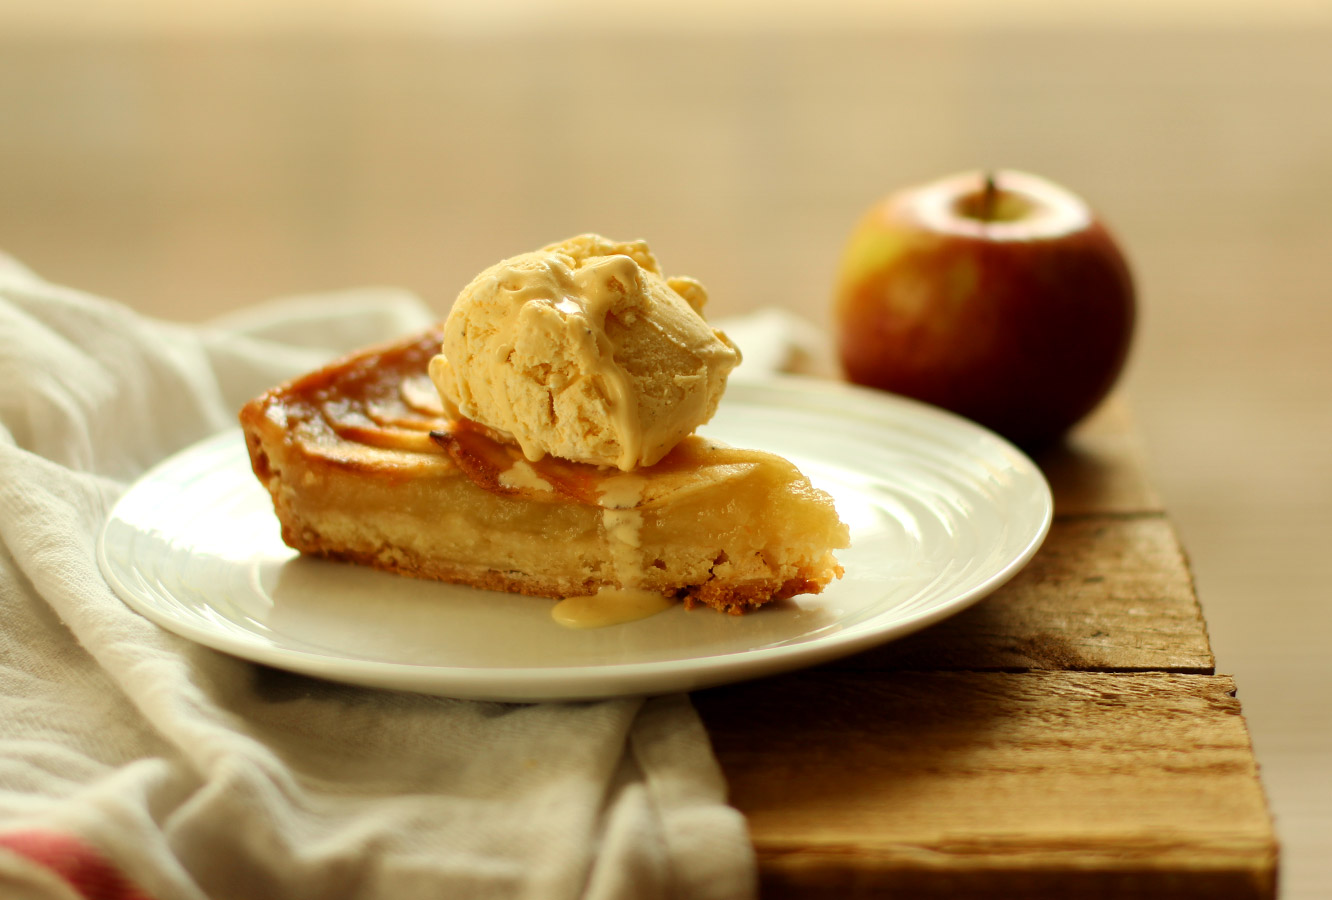
Get a scoop of vanilla ice-cream on that guy.
You can reheat your pie in the oven or individual slices in the microwave if you aren’t eating it straight away.
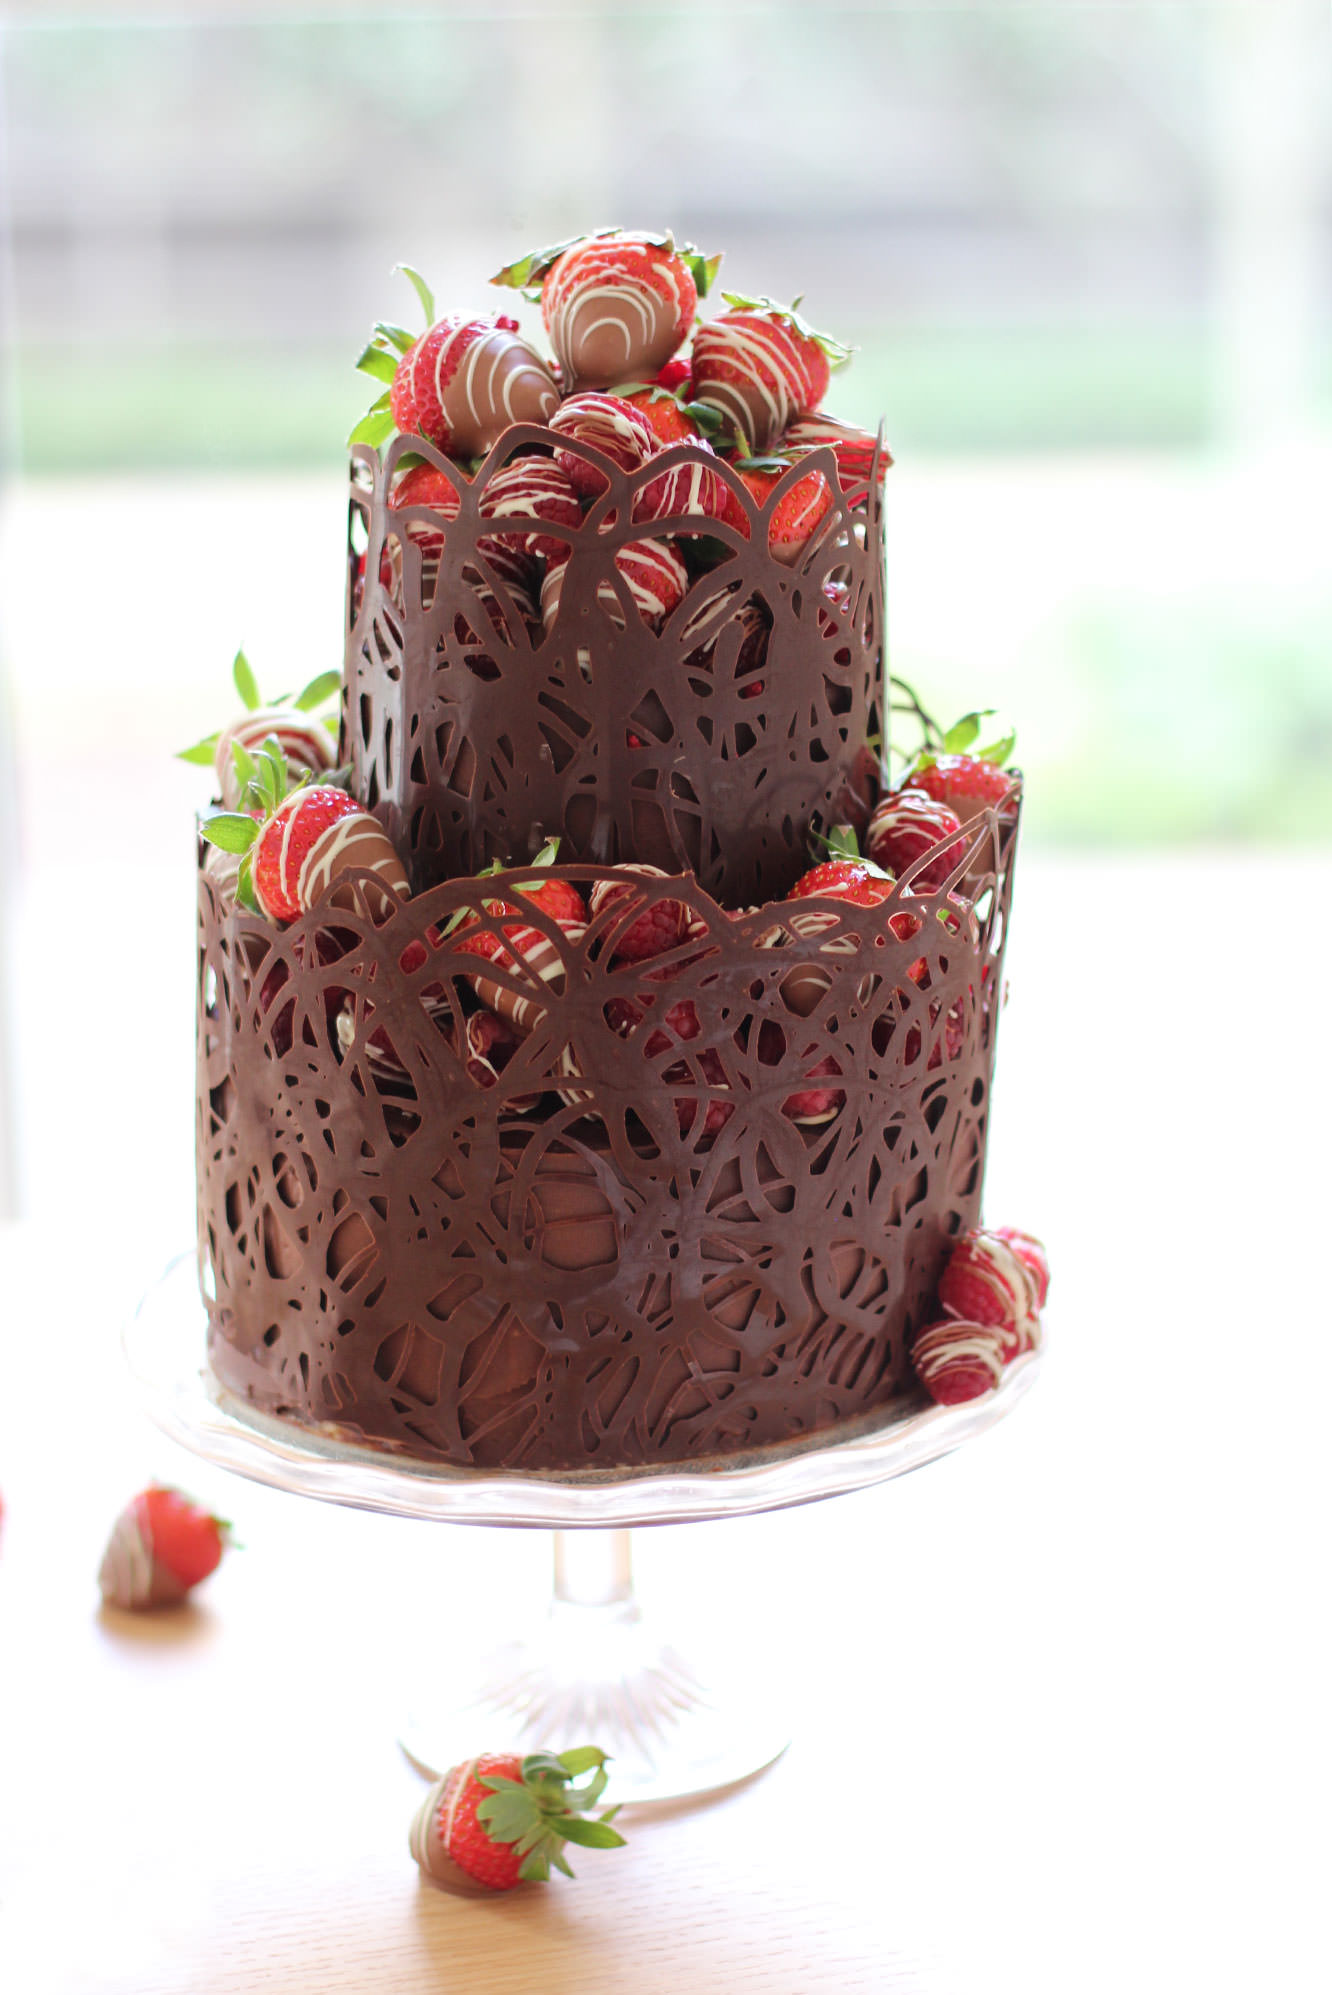
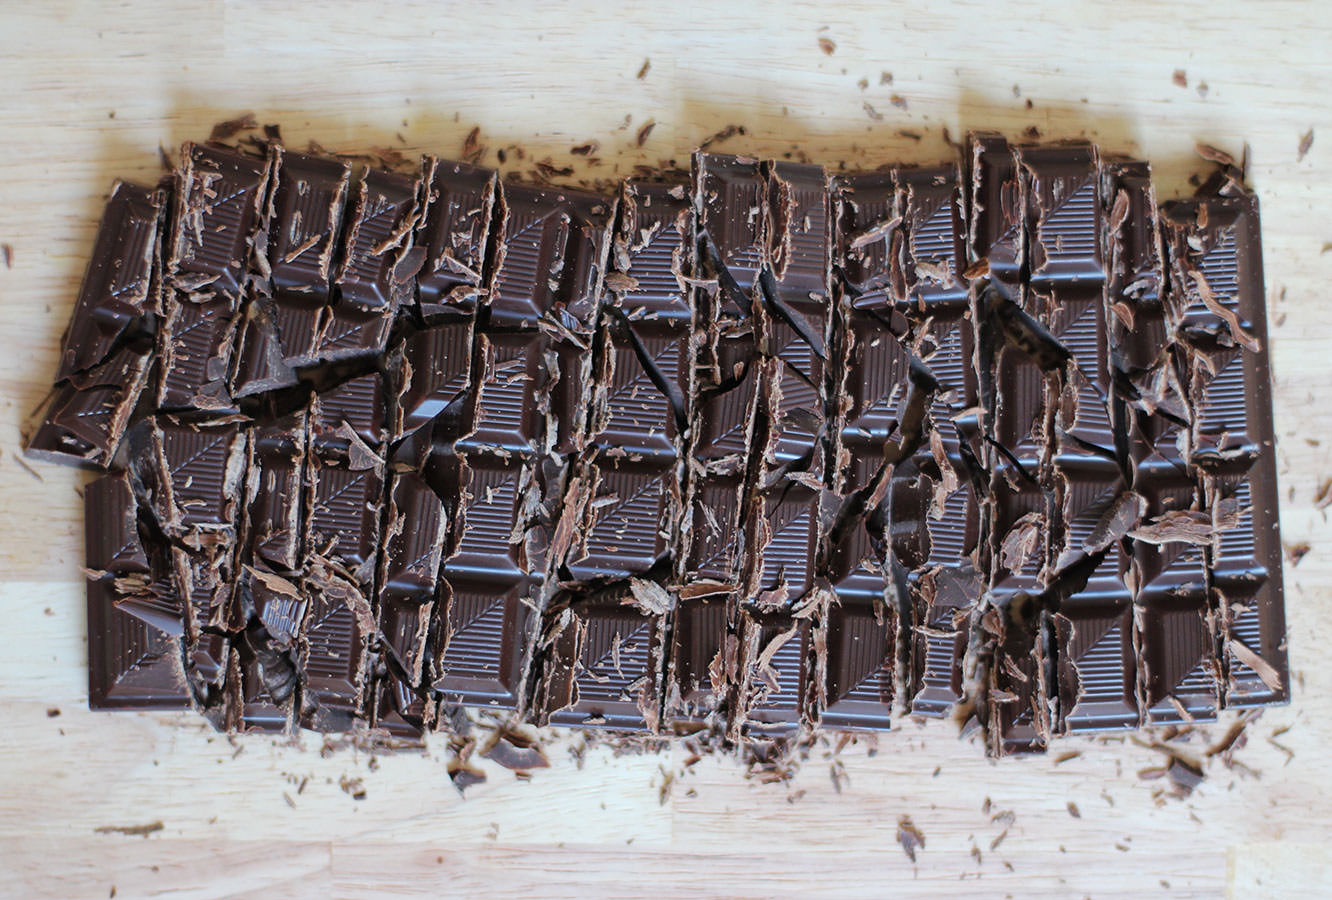
A couple of weeks ago one of my favourite colleagues had a special birthday, so for a special birthday we needed a special cake.
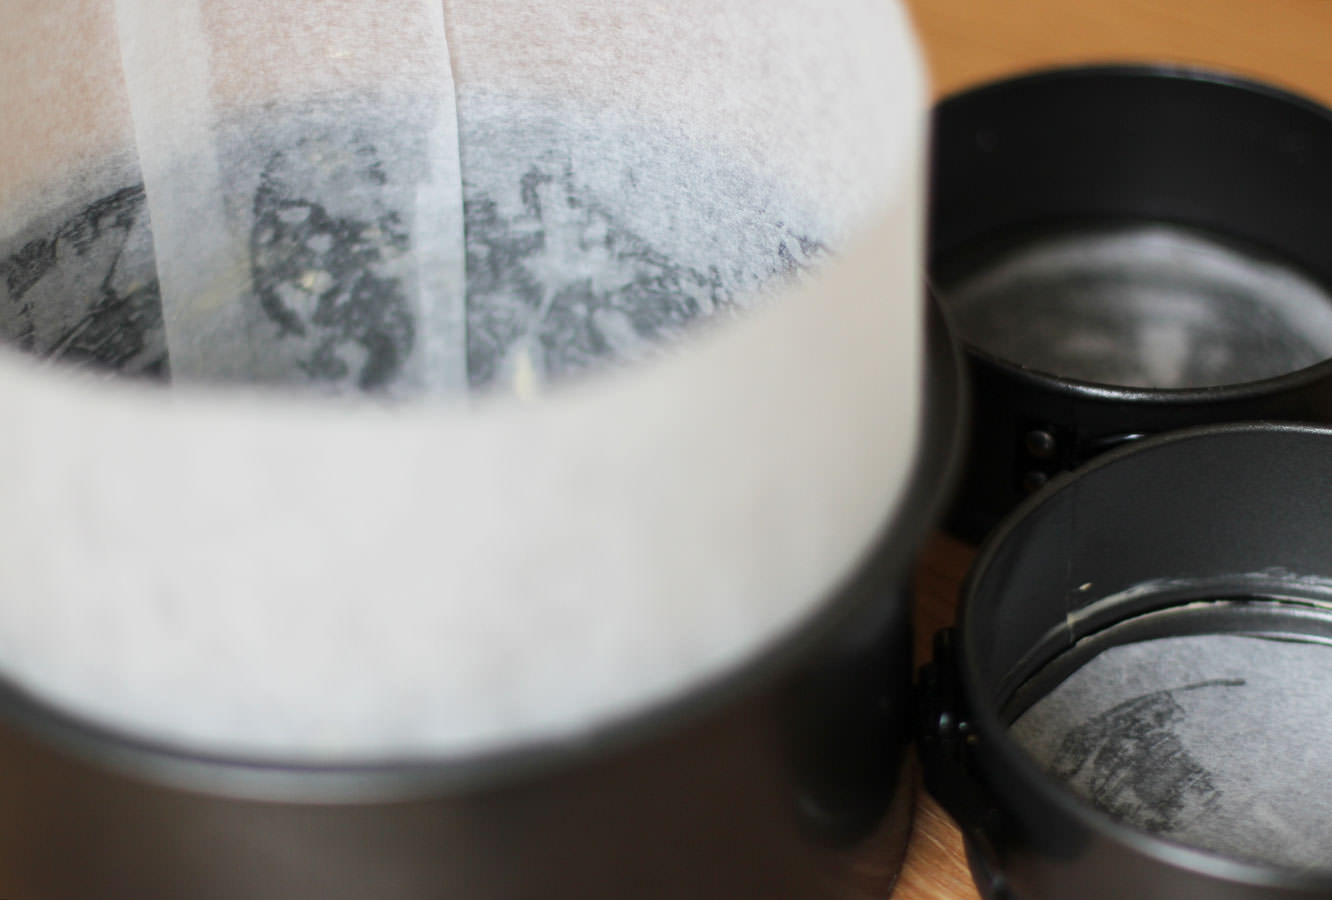
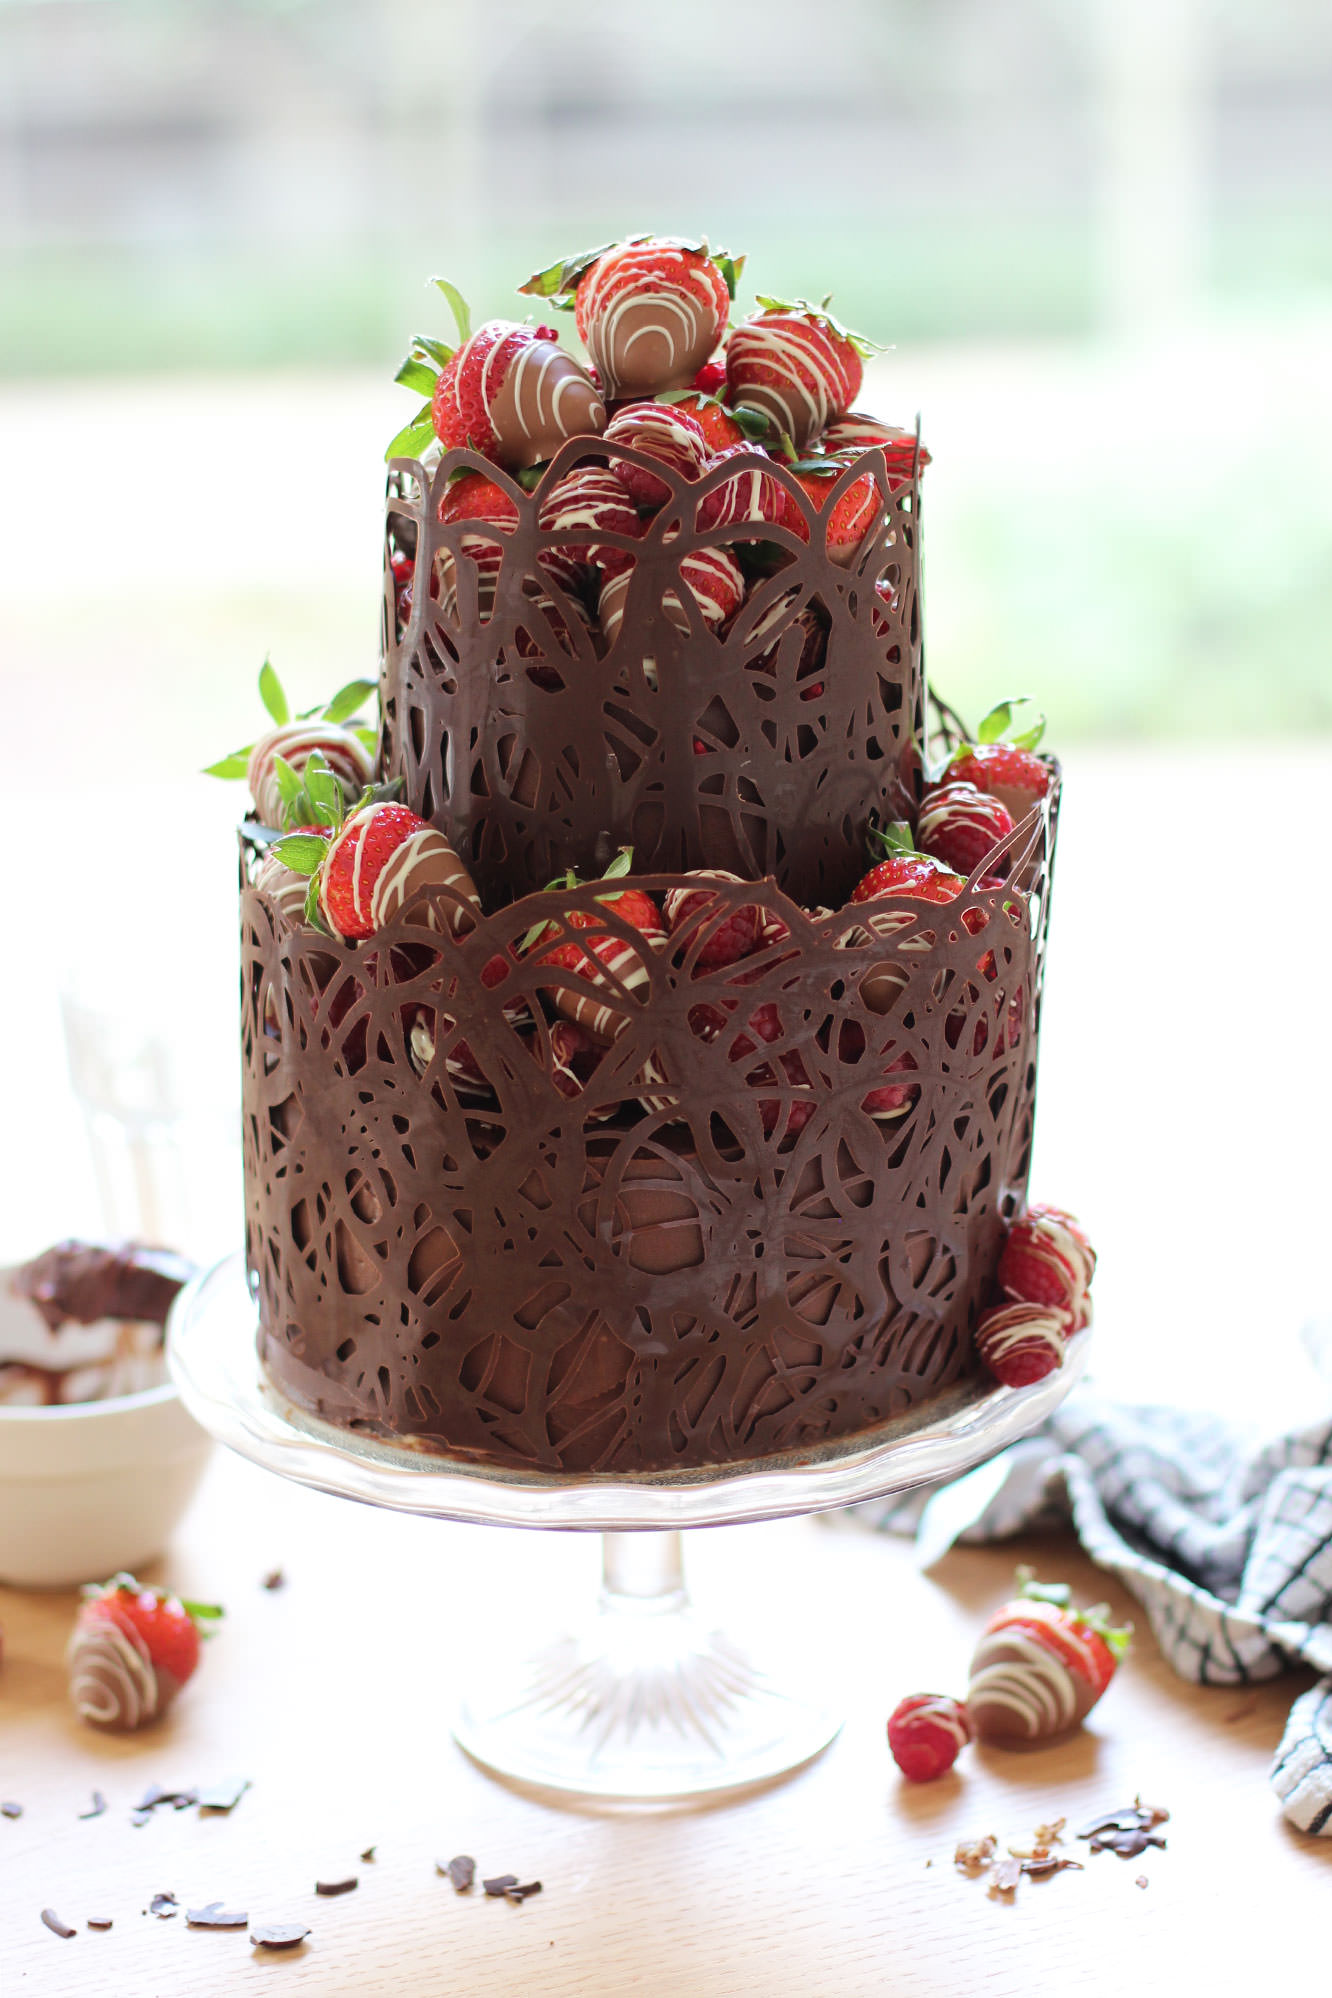
I had only attempted one two tier cake before and had never made the chocolate collar you’ll see below. Sure this cake was a bit more effort than your average victoria sponge, but if you’ve got a few hours and a bit of patience and determination this is very much possible.
I present to you a full step-by-step recipe for a two tiered chocolate fudge cake with salted caramel buttercream, decorated with a dark chocolate collar and chocolate dipped berries. I just wanted to say that out loud. Look away if you don’t like chocolate. This won’t please you.
Happy birthday Jane!
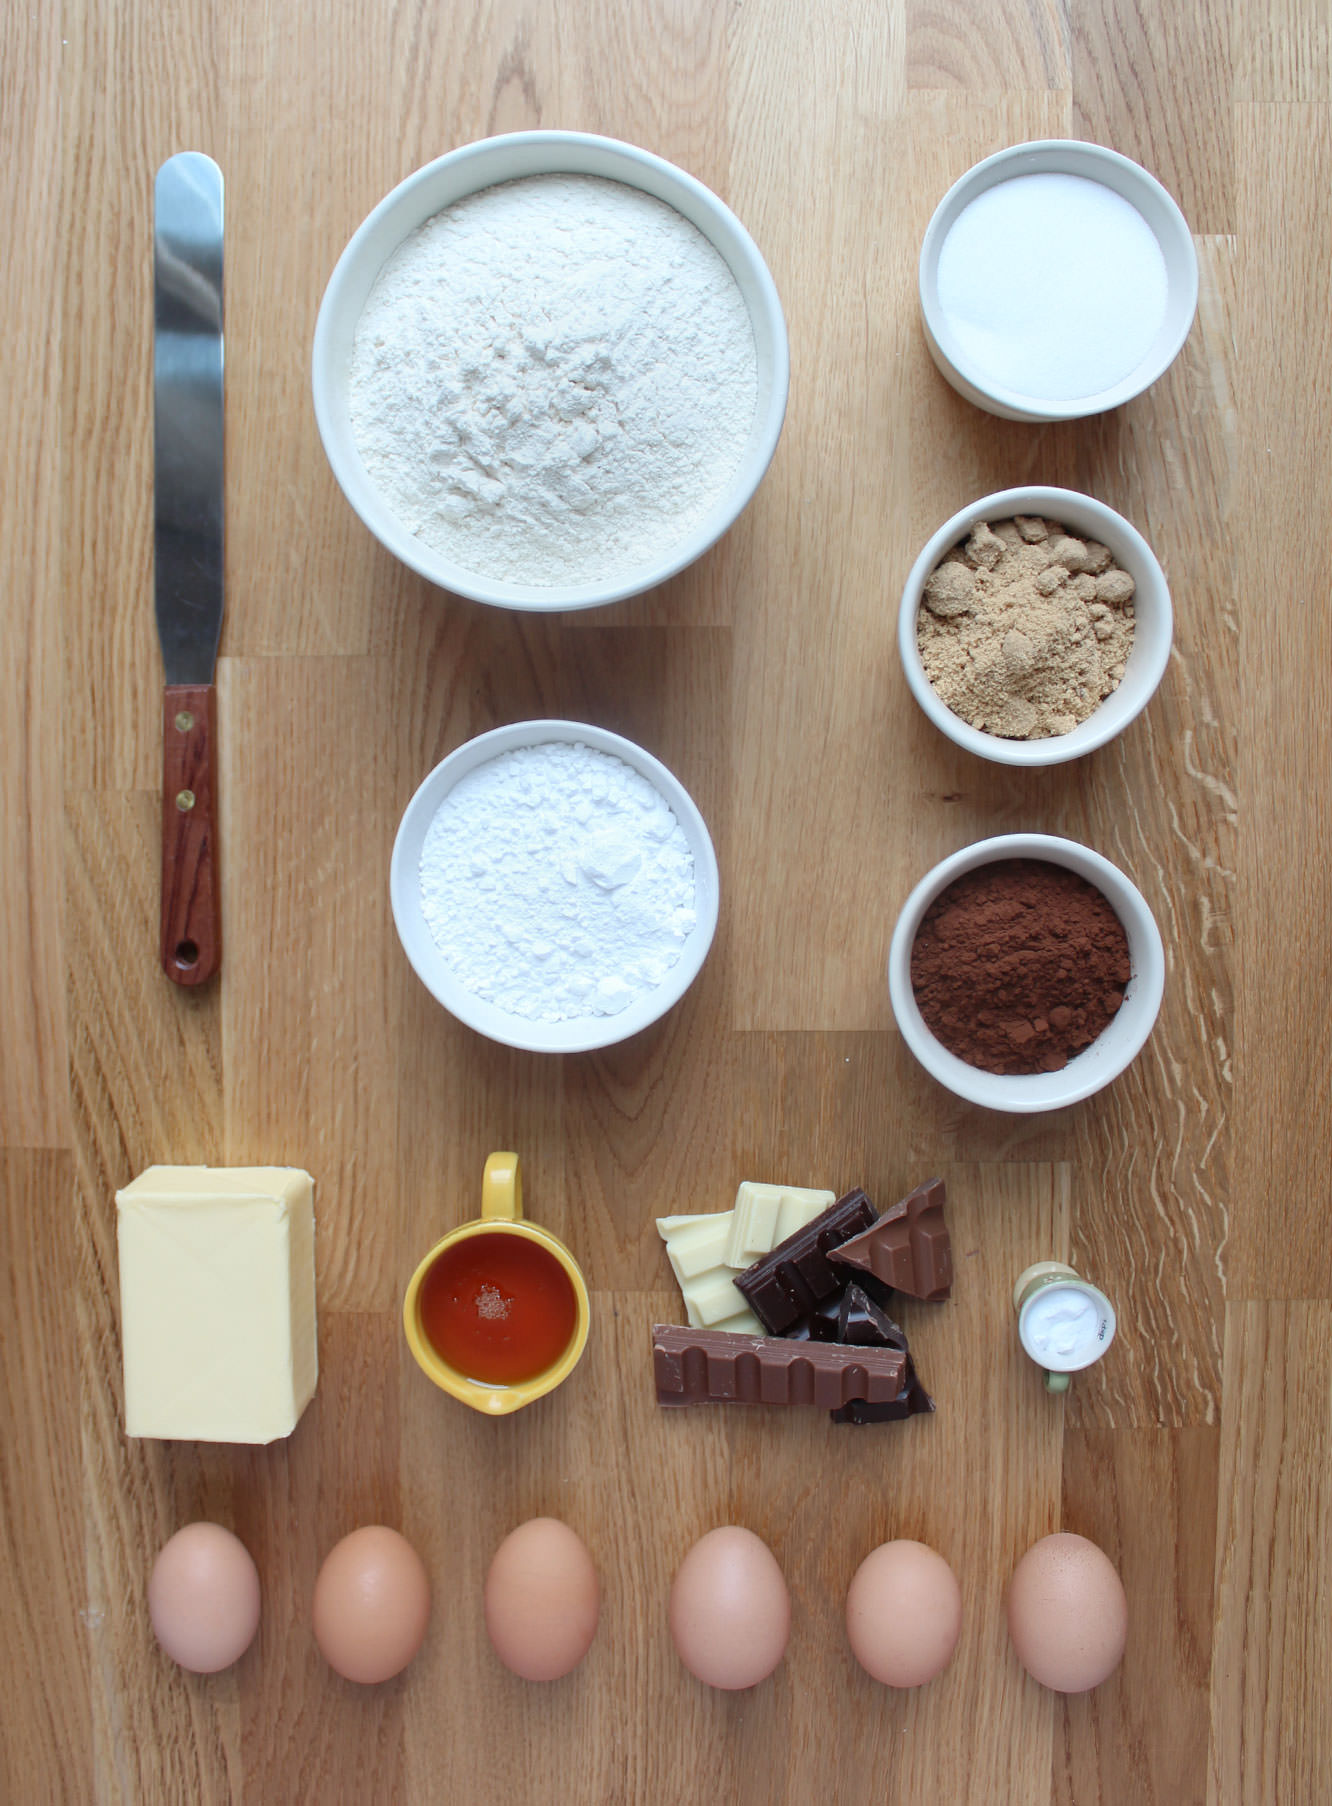
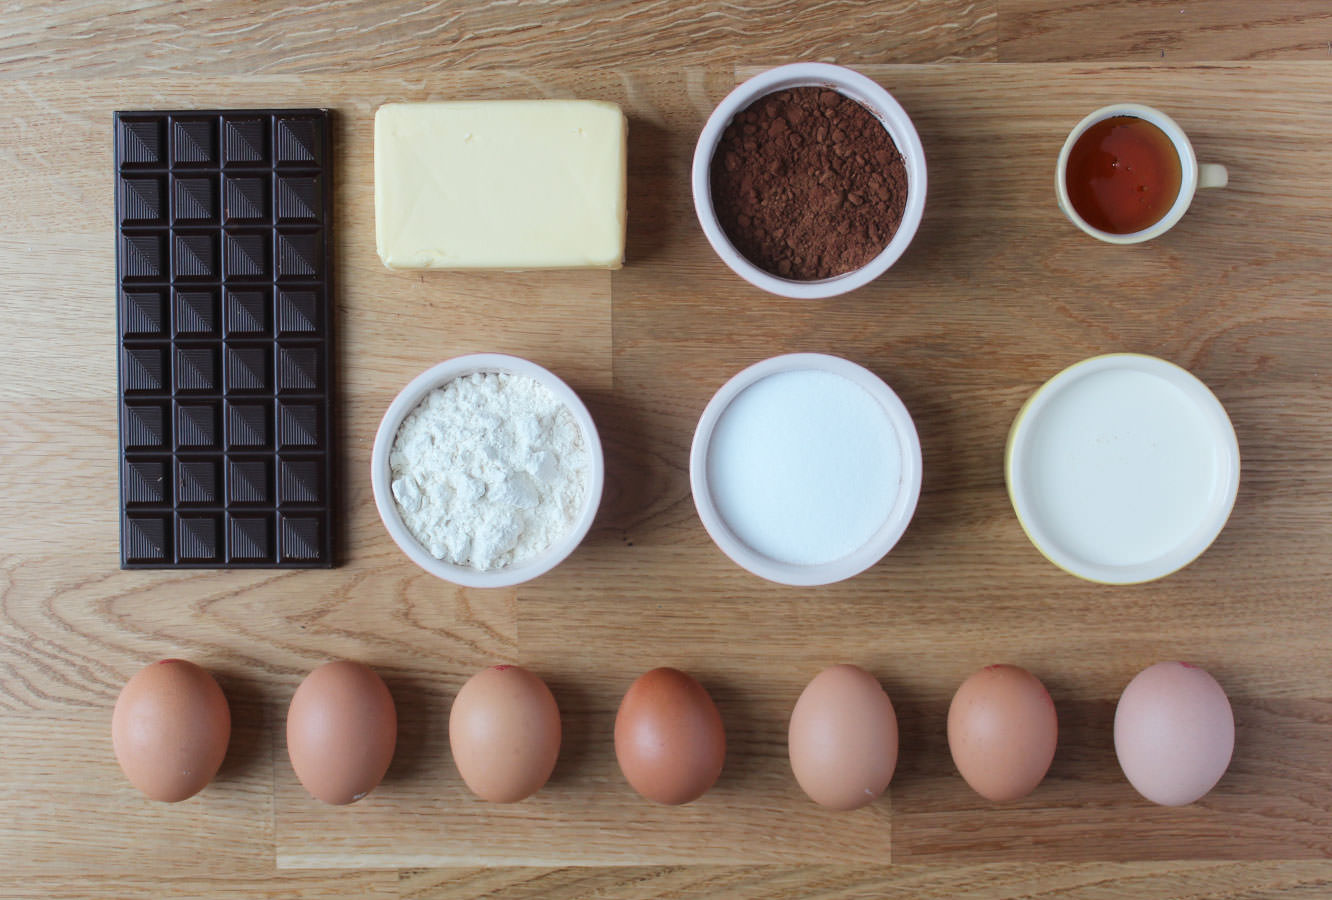
You will need
For the cake:
380g/13.5 oz caster sugar
380g/13.5 oz unsalted butter or margarine (I use stork)
325g/11.5 oz self raising flour
6 eggs
55g/2 oz cocoa powder
1 1/2 tsp bicarbonate of soda
For the salted caramel buttercream:
400g/14 oz icing sugar
250g/9 oz butter
80g/3 oz soft brown sugar
100ml/3.5 fl oz double cream
2 tbsp golden syrup
2 tsp salt
For the chocolate fudge icing:
225g/8 oz unsalted butter
200g/7 oz plain chocolate
100g/3.5 oz milk chocolate
2 tbsp golden syrup
200ml/6.5 fl oz double cream
For the decorations:
1 packet strawberries (sorry I didn’t look at weight)
2 packets of raspberries (about 500g)
200g/7 oz plain chocolate
200g/7 oz milk chocolate
100g/3.5 oz white chocolate
(for the chocolate amounts are the best approximates I can make, I bought a LOT of chocolate. I strongly recommend Sainbury’s Belgian cooking chocolate if you are in the UK, definitely do not buy that scot block stuff)
Other:
Cake tin bottom tier – 1 x 7 inch (3.5 inches deep)
Cake tin top tier – 2 x 5 inch (1.5 inches deep)
Cake boards – 1 x 8 inch, 1 x 5 inch
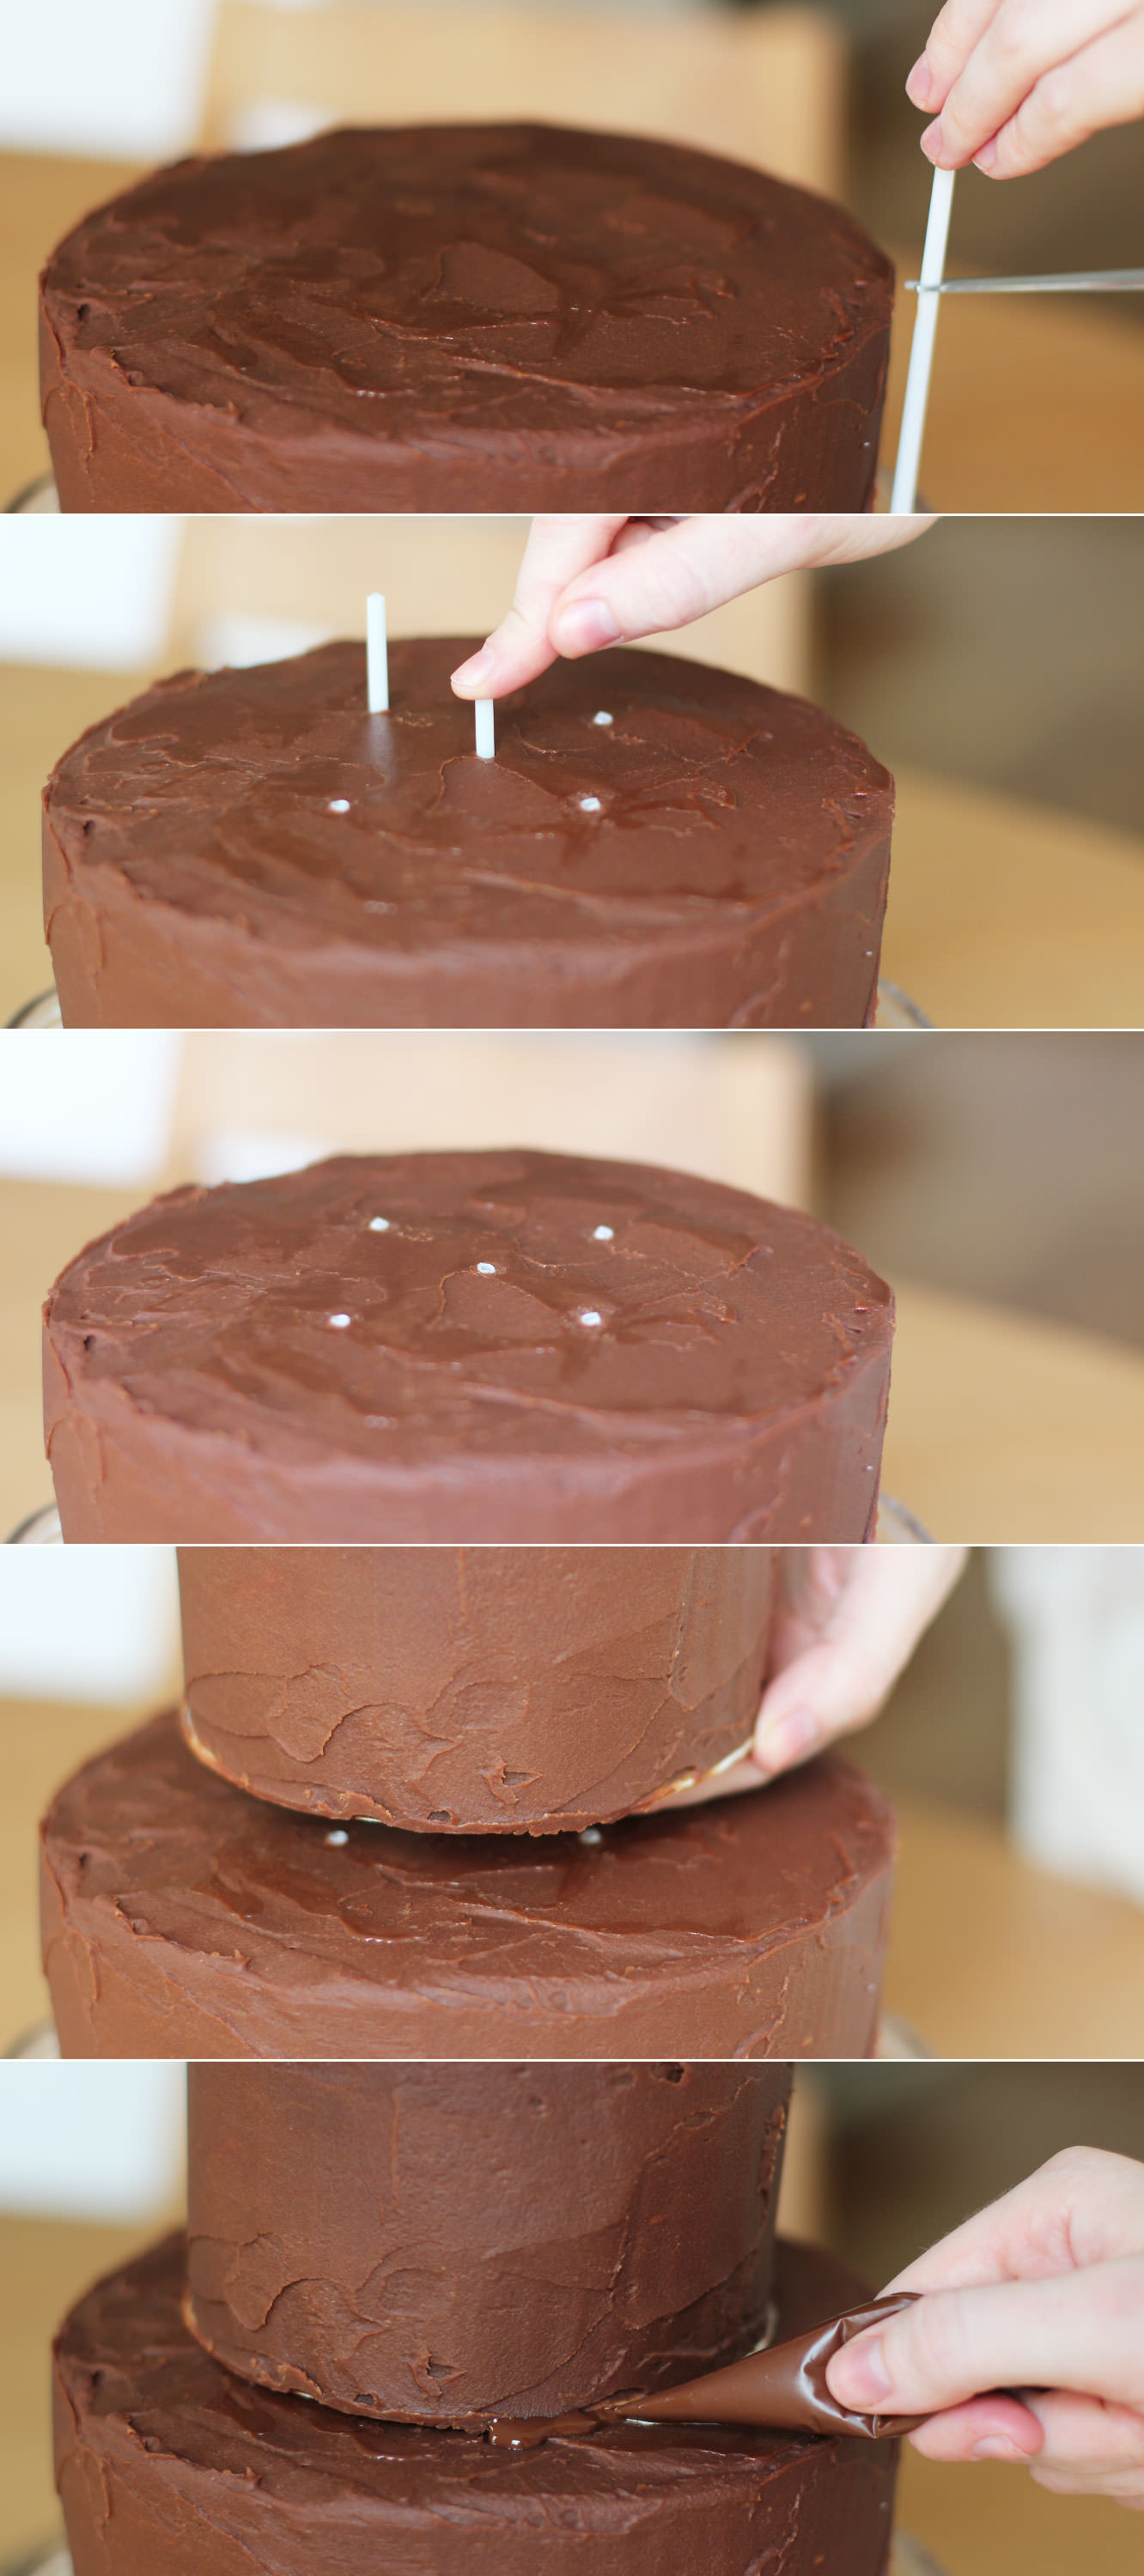
Sticks/straws for support. I used cake pop sticks, but wooden dowling or special cake making supports would be fine. Make sure they are at least 4 inches so you can cut them to size.
Palette knife
Sugar thermometer (not 100% essential but I recommend tempering the chocolate)
Cellophane
Piping bags
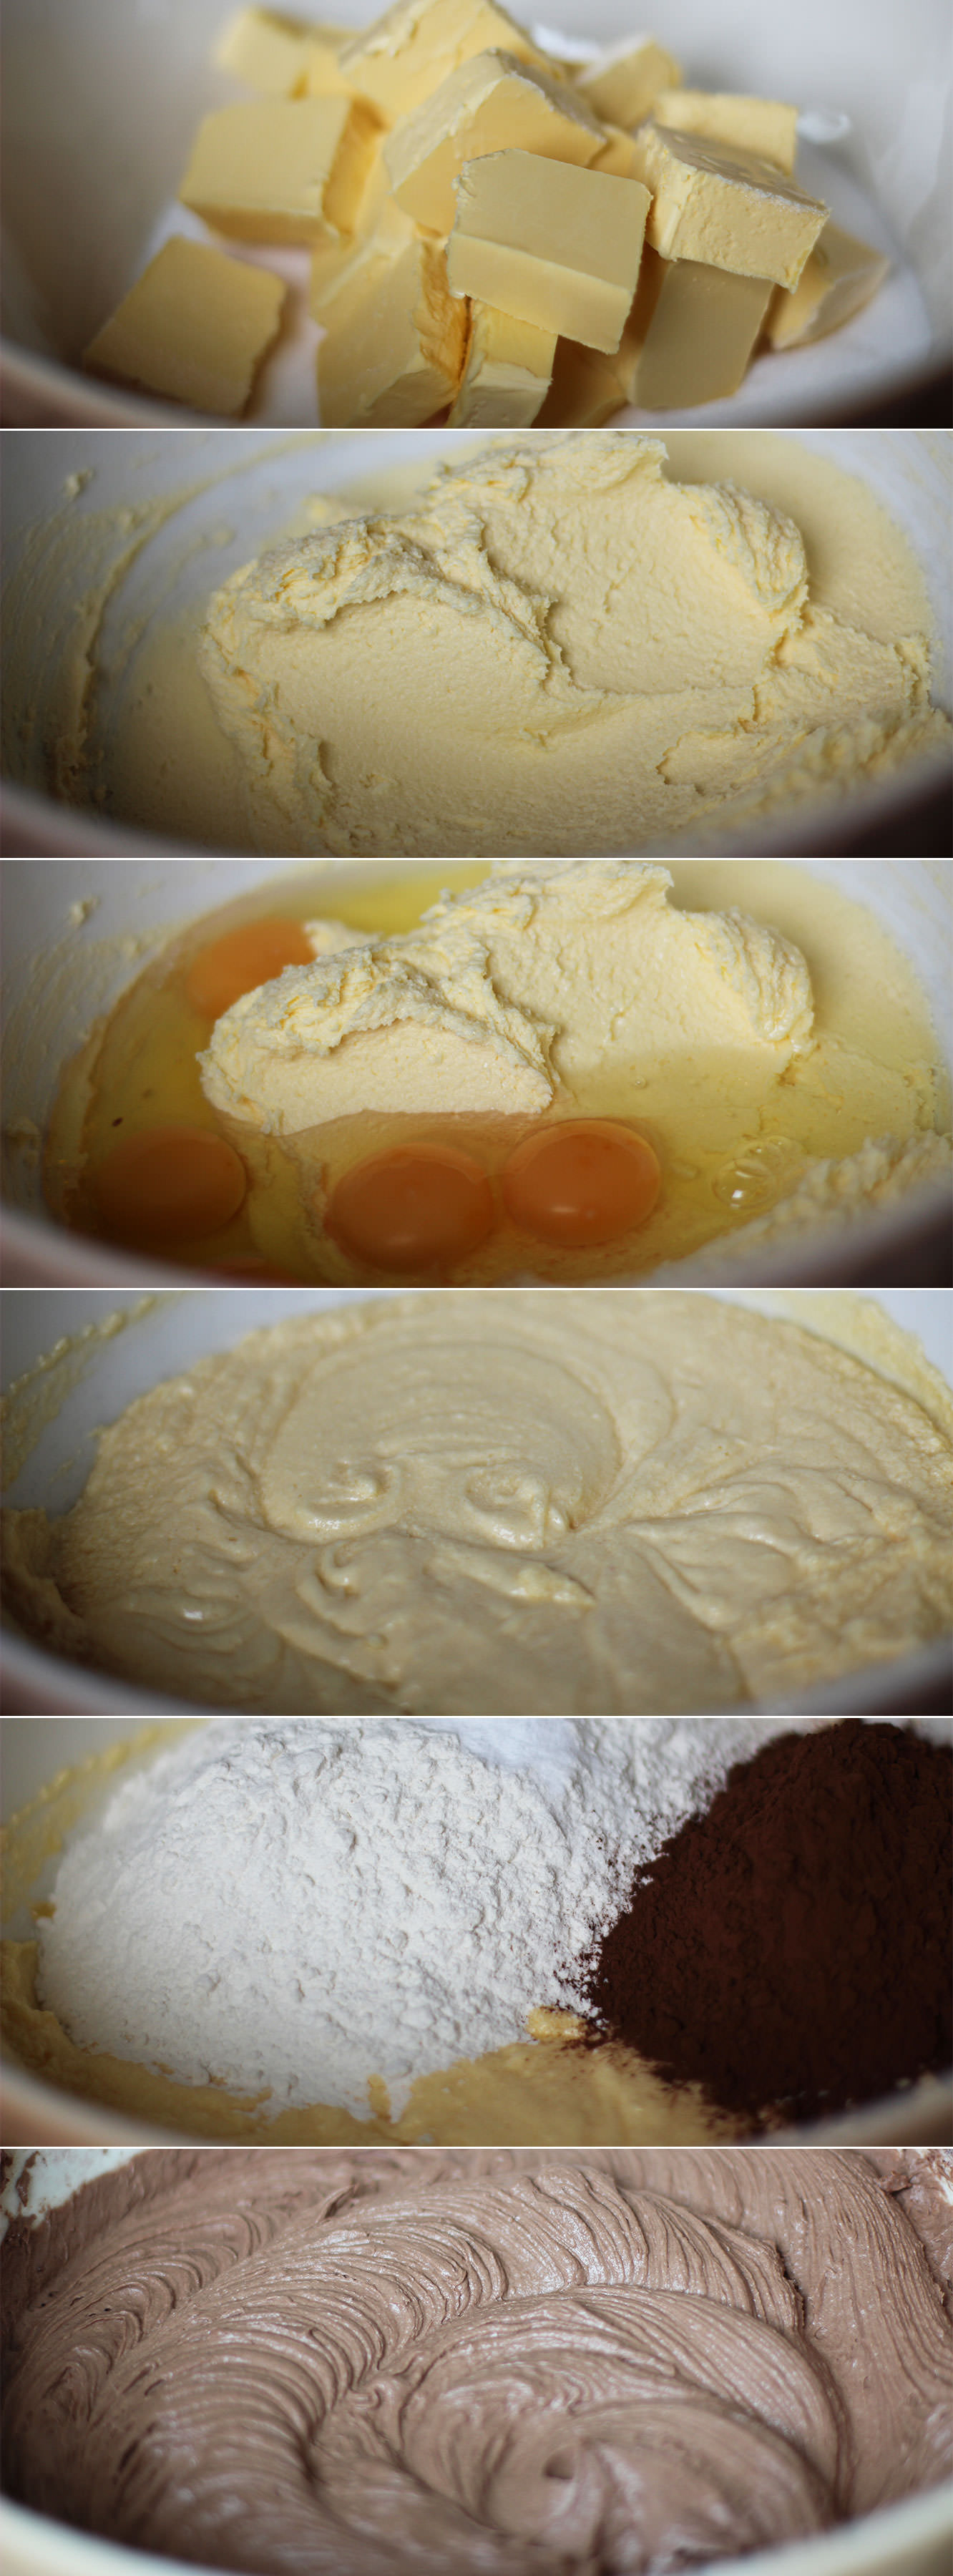
Step one
Grease and line the tins.
Note how I created a bit of a collar on the larger tin from greaseproof. This is to help stop the sides of the cake catching while the inside bakes as it’s essentially double the thickness.
Step two
Whisk together the butter and sugar with an electric whisk, or a wooden spoon and some elbow grease, until smooth.
I used a block of stork for this, but I prefer the softer version you can get in a tub, you don’t have to wait for it to come to room temperature first that way. Margarine works just fine for cakes, I think it makes them fluffier.
You might want to use a tea towel over the bowl to avoid everything getting covered in sugar and butter.
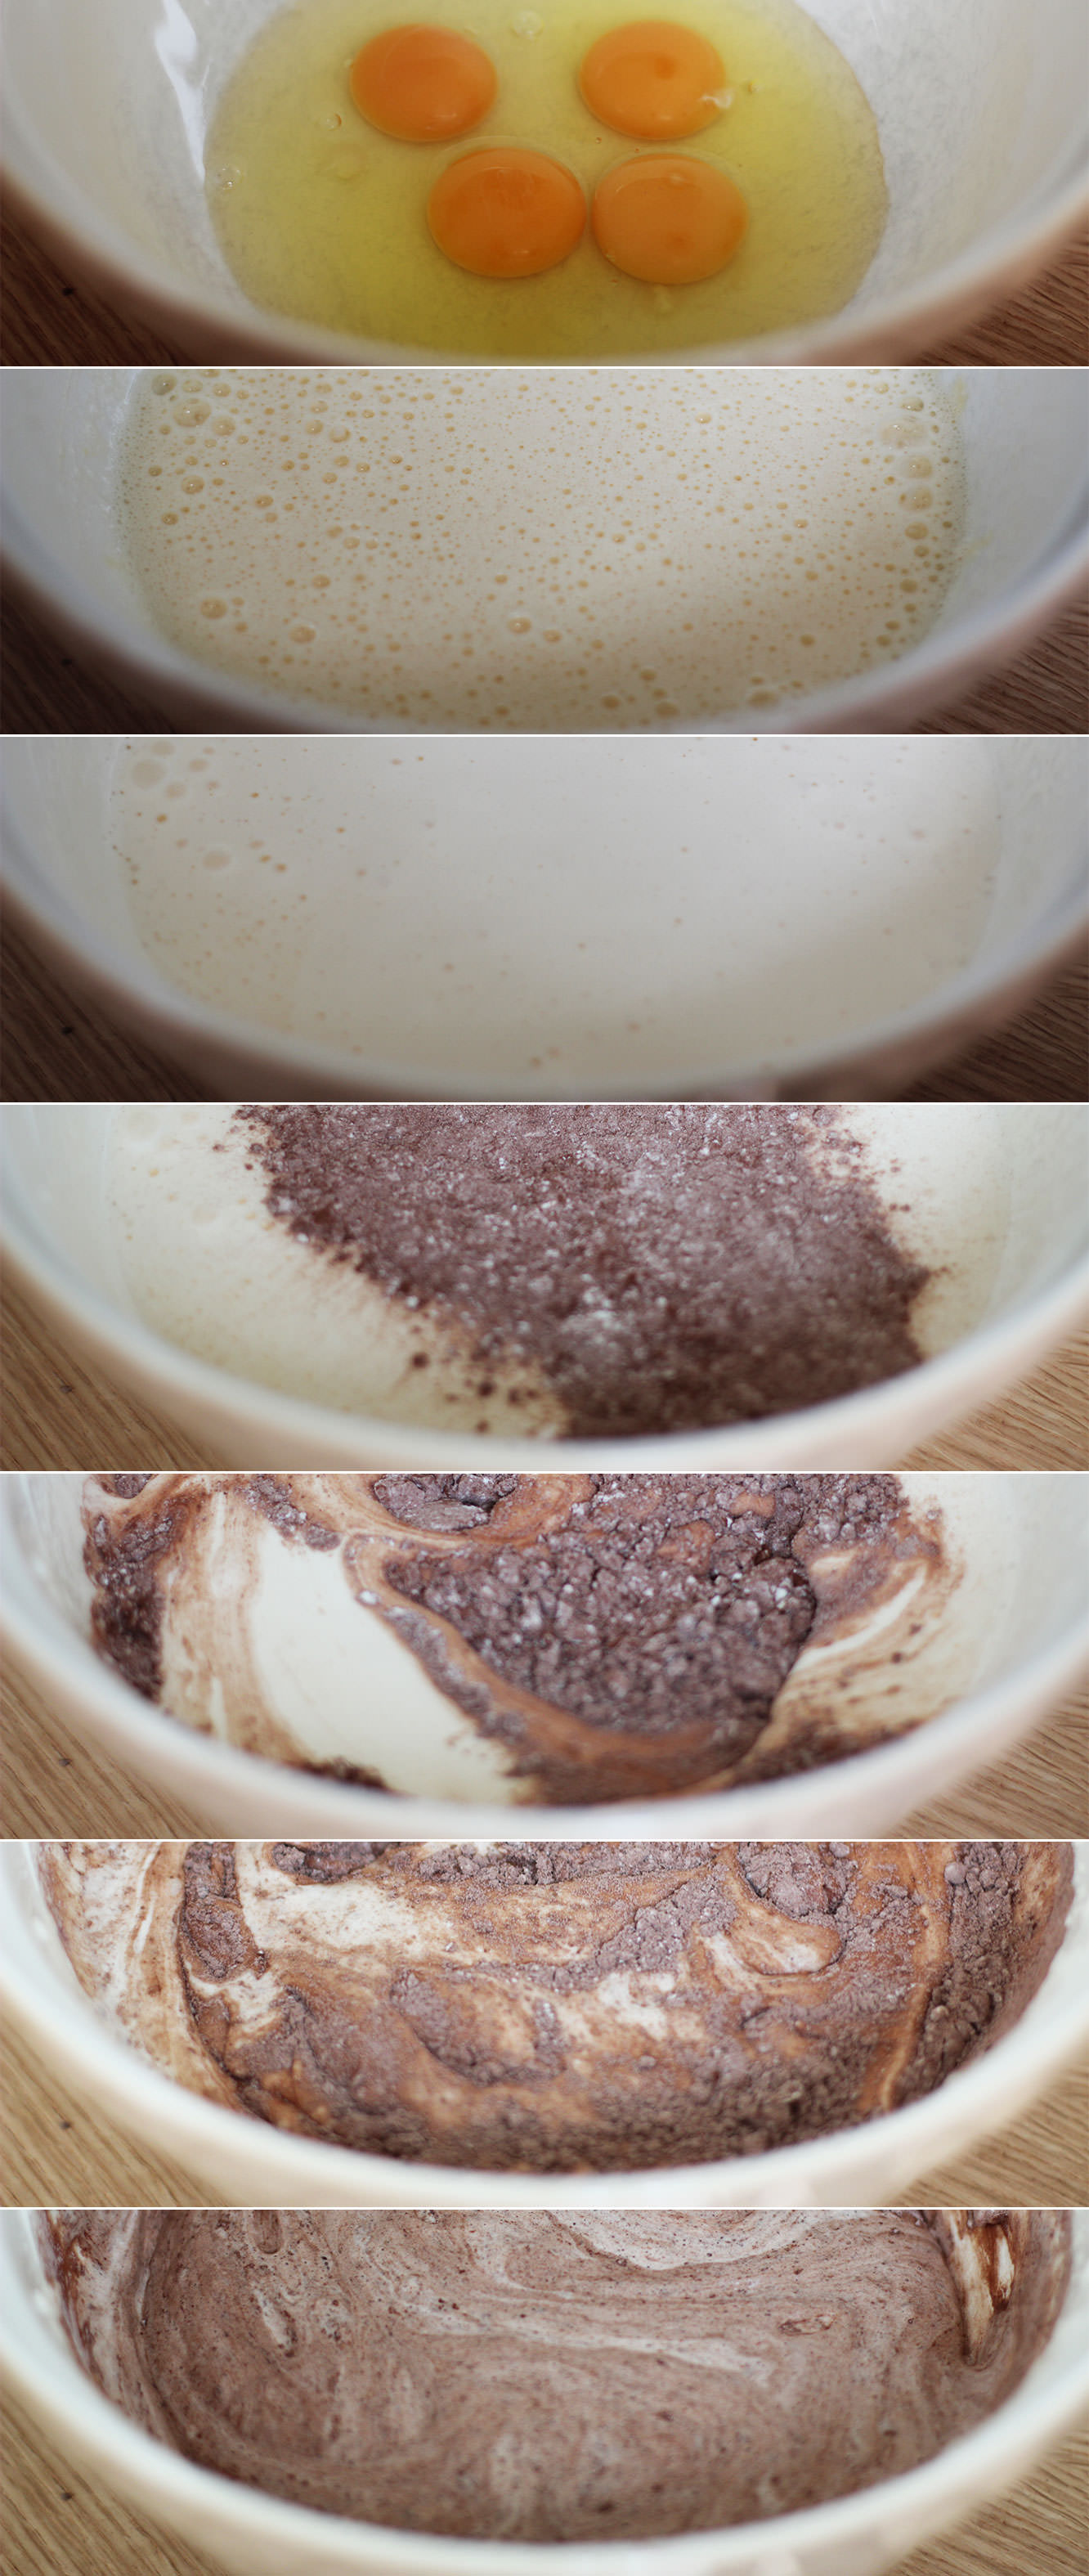
Step three
Add all the eggs and whisk until combined.
Step four
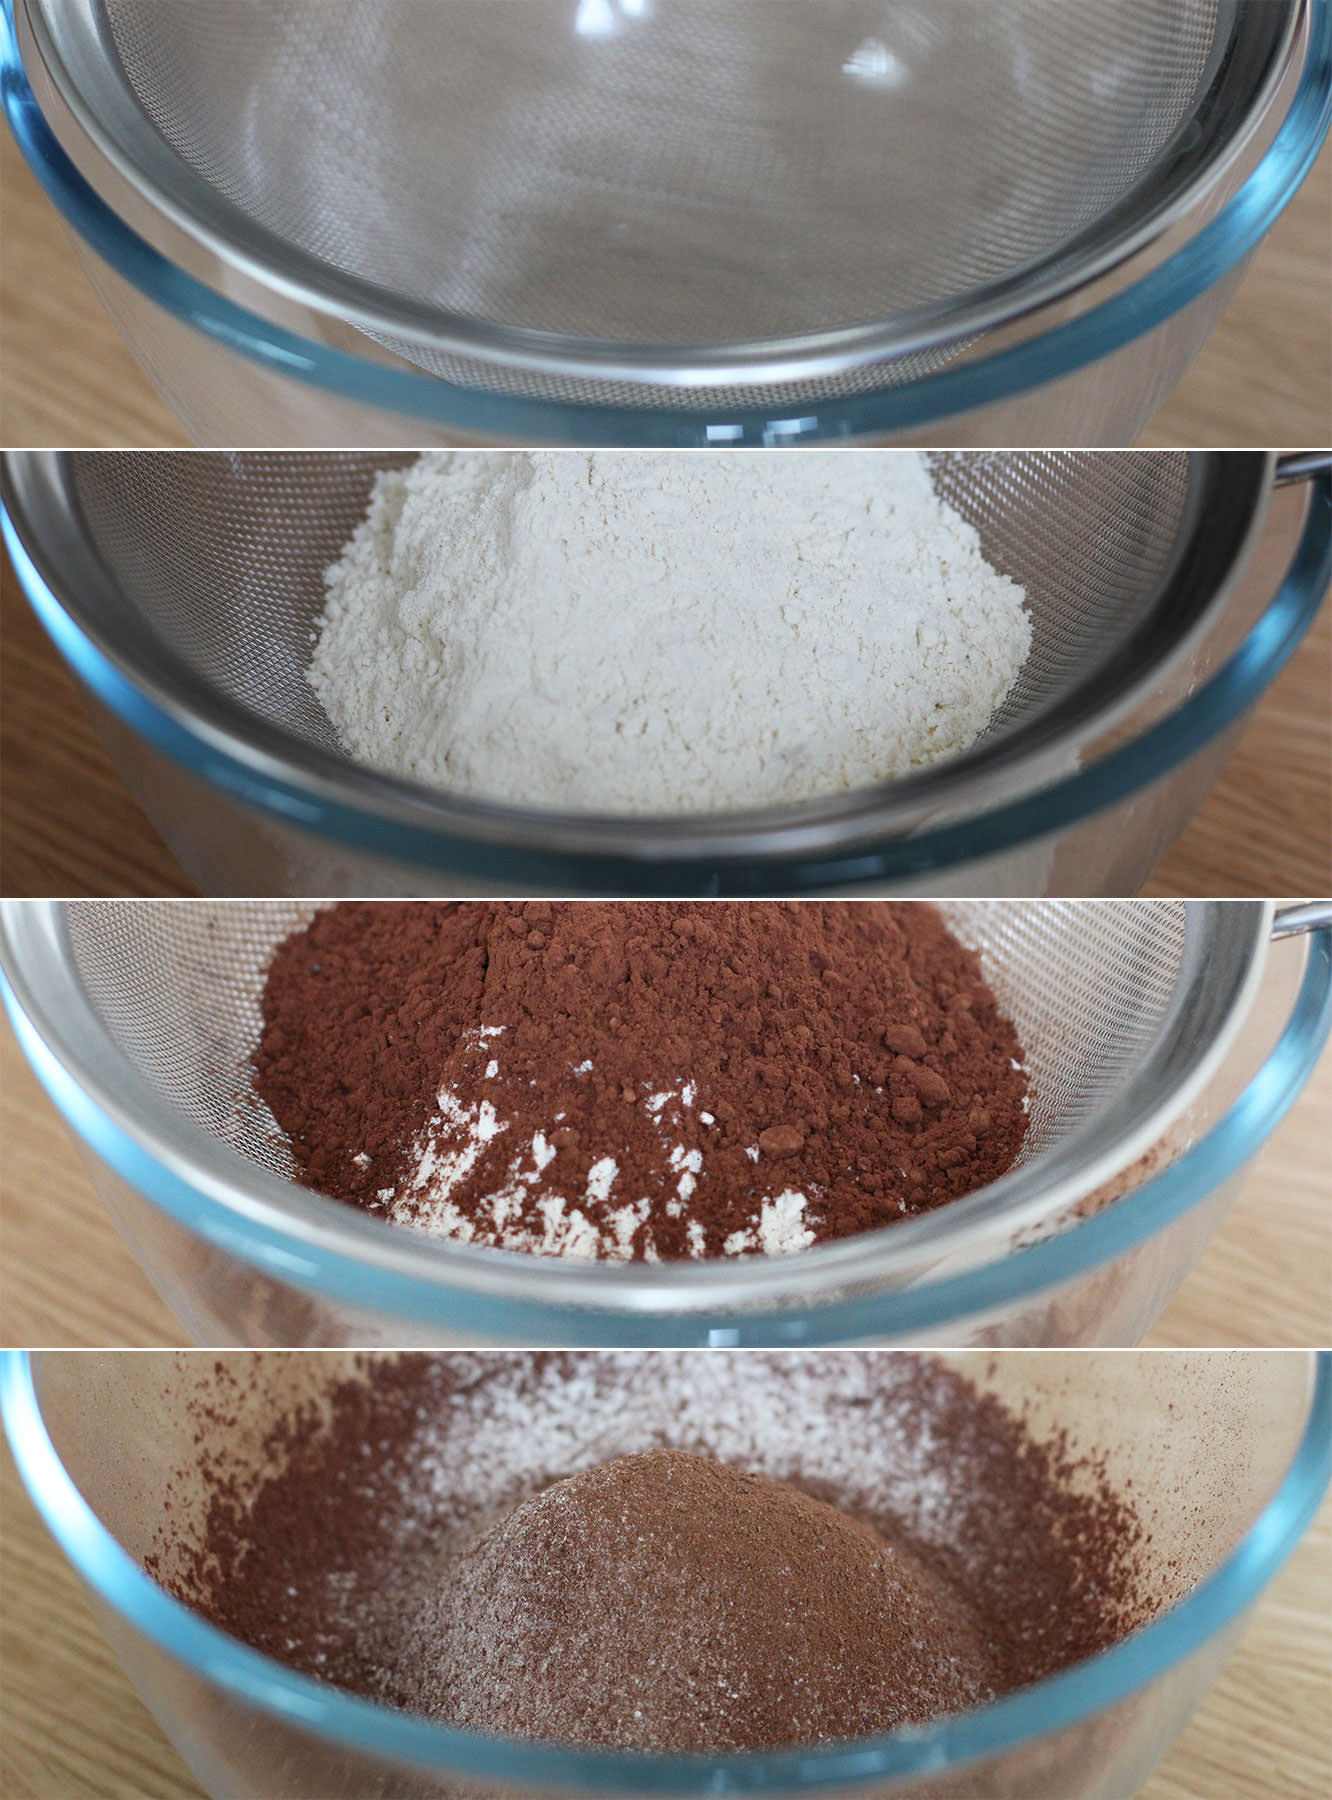
In go the flour, bicarbonate of soda and cocoa powder.
Stir gently to start mixing the dry ingredients in first before turning the whisk on, you don’t want to choke on flour, that’s not a good way to go. It also means you will never get to eat this cake.
Step five
Divide into the tins.
Bake in the oven on 180C/350F/gas mark 4. This is where it’s a little tricky as the little cakes need a lot less time but you don’t want to open the oven much or your big cake will sink.
I say give the big cake about 30 minutes on its own, and then opening the door as little as possible add the smaller ones for the next 20 minutes. You will then need to test the cakes by sticking a sharp knife, or a cake tester if you have one. If this comes out clean (or with the odd crumb) you’re all good. If not give them another 5-10 minutes.
Step six
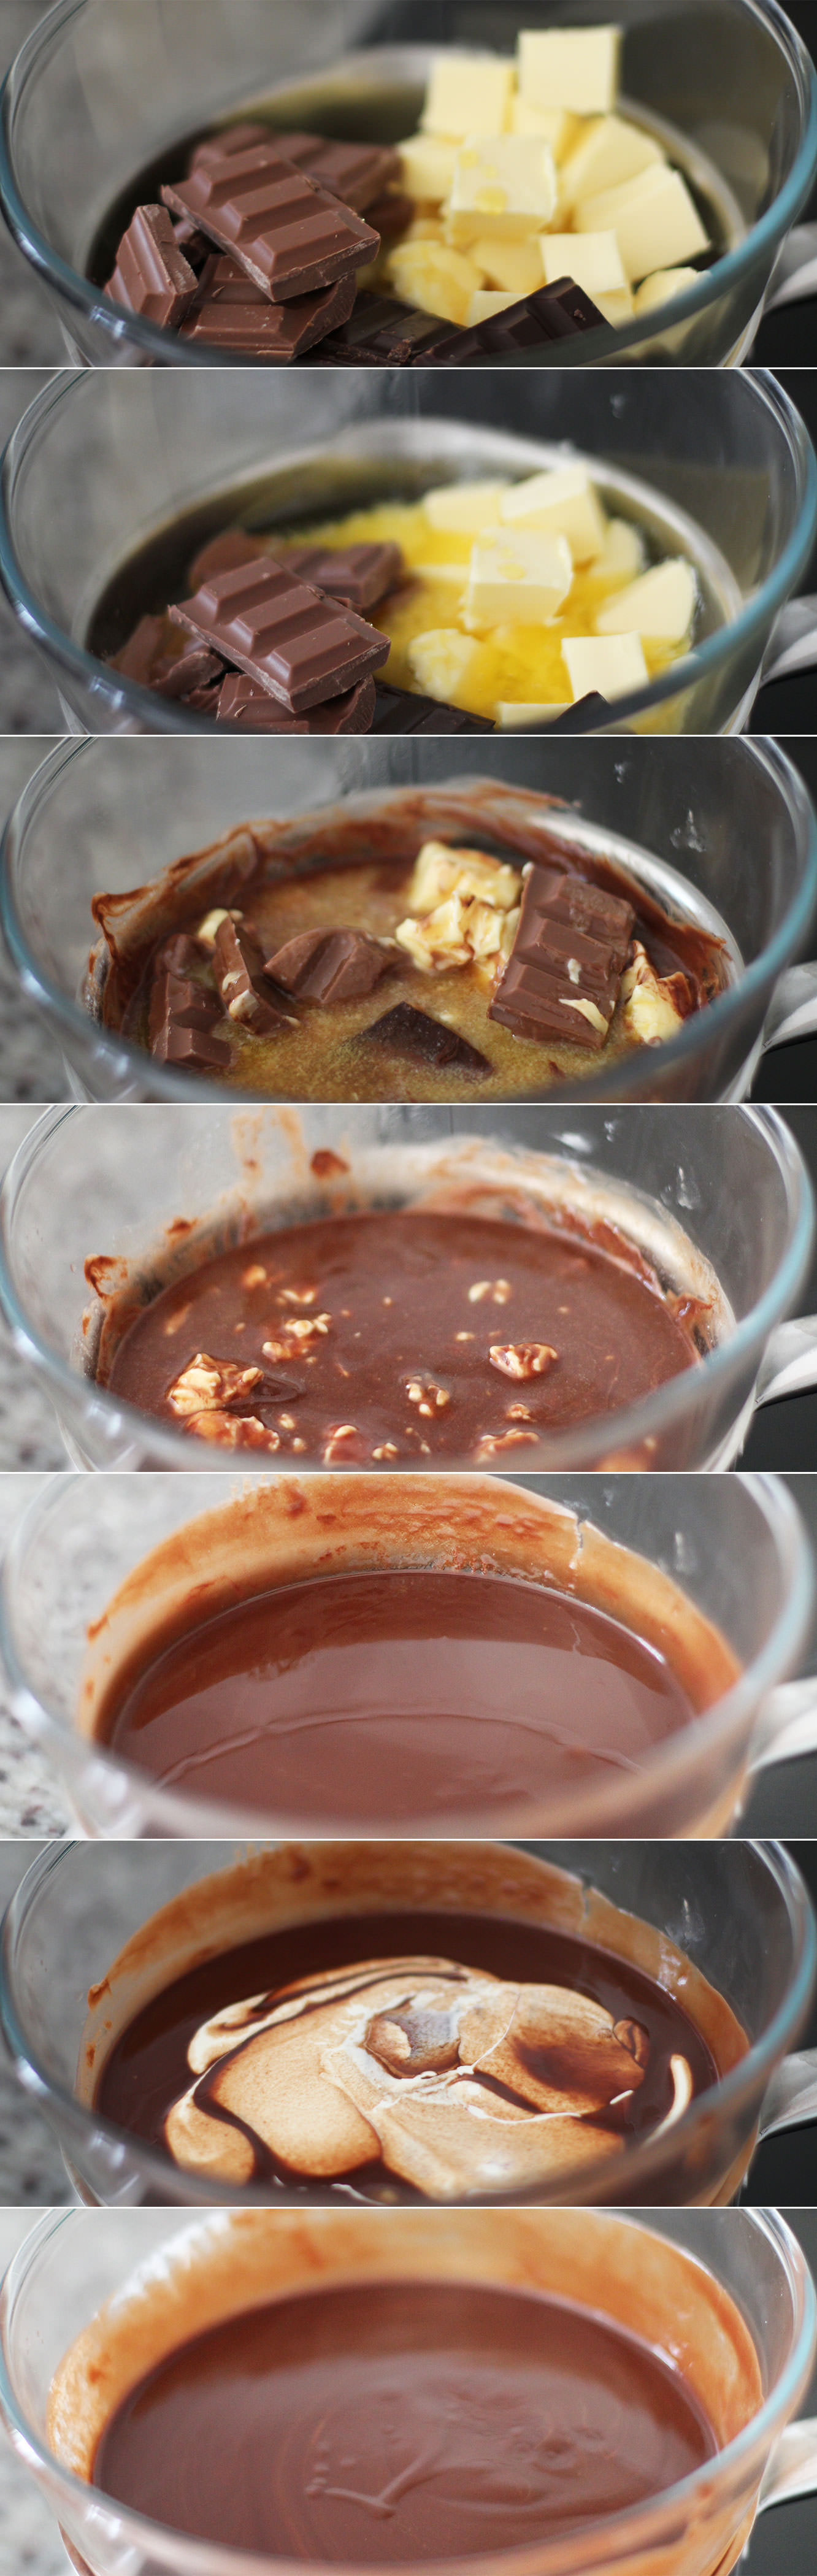
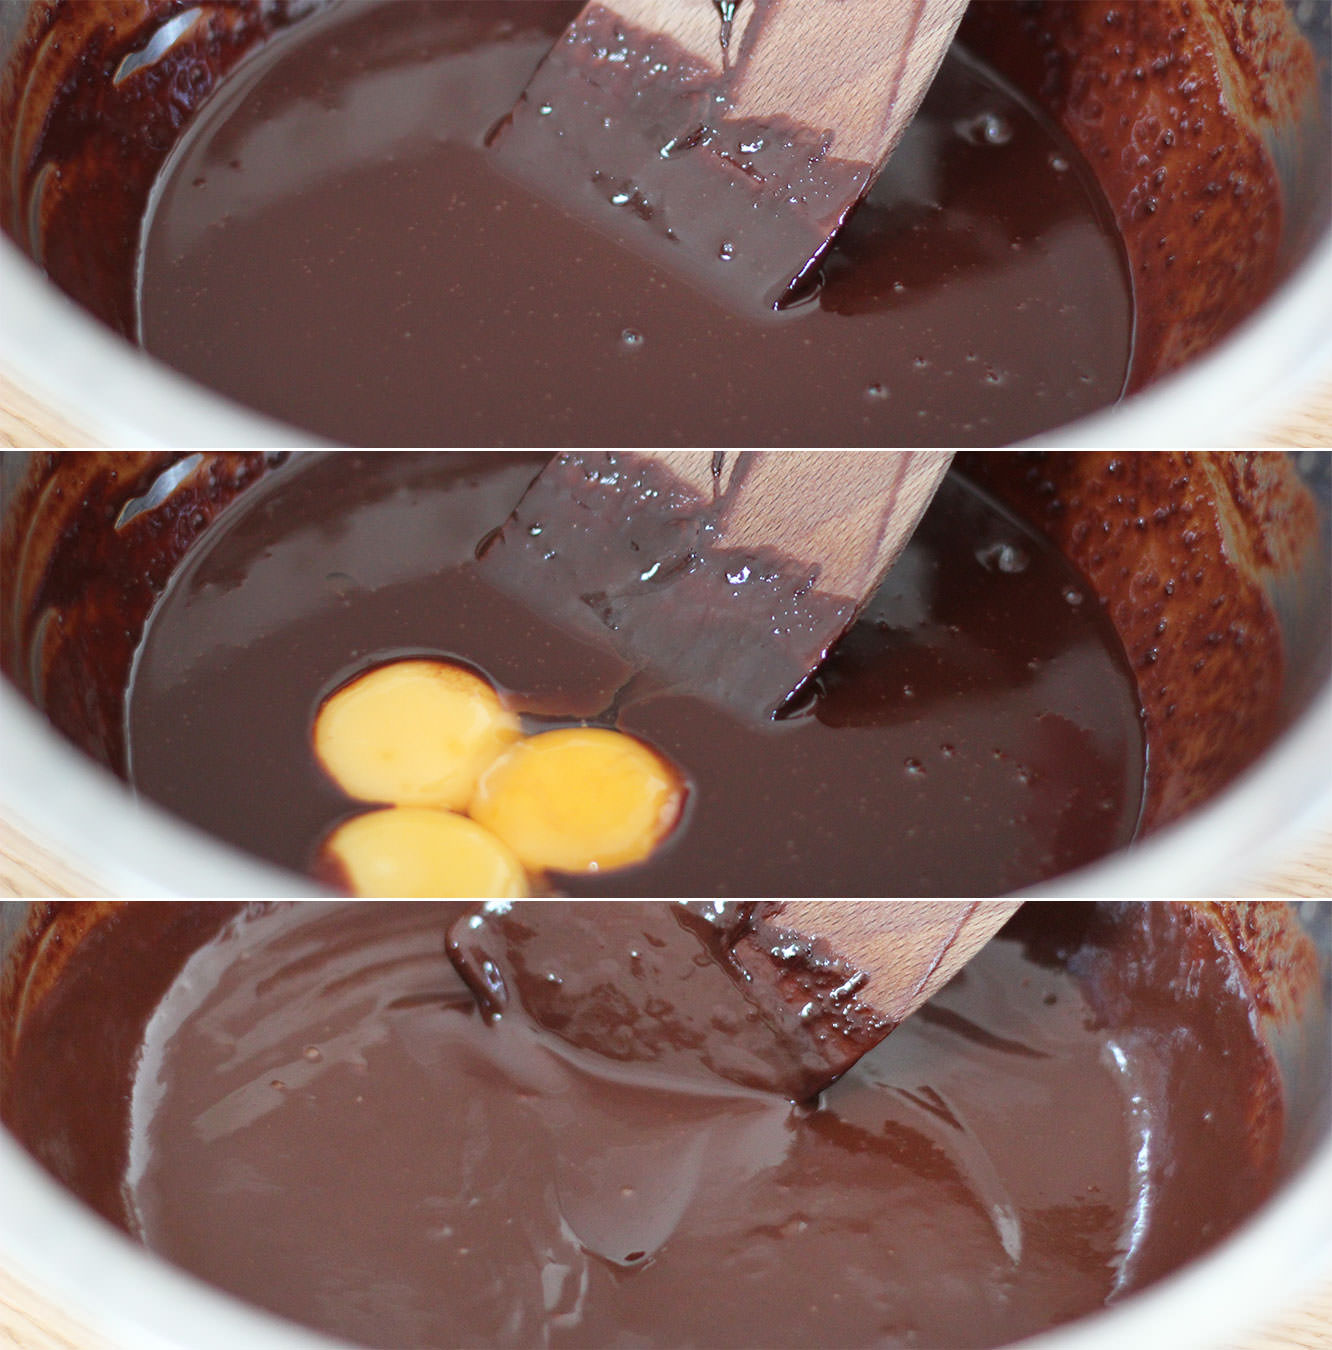
While the cakes are in the oven make the icing as both, but particularly the chocolate, need time to cool.
Place a heatproof bowl over a pan of barely simmering water. Add the butter (real butter this time), chocolate and golden syrup. Melt until smooth.
Remove from heat and stir in the cream quickly. Take the bowl off the pan and place somewhere cool and dry.
I don’t really suggest the fridge because you might forget it (like I did) and then you have to wait for it to warm up enough to spread. But that being said, the fridge is a viable option, just keep an eye on it.
Step seven
For the salted caramel buttercream melt together 100g of the butter, the brown sugar, golden syrup and salt. Do this slowly and then bring the heat up to a simmer.
Simmer for 10 minutes. Stir regularly so that it doesn’t catch and burn. Leave to cool down for about half an hour or so.
Step eight
Stir in the 100ml cream and leave to cool further.
Step nine
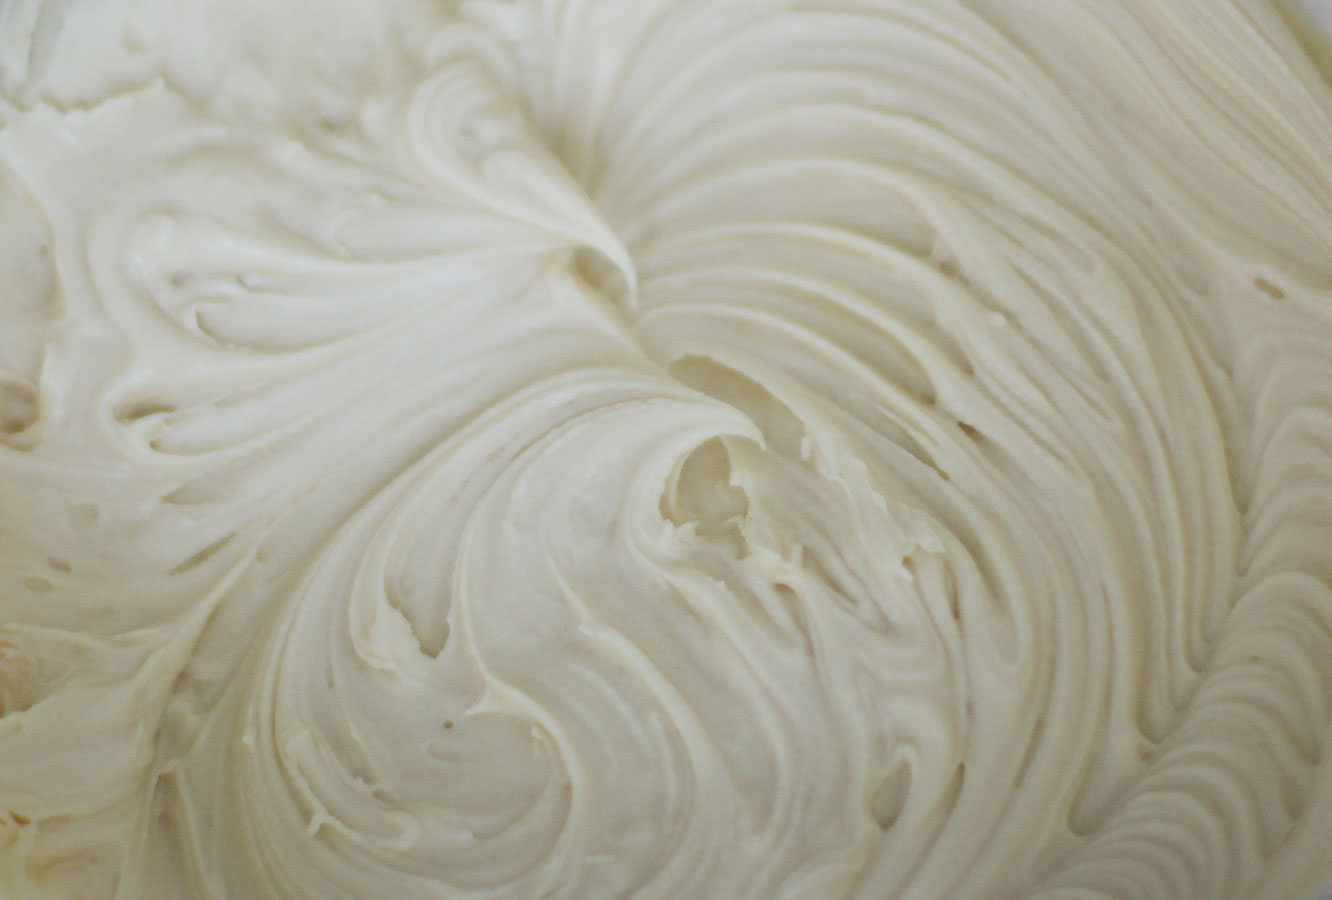
Whisk the icing sugar and 150g of butter together with the salt. Definitely cover the bowl with the tea towel this time. I find if my butter is not quite soft enough it helps to rub it in a bit with clean hands first. There is NOwhere icing sugar won’t go when you use an electric whisk.
Step ten
Add the caramel and whisk again until smooth. Don’t worry if the caramel is still a little warm, just leave your buttercream to cool in the fridge for a bit. But again, don’t forget about it or it won’t be spreadable.
Step eleven
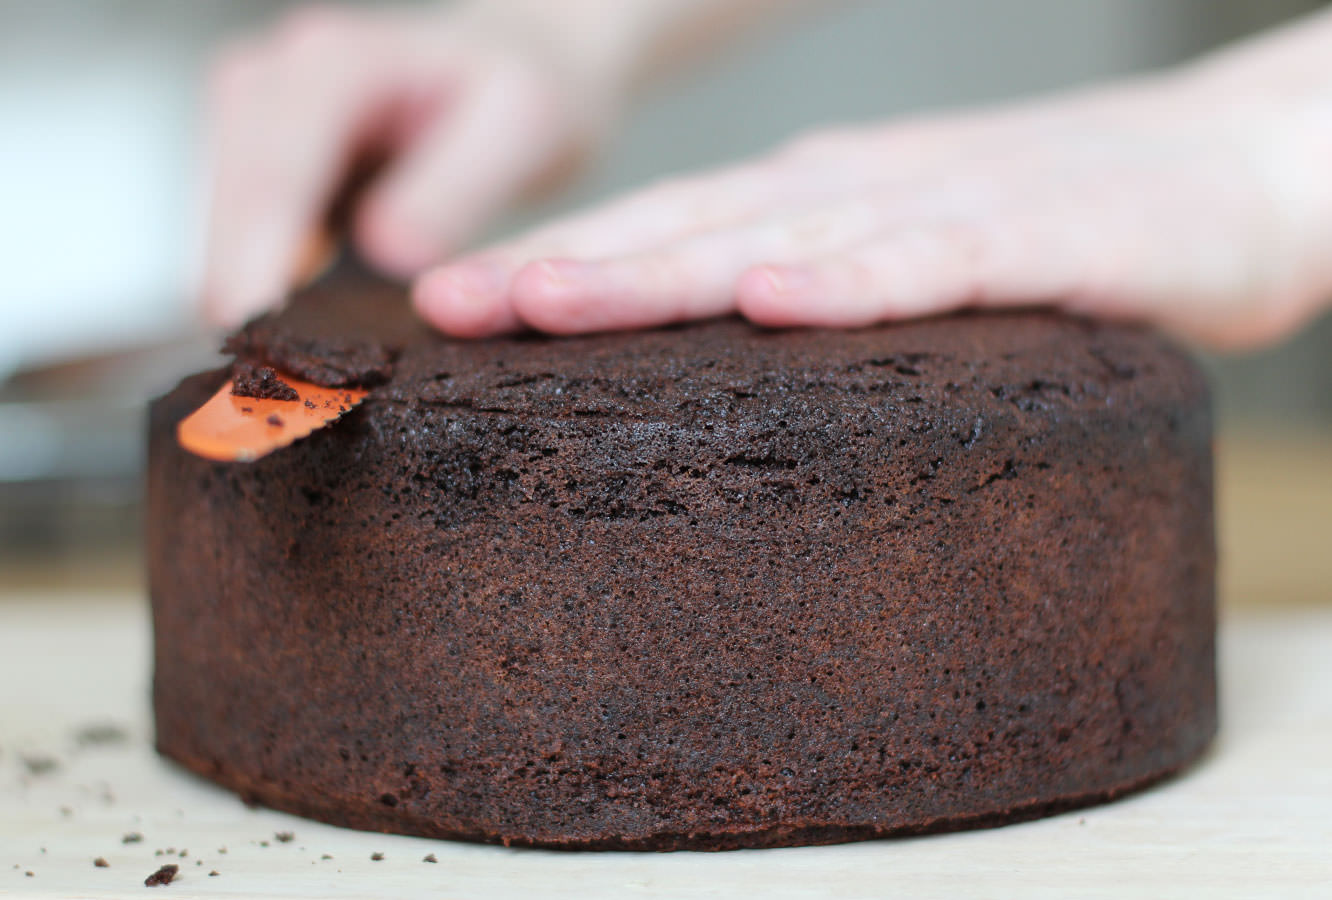
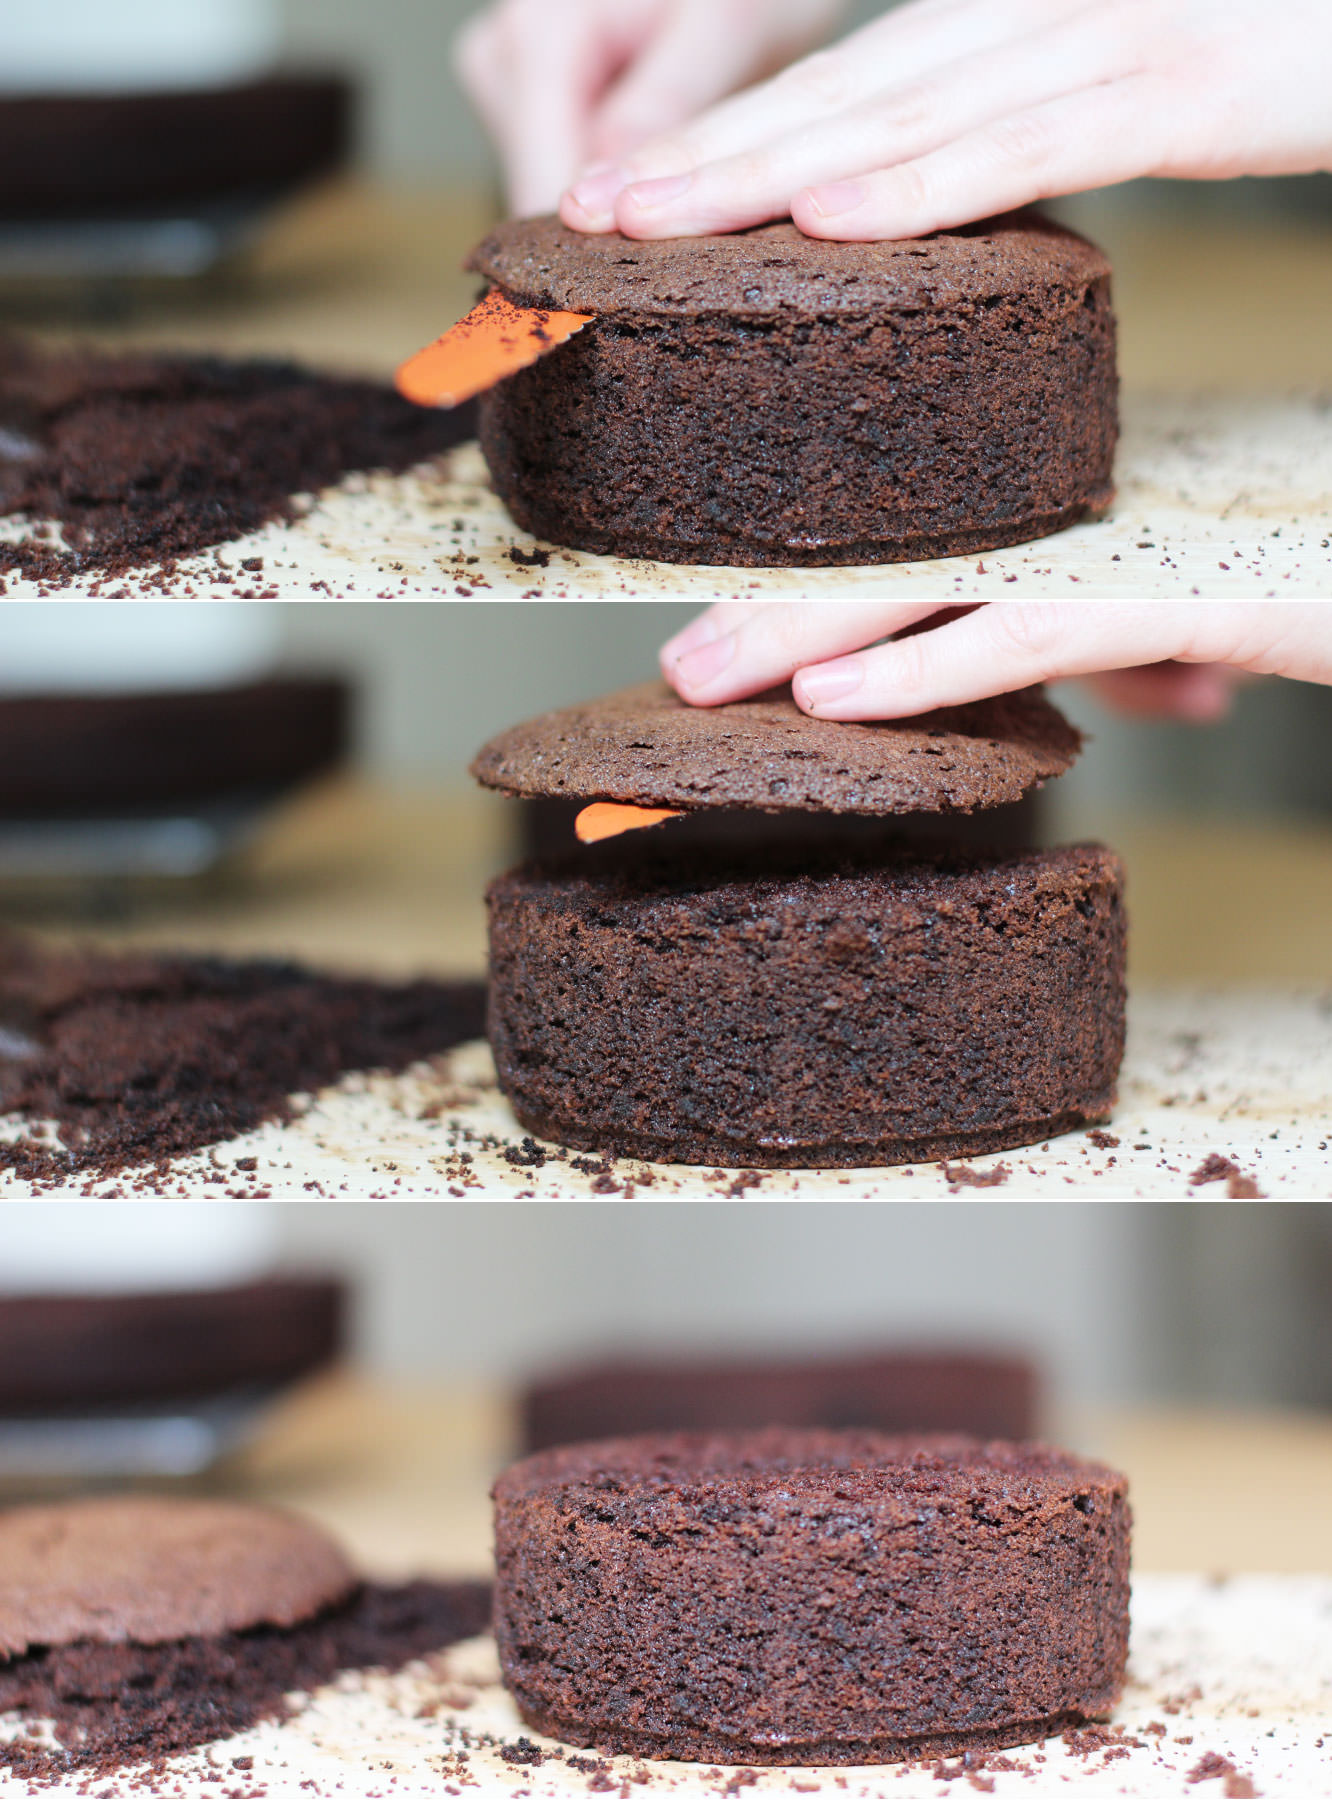
When your cakes have completely cooled prepare them for icing. You need to lop the top off the large one until it’s as flat as possible on top. So much of this cake is covered in decoration that you can get away with a little bit of wonky though so don’t panic if it’s not prefect. Having said that the flatter the better so the top tier sits straight. NO PRESSURE.
Step twelve
Cut the cake in the middle. Try to do this evenly by scoring it the whole way round first. Just keep going round in circles, getting further in each time until you’re all the way through.
Step thirteen
Level out the tops of the small cakes. I would be lying if I said I didn’t spread some icing on the offcuts and eat them.
Step fourteen
Using a palette knife ice the cakes.
First place a bit of buttercream on the cake base to stick the cake to it. Start with the caramel buttercream and ice the middle and the top. Don’t worry if bits splurge out the sides.
Smooth these out around the sides with the palette knife, gradually adding buttercream here and there to create the sharpest sides you can. Some parts will have a thicker coating than others, this layer is made to contain all the crumbs (hence the name crumb layer) and to even out the shape a bit. It’s not going to be pretty.
Place in the fridge for about an hour before starting the chocolate.
Ice the chocolate on in the same way, neatening as you go. For the most part it will be covered up, so it really doesn’t need to be too smooth.
Step fifteen
Cover the small cake in the same way.
Place both in the fridge while you prepare the decorations.
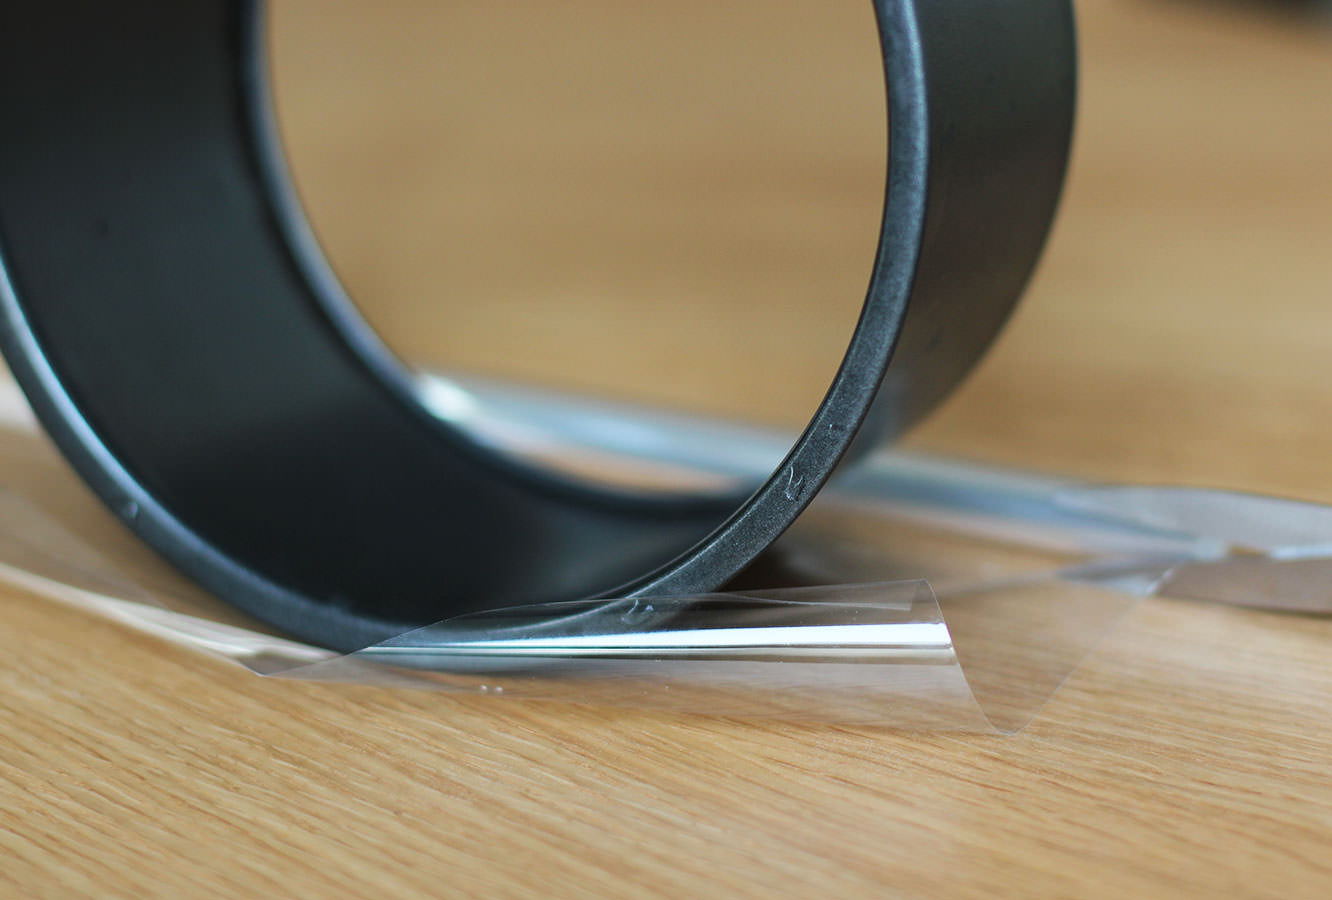
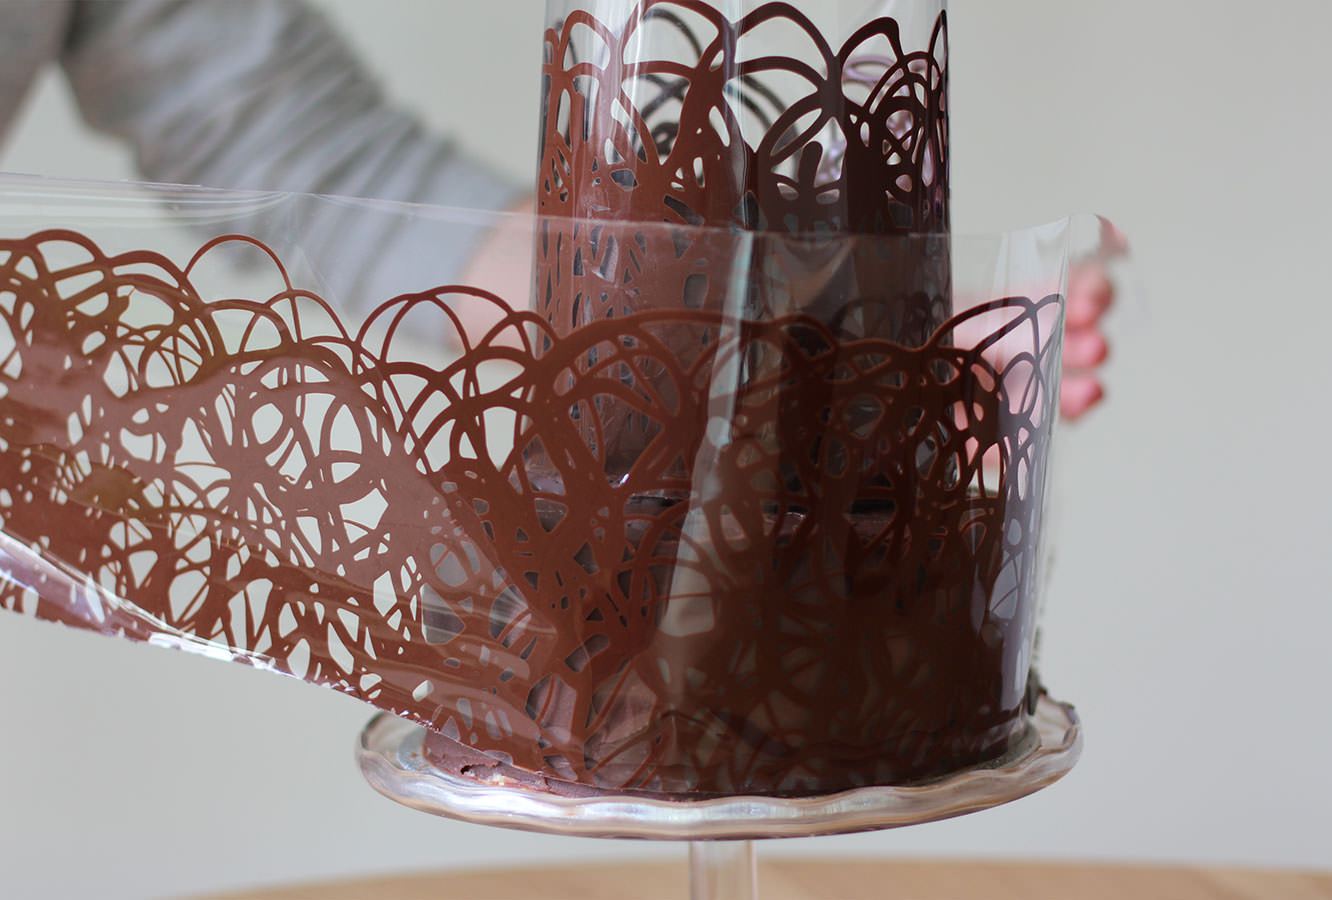
Step sixteen
Using the tins as a guide cut a strip of the cellophane for both the top and bottom layer. You want these to be quite close to the size of the chocolate collar, so tall enough that you will have about 5cm/two inches taller than the cake, and wide enough to match the circumference. You can quickly check this against the cake to ensure it will fit.
Don’t forget to cut one for the top tier and one for the bottom, bearing in mind your top tier cake is twice as tall as the tin.
Step seventeen
Temper 200g dark chocolate. Don’t look at me like that…you are really going to want to do this so you have shiny chocolate on the collar.
First melt 125g of the chocolate in a heatproof bowl over a pan of simmering water. Let it get to 55C/131F before removing from the heat.
Chop the remaining chocolate and stir into the melted mix to aid the cool down process. Stir continually until it cools to 28C/82F. I found a good way to speed this up a bit. Put cold water in a large saucepan and the bowl on top. You’re welcome.
Place the bowl back on the heat and bring it to 31C/88F. Your chocolate is tempered.
Be warned – if you’re doing a different type of chocolate the temperatures are different:
Milk – 45C/113F original melt, 27C/81F cool down, 29C/84F
White – 45C/113F original melt, 26C/79F cool down, 28C/82F
Step eighteen
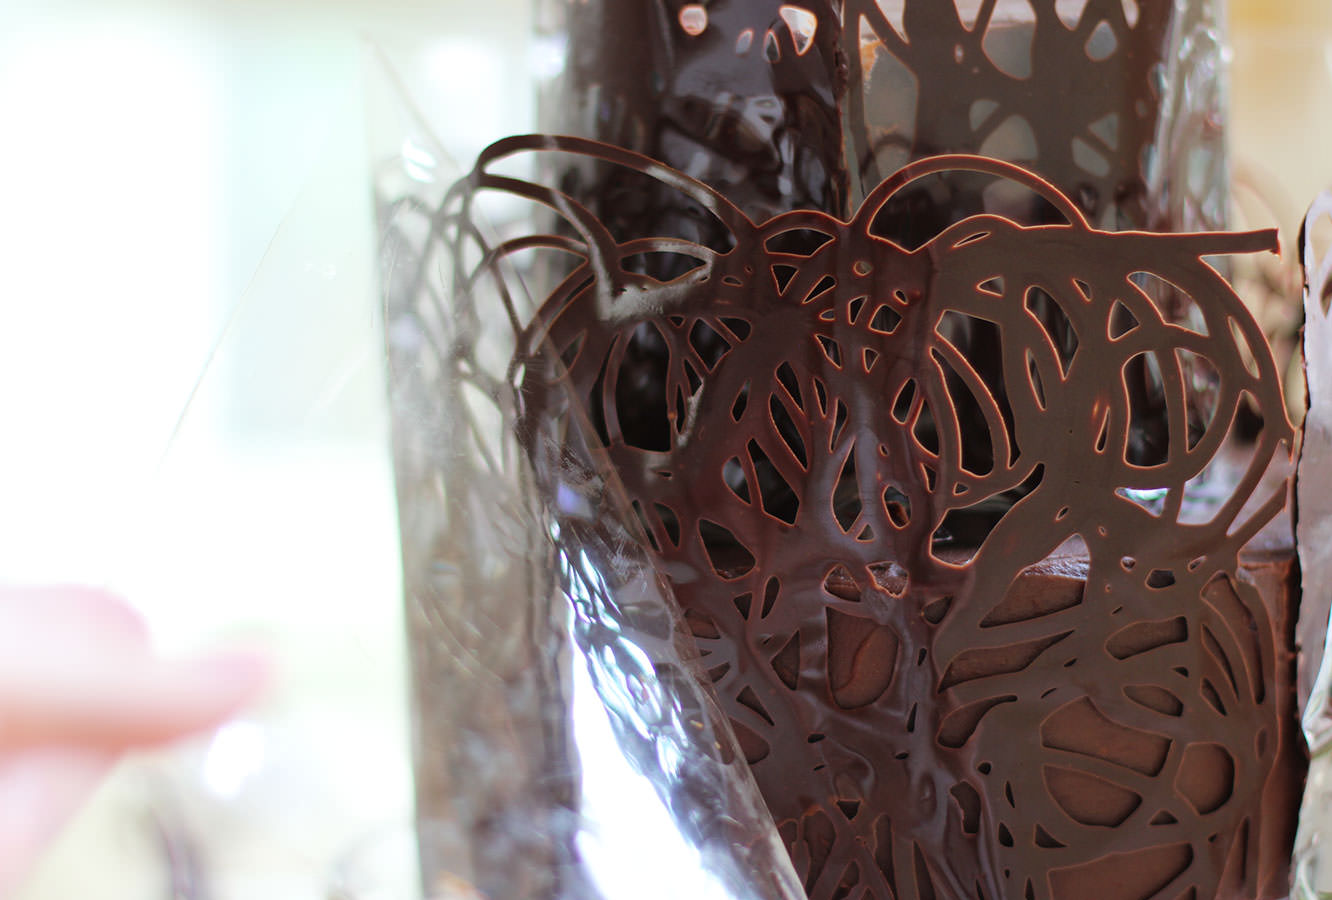
Place chocolate in a piping bag and using circular motions cover the cellophane with swirls. Go over the bottom edge onto the work surface but ensure the top stays on the cellophane so it’s ‘whirly’.
Step nineteen
When it has started to dry pull the cellophane away so the bottom is clear of the extra overlap bits.
Step twenty
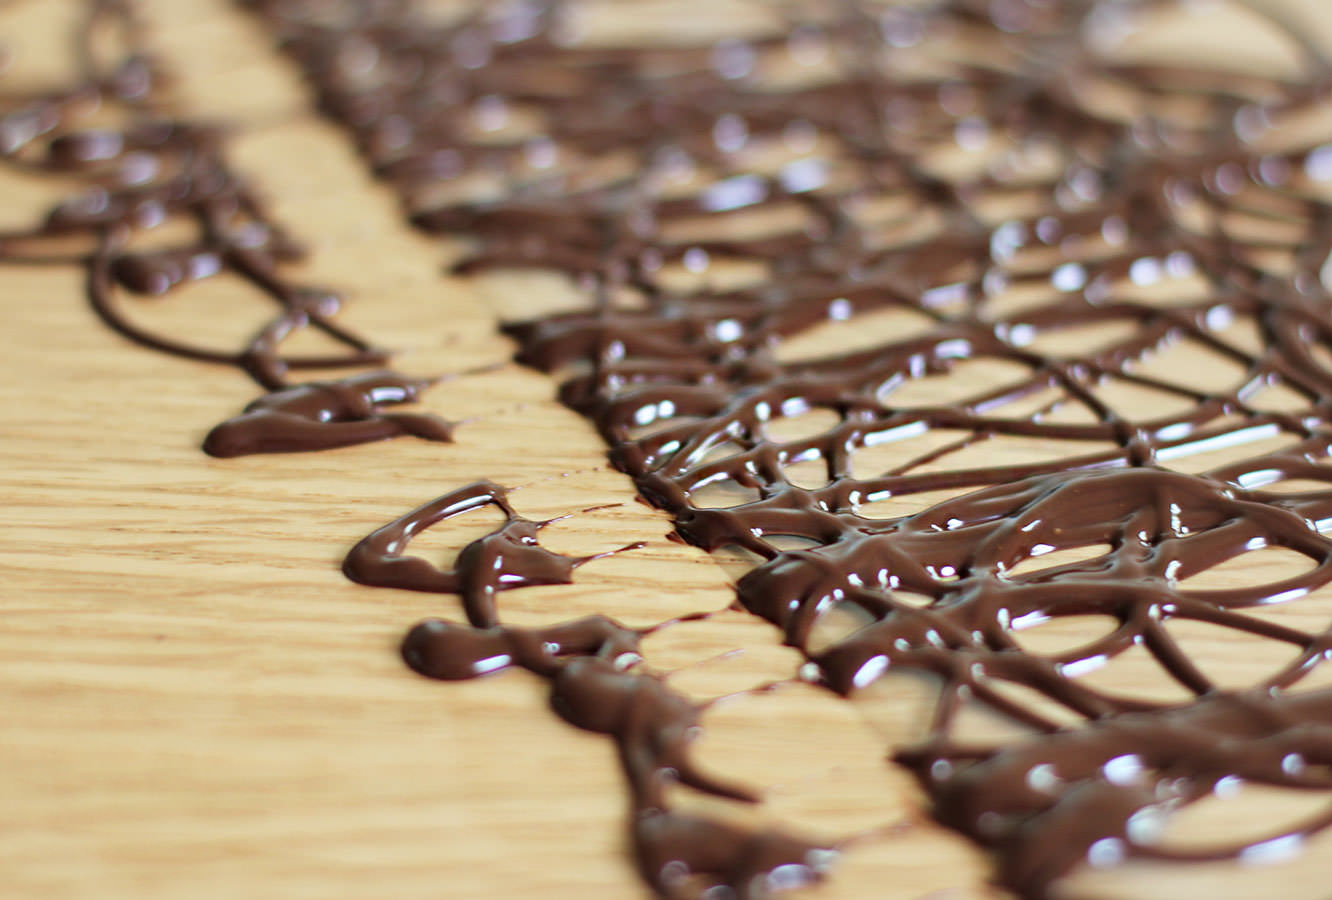
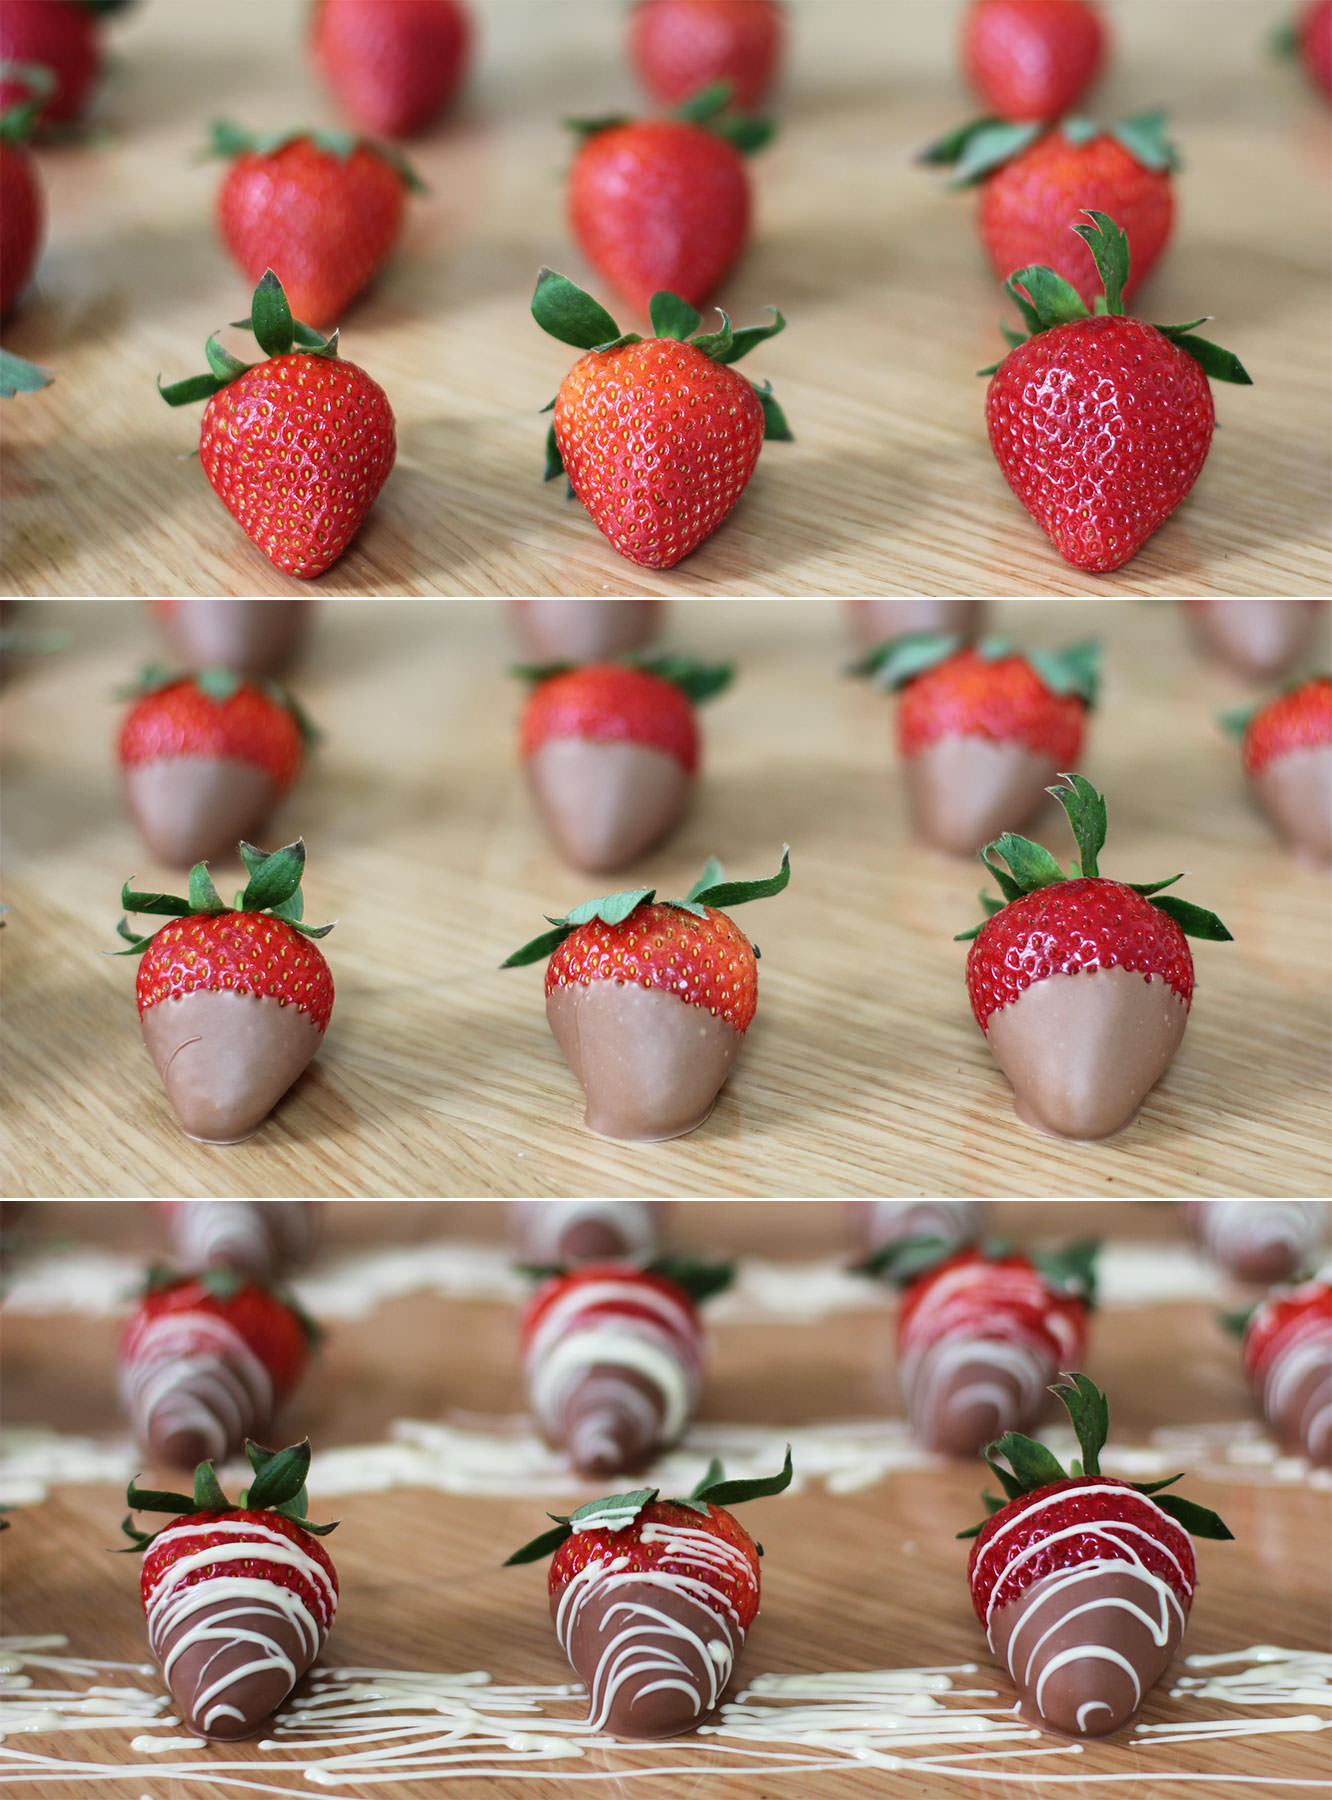
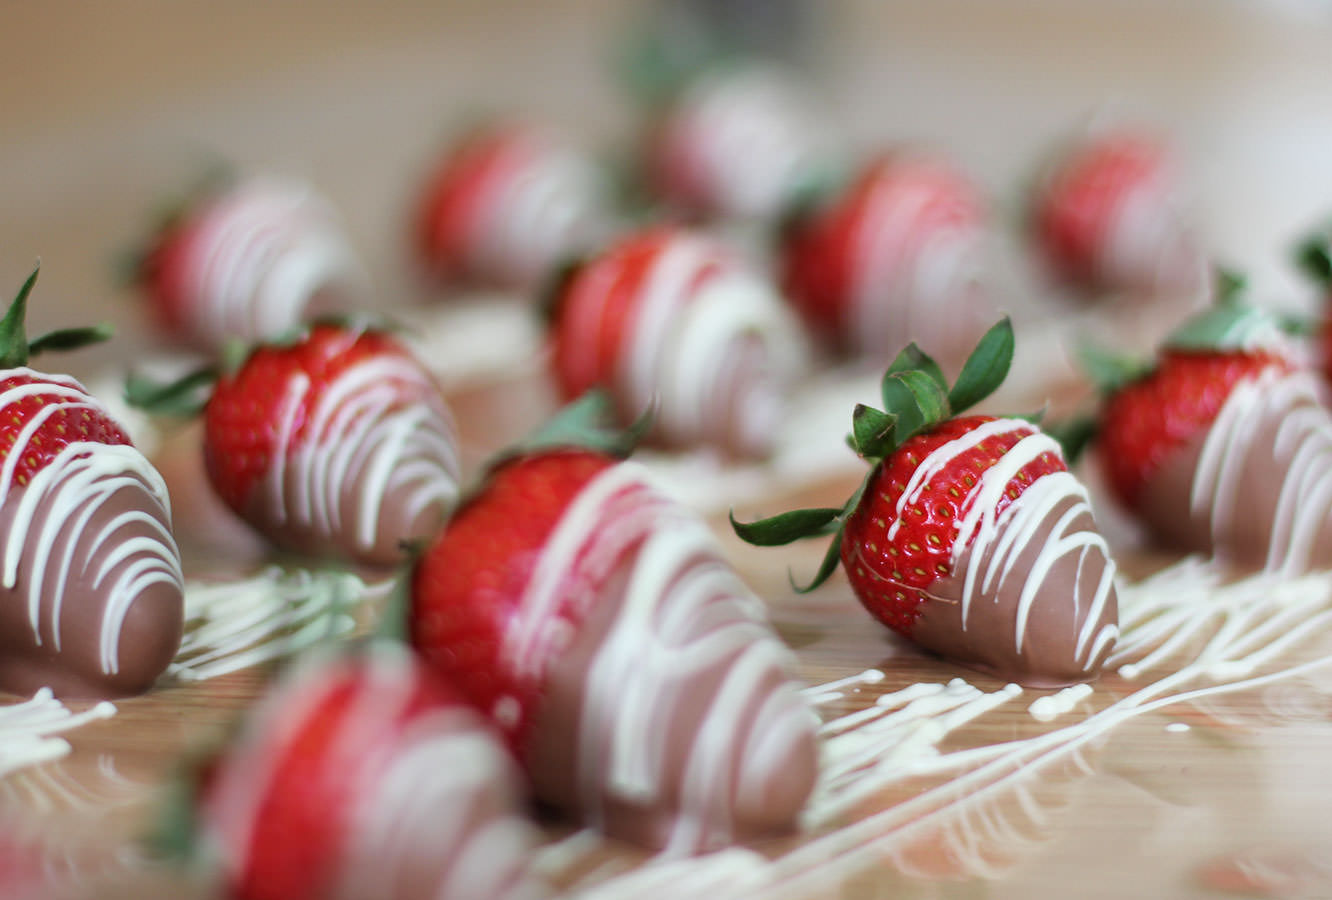
Melt (preferably temper) the milk chocolate. Dip the strawberries in half way and leave to set on some more cellophane.
Melt the white chocolate (no real need to temper this) and place in a piping bag. swing the bag back and forth to drizzle the white chocolate over the top.
Step twenty one
Drizzle the raspberries with white and milk chocolate. You can dip them if you want to, but, really? I know this is taking a while, but do you have that kind of time??
Step twenty two
Get the cakes out of the fridge to assemble.
Cut the sticks to size and push through the bottom layer where the top tier will sit.
Place it on top.
I then secured this a bit further with the remaining dark chocolate I had. It will be covered up so no big deal if it’s messy.
Step twenty three
When the collars become touch dry, (meaning if you gently touch the surface you shouldn’t get chocolate on your finger, but what’s underneath is still not set) wrap them around the cake.
LEAVE THE CELLOPHANE ON. Sorry for shouting. But please. Walk away and don’t touch it for a while. Maybe leave a window open if it’s a cool day to help the process along.
Step twenty four
When you’re feeling brave slowly peel off the cellophane to reveal your beautiful shiny chocolate collar. I was pretty excited at this point I must confess.
Step twenty five
Fill with the fruit and make someone’s occasion that bit happier.
I promise next week will be more diet friendly. Well, actually I don’t. I really like food, and the sweeter the better as far as I’m concerned.
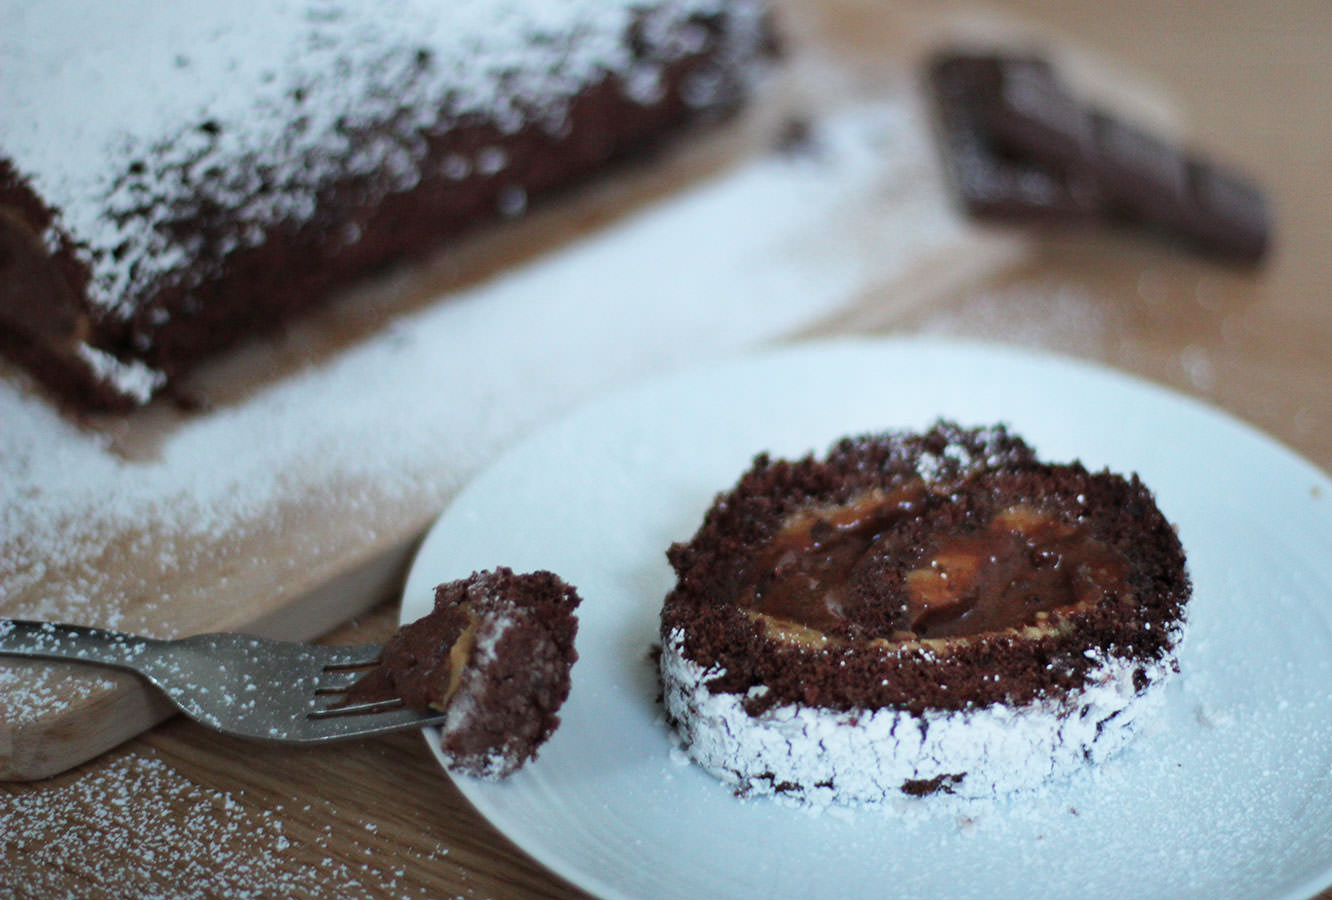
Last week we had some buddies round for a sleepover and I couldn’t resist making a naughty pud. This salted caramel chocolate mousse filled roulade is the perfect edition to a girls’ night in, or a dinner party, or breakfast.
Buckle up, it’s not a speedy bake, but it’s worth it.
You will need
For the sponge:
130g/4.5 oz Caster sugar
100g/3.5 oz Plain flour
4 Eggs
35g/1.5 oz Cocoa powder
For the chocolate mousse:
200g/7 oz Dark chocolate
3 Eggs
40g/1.5 oz Caster sugar (golden if you have it)
90ml/3 fl oz Water
For the salted caramel frosting:
300g/10.5 oz Icing sugar
250g/9 oz Butter
80g/3 oz Soft brown sugar
100ml/3.5 fl oz Double cream
2 tbsp Golden syrup
2 tsp Salt
Step one
Sift together the cocoa powder and flour. Usually I’m not one of life’s sifters, but for this one you’ll want to; you don’t want to knock out all the air trying to get the lumps out of the flour.
Step two
Whisk the four eggs until they are pale and shiny and so that the tracks of the whisk stay for a few seconds before sinking back into the main mixture.
Step three
Gently fold the flour and cocoa powder mix in two halves. Do this with a metal spoon and imagine you are stirring a bowl of baby kittens. Softly.
Ideally I guess it should all be one colour, but mine was still a little marbled and it didn’t seem to impact the bake.
Step four
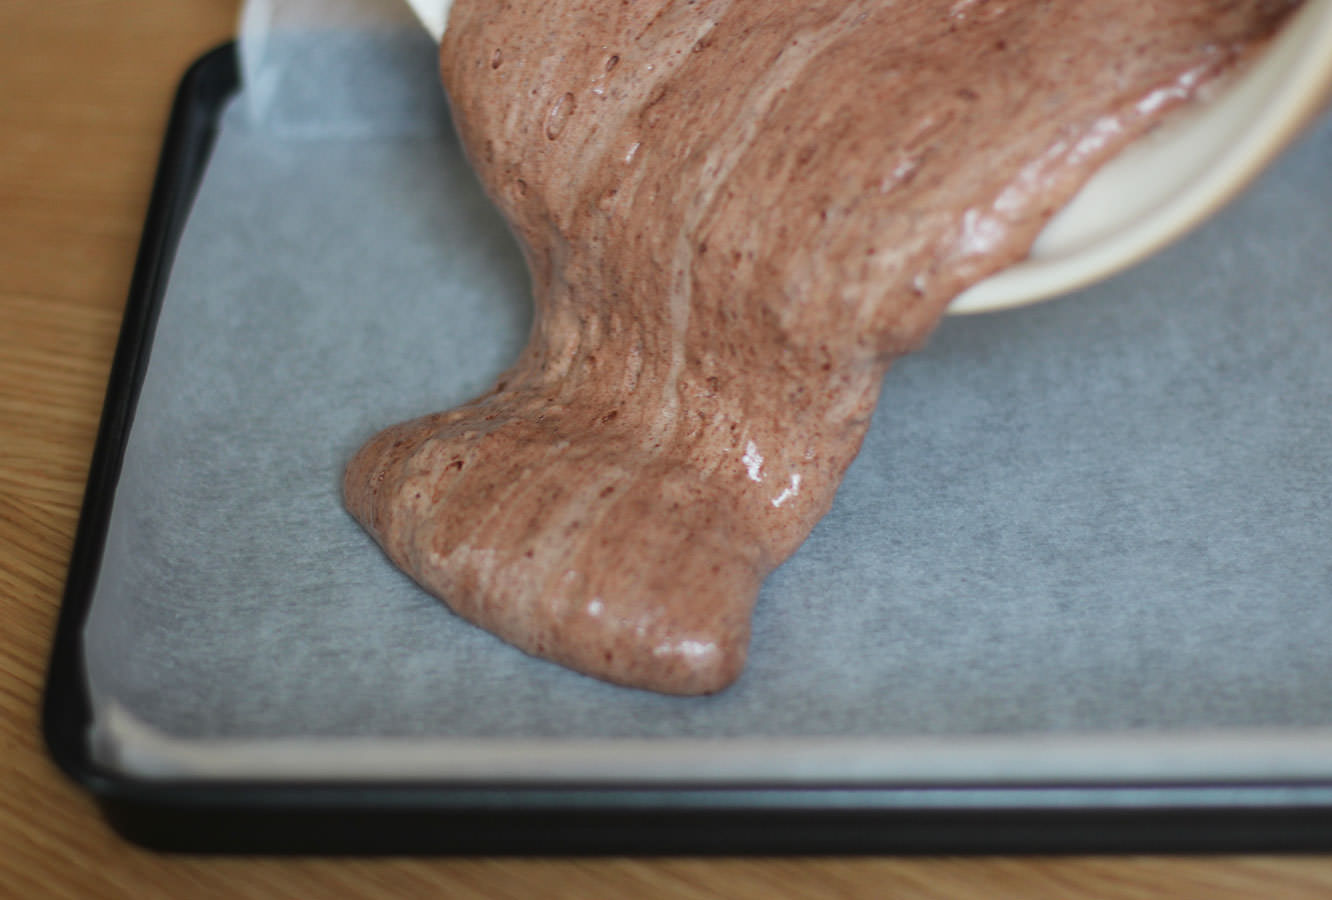
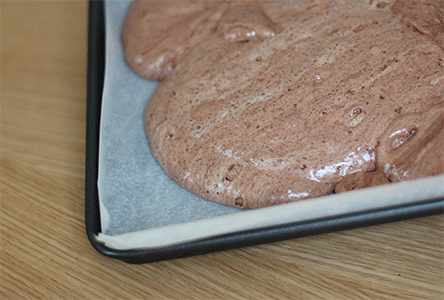
Slowly pour batter evenly across a lined tin. Mine’s not actually a swiss roll tin, it’s a bit bigger. Try not to knock any air out.
Step five
Tilt the tin to distribute the sponge mix as evenly as possible and get it right into the corners. You want to avoid spreading it with anything but you do need it to be as flat as possible on the surface. There’s no fat in this recipe to melt down and level everything off.
p.s. the GIF makes it look quicker than it is, be patient.
Step six
Bake in a preheated oven on 220C/ gas mark 7/ 450F for 10 minutes.
Step seven
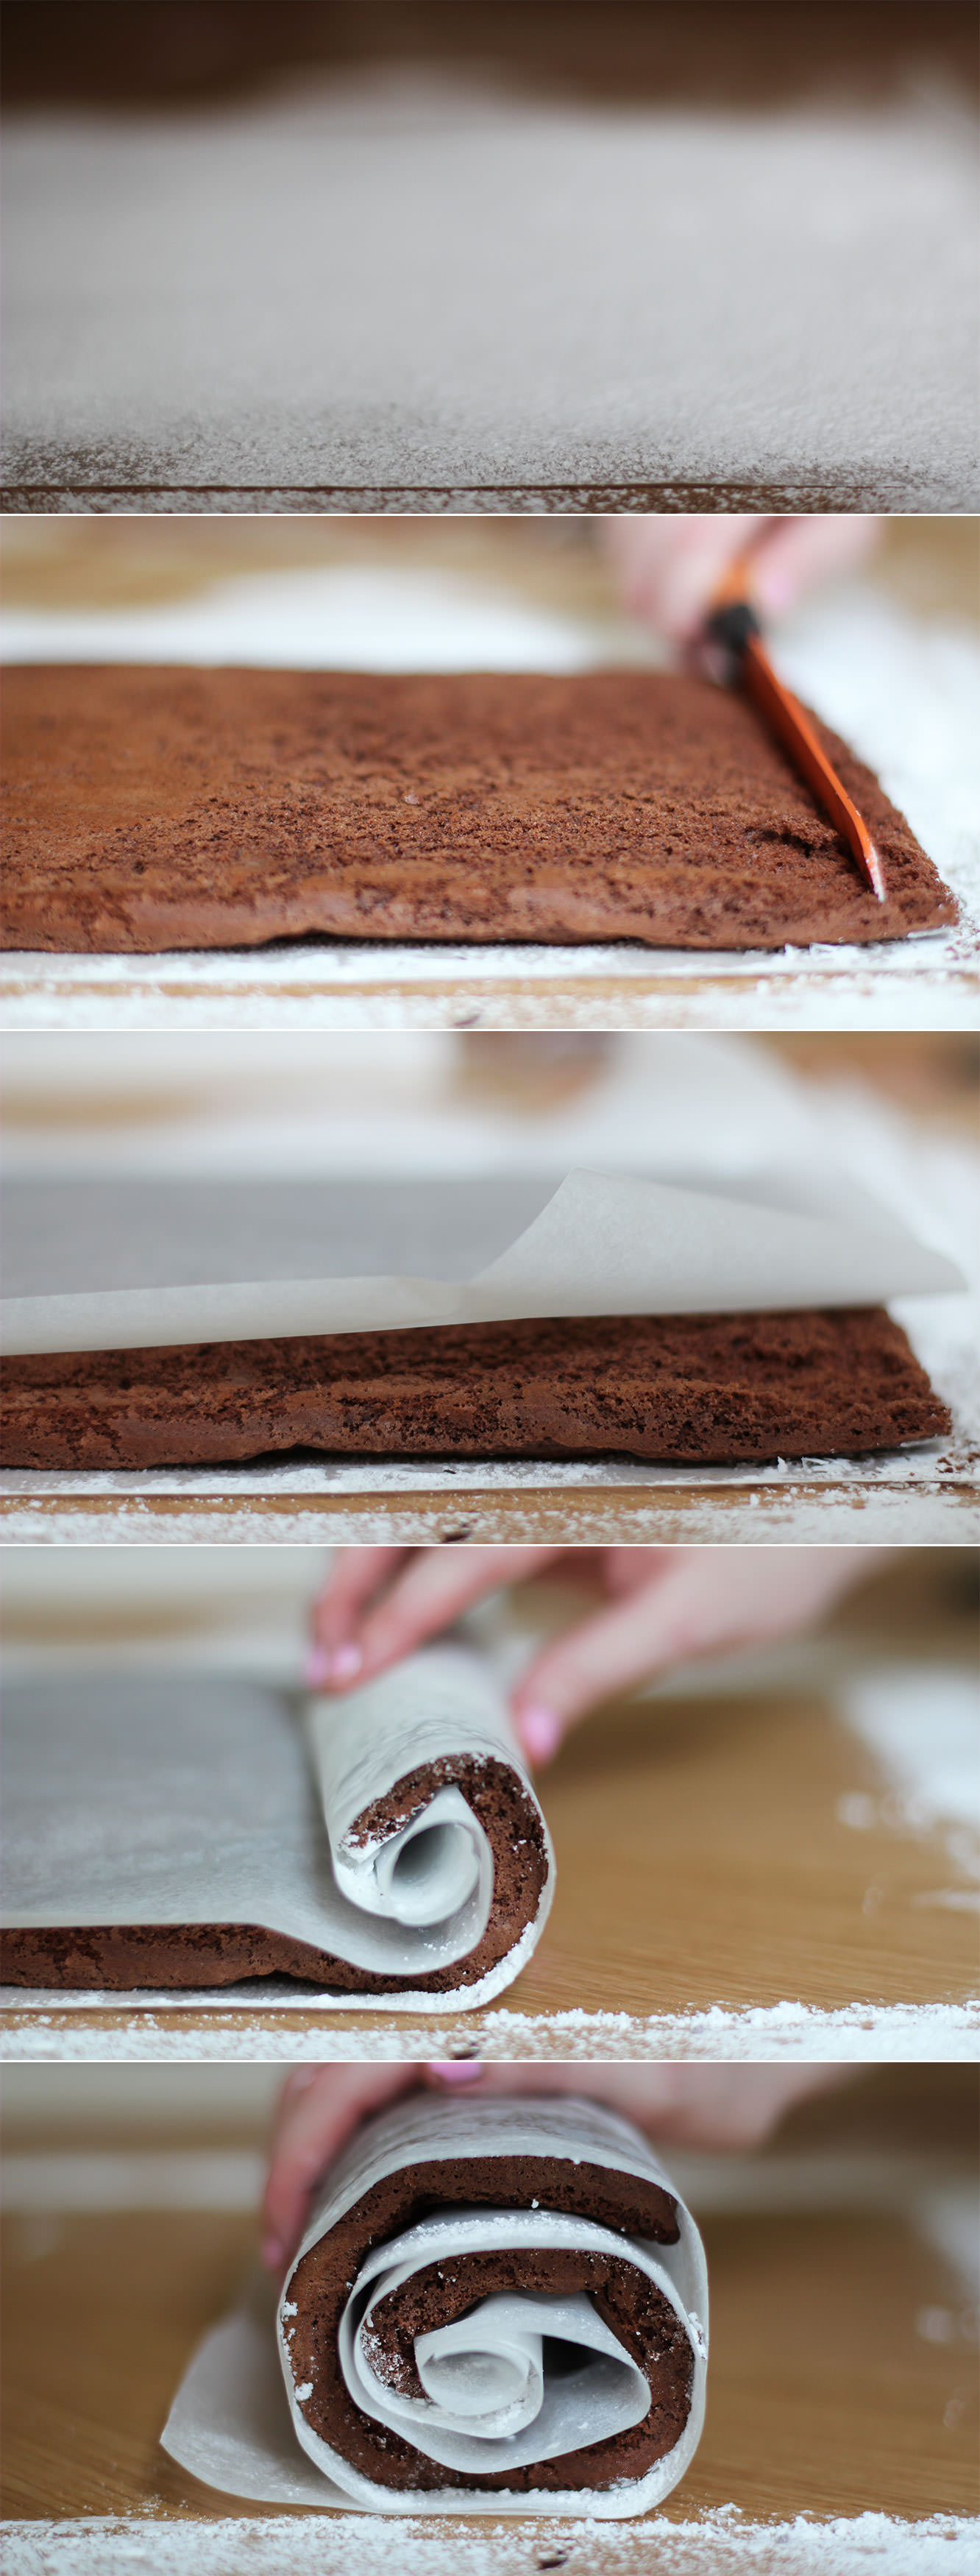
While the sponge is in the oven, dust a sheet of greaseproof paper with icing sugar.
Step eight
As soon as it’s finished cooking turn the sponge out onto the paper.
Cut a small groove about 1cm in from the edge to start the roll. Place another sheet of greaseproof on top and roll the cake up. Leave it to one side to cool.
Step nine
Move onto the mousse. In fact, probably do the mousse first, it needs a while to chill.
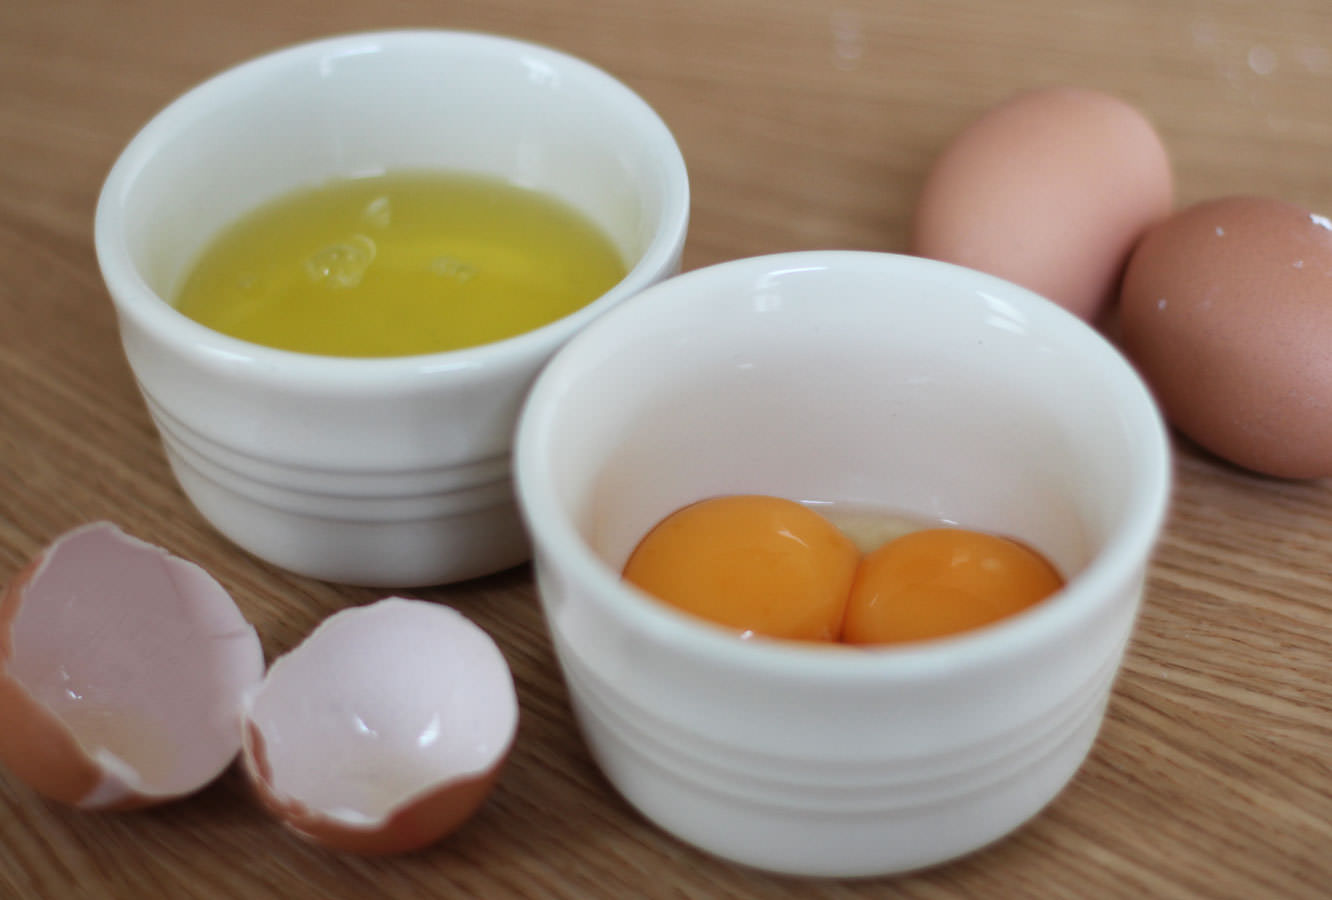
Separate the three eggs into two bowls and finely chop the chocolate.
Step ten
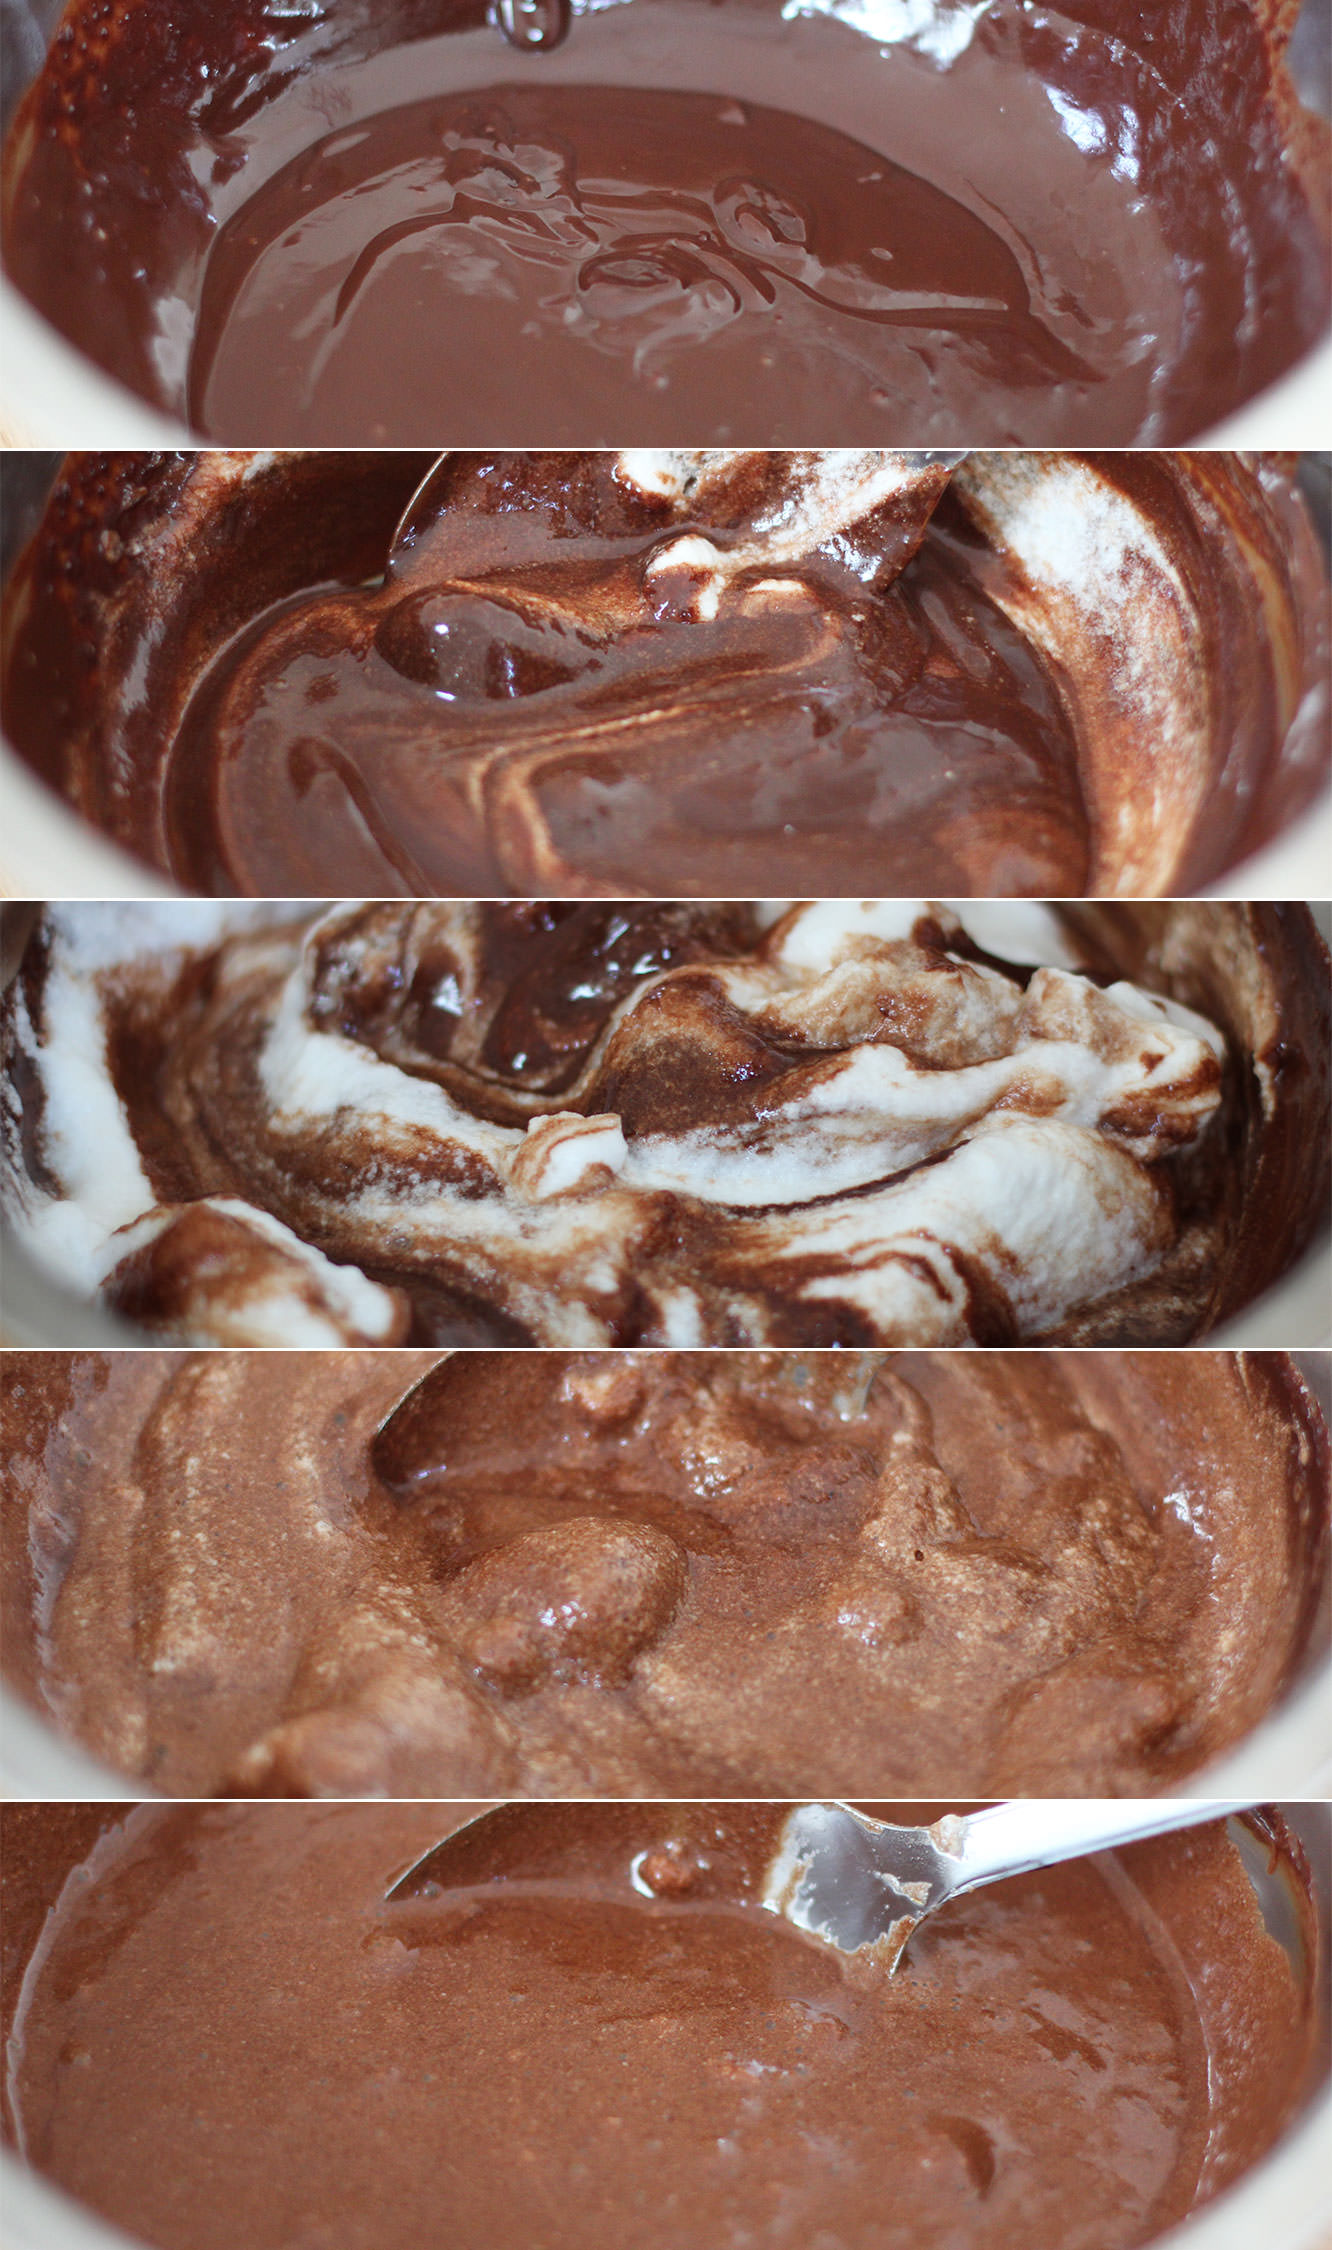
Place the chocolate and 90ml water in a heatproof bowl over a pan of simmering water until melted.
Allow to cool for 10 minutes and then stir in the egg yolks. The mixture will become thicker and should be glossy.
Step eleven
Whisk the egg whites into stiff peaks, add the caster sugar and whisk again until combined. You should be able to turn the bowl upside-down without it all falling out.
Step twelve
Place a spoonful of egg white into the chocolate and stir quickly to loosen the chocolate mix. Then add the rest and gently fold in with a metal spoon.
Put in the fridge for an hour or two, the longer the better really.
Step thirteen
Make the salted caramel for the buttercream by melting together 100g of the butter, the brown sugar, golden syrup and salt. Do this slowly and then bring the heat up to a simmer.
Simmer for 10 minutes. Stir regularly so that it doesn’t catch and burn. Leave to cool down for about half an hour or so.
If you think you’ve seen this before, you have, this is about the 5th time I’ve used this salted caramel recipe.
Step fourteen
Once the caramel has cooled down a bit, stir in the 100ml of cream. Set to one side and make the buttercream.
Step fifteen
With an electric whisk beat together the rest of the butter and the icing sugar. Cover with a tea towel to begin with, or you will wind up looking like a cloud.
Step sixteen
Add the salted caramel to the buttercream and whisk. Voila. Place in fridge for at least 15 minutes until cooled completely.
Step seventeen
Once the chocolate mousse is set get ready to assemble.
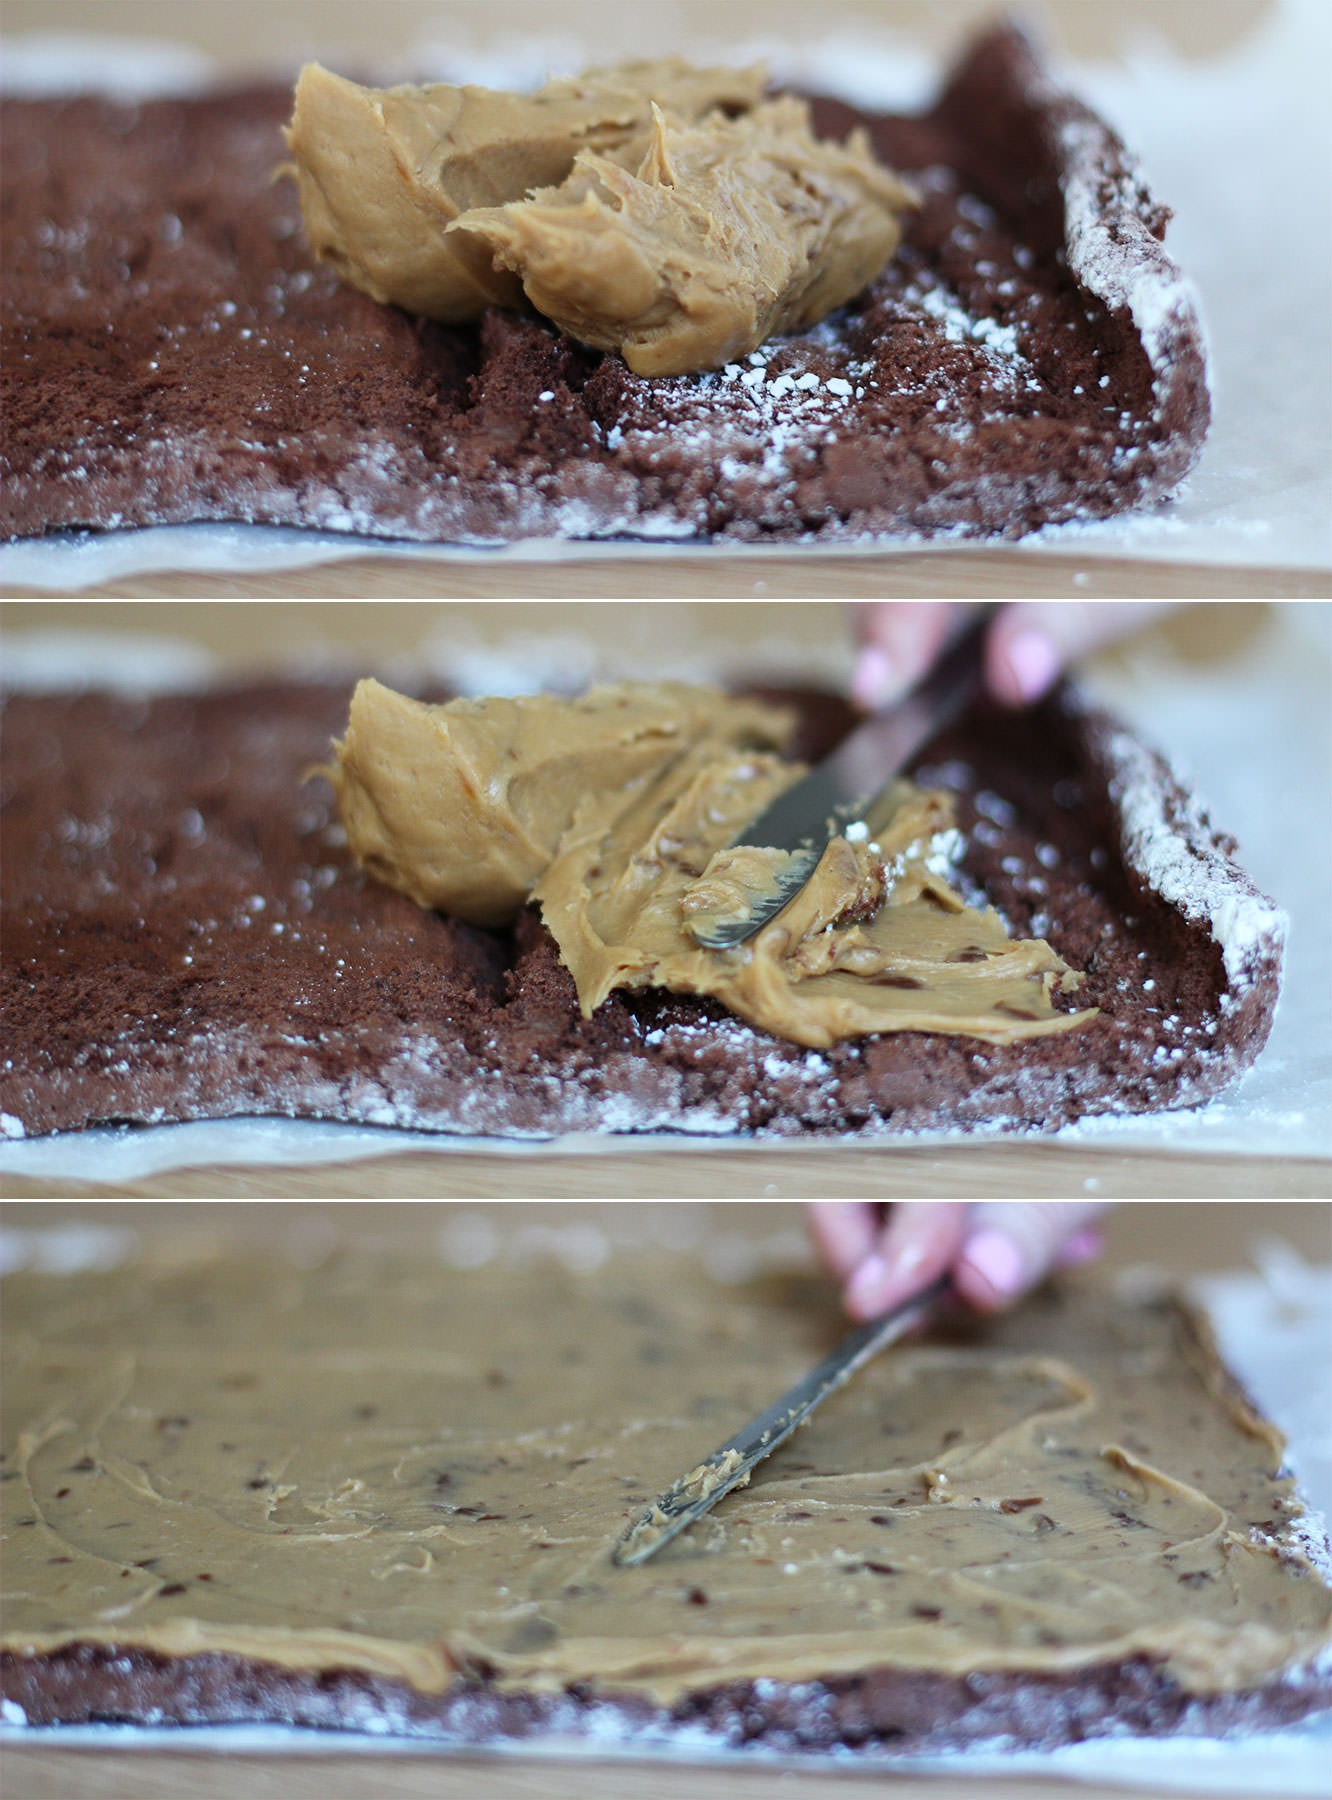
Unroll the sponge and spread a layer of caramel over the surface. I didn’t use all the buttercream so go with what feels right. I used the rest of it up on some cupcakes. Apparently I want my housemates to be obese.
If you’re wondering why mine looks darker than yours it’s because I used dark soft brown sugar and cooked it for too long.
Step eighteen
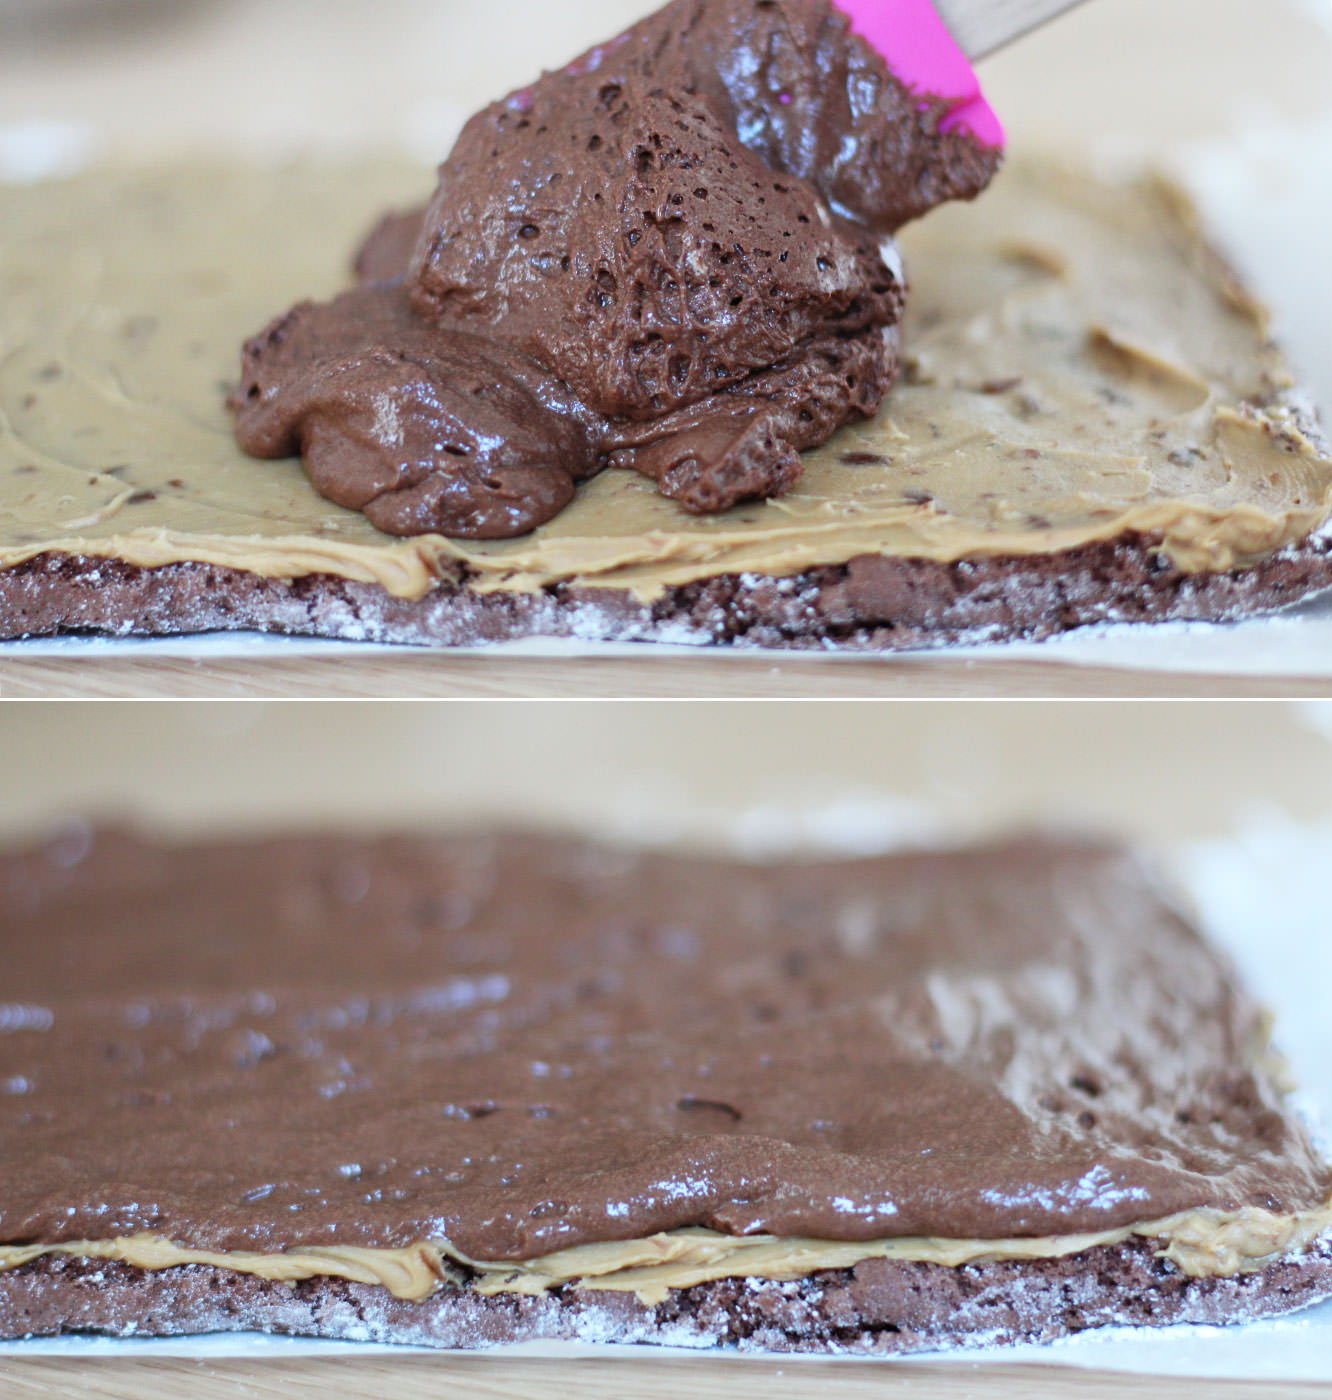
Spread the mousse over, try to keep air in it if you want, but you’ll abandon all hope fairly soon.
Step nineteen
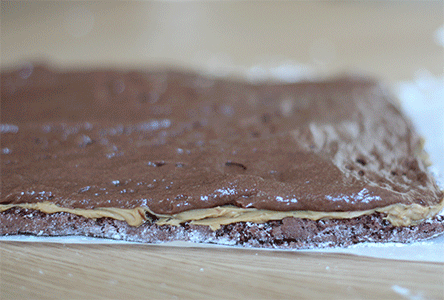
Using the greaseproof paper roll the roulade up. Now. I probably didn’t get my first bit tight enough, but regardless, this bit ain’t pretty. Just do it, put it on a chopping board/tray put it back in the fridge and don’t think about it.
Seriously. The mousse will splurge a lot a bit. Pretend it never happened.
Step twenty
After about an hour or so in the fridge the mousse will have firmed up again. You can take it out, wipe away any excess filling and dust some more icing sugar over it.
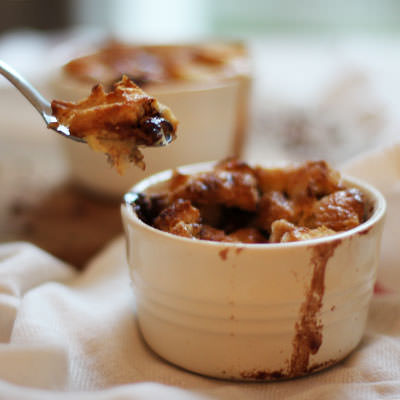
This week a cheap and cheerful bake was on the cards for everyone out there cutting costs this January. The perfect pudding to blast away those winter blues. I apologise in advance for laughing in the face of all your 2015 diets, but if you’re going to break them, this is a great way to do so.
This recipe is ideal for people who doubt their skills in the kitchen, I’ll be seriously impressed if you managed to mess this one up. Send me photos if you do.
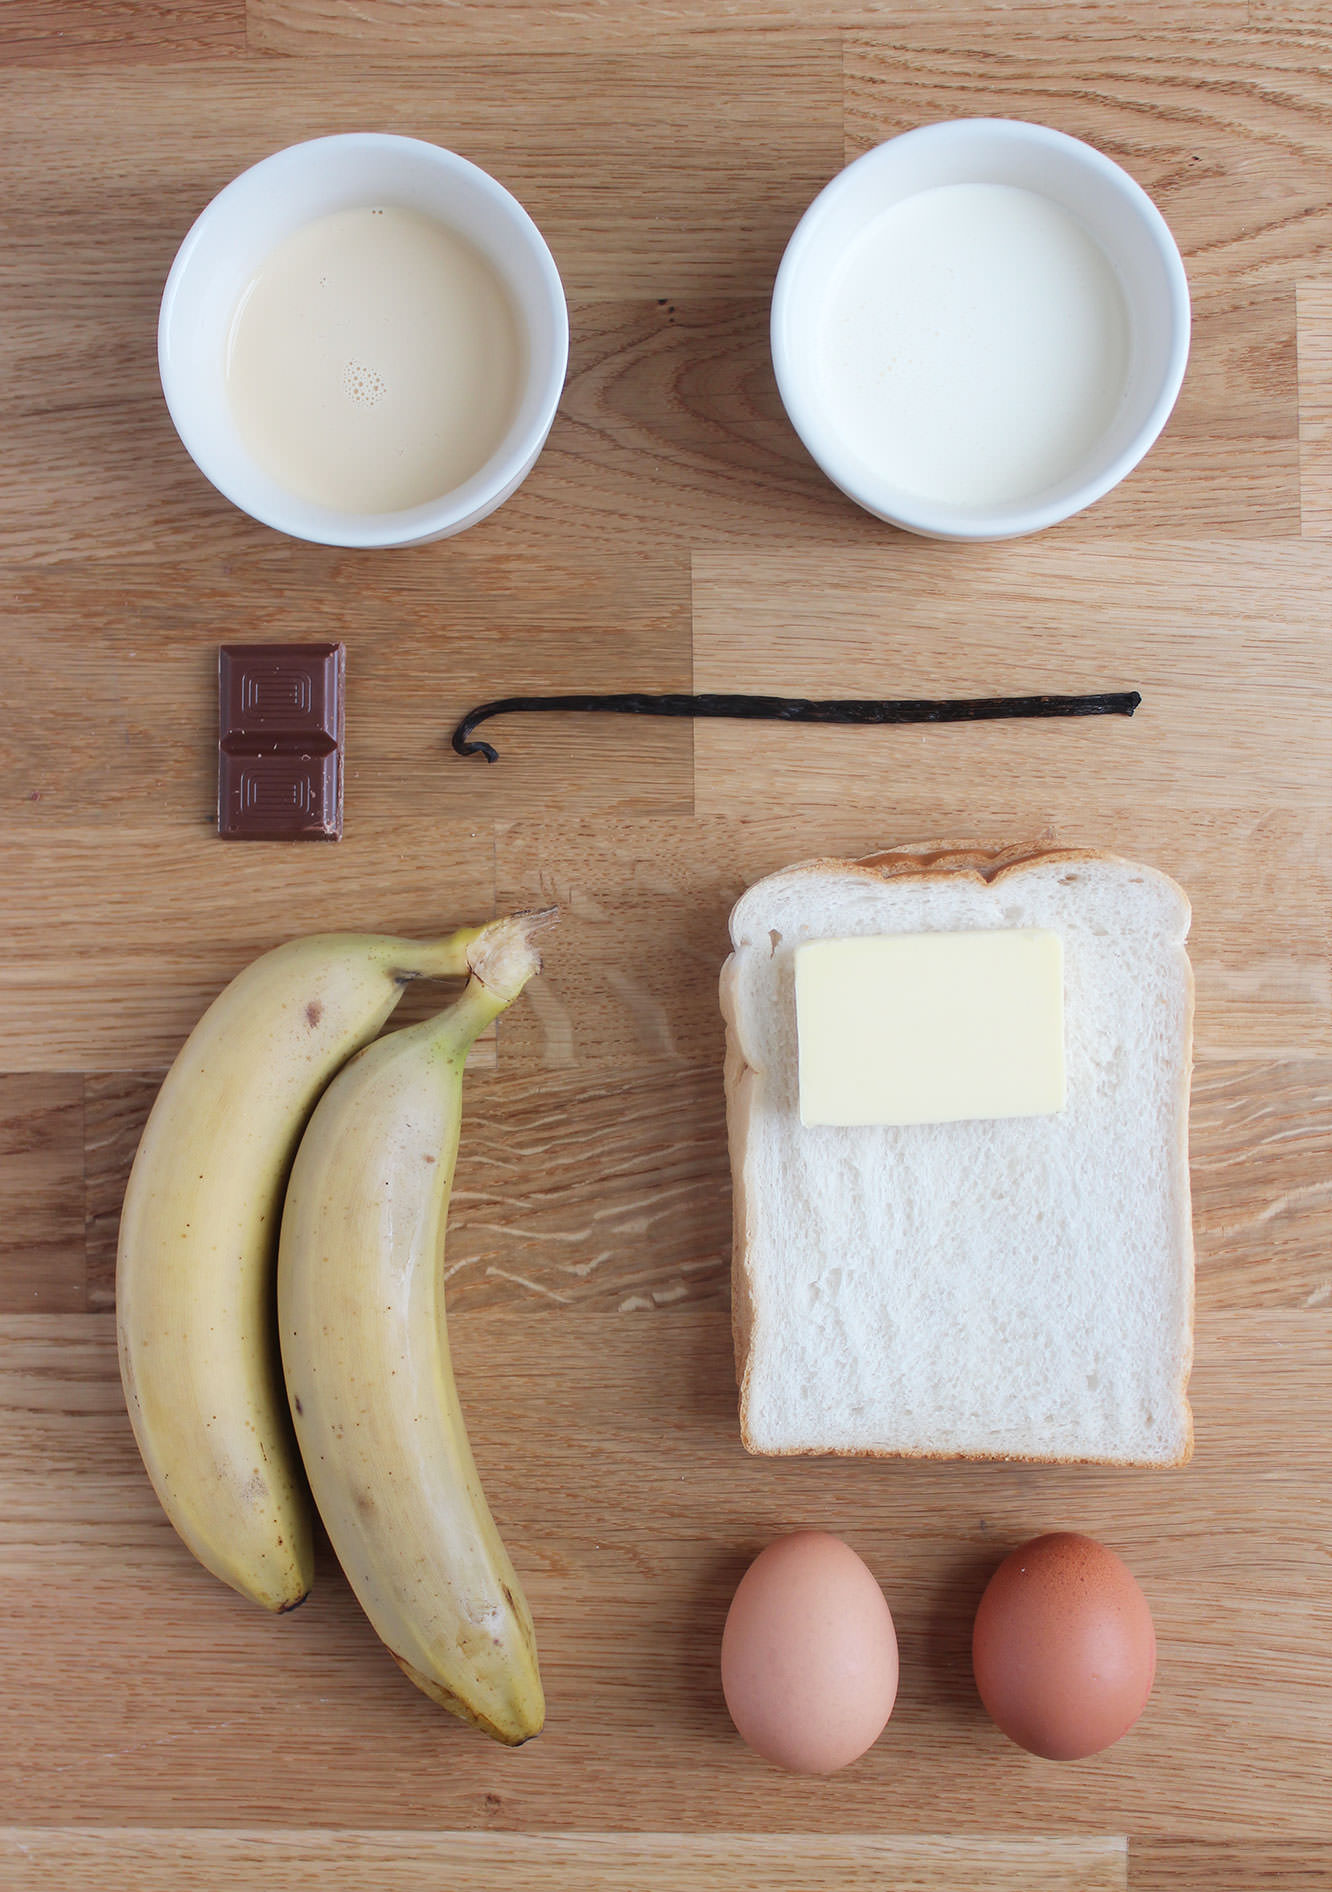
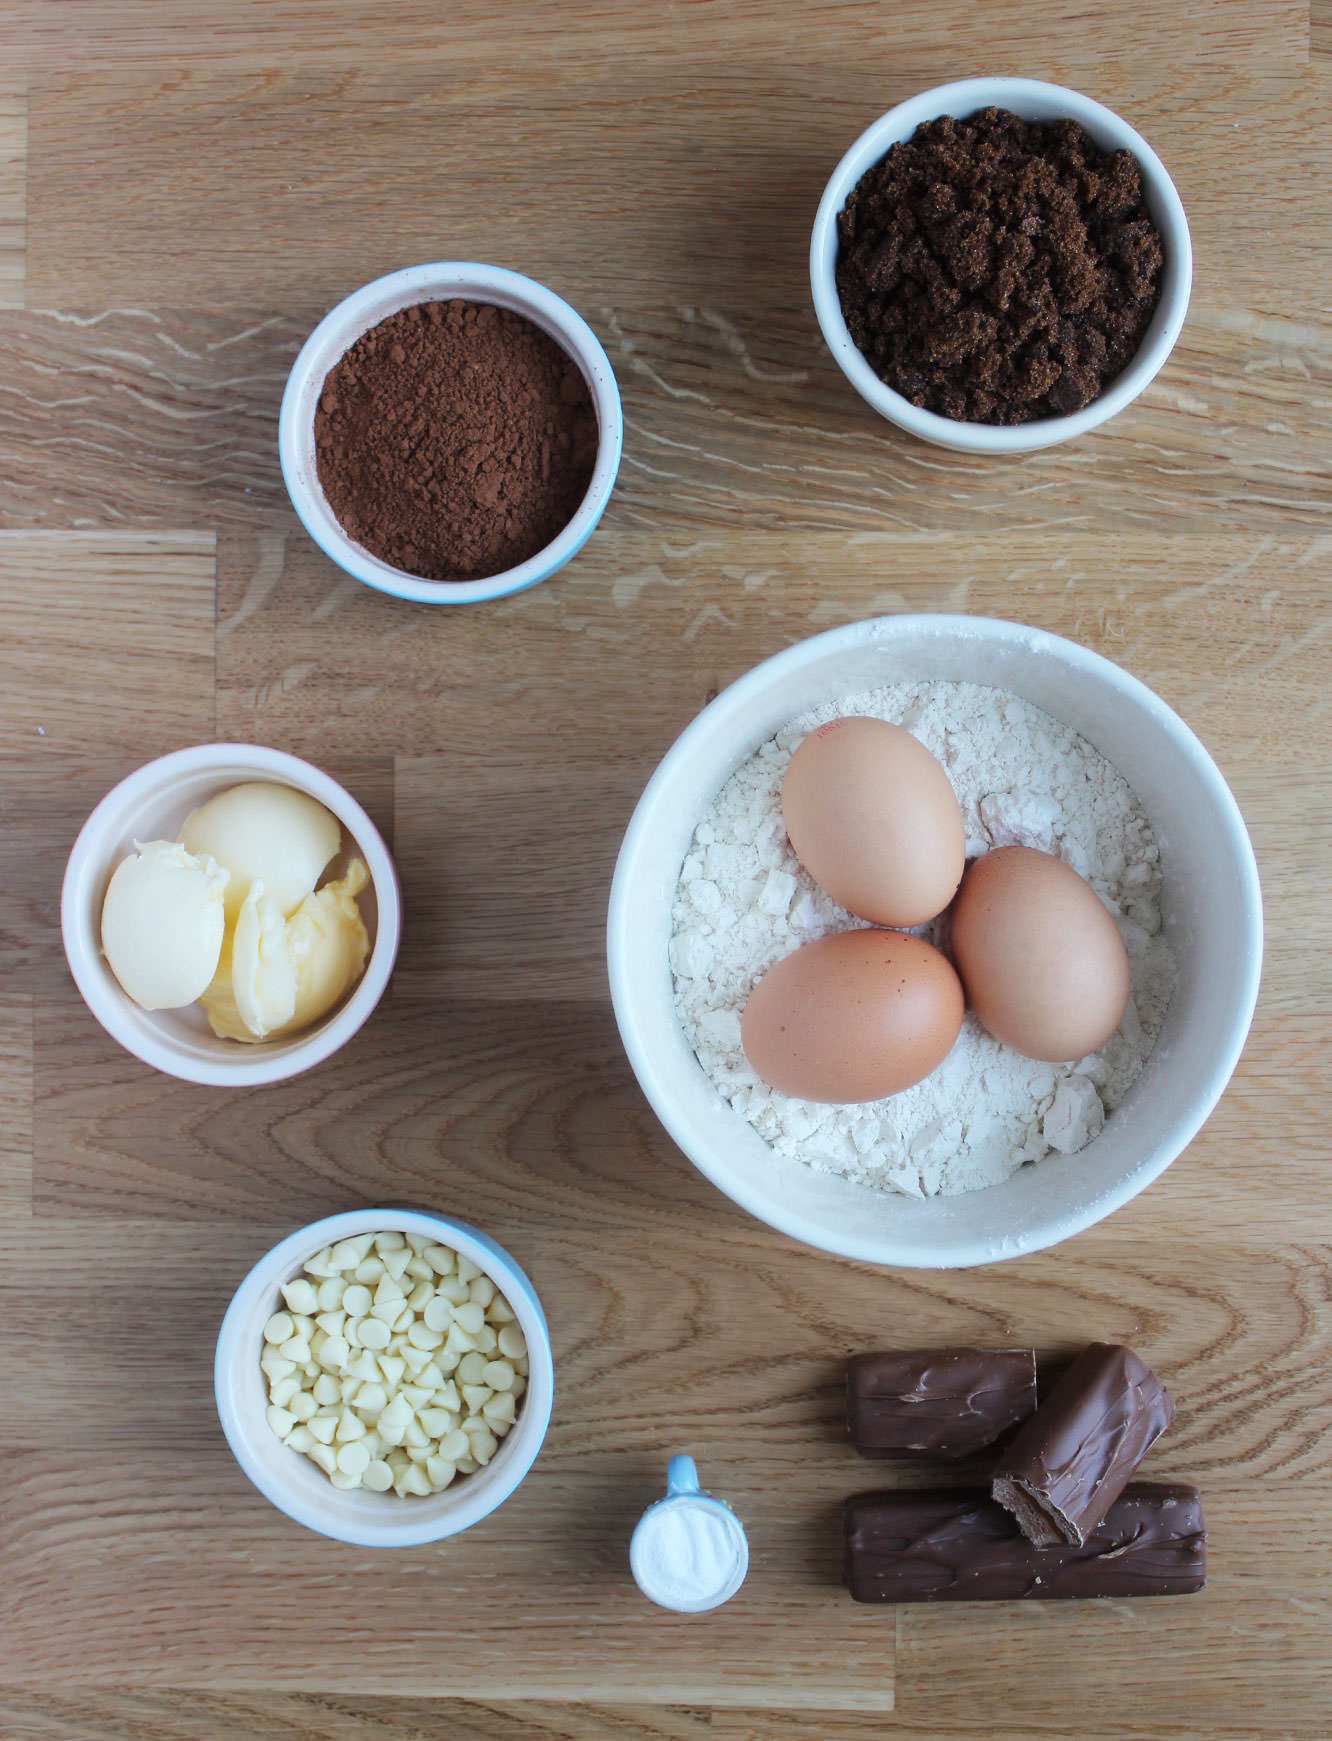
You will need
For the pudding:
500ml/17 fl oz Double cream
100ml/3.5 fl oz Condensed milk
2 Eggs
Vanilla pod/2 tsp Vanilla extract
100g/3.5 oz Dark/Milk chocolate
50g/2 oz Soft brown sugar
6 – 8 Slices white bread (let’s be honest, you will need to get a loaf anyway, and I wasn’t counting properly)
3 Bananas
Butter for spreading
Ramekins if you’re feeling a bit posh.
For the salted caramel:
100g/3.5 oz Salted butter
80g/3 oz Soft brown sugar
100ml/3.5 fl oz Double cream
2 tbsp Golden syrup
2 tsp Salt
(Makes 6)
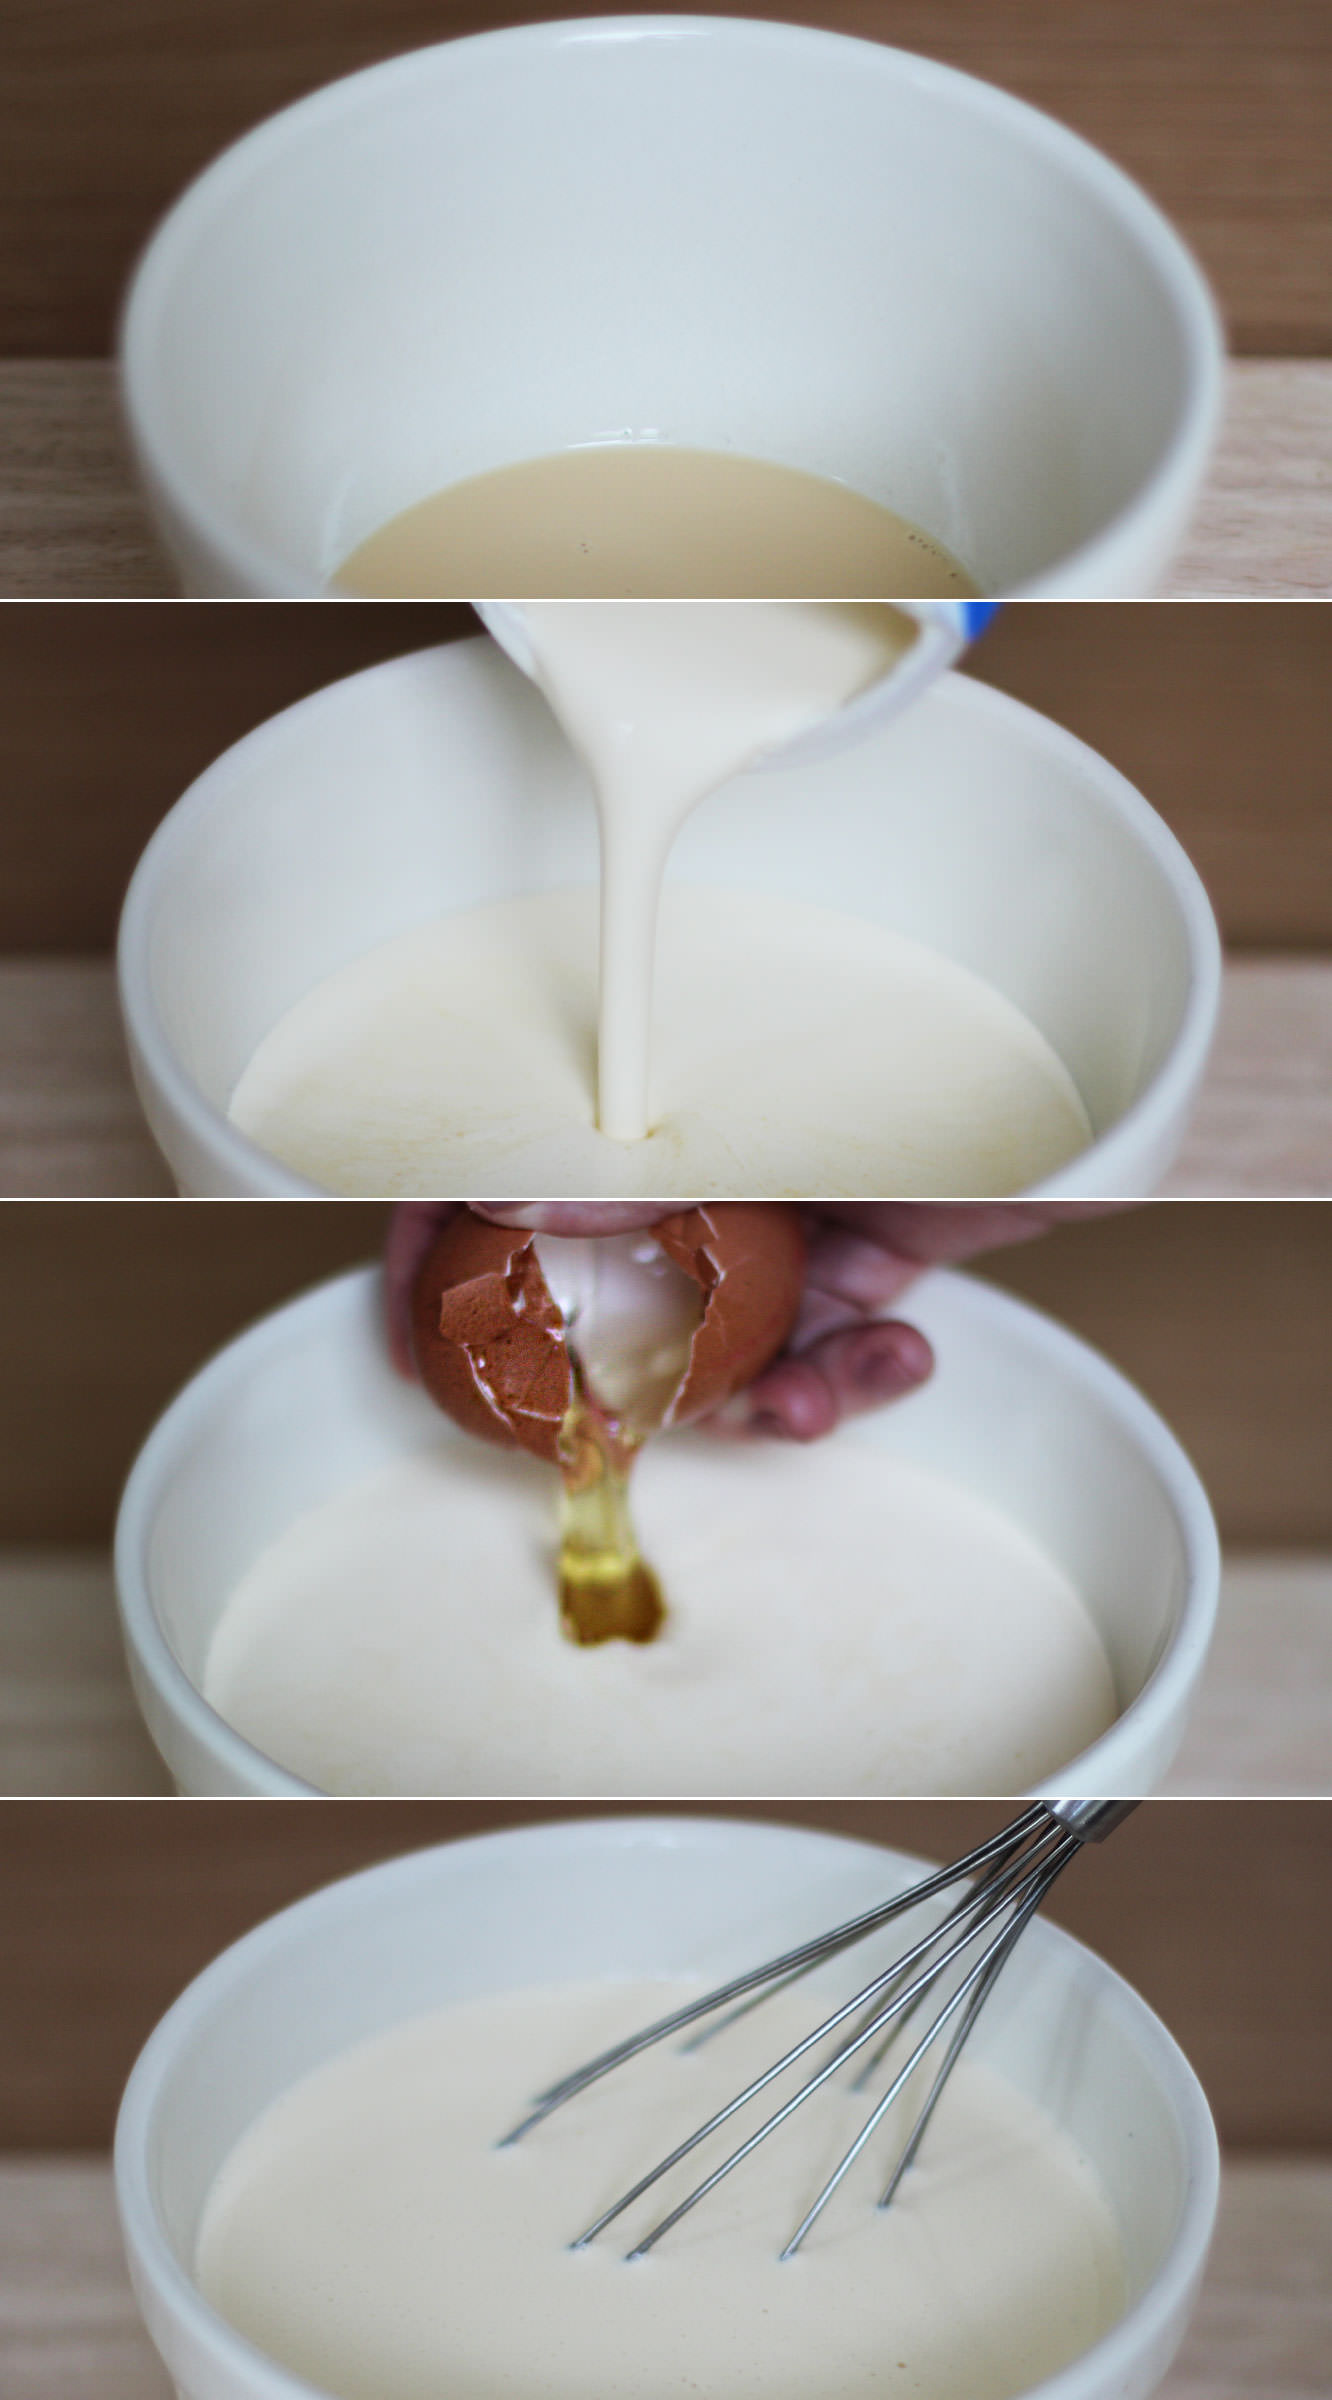
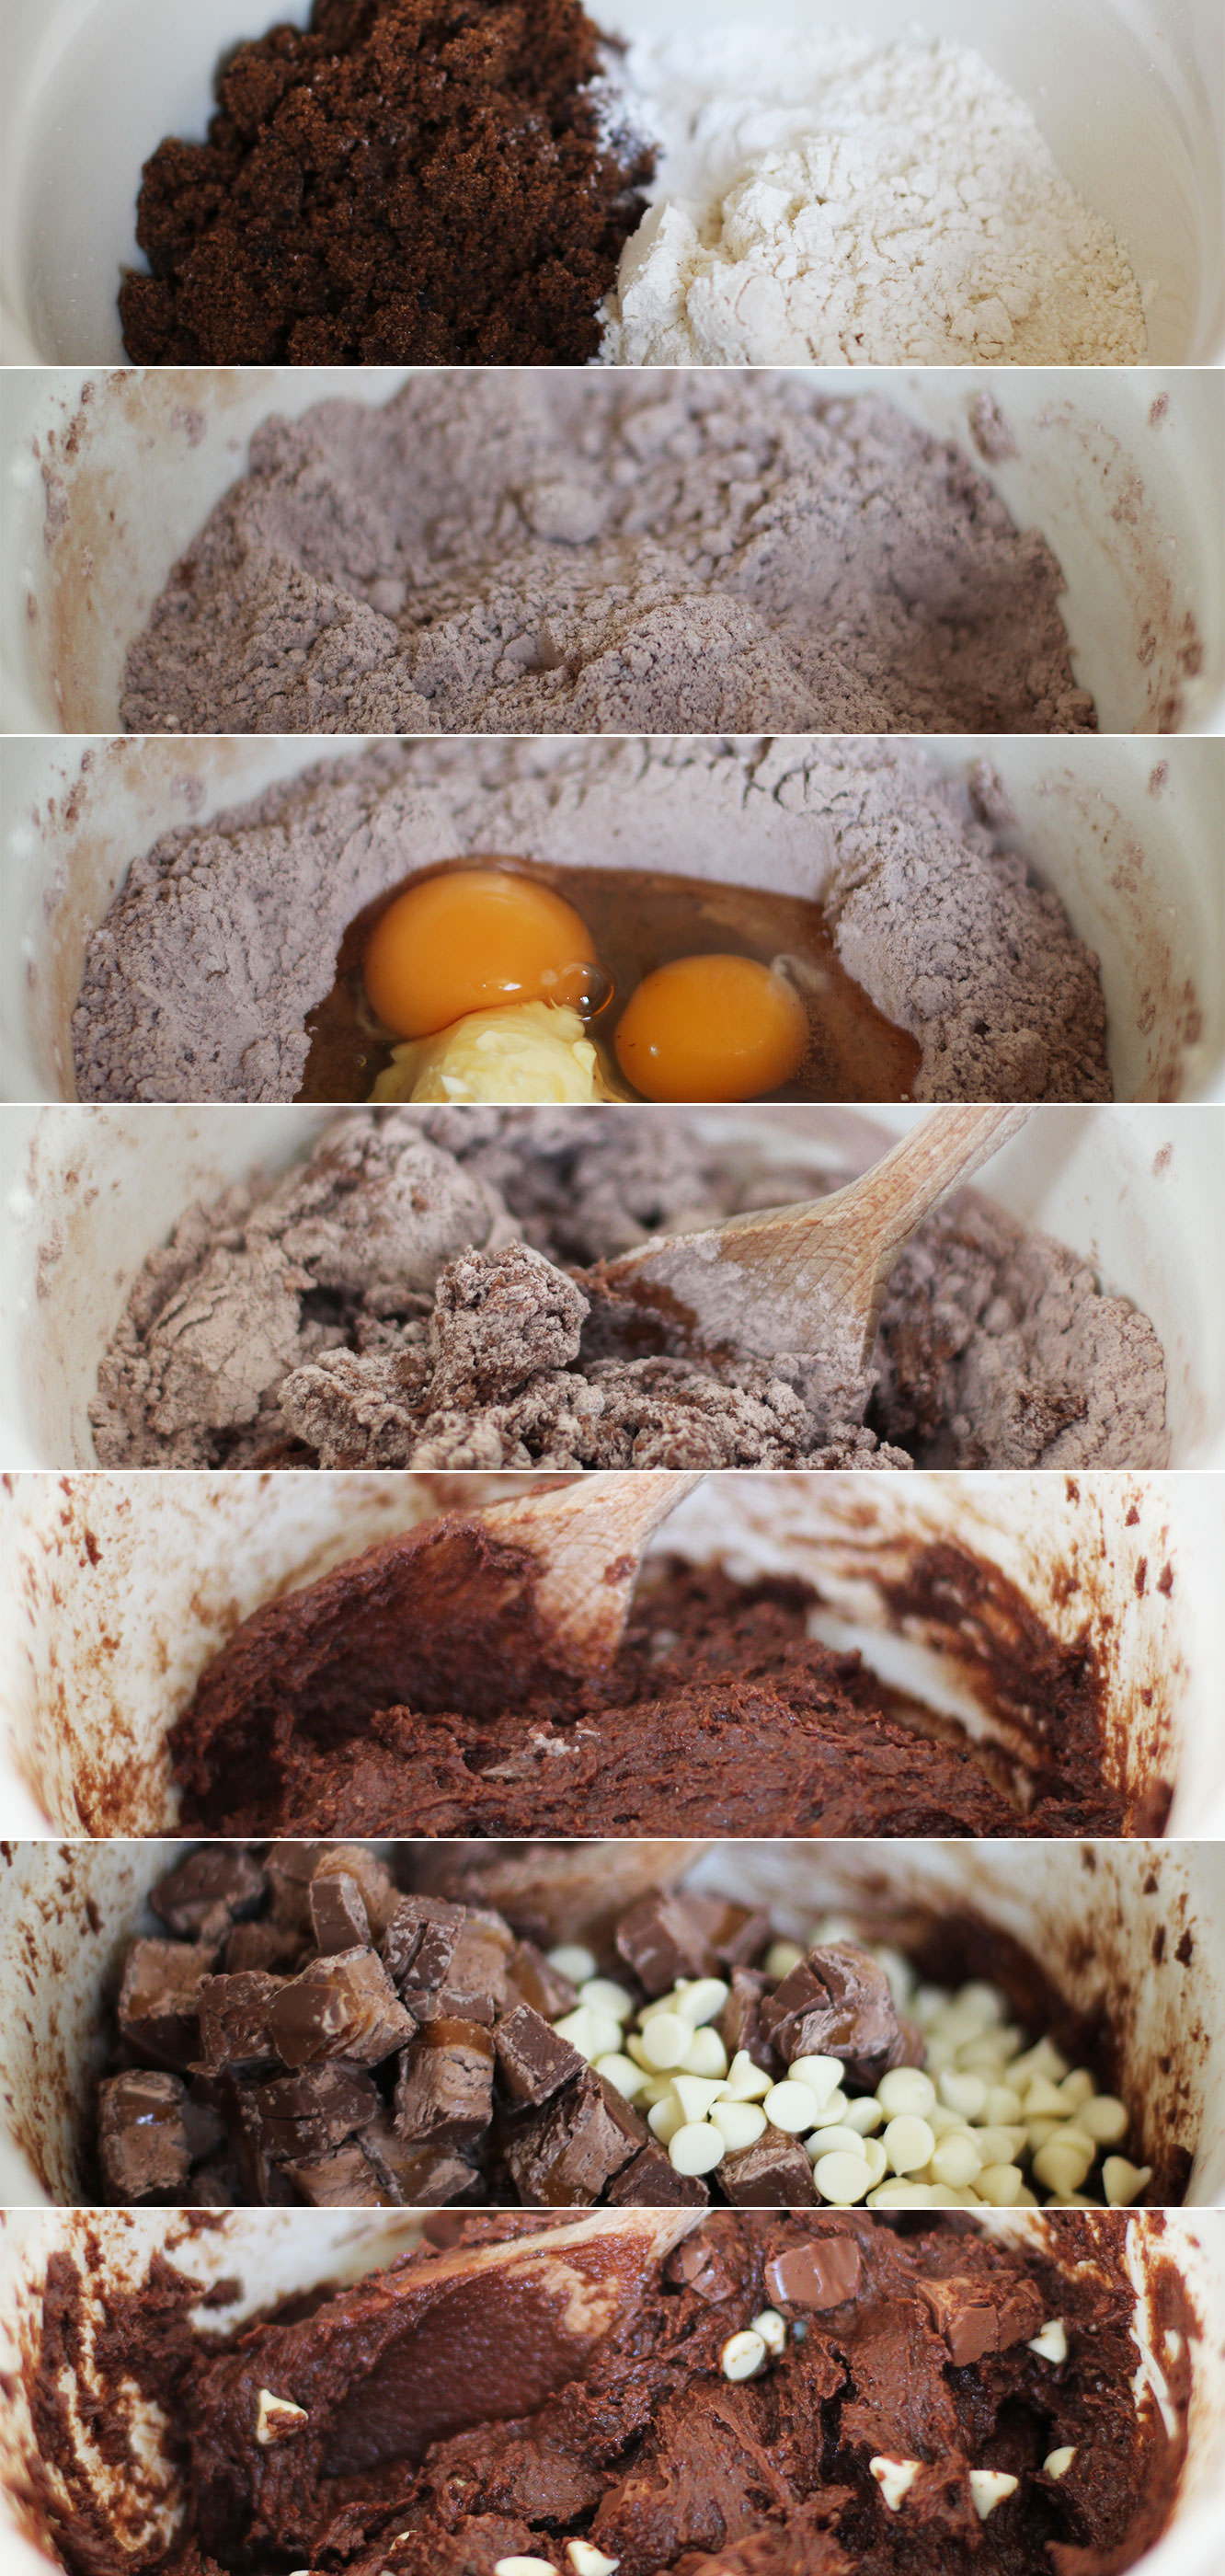
Step one
Whisk together the cream, condensed milk, vanilla and eggs. Set aside, and try not to think about how much cream that was.
Step two
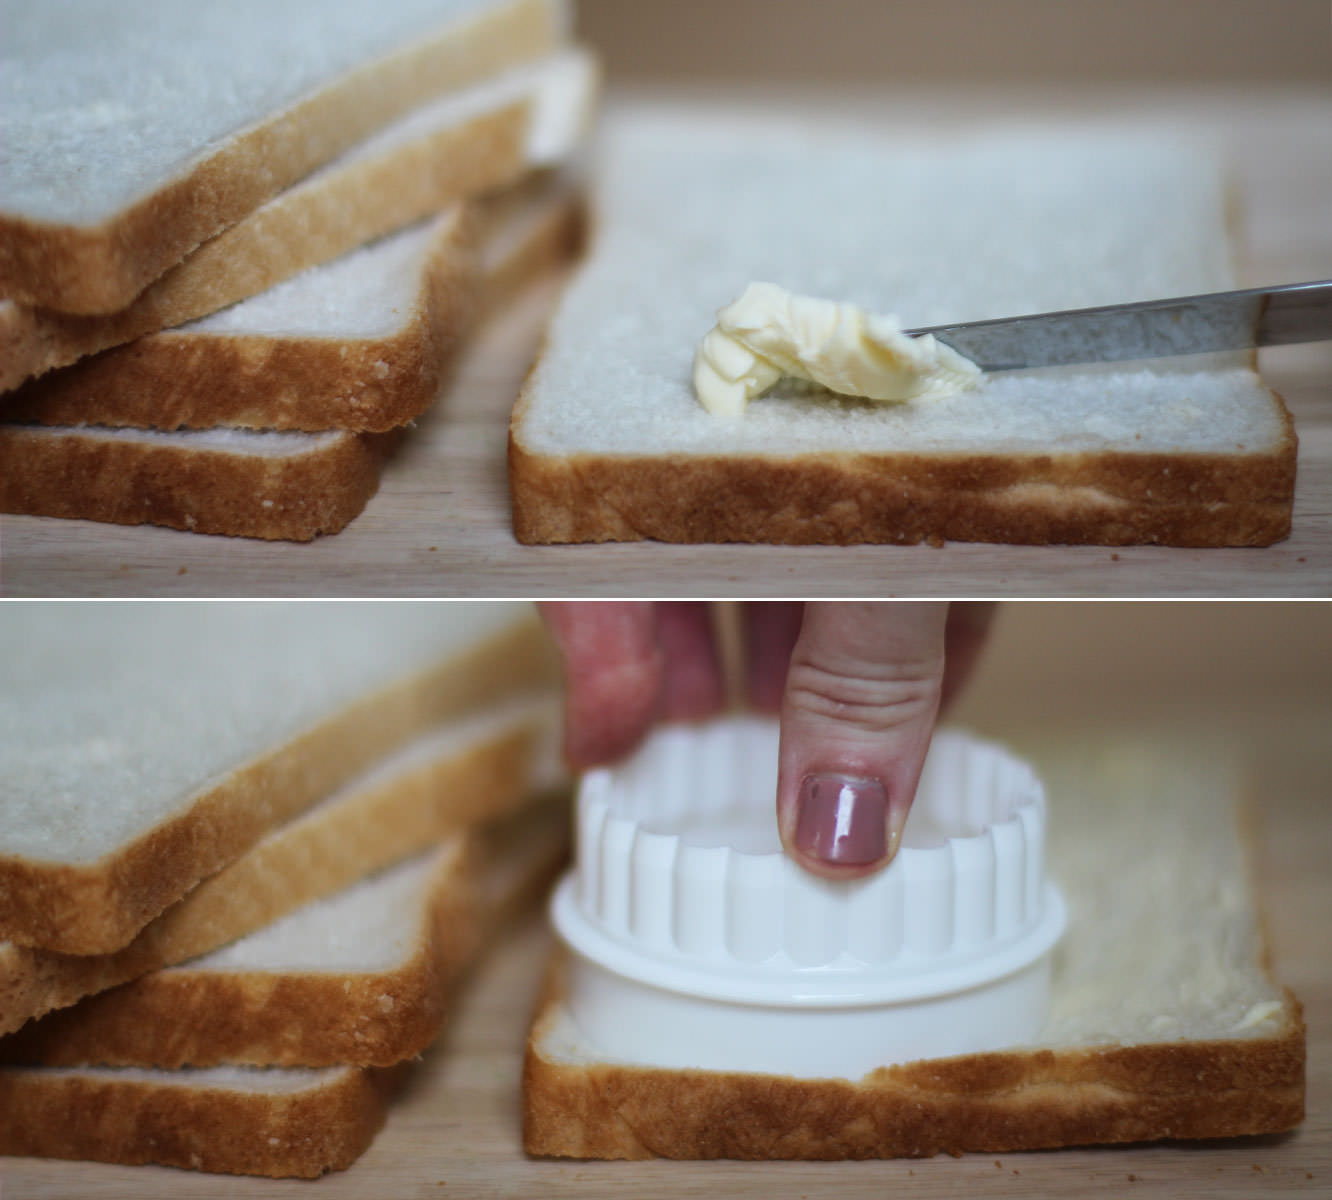
Butter the bread slices generously. I just used regular spreadable butter for this, but if you’re a purest you could buy unsalted.
Using a cutter that’s the same diameter as your ramekins, cut circles out of the bread. Chop the offcuts into small pieces and leave to one side.
Step three
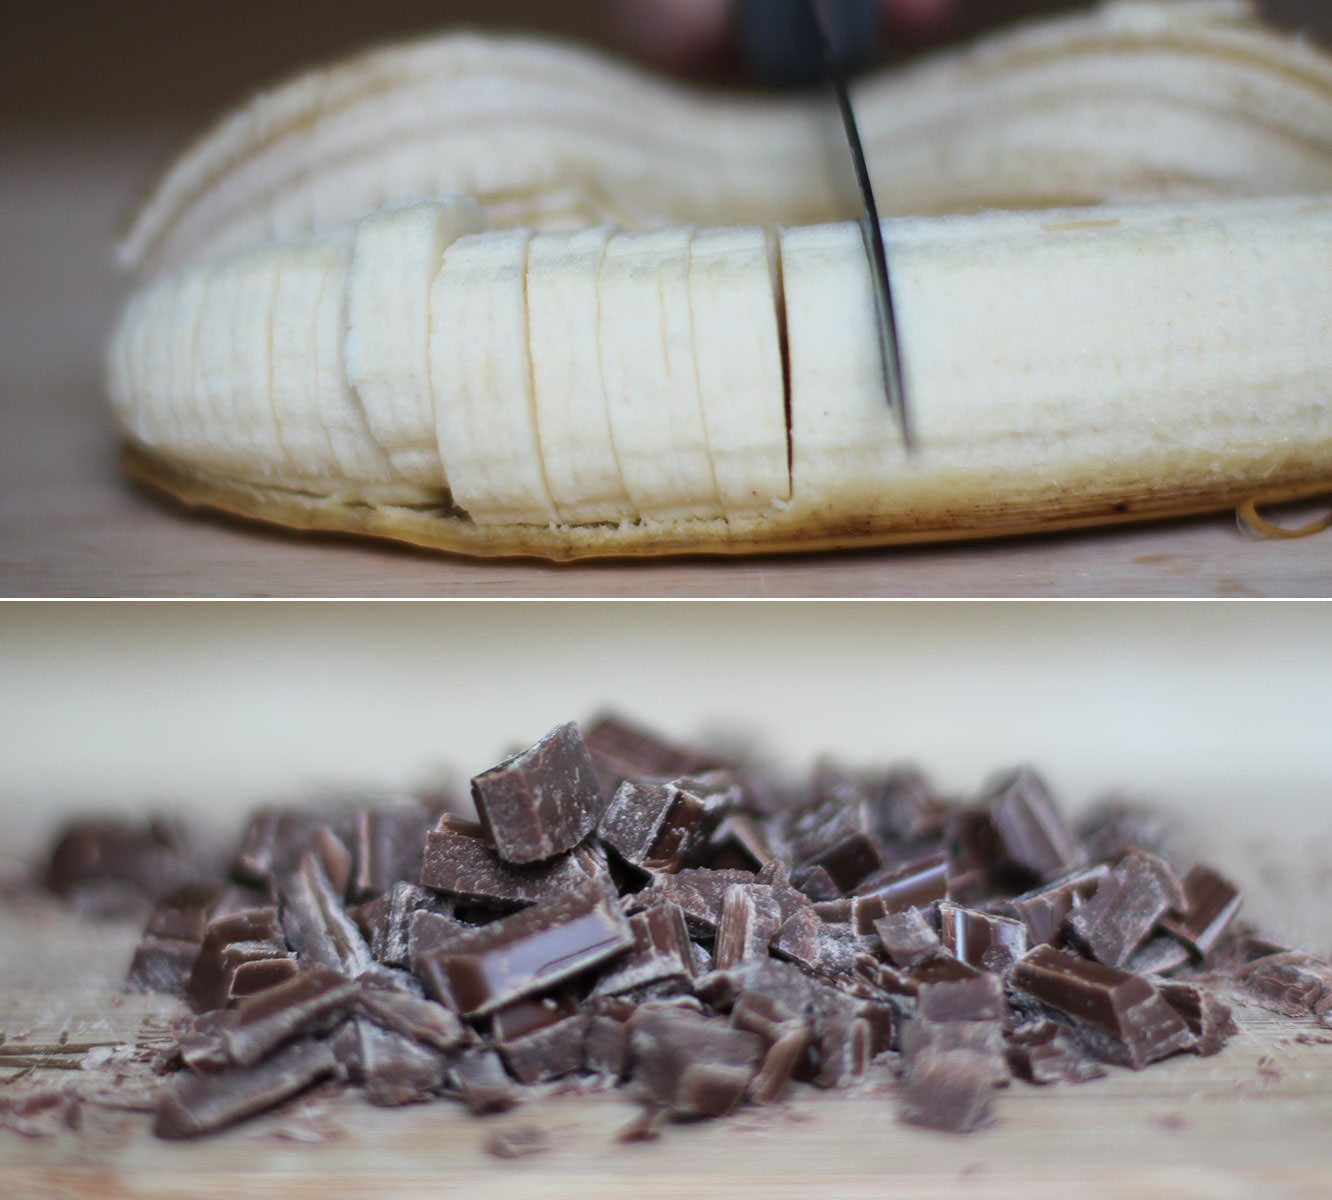
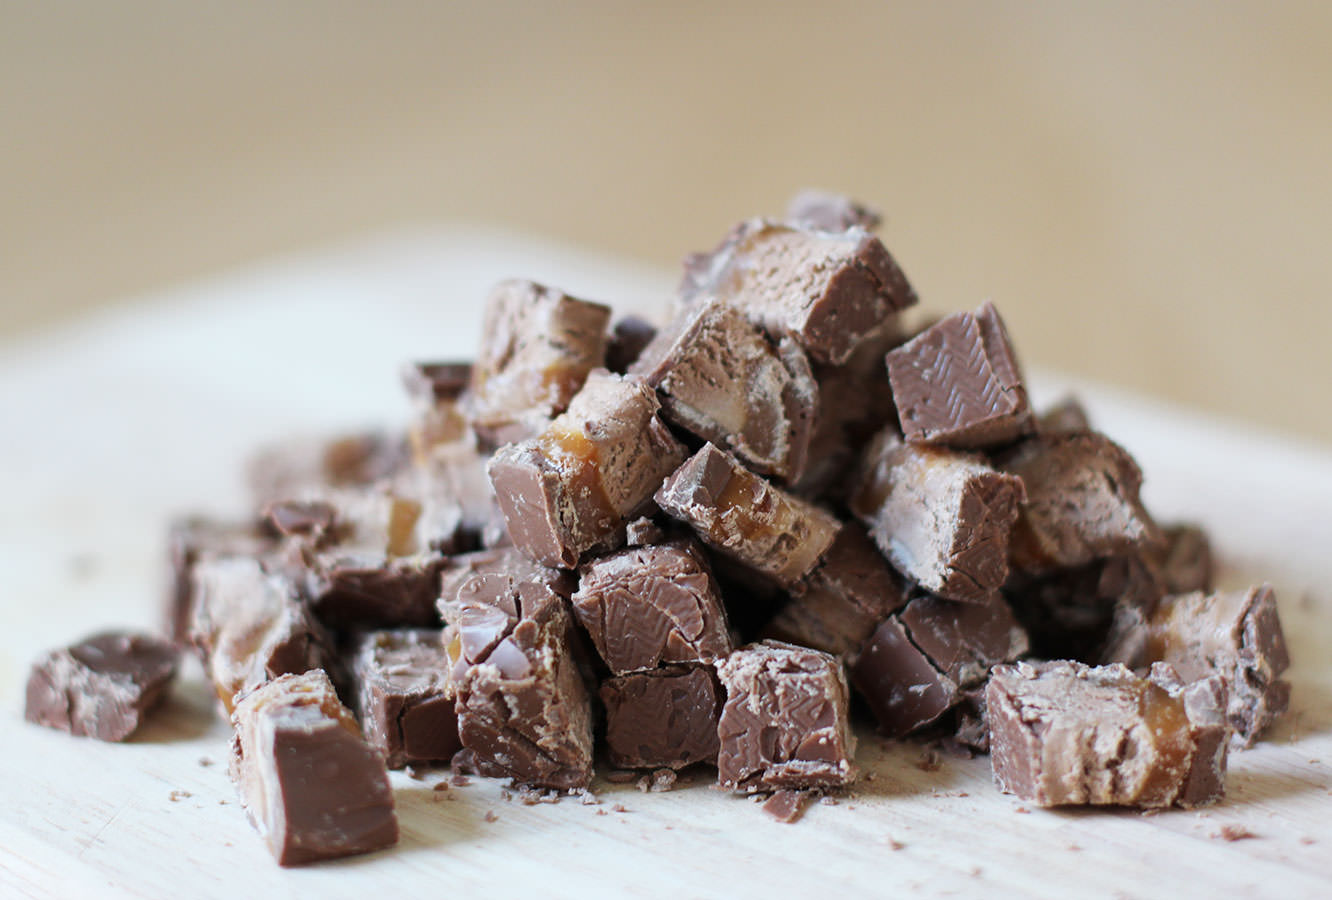
Slice the banana into thin pieces and chop the chocolate into small chunks (as if I haven’t said it enough – a bread knife is the best way to do this).
Step four
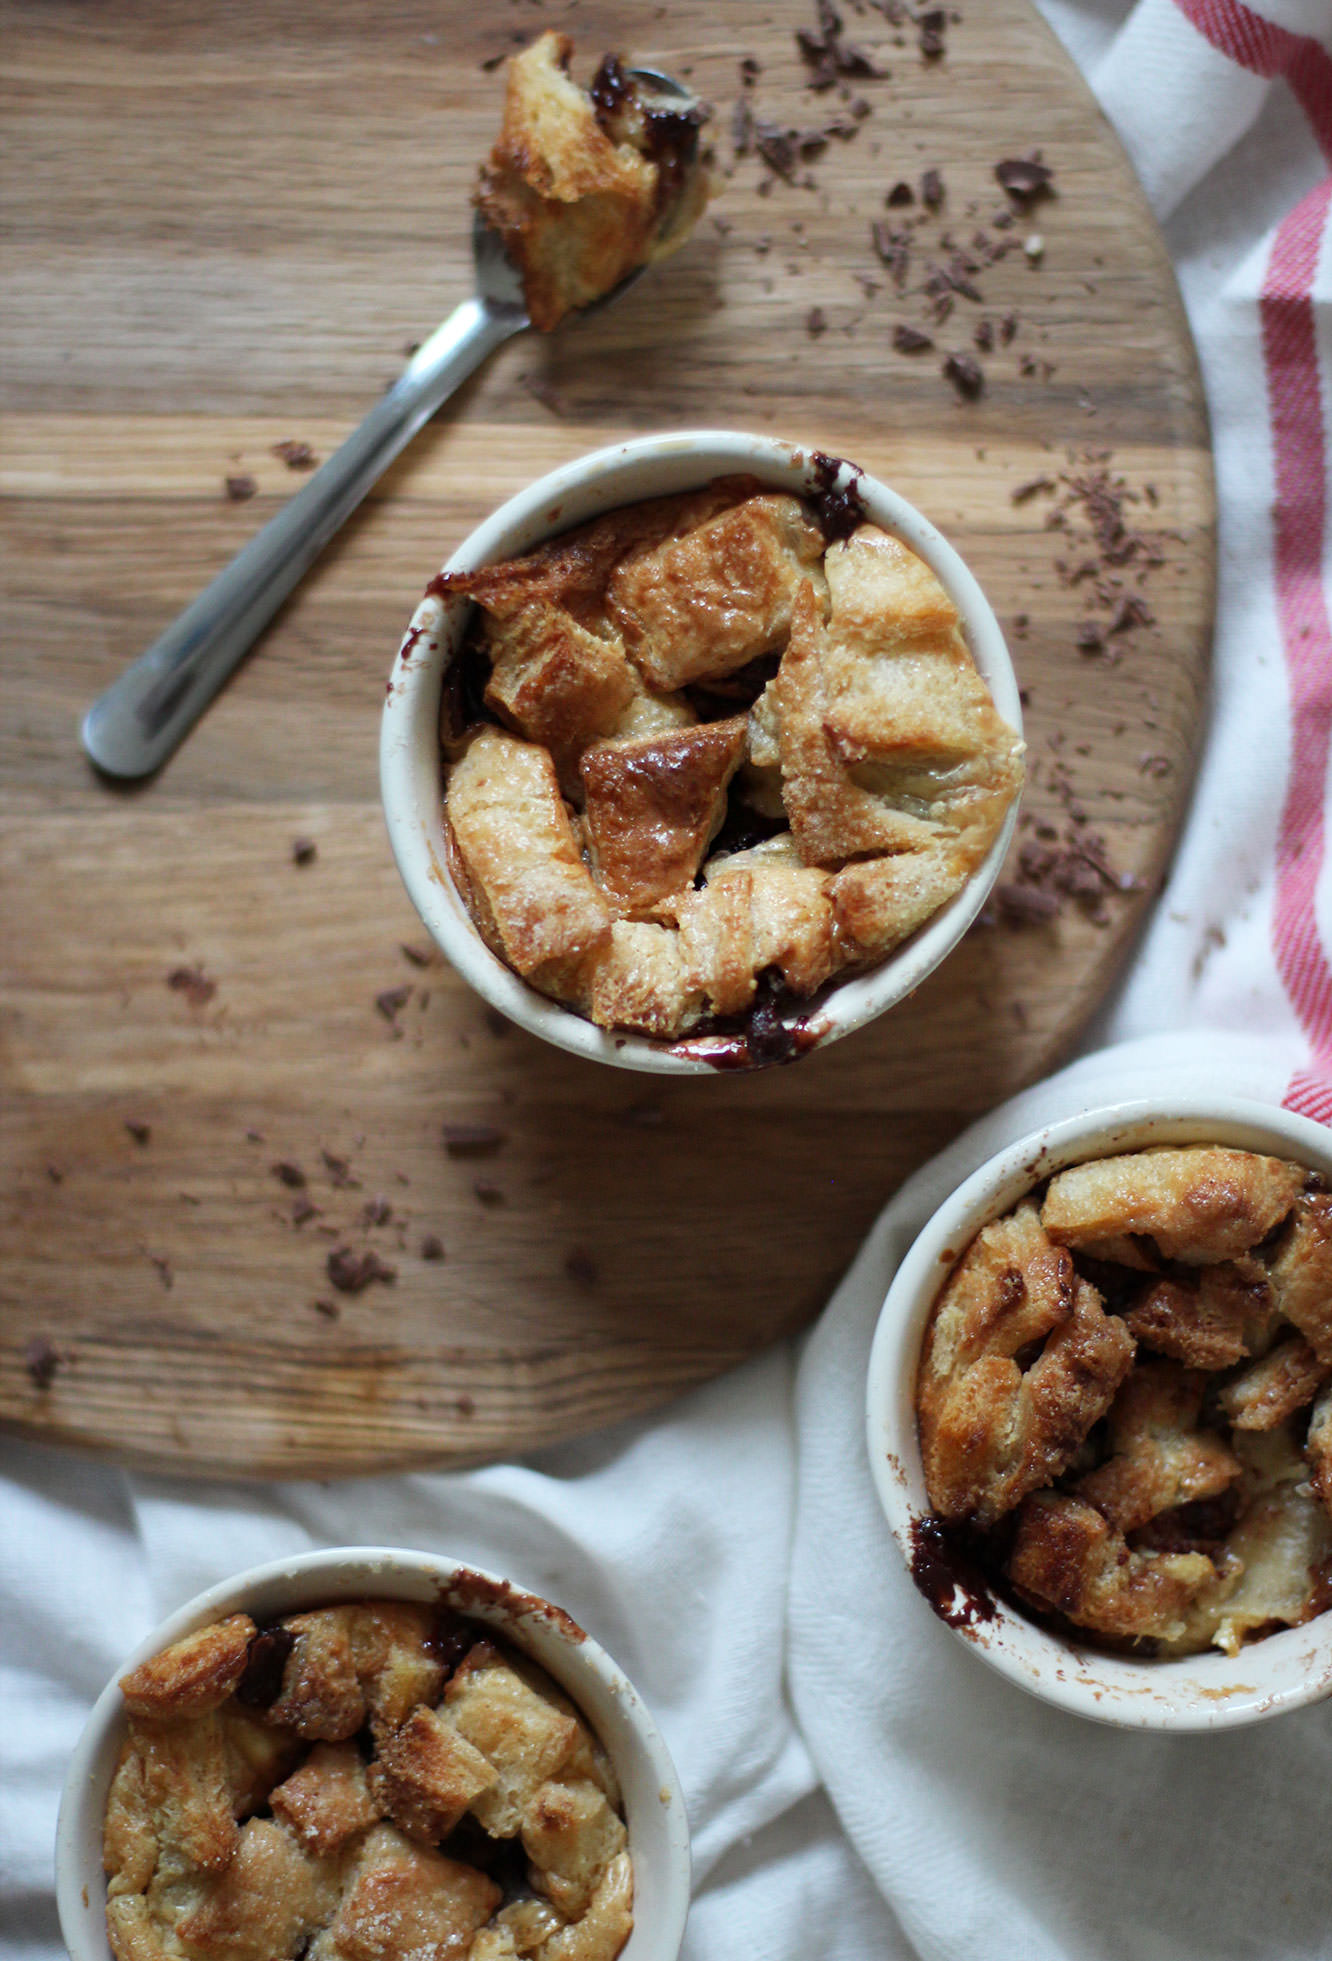
Assemble!
Butter the ramekins and layer up the puddings. Bread, banana, chocolate, sugar, repeat. Finish the last layer with bread using the offcuts and sprinkle some caster sugar on top, this will make a lovely crisp topping.
Step five
Once all the ramekins are layered up, pour the custard mixture on top, try to fill them evenly.
Leave to sit for 20 minutes to let the custard soak into the bread.
Step six
Bake in a pre-heated oven for 35 minutes on 180C/350F/gas mark 4.
Step seven
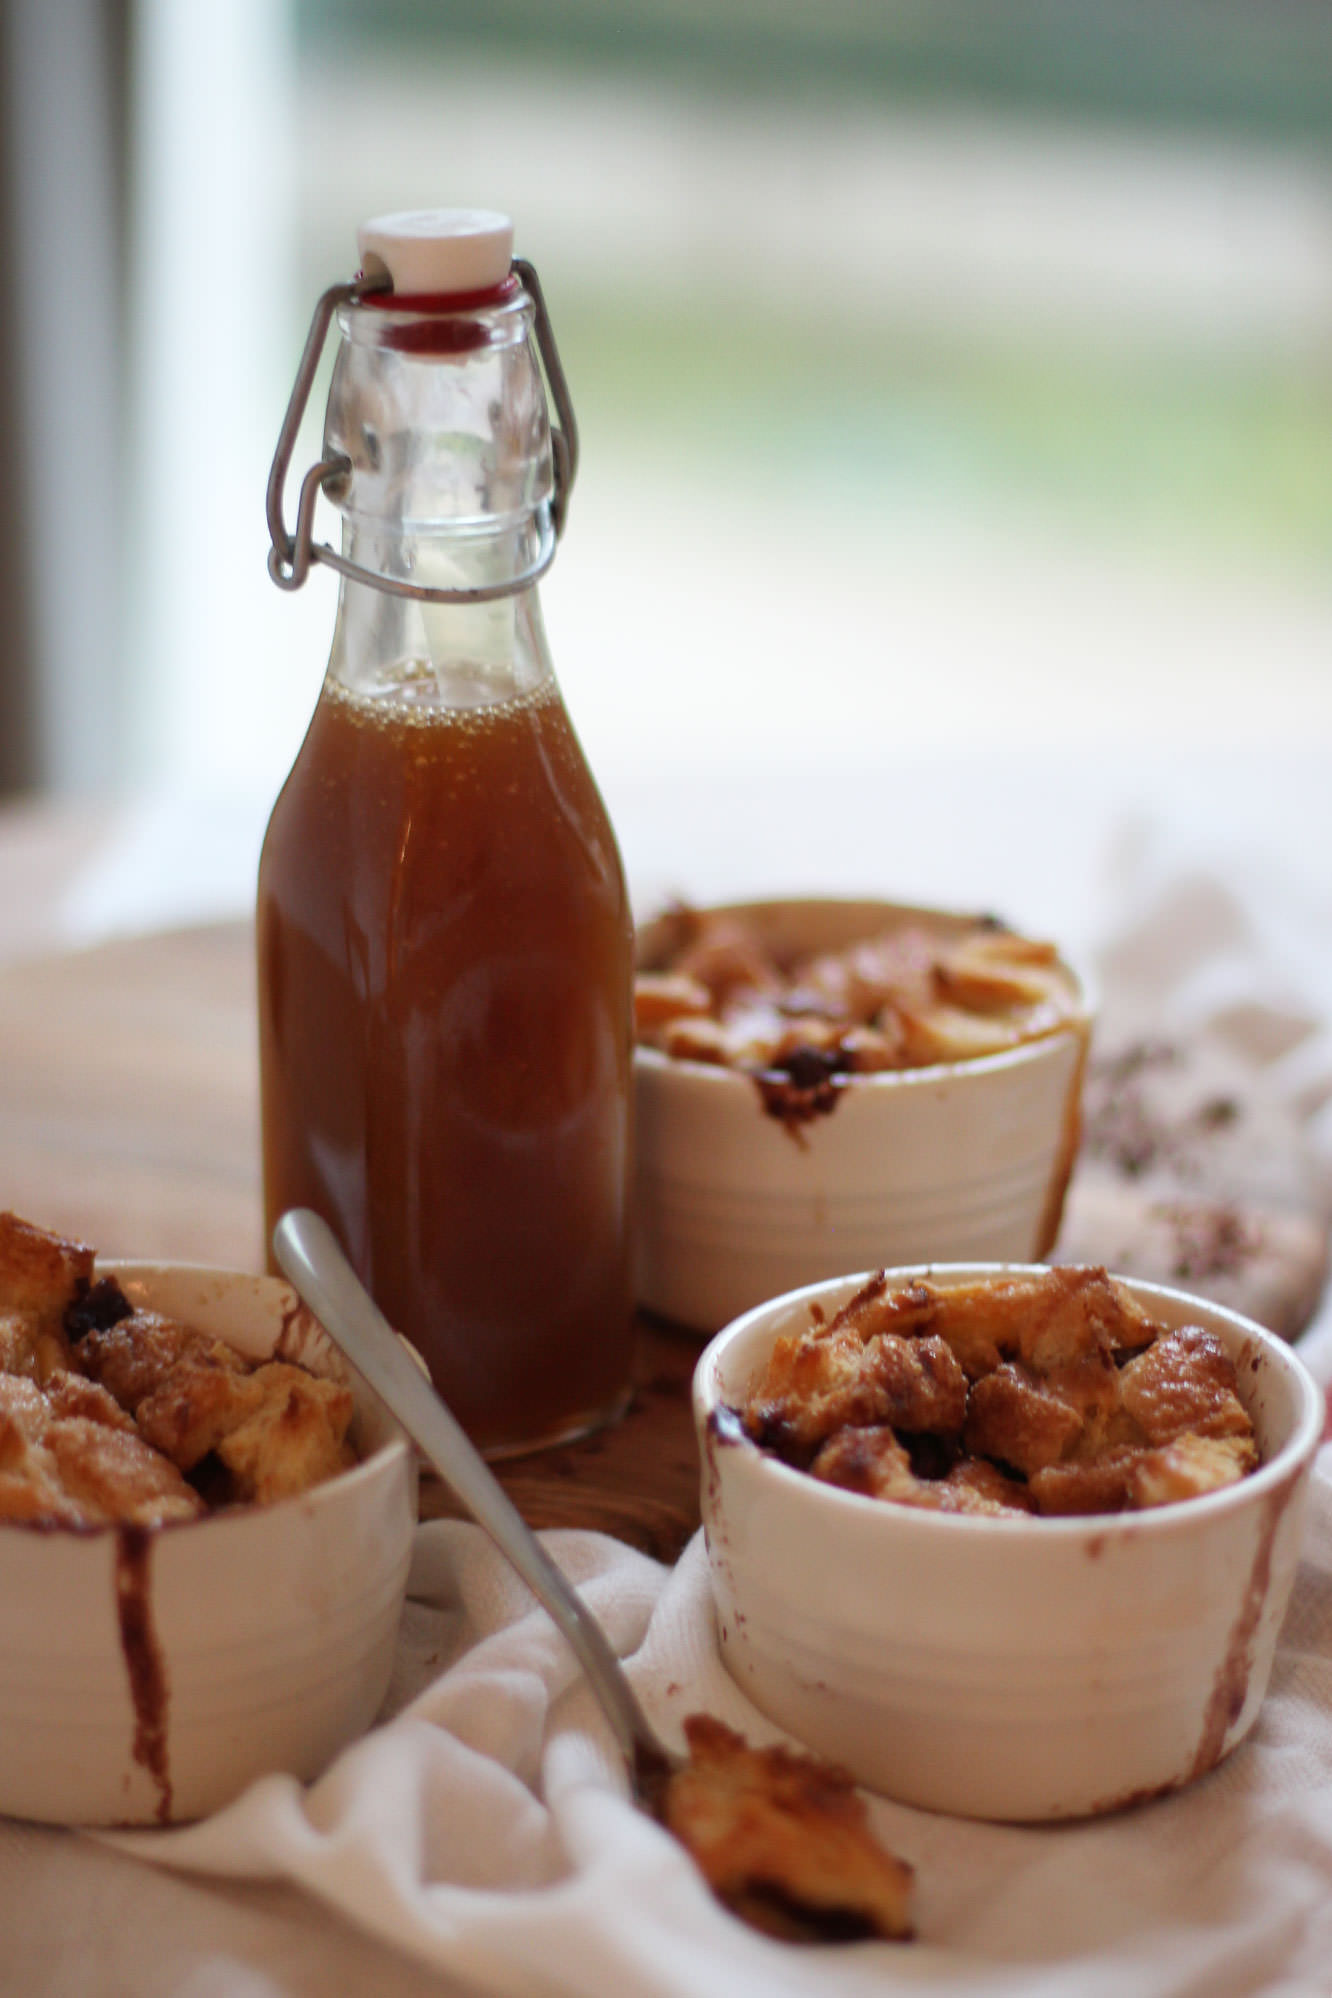
While you are baking the puddings, place all the ingredients for the salted caramel into a saucepan (minus the cream).
Heat gently until melted and then bring to a simmer. Simmer for 10 minutes. Stir regularly so that it doesn’t catch and burn. Leave to cool for about half an hour.
Step eight
Once cooled, stir in the 100ml double cream.
Not the prettiest things but they aren’t too shabby to eat. Bon apetit!
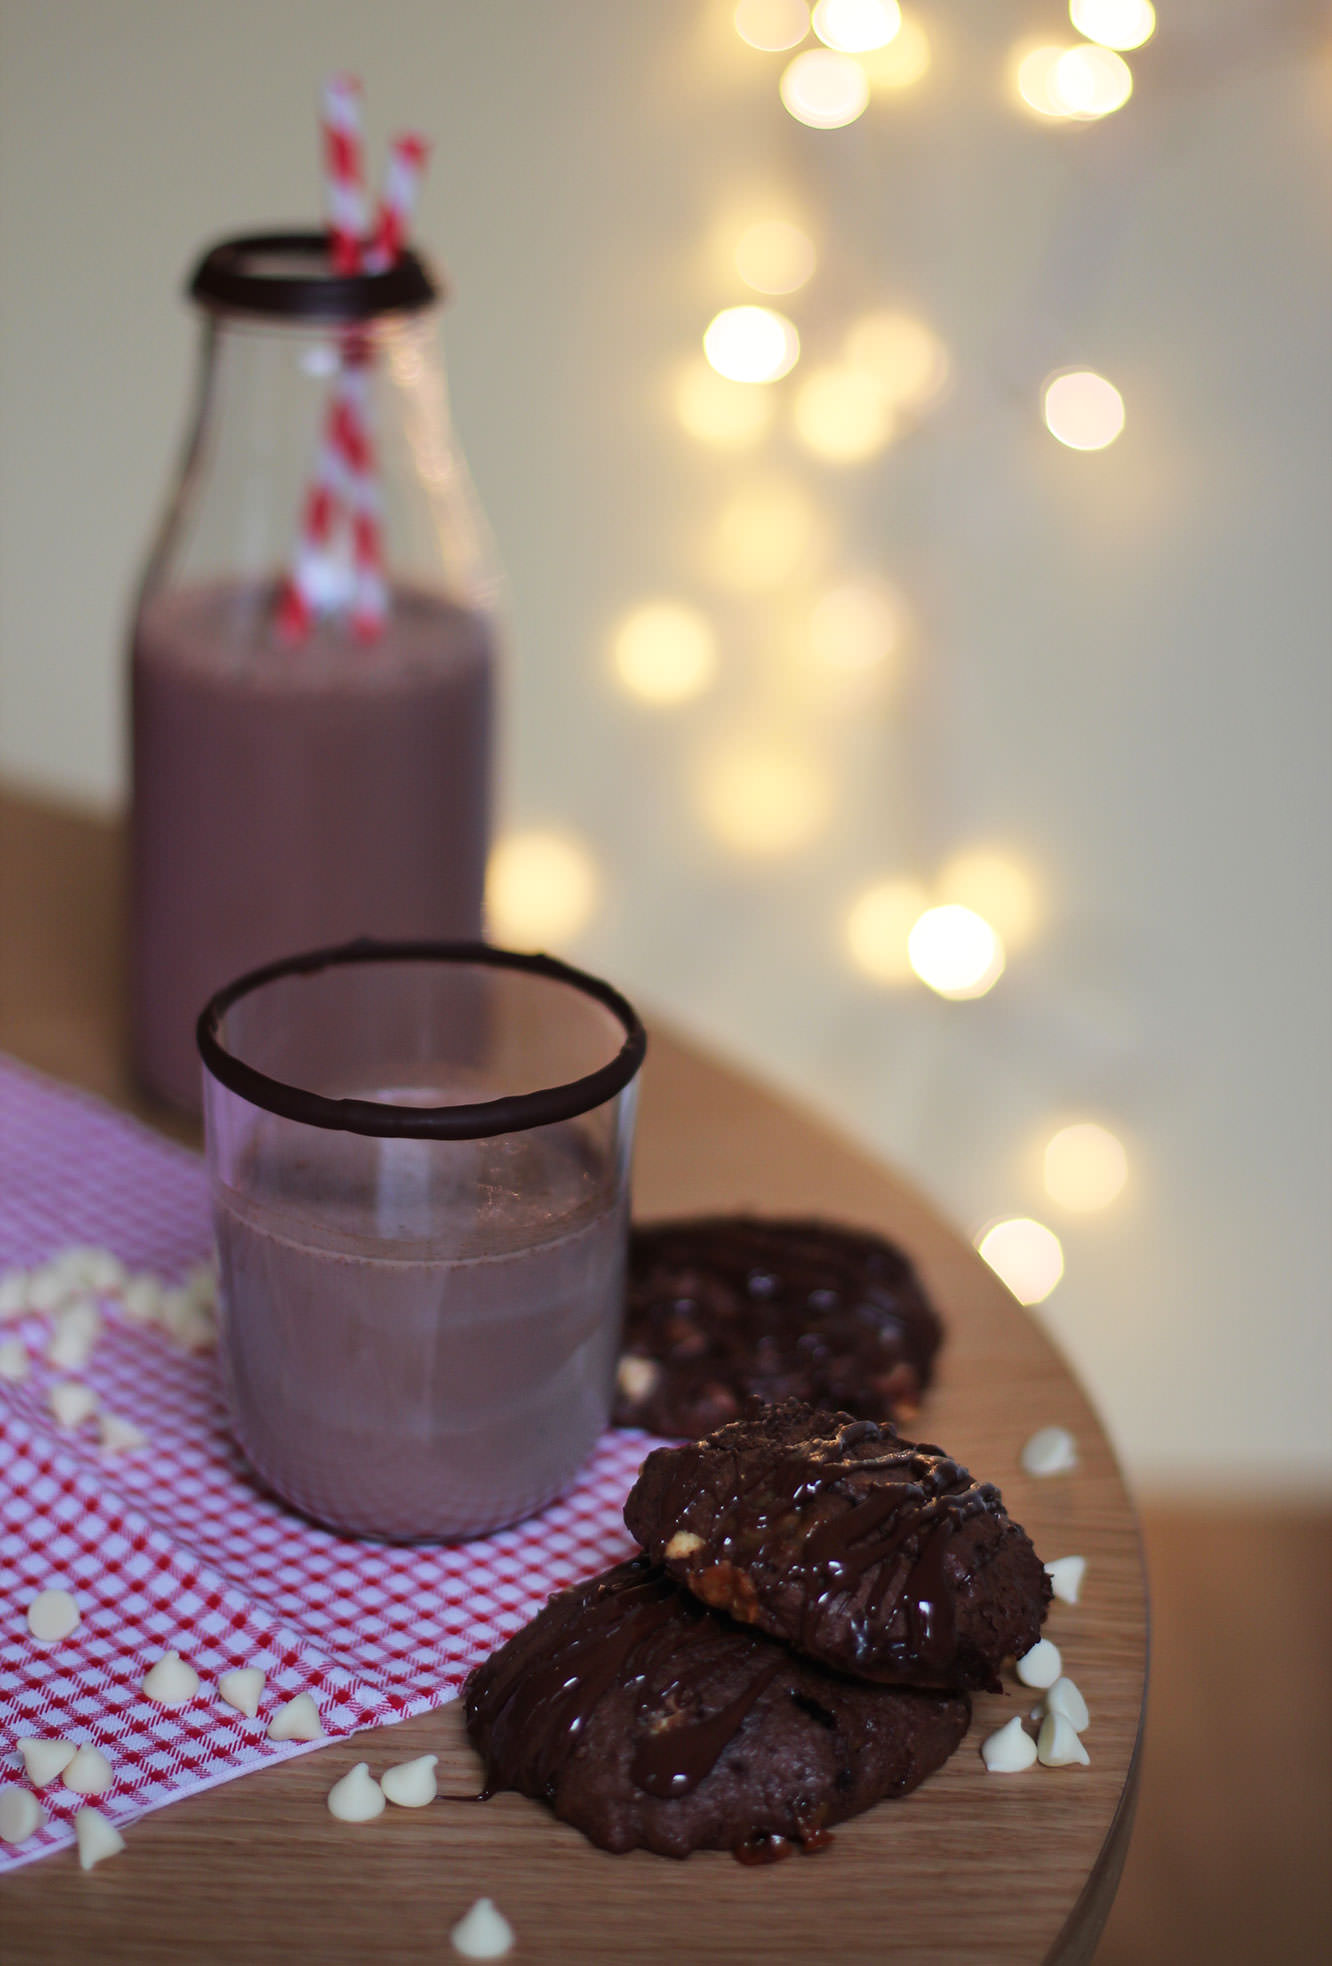
In England we tend to leave Santa a sherry or a brandy and a mince pie. I’ve heard that in some Scandinavian countries he gets ‘treated’ to porridge…lucky guy. Well this post is a nod to our North American friends from whom Santa receives milk and cookies. I decided to jazz up the traditional a little, after all, you hard working parents deserve a little more than a glass of milk on the 24th.
I should start off by saying that the recipe leans more towards a sort of whoopie pie consistency than a cookie, a whookie if you’d like. Perhaps if you wanted to commit to whoopie pies you could sandwich them with the salted caramel buttercream I made a couple of months back.
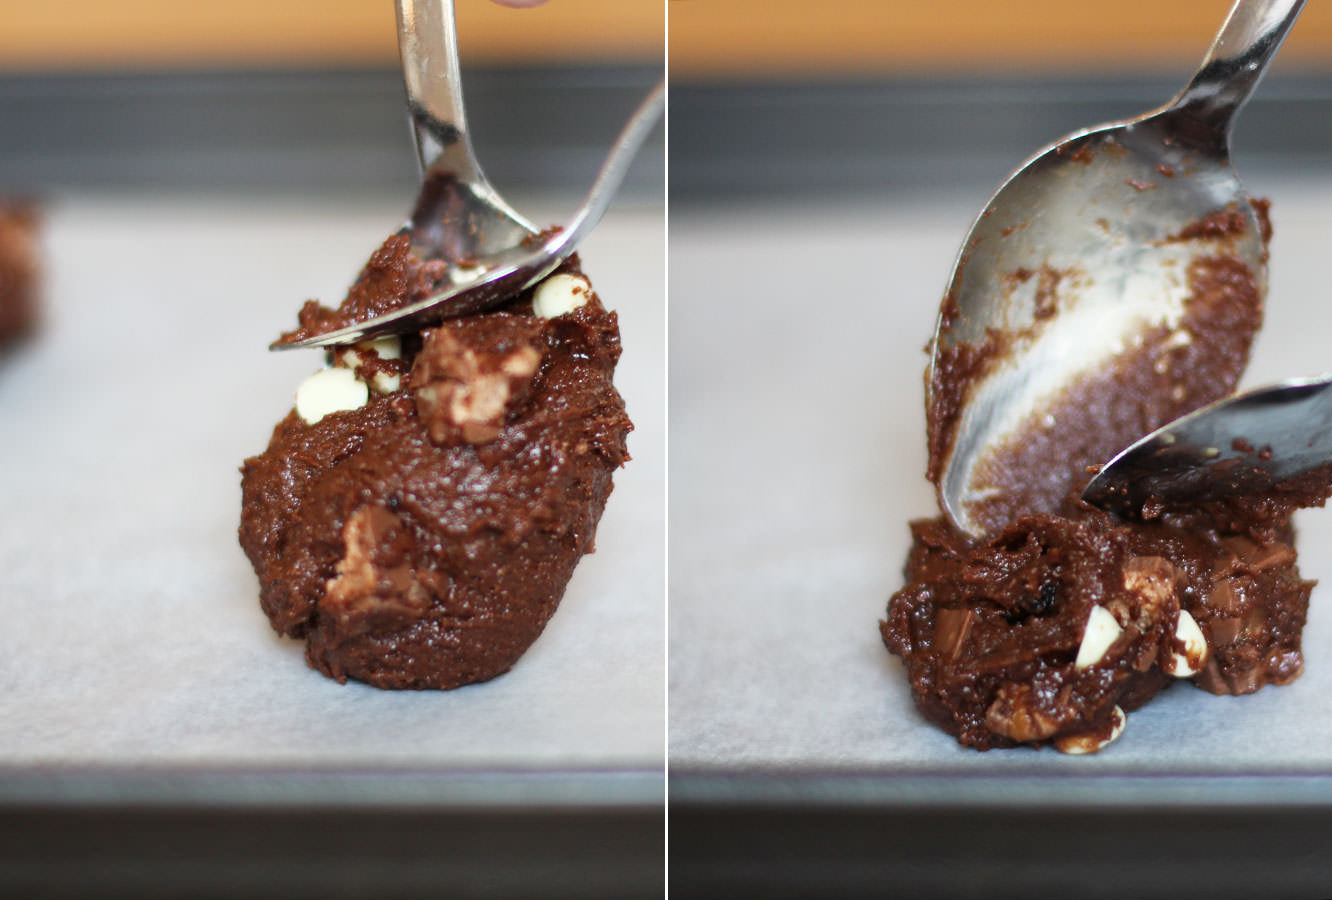
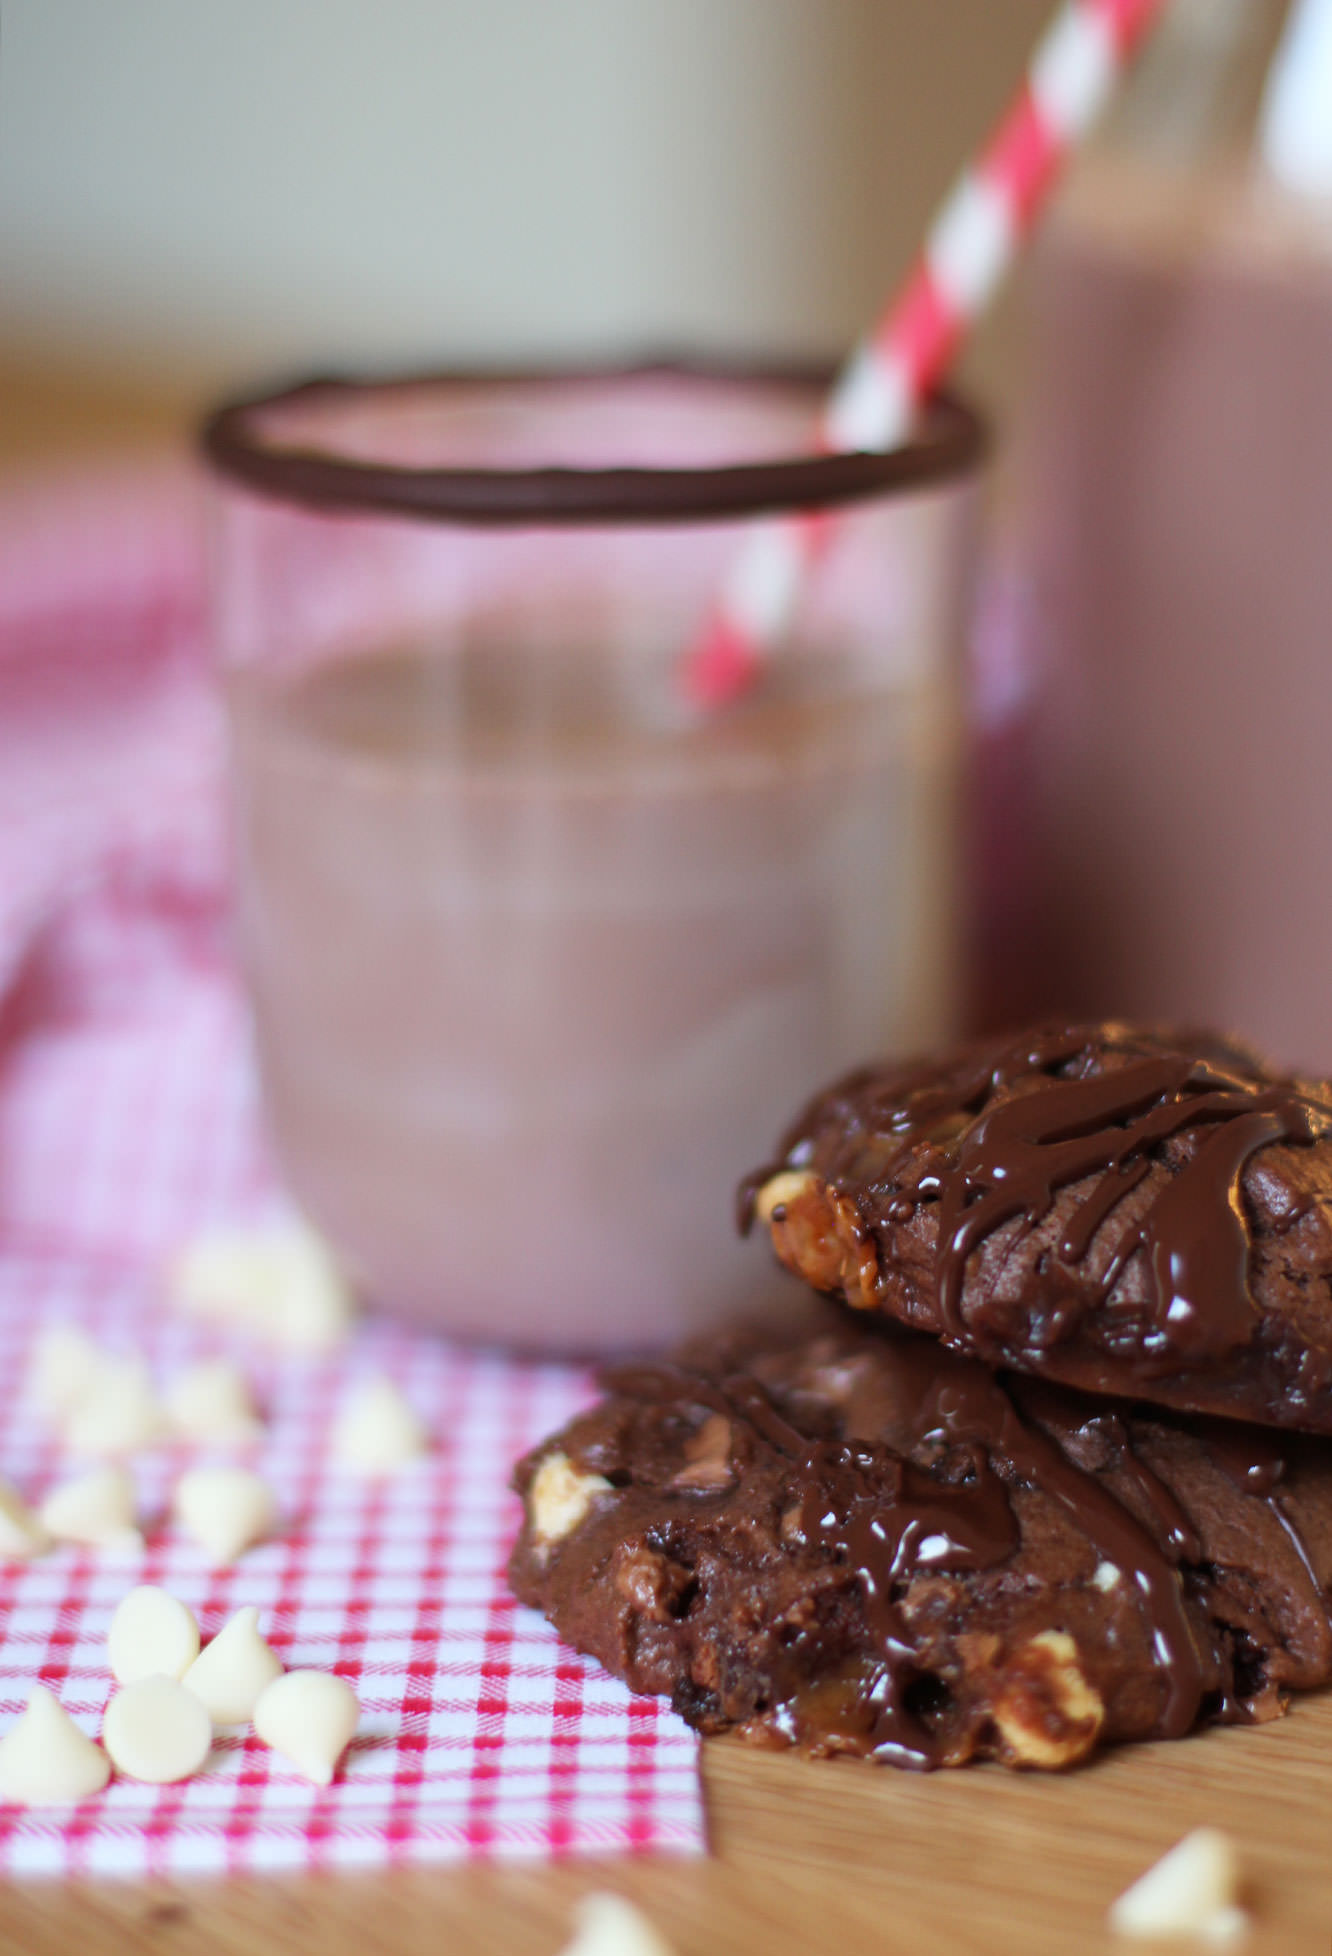
Without further ado here’s an easy Bailey’s (Irish cream) cocktail (which is more like a pudding really) and triple chocolate Mars Bar whookies.
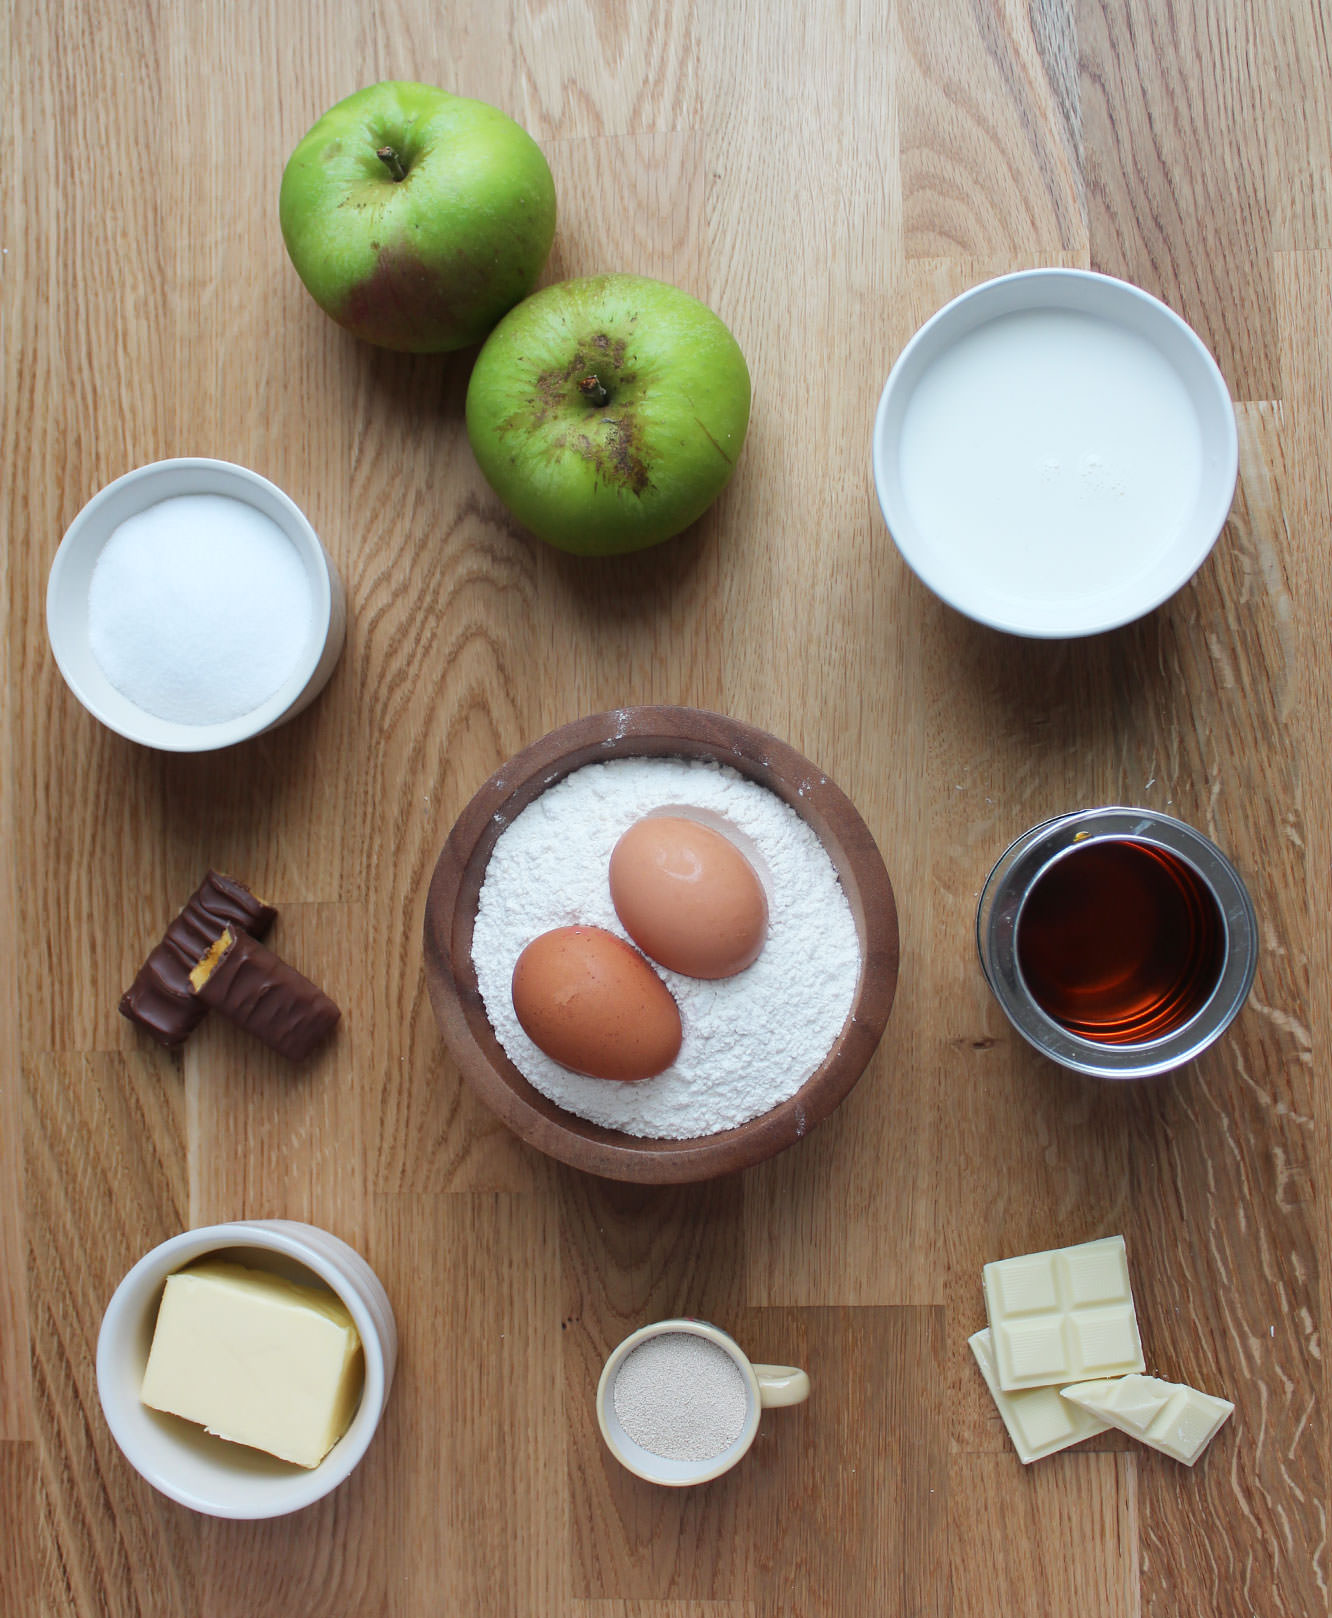
You will need
260g/9 oz Plain flour
150g/5.5 oz Soft dark brown sugar
100g/3.5 oz Unsalted butted
100g/3.5 oz White chocolate chips
40g/1.5 oz Cocoa powder
50-100g/2-3.5 oz Dark chocolate
3 Eggs
3 Mars Bars
1.5 tsp Baking powder
1 tbsp Full fat milk
For the Bailey’s cocktail
Bailey’s Irish Cream
Chocolate milk
50g/2 oz Dark chocolate
Rum/Brandy if you have some (I went without)
A sprinkle of cinnamon and nutmeg
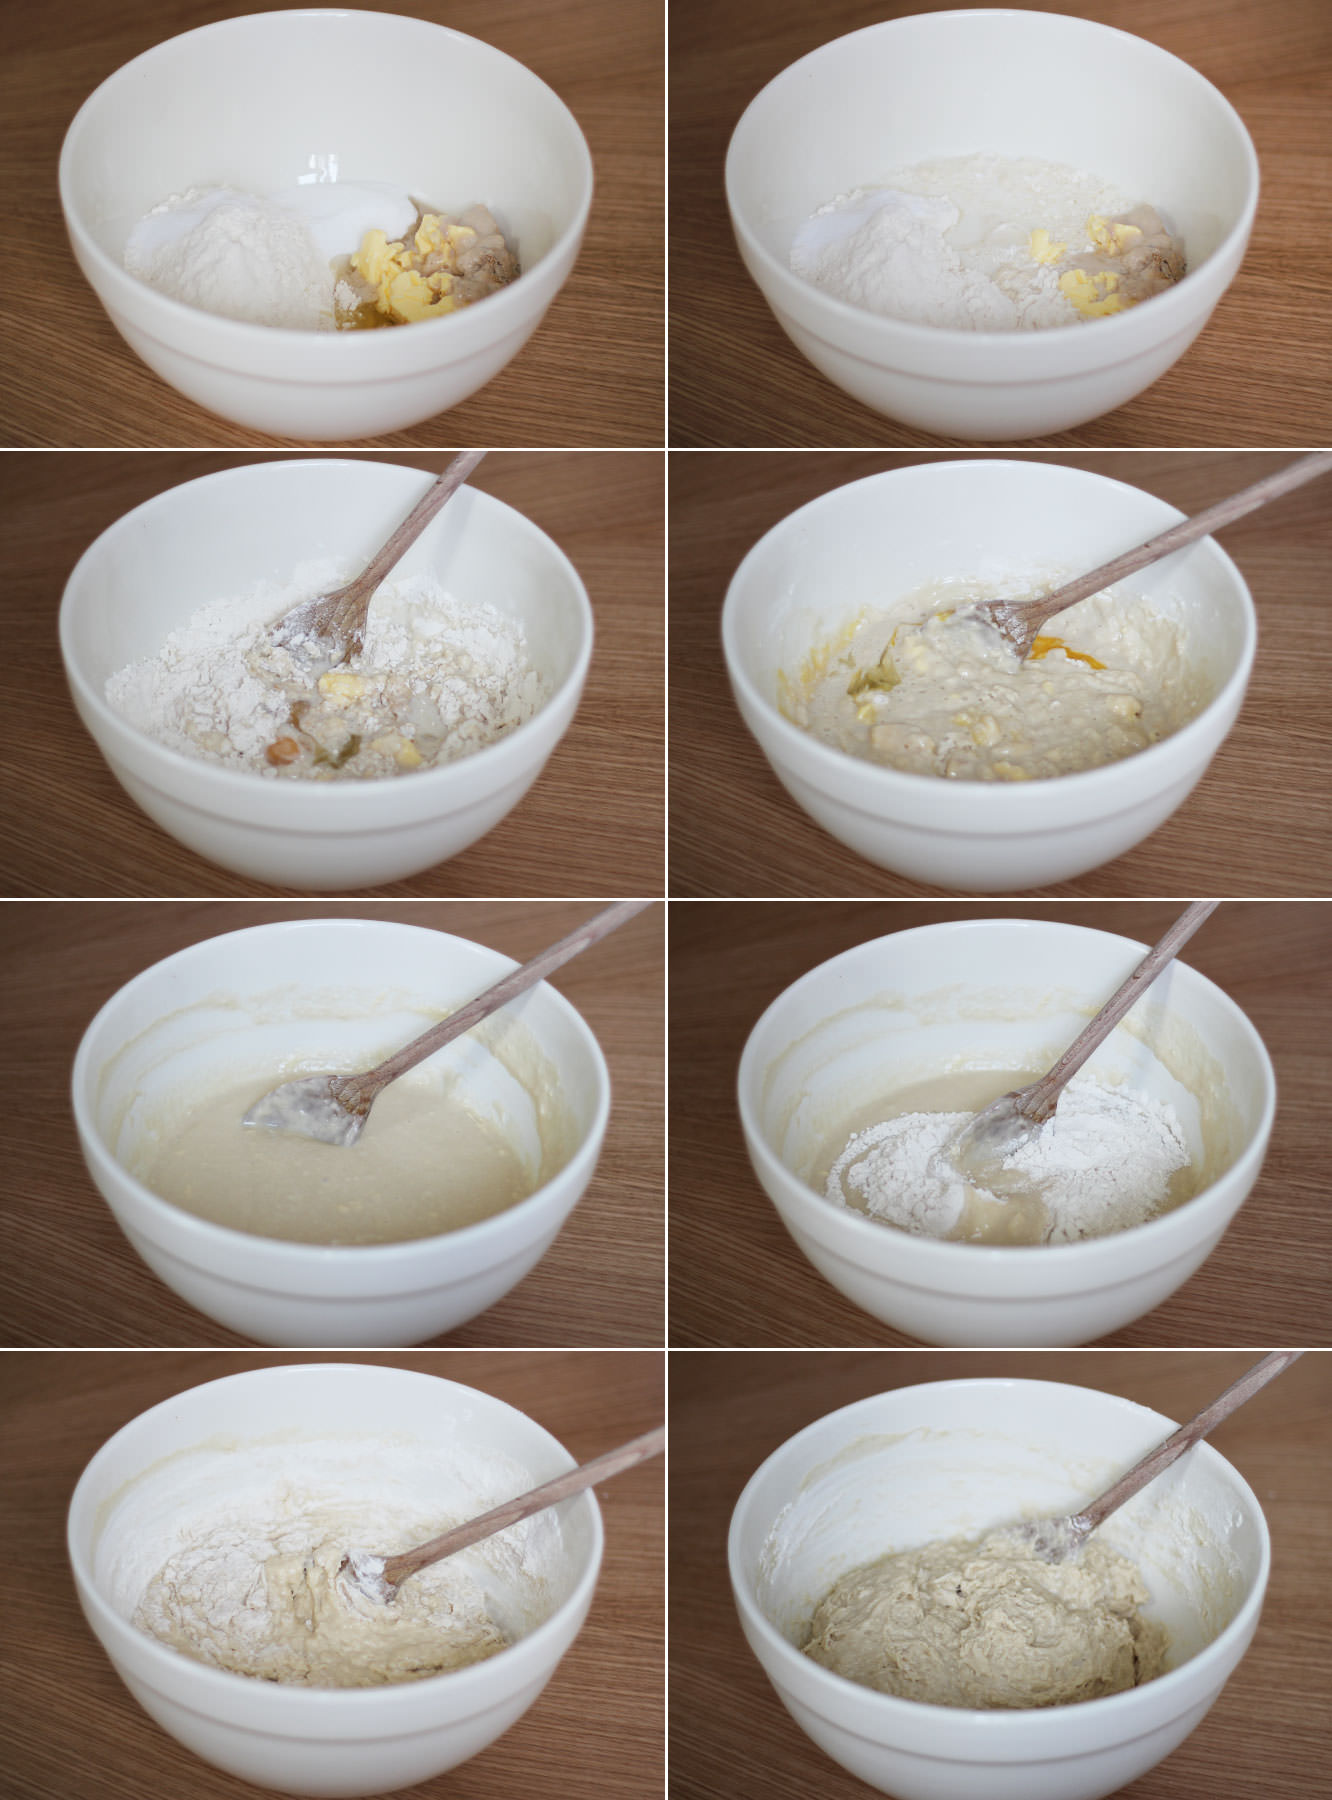
Step one
Chop the Mars bars into small chunks.
If you, like me, can’t control yourself around chocolate, you might want to add an extra one to the mix. There’s just something about chopped up Mars bar that is excessively moorish.
Step two
Combine all the dry ingredients (minus the chocolate) in a large bowl.
Step three
Make a well in the middle and add the eggs, milk and butter. Stir to combine. Ideally your butter will be room temperature, otherwise you’ll be mixing for a while.
Step four
Add the white chocolate and Mars bar and mix again until the chips and chunks are evenly distributed.
Step five
Drop dessert spoonfuls of the mixture onto baking trays lined with greaseproof paper. They won’t spread too much so flatten down a bit.
Step six
Bake on 180C/gas mark 4/350 F for about 15-20 minutes.
Step seven
Leave to cool and then melt the dark chocolate and drizzle over the top.
Step eight
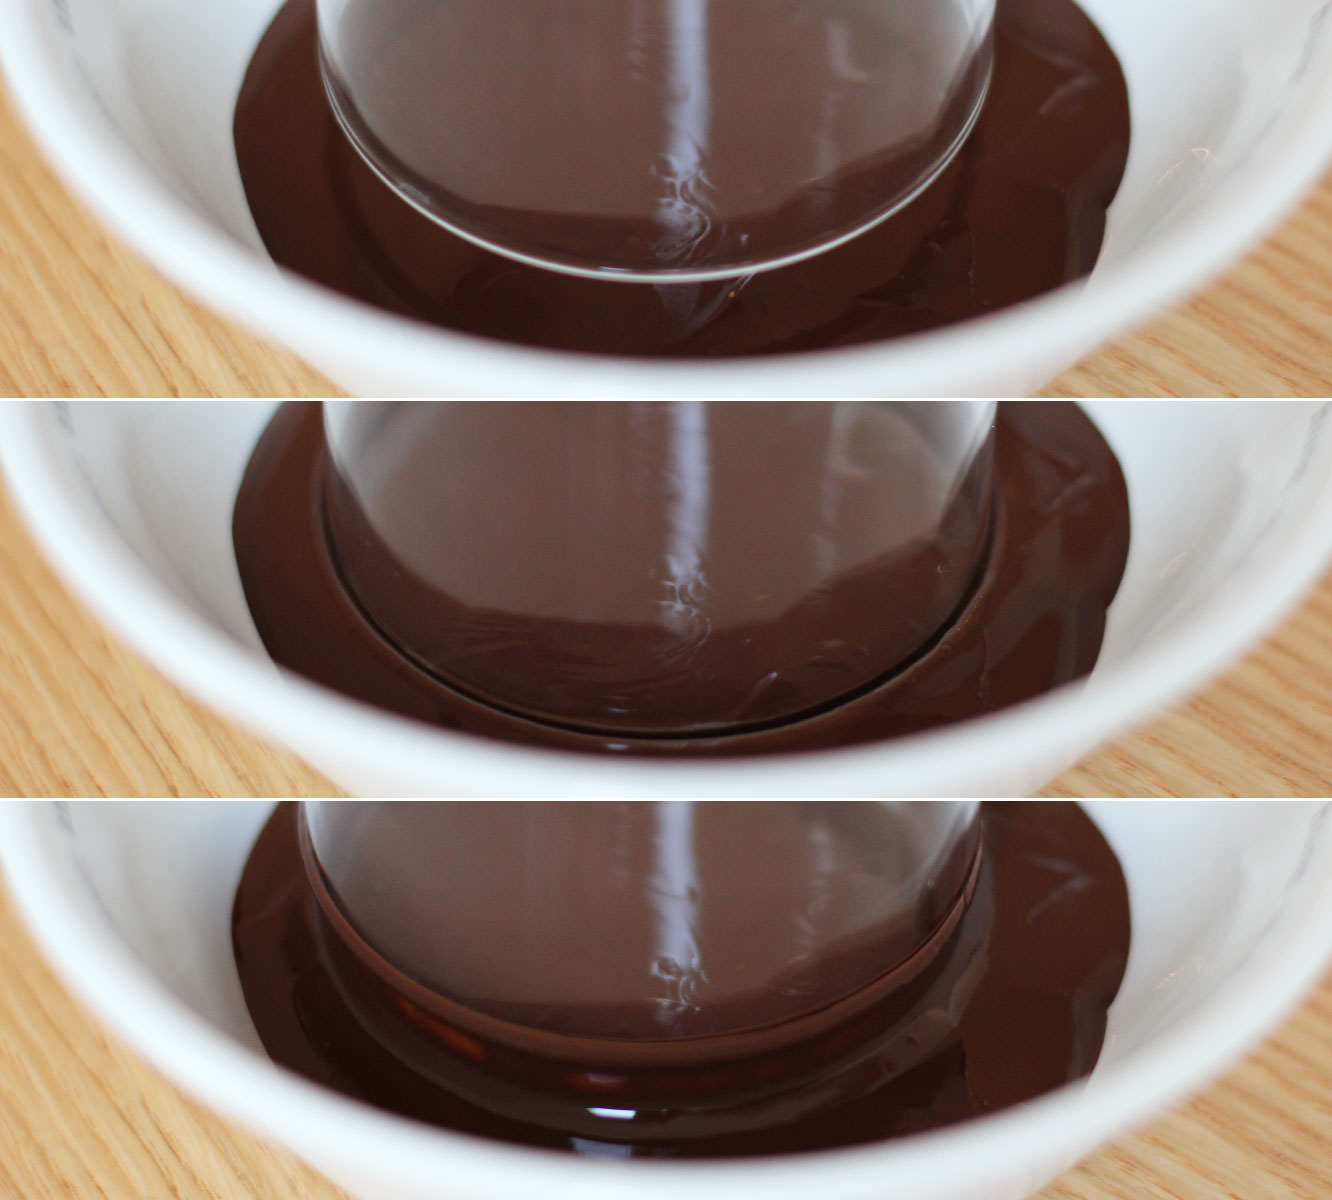
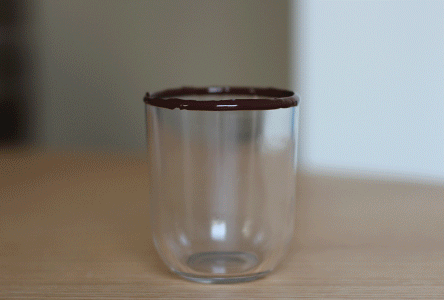
Melt the remaining dark chocolate in a small bowl and dip your glasses in to coat the rim.
Step nine
Add a shot of Baileys (and a dash of rum if you have it). A sprinkle of both cinnamon and nutmeg. Top up with approx 150ml of chocolate milk.
As you can probably tell, I didn’t exactly measure this one out, so go with your taste as a measure.
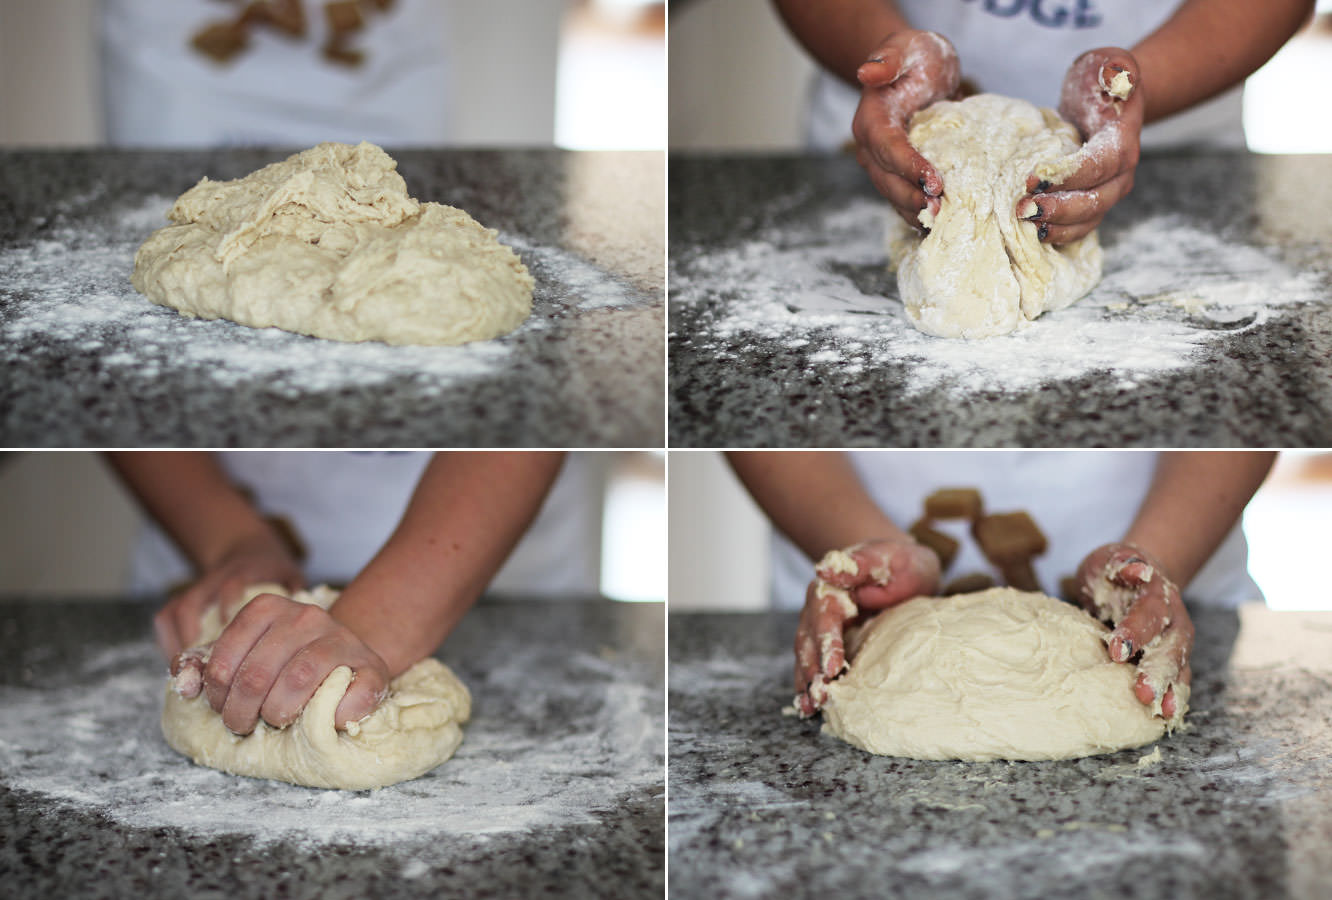
You might notice there’s a different pair of disembodied hands in the post this week. That’s because my lovely housemate was on half term, and ever since we watched this year’s GBBO we have wanted to make our own doughnuts (I’ve been informed donut is the wrong way to spell it). Thanks for your help Vicky and for very patiently allowing me to photograph the occasion.
We’re having a little get together for bonfire/fireworks night on Wednesday and we thought we would make some appropriately themed treats. We bring to you a doughnut double whammy, flavoured with toffee apple and cinder toffee.
Disclaimer – these aren’t quick to make, but they are IN-credible, I was very sad to put them into the freezer, and I hope they emerge as delicious as they went in.
You will need
Please note: doughnut recipe makes 30, so the extra flavourings recipes are for 15 of each. If you want to make just one of the versions you will need to double the quantities of the fillings and toppings or halve the doughnut mix.
For the doughnuts:
350ml/12 fl oz Warm full fat milk
700g/1lb 8 oz Strong white bread flour
2 Eggs
70g/2.5 oz Unsalted butter
100g/3.5 oz Caster sugar
1 tsp Salt
14g/0.5 oz Dried yeast
50ml Warm water
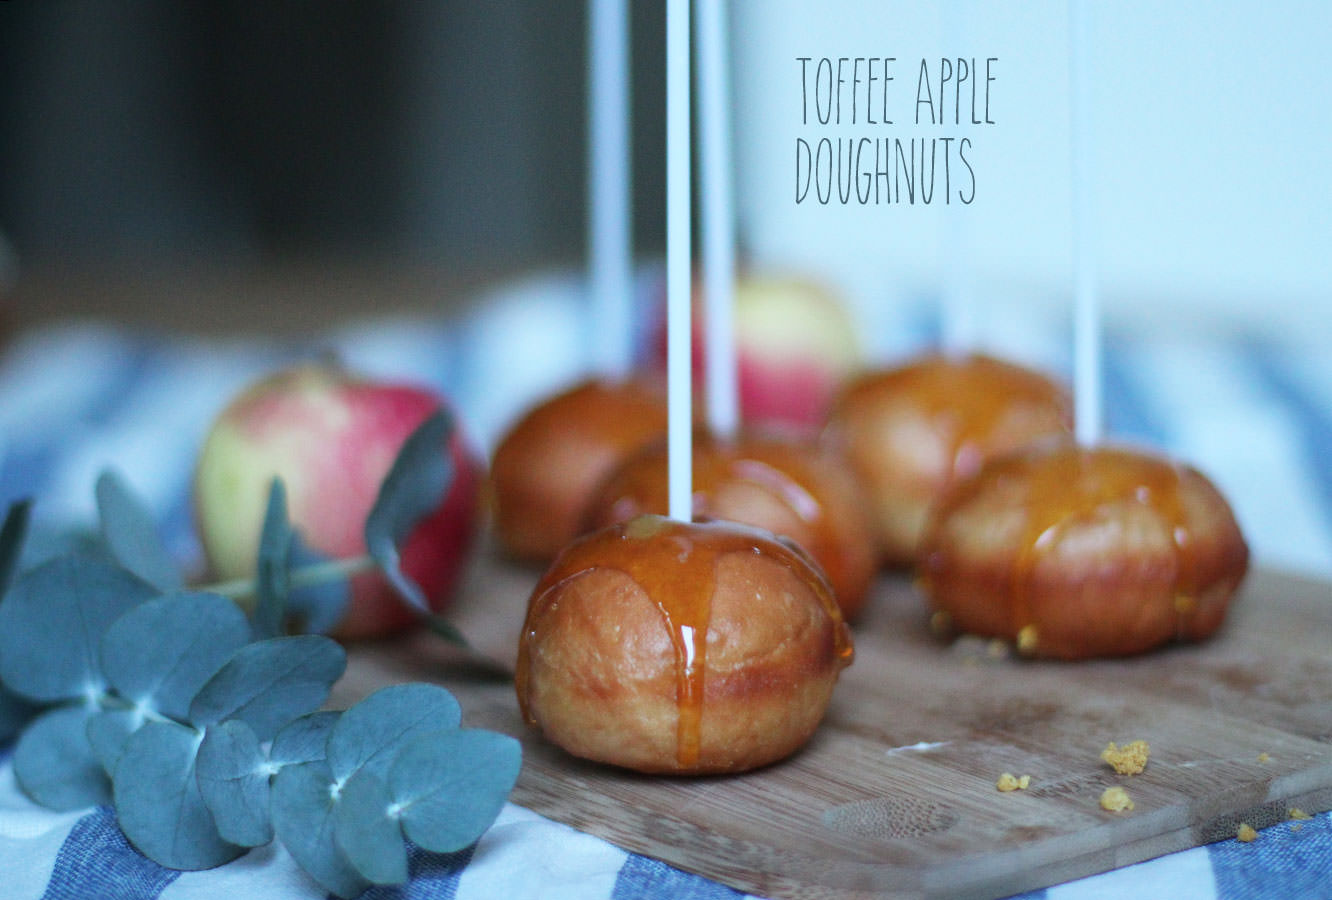
For the toffee apple version:
2 Bramley (cooking) apples
3 tbsp Soft light brown sugar
1 tbsp Water
300g/10.5 oz Granulated sugar
6 tbsp Water
For the cinder toffee version:
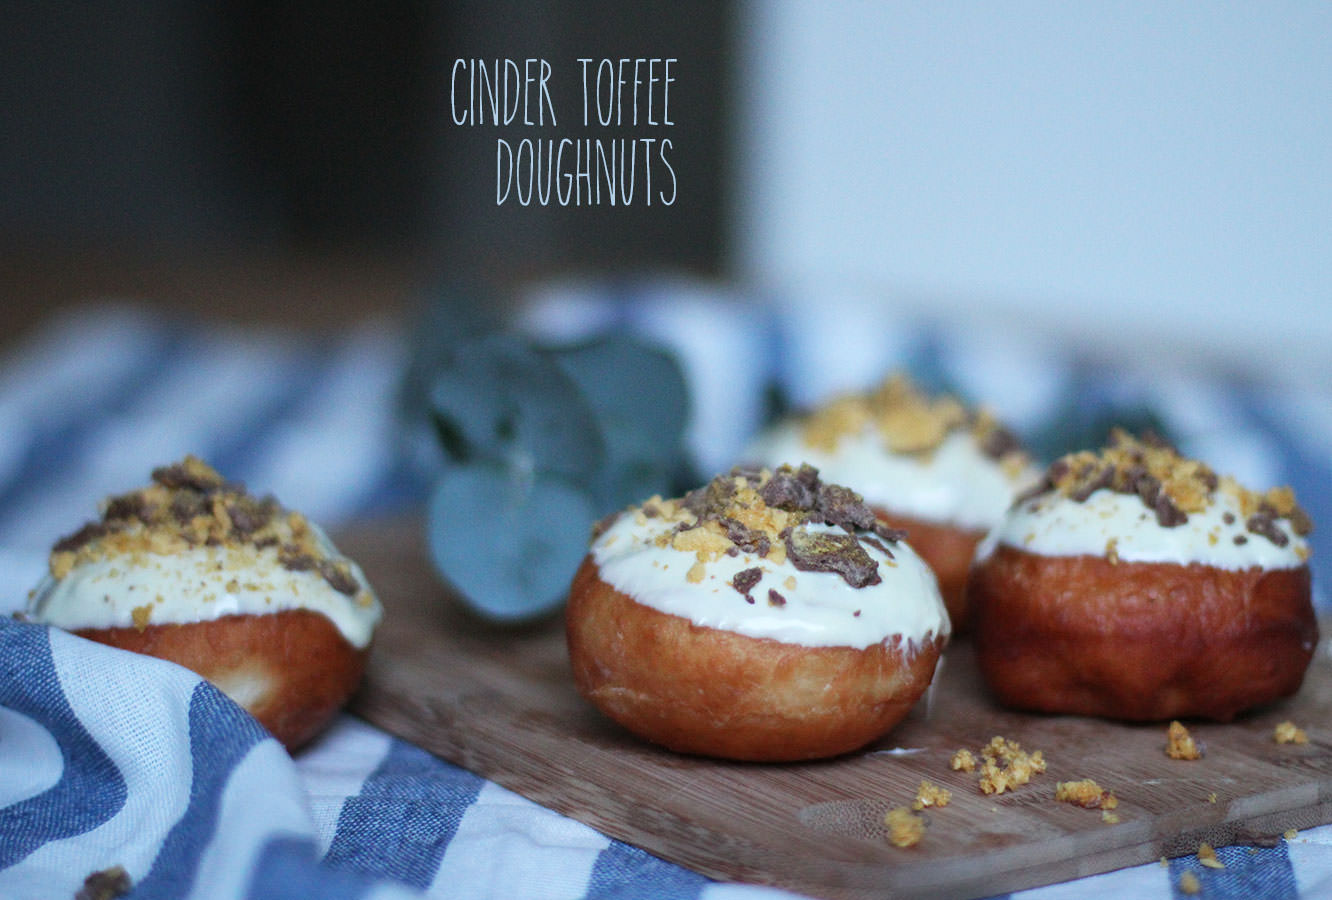
200g/7 oz White chocolate
2 Crunchie bars/some cinder toffee
1.5-2 tbsp Golden syrup
1.5-2 tbsp Full fat milk
150g/5.5 oz Icing sugar
50g/3.5 oz Unsalted butter
1 tsp Vanilla extract
Extras:
1.5 litres/50 fl oz Vegetable oil for frying
15 Cake pop sticks for the ‘toffee apples’
Flavour injector (if you don’t have one of these, a long thin piping nozzle should also work)
Step one
Put the yeast in the warm water and wait until frothy.
Step two
Combine half the flour with the rest of the dough ingredients (including the yeast froth). Remember to put the yeast and the salt on opposite sides of the bowl, they don’t get on.
Step three
When the batter is smooth, gradually add the rest of the flour and stir. The dough should be sticky but not impossible to work with. Vicky and I found we had to add a lot of flour in kneading so I’ve adjusted the recipe for y’all.
Step four
Turn the dough out onto a floured surface and knead for 5-10 minutes. It’ll still be quite sticky, don’t sweat it.
Step five
Place in a lightly oiled bowl and leave to rise for an hour or until doubled in size. While that’s going on you can prepare your toppings and fillings.
Step six
For the puree which will fill the toffee apple doughnuts, peel and chop the apples into small chunks.
Step seven
Place the apples in a saucepan with the 3 tablespoons of soft brown sugar and 1 tablespoon of water. Heat on medium until the apples have reduced.
Step eight
If you have one, use a food processor to liquidise the apple mixture. If you don’t, do what we did and use a potato masher and then pass the mix through a sieve.
Step nine
To make the filling for the cinder toffee donuts combine the butter, icing sugar, milk, golden syrup and vanilla extract. Whisk until smooth and set aside.
Step ten
Tip the risen dough onto a floured work surface. Squeeze into a long sausage shape and chop into 30 pieces.
Step eleven
Roll into balls and leave on a tray to prove for another hour. Make sure you leave plenty of space. The picture above was before these rose, and they almost filled the tray after.
Step twelve
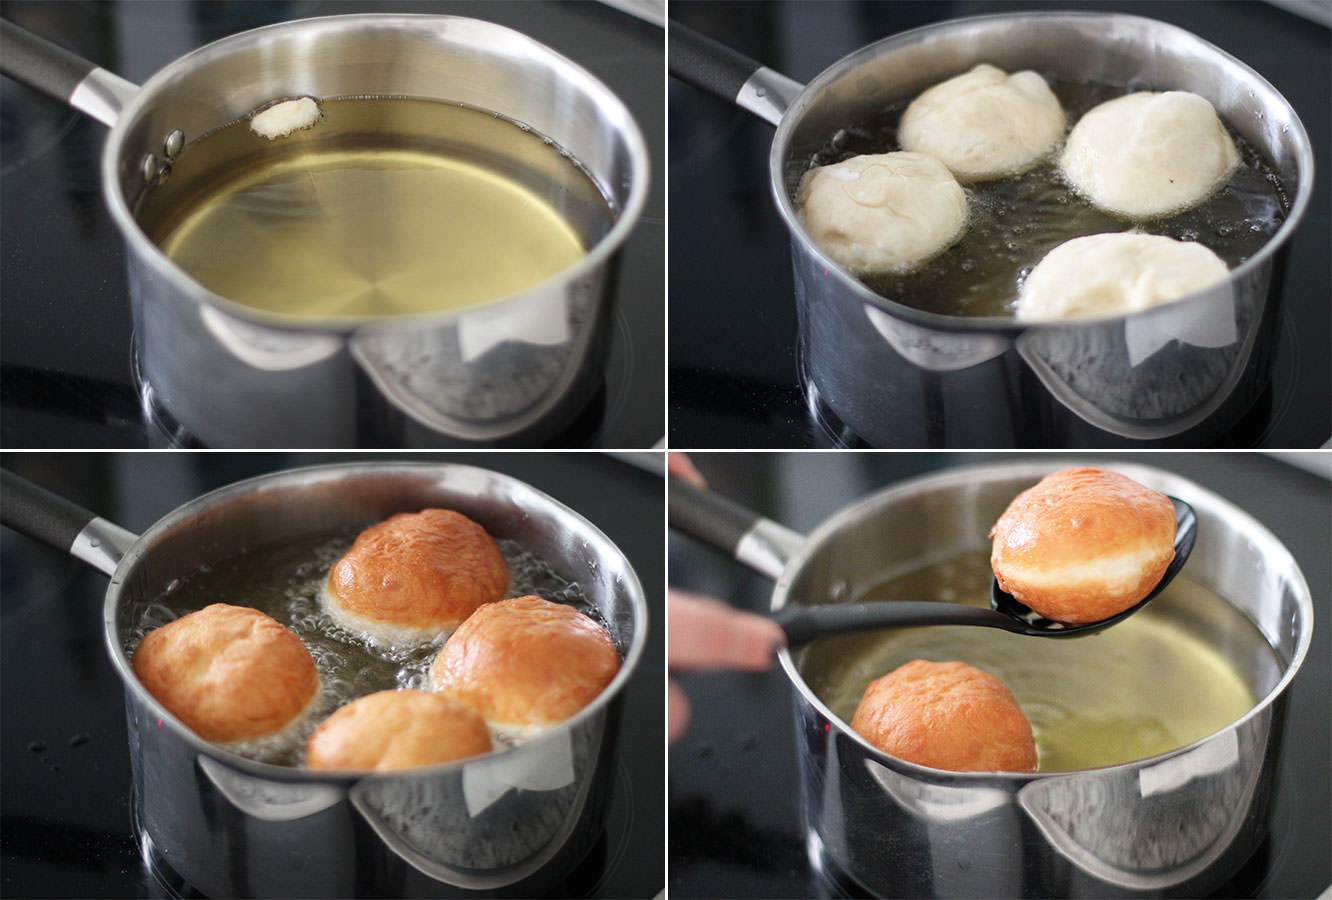
About 20 minutes before the doughnuts have finished their second rise, begin to heat the oil.
It’s beyond important that you heat the oil really slowly on a low heat to avoid risking a pan fire. There’s no reason to worry as long as you heat this gradually.
Test your oil heat with little pieces of a doughnut. When the sample floats and bubbles straight away you’re good to go.
Step thirteen
Fry the doughnuts in batches, you will get a good idea when to turn them pretty quickly, it only takes a few minutes for them to get golden.
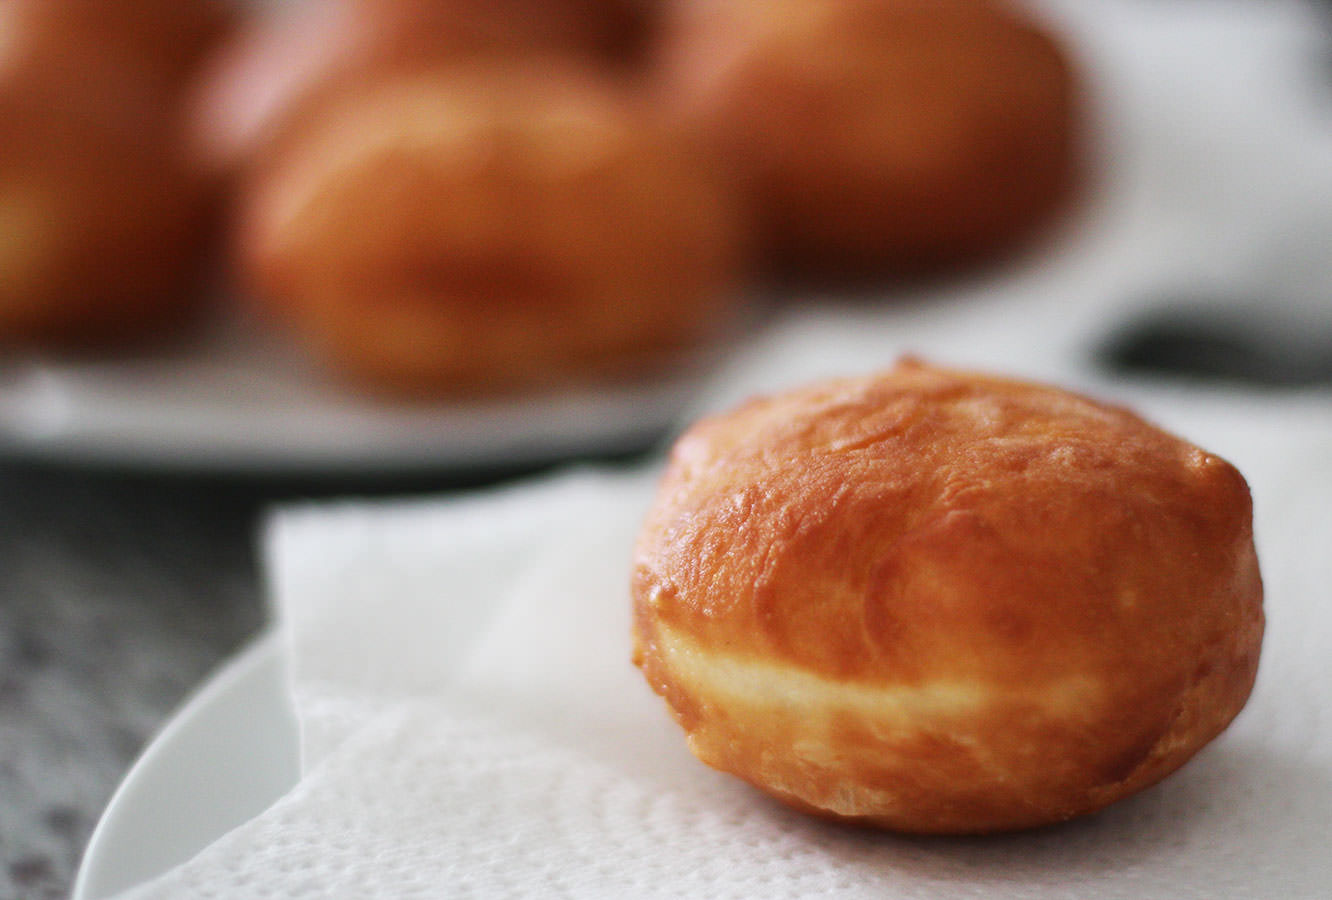
Leave your doughnuts to rest on a few sheets of kitchen roll which will soak up any excess oil.
Step fourteen
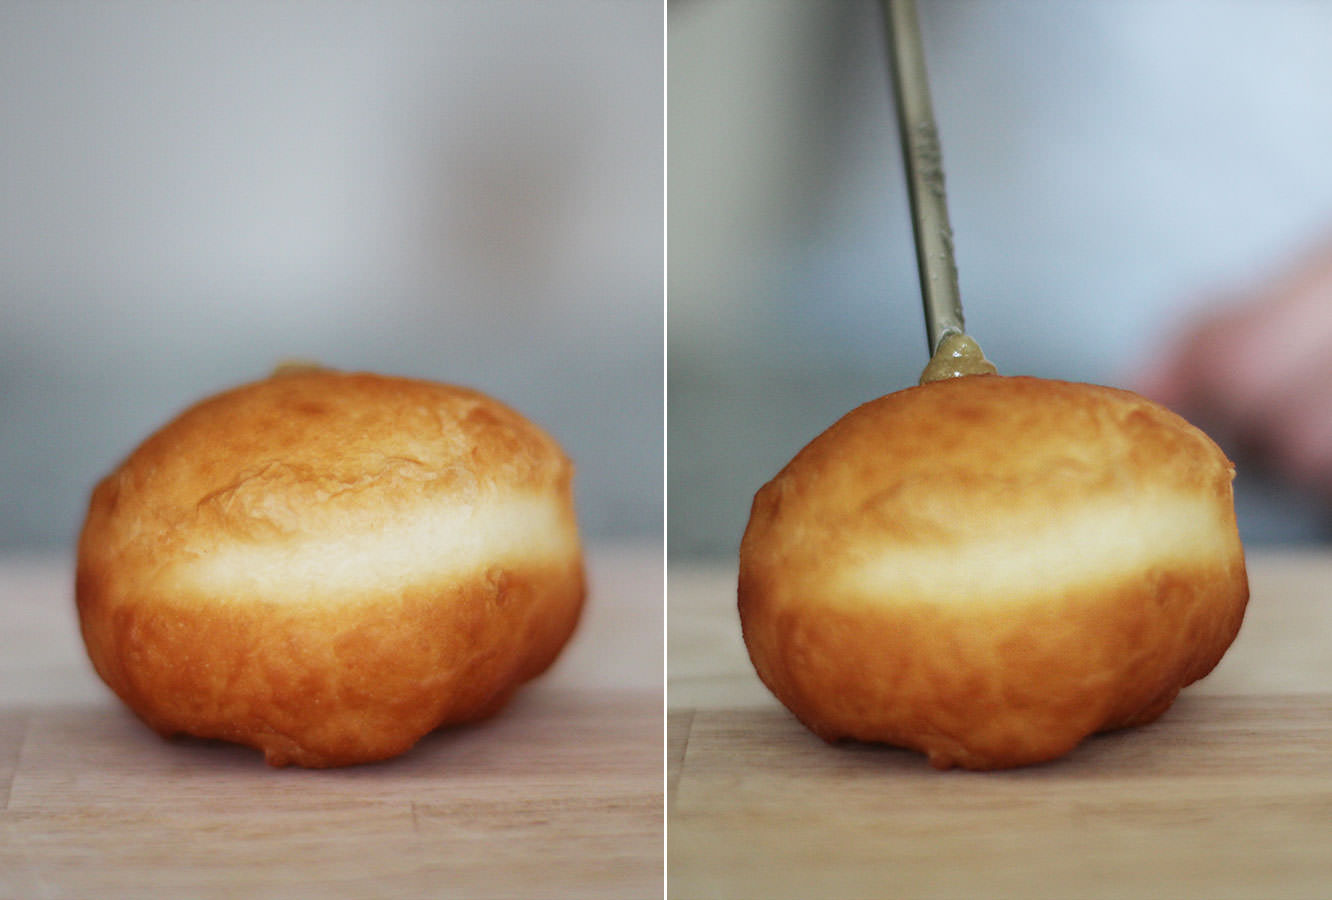
When the doughnuts are completely cooled inject 15 of them with the apple puree and 15 with the cinder toffee filling.
We went in at the top because we knew we were going to cover the holes, otherwise you would use the side. For those of you with a flavour injector (and of course that will be most of you…) we did 10 ml per doughnut.
Step fifteen
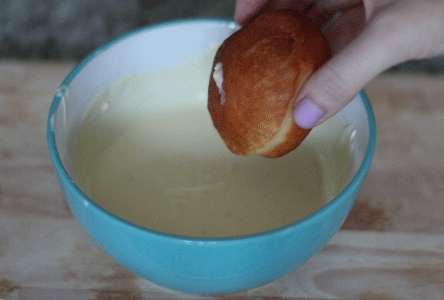
For the cinder toffee doughnuts you need to crush up the crunchie bars (easily done when they’re in their wrappers) and melt the white chocolate. Do this slowly in the microwave to avoid burning it.
Dip the doughnuts in the chocolate to coat the upside down top, and sprinkle with crunchie pieces. Leave to one side for the chocolate to set.
Step fifteen
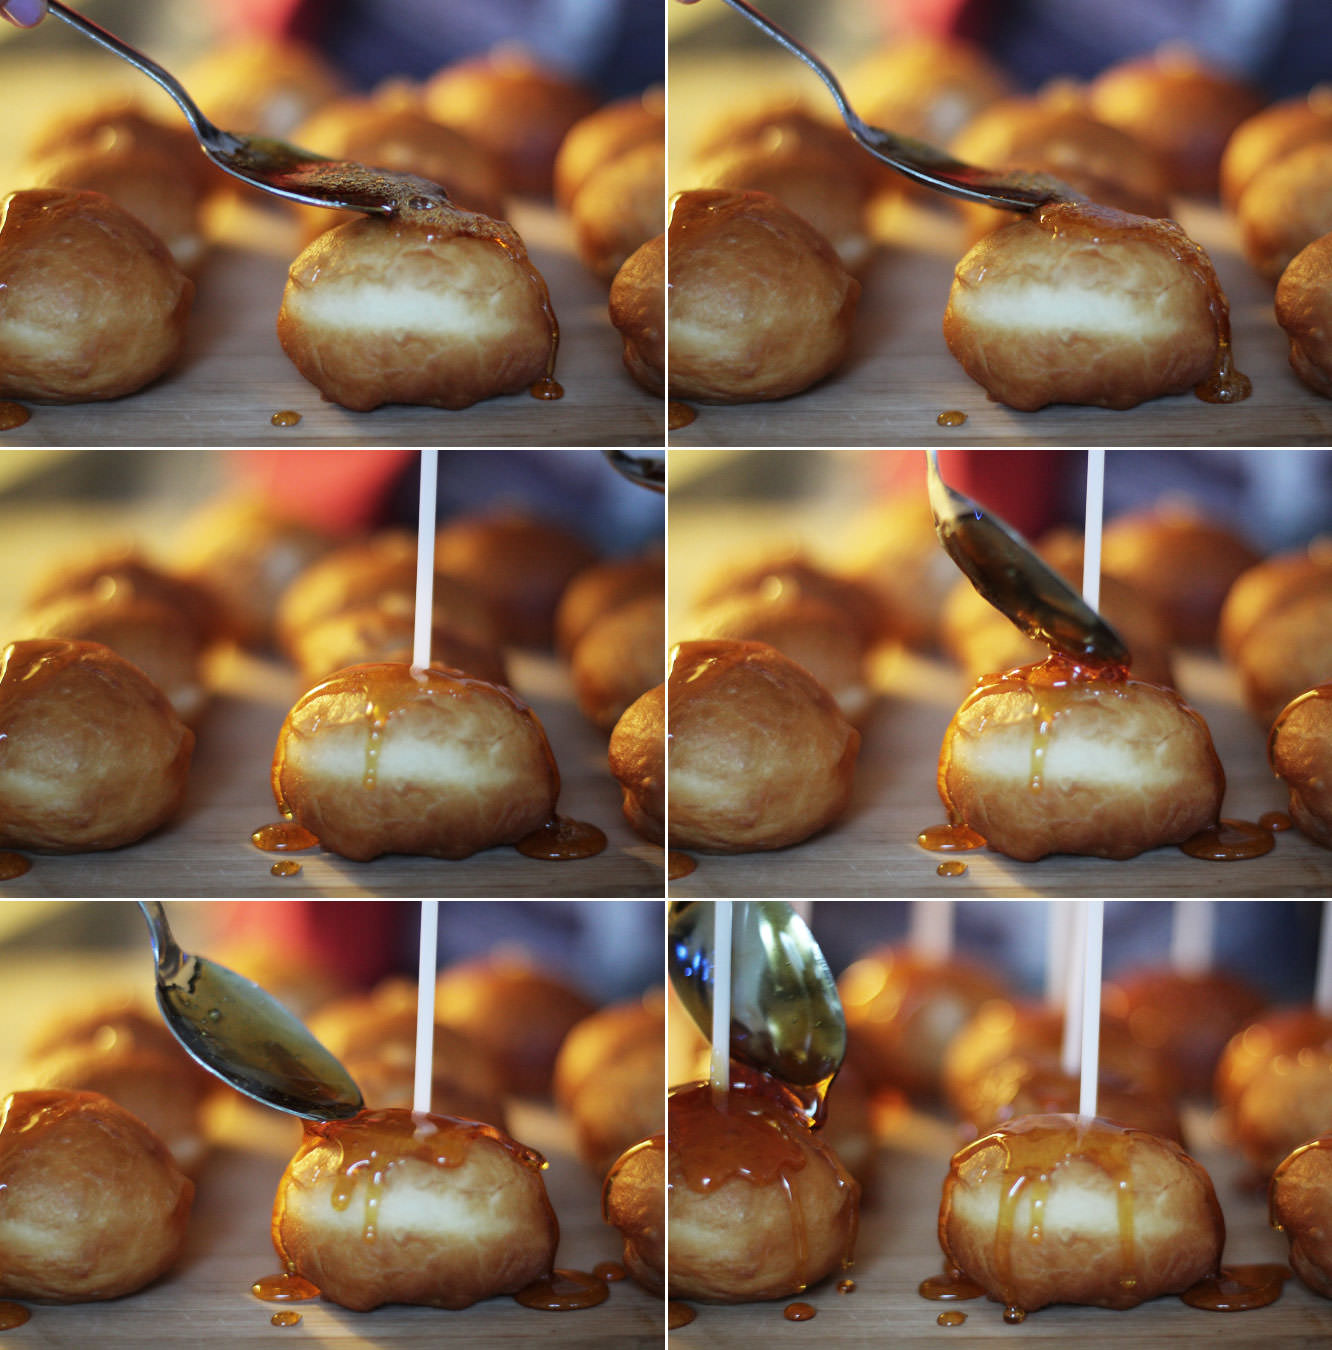
Make a hard caramel by combining the 300g of granulated sugar and 6 tbsp water in a saucepan.
Heat on a low-medium heat until the mixture takes on a dark honey colour. Do not stir it as the sugar will crystallise. I’m afraid I did this by eye so I don’t have a temperature, but use the pictures above for a reference point for the colour and you’ll be fine, it’s not an exact science.
Remove from heat and cool by dipping the bottom of the saucepan in a mixing bowl full of cold water.
Spoon over the top of the doughnuts. I did one layer on each and popped the sticks in, then went back once the caramel got a little thicker (this happens as it cools) to do another and to secure the sticks in place.
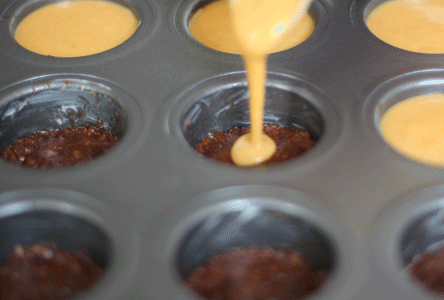
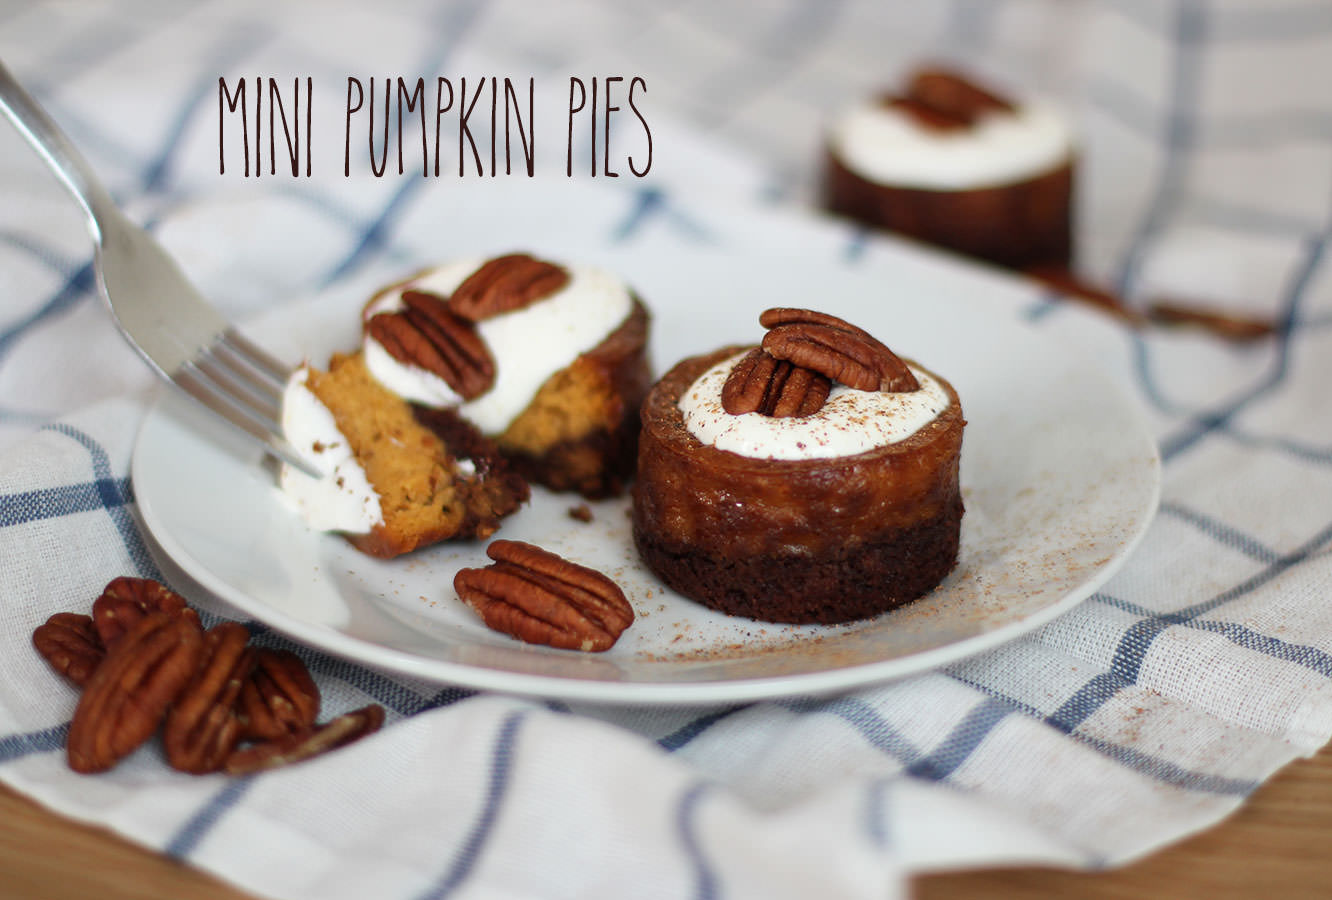
With an invitation to a Canadian Thanksgiving feast this weekend I started to crave pumpkin pie. I also live very near a Lakeland and happened to wander in and procure myself a little individual cake tin. Too much GBBO consumed by me I think. The result of these two happenings brings you mini pumpkin pies.
If you don’t have a tin like mine (get one) then this recipe will work as a big pie in a cake tin or whatever you have to hand.
These are super easy to make and totally DE-licious. I recommend them warm with a big dollop of sour cream.
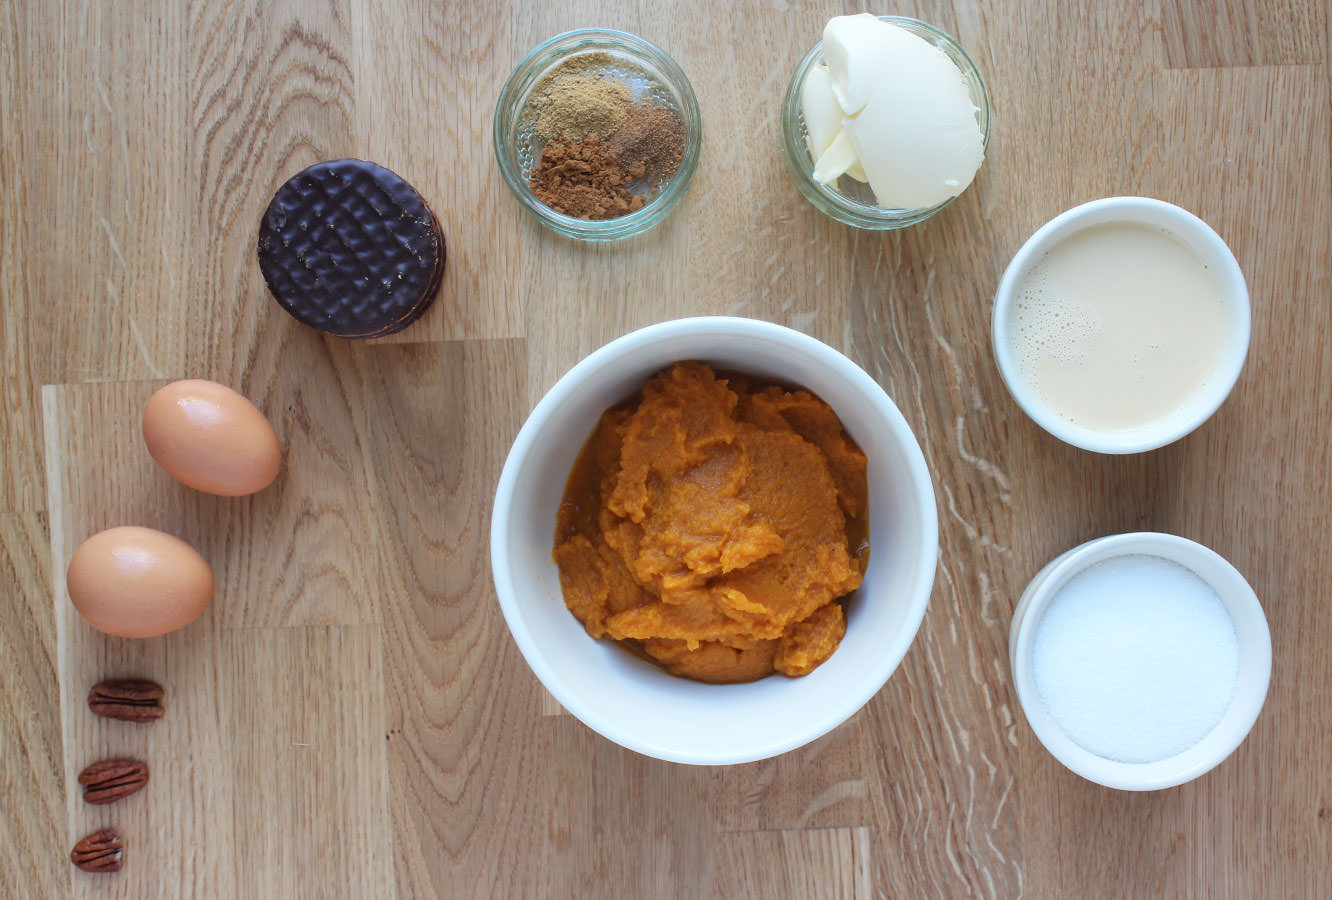
Things you need
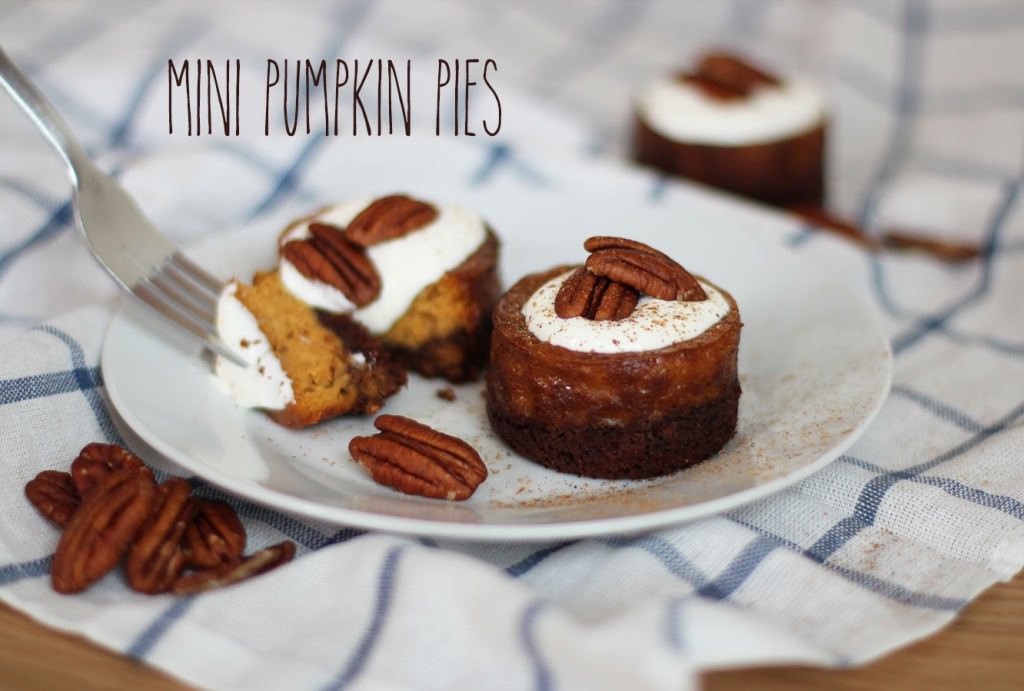
For the filling:
425g can of Pumpkin (I got this from Waitrose, if you want to chop up and boil a real pumpkin you can, but I’ve done that before and it wasn’t any kind of fun)
2 Eggs
170g/6 oz Granulated sugar
285ml/9.5 fl oz Evaporated milk
1 tsp Ground cinnamon
1/2 tsp Ground ginger
1/4 tsp Ground nutmeg
For the base:
200g/7 oz Dark chocolate digestives
75g/2.5 oz Butter
Pot of soured cream and some pecans for topping
Makes 12 (or one big pie)
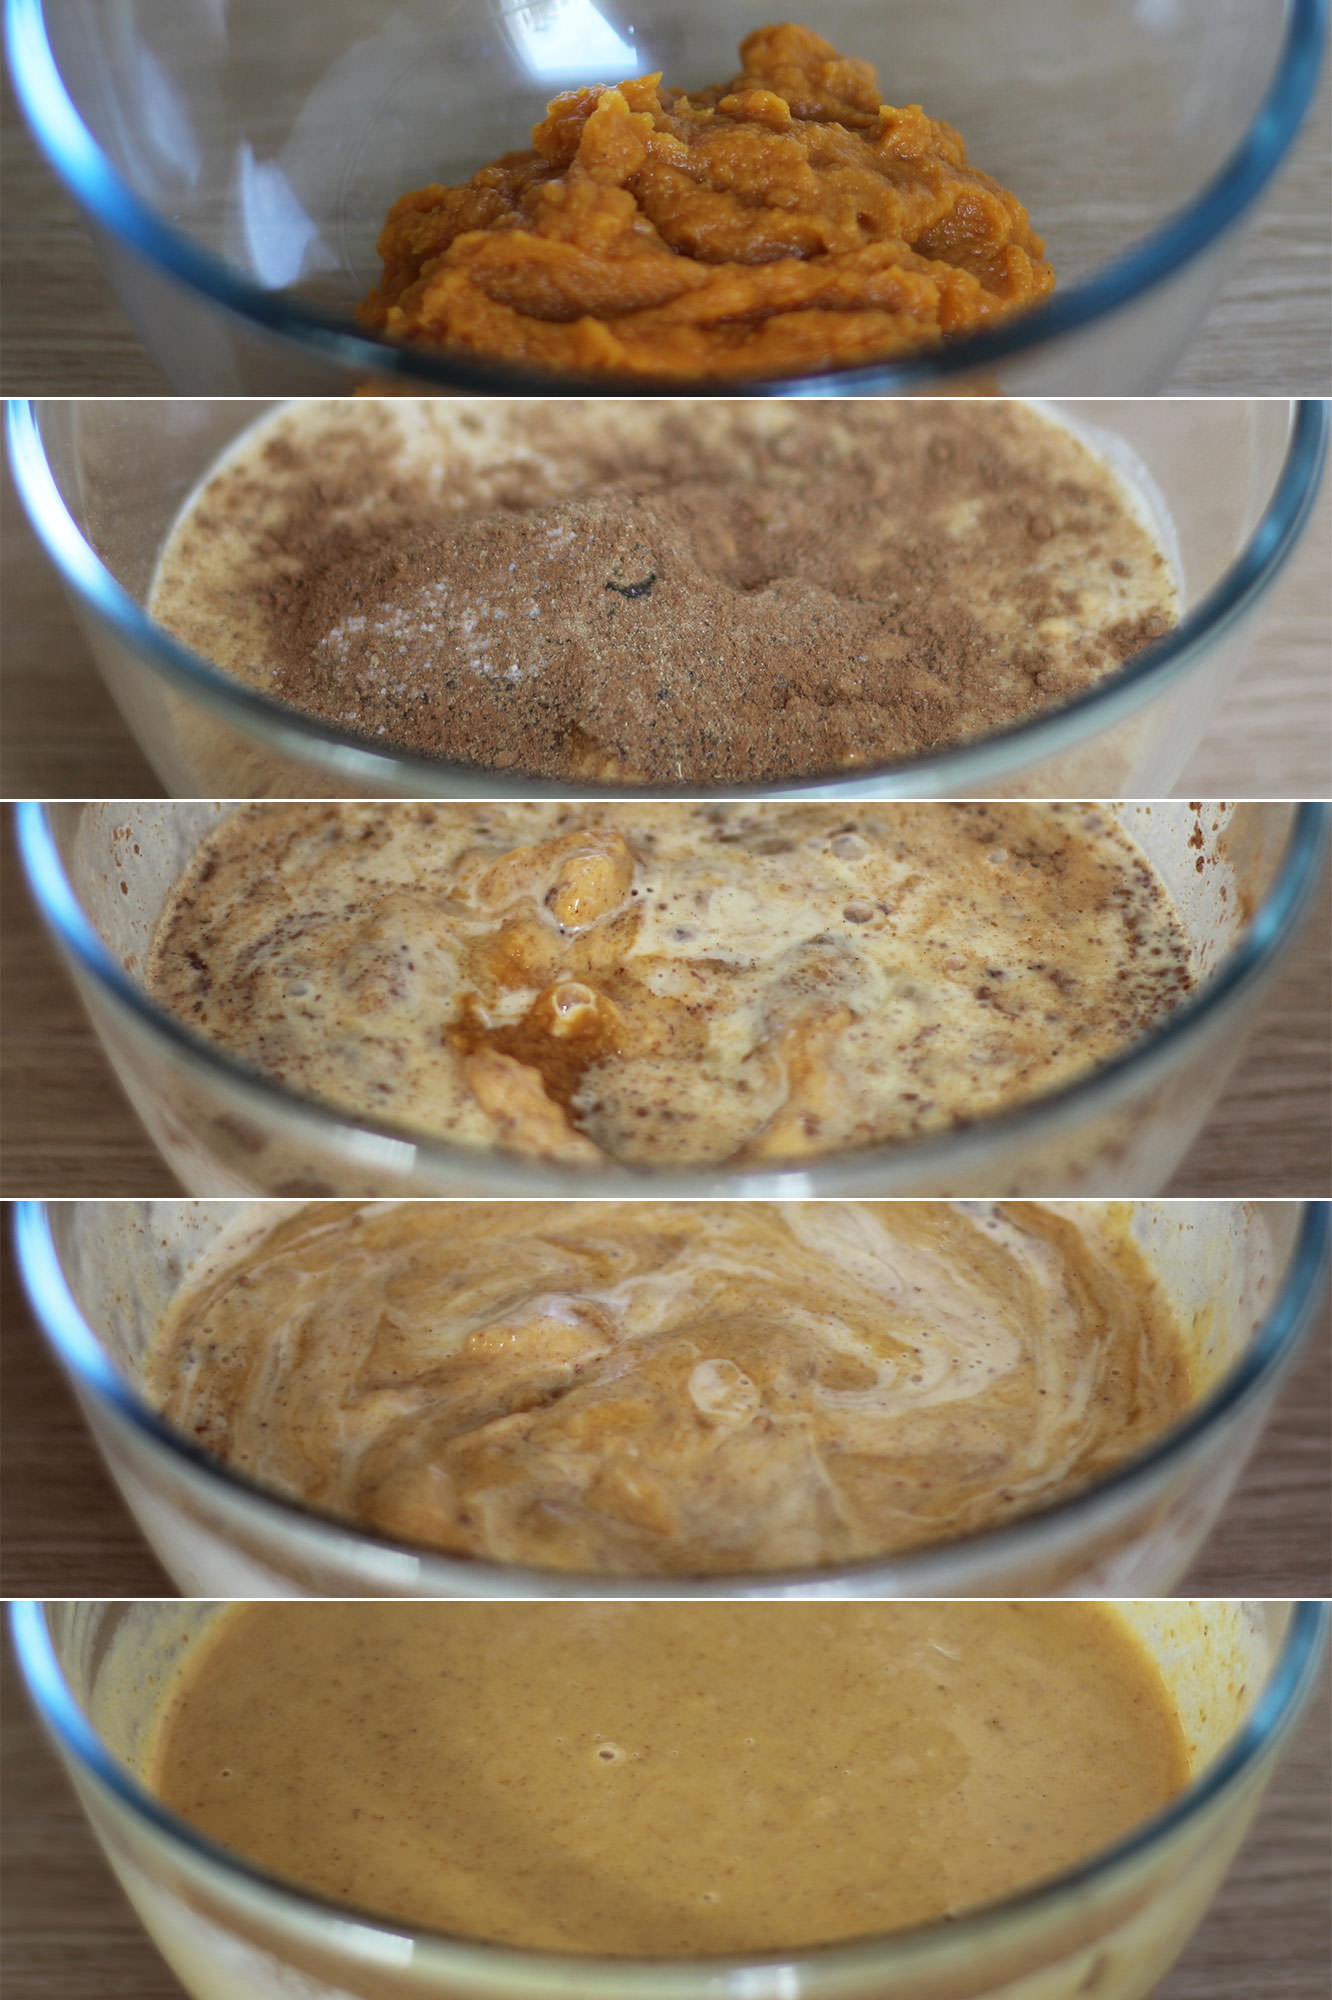
Step one
Combine all the filling ingredients until smooth (lightly beat the eggs with a fork first). Pour into a jug.
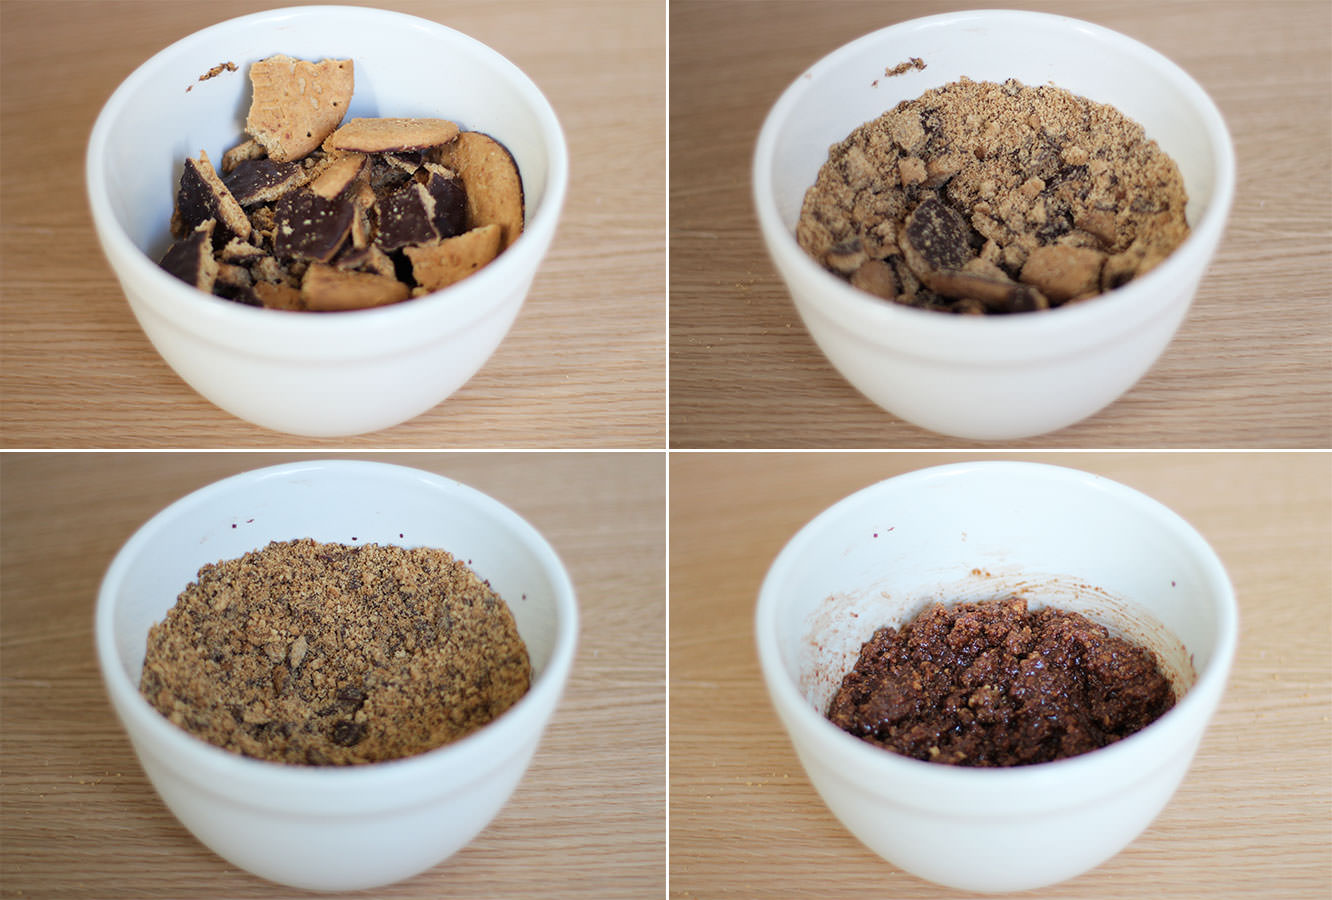
Step two
Using the end of a rolling pin (or a food processor if you have one) crush the biscuits into a fine crumb.
Step three
Heat the butter on a low setting in the microwave until just melted. Stir into the crushed biscuits.
Step four
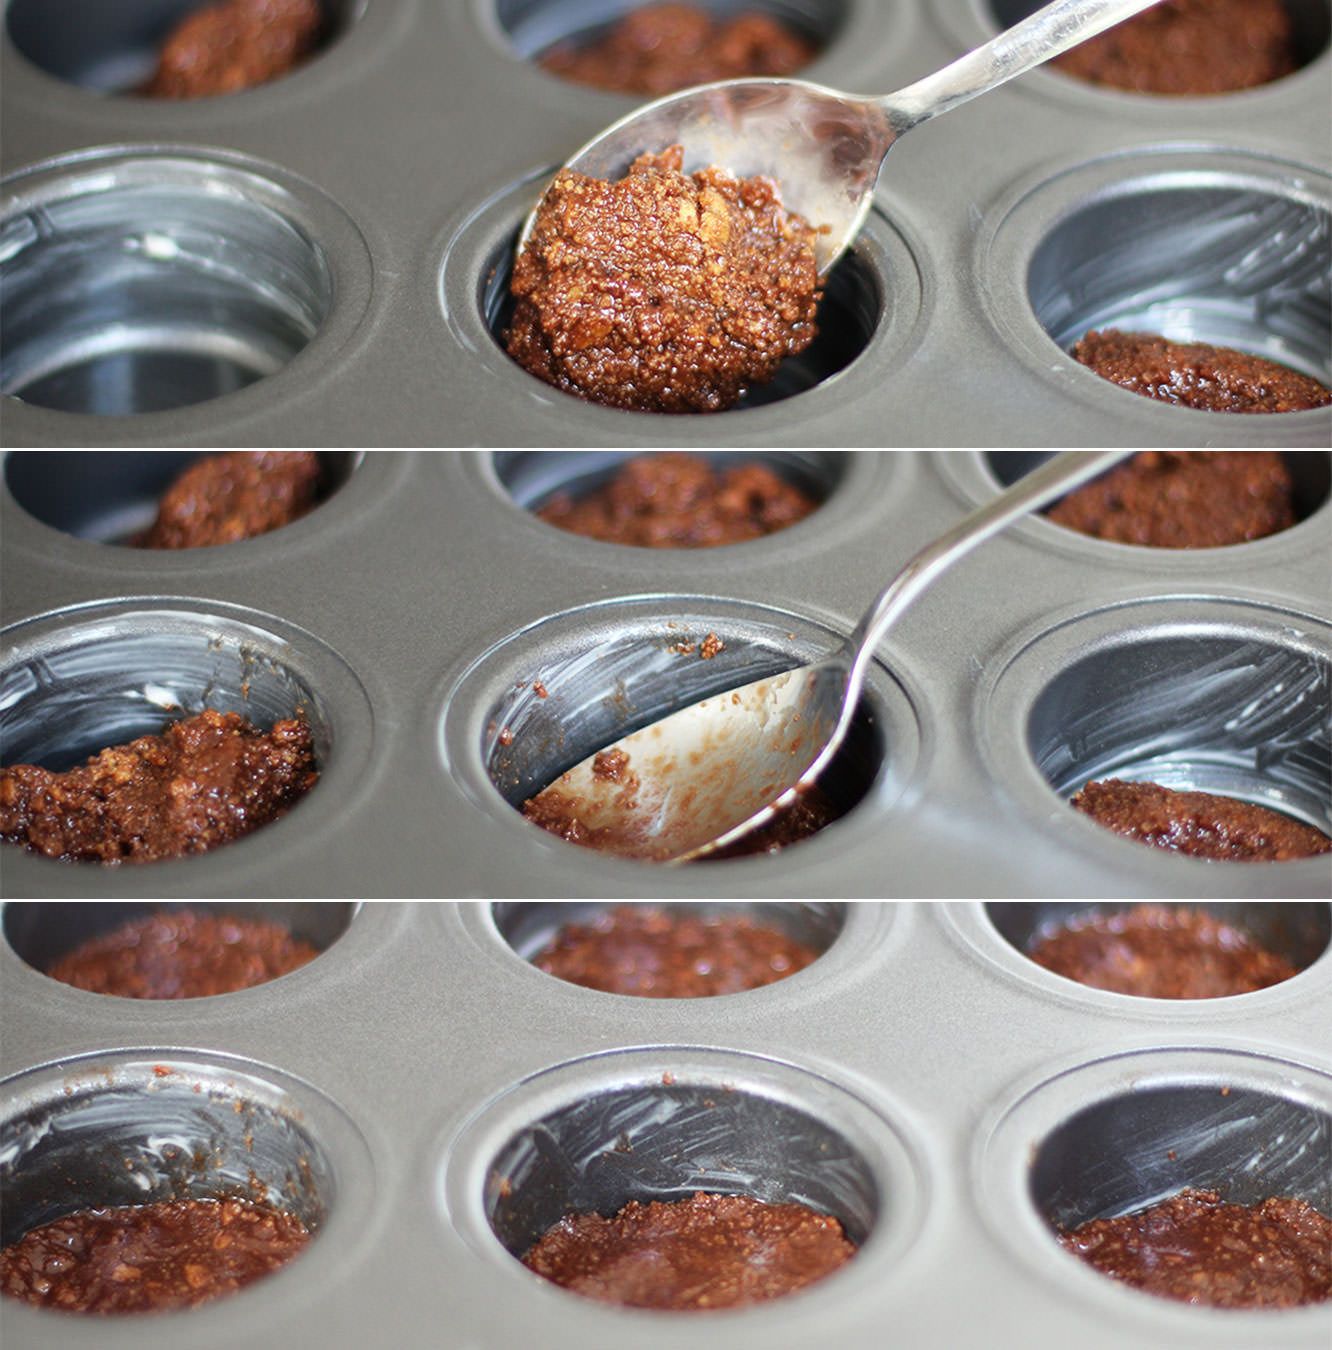
Pop the loose bottoms in and lightly grease the tin.
Place a dessert spoon of the biscuit mixture into into each basin and press down with the back of the spoon.
I guess you could give this a go with a muffin tin if you don’t have a loose bottomed one, let me know how it goes if you do!
If you have time to stick this in the fridge then 30 mins will make sure your base stays firmly at the bottom. I didn’t do this and it turned out fine, just rose up a little at the sides, so don’t worry too much if you’re in a rush.
Time for a gif? I thought so too.
Step five
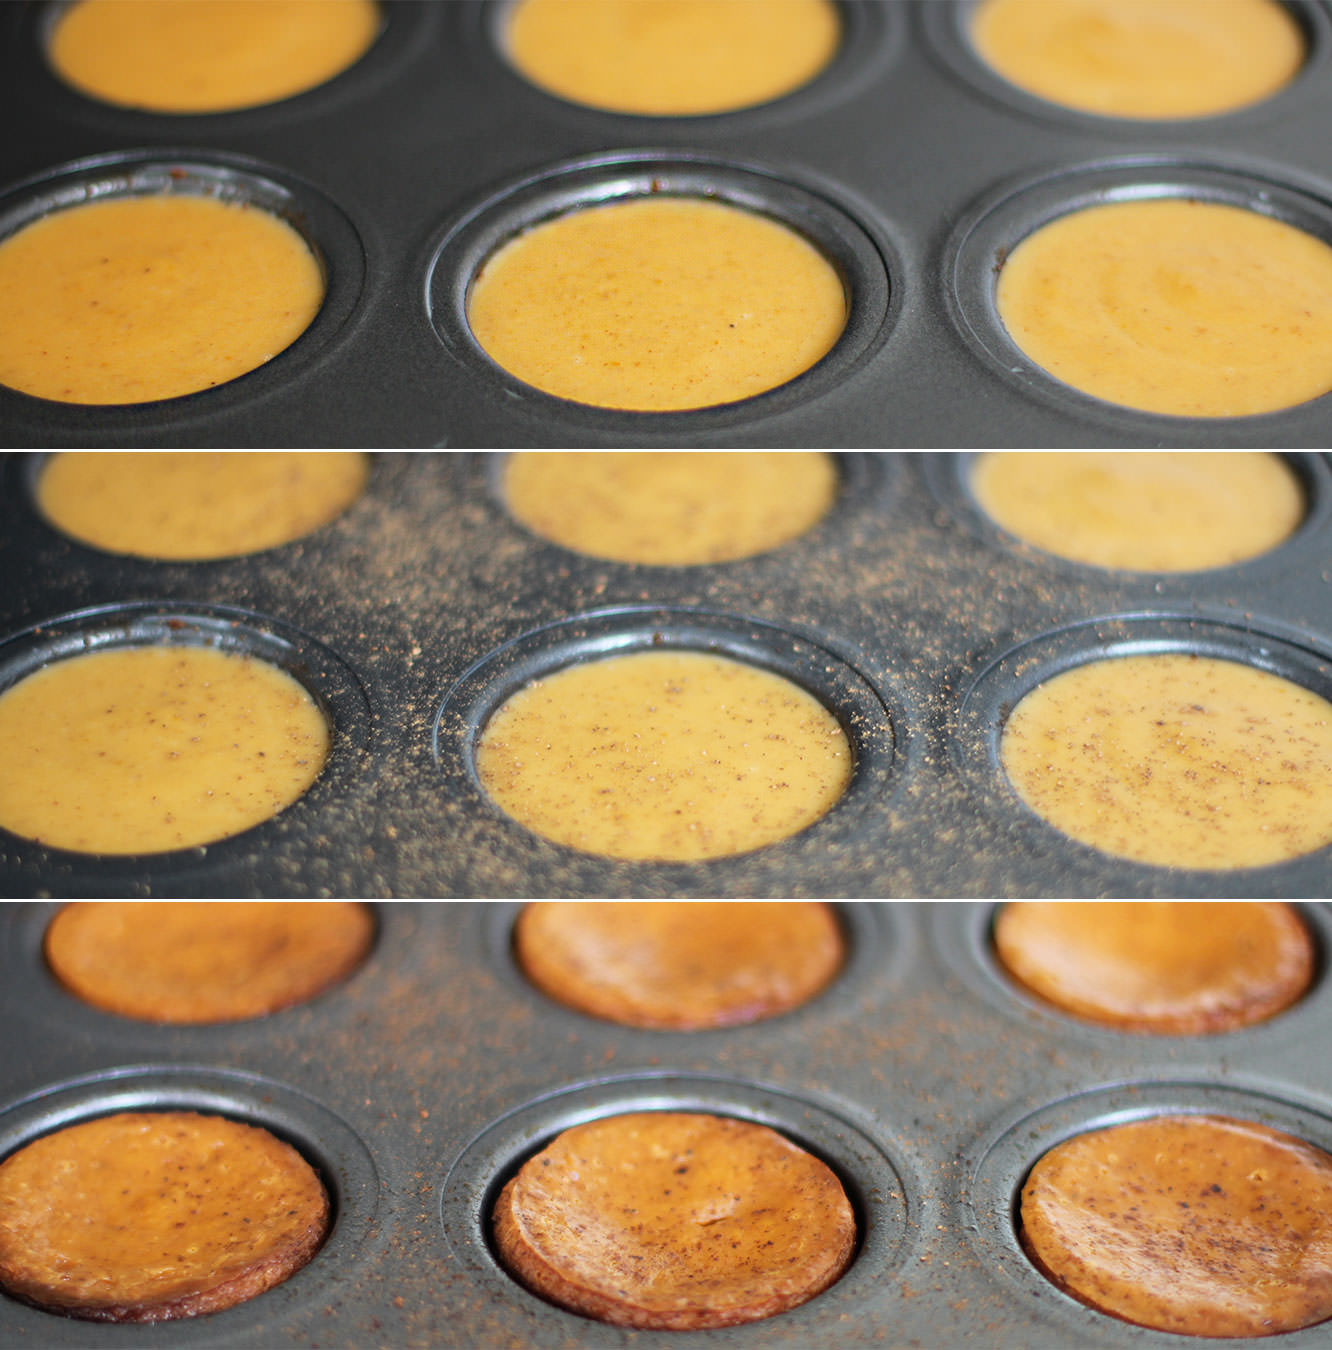
Pour the mixture to the top of each basin. Don’t worry about it overflowing, it only rises up a little bit and is quite solid so doesn’t spill. I had a bit of mix left over so I just poured it into a spare ramekin, you always need a little sample anyway.
Sprinkle a little more ground nutmeg on.
Step six
Bake on the middle shelf of the oven for 40 minutes on 180C/350F/gas mark 7.
Leave to cool a bit before removing from the tin. They are really yummy warm, so either let them cool and whiz them in the microwave before serving or cook just before you want to eat them.
Chaps! Welcome back, apologies for my prolonged absence. Holidays have been had, possessions been moved, and I’m back online.
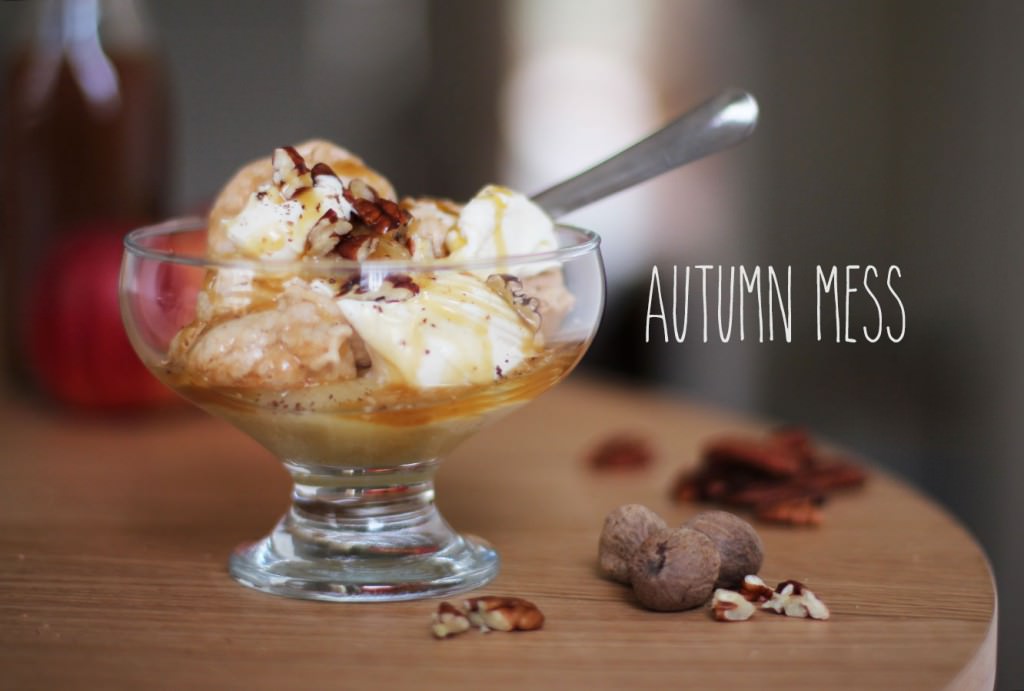
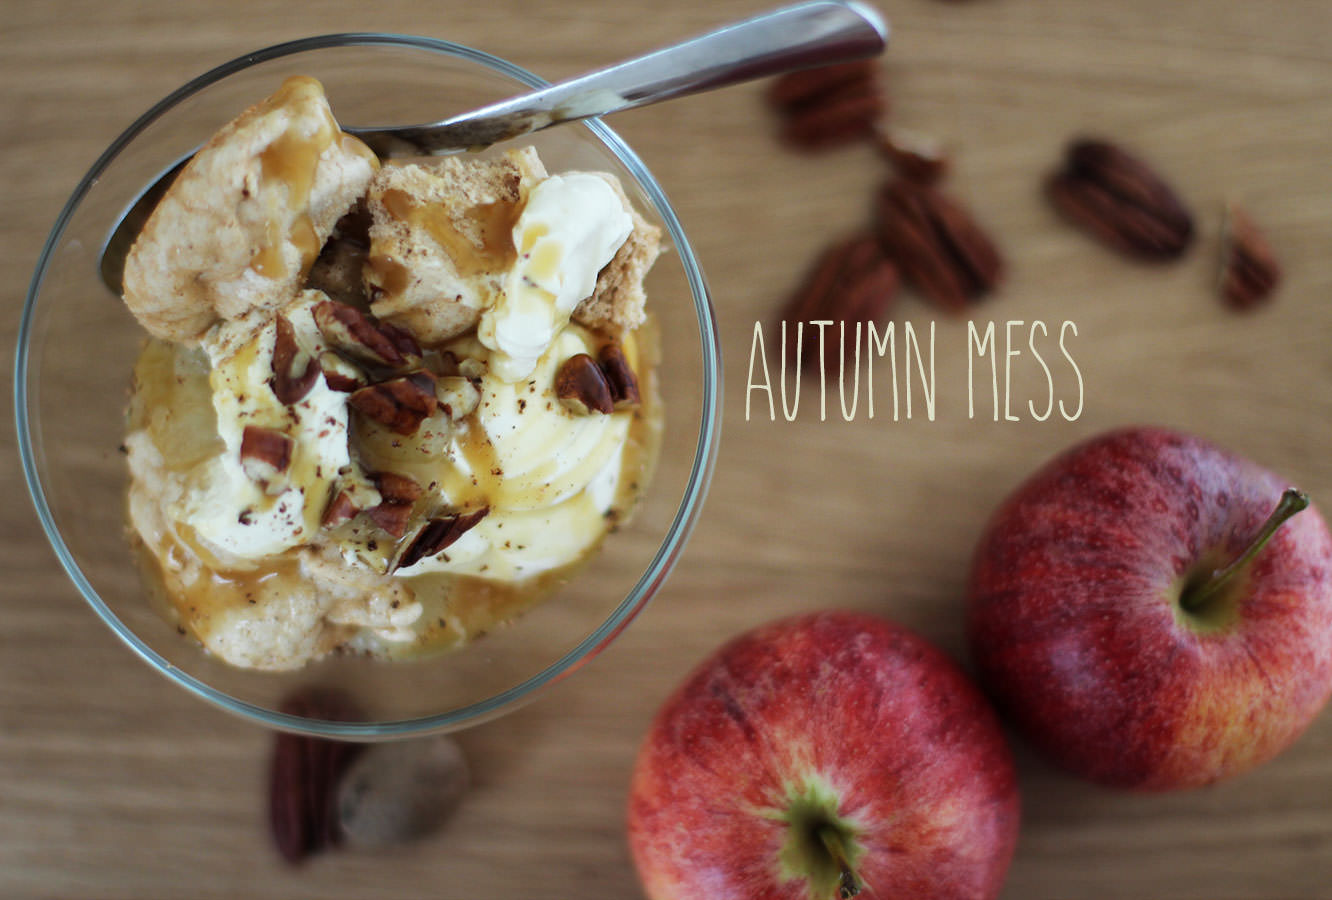
Still riding high on my summer vacay, everything I thought of for this post was just not seasonal. Autumn is my favourite season usually, but, quite out of character, I’ve actually enjoyed summer this year. To get myself into a cosy autumnal mood I decided to turn an old summer favourite – Eton Mess – into a pudding perfect for fall.
I present Autumn Mess (or Fall Mess, I guess, if you’re across the pond, but that sounds a bit too much like a road traffic accident).
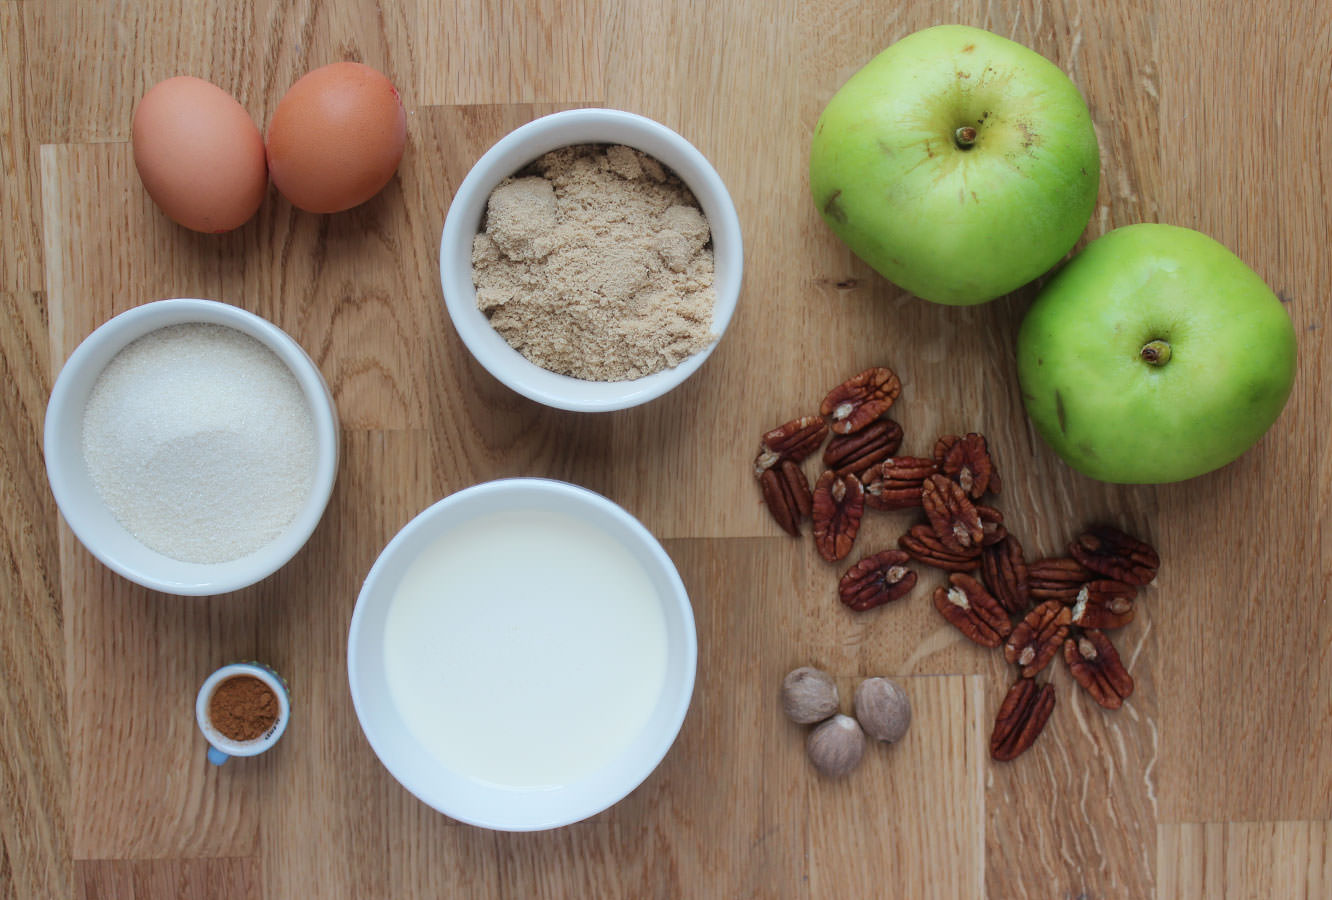
Things you need
For the meringue:
2 large egg whites
110g/4oz Golden caster sugar (that’s all I had – white would be fine – probably better)
1/4 tsp Ground cinnamon
For the salted caramel frosting:
100g/3.5 oz Salted butter
80g/3 oz Soft brown sugar
100ml/3.5 fl oz Double cream
2 tbsp Golden syrup
2 tsp Salt
For the rest:
50-100g Pecans (chopped)
300ml/10 fl oz Double cream
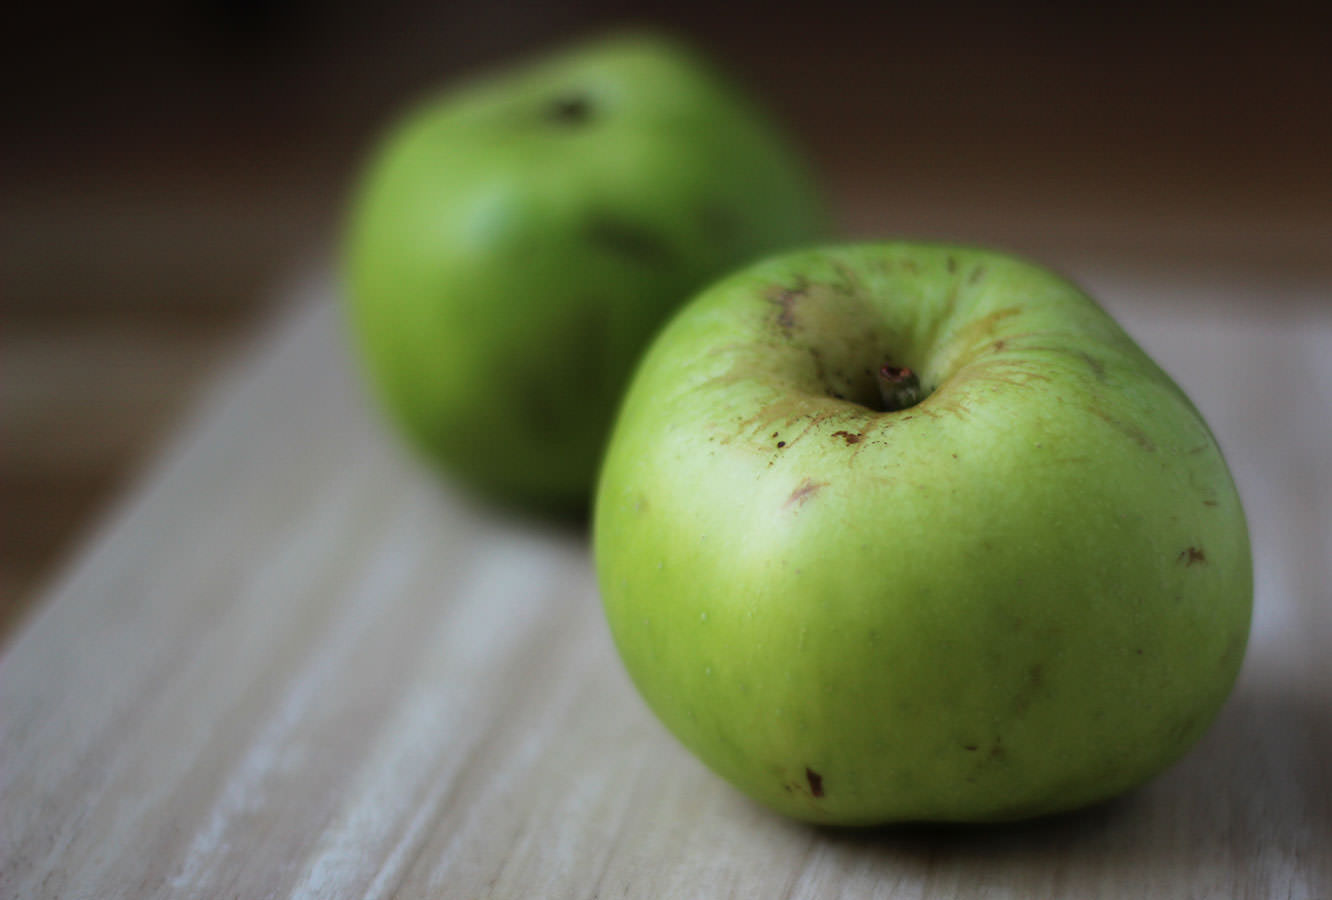
1-2 Bramley cooking apples
Nutmeg (optional)
Makes 6-8 servings
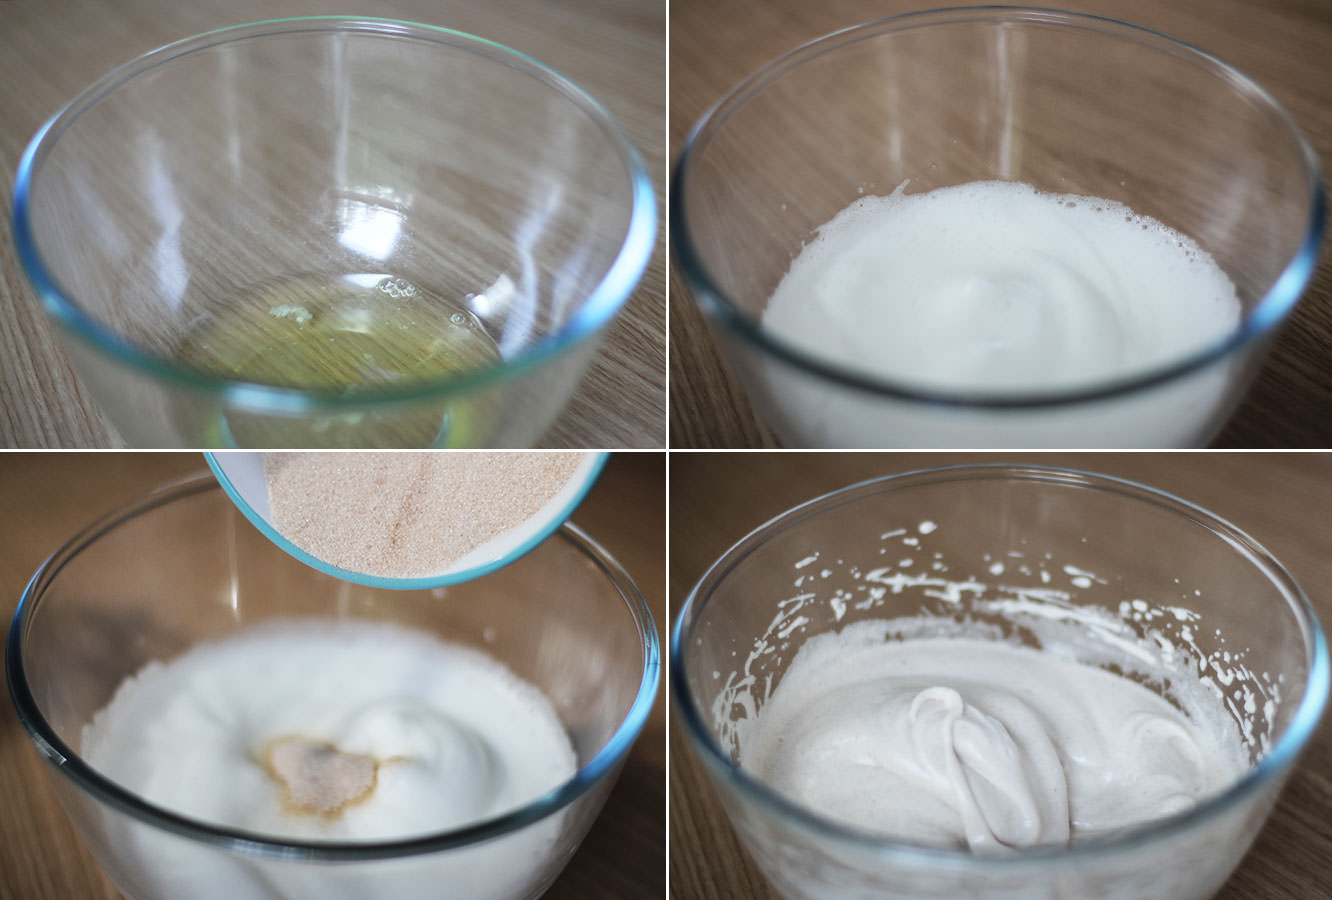
Step one
Mix together the cinnamon and sugar. I actually used 1/2 a tsp of cinnamon, but felt it was a little strong, others disagreed, so go with your gut. It depends on whether or not you are a cinna-fan.
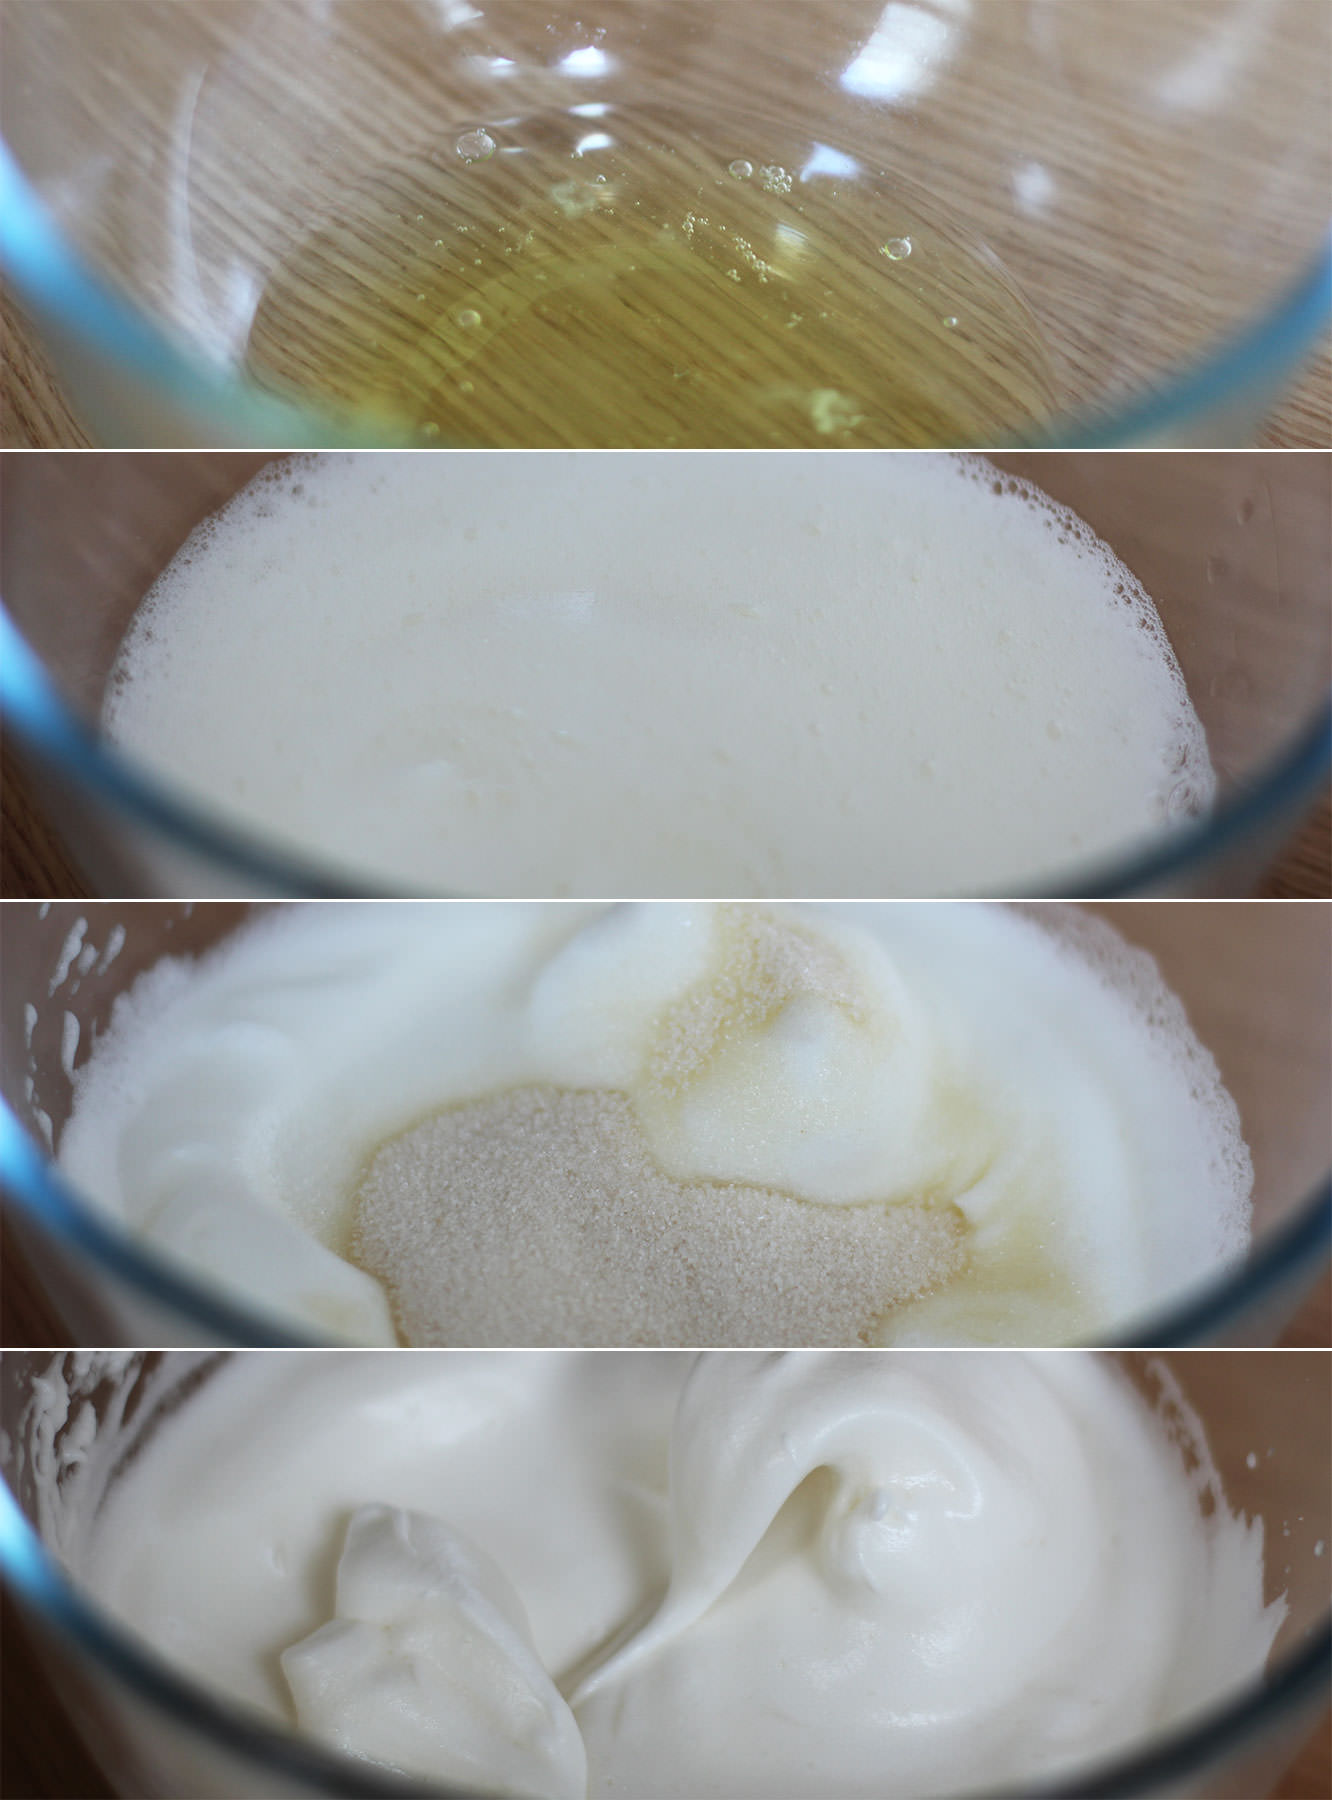
Using an electric whisk whip the egg whites until they are three times their original size and starting to turn glossy.
Gradually whisk in all the sugar until you have stiff peaks (and can turn the bowl upside-down without the mix falling out).
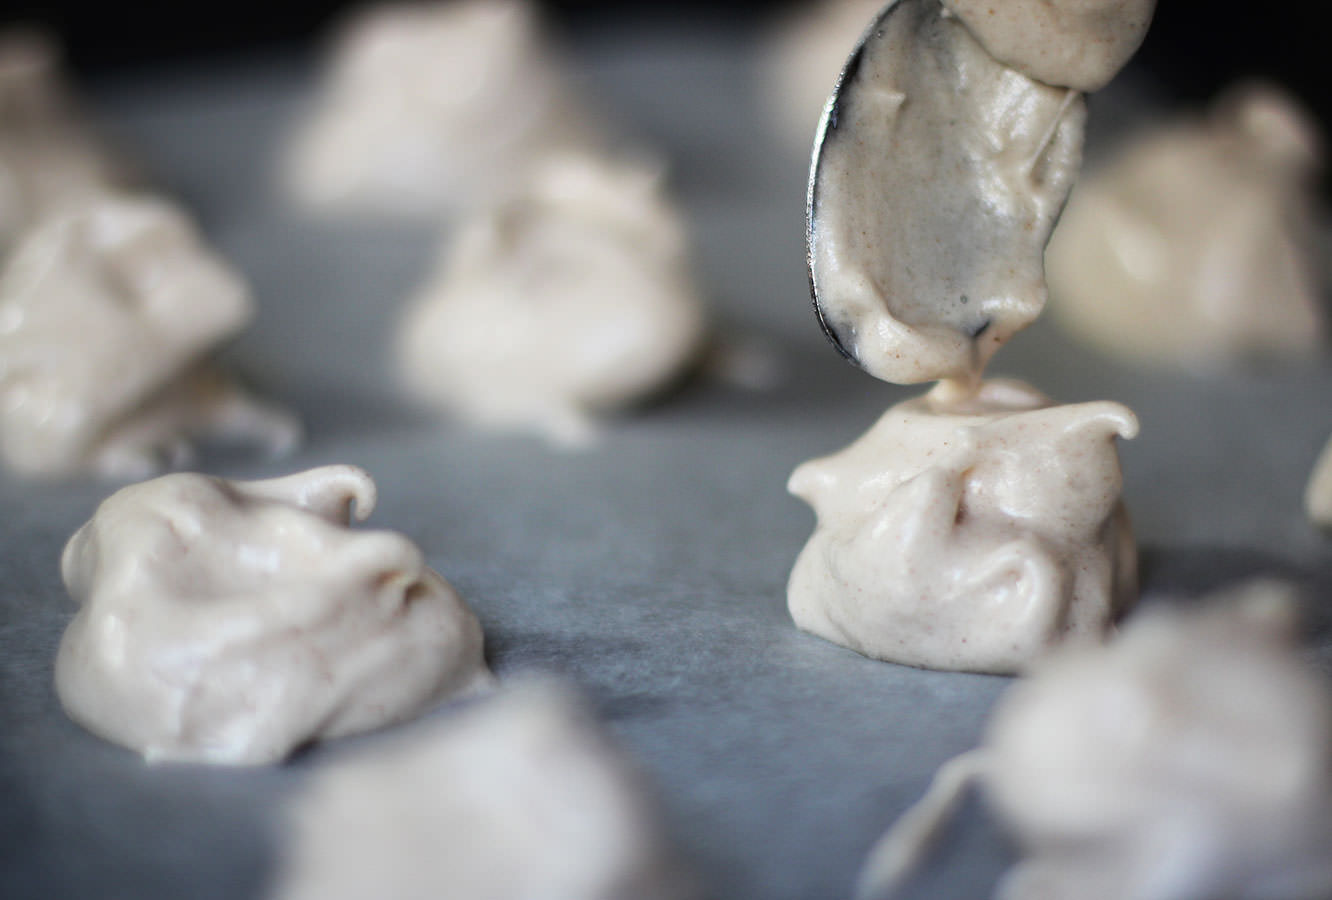
Step two
Using two teaspoons place blobs of the meringue onto a baking sheet lined with greaseproof paper. Don’t grease this to stick it down. If you need something to stop it curling up, dab a little of the mixture under each corner as glue.
This doesn’t need to be done too carefully as the purpose of this dessert is not to look pretty.
Step three
Bake on gas mark 1/2, 130 degrees C or 250 degree F for an hour. Turn off the oven and leave until completely cool before taking them out.
Step four
While the meringues are in the oven, you can get going on the rest of the components.
Peel and chop the cooking apples into small chunks. Place into a microwaveable bowl.
Step five
Add three tablespoons of water and three tablespoons of caster sugar and place in microwave.
Microwave on a medium-high heat until you have a pulpy consistency. This took about 10 minutes with fairly regular stop and stirs.
Step six
If you are thinking you have seen these pictures before, I’m sorry, I’m plagiarising myself. I know I know, in the very next post too.
In a saucepan add together the butter, brown sugar, golden syrup and salt. Heat gently until melted and then bring to a simmer.
Simmer for 10 minutes. Stir regularly so that it doesn’t catch and burn. Leave to cool for about half an hour.
Step seven
Stir in 100 ml of double cream and leave to cool.
Step eight
Whisk the remaining double cream until thick and gloopy.
Step nine
Once everything is cool combine the meringues, cream, caramel and apple to taste. I let everyone do this to their own preferences in individual bowls which worked really well.
Sprinkle chopped pecans and grate nutmeg over the top (if you like it) to finish.
Recently I have been partying down with some of the lovely hens (bachelorettes for those of you across the pond) in my life who are getting married this summer. My friends are definitely going wedding crazy at the moment, and with hen parties springing up every other weekend I thought I would put together a yummy recipe for any keen party planners, or any of you who fancied a new afternoon tea recipe.
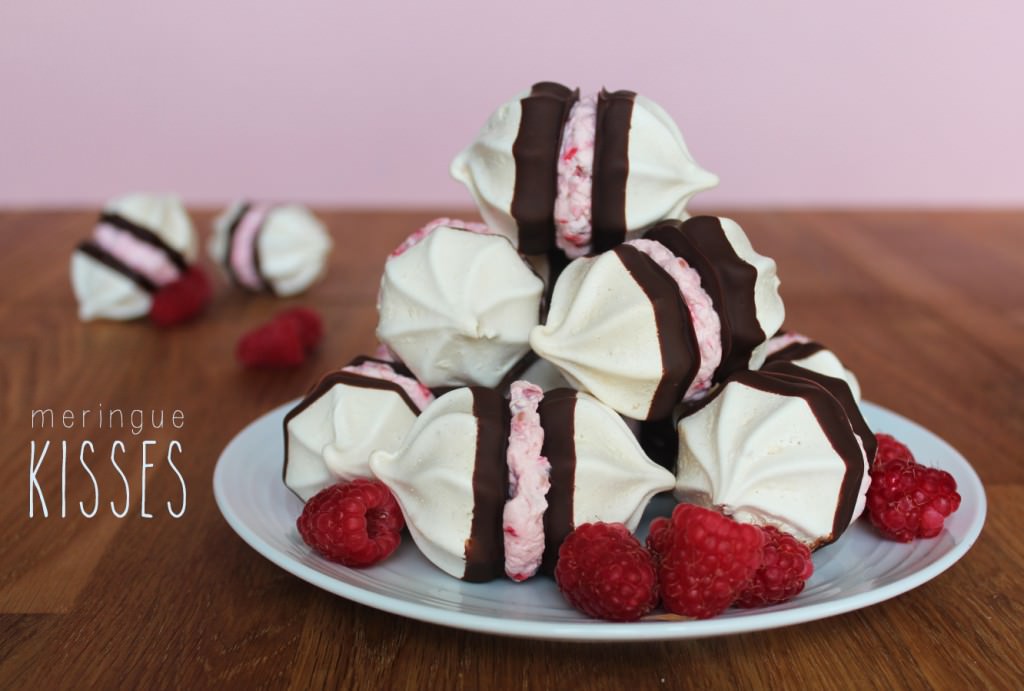
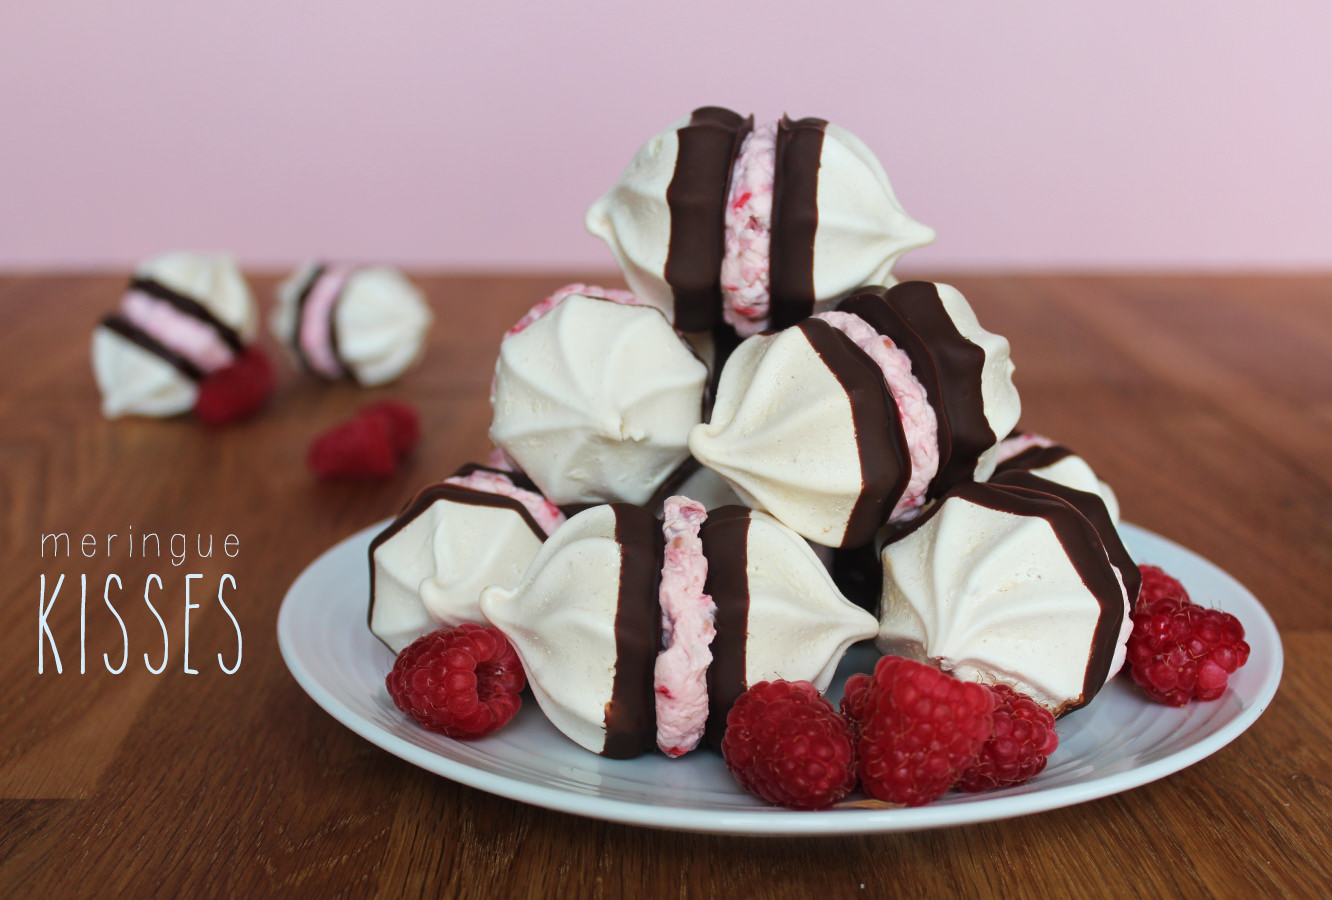
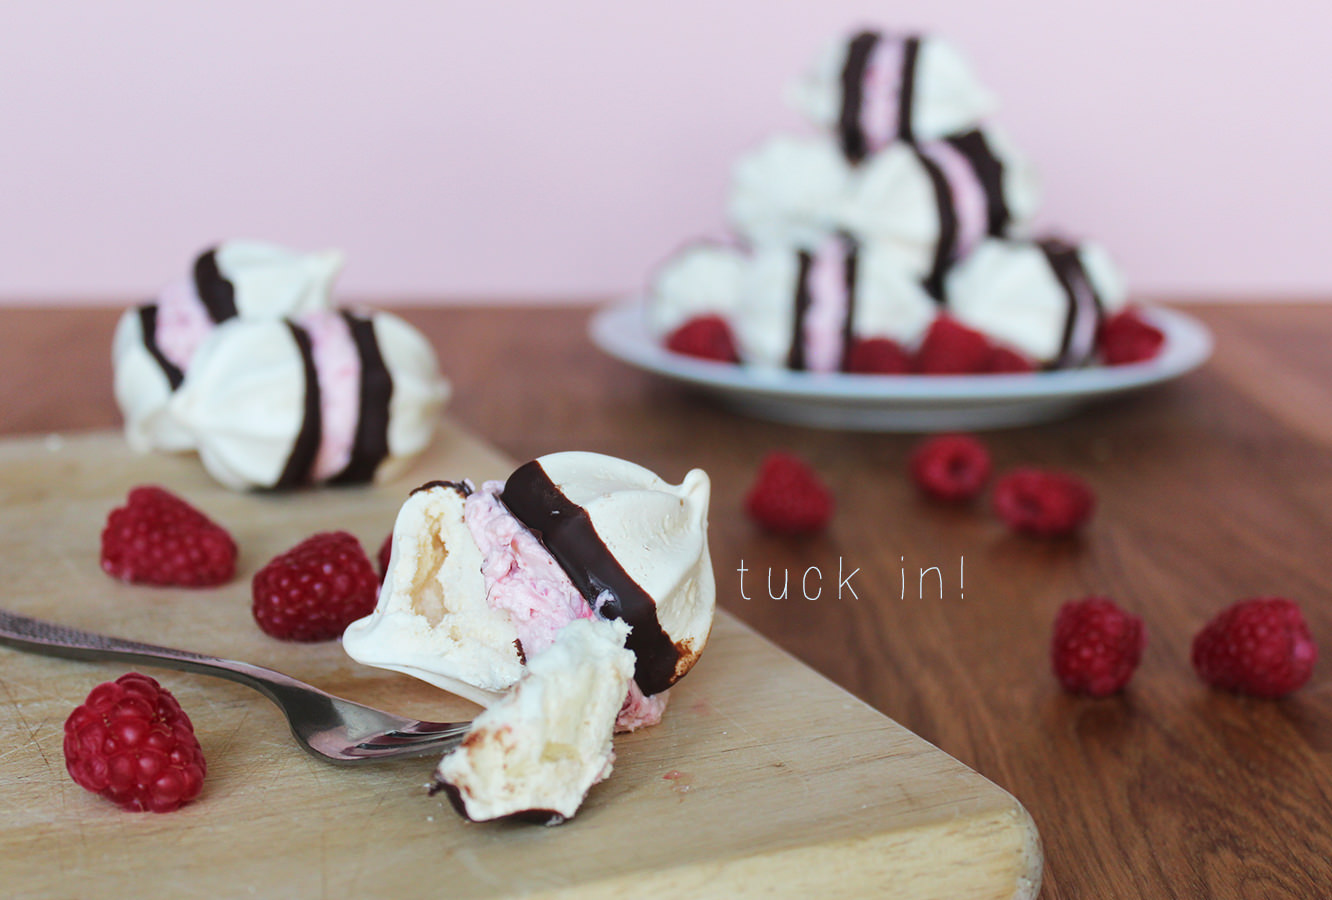
Introducing these lovely little meringue kisses. Although any of the wedding party who are on diets might want to look away now…
You will need
2 egg whites
110g/4 oz caster sugar
100g/3.5 oz dark chocolate
150ml double cream
75g/2.5 oz raspberries
Makes 20
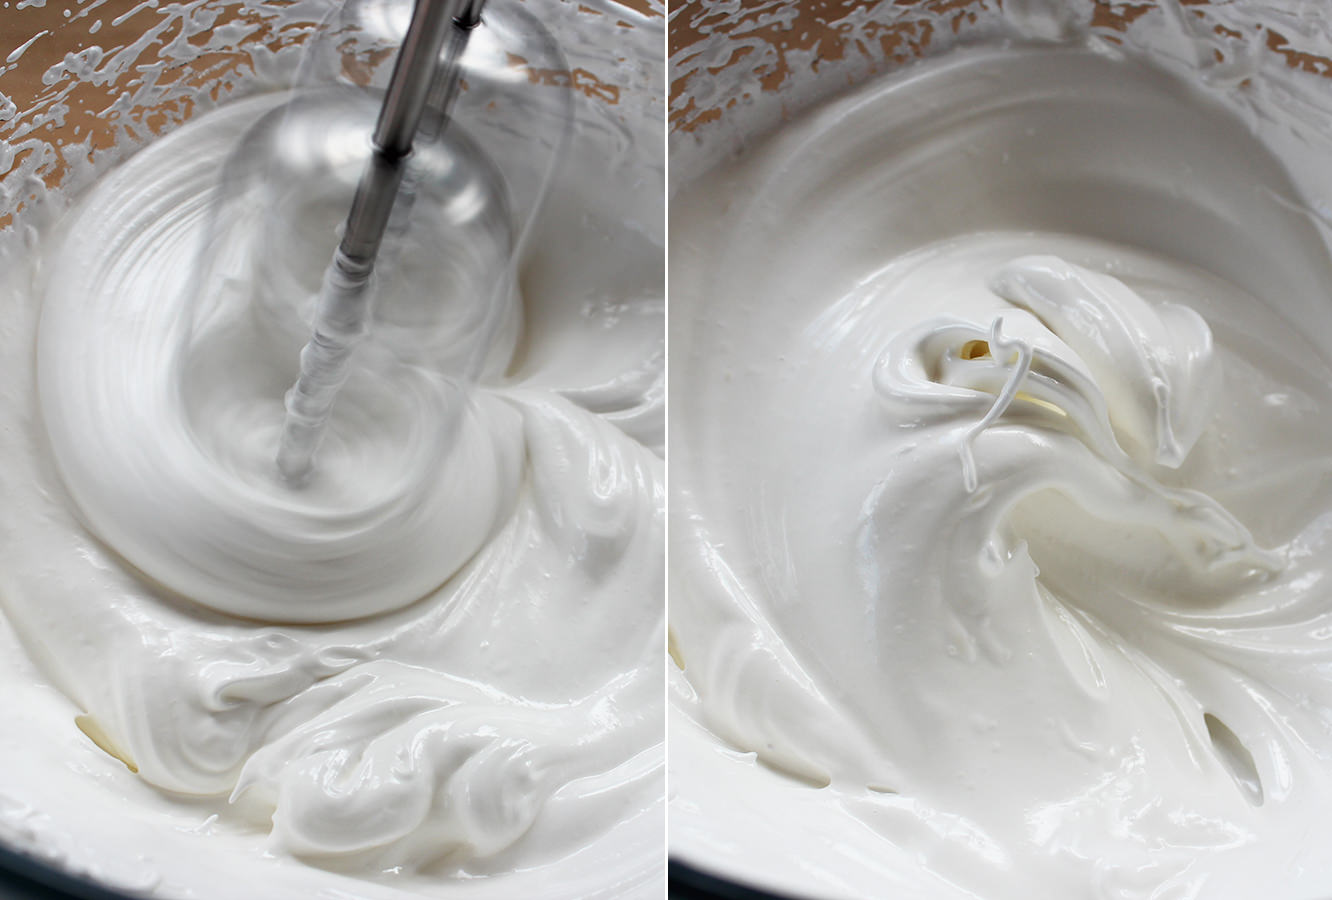
Step one
Separate eggs whites into a glass or metal mixing bowl (plastic tends to hold a bit of grease, gross I know, but this will stop your egg whites fluffing like they should).
Use an electronic whisk (or a really strong arm) to whip the whites until they double in size and start to stiffen up.
Once they look kind of like the third photo start adding in the sugar as you whisk.
Step one and a half
Keep whisking until you have what’s known in the biz as stiff peaks. If you’re a bit unsure, turn your bowl upside down, if your mix doesn’t fall out then you’re good to go, if it does then I’m sorry.
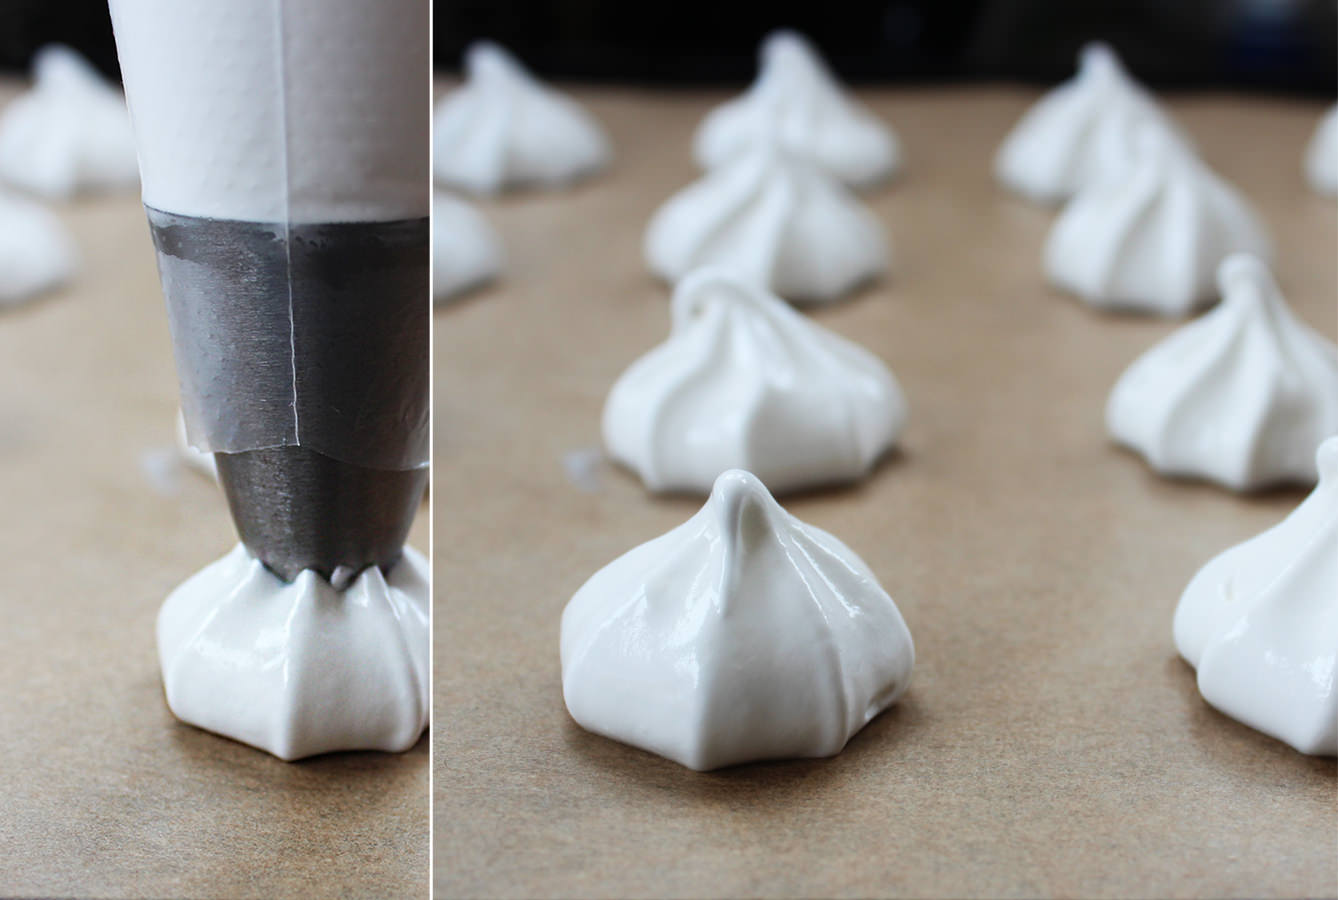
Step two
Cover two baking trays in greaseproof paper or baking parchment. Don’t whatever you do grease this, use a dab of meringue in each corner to secure it to the tray.
Fill a piping bag with the meringue mix and pipe lots of little blobs. Hold the piping bag about 2cm away from the tray at a 90 degree angle and squeeze down, once your meringue has reached the desired spread (say 4cm wide?) pull away quickly.
Remember to pipe in pairs, no odd numbers, and leave a little space for these to expand.
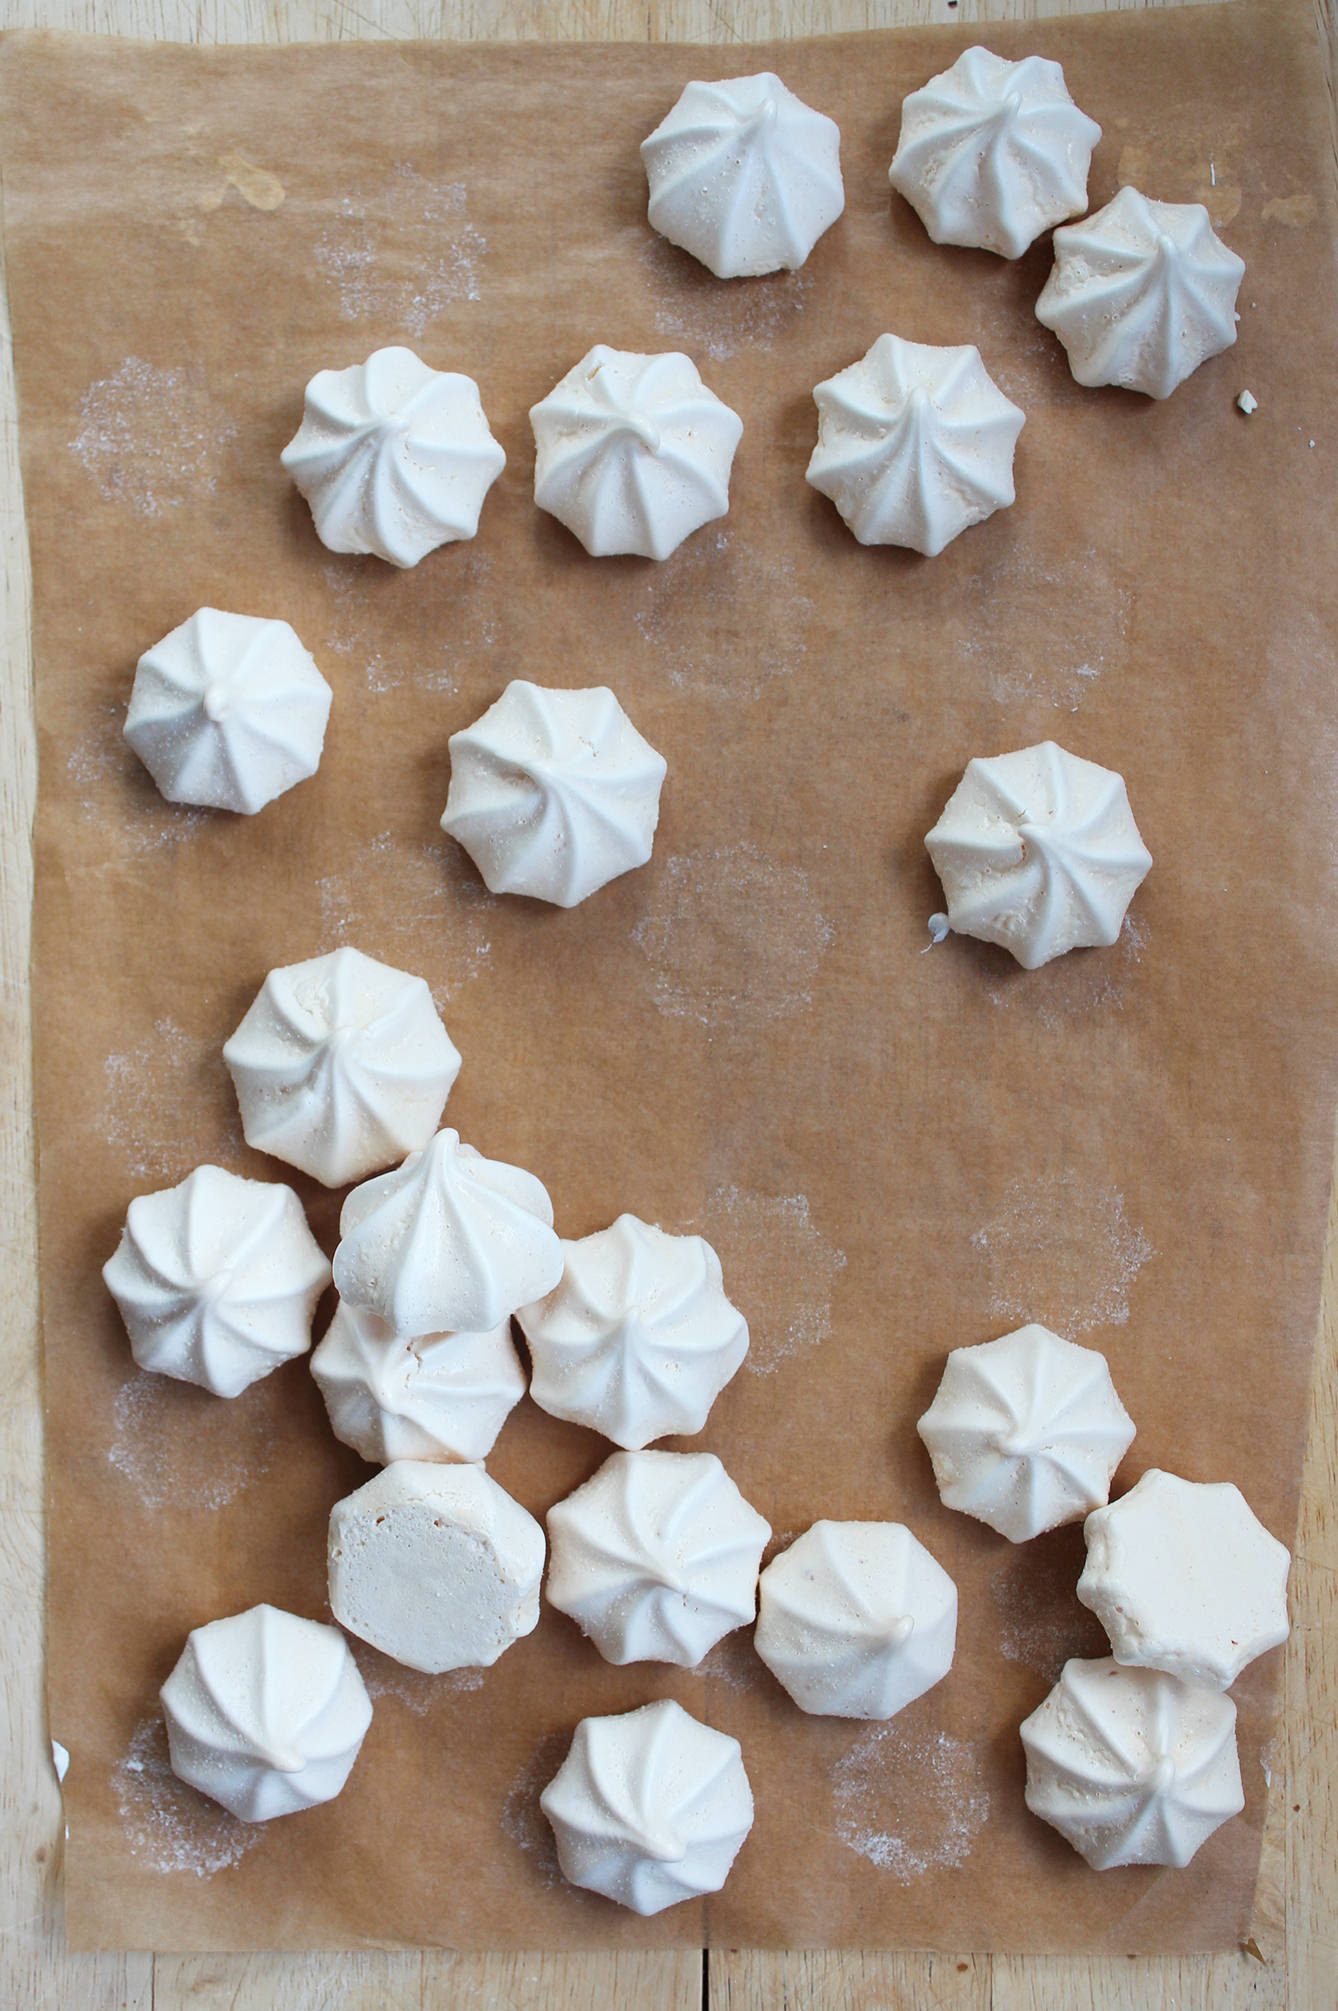
Step three
Bake.
Gas Mark 1/2, 130 degrees C or 250 degree F for 40 minutes to an hour. I know, that’s really unhelpful, but I sort of went jogging, and my oven is a law unto itself.
Once you can see they’ve grown and have developed shells, turn the oven off and wait for it to cool before removing them. If you need to take a peek by opening the oven door, try not to throw it wide, or your meringues will crack.
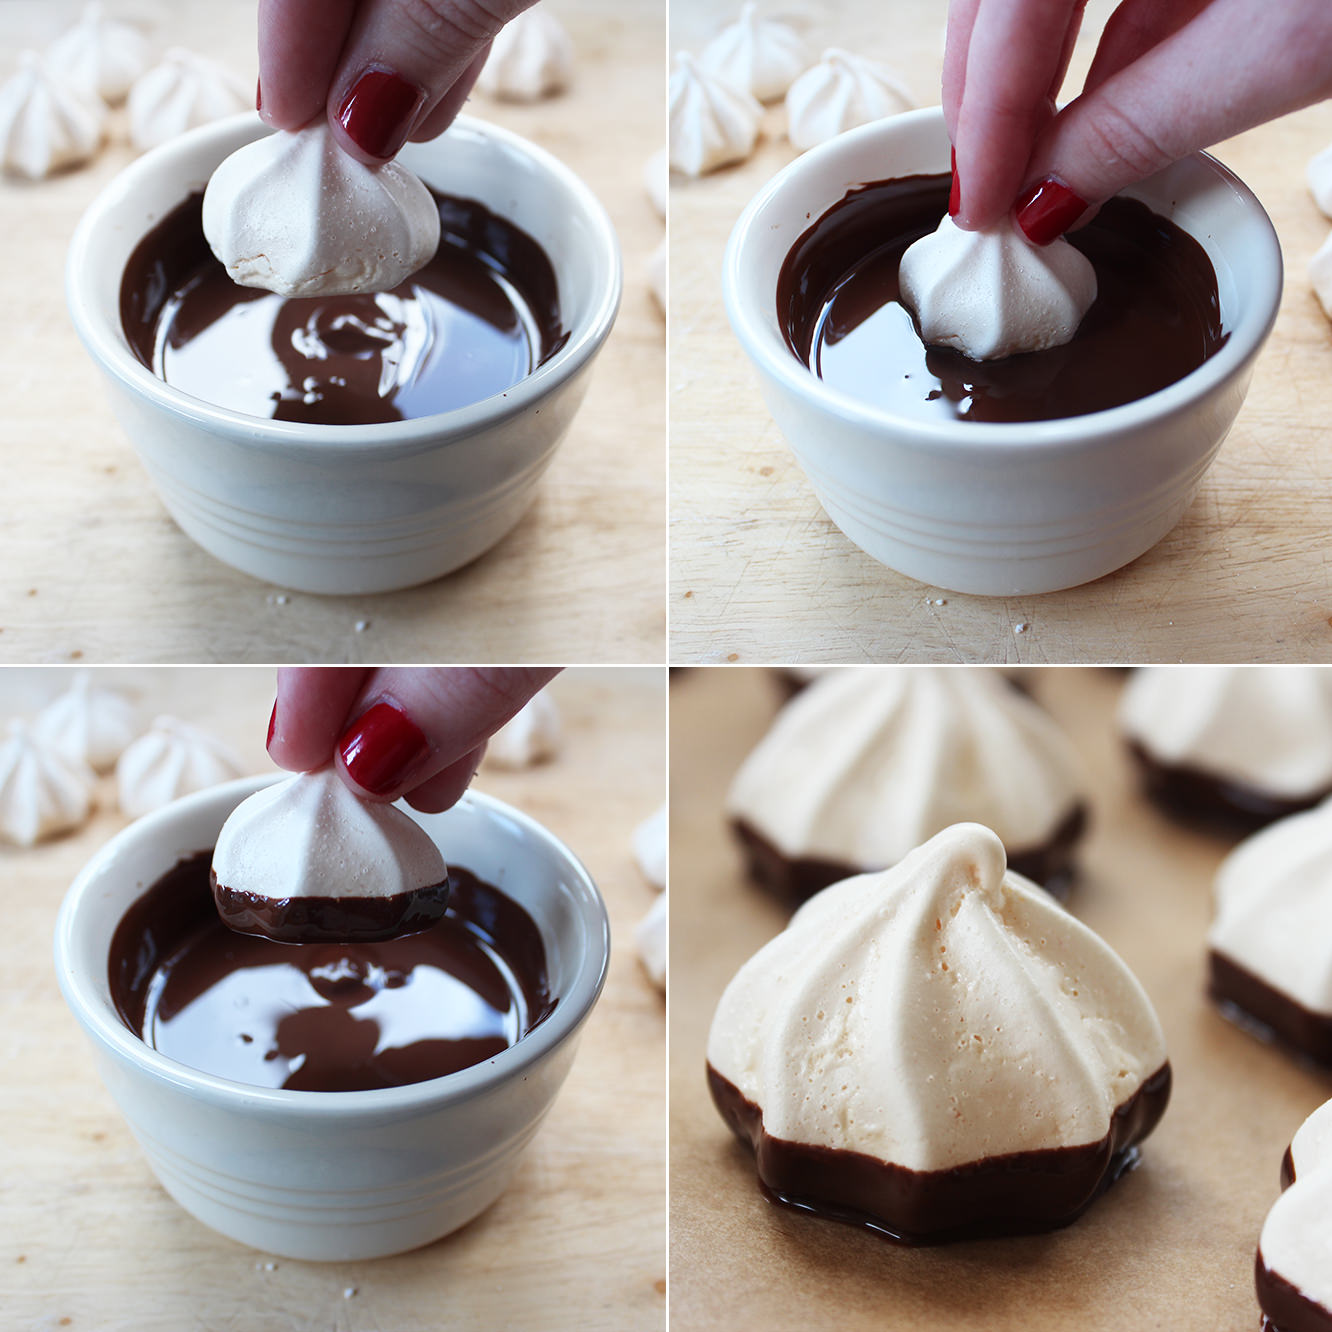
Step four
Melt the dark chocolate in a small bowl/ramekin. Do this gradually in the microwave so you don’t burn the chocolate.
Dip each meringue so that the bottom an a little bit of the side is covered. Sit on greaseproof paper and leave to set.
Step five
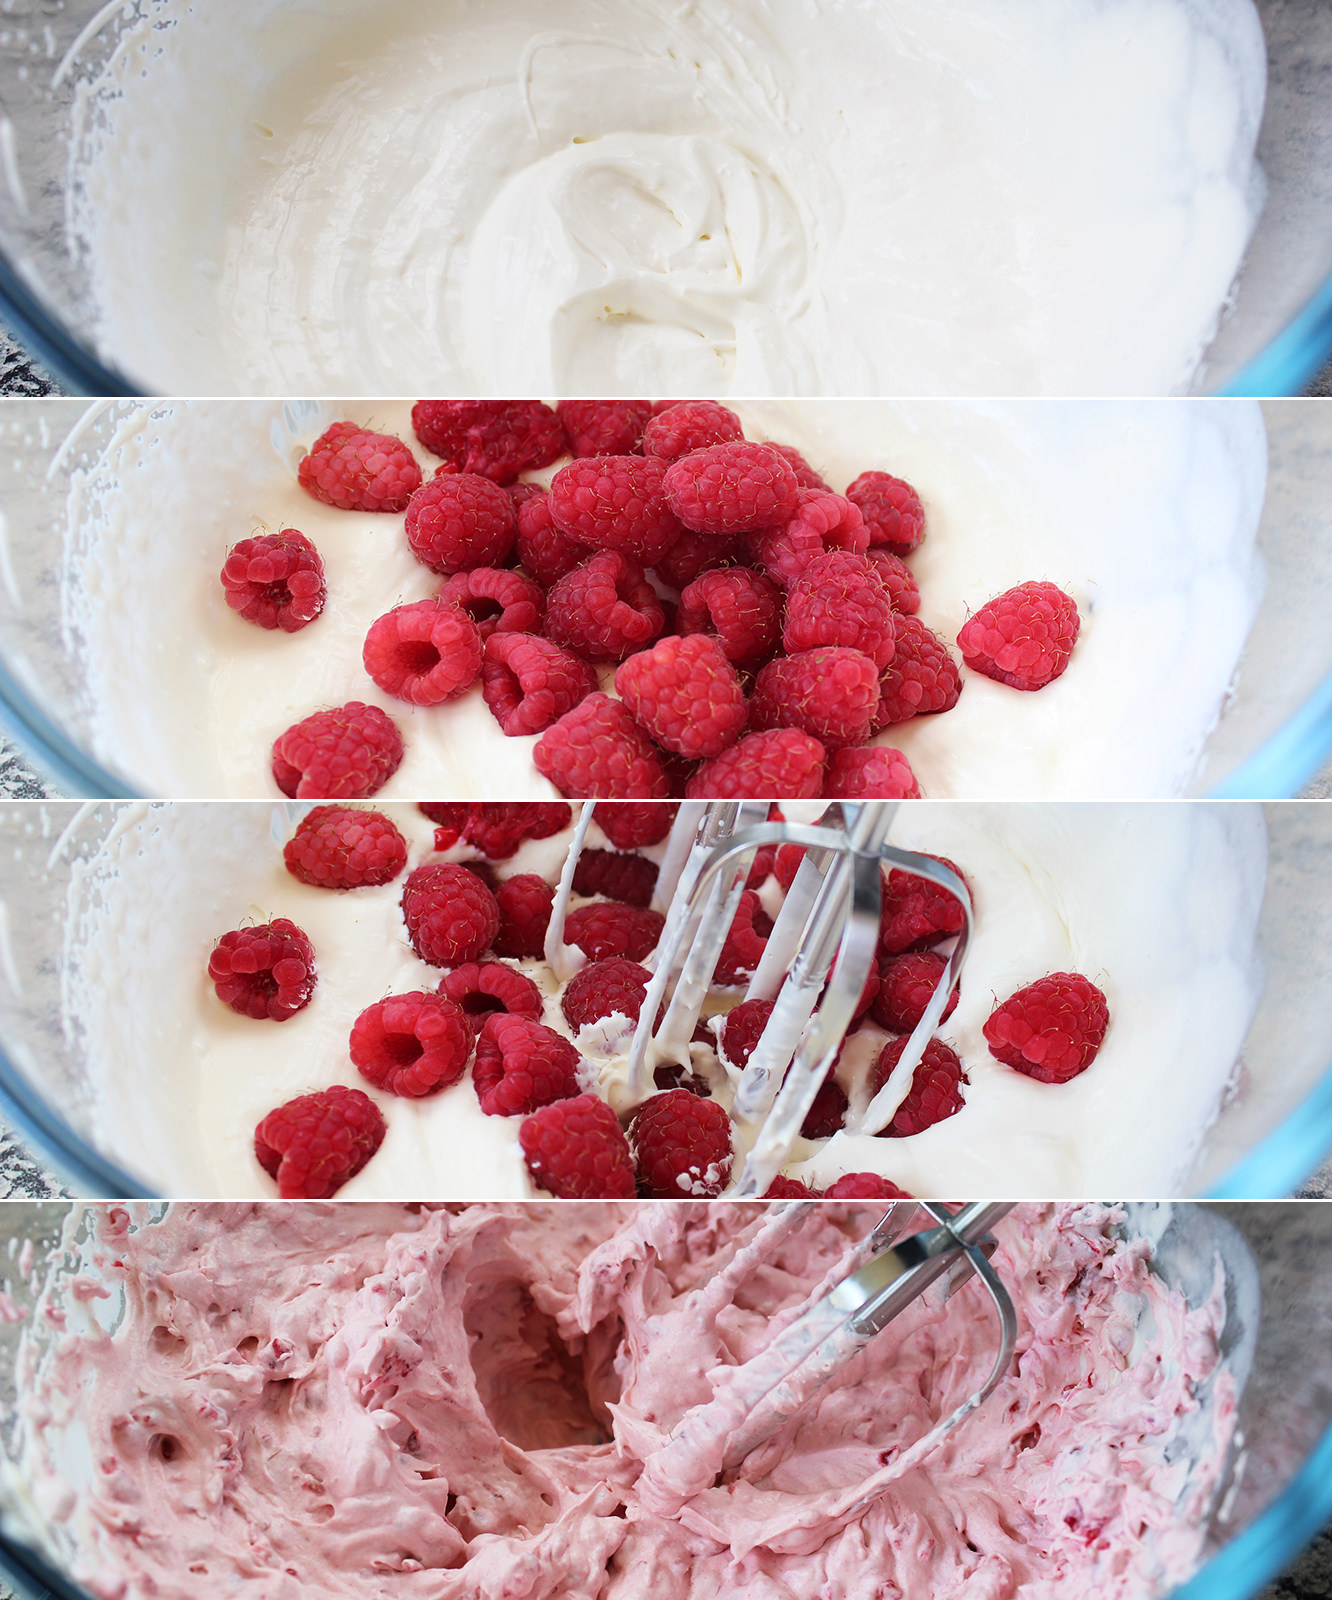
Whisk the double cream until it has doubled in size and is beginning to hod it’s shape.
Add the raspberries and whisk some more. This is pretty satisfying for some reason.
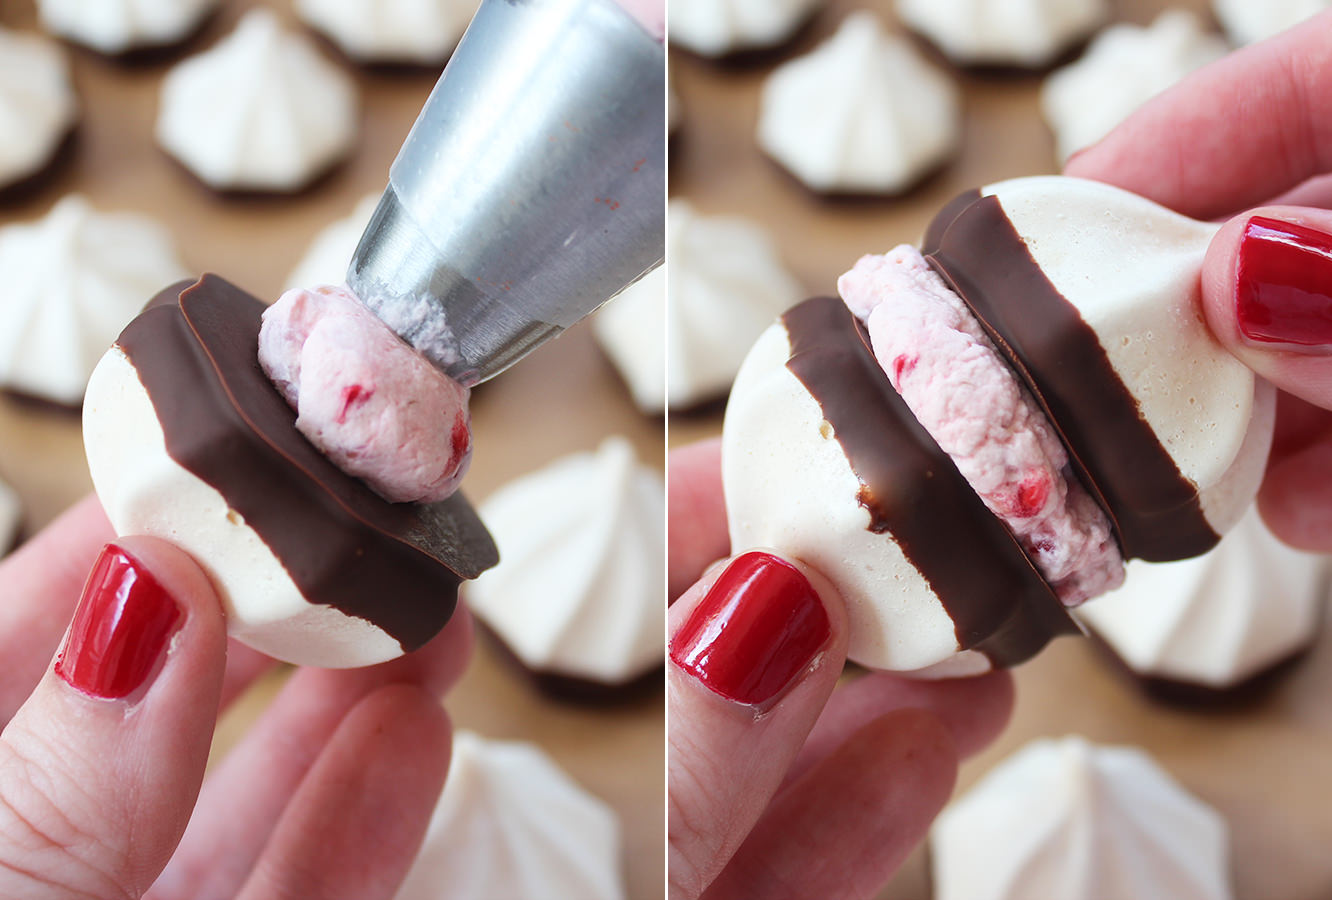
Step six
Pipe the raspberry cream onto a shell and squish another one on top. Repeat until finished.