Category: Mother’s Day

Ta, Ma.

Apparently when I think Mother’s Day blogging I think fudge. It’s a good thing my mum likes fudge. What’s that? You didn’t realise Mother’s day was so soon? I know, right? Me neither. It’s this Sunday for those of you in GB, the rest of you should check your calendars, this is the sneakiest holiday of the year.

This is a super super easy way to make a treat for your Ma. It’s not like the last fudge recipe I posted, which while being totally delicious I’d wager none of you actually made. Well there’s no boiling sugar or a thermometer required for this one, and barely any cooking at all.

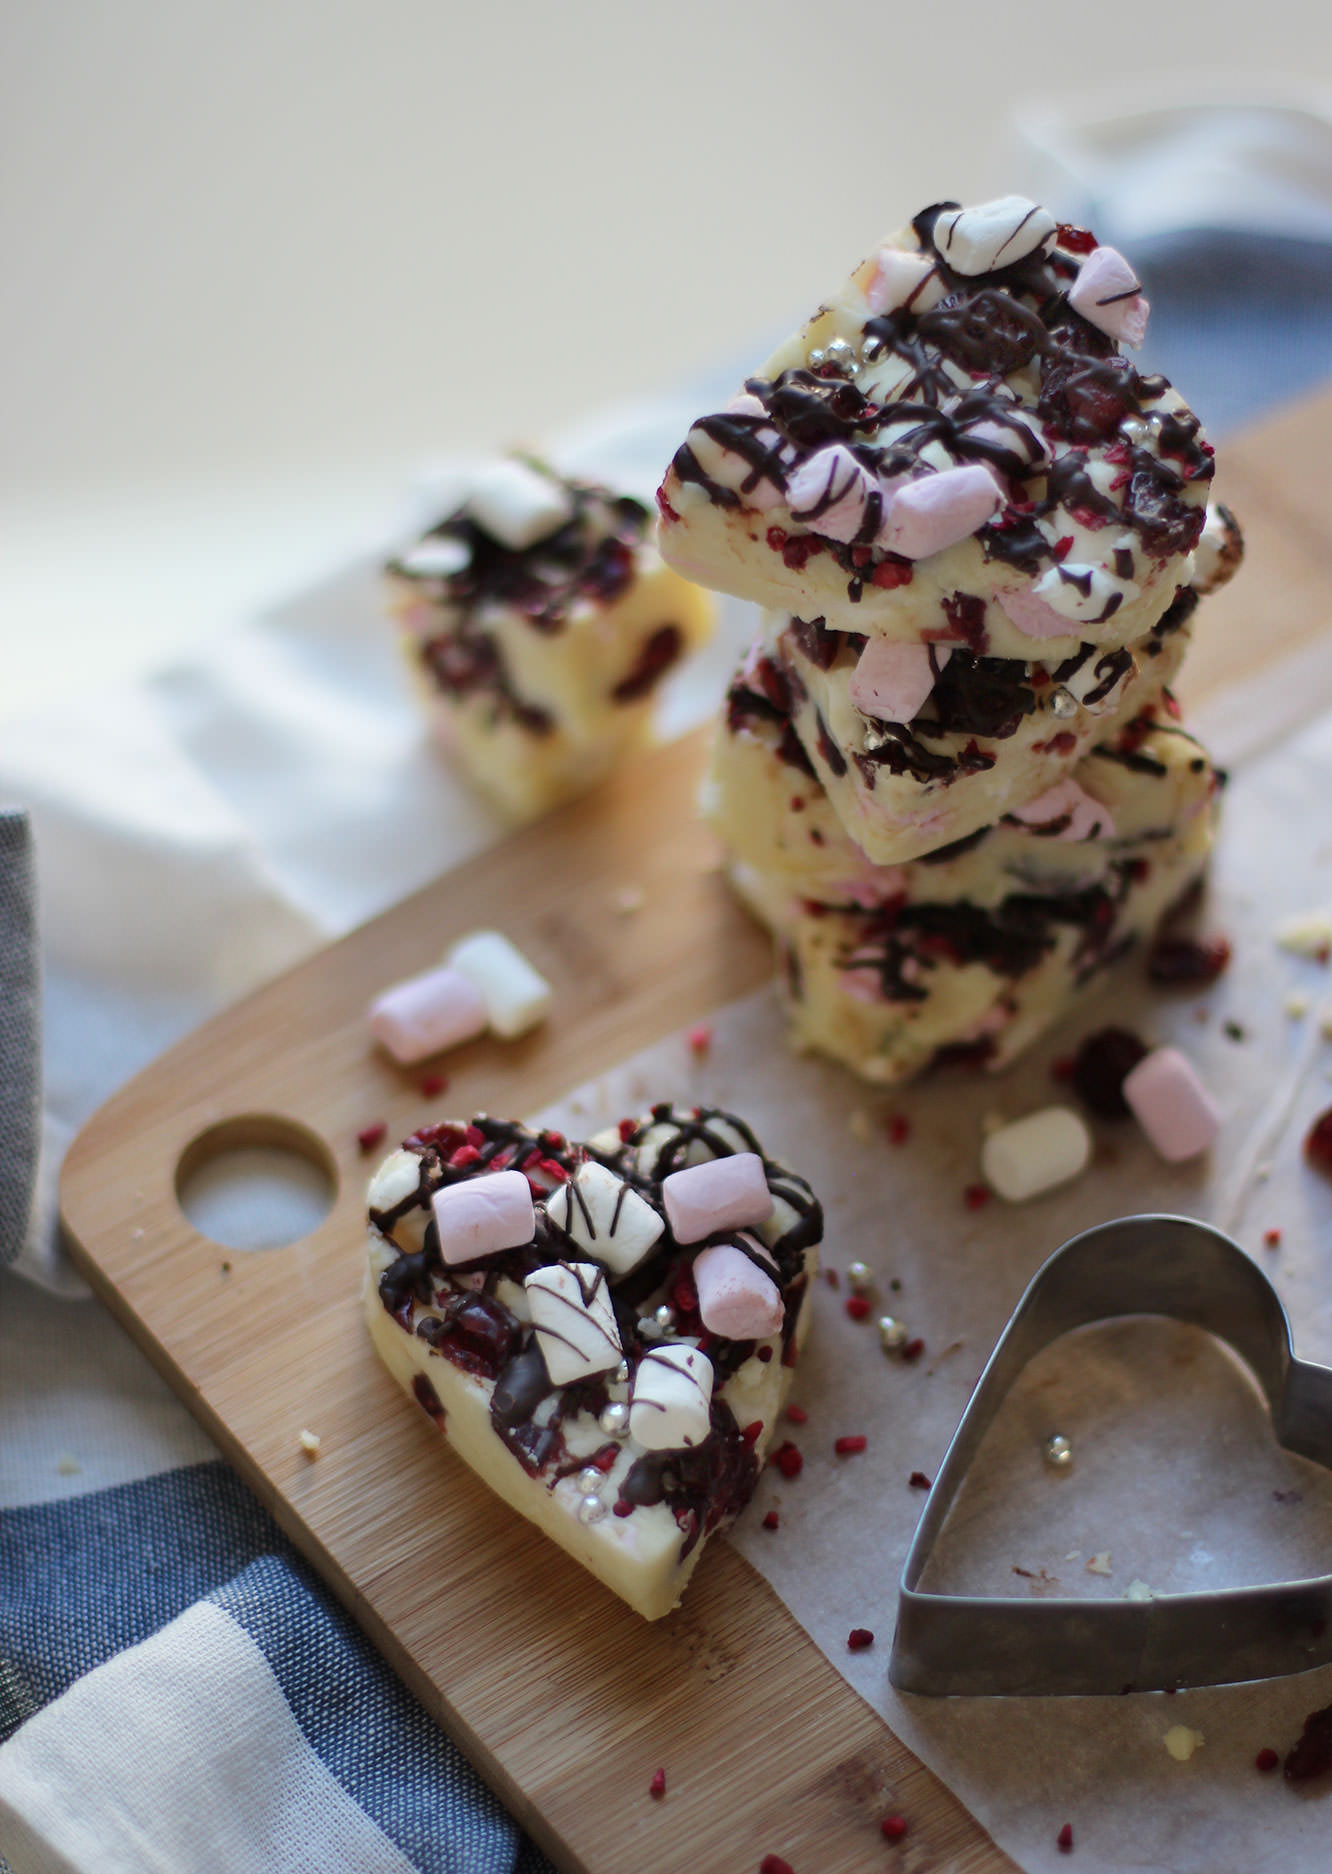
You might need to cut this recipe by half or even more, it makes quite a large batch for just one mummy to eat. It can be frozen.
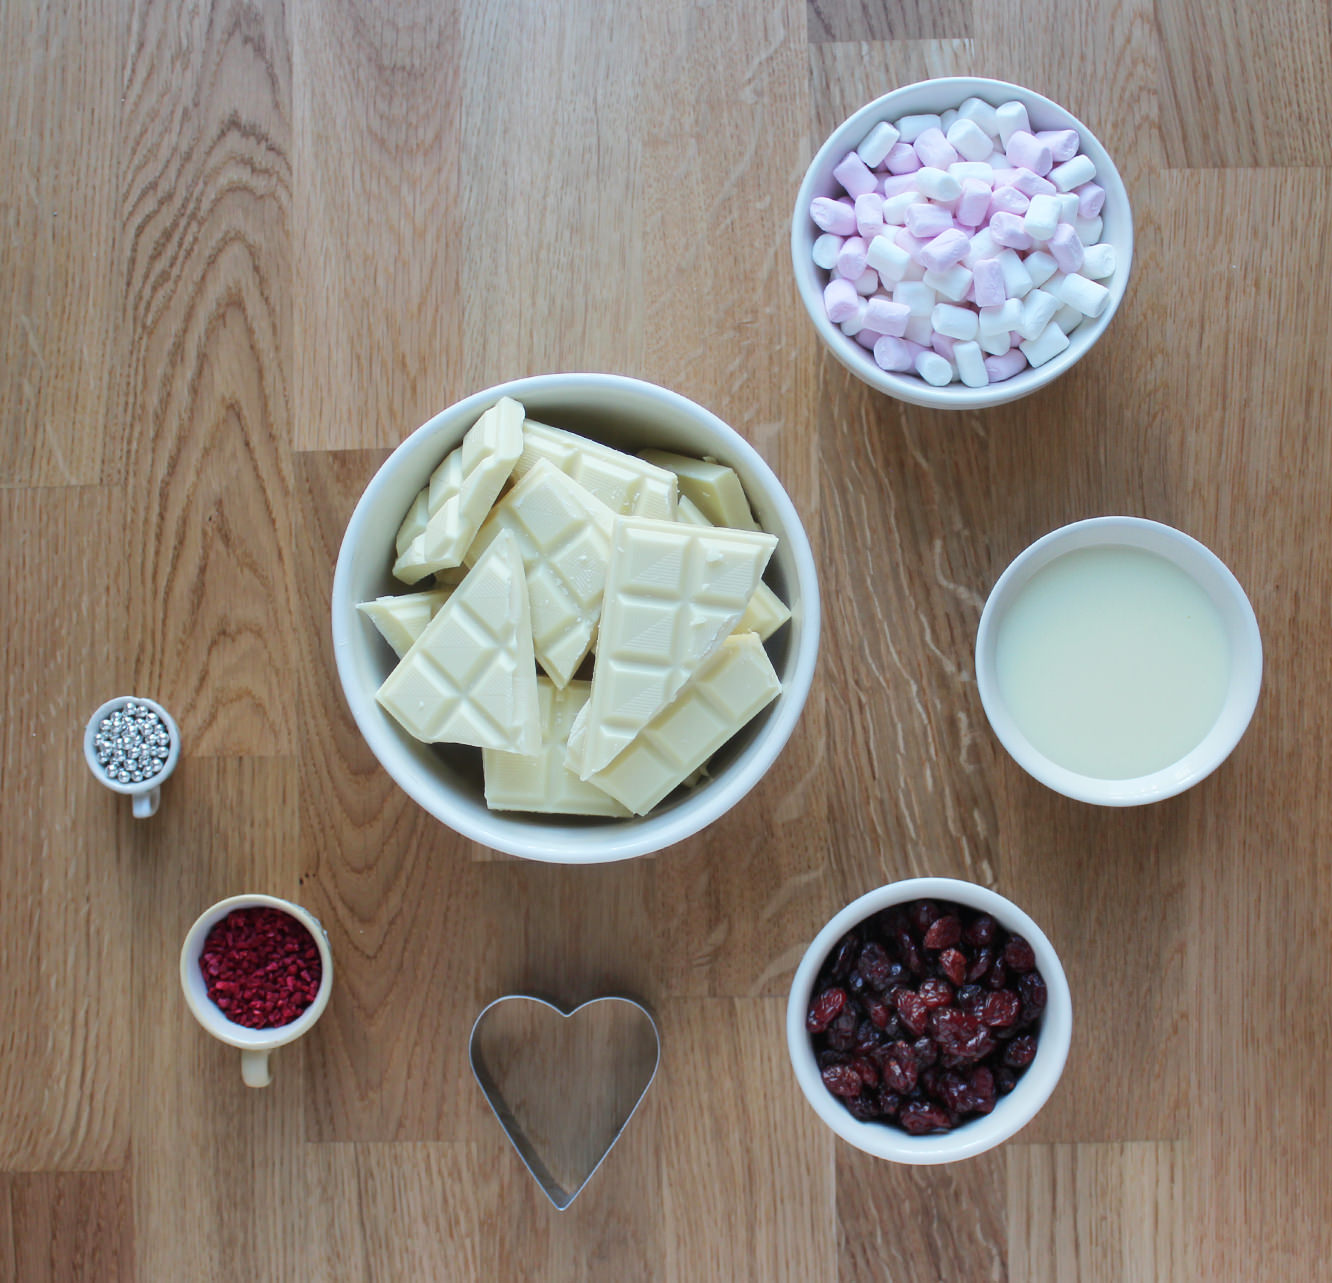
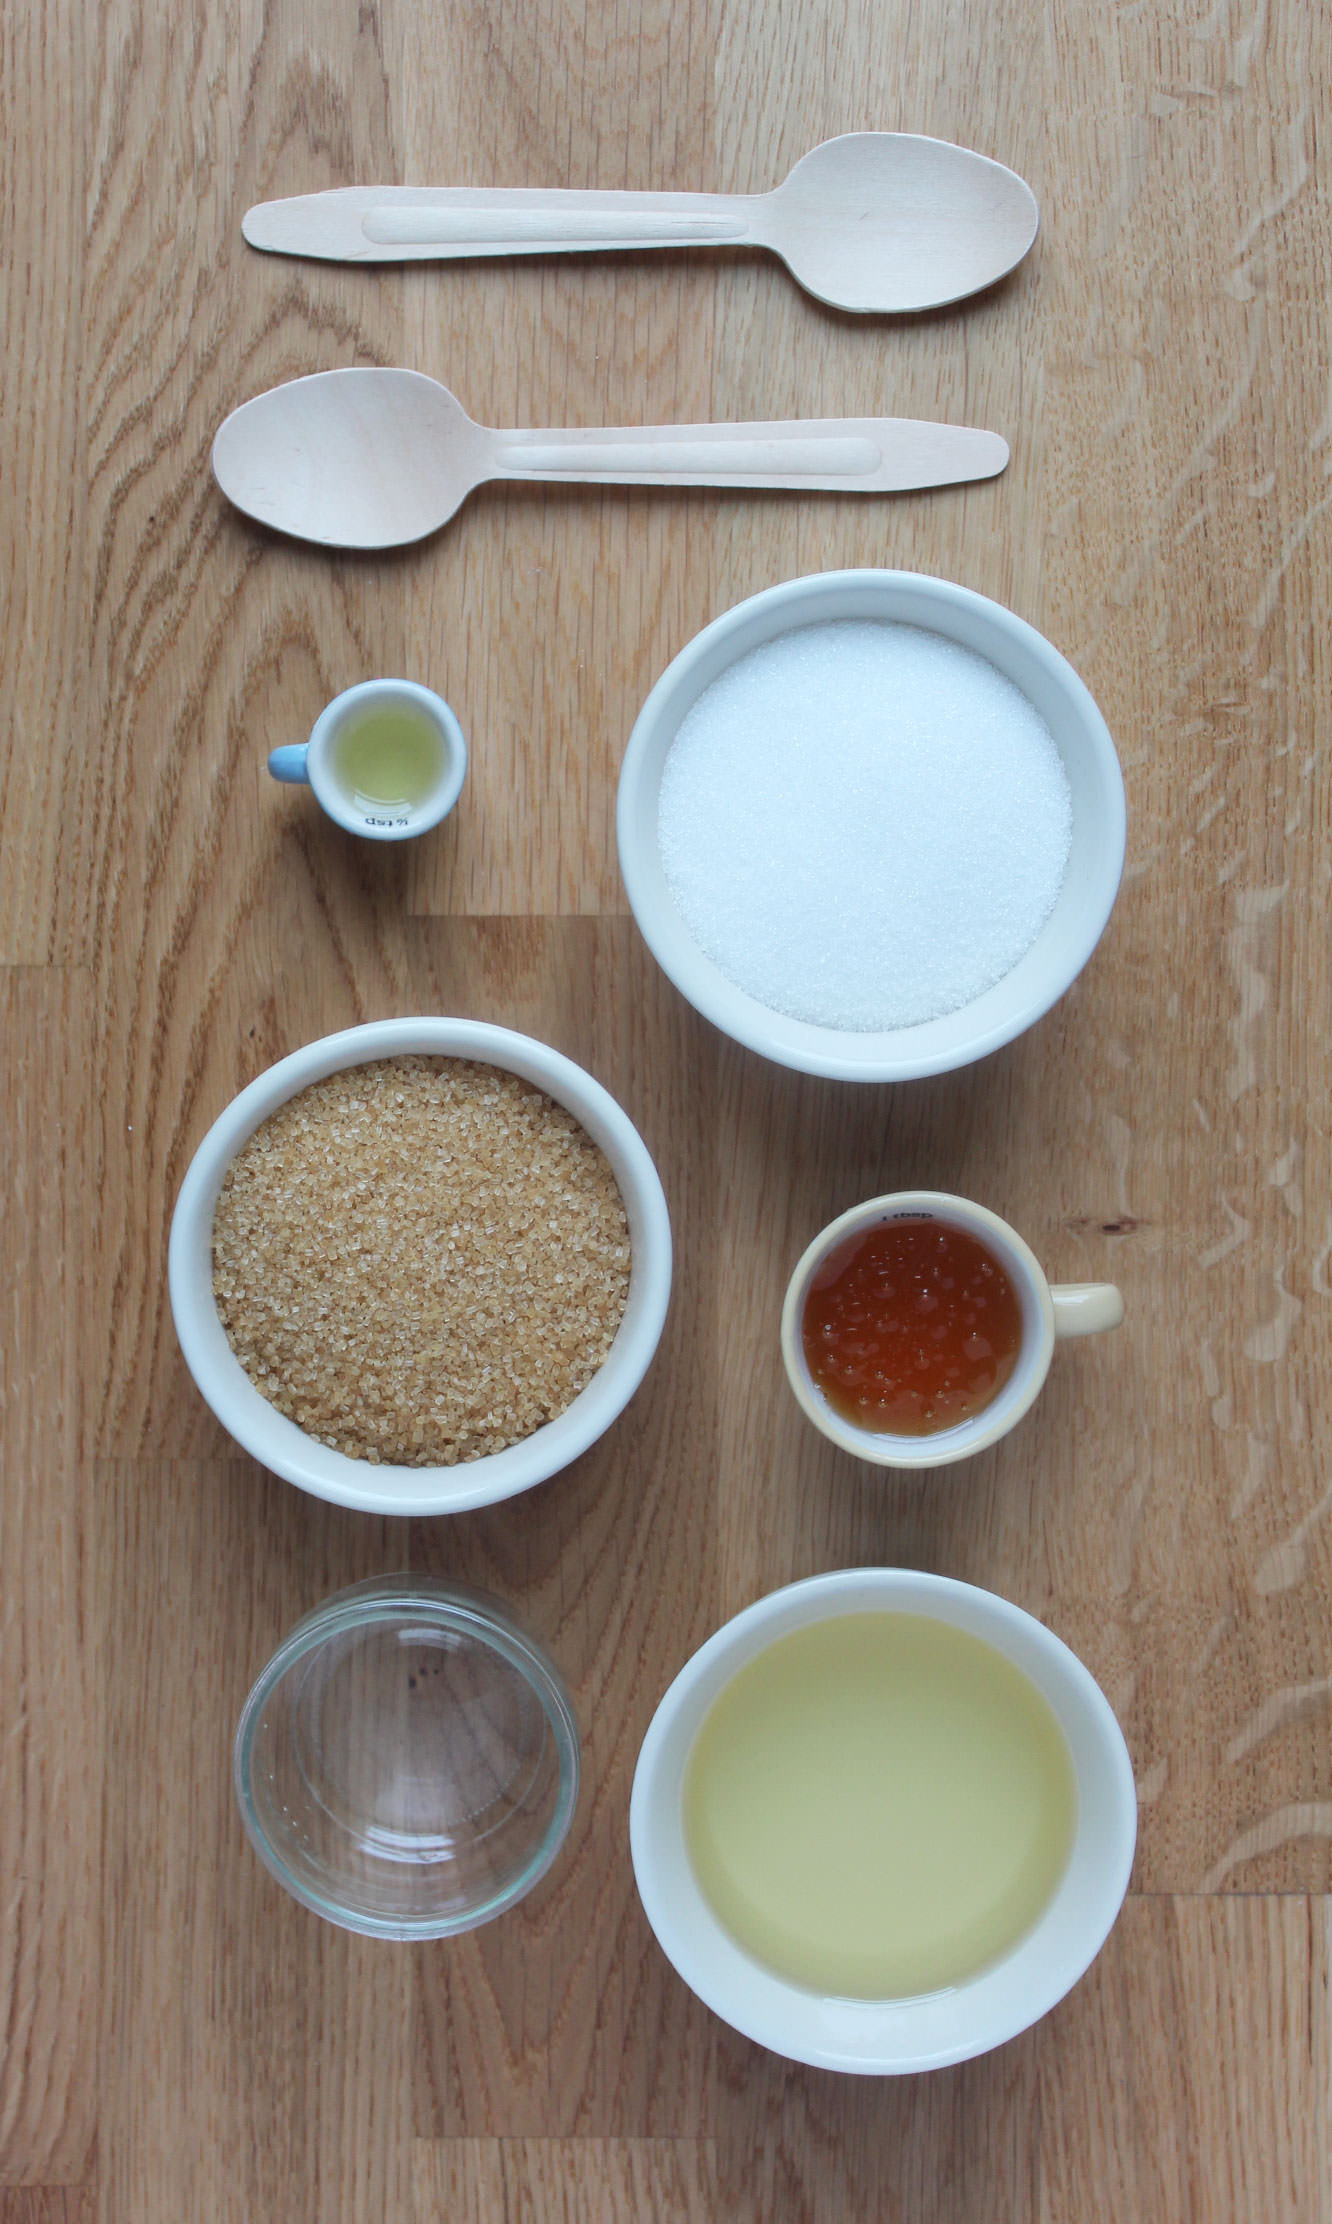
white-chocolate-fudge-mothers-day-recipe-1

You will need

600g/1 lb 3 oz White chocolate (yeah, this is serious stuff)

397g Condensed milk (1 can basically)

125g/4.5 oz Cranberries

85g/3 oz Mini marshmallows

25g/1 oz Dark chocolate

Other decorations (I used silver balls and freeze dried raspberries because that’s what I had, but any manner of nuts and dried fruits would be acceptable, even as a substitute for the marshmallows and cranberries)
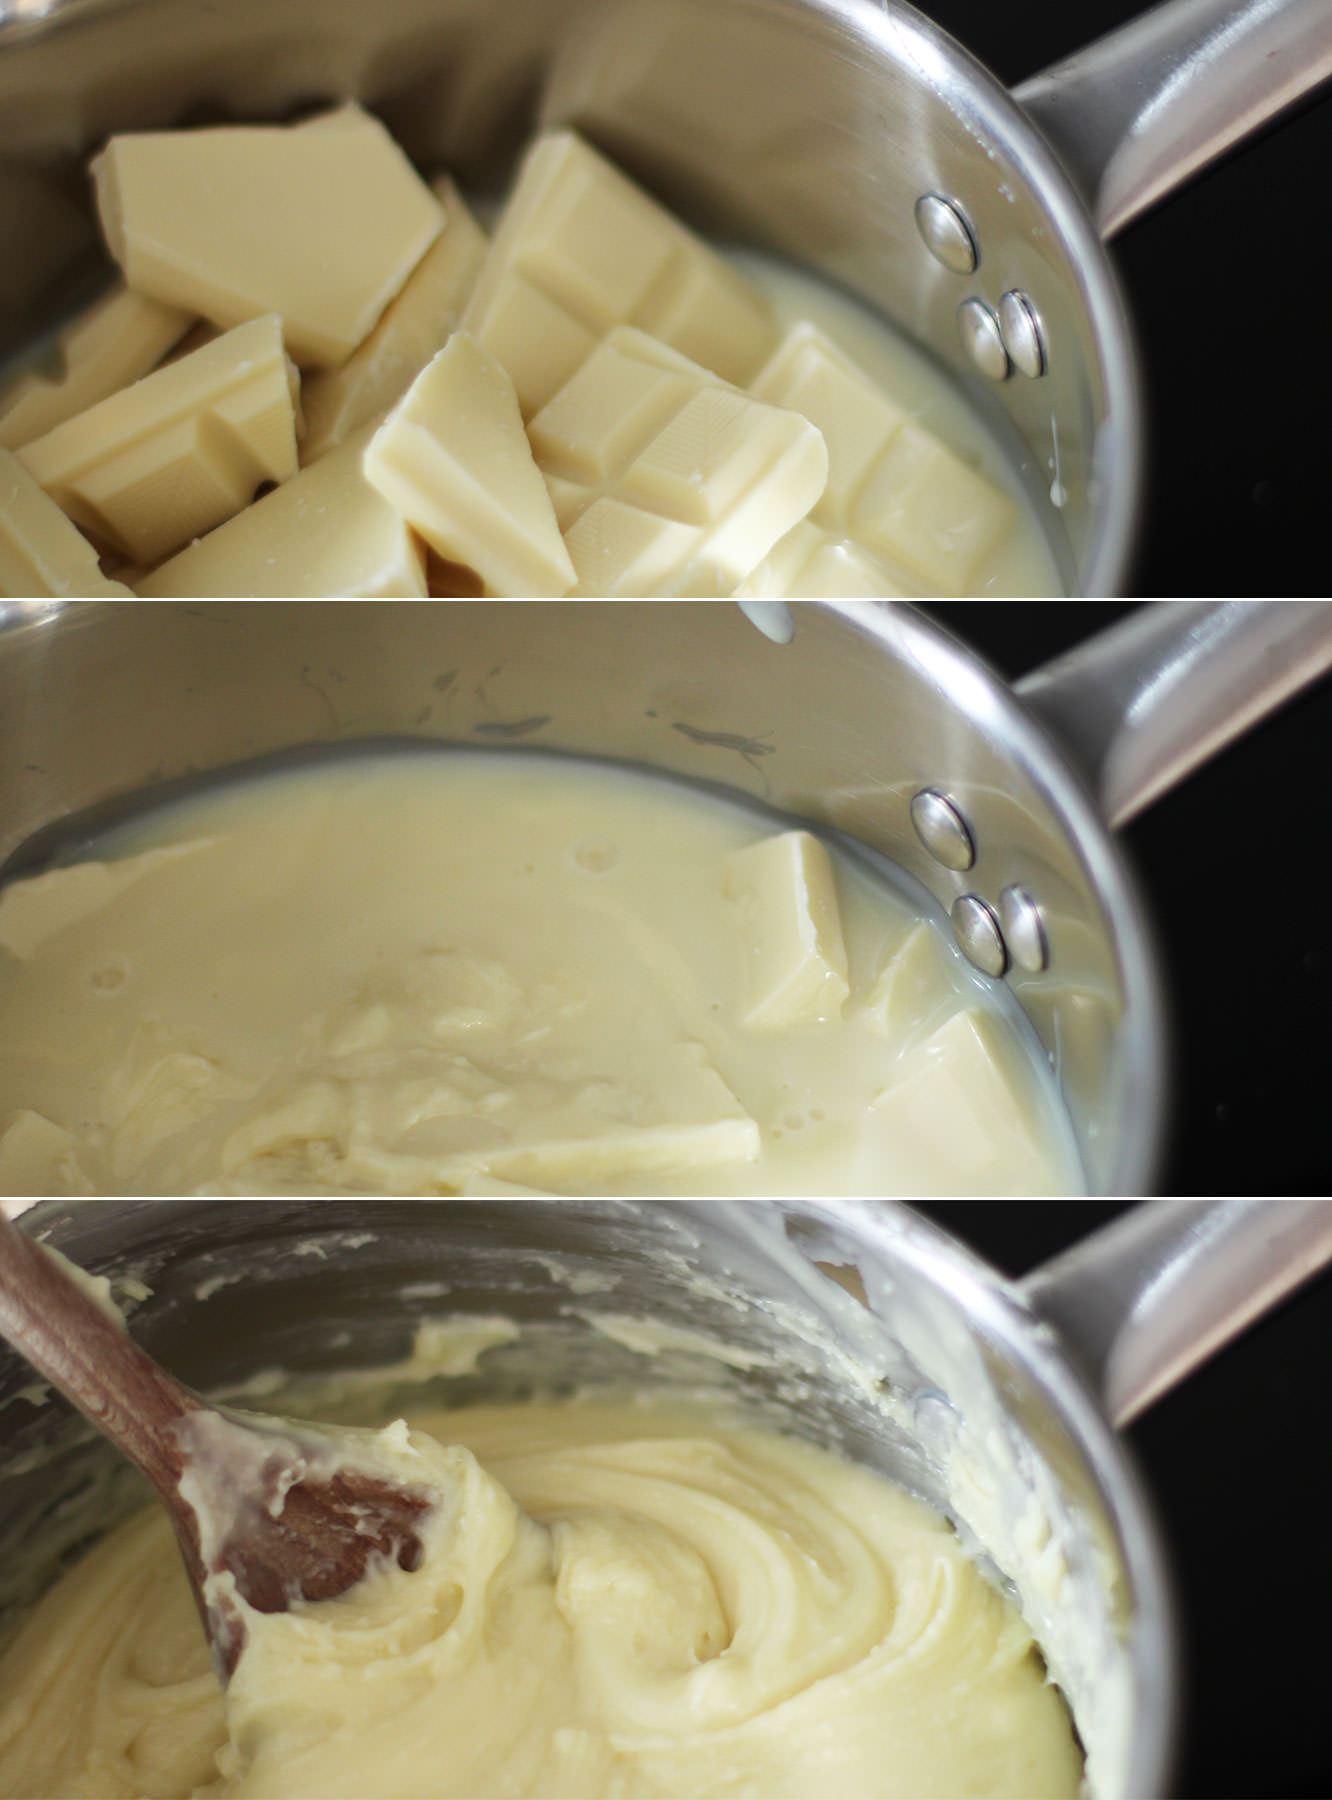
white-chocolate-fudge-mothers-day-recipe-2

Step one

Break the white chocolate into chunks and place in a pan with the tin of condensed milk.

Melt together on a low heat. Once you have a smooth fudge-like mixture, remove from the hob.
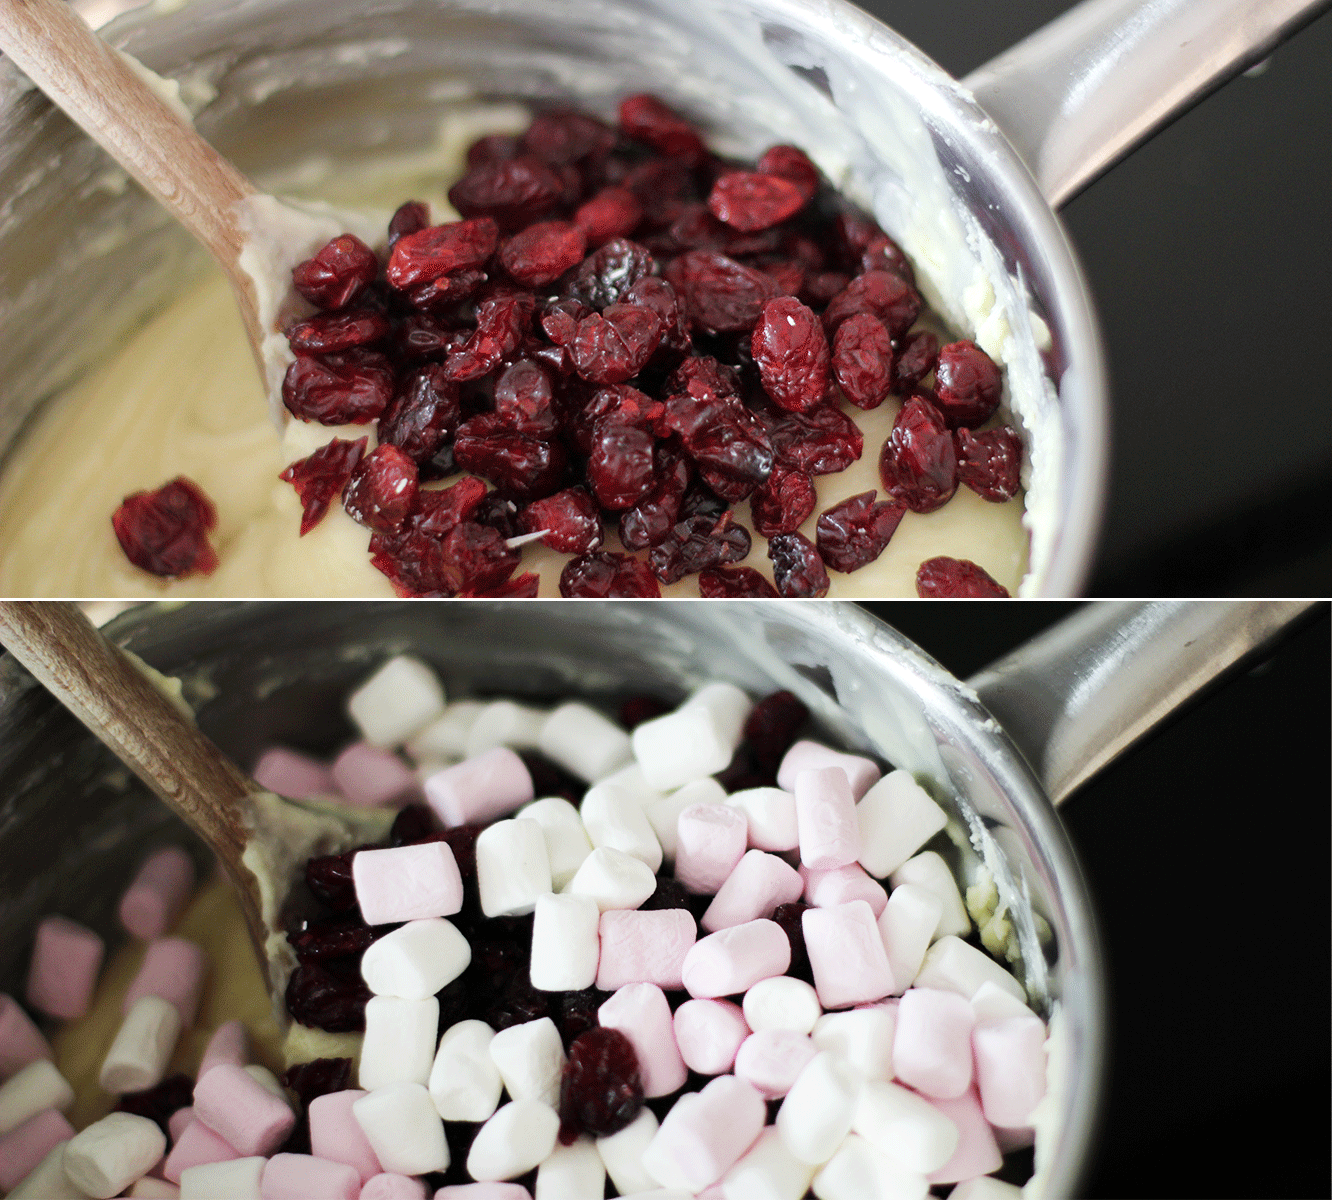
white-chocolate-fudge-mothers-day-recipe-7

Step two

Add two thirds of the cranberries and marshmallows, stir to combine.
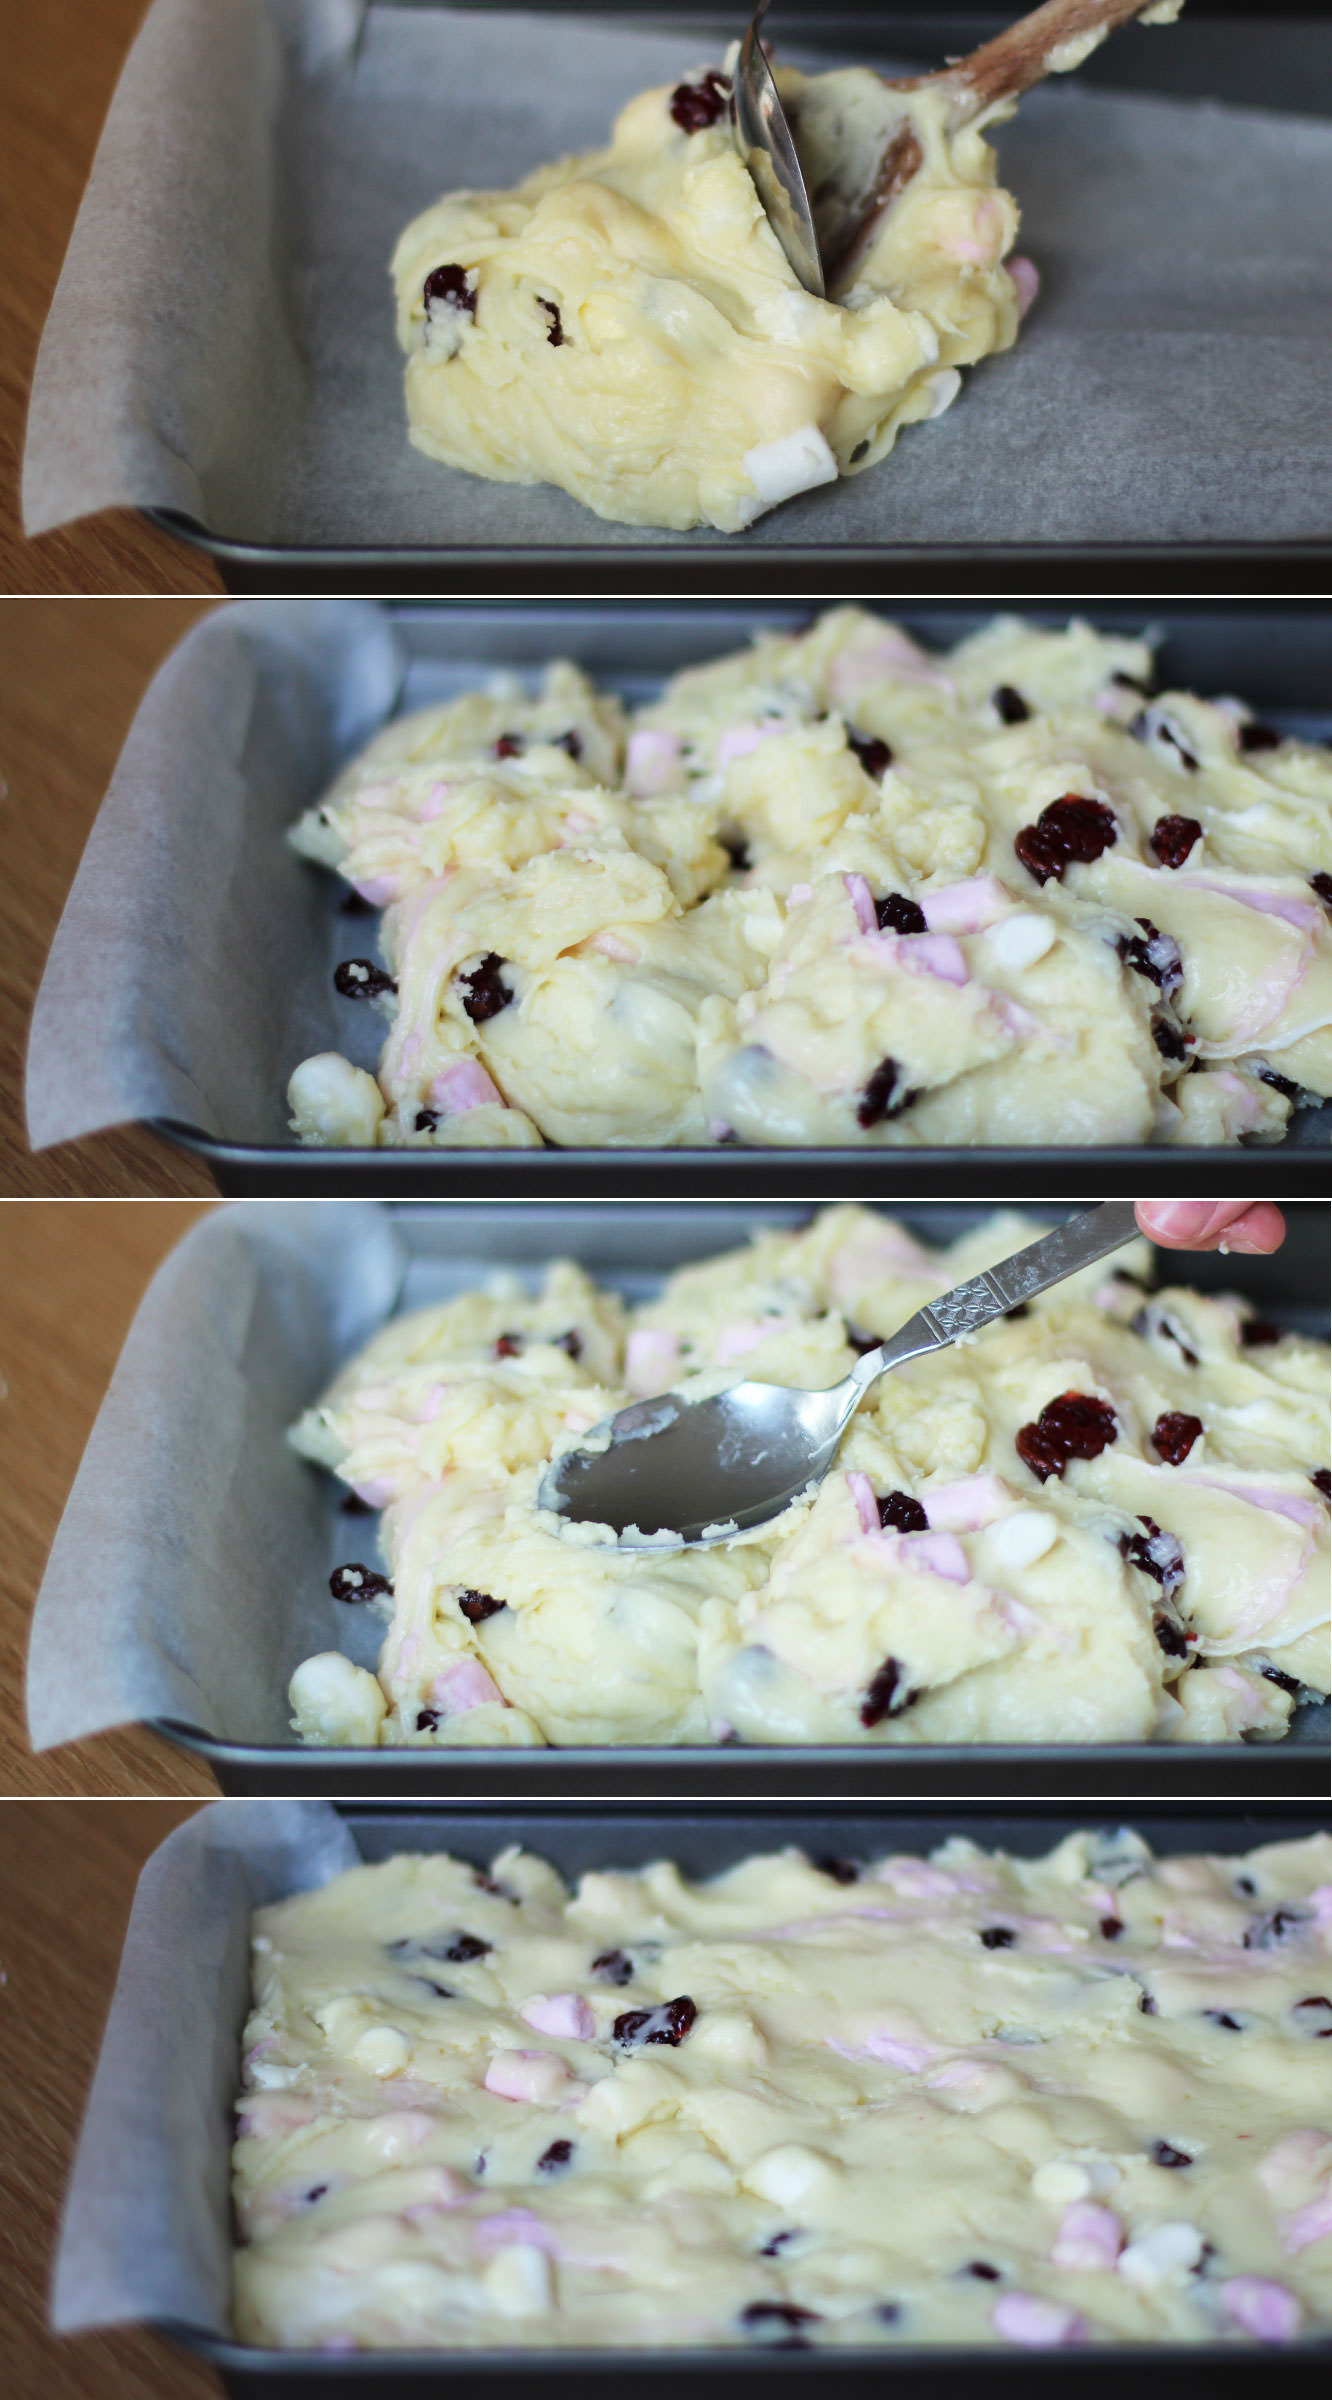
white-chocolate-fudge-mothers-day-recipe-3

Step three

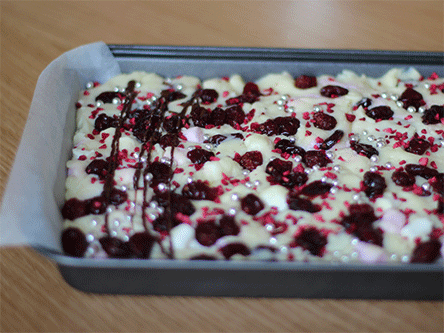
Drop the mixture into a brownie tin lined with greaseproof paper. Push into the corners with the back of a spoon and even the top out a bit.
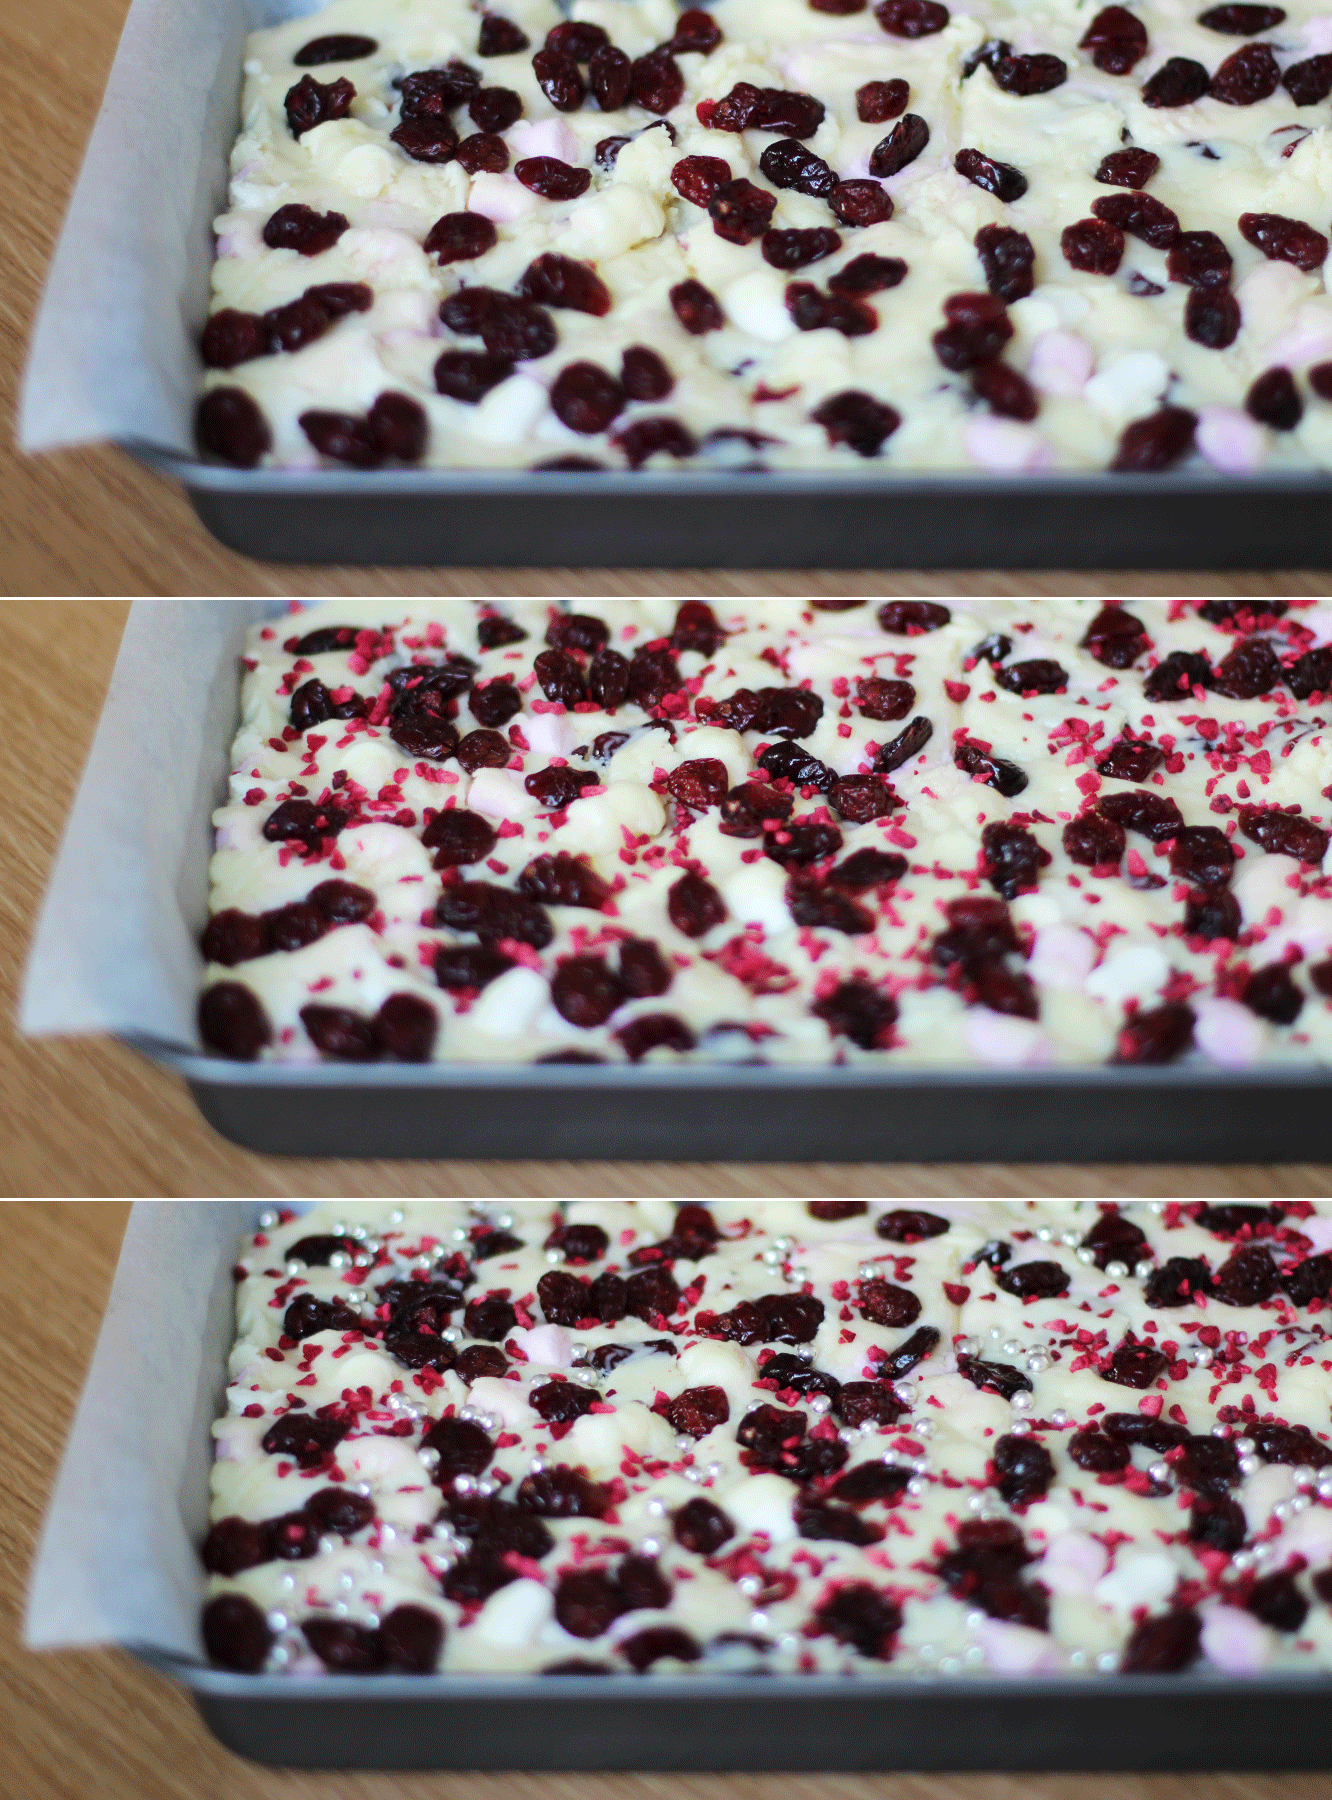
white-chocolate-fudge-mothers-day-recipe-6

Step four

Sprinkle the remaining cranberries, the silver balls and freeze-dried raspberries on top and push down slightly so they stick.

The alternative would be to swap this step with the next one so they stick to the chocolate (this would probably also look nicer because you would actually be able to see them rather than hiding them with a load of dark chocolate…). I make the mistakes so you don’t have to.

white-chocolate-fudge-mothers-day-recipe-gif

Step five

Melt the dark chocolate in the microwave and drizzle over the fudge. Sprinkle the remaining marshmallows on top. I had a bit of dark chocolate left so did another layer on top of the marshmallows.

Place in the fridge to allow the whole thing to set.

white-chocolate-fudge-mothers-day-recipe-4

Step six

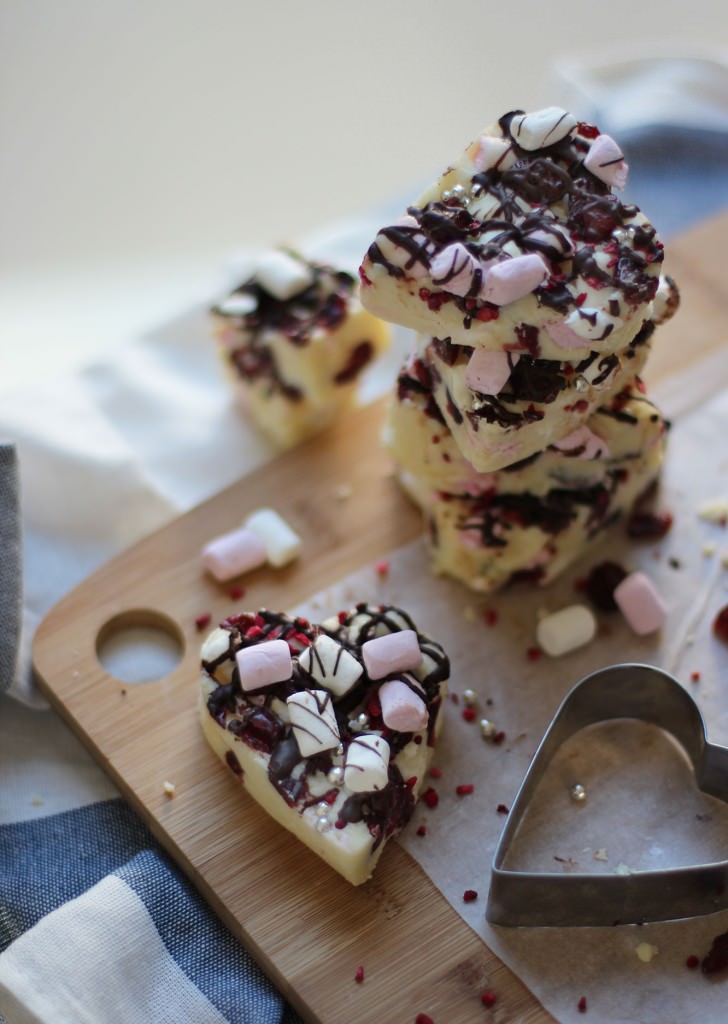
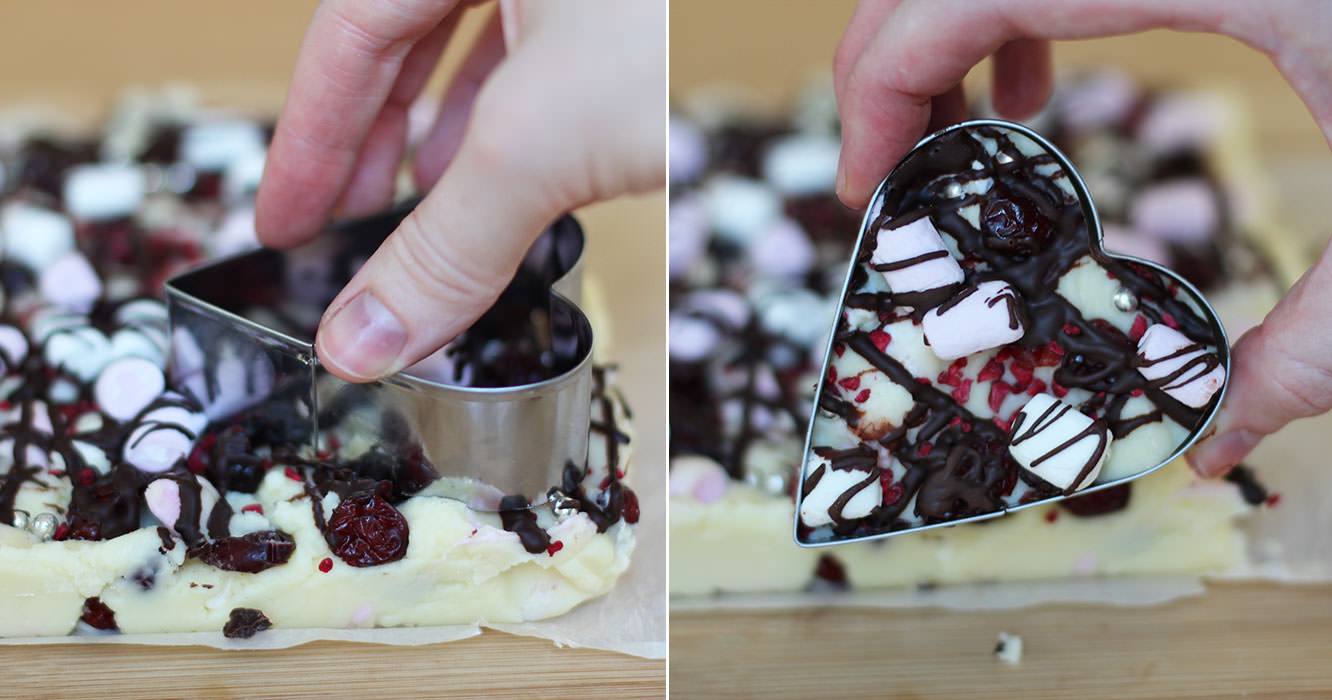
Using a cutter of your choice (this heart-shaped one was from Lakeland), cut the fudge into pieces. If you don’t have a cutter, then bars or chunks would look nice too.

white-chocolate-fudge-mothers-day-recipe-5

Scrub-a-dub-dub

Welcome back chaps, I hope you had a lovely weekend and are now stuffed full of last week’s roulade.

This week’s post is a little more January friendly – it doesn’t involve eating and will help save a few pennies too. Since the Christmas drinks specials season came to an end I’ve been missing a certain honey and almond hot chocolate and planning to concoct something with those flavours for fabrefaction. I didn’t expect it to not be for consumption but there you go.

I thought it would be fun to give some favours the ladies who came to our little sleepover last week. This scrub is a great little gift on the cheap and would work well for favours for a hen party/bridal shower or similar.

honey-and-almond-homemade-sugar-scrub-1
You will need

2 cups Demerara sugar

1 cup Granulated sugar

1/4 cup Walnut oil

1/2 cup Sunflower/vegetable oil

1/2 cup Clear honey

2 tsp Almond extract

(Makes six small jars)

honey-and-almond-homemade-sugar-scrub-2

Step one

There really only is one step. I couldn’t even think of a gif this week.

Take all the ingredients and mix them together.

honey-and-almond-homemade-sugar-scrub-3

Step two

If you’re gifting these then you might want to use little ramekins or jars. I recommend something with a lid to be honest, I used cellophane to seal the scrub in. I’ll be honest, this was with mixed success – just keep them upright if you go for this option to stop the oil leaking.

honey-and-almond-homemade-sugar-scrub-4

Step three

Using paper or fabric (I thought brown paper added nicely to the natural look and feel) cover the pots.

Make sure it;s a larger piece than required. Fasten with a loom band (find a small child who’s become bored of them and pinch a few).

Step four

Trim the edges of the paper or fabric. If using fabric I recommend pinking shears for the job to stop it fraying.

Step five

Tie a nice piece of string/twine/ribbon around the rim to cover the loom band. Depending on the size of the jar you might want to tie a small wooden spoon to it at this point (the scrub settles and needs a little stir before use).

I left the spoons loose because they looked novelty big in comparison to the jar. If you’re in the UK I got these from Tiger.

honey-and-almond-homemade-sugar-scrub-5

Happy scrubbing!

Fudge for mama

Hello there, apologies for the short blogging hiatus; life happens sometimes, but I appreciate you sticking with me.

This weekend I went to stay with my friend Beth before she goes on her trip. Being as Mother’s Day is so near (this Sunday for those of you in the UK), B and I thought we would make some fudge for our mummys.

Whether or not you have Mother’s Day coming up, I urge you to have a go with making fudge. It’s a bit of a rascal but there’s lots to feel good about when you get it right, I’ve made quite a lot in my life time and so hopefully some of the below will help you avoid some of the fudging pitfalls.

Just a heads up, the batch below is fairly large, so unless you’re making it with a friend or for your Grandma too, you may want to cut the quantities in half.

how-to-make-honey-fudge-8

how-to-make-honey-fudge-1

You will need

1kg/2lb Granulated sugar

280g/10 floz Evaporated milk

120g/4 oz Clear honey

120g/4oz Salted butter

250g/9oz Dried apricots

1tsp of Liquid glucose (if you have it – not essential – but great)

Tray bake tin lined with greaseproof paper

Sugar thermometer (essential)

how-to-make-honey-fudge-2

Step one

Combine all the ingredients (minus the apricots) into a large heavy bottomed pan.

At home I use the pressure cooker, and at Beth’s we discovered this casserole dish worked pretty well. The pan should be quite large as the mixture will bubble up, and the sturdier it is the less likely your fudge is to scorch.

how-to-make-honey-fudge-3

how-to-make-honey-fudge-4

Step two

Melt ingredients on a reeeaaallly low heat.

Seriously. As low as your cooker goes. Impatience will not help you here.

This ensures all the sugar is dissolved before it boils, and should help to prevent sugar crystals forming.

You should stir gently to stop the mixture burning on the bottom of the pan. Pop your thermometer in at this point too.

This was the first outing of my rather swish thermospatula, above, so I could stir and measure the temperature at the same time. I know, I need to get out more.

how-to-make-honey-fudge-5

Step two and a half

Keep the fudge on a low heat, stirring gently.

It will begin to boil as above. Resist the urge to put your face in it, as good as it smells, that won’t end well for you.

This is where the thicker your pan the better, as this boiling stage should take around 10-15 minutes ideally. You want your fudge to reach soft ball stage on the thermometer or 115 degrees. Patience is the key here. You should the fudge thicken up and get darker evenly.

Step three (optional)

Once your fudge has reached 115 degrees pour immediately into an empty saucepan. Some fudge people will disagree with me here, as faffing about with fudge can cause crystallisation in the sugar. However, I’ve found that if I leave it in the original pan it carries on cooking and can become brittle. The trick is to do it straight away and don’t scrape the pan out or stir it once transferred.

Now, DO NOT TOUCH. Don’t allow pets, children or interfering family members near the fudge mix for at least half an hour. Preferably you want to wait until the thermometer hits about 50 degrees, but when I did this for a craft fair a few years ago I didn’t have the time to hang around, and found that half an hour was generally enough.

how-to-make-honey-fudge-6

Step four

While you wait, use scissors to chop the apricots into tiny pieces. These are an optional addition and can be substituted depending on your mum’s tastes. You may want to add a different dried fruit, some chopped nuts, or chocolate instead.

how-to-make-honey-fudge-7

Step five

Get a wooden spoon, summons all your arm power, and beat the mixture. If you have a stand mixer, you’re laughing at this stage, because it can take up to 15 mins sometimes…

About 5-7 minutes into your beating add the apricots (warning, if using chocolate chips you want to add them as late as possible so they don’t melt completely).

Keep going until the fudge becomes very thick, you still need it to be soft enough to spoon into the tin, so try not to take it too far. I didn’t have the chance to photograph this, so you will need to take your best guess. Here’s a clue though, your arm will be hurting you by now.

Step six

Spoon into your lined tin and leave to set.

how-to-make-honey-fudge-9

Ta da! You’ve done it!