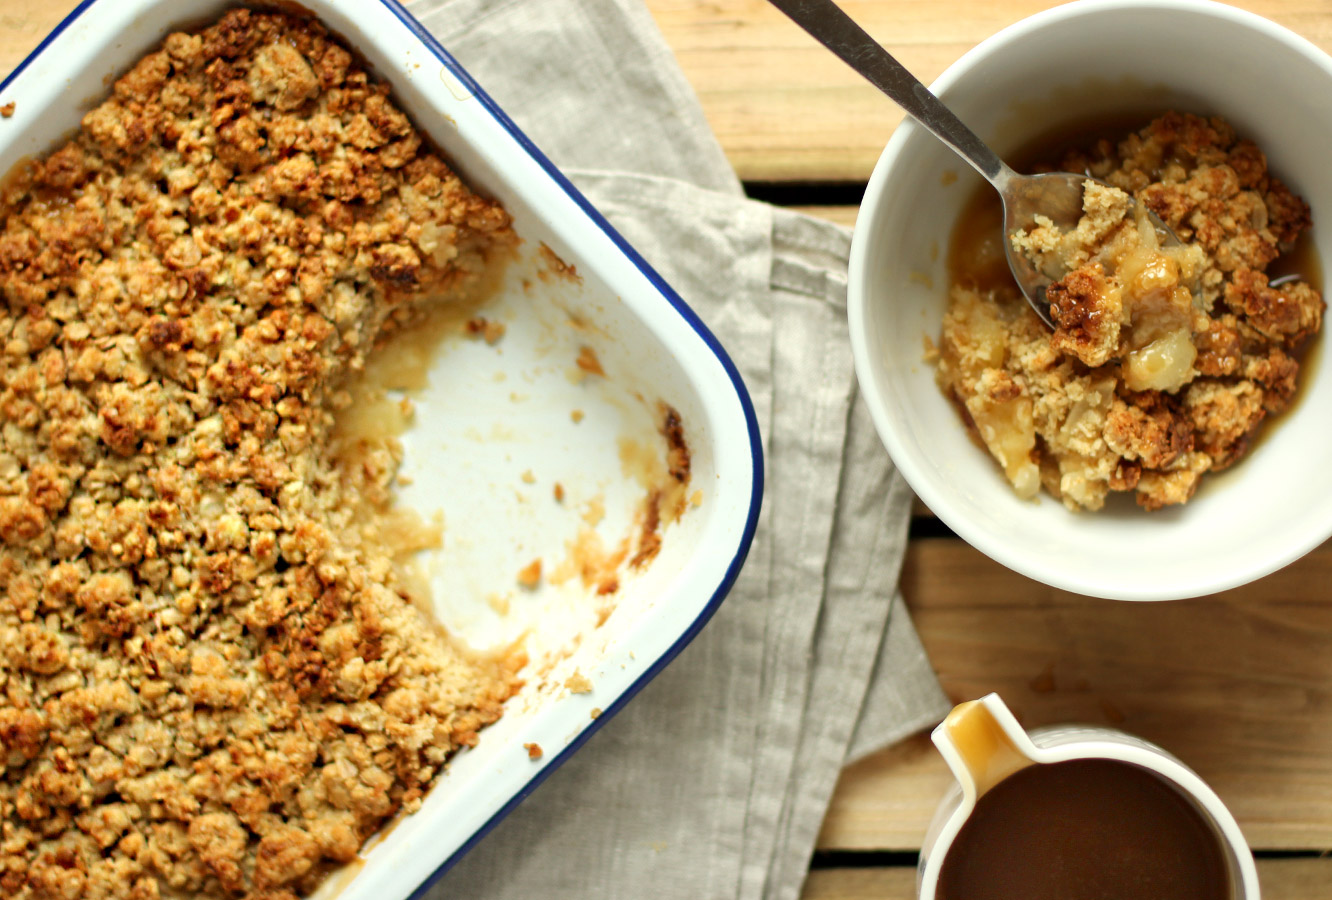
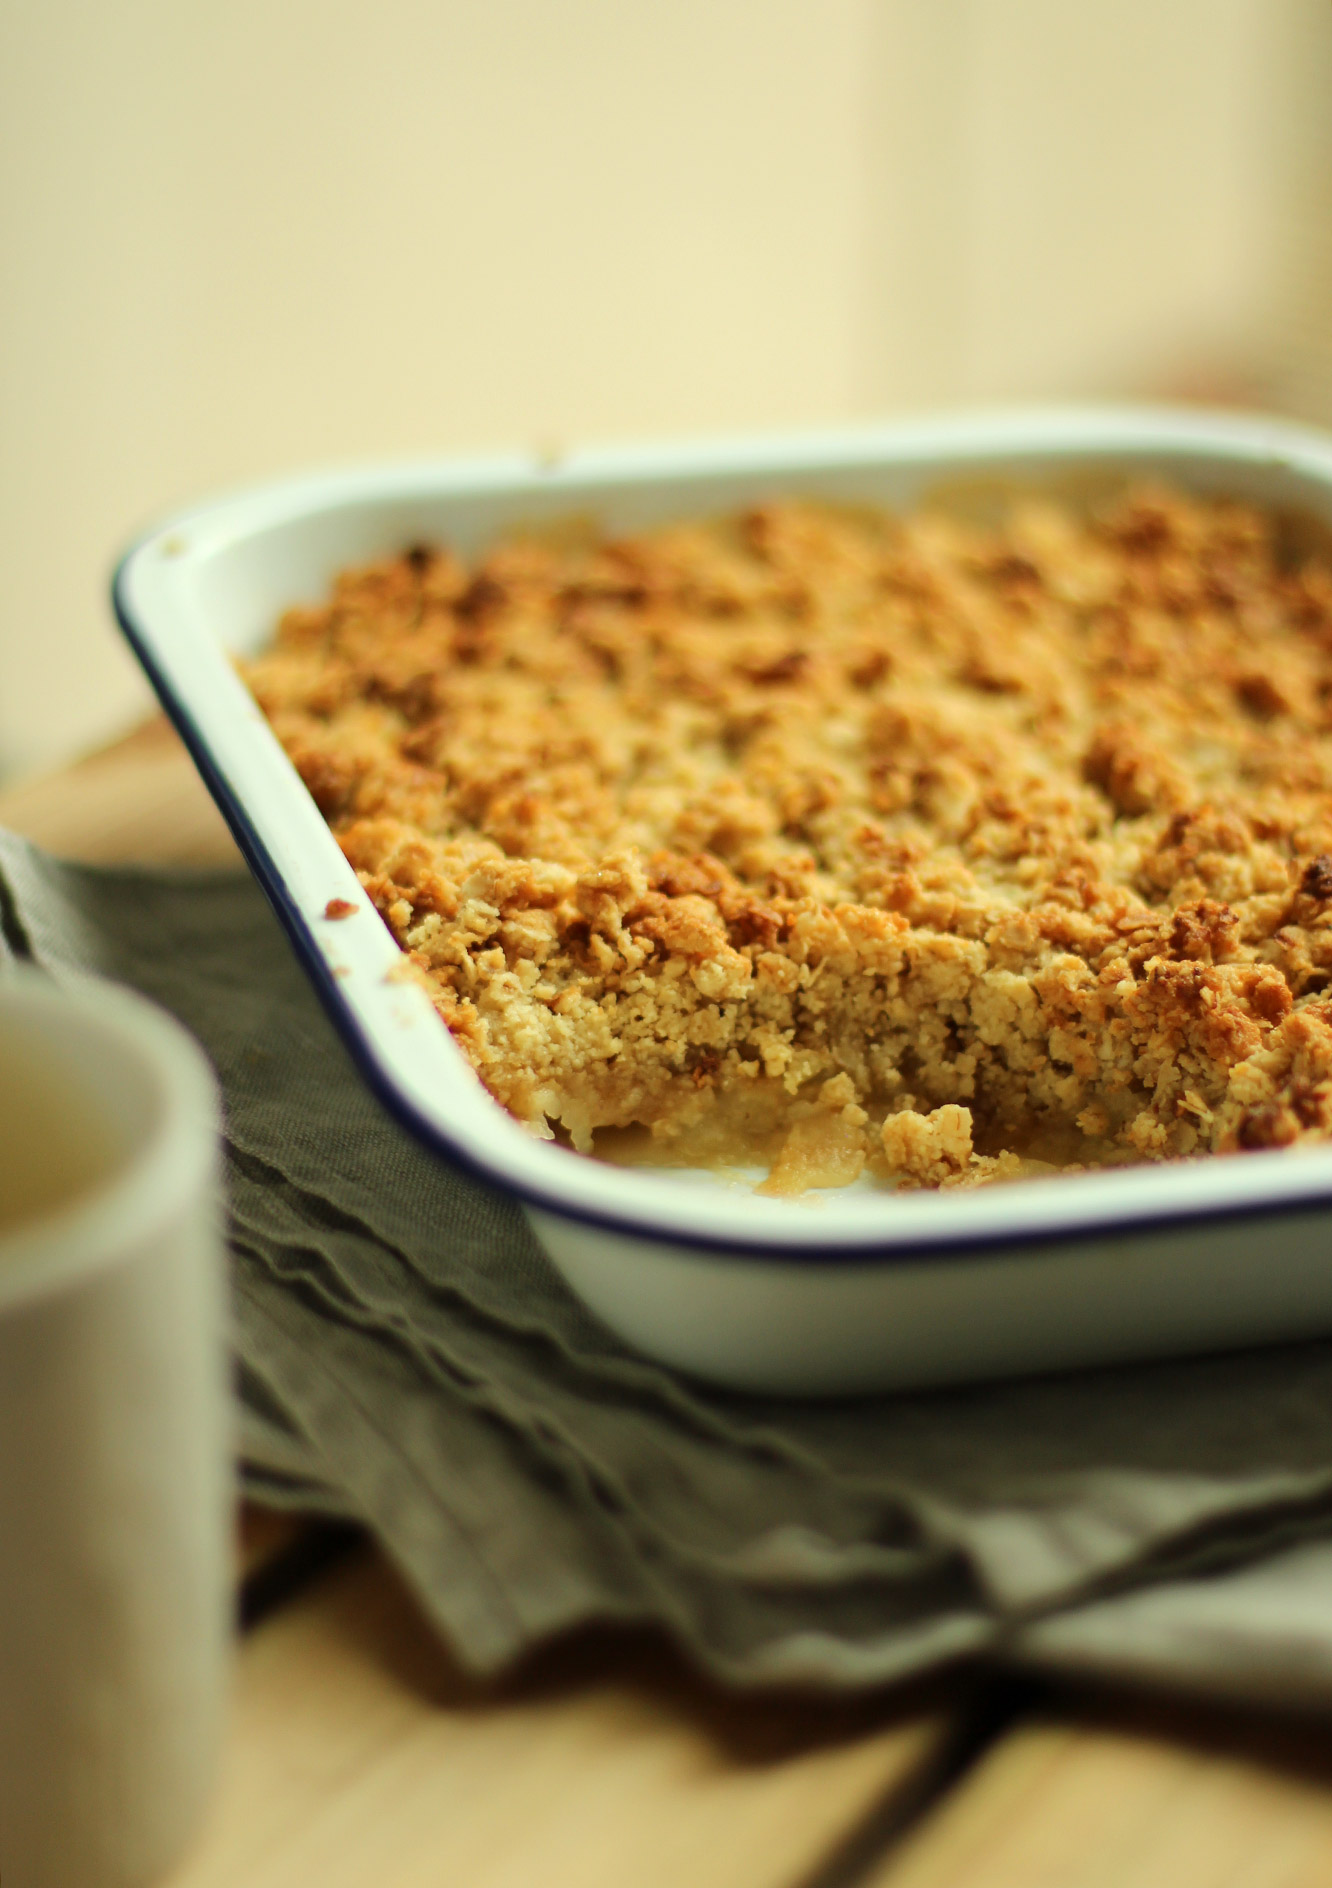
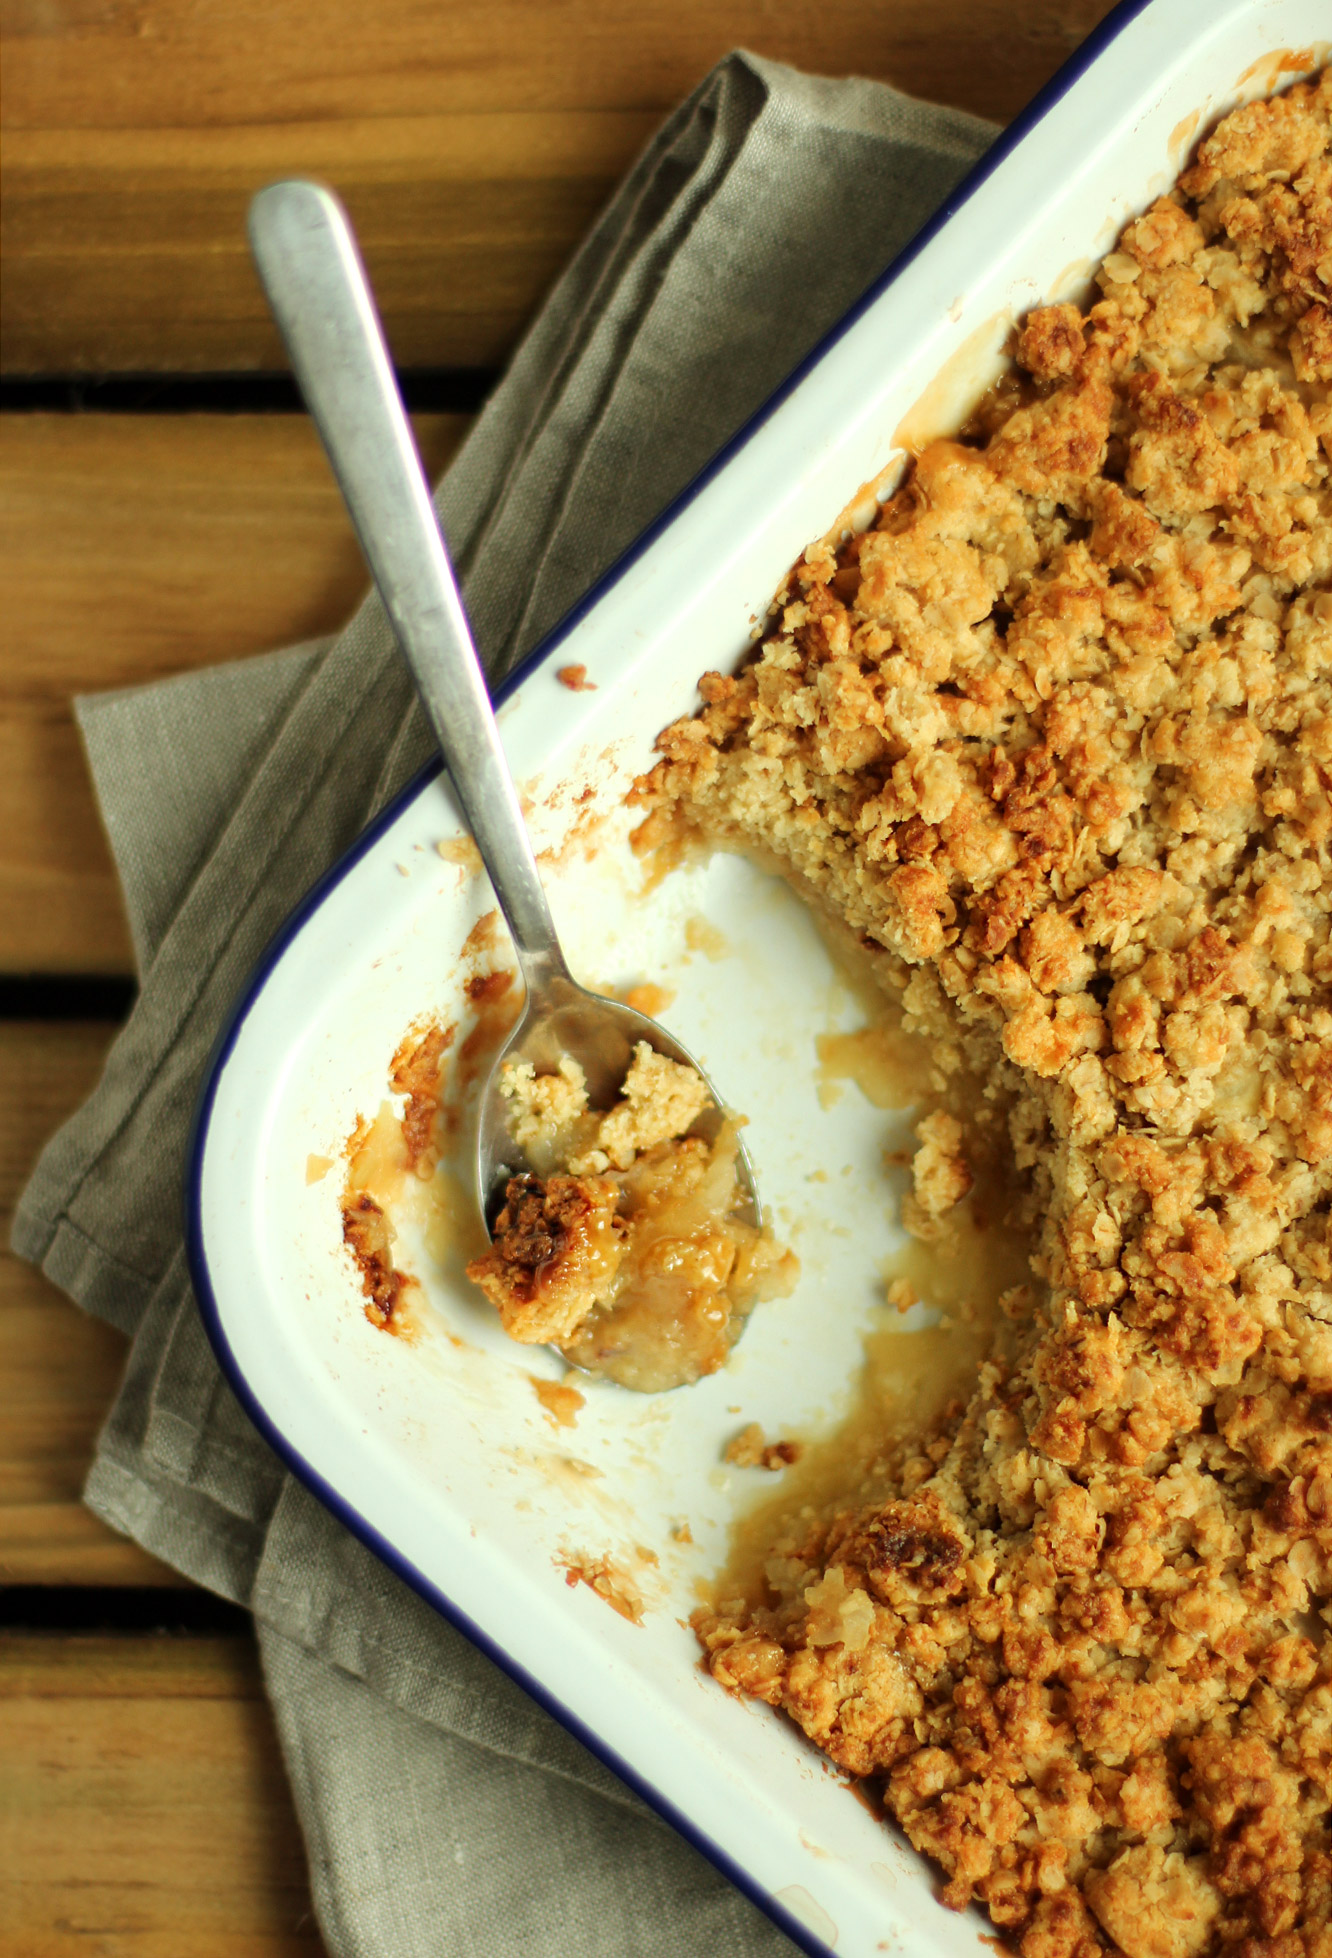
When it comes to autumn blogging, I just can’t get away from apple related ideas. It’s a well known fact that toffee flavours go well with apple so I thought I might wheel out the salted caramel recipe for this week’s post.
We had this after a large roast on Sunday and it was the perfect pud for a cosy autumn afternoon. One of my housemates (self proclaimed crumble connoisseur) called it “the zenith of desserts”, just saying, perhaps this crumble is not so humble after all.
The great thing about crumble is that it’s so quick to make and you can do it in advance, either cooked or uncooked and pop it in the fridge until you need it.
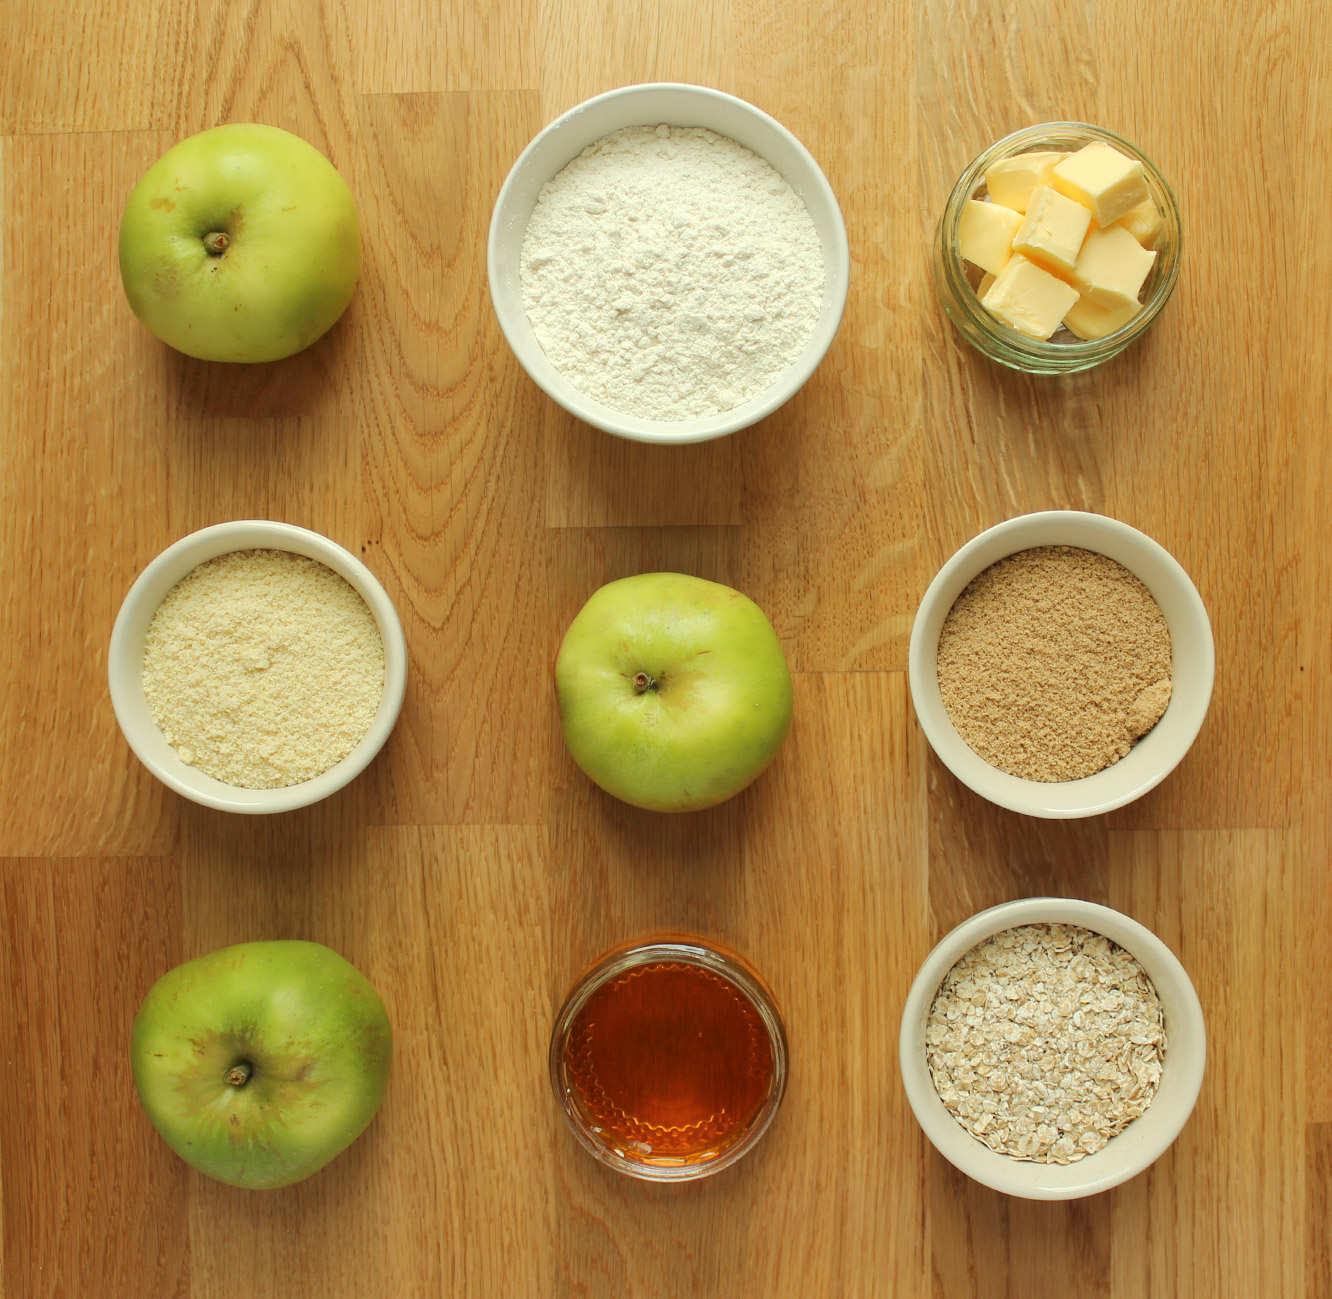
You will need
For the crumble:
140g/5 oz unsalted butter
125g/4.5 oz porridge oats
75g/2.75 oz ground almonds
50g/1.75 oz plain flour
50g/1.75 oz caster sugar
2 tbsp clear honey
4 cooking apples (bramley)
For the salted caramel:
100g/3.5 oz salted butter
80g/3 oz soft brown sugar
100ml/3.5 fl oz double cream
2 tbsp golden syrup
2 tsp salt
(Serves 6)
Apologies to those of you who spotted the missing ingredients list for a while there!
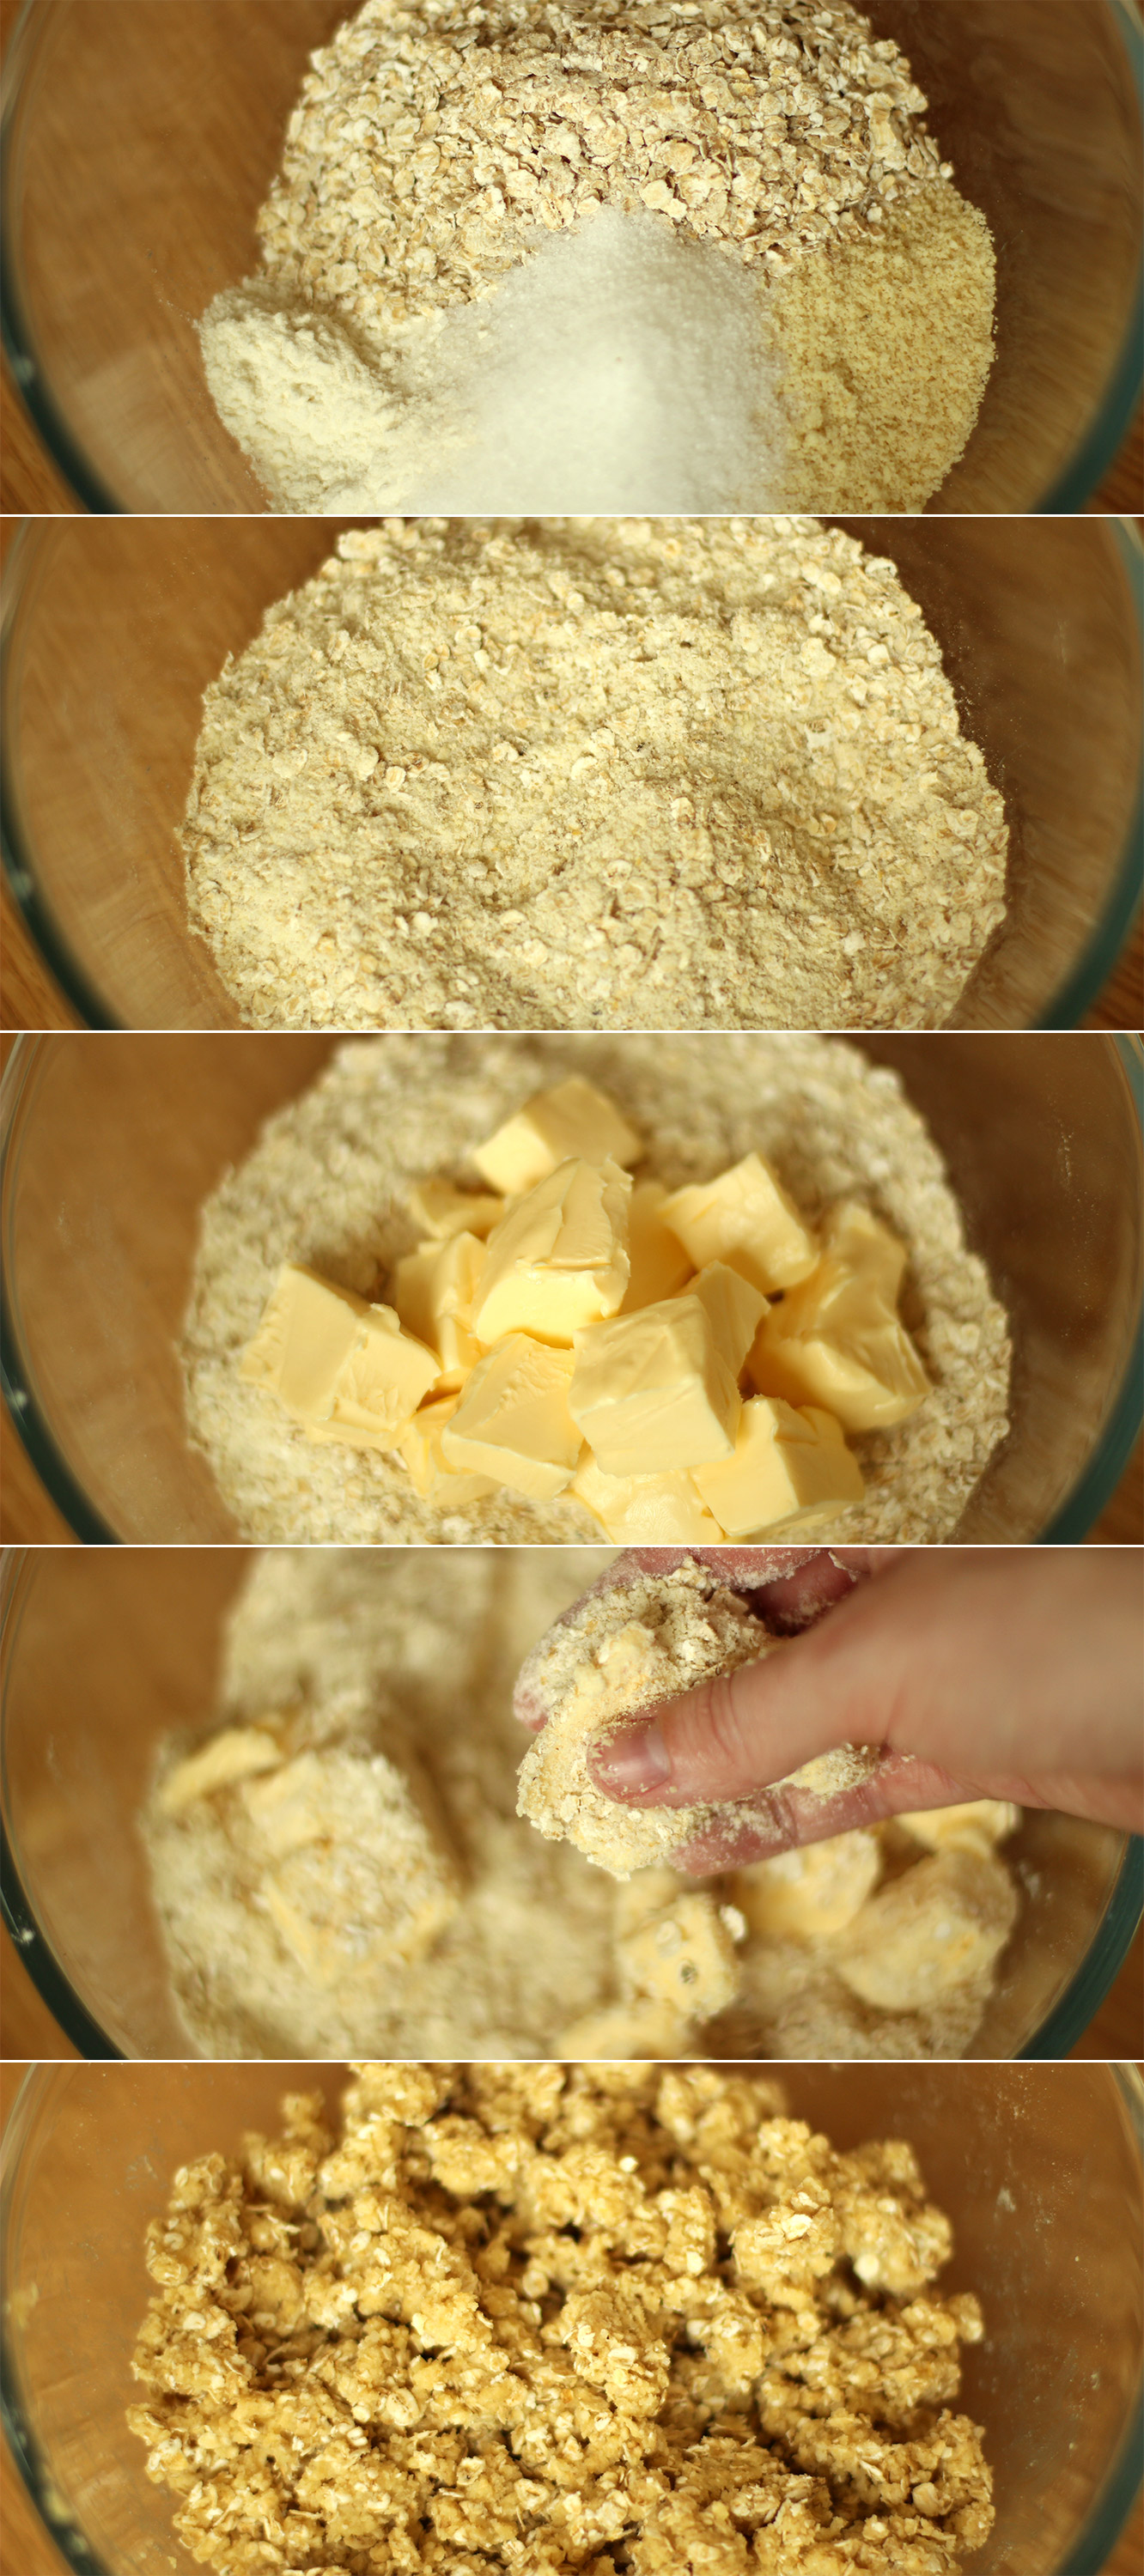
Step one
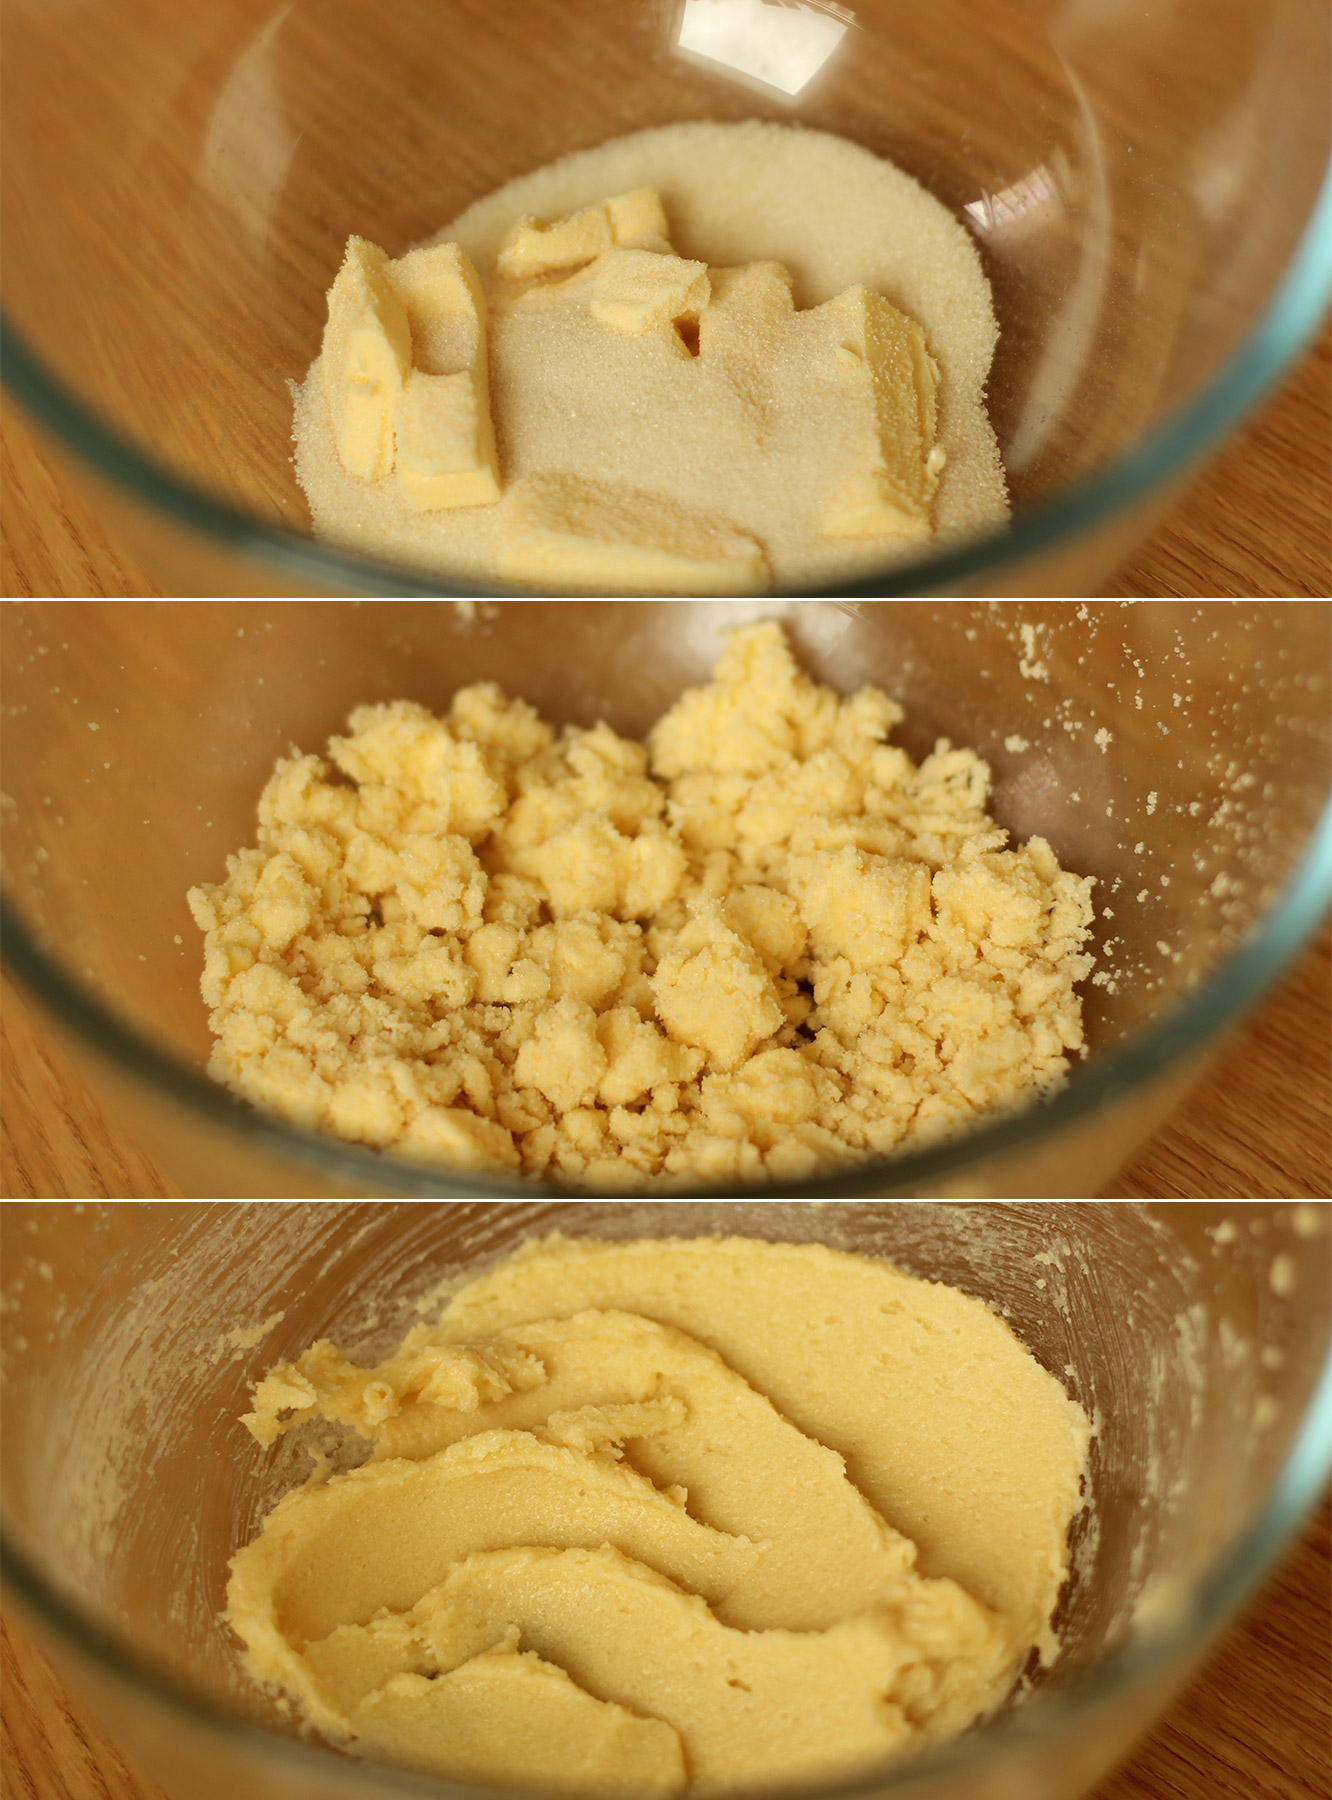
Mix together the dry ingredients for the crumble topping (almonds, flour, oats and sugar).
Step two
Rub in the butter with your hands, it’s better if it’s cold as the mix will breadcrumb a bit more. Mine was a little on the soft side because I got distracted and left it on the counter for a while.
Step three
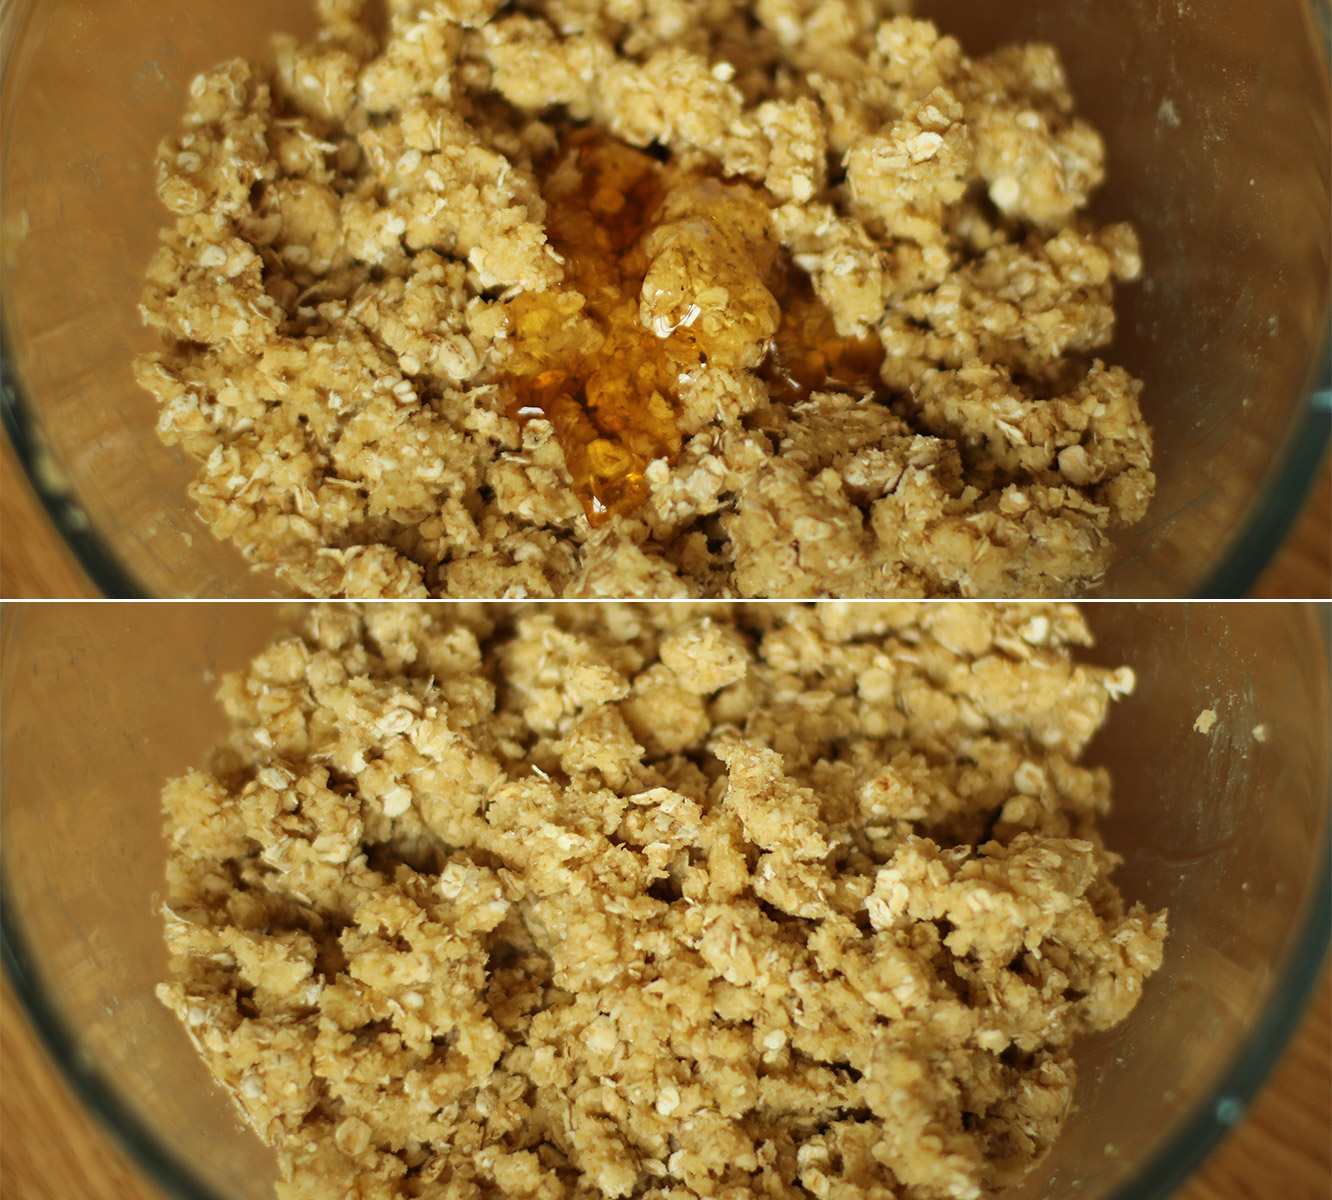
Add the honey and mix in with a wooden spoon.
Put it in the fridge until needed.
Step four
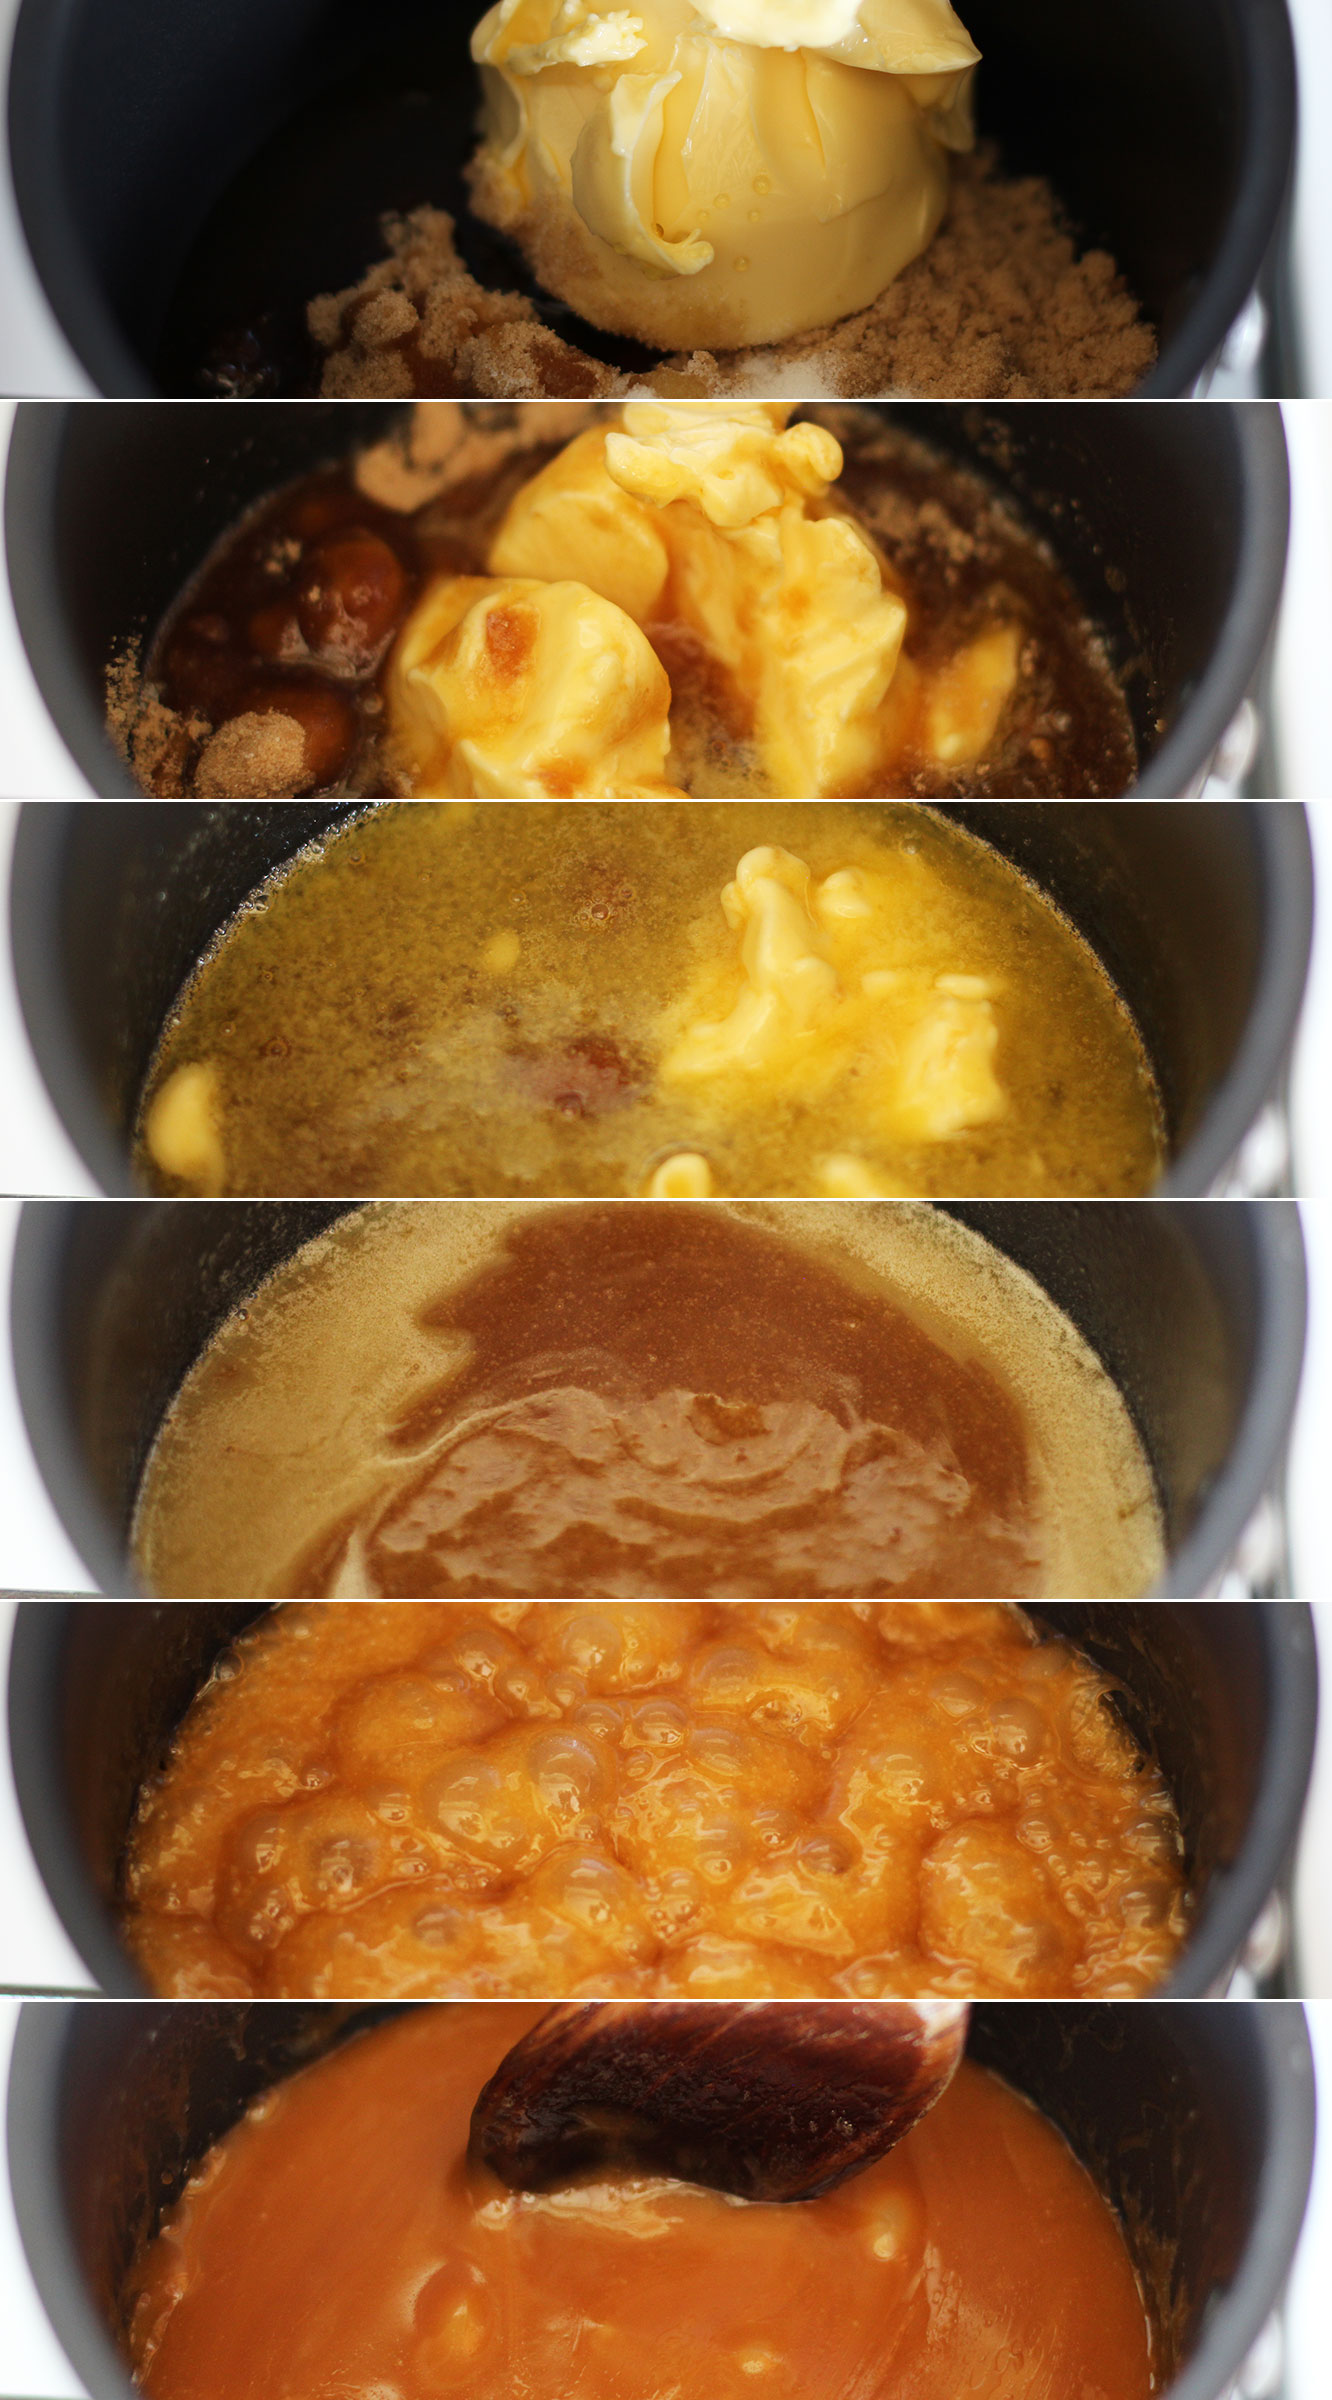
Place all the ingredients for the salted caramel into a saucepan (minus the cream).
Heat gently until the butter is melted and the sugar dissolved and then bring to a simmer. Simmer for about 10 minutes. Stir regularly so that it doesn’t catch and burn. Leave to cool for fifteen minutes to half an hour.
Step five
Once the caramel has cooled for a little while add the cream and stir until combined.
Step six
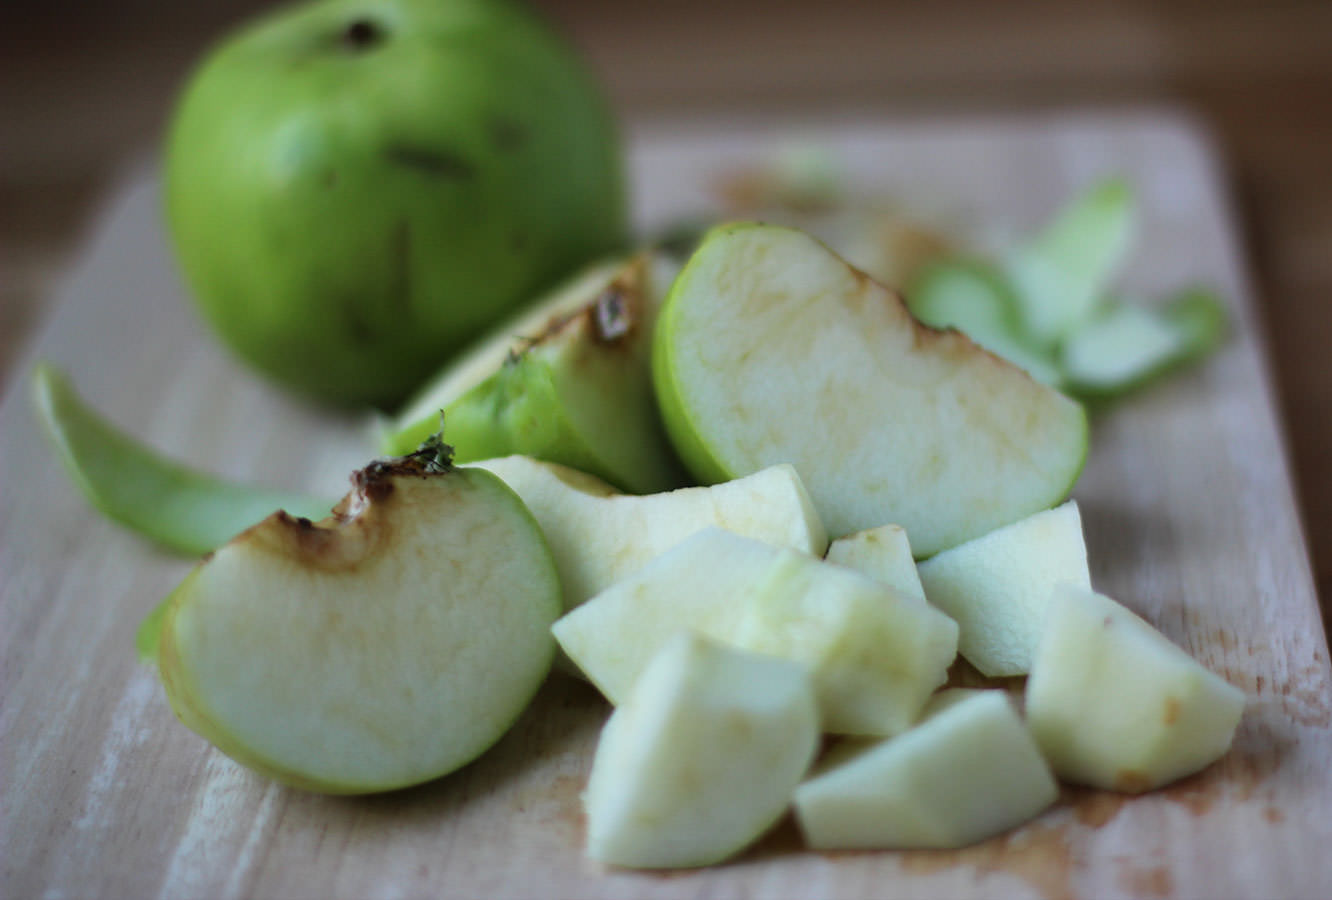
Peel and chop the apples.
Step seven
Put the apples in the bottom of your dish, sprinkle with a little light brown sugar. Pour just a third to a half of the caramel sauce over the apples and cover with the crumble mixture.
I realise it’s been a while since I did something quite fancy, and while people seem to prefer to make the easy ones, there’s definitely some love for the posts with lots of steps too.
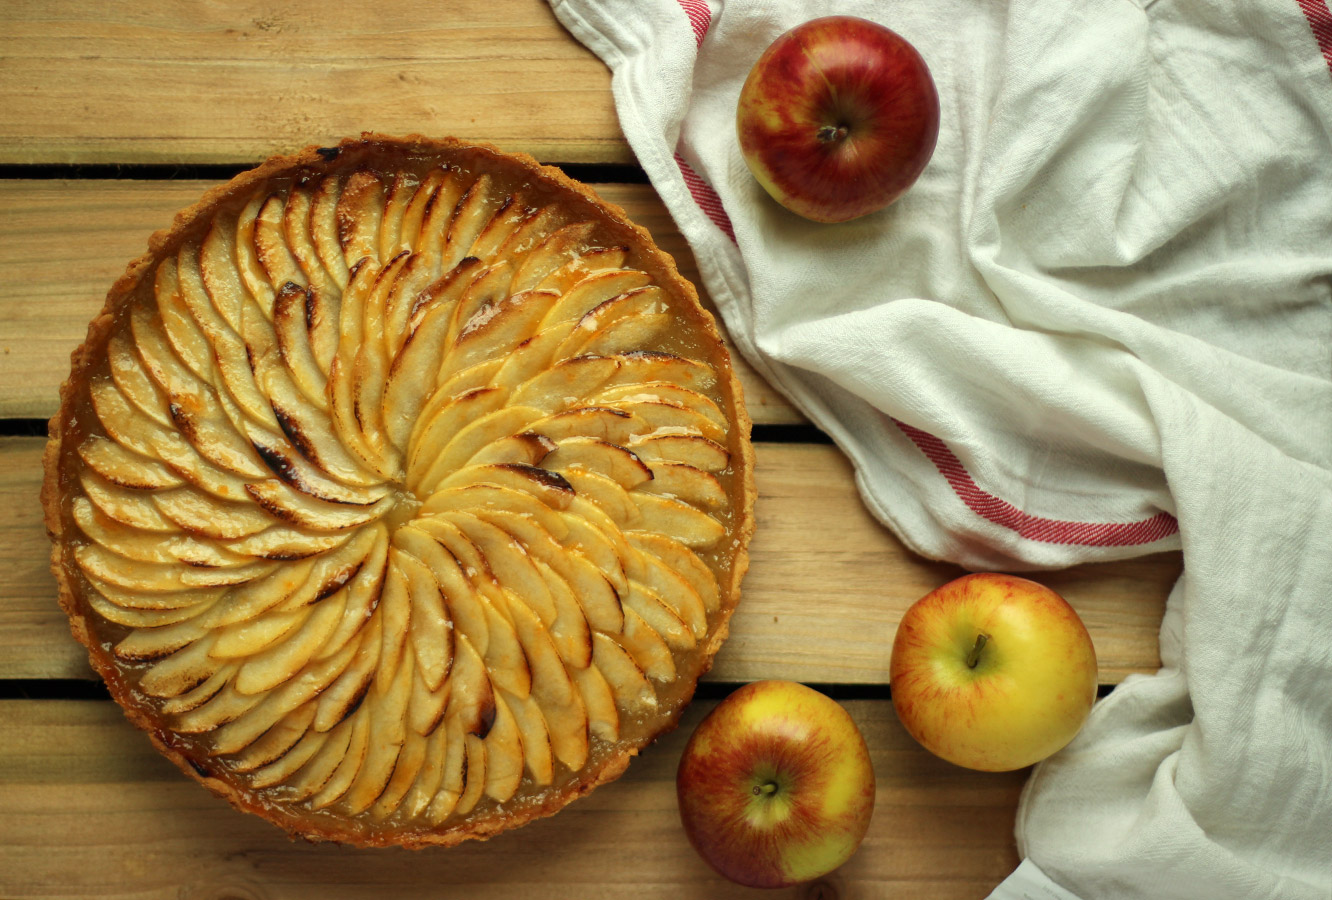
With the return of my favourite season (I’m really fair-skinned, so shoot me if I don’t adore summer like the rest of you) and a little dinner party this weekend, I figured the only way to round off my housemate’s uh-mazing main course was with a little homage to the apple.
Without further ado here’s a recipe for a rather yummy apple and frangipane tart.
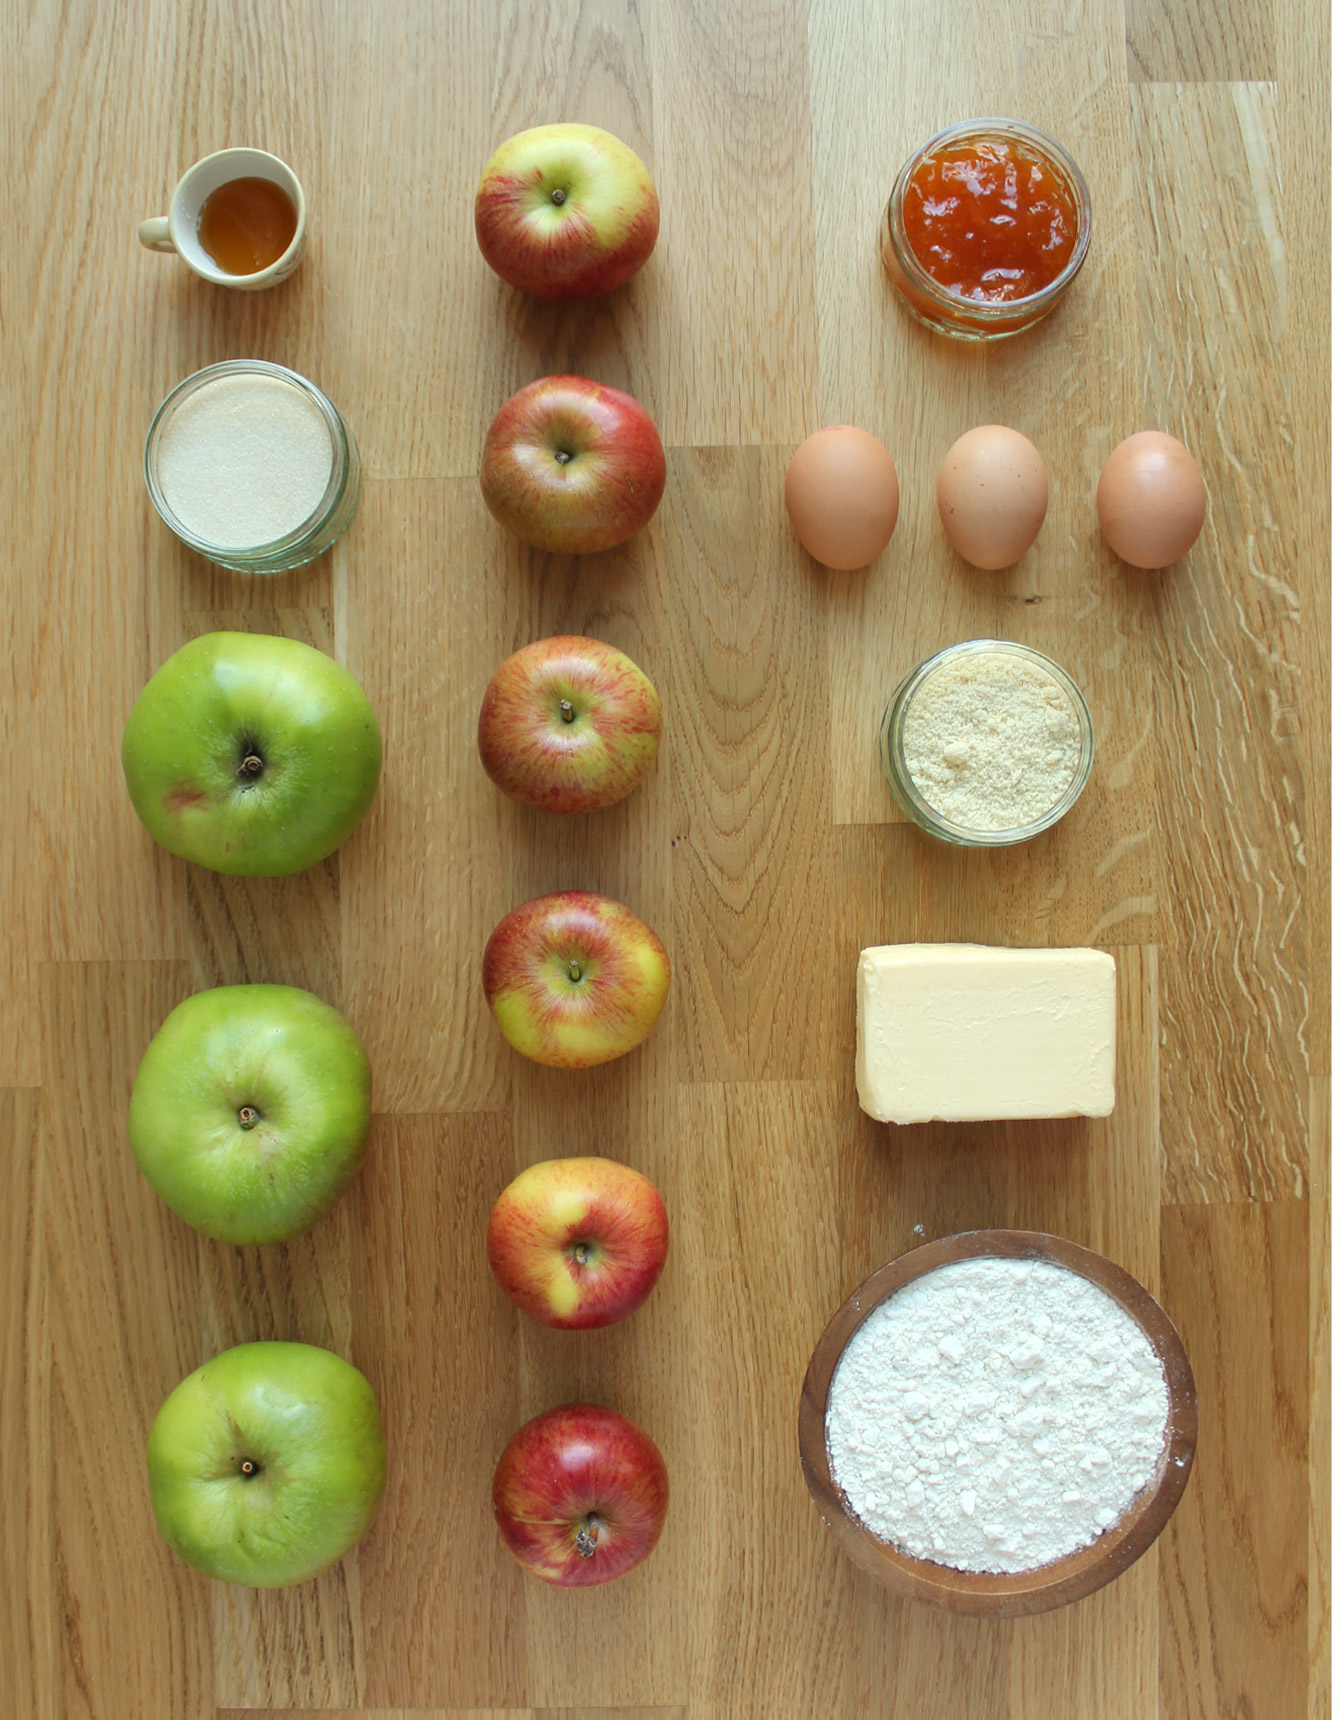
You will need
For the pastry:
300g/10.5 oz plain flour
170g/6 oz unsalted butter
30g/1 oz golden caster sugar
50ml/1.75 fl oz milk
1 egg yolk
A pinch of salt
For the frangipane:
70g/2.5 oz ground almonds
60g/2 oz unsalted butter
50g/1.75 oz golden caster sugar
40g/1.5 oz plain flour
1 egg
1-2 tsp almond extract (optional, but apple will likely overpower the almond a bit)
For the apple filling:
3 bramley cooking apples
100g/3.5 oz golden caster sugar
10g/0.5 oz unsalted butter
50ml/1.75 oz water
2-3 tbsp clear honey
For the topping:
4-5 braeburn apples (probably any eating apples would work)
2-3 tbsp apricot jam (for the glaze)
(My dish was 25cm and for quiches/pies, but there would be enough pastry and filling to do a slightly larger, shallower tart, perhaps up to 29cm or so).
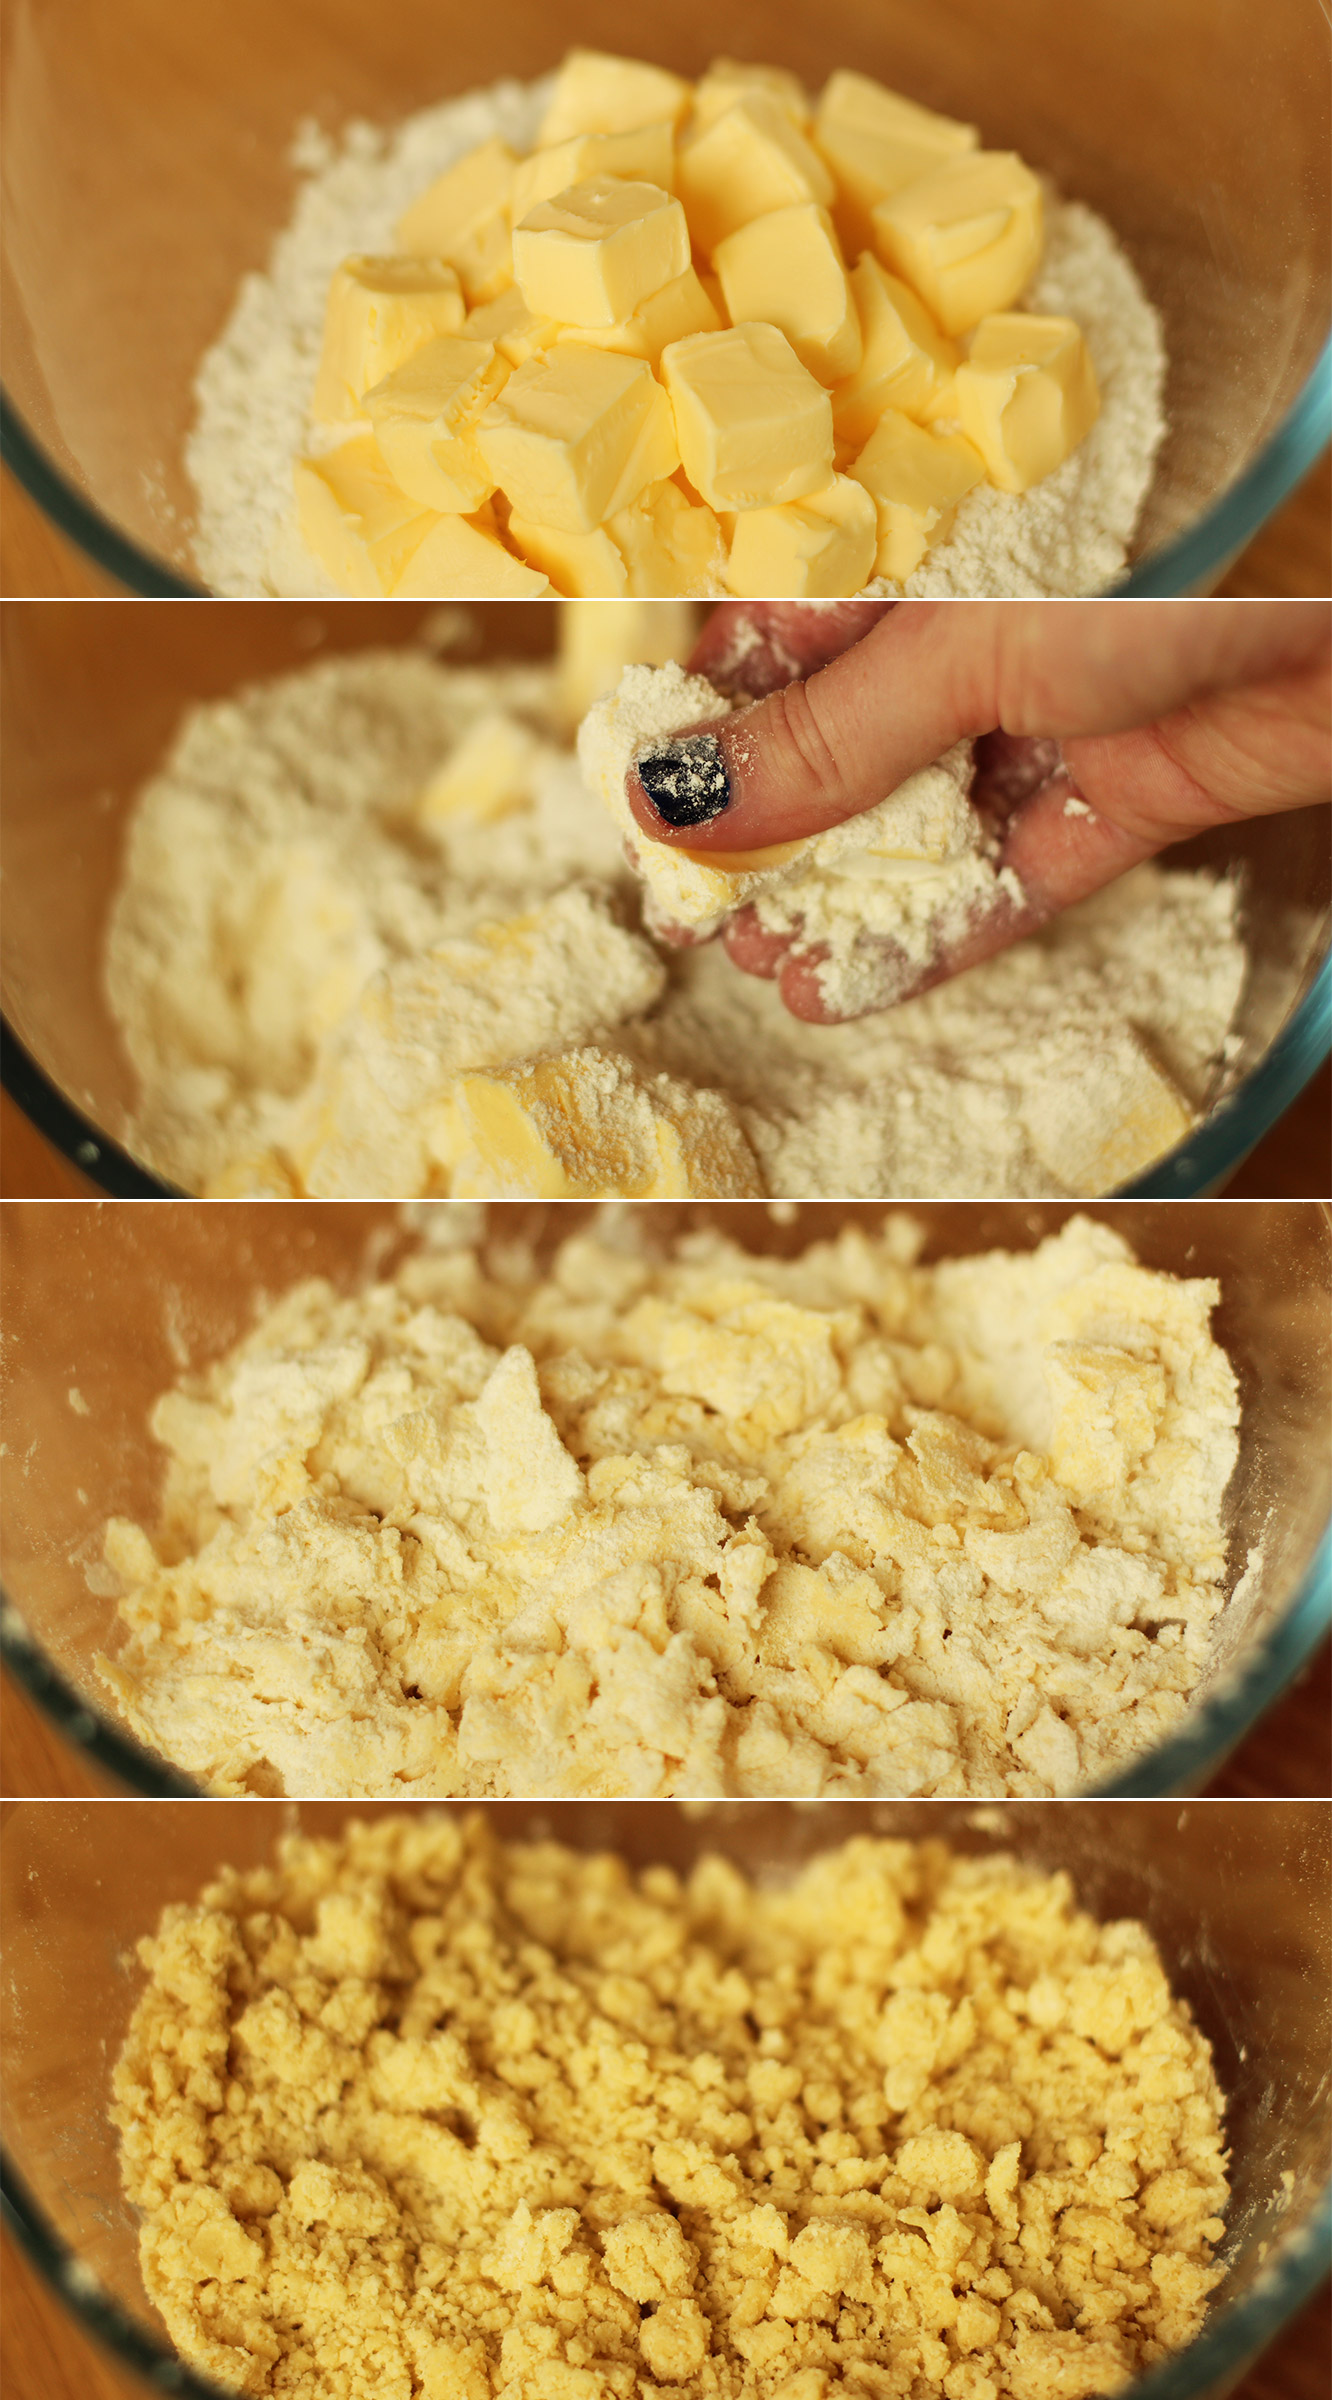
Step one
Start by making the sweet shortcrust pastry.
First cube the butter and pop that into the plain flour. Using your fingers, rub the butter and flour together to get a crumb-like texture.
The colder your butter the better and the smaller the crumbs you will be able to get. My house is waaaaaaarm, so as you can see, mine was a tad lumpy at this stage.
If you have a food processor I am led to believe you can do this bit in that very quickly and easily. But we can’t all be posh like you so (clean) fingers are just fine too.
Step two
Stir in the caster sugar.
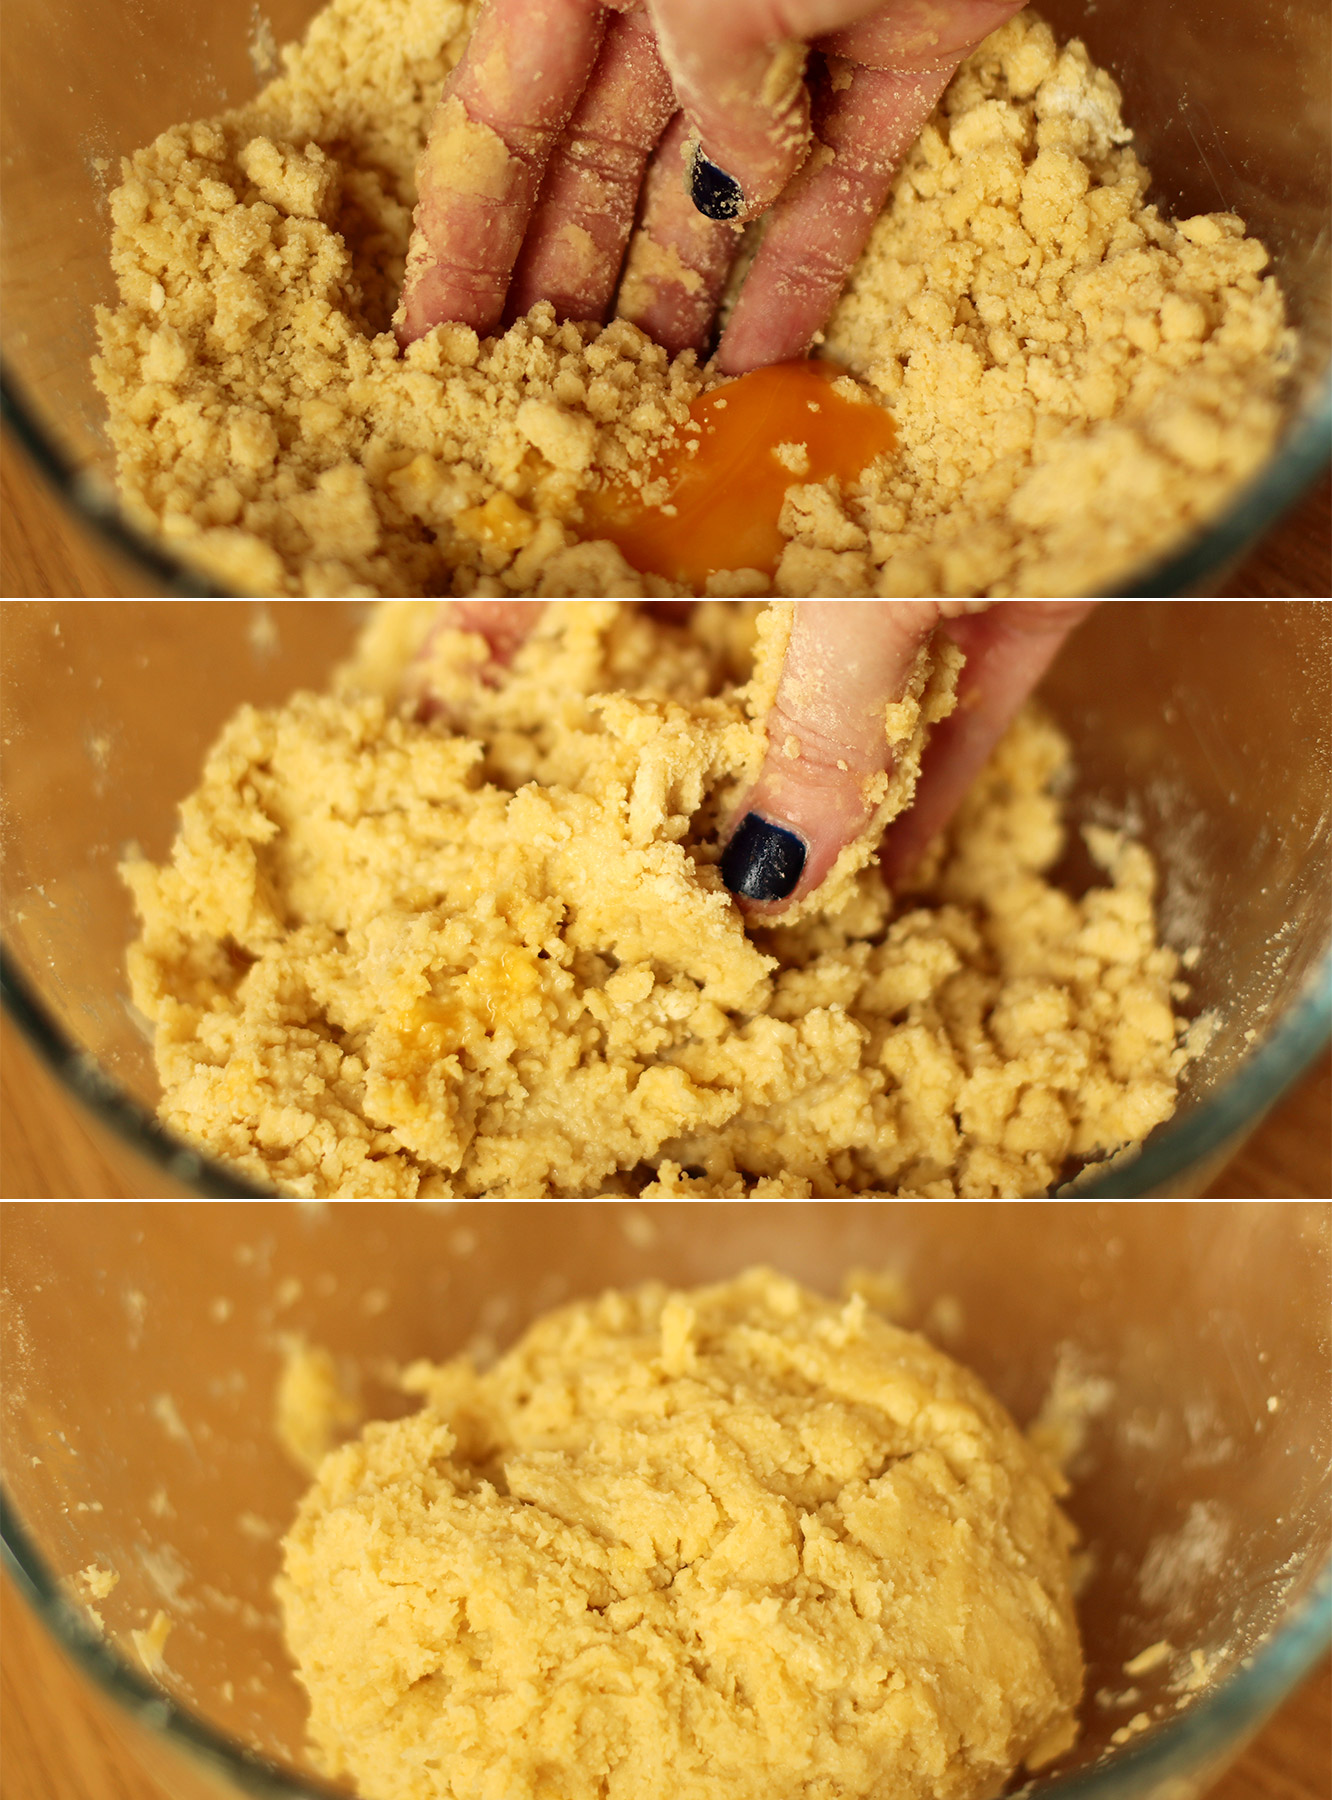
Step three
Make a well in the middle for the milk and egg yolk. Fairly sure you can guess what’s next…put yolk and milk in said well.
Bring the mixture together with your hands. It may be a bit crumbly so you can tip it onto a worktop and knead it together slightly to combine, but be careful not to over work it.
Wrap it in clingfilm and put it in the fridge for at least an hour.
Step four
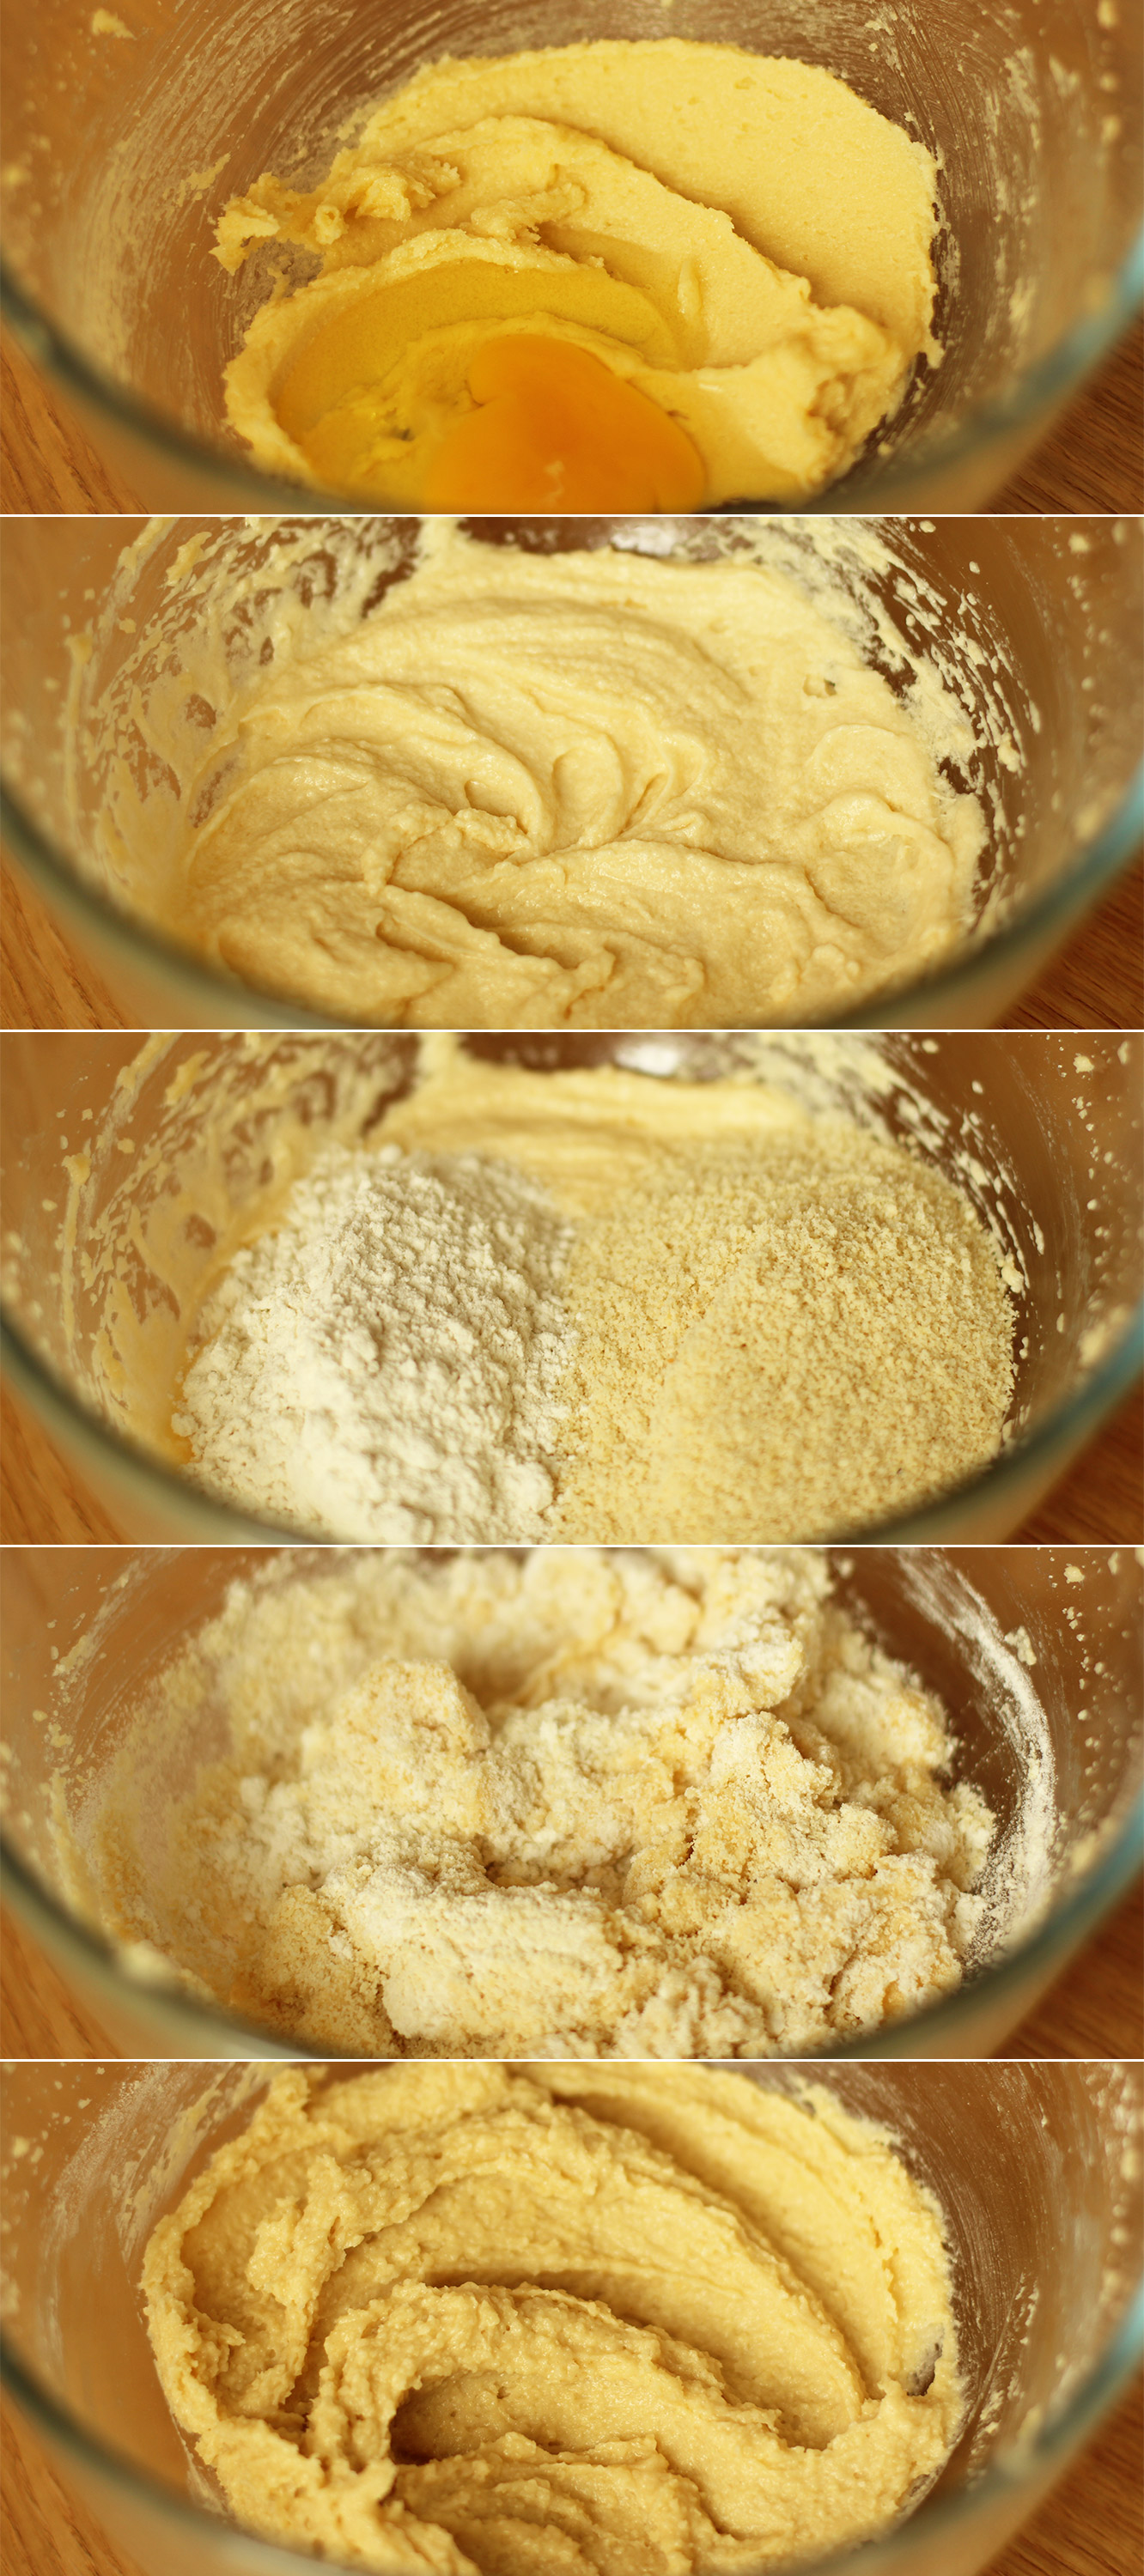
Frangipane making time. Using an electric whisk (or a wooden spoon and some strong arms) beat together the butter and sugar until smooth and fluffy.
Step five
Add the egg and beat again with the whisk.
Stir in the almonds, almond extract and the flour.
Voila. Set aside.
Step six
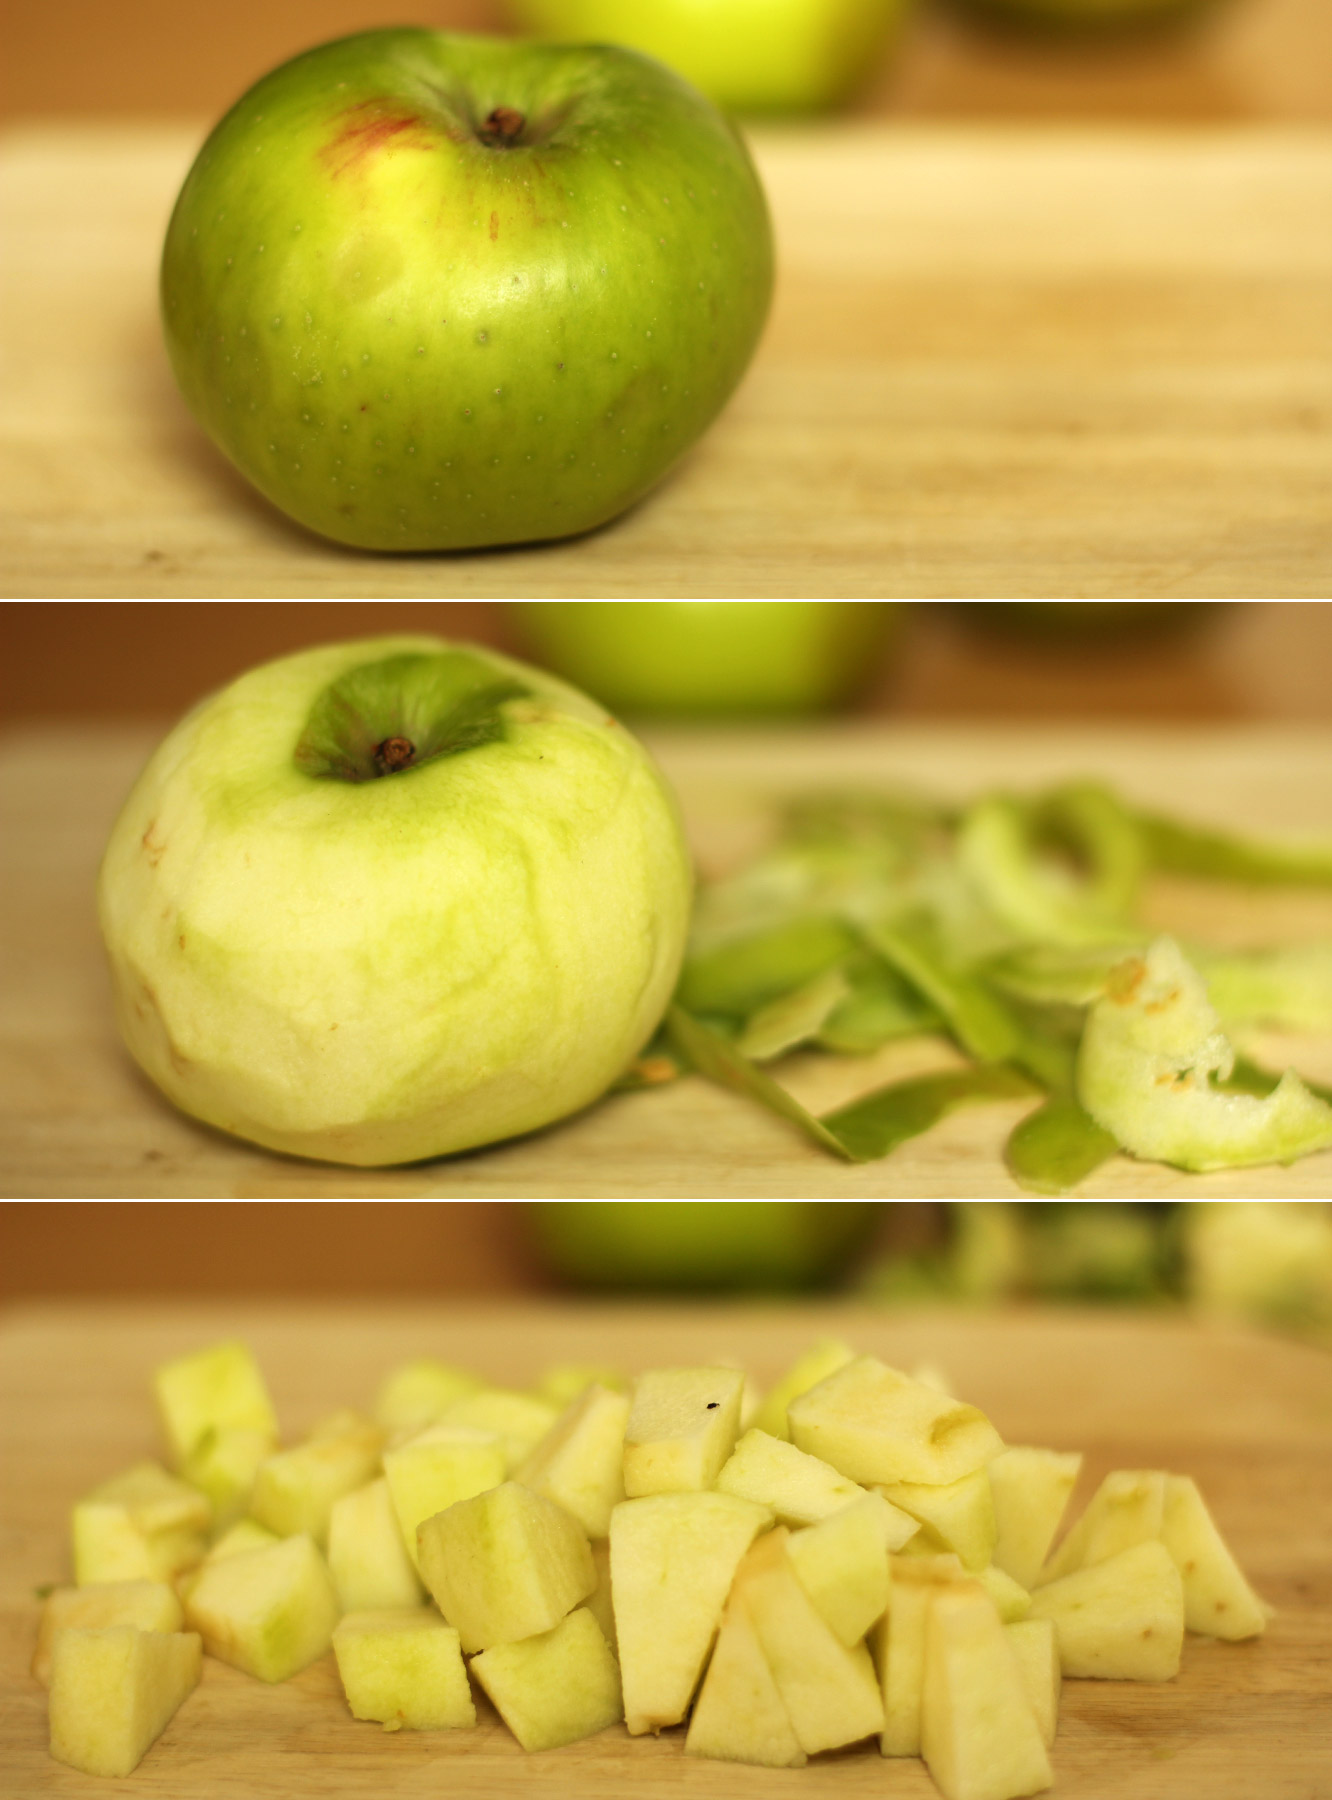
Prepare the stewed apple filling. Being by peeling and chopping the three bramley apples. If you have a bit of lemon juice handy a quick squeeze will keep the chopped ones pale while you see to the rest.
Step seven
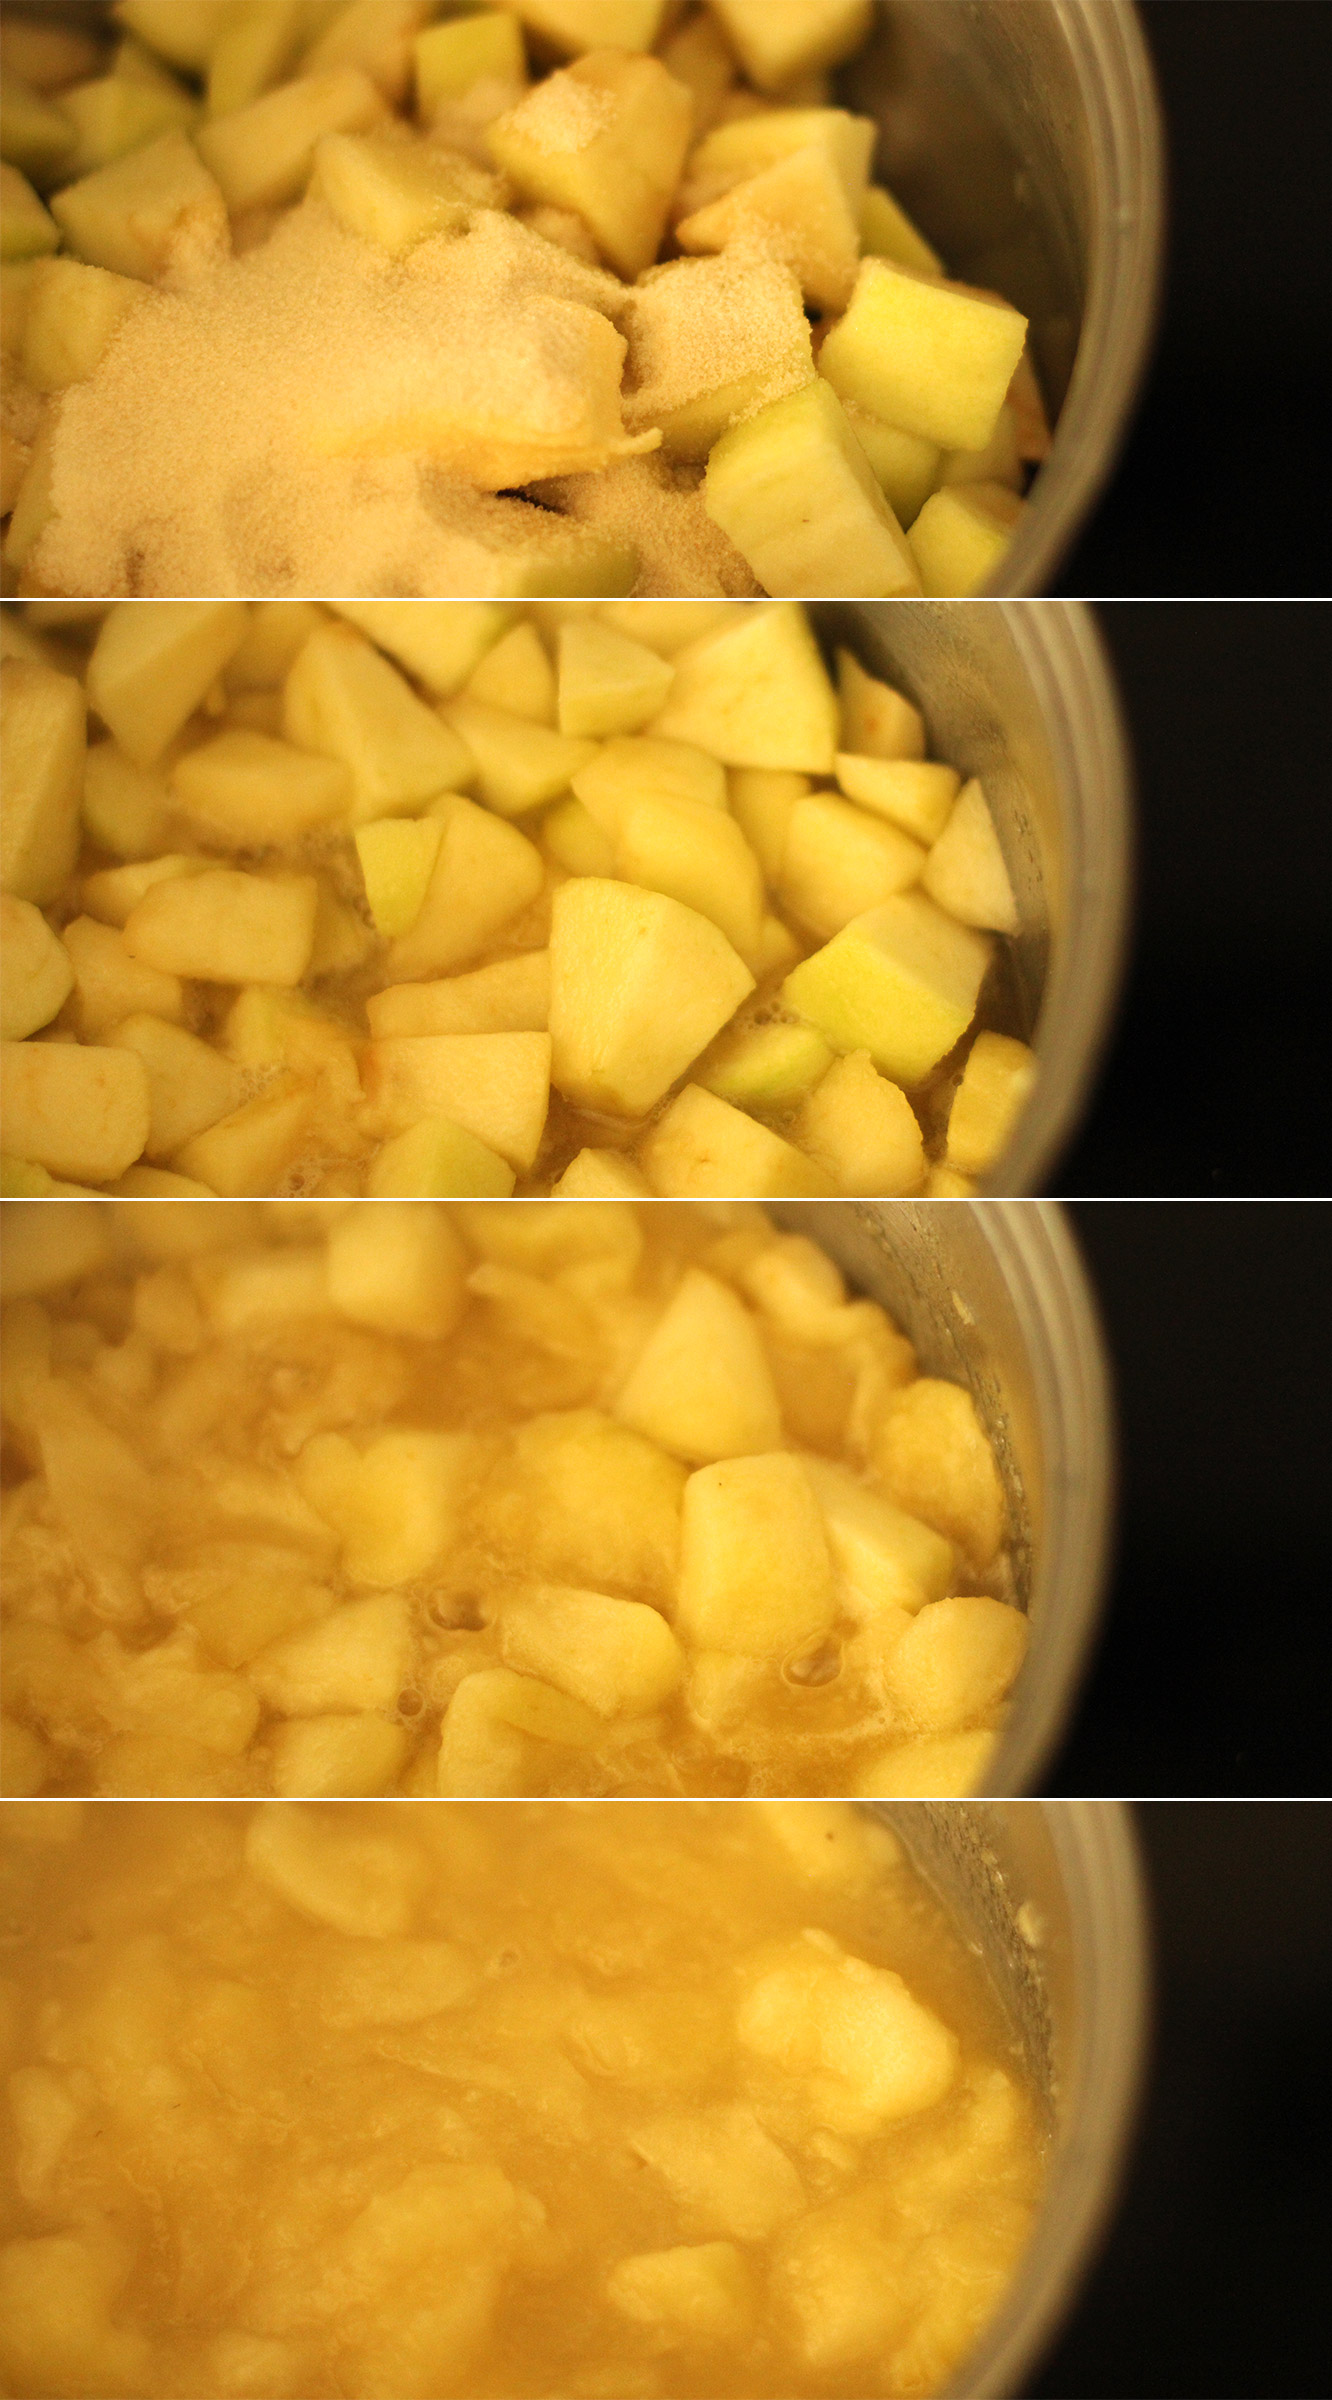
Put the chopped apples in a saucepan with the butter, honey, water and sugar. Bring to a medium-low heat and stir occasionally until the apples are mostly broken down. You want a pulp really (an appetising thought, I know).
Step eight
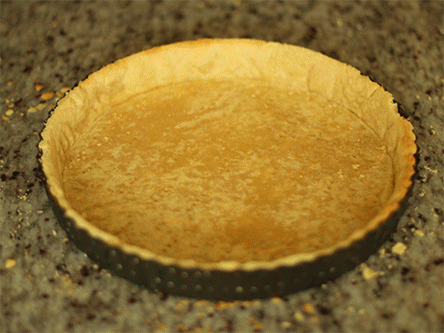
Remove the pastry from the fridge (providing an hour has passed). Place onto a lightly floured surface (you don’t want to add much more flour to the mix if you can help it).
Roll the pastry out as evenly as you can, until your chosen dish can sit in the middle with an inch or two on all sides. You don’t really want your pastry to be thicker than 5mm.
Step nine
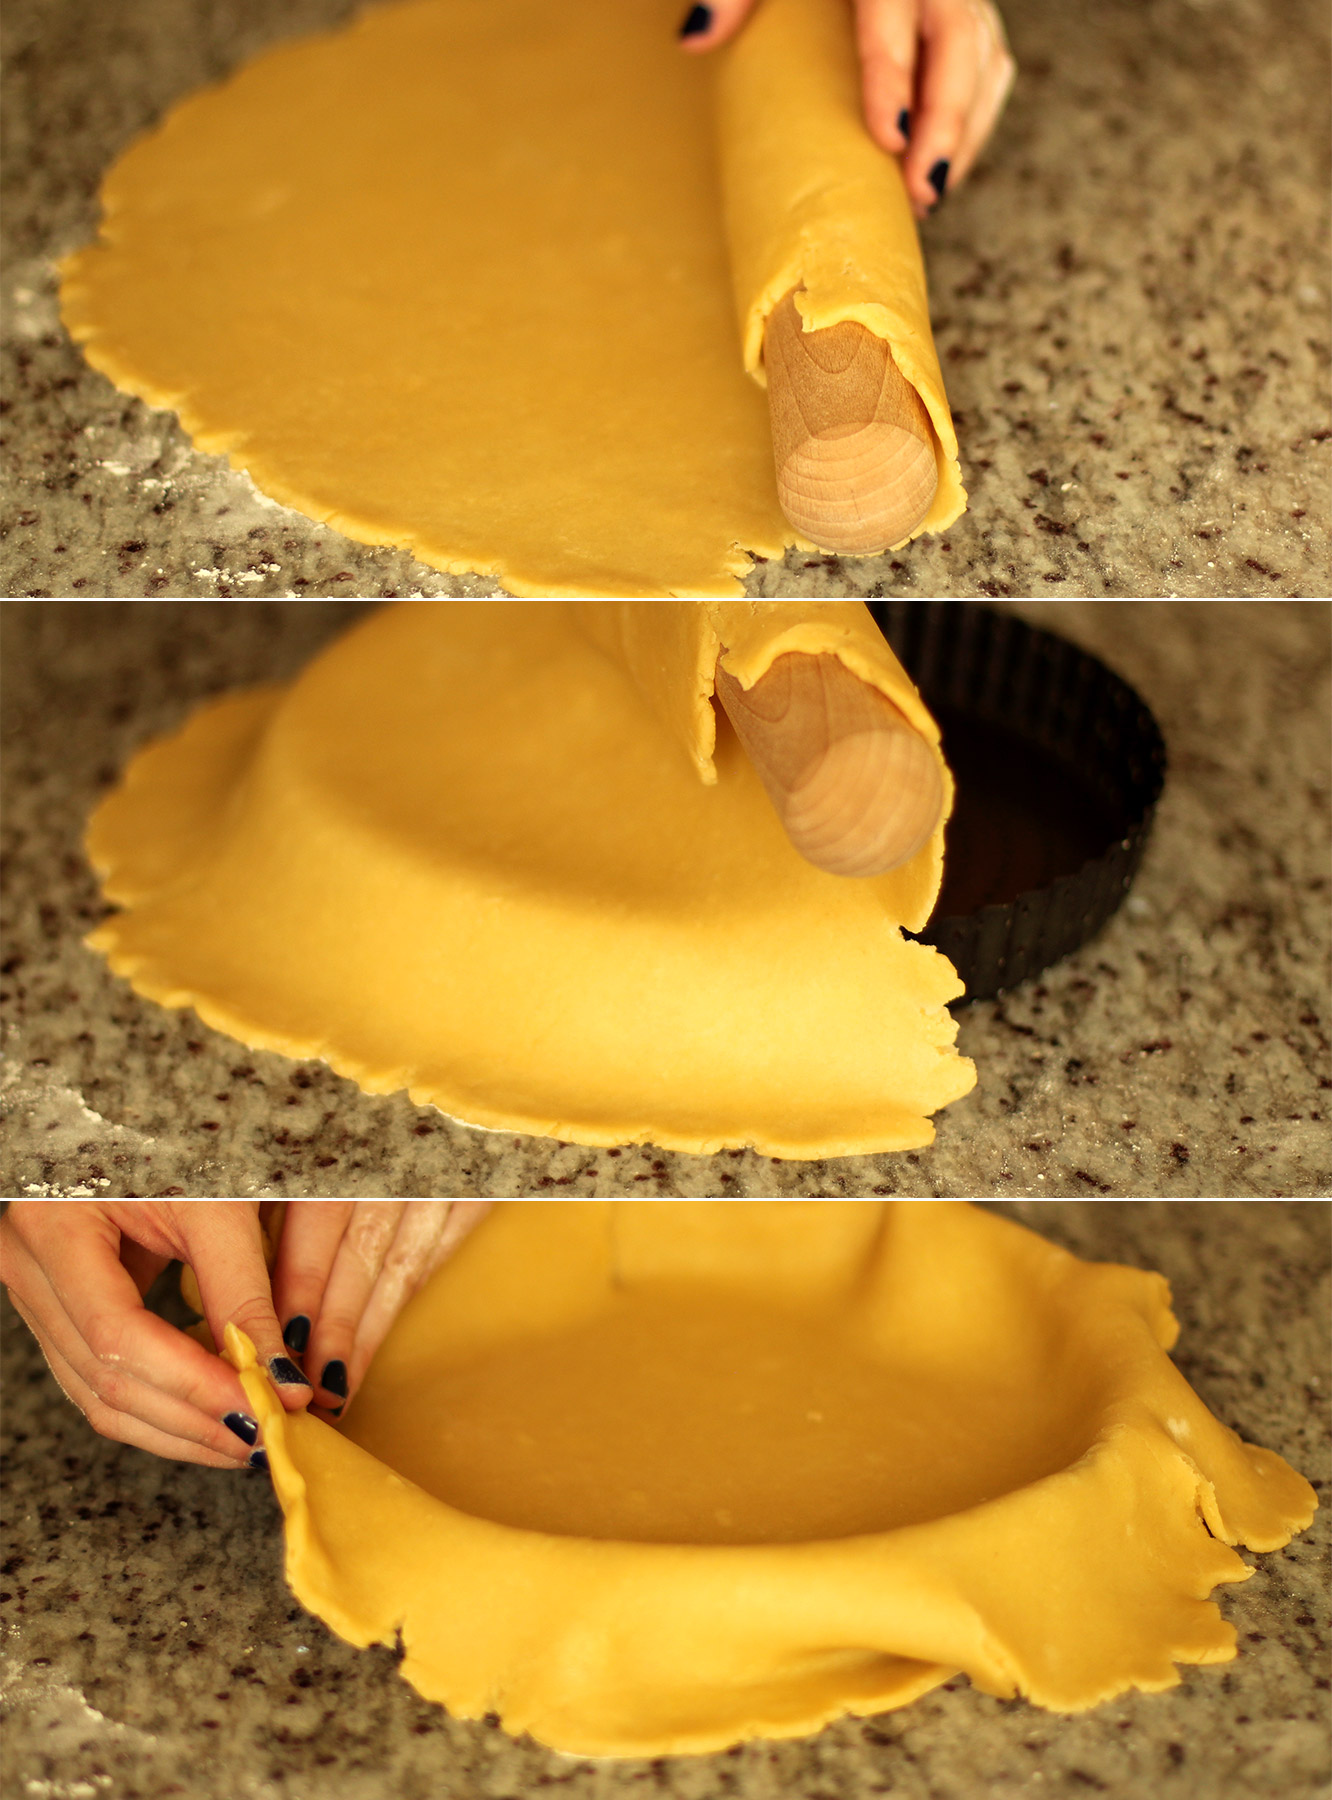
Transfer your pastry by rolling it at least half of it up onto your rolling pin and unrolling it over the top of your dish.
I then needed to lift the edges back up and place them back in to tease them better into the corners. Do this gently so as not to tear it. Having said that, I was a bit heavy handed and tears can be fixed quit easily by sticking a bit of excess pastry on top.
Step ten
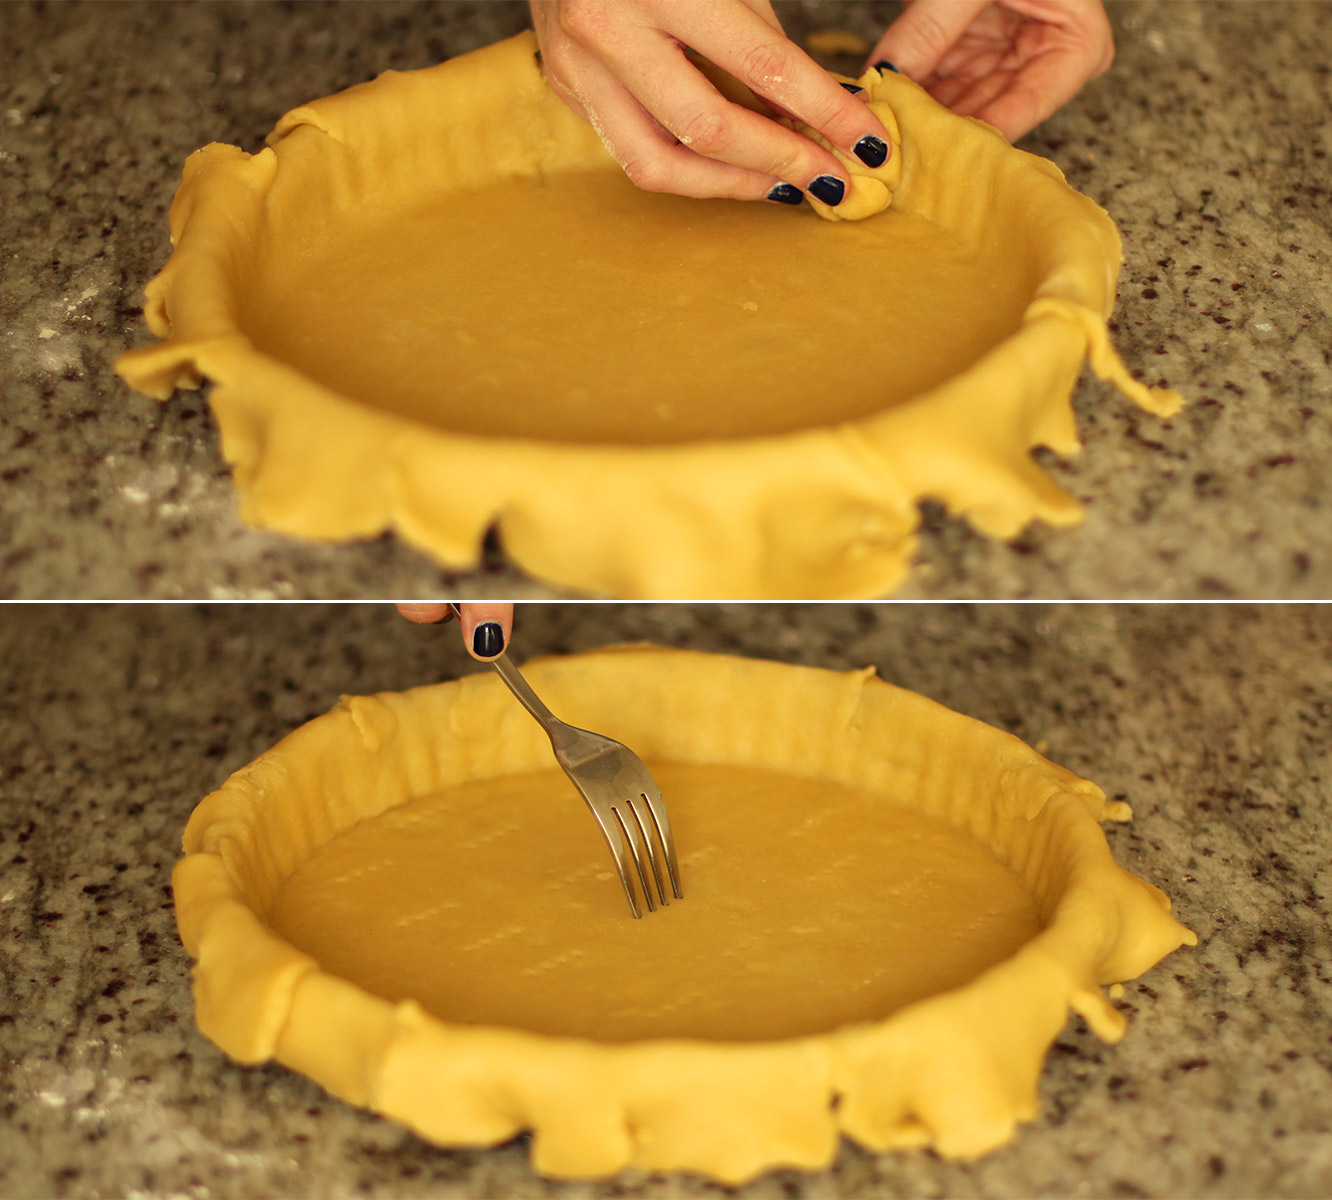
Rip a bit of pastry off the overlap and use it to press the crust further into the crevices.
Use a fork to pierce the base of the pie, this will help the pastry stay flat in the oven.
Pop him back in the fridge for another 20-30 minutes.
Step eleven
While the pastry is chilling again, peel and slice the braeburns/eating apples. You need to do this carefully as it will be the making or breaking of how your pie looks (no pressure). Try to peel nice and evenly and cut the apples as thinly as you can.
Have a large tupperware filled with cold water nearby to put your cut slices into, which will stop them from browning, again, if you have any lemon juice a few drops wouldn’t go amiss but not essential.
Pre-heat the oven to 180C/gas mark 4/350F
Step eleven
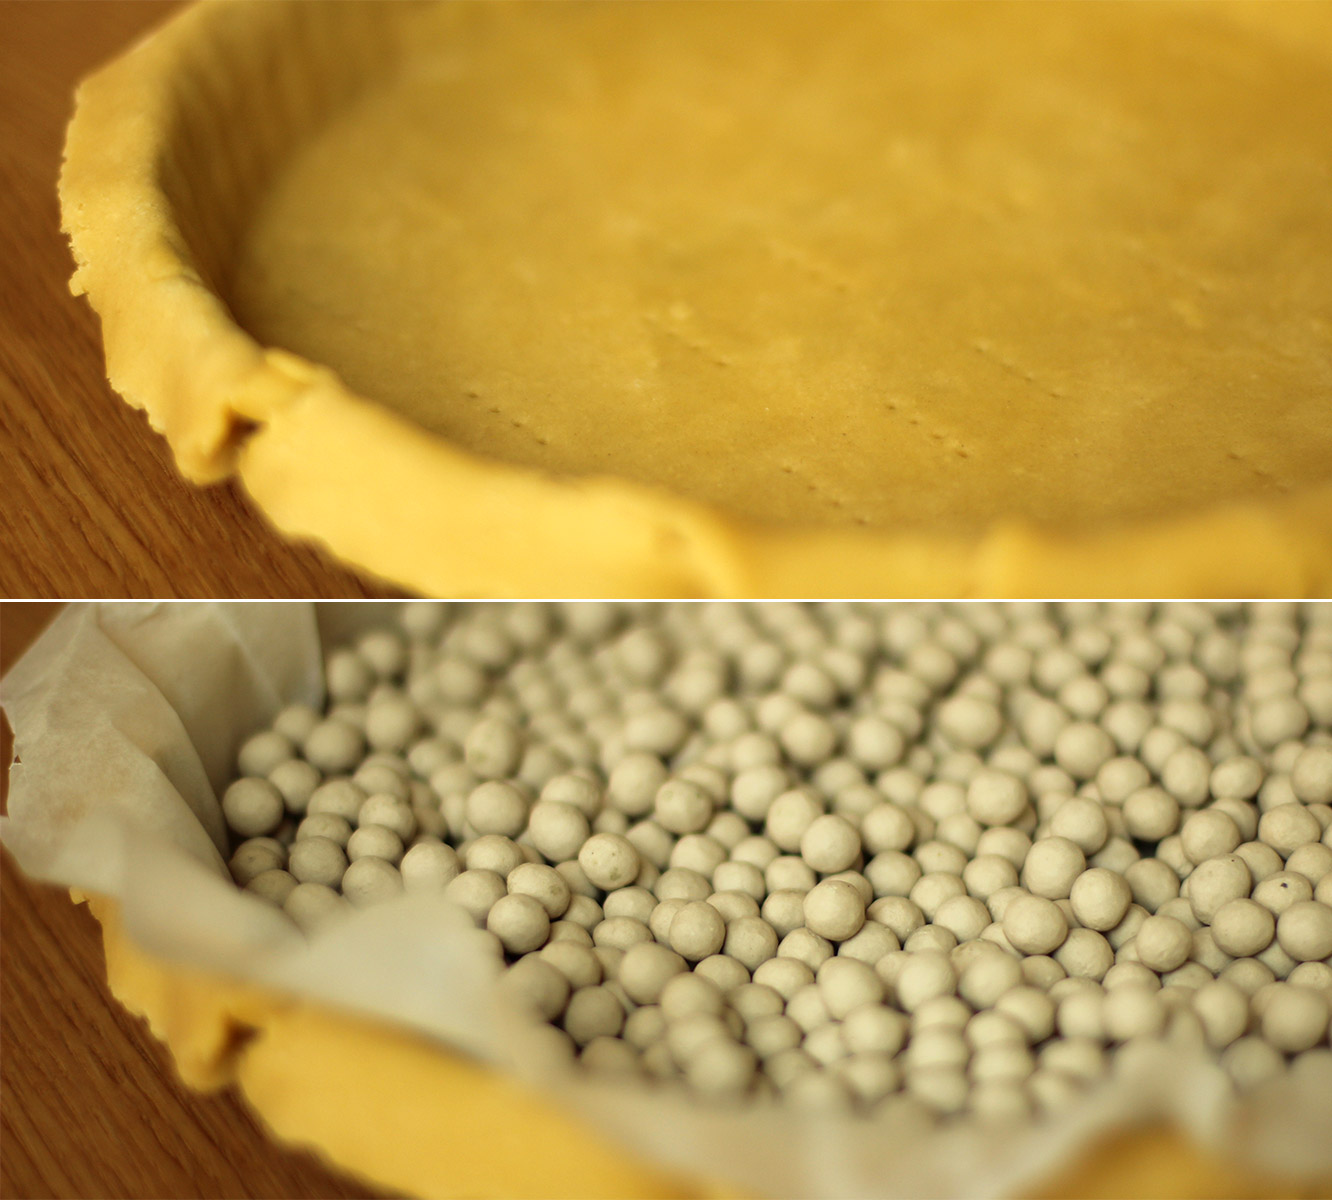
Remove the pie from the fridge and trim some of the excess pastry off the sides but still leave an overlap.
Place some baking paper in the pie and fill with baking beans. If you don’t have any then rice works too, and most dried lentils/pulses really.
Place on a baking tray and bake for 15 minutes.
Step twelve
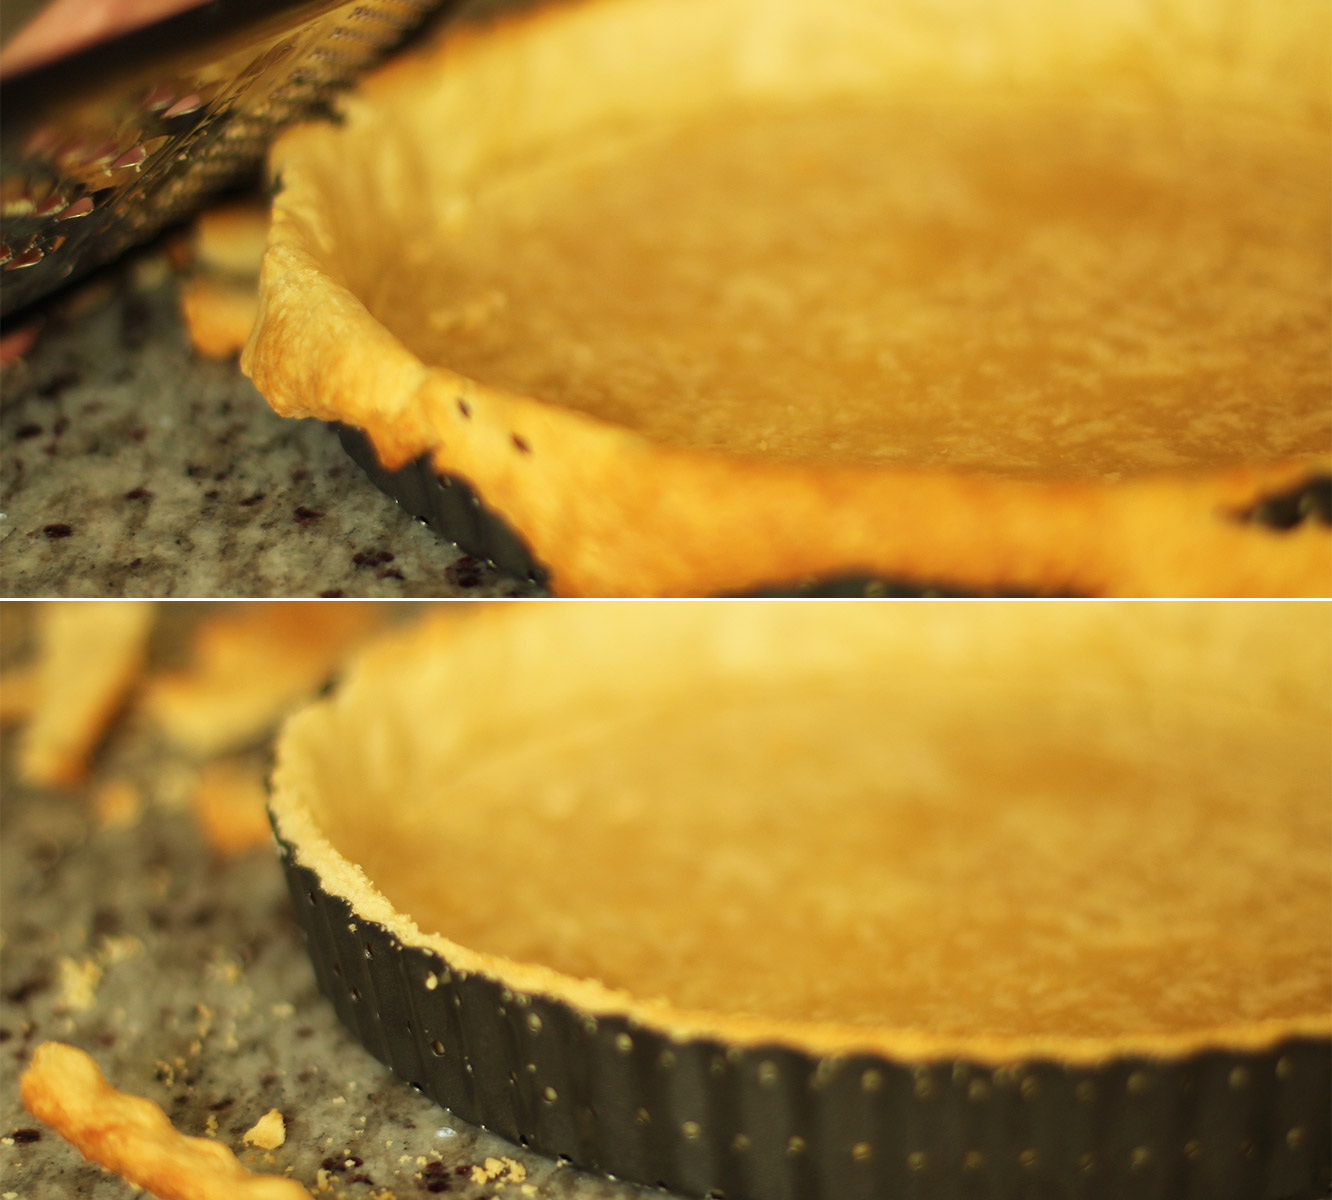
Using a grater remove the excess pastry at this stage. Doing it this way helps to avoid your pastry shrinking in the oven.
Step thirteen
FILL.
First spoon in the frangipane and spread out, followed by the stewed apple puree mixture.
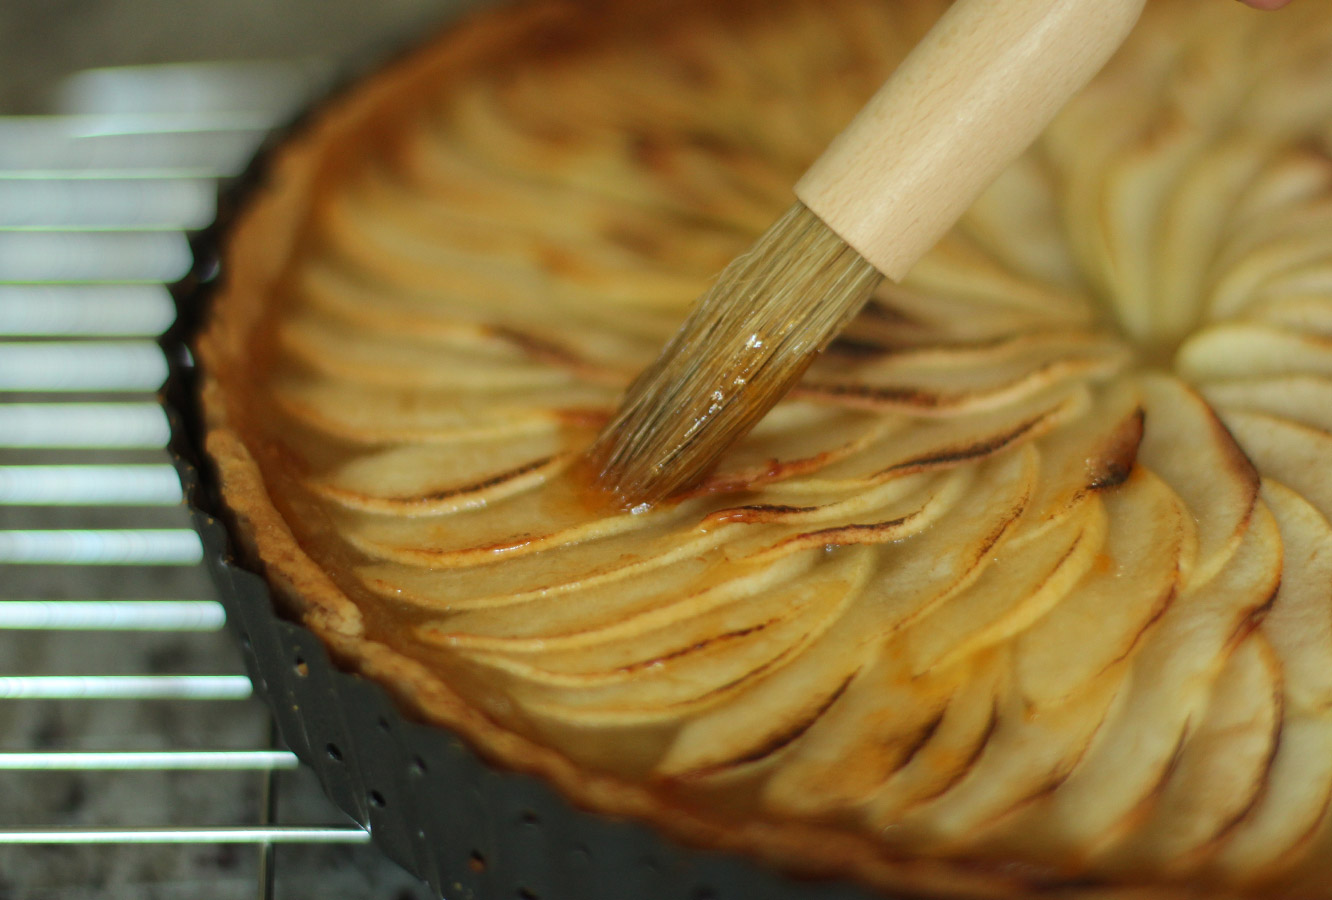
Finally add your eating apples. Start with the outside and work inwards. Make sure your apples overlap each other quite a bit; the cooking process reduces the water so they will shrink and flatten out.
Bake for another hour on 180C/350F/gas mark 4. I advise checking in at regular intervals after 30 minutes as every oven is different.
Step fourteen
Pop a few tablespoons of apricot jam in the microwave for 10-20 seconds (keep your eye on it as it’s sugary and will heat up quickly). Brush over the surface of the tart, being careful not to move the apples around, spoiling your lovely design.
Step fifteen
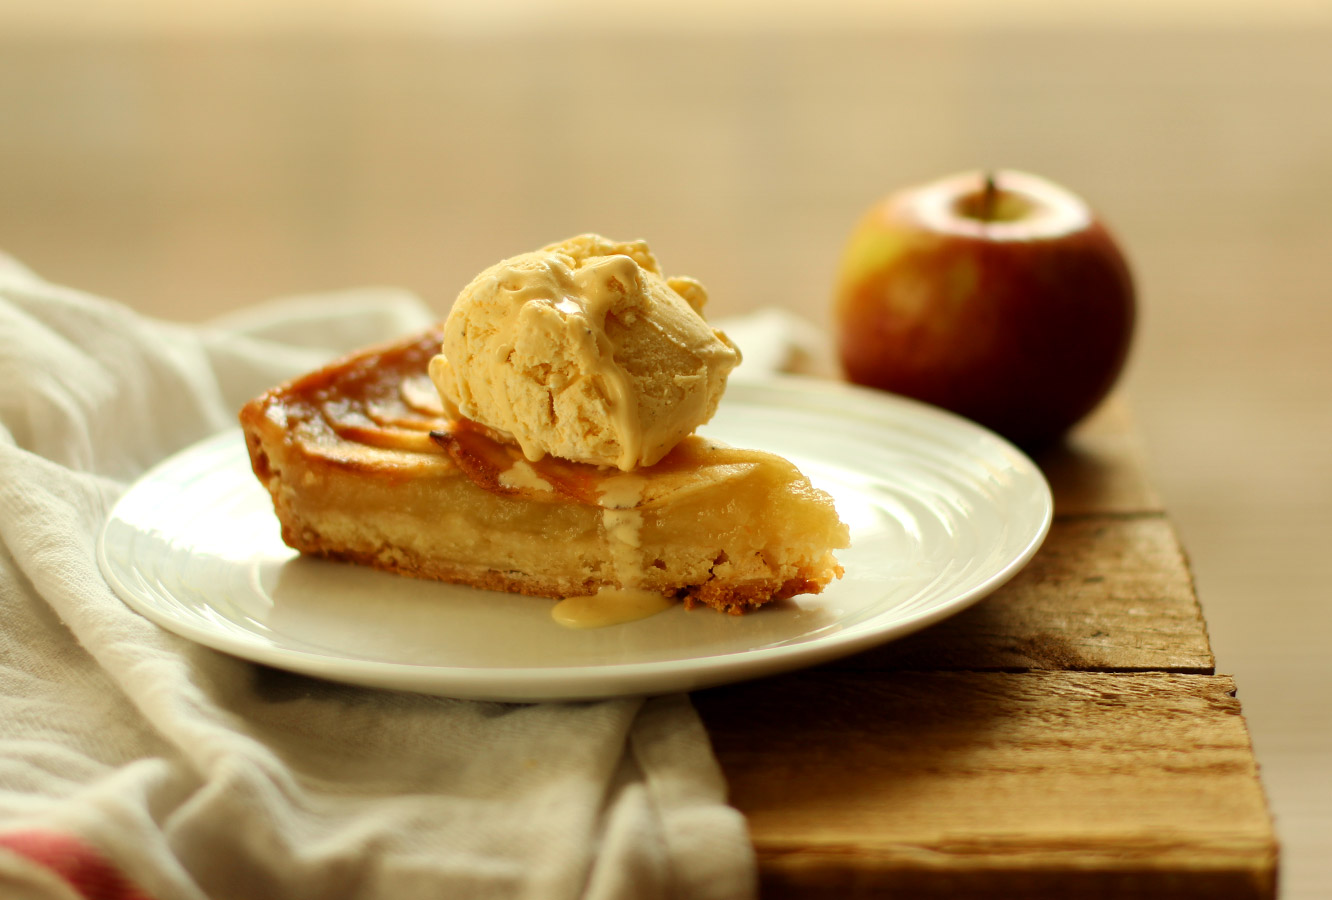
Get a scoop of vanilla ice-cream on that guy.
You can reheat your pie in the oven or individual slices in the microwave if you aren’t eating it straight away.
Hullo again. I’ve decided to start a small series. I know, I can smell your excitement from here.
I will probably break it up a little every so often because it has one main theme (cupcakes) and I don’t want to bore. Not that cupcakes could ever be boring right?
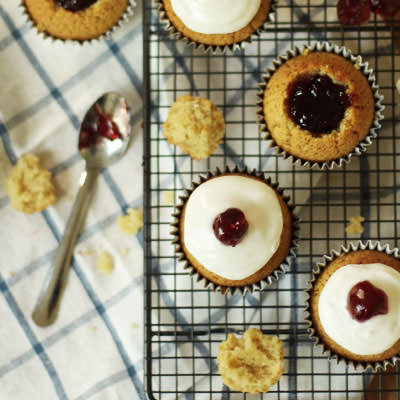
The other day I was handed a Bakewell tart on the street (by a man in a co-op uniform, don’t worry, I’m not taking sweets from strangers). It’s been a while since I had a Bakewell tart, and you know what? I actually quite enjoyed it.
Then the thought struck me…a series of British sweets/puds baked into cupcakes is just what this blog needs.
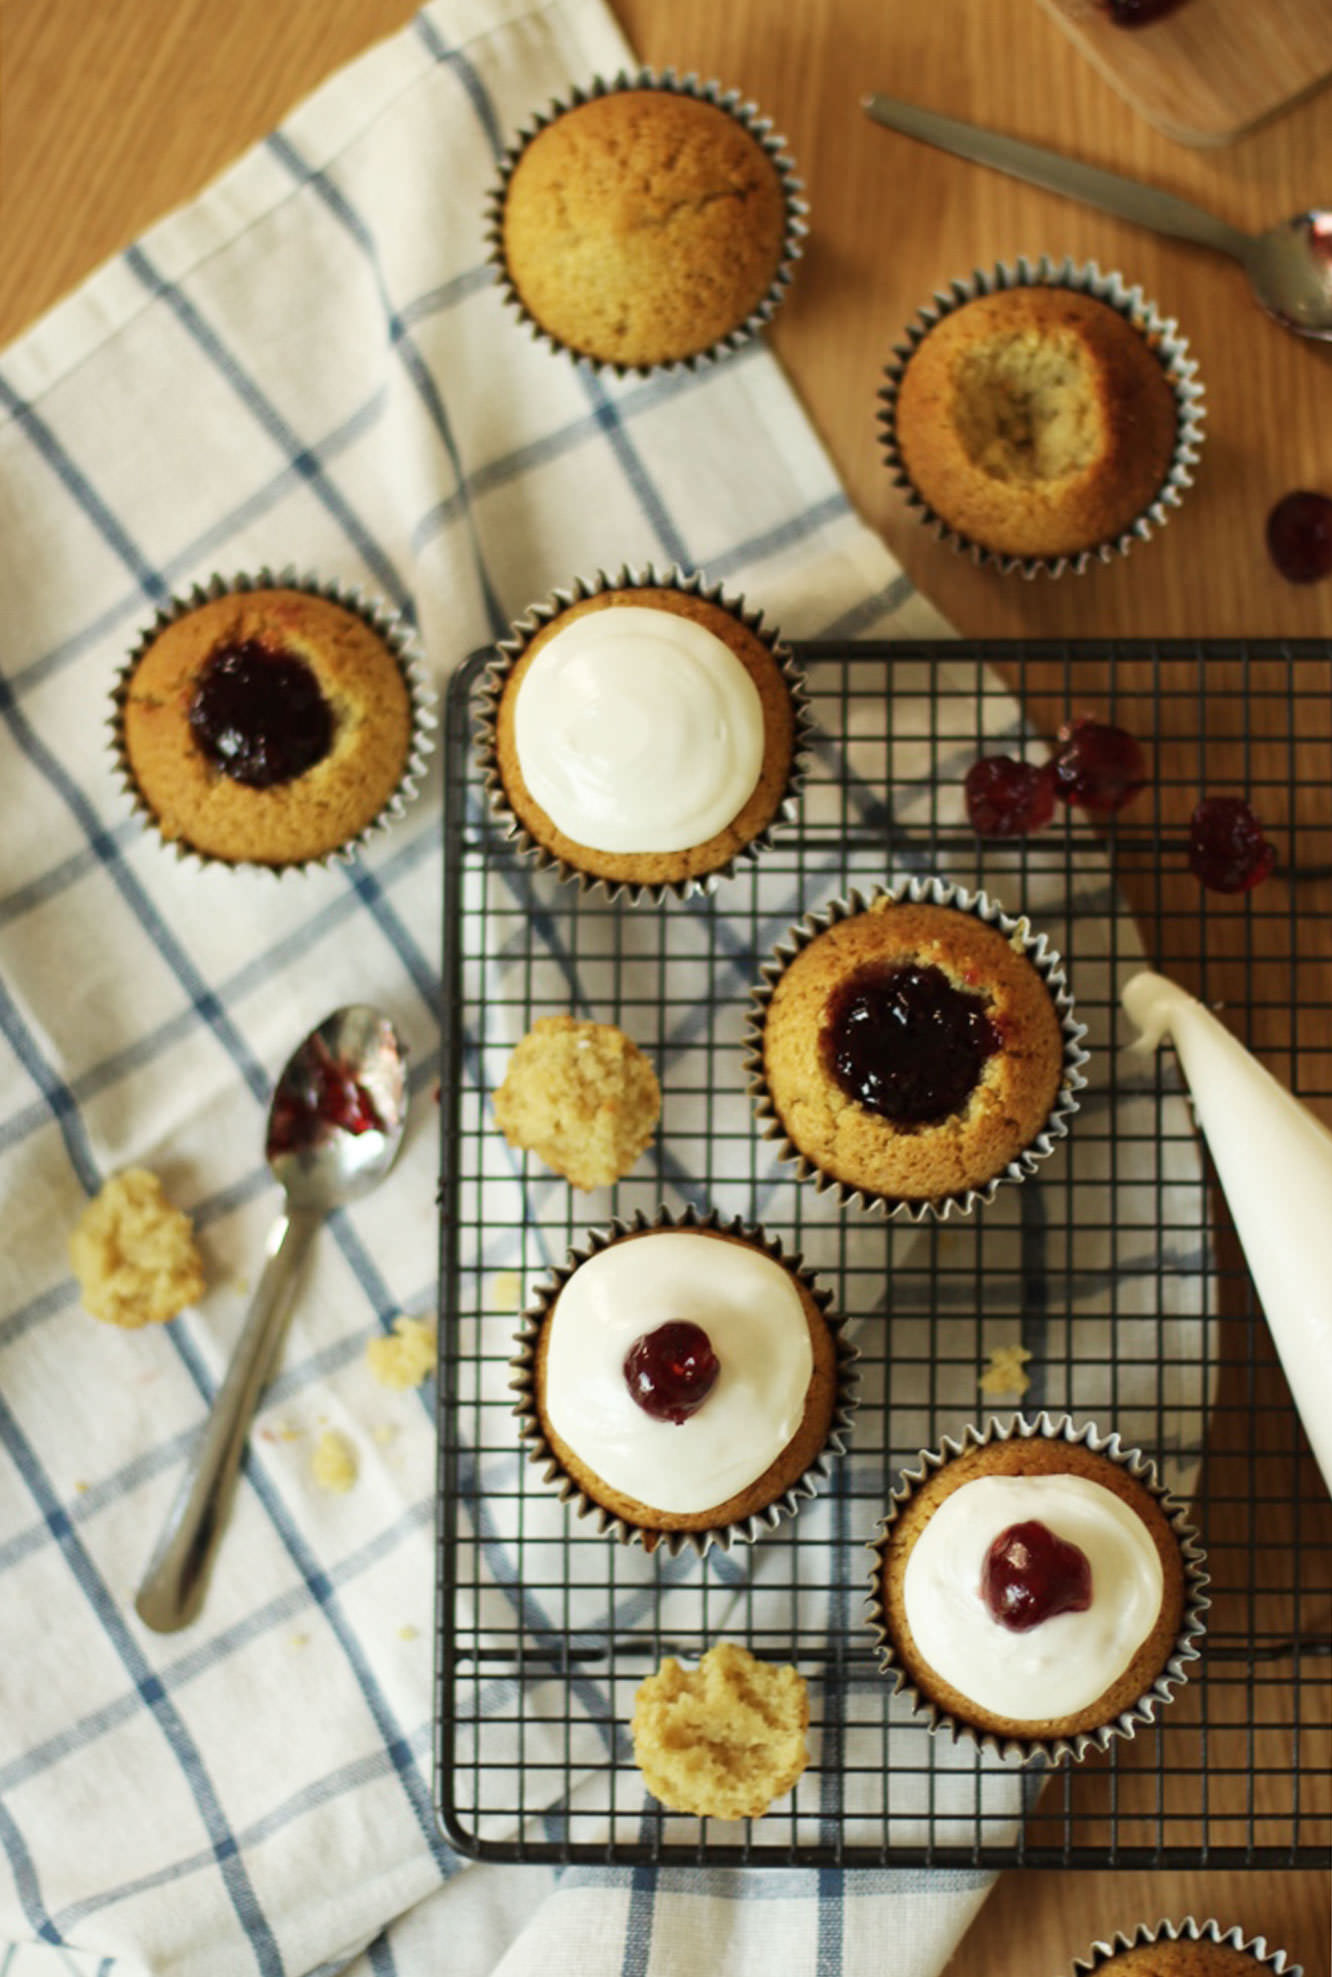
For anyone who doesn’t know, a Bakewell tart has a pastry case, full of frangipane (almond), cherry jam and is topped with a thick layer of icing and half a glacé cherry.
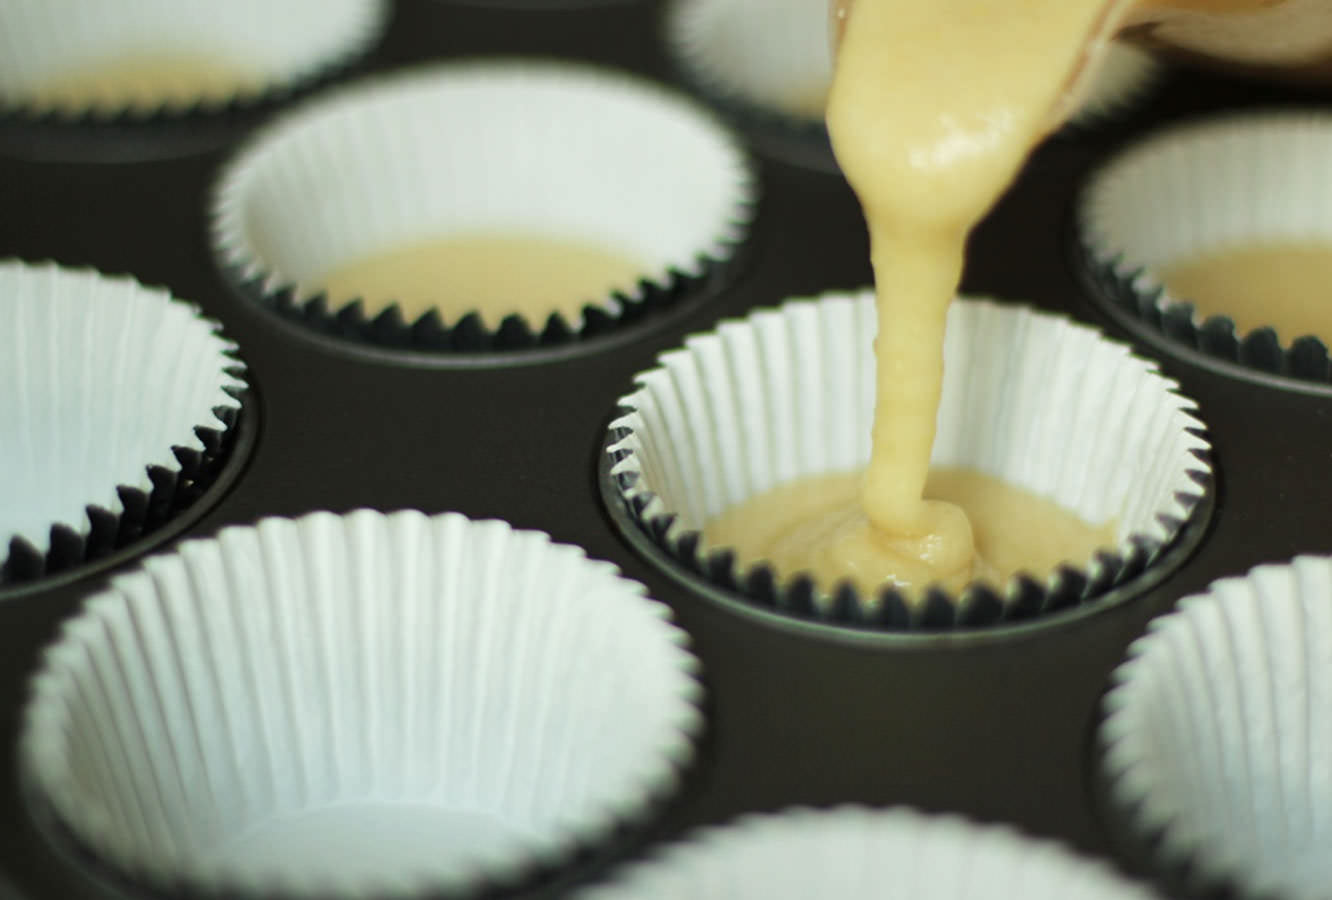
So without further ado let’s kick off with an easy peasy Bakewell tart cupcake, which are also handily dairy free for our lactose intolerant friends.
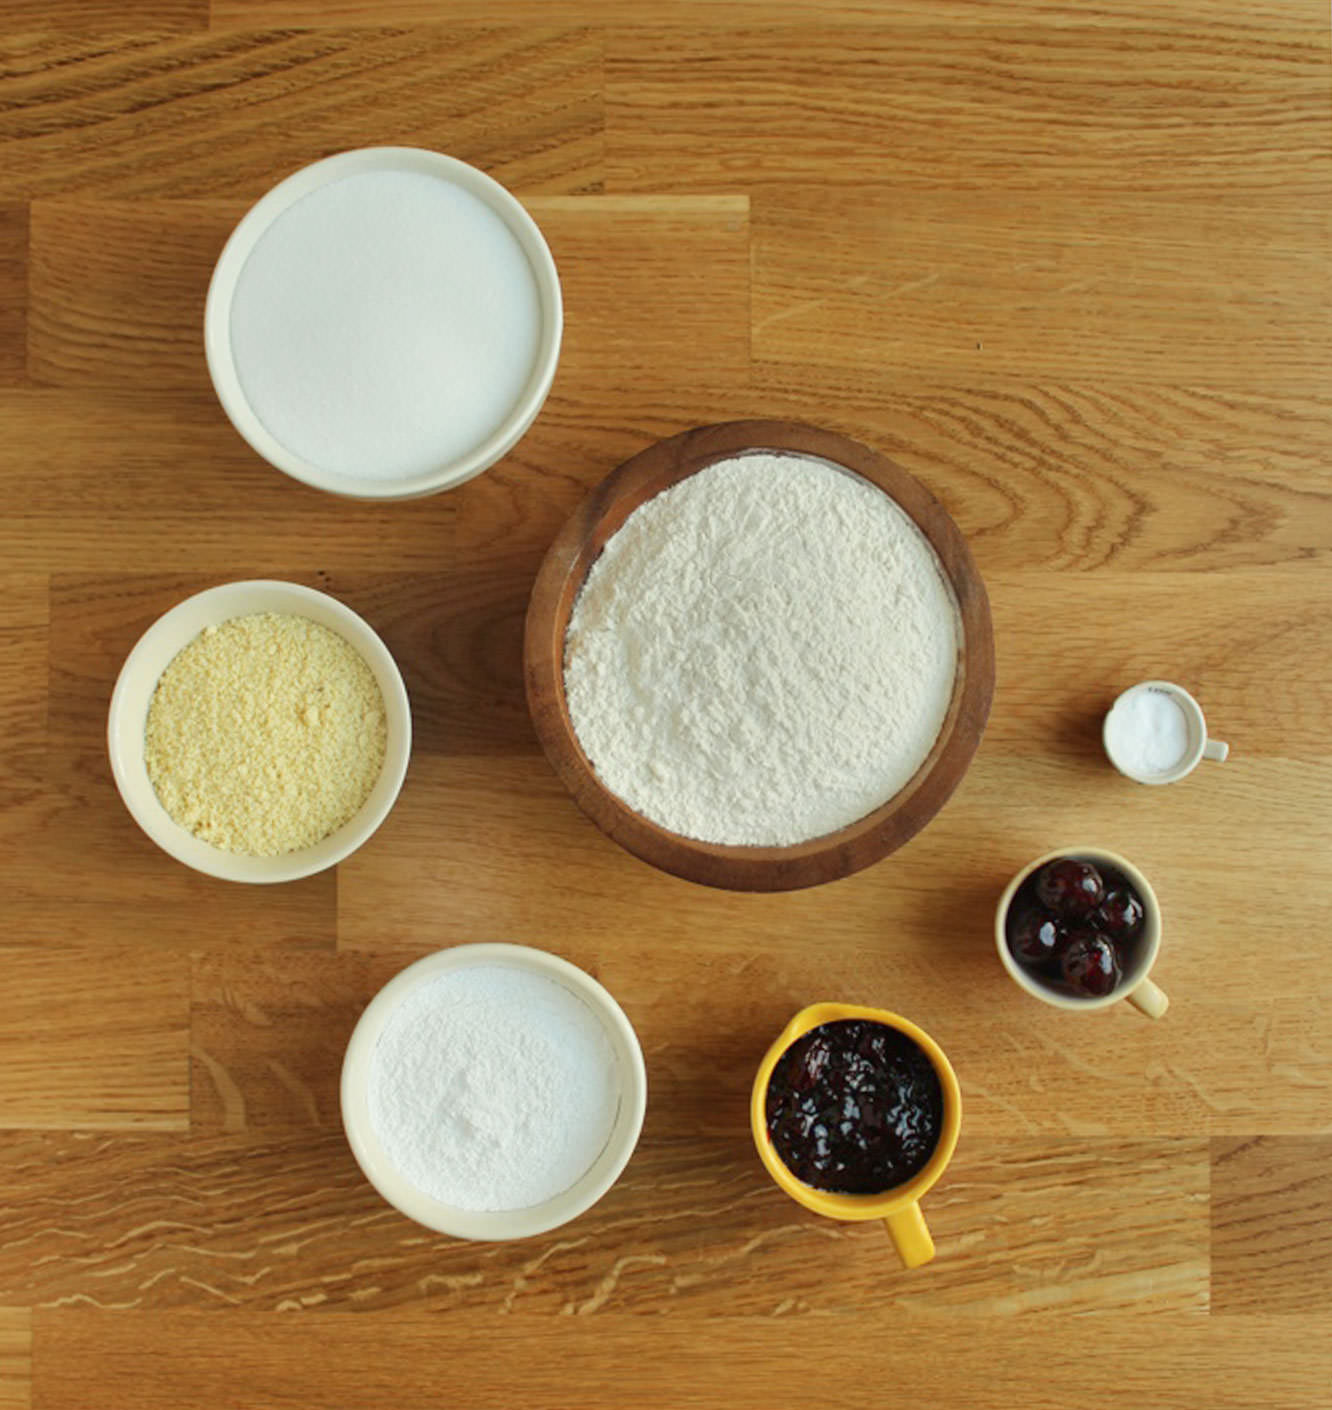
Things you need
200g/7 oz plain flour
200g/7 oz caster sugar
50g/1.75 oz ground almonds
5 tbsp vegetable oil
250ml/6.5 fl oz cold water
1 tsp vanilla extract
2 tsp almond extract
1 tsp bicarbonate of soda
1 tsp white vinegar (I won’t lie…I actually used cider vinegar, because I wasn’t about to buy a whole bottle for a single teaspoon)
To decorate:
Icing sugar (royal icing works well if you have it)
6 glacé cherries
Cherry jam
Silver foil cupcake cases (to add that authentic touch)
(Makes 12 cupcakes)
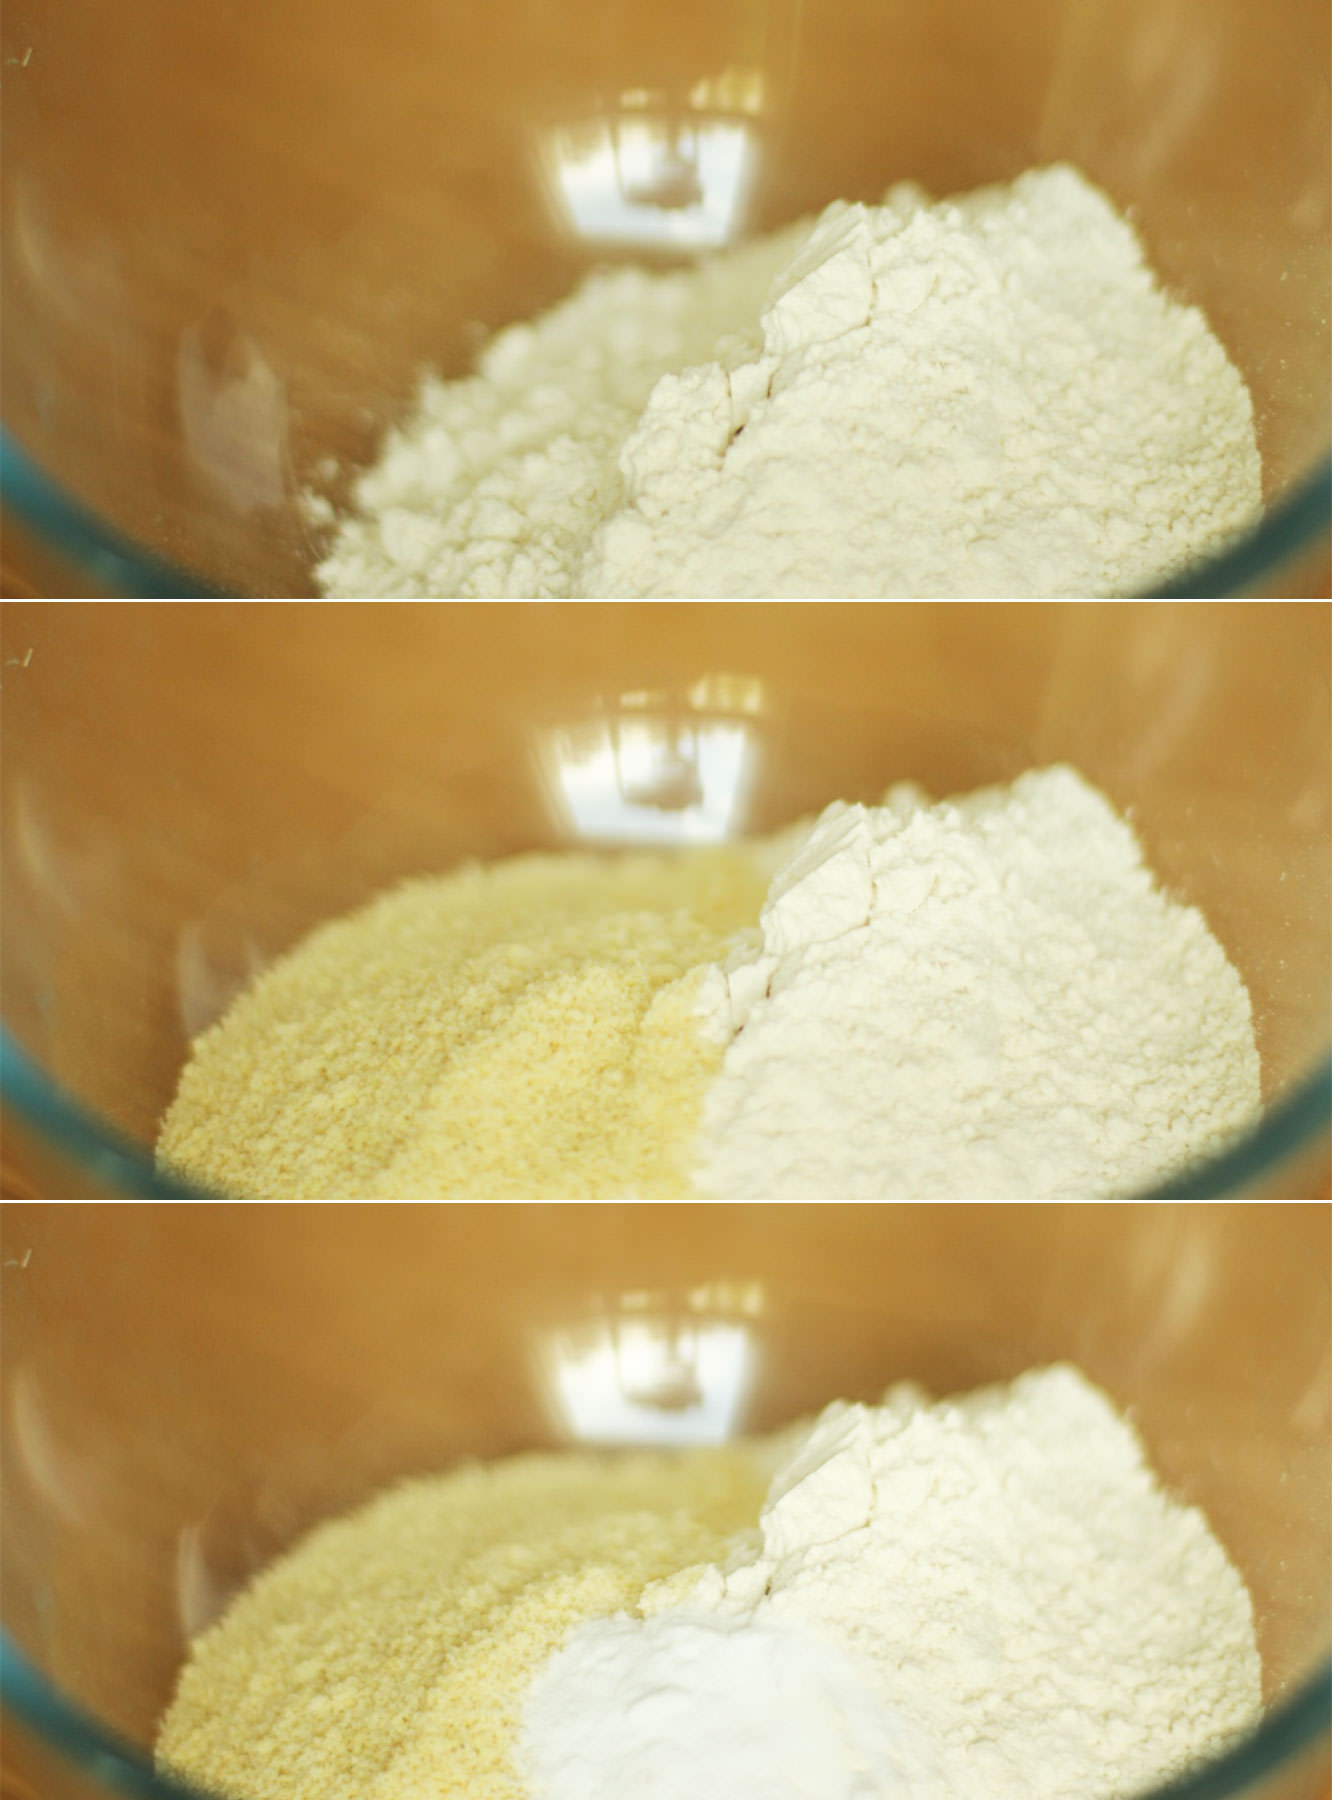
Step one
Mix together the flour, almonds and baking powder.
Step two
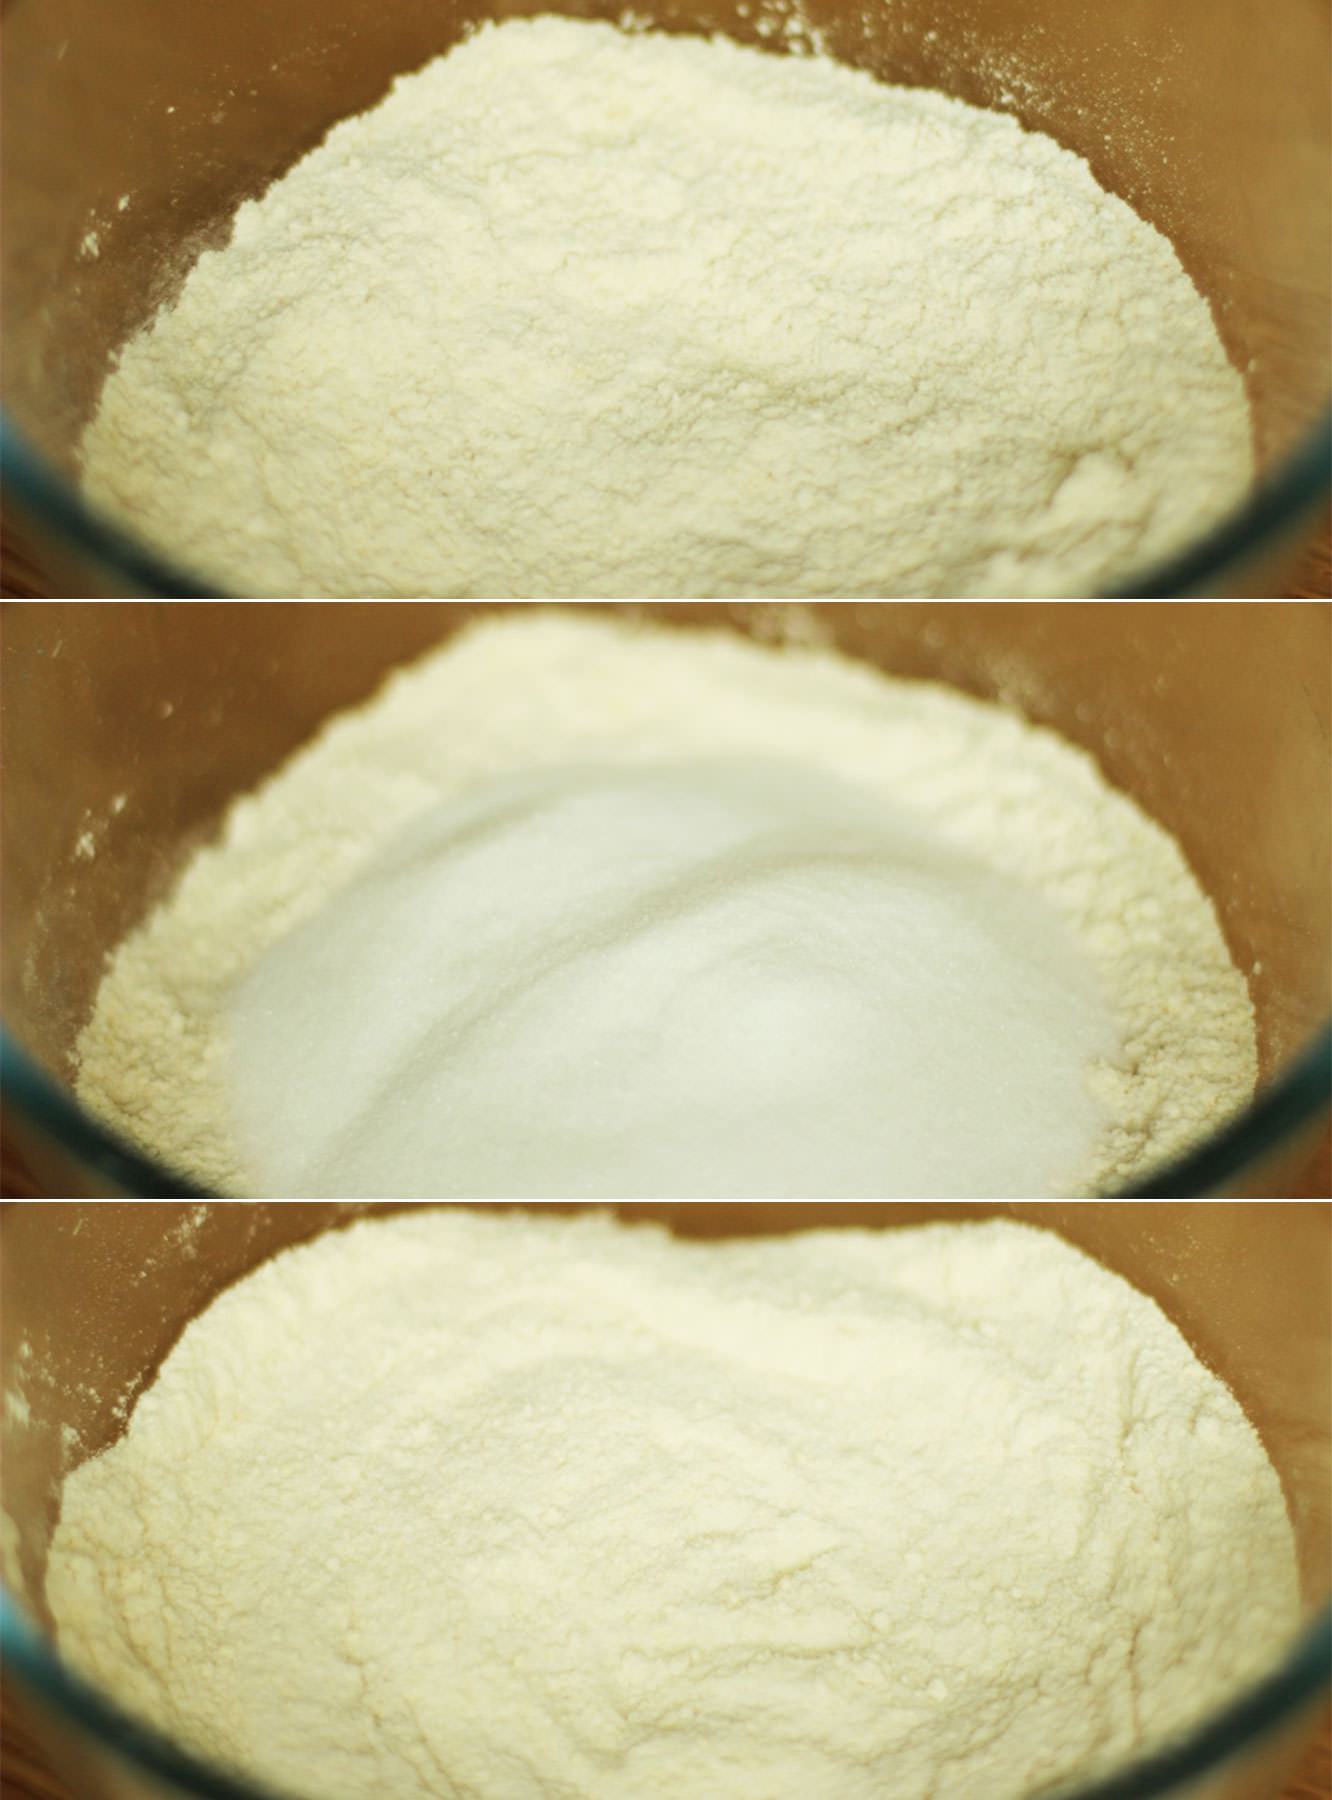
Add the caster sugar and stir again until combined. Yup, this is SUCH an easy recipe that I gave that its own step.
Step three
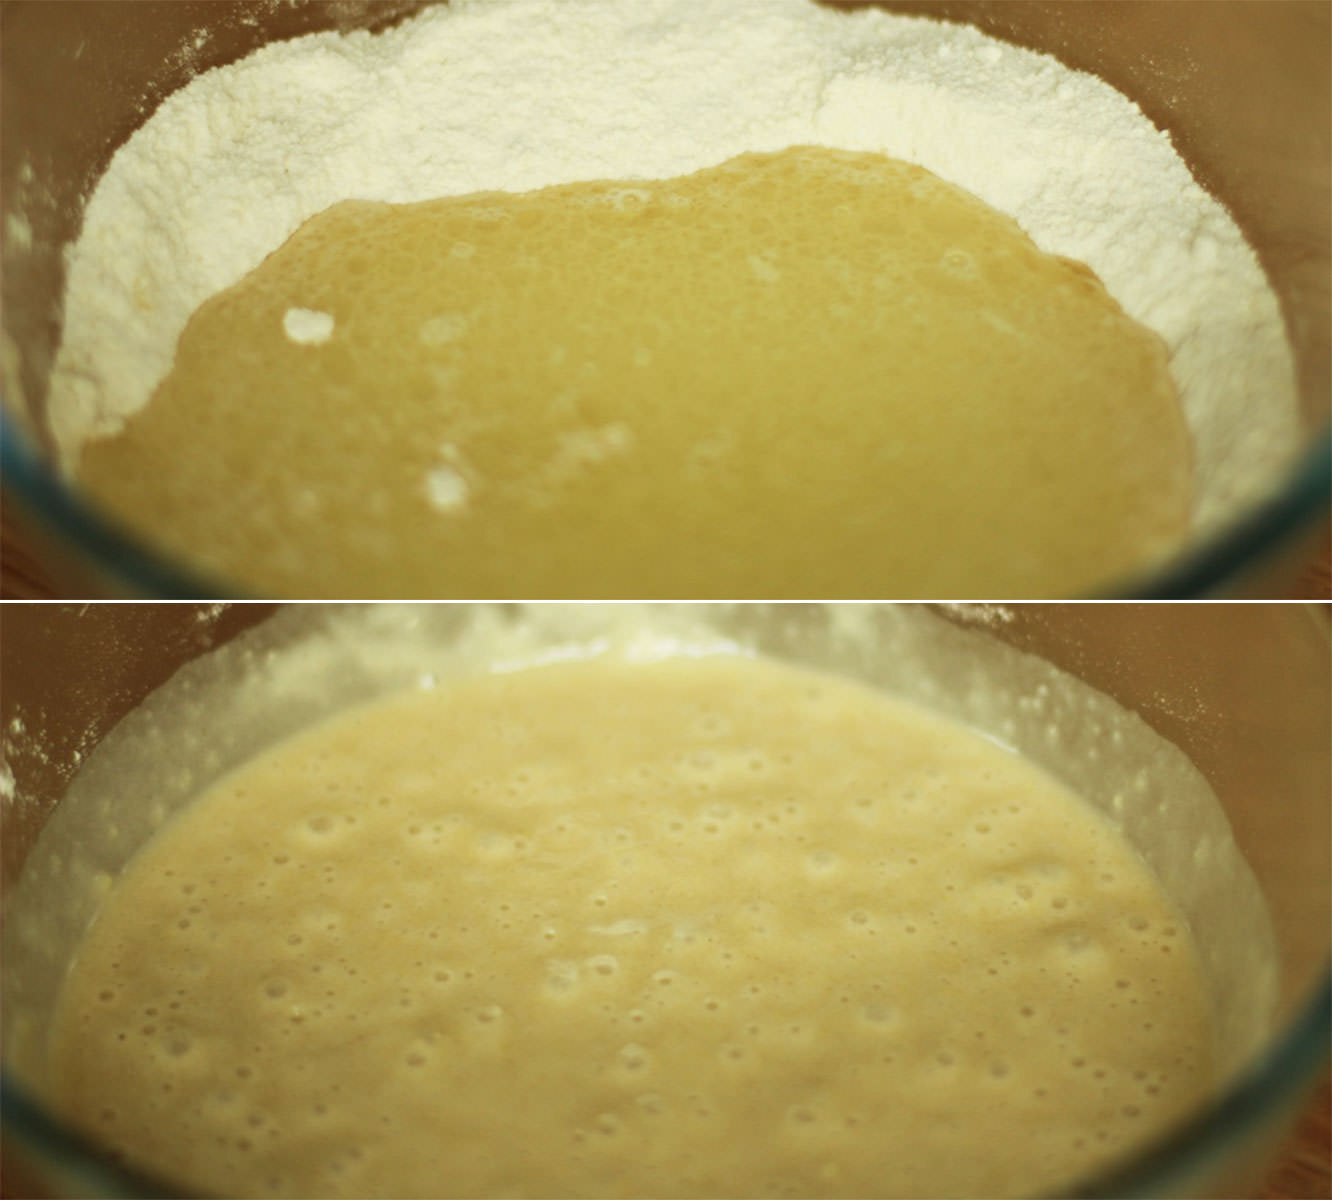
Make a well in the middle and add the water, oil, vinegar and extracts.
Using a hand whisk make small circular motions until all the flour mix is gradually incorporated. Doing it that way will reduce the number of lumps.
Step four
Using a jug distribute the mixture evenly between 12 cupcake cases. Trust me. You will want a jug.
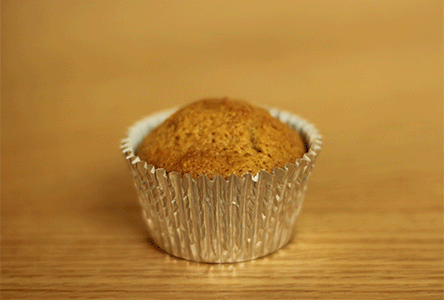
Bake on gas mark 4/180C/350F for 20-25 minutes until they spring back when touched.
Step five
Cut a circular section out of the middle with a small knife and fill with cherry jam. Remove excess sponge from the bit you removed and put the lid back on.
Step six
Mix some icing sugar with water until you have quite a thick consistency. Royal icing is good for this because it’s thicker and more opaque generally.
Pipe onto the cupcake, try to get it as round as you can.
I promise next week will be more diet friendly. Well, actually I don’t. I really like food, and the sweeter the better as far as I’m concerned.
Last week we had some buddies round for a sleepover and I couldn’t resist making a naughty pud. This salted caramel chocolate mousse filled roulade is the perfect edition to a girls’ night in, or a dinner party, or breakfast.
Buckle up, it’s not a speedy bake, but it’s worth it.
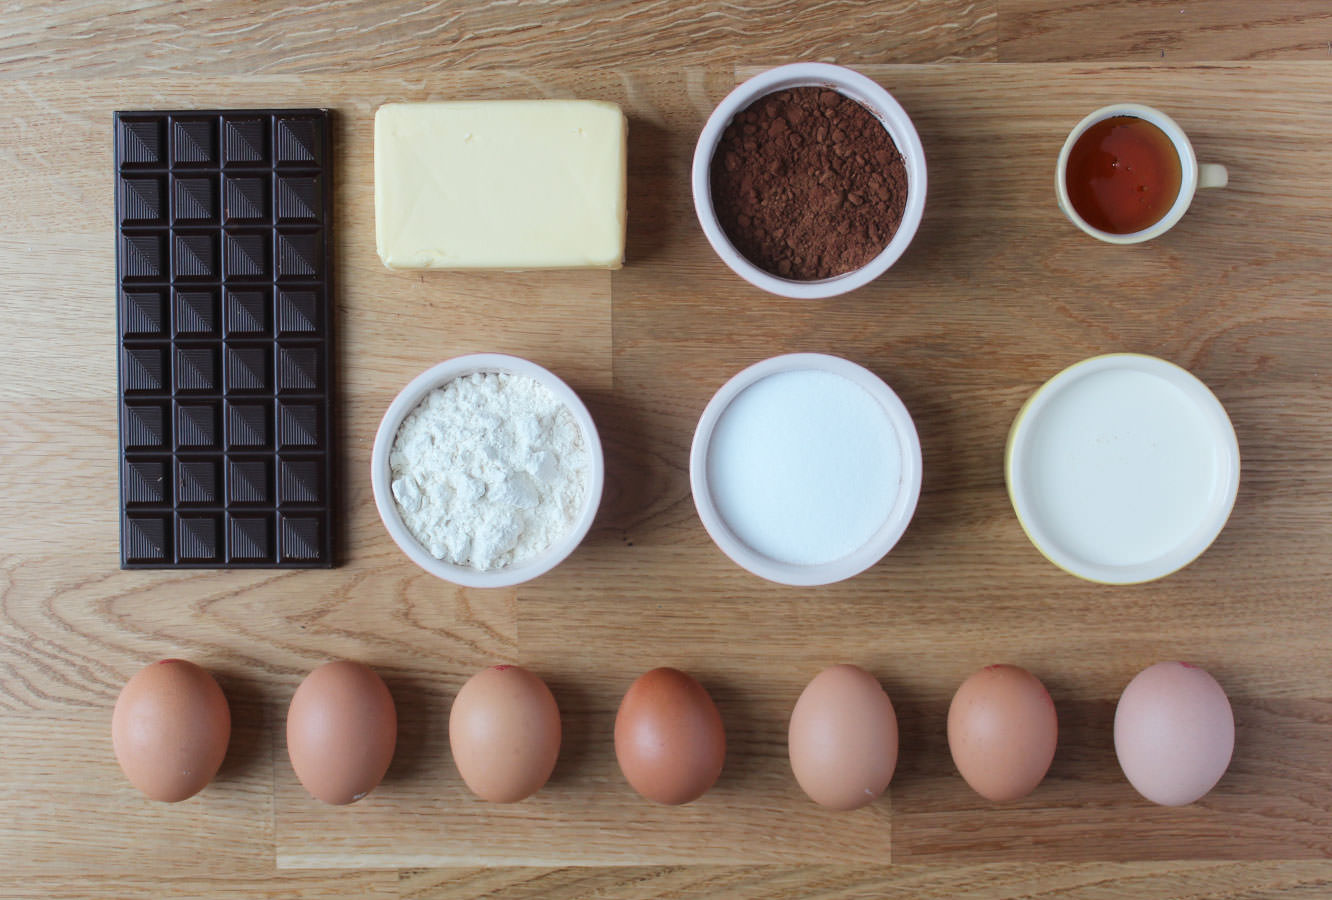
You will need
For the sponge:
130g/4.5 oz Caster sugar
100g/3.5 oz Plain flour
4 Eggs
35g/1.5 oz Cocoa powder
For the chocolate mousse:
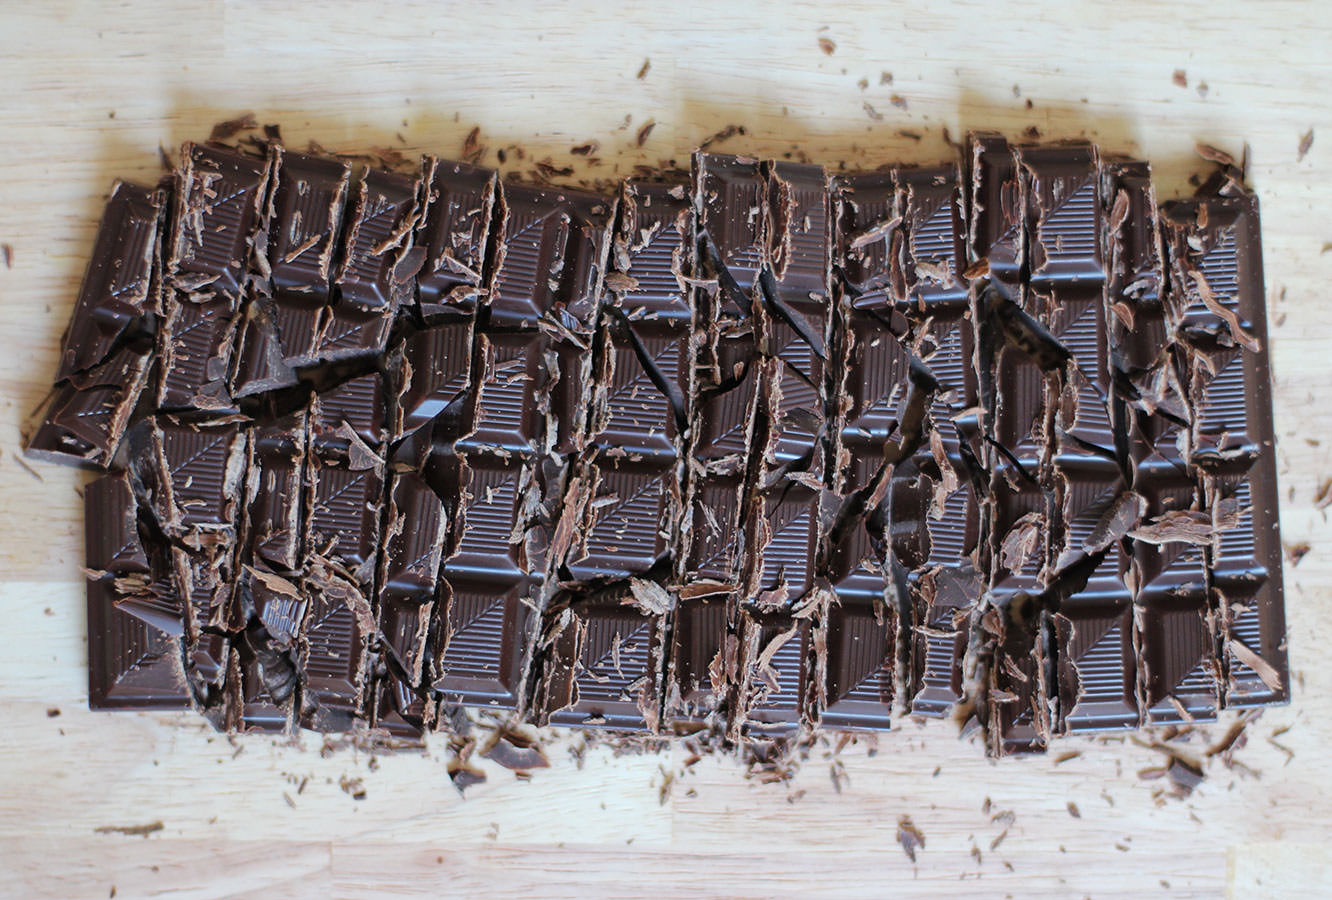
200g/7 oz Dark chocolate
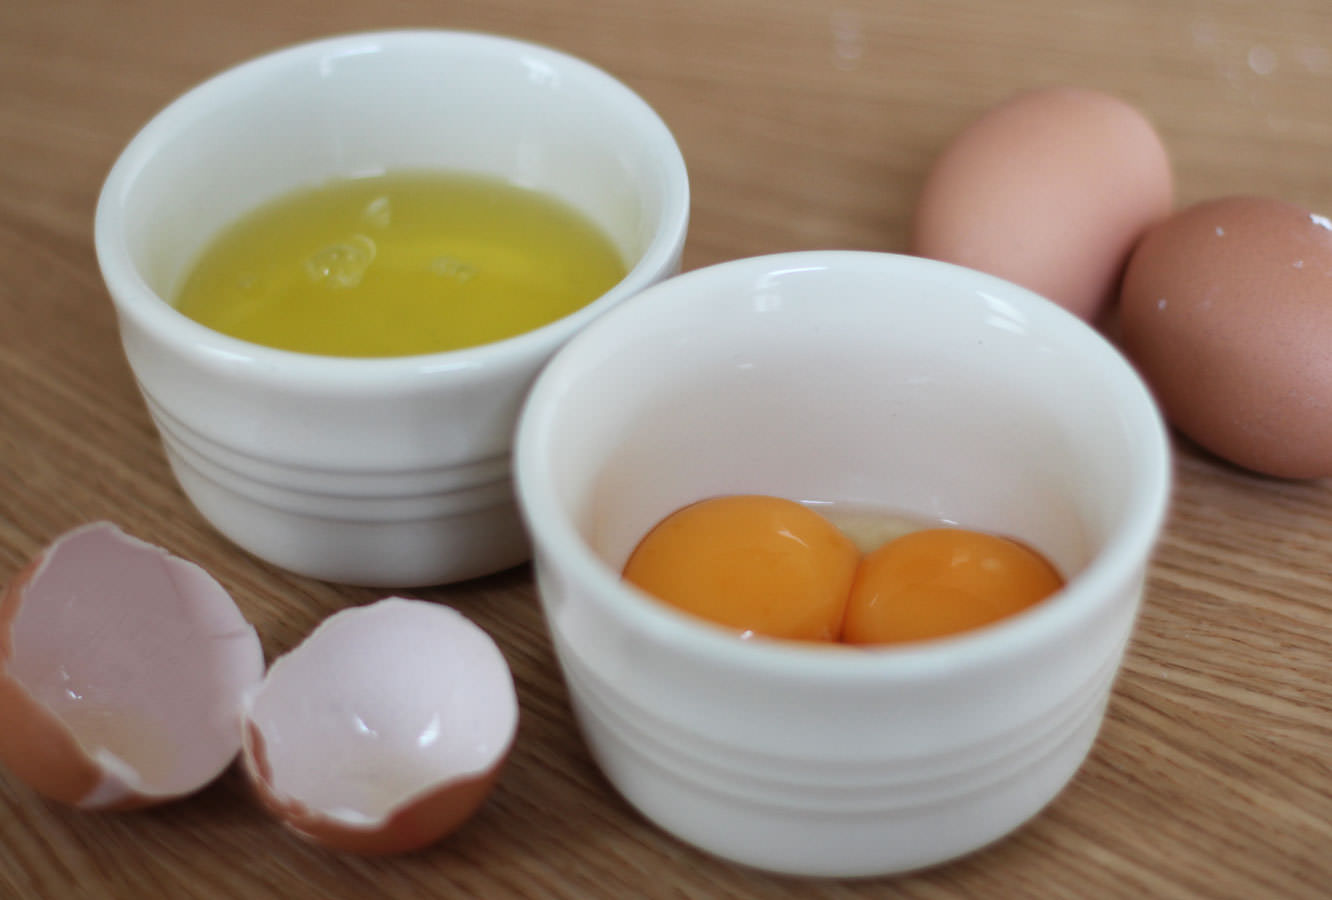
3 Eggs
40g/1.5 oz Caster sugar (golden if you have it)
90ml/3 fl oz Water
For the salted caramel frosting:
300g/10.5 oz Icing sugar
250g/9 oz Butter
80g/3 oz Soft brown sugar
100ml/3.5 fl oz Double cream
2 tbsp Golden syrup
2 tsp Salt
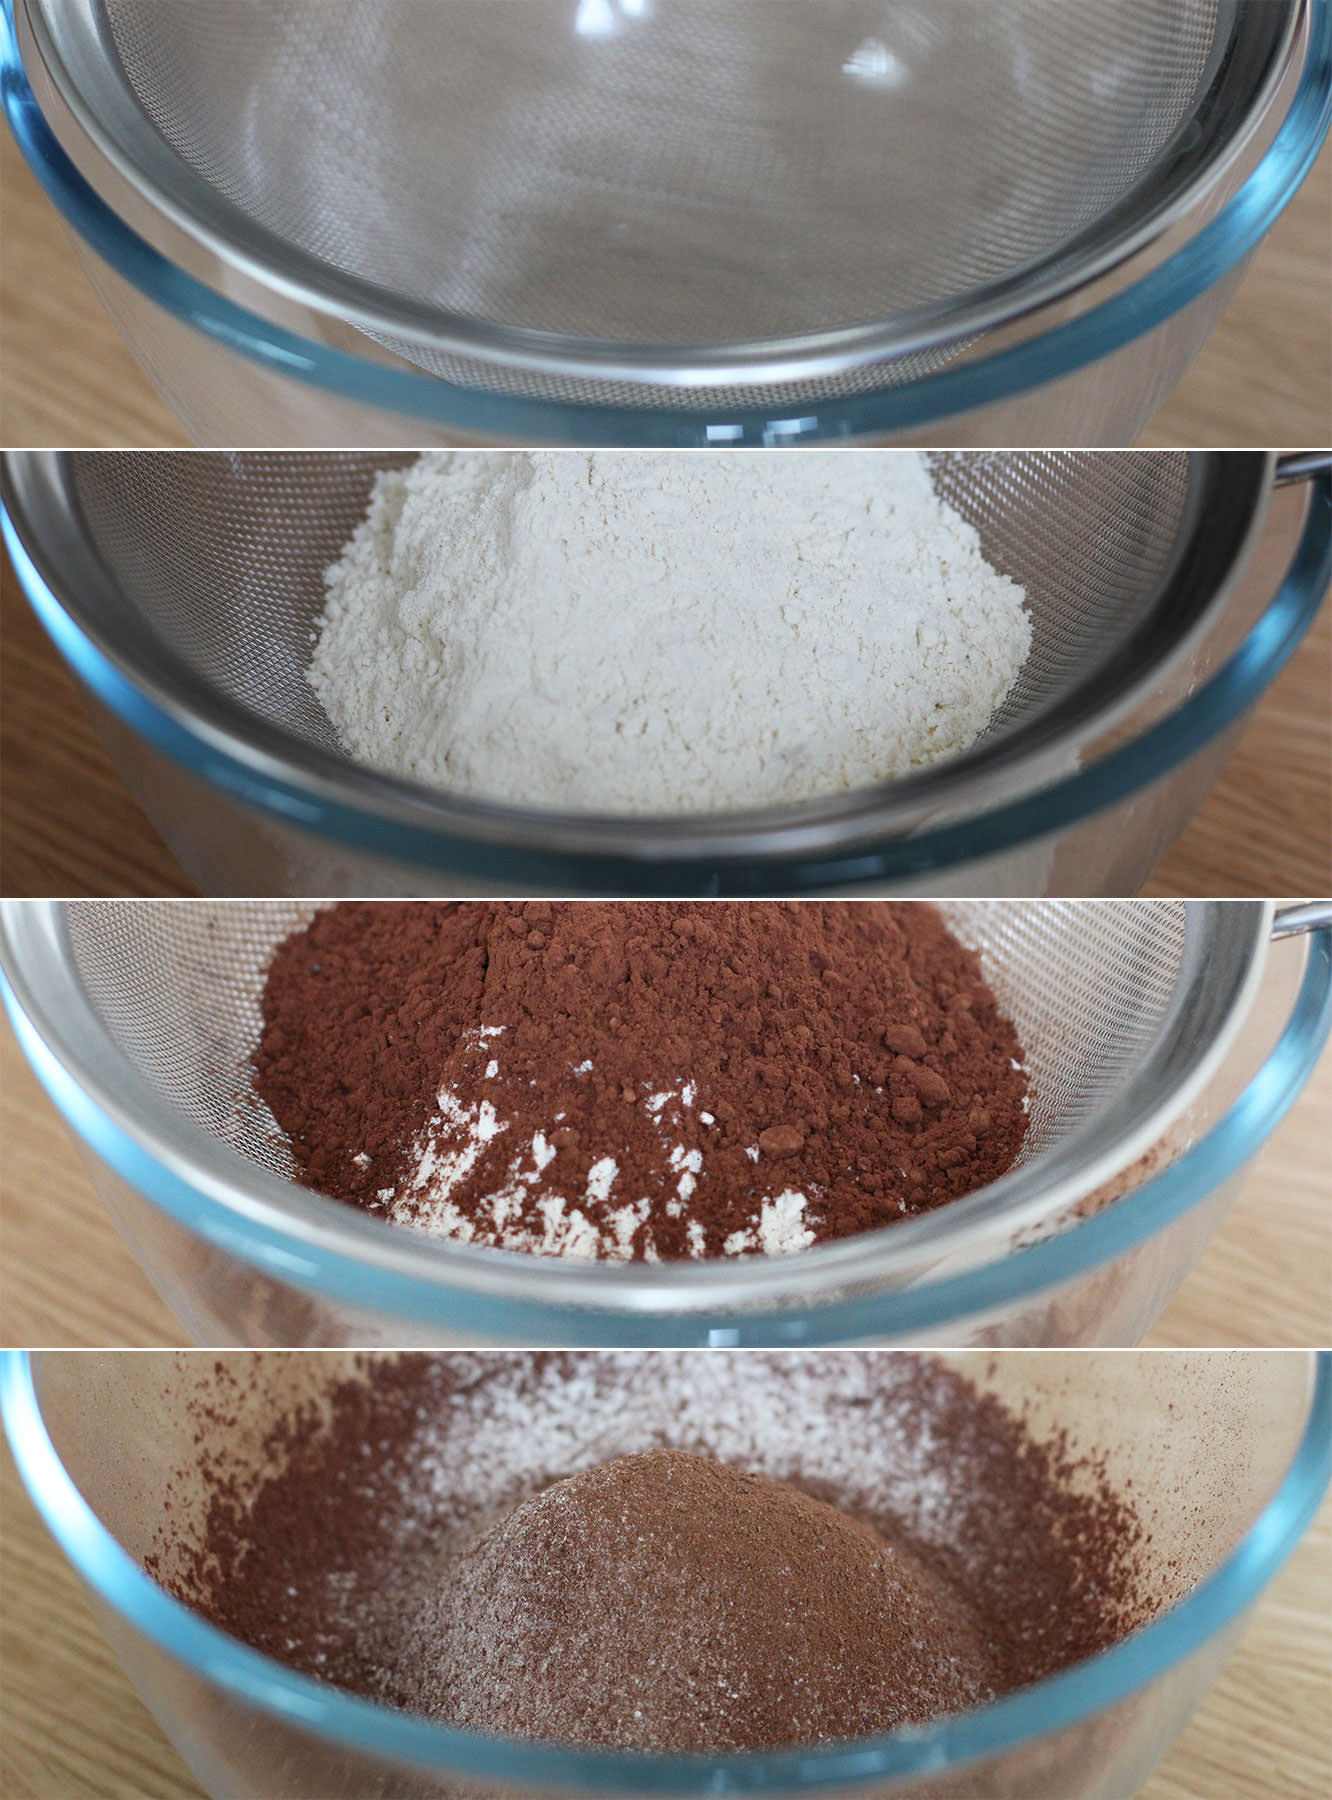
Step one
Sift together the cocoa powder and flour. Usually I’m not one of life’s sifters, but for this one you’ll want to; you don’t want to knock out all the air trying to get the lumps out of the flour.
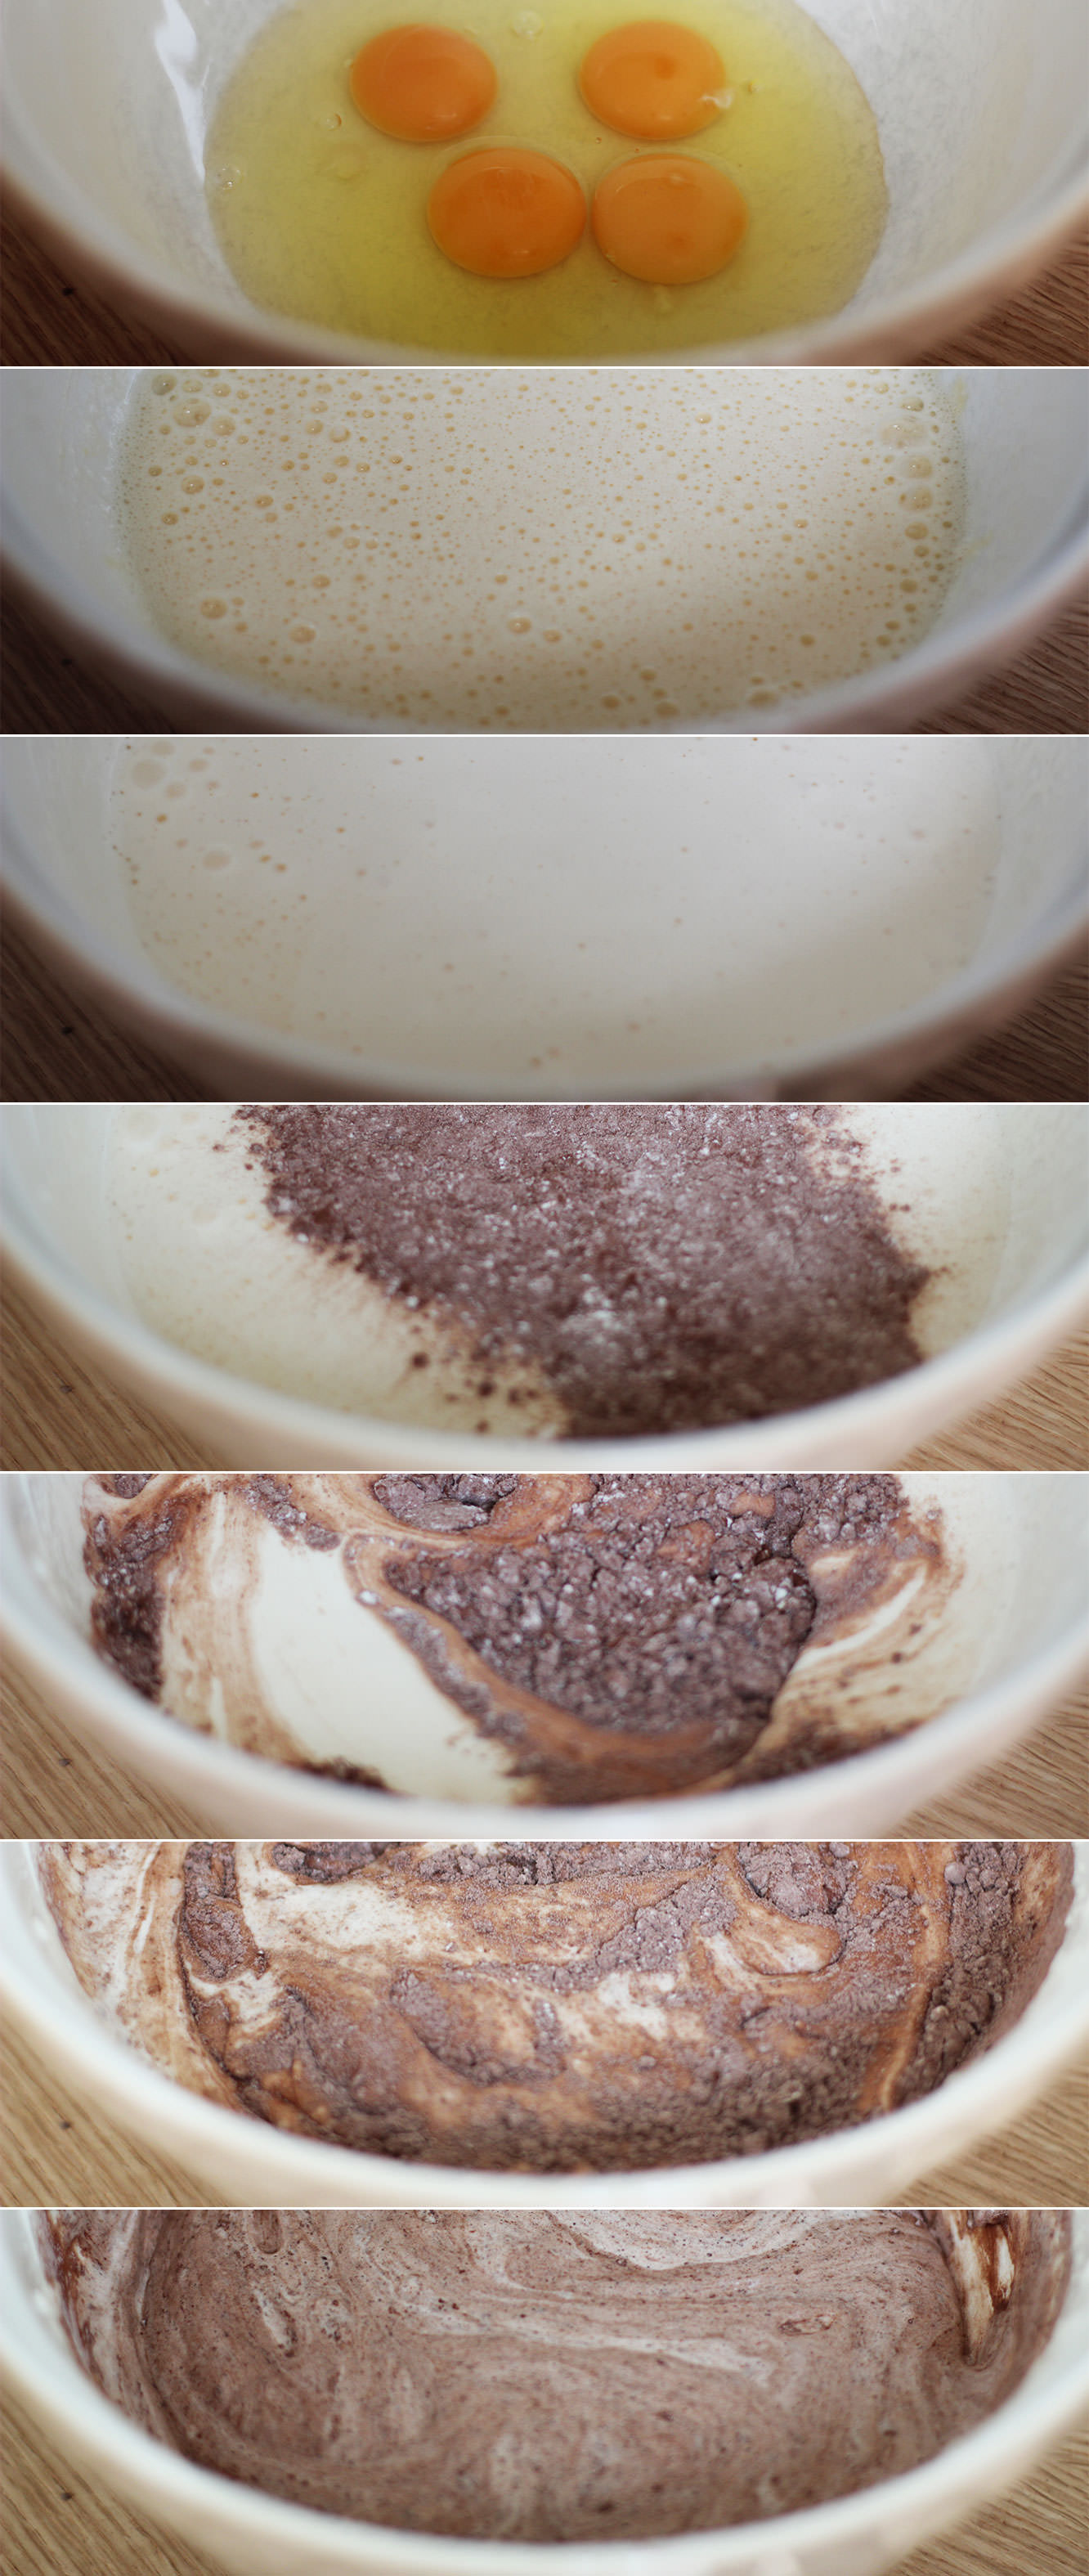
Step two
Whisk the four eggs until they are pale and shiny and so that the tracks of the whisk stay for a few seconds before sinking back into the main mixture.
Step three
Gently fold the flour and cocoa powder mix in two halves. Do this with a metal spoon and imagine you are stirring a bowl of baby kittens. Softly.
Ideally I guess it should all be one colour, but mine was still a little marbled and it didn’t seem to impact the bake.
Step four
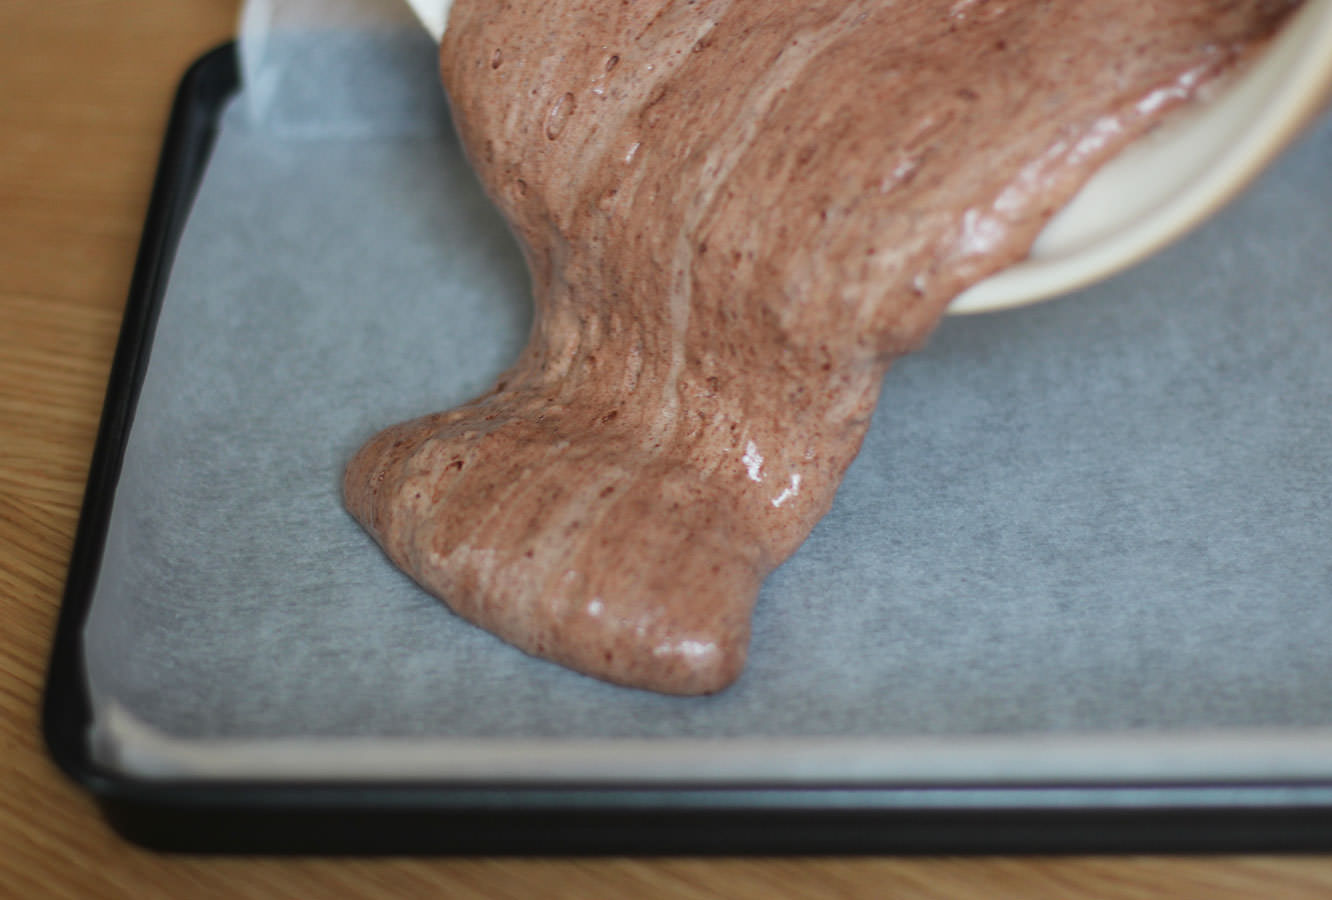
Slowly pour batter evenly across a lined tin. Mine’s not actually a swiss roll tin, it’s a bit bigger. Try not to knock any air out.
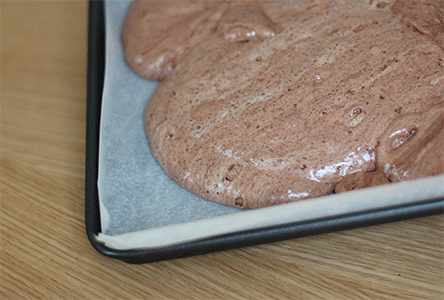
Step five
Tilt the tin to distribute the sponge mix as evenly as possible and get it right into the corners. You want to avoid spreading it with anything but you do need it to be as flat as possible on the surface. There’s no fat in this recipe to melt down and level everything off.
p.s. the GIF makes it look quicker than it is, be patient.
Step six
Bake in a preheated oven on 220C/ gas mark 7/ 450F for 10 minutes.
Step seven
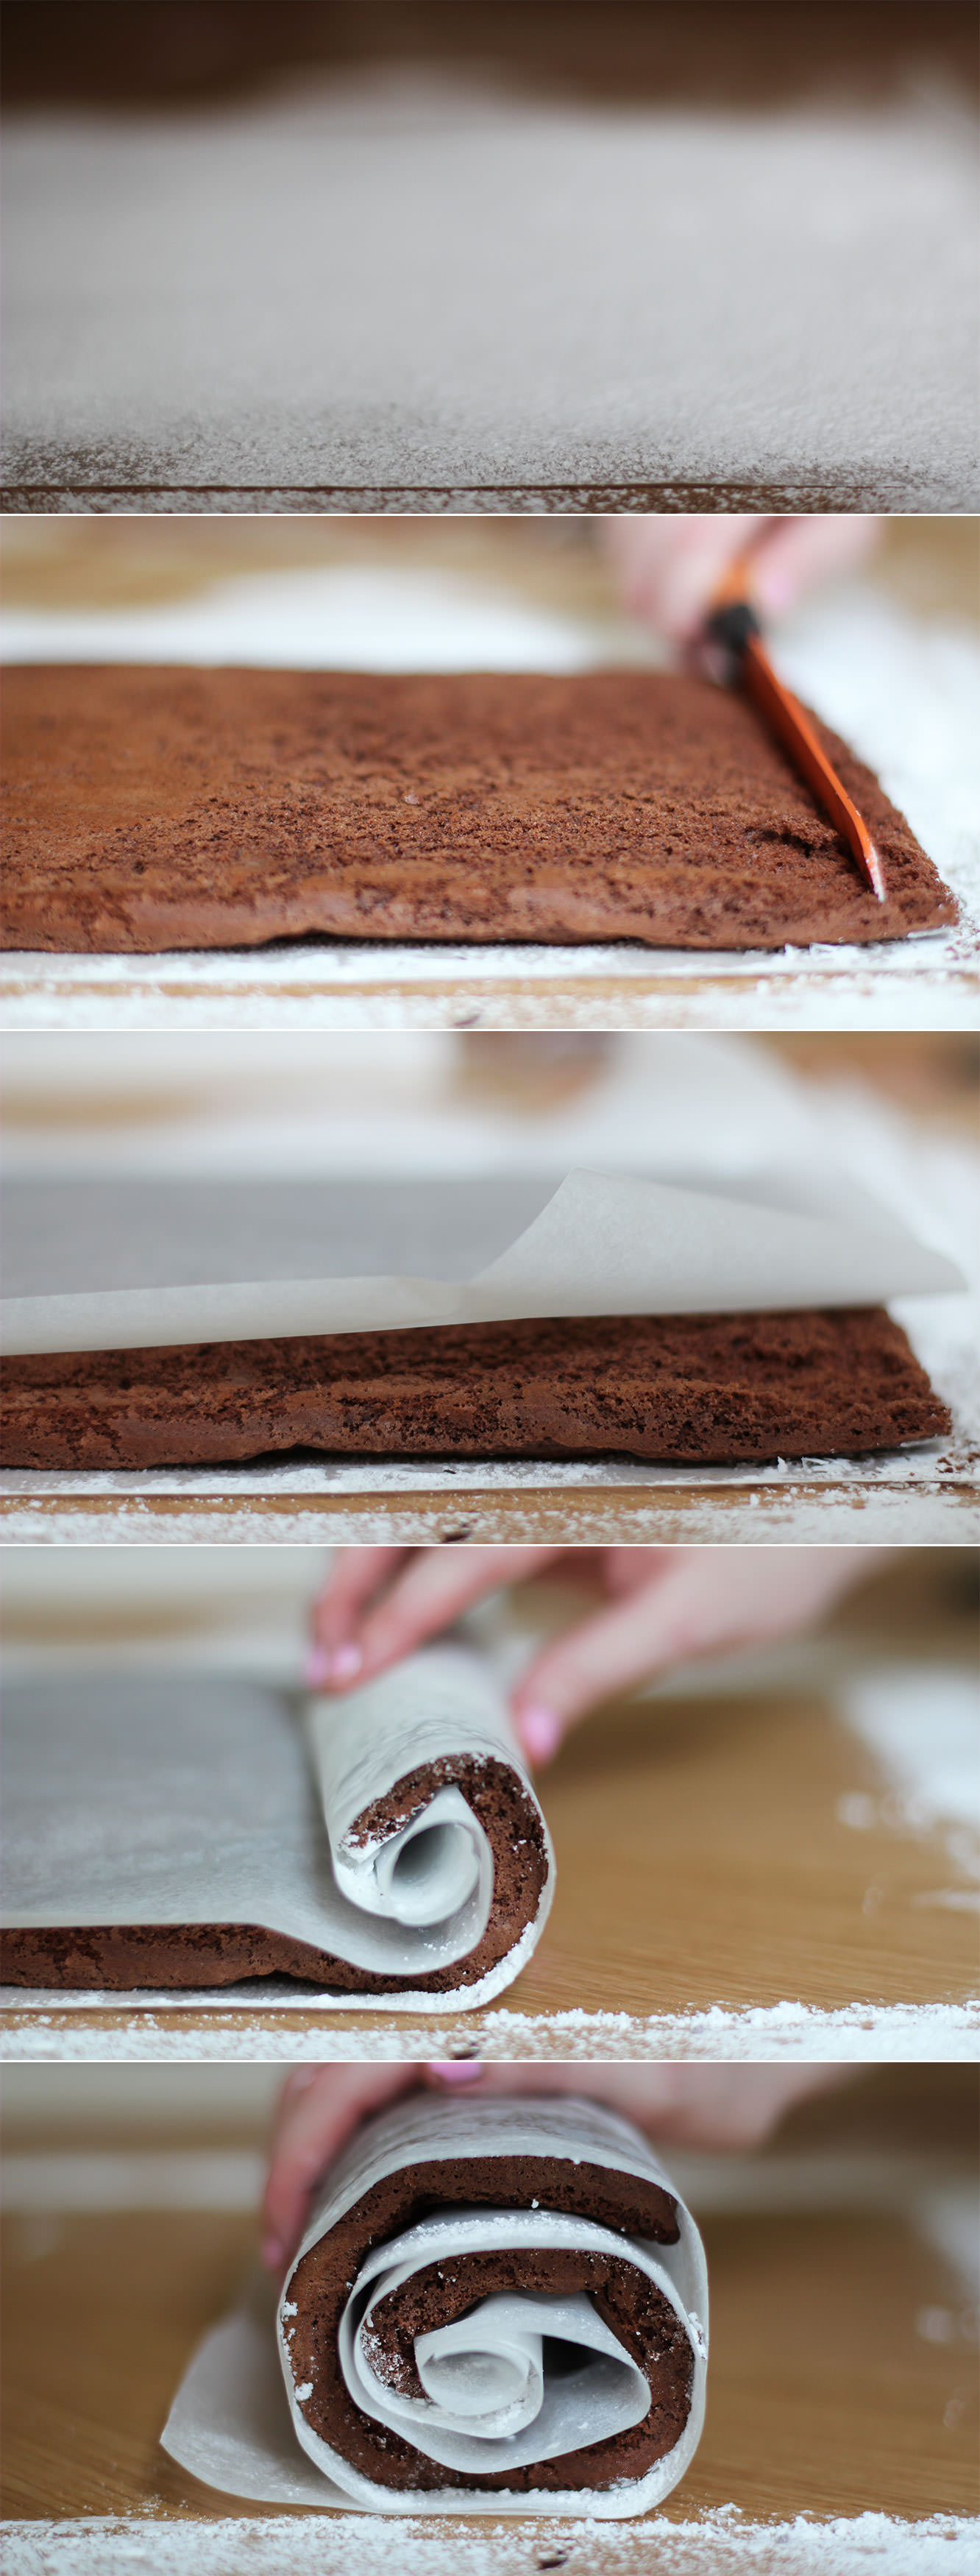
While the sponge is in the oven, dust a sheet of greaseproof paper with icing sugar.
Step eight
As soon as it’s finished cooking turn the sponge out onto the paper.
Cut a small groove about 1cm in from the edge to start the roll. Place another sheet of greaseproof on top and roll the cake up. Leave it to one side to cool.
Step nine
Move onto the mousse. In fact, probably do the mousse first, it needs a while to chill.
Separate the three eggs into two bowls and finely chop the chocolate.
Step ten
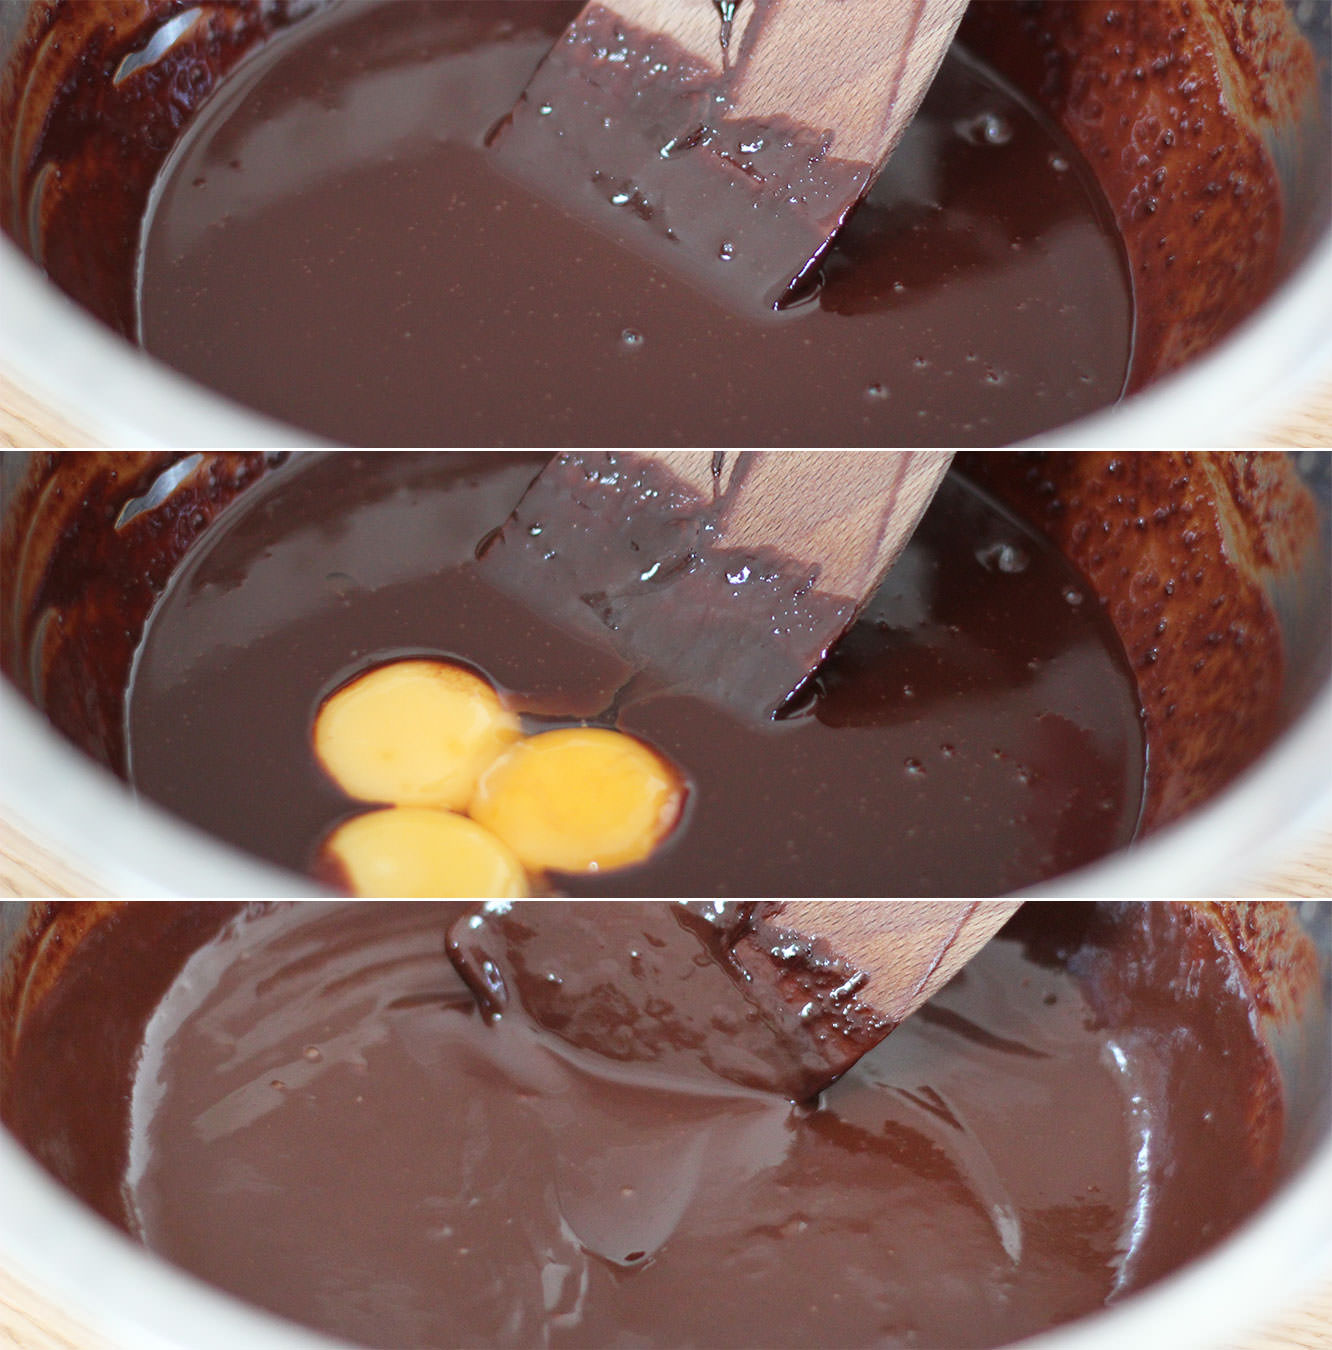
Place the chocolate and 90ml water in a heatproof bowl over a pan of simmering water until melted.
Allow to cool for 10 minutes and then stir in the egg yolks. The mixture will become thicker and should be glossy.
Step eleven
Whisk the egg whites into stiff peaks, add the caster sugar and whisk again until combined. You should be able to turn the bowl upside-down without it all falling out.
Step twelve
Place a spoonful of egg white into the chocolate and stir quickly to loosen the chocolate mix. Then add the rest and gently fold in with a metal spoon.
Put in the fridge for an hour or two, the longer the better really.
Step thirteen
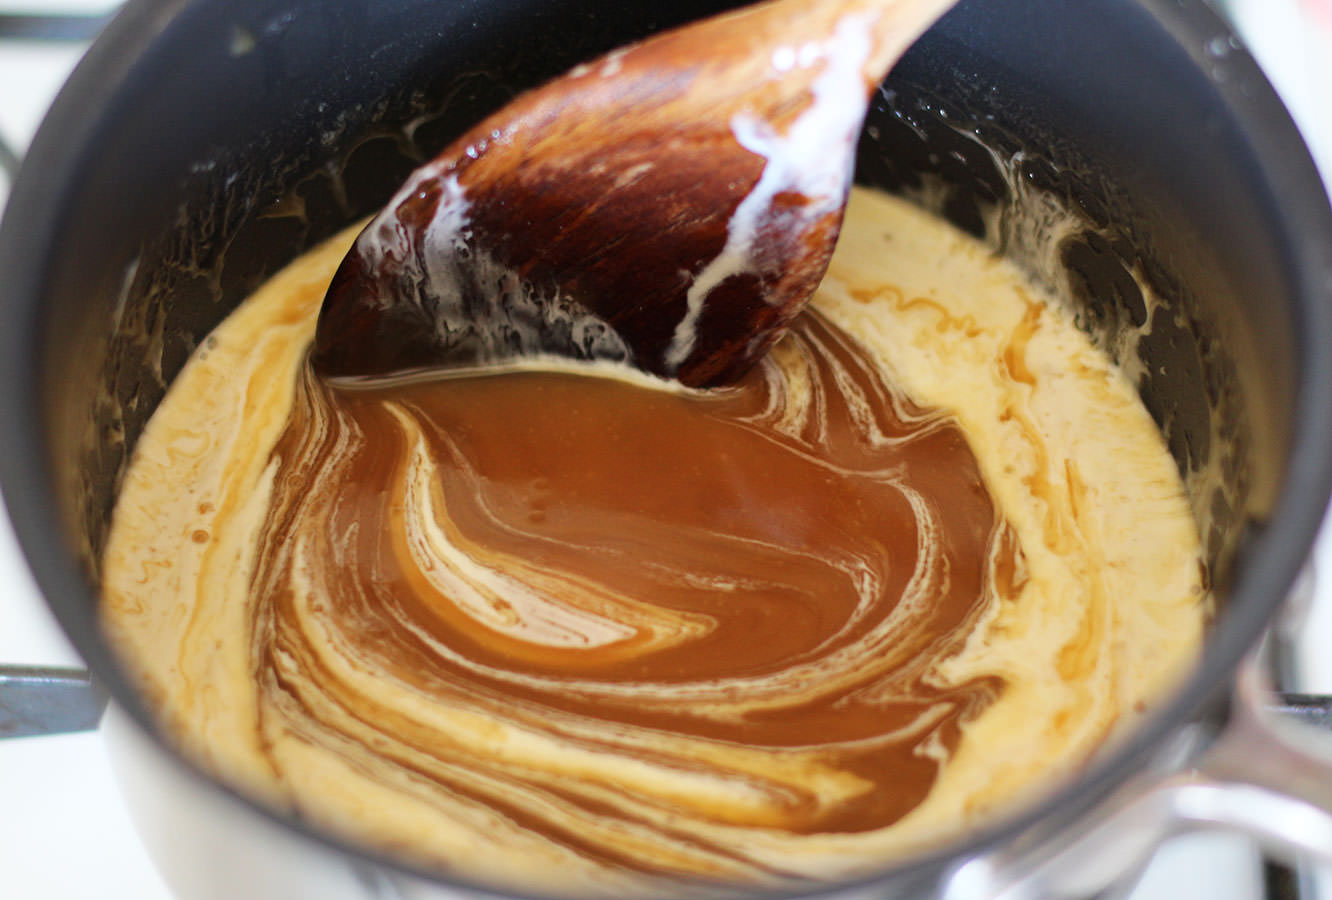
Make the salted caramel for the buttercream by melting together 100g of the butter, the brown sugar, golden syrup and salt. Do this slowly and then bring the heat up to a simmer.
Simmer for 10 minutes. Stir regularly so that it doesn’t catch and burn. Leave to cool down for about half an hour or so.
If you think you’ve seen this before, you have, this is about the 5th time I’ve used this salted caramel recipe.
Step fourteen
Once the caramel has cooled down a bit, stir in the 100ml of cream. Set to one side and make the buttercream.
Step fifteen
With an electric whisk beat together the rest of the butter and the icing sugar. Cover with a tea towel to begin with, or you will wind up looking like a cloud.
Step sixteen
Add the salted caramel to the buttercream and whisk. Voila. Place in fridge for at least 15 minutes until cooled completely.
Step seventeen
Once the chocolate mousse is set get ready to assemble.
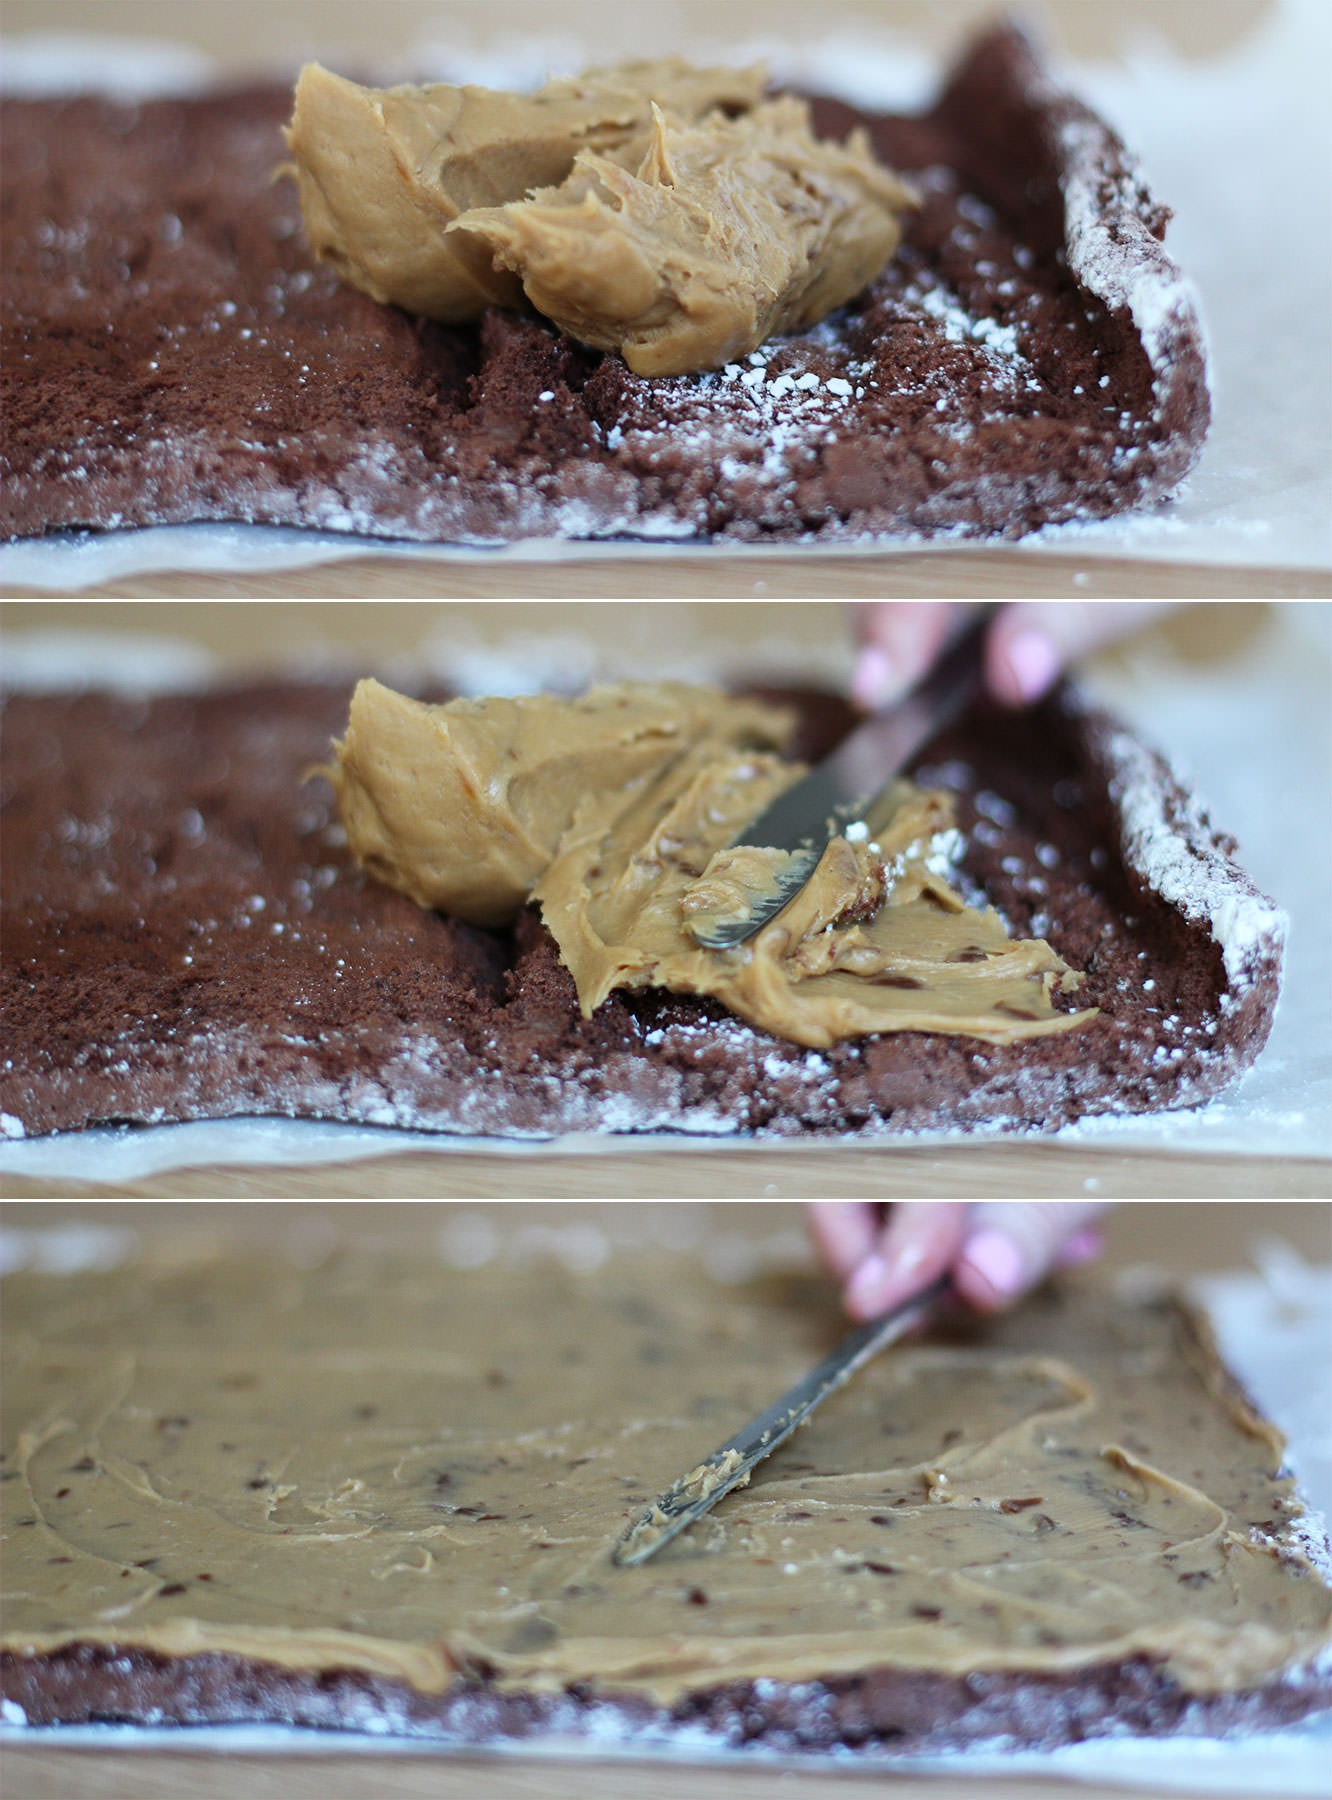
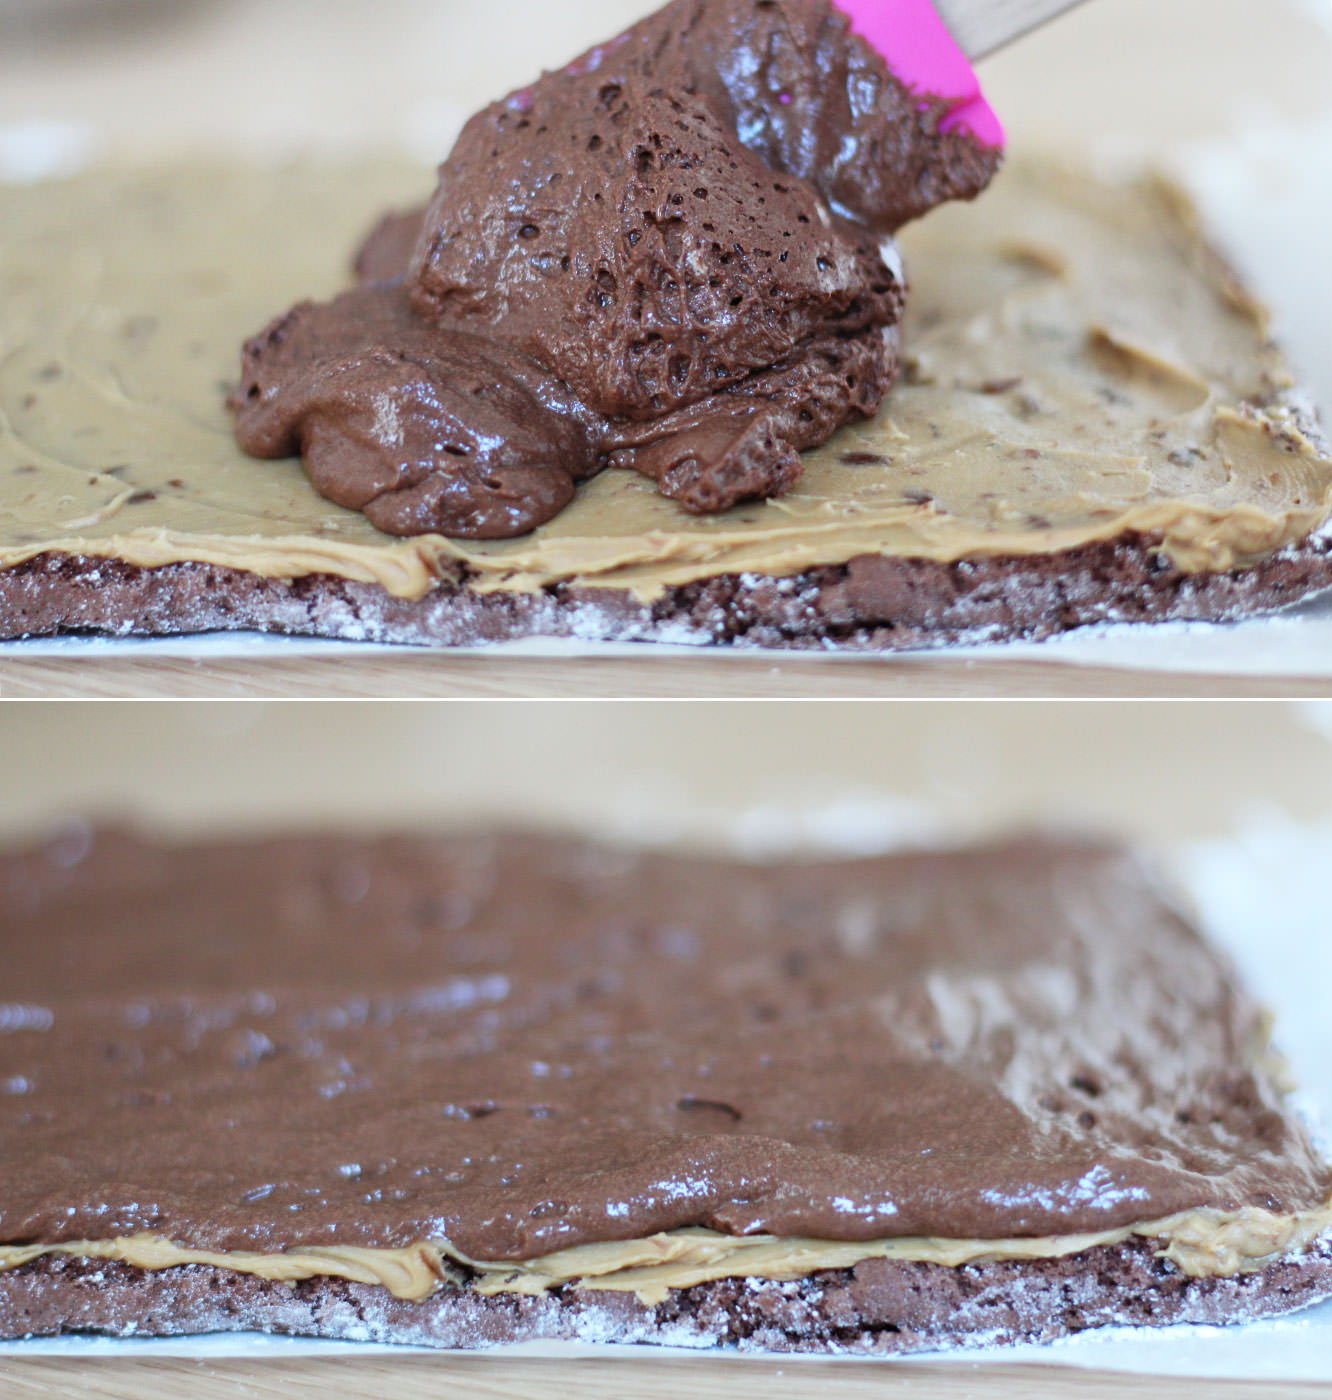
Unroll the sponge and spread a layer of caramel over the surface. I didn’t use all the buttercream so go with what feels right. I used the rest of it up on some cupcakes. Apparently I want my housemates to be obese.
If you’re wondering why mine looks darker than yours it’s because I used dark soft brown sugar and cooked it for too long.
Step eighteen
Spread the mousse over, try to keep air in it if you want, but you’ll abandon all hope fairly soon.
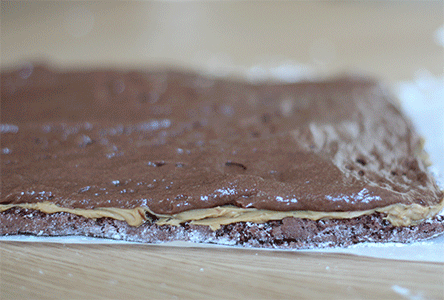
Step nineteen
Using the greaseproof paper roll the roulade up. Now. I probably didn’t get my first bit tight enough, but regardless, this bit ain’t pretty. Just do it, put it on a chopping board/tray put it back in the fridge and don’t think about it.
Seriously. The mousse will splurge a lot a bit. Pretend it never happened.
Step twenty
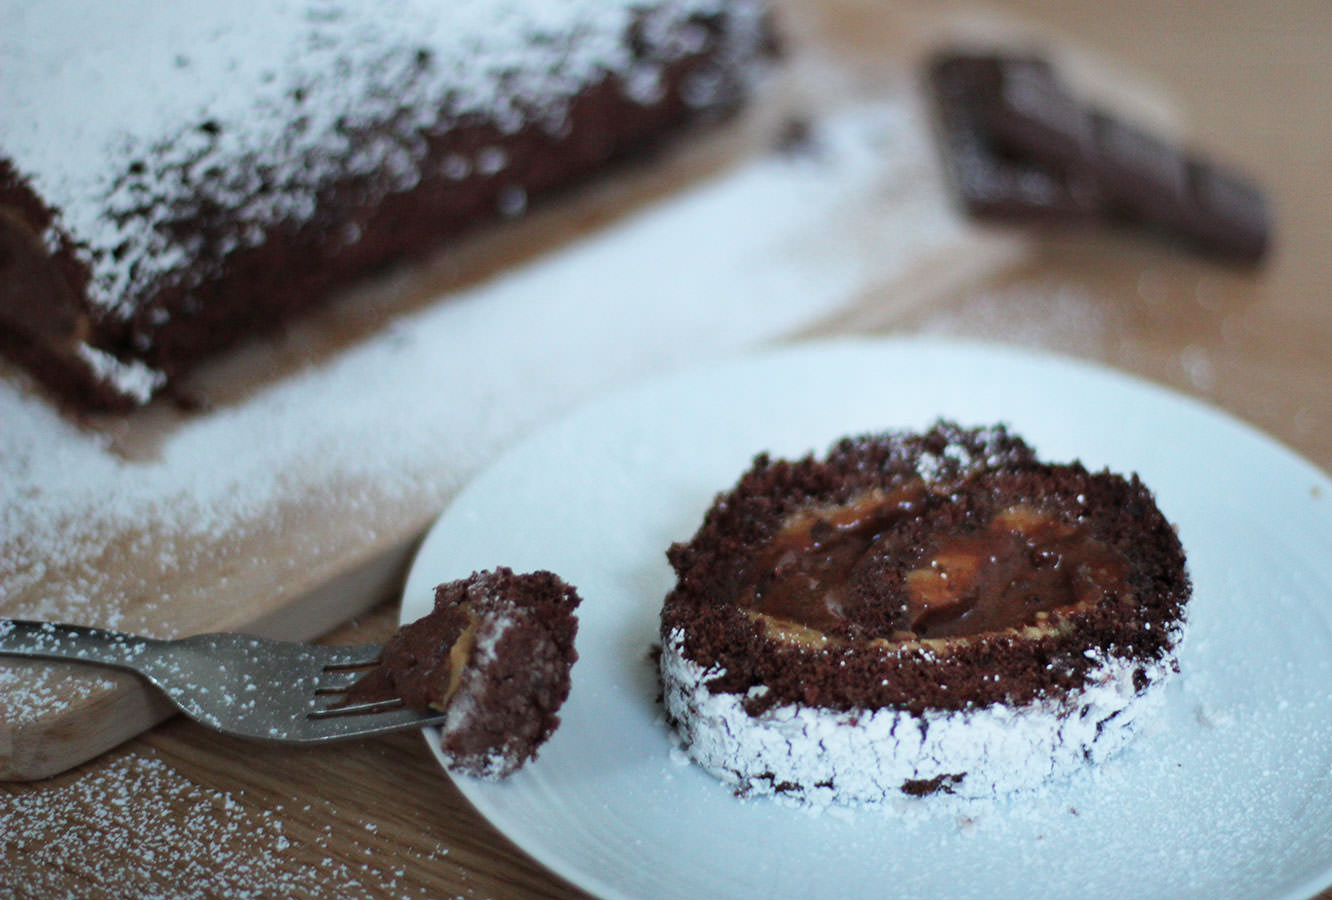
After about an hour or so in the fridge the mousse will have firmed up again. You can take it out, wipe away any excess filling and dust some more icing sugar over it.
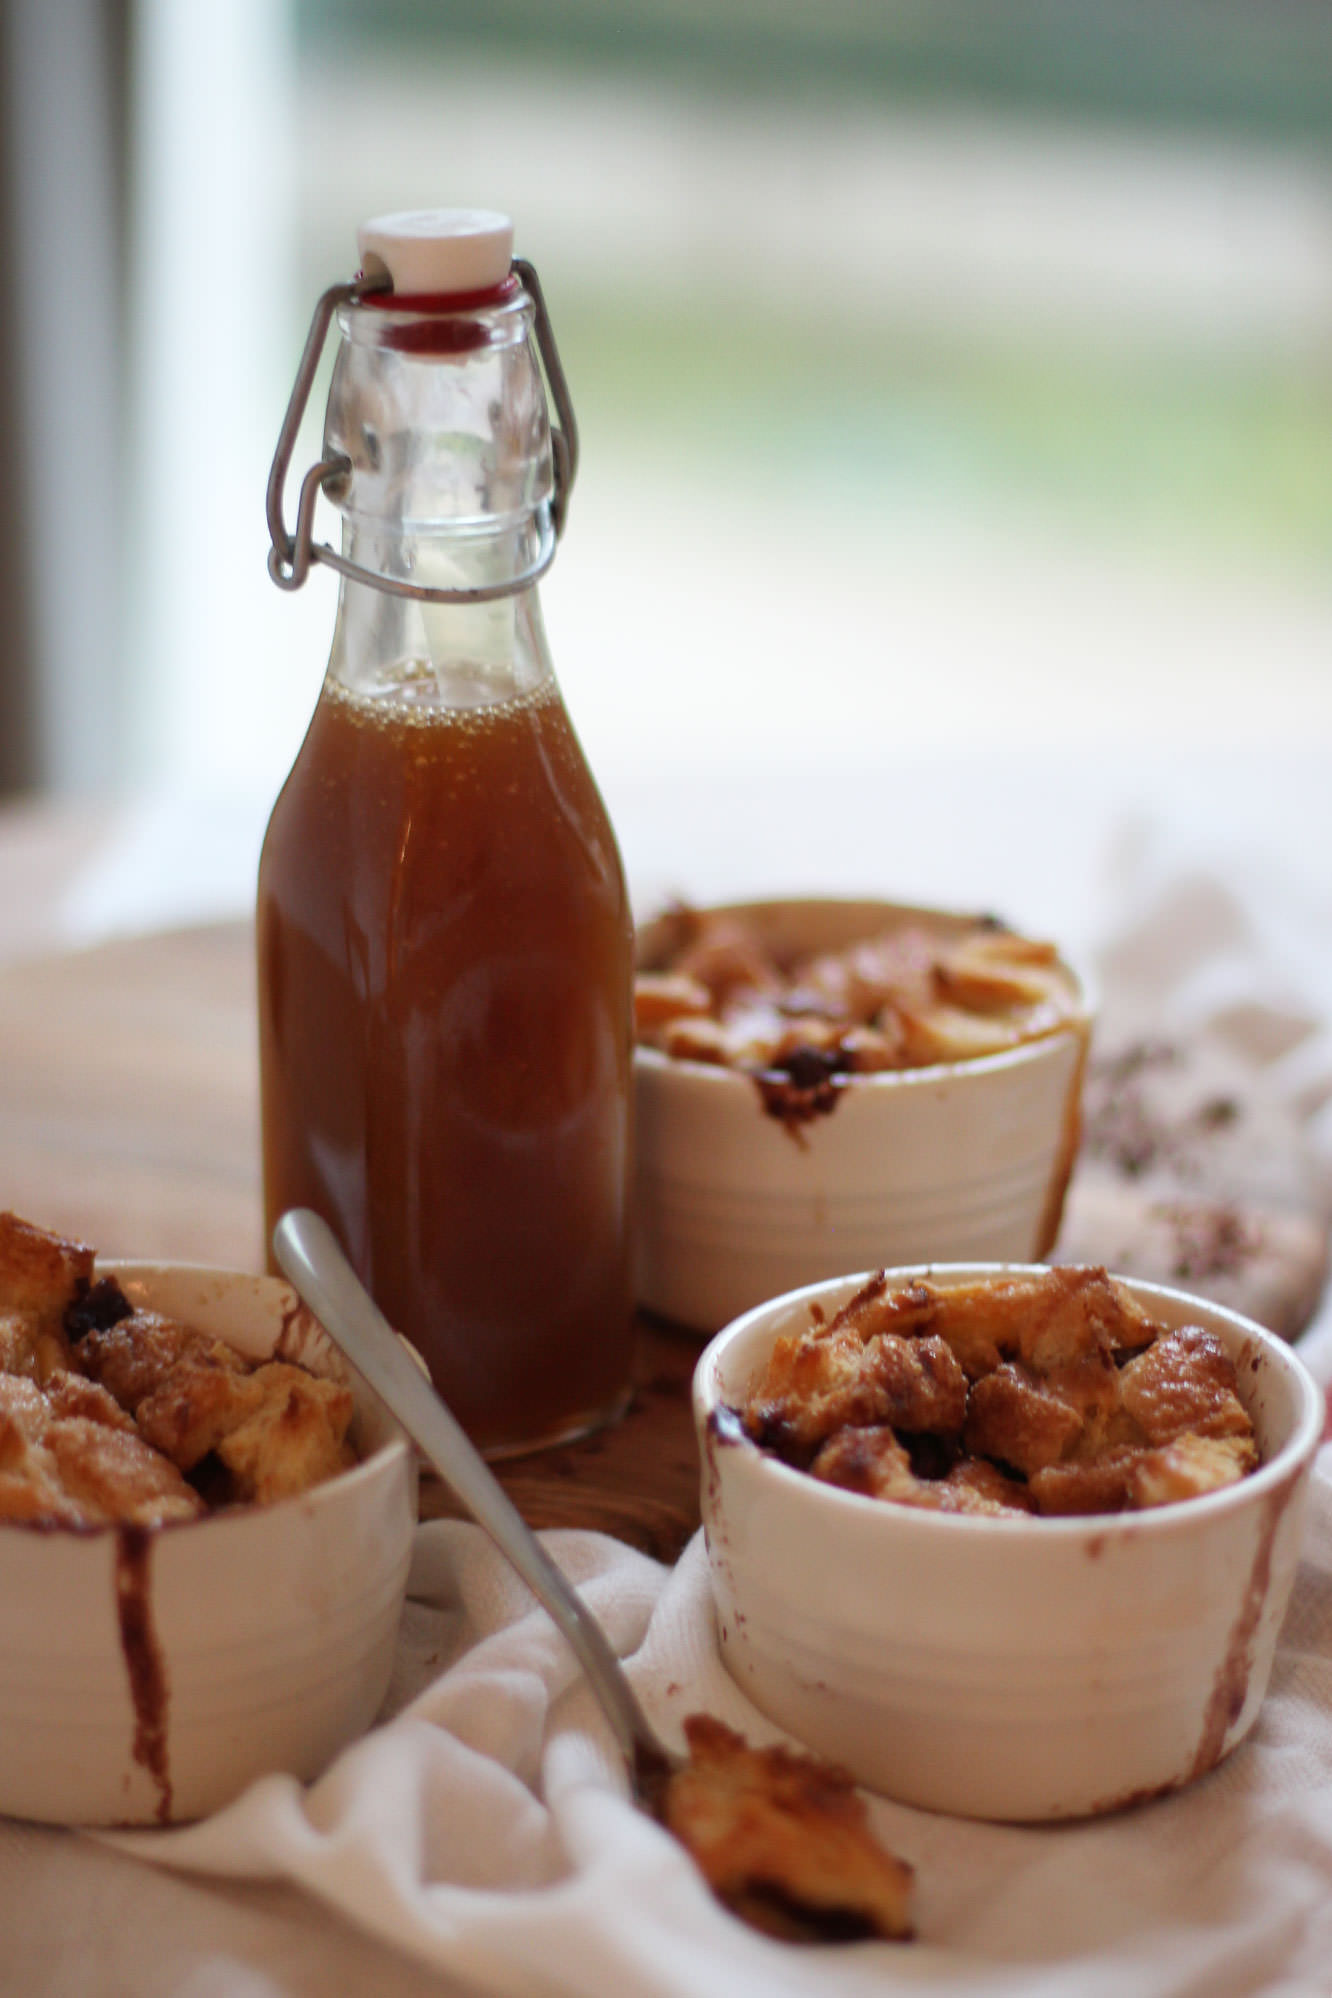
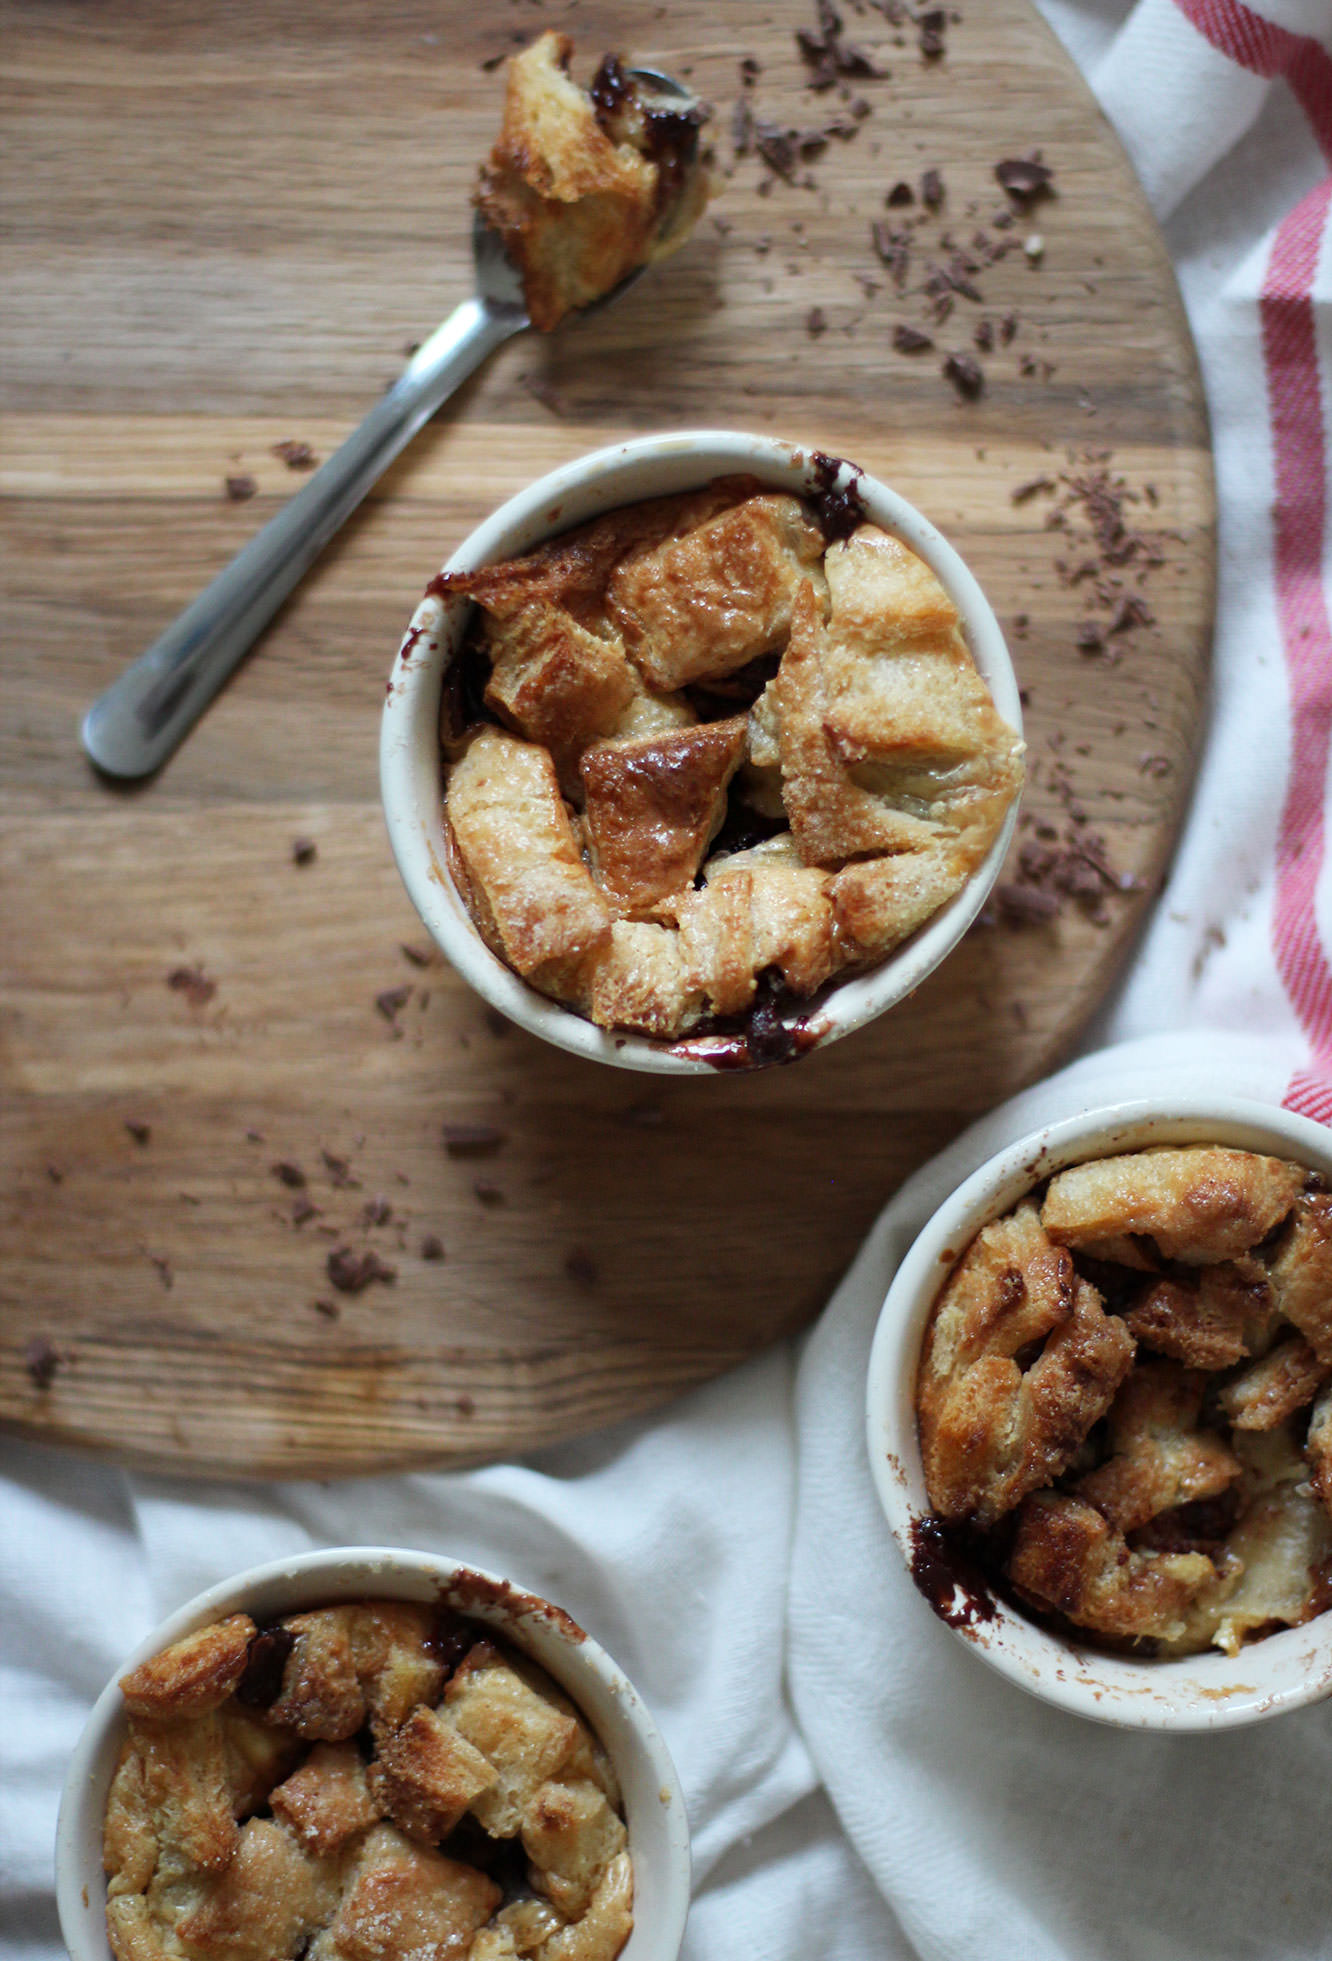
This week a cheap and cheerful bake was on the cards for everyone out there cutting costs this January. The perfect pudding to blast away those winter blues. I apologise in advance for laughing in the face of all your 2015 diets, but if you’re going to break them, this is a great way to do so.
This recipe is ideal for people who doubt their skills in the kitchen, I’ll be seriously impressed if you managed to mess this one up. Send me photos if you do.
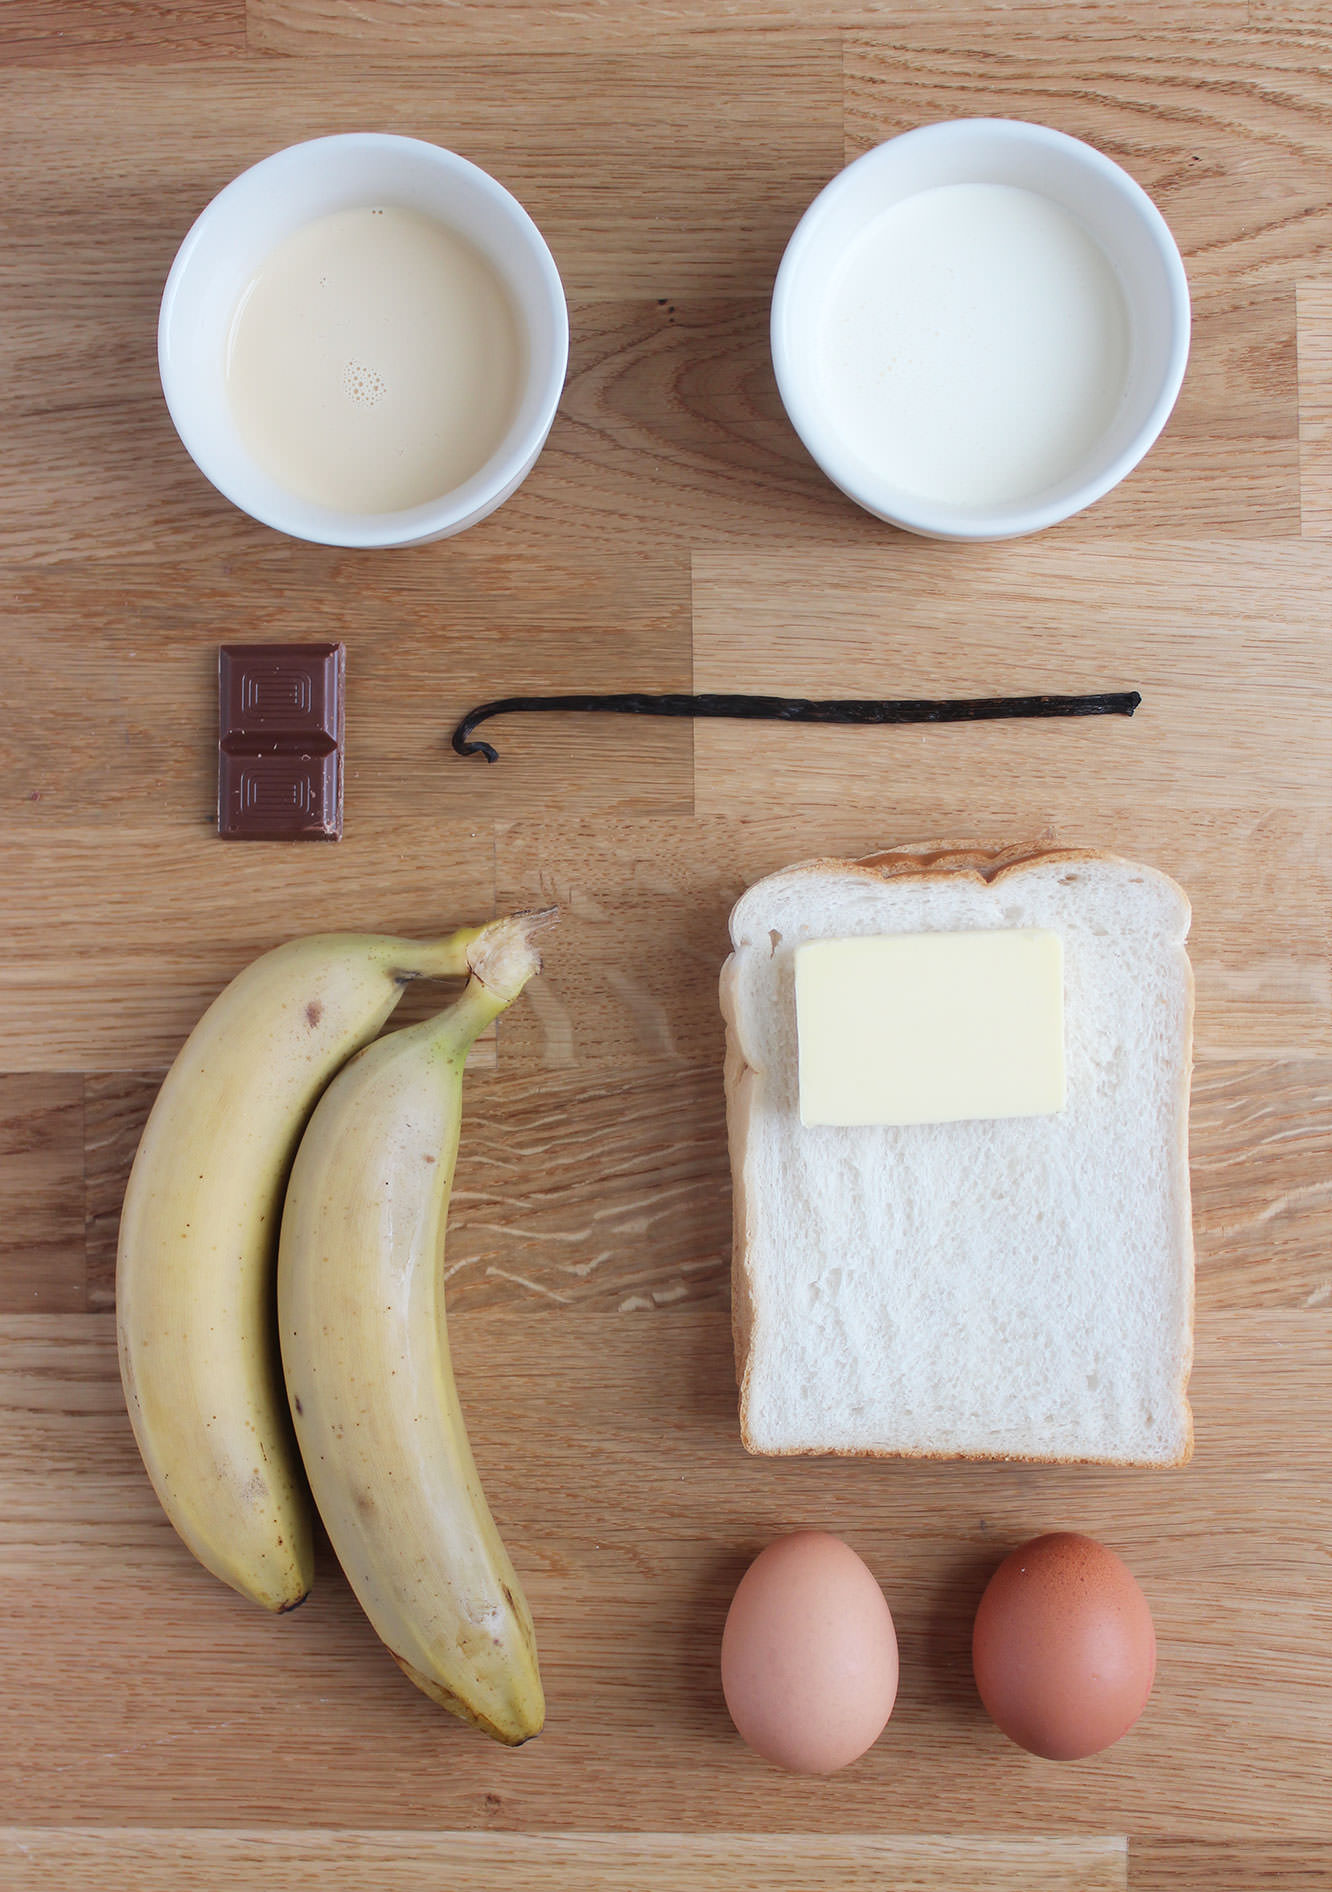
You will need
For the pudding:
500ml/17 fl oz Double cream
100ml/3.5 fl oz Condensed milk
2 Eggs
Vanilla pod/2 tsp Vanilla extract
100g/3.5 oz Dark/Milk chocolate
50g/2 oz Soft brown sugar
6 – 8 Slices white bread (let’s be honest, you will need to get a loaf anyway, and I wasn’t counting properly)
3 Bananas
Butter for spreading
Ramekins if you’re feeling a bit posh.
For the salted caramel:
100g/3.5 oz Salted butter
80g/3 oz Soft brown sugar
100ml/3.5 fl oz Double cream
2 tbsp Golden syrup
2 tsp Salt
(Makes 6)
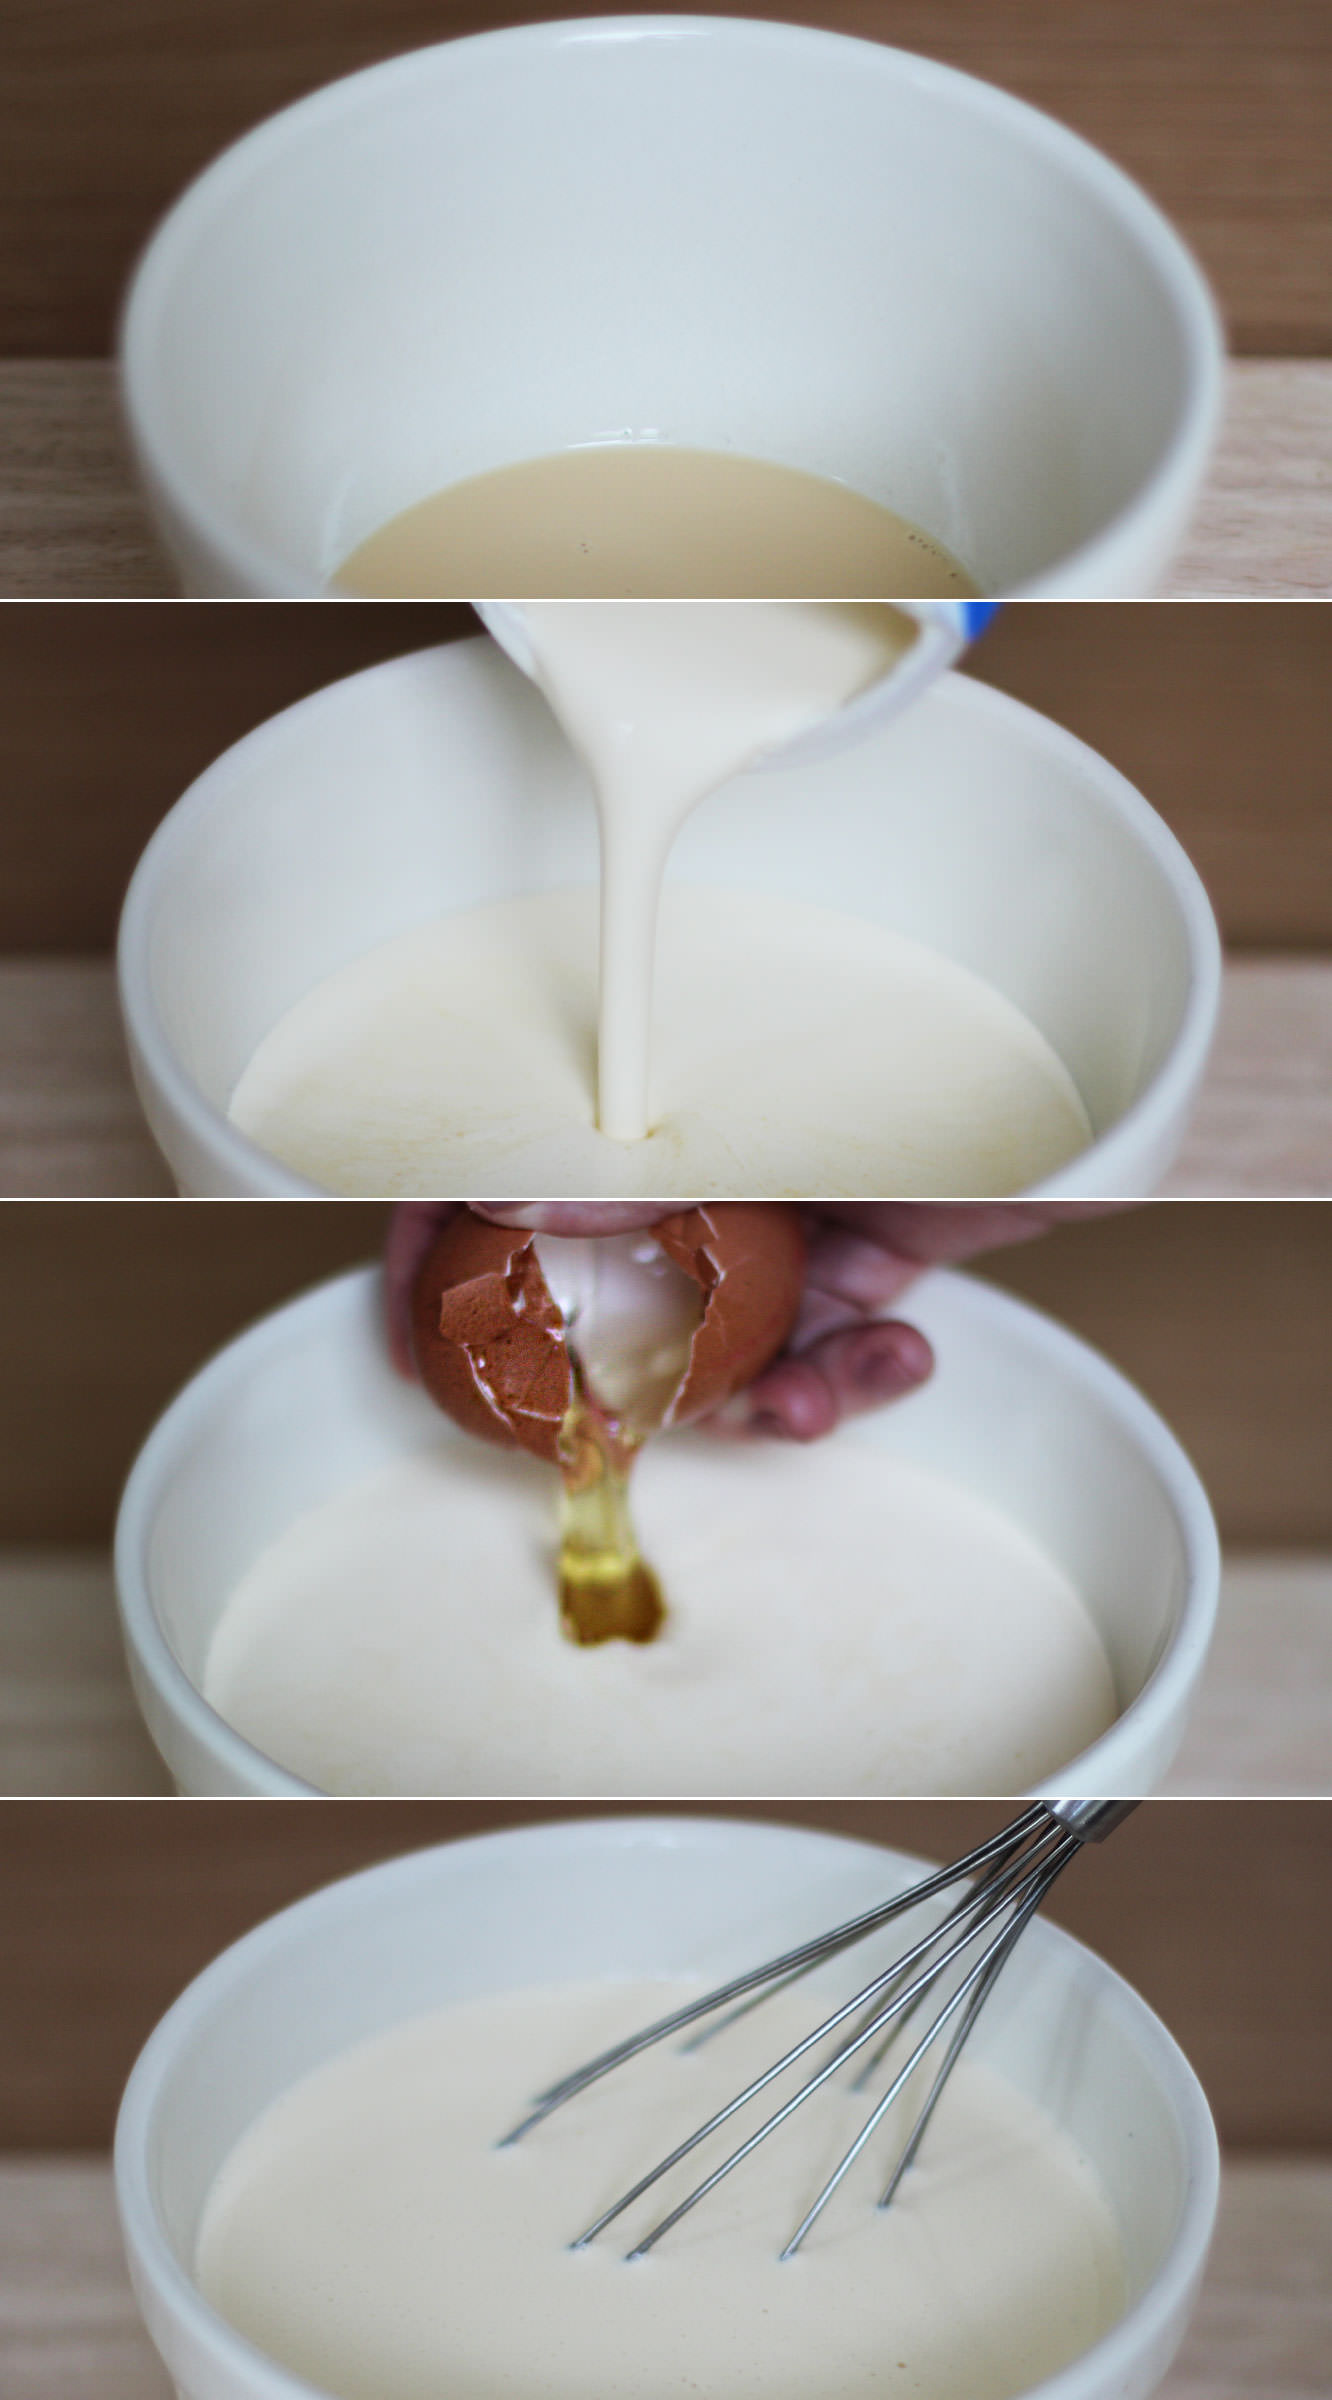
Step one
Whisk together the cream, condensed milk, vanilla and eggs. Set aside, and try not to think about how much cream that was.
Step two
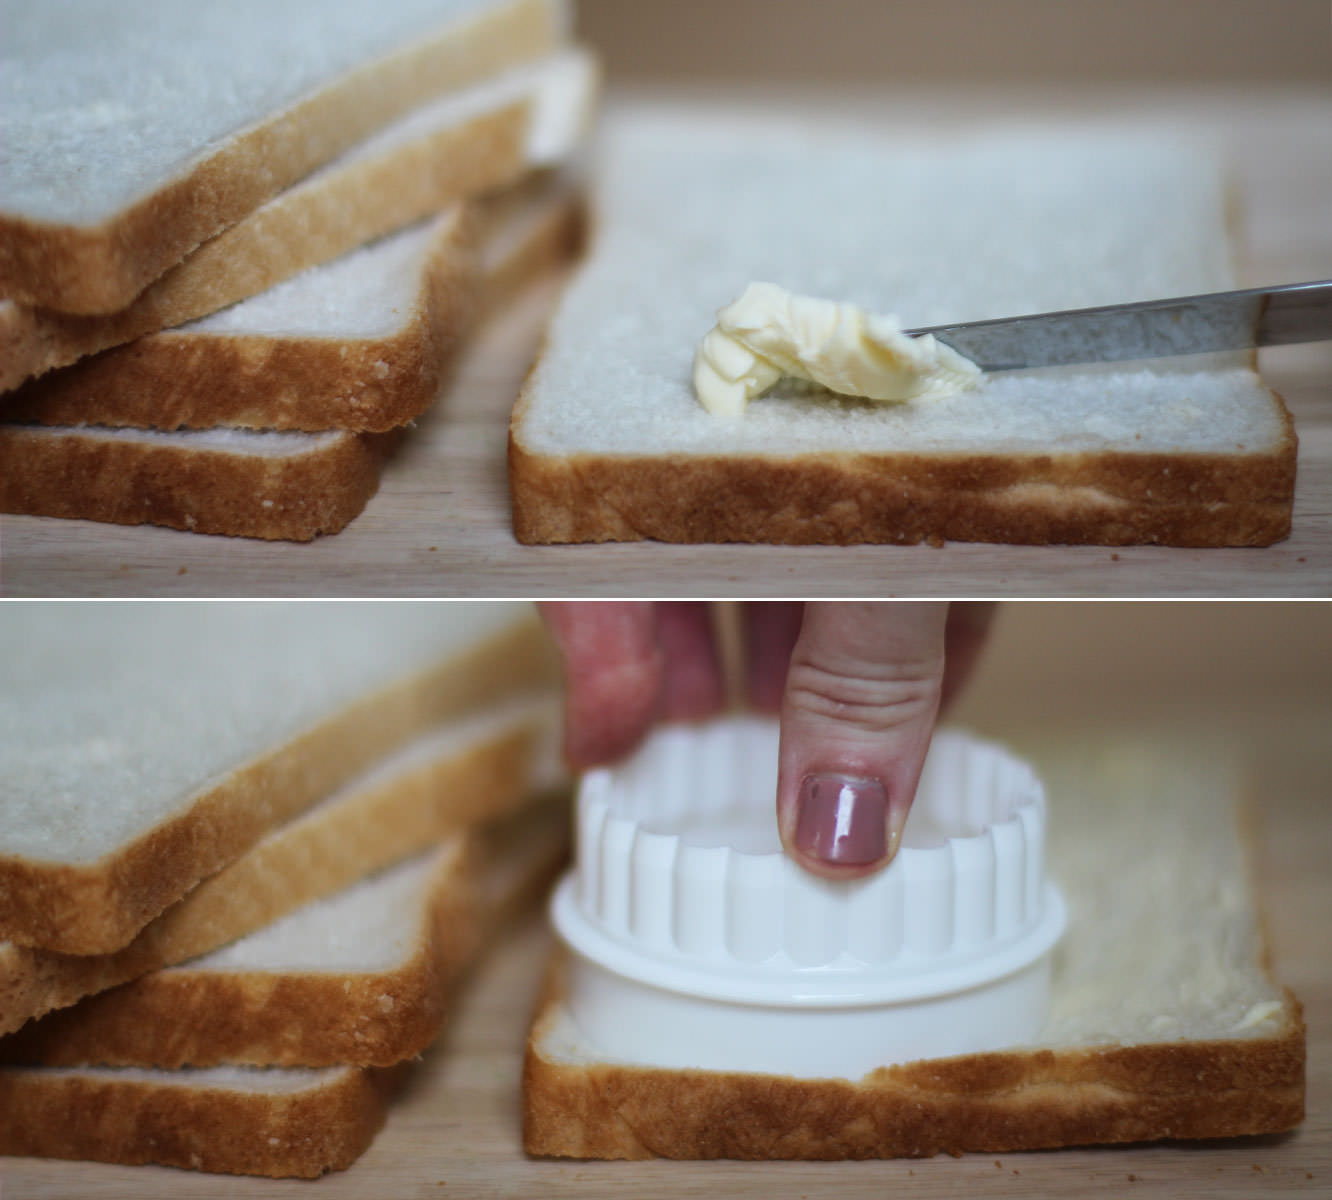
Butter the bread slices generously. I just used regular spreadable butter for this, but if you’re a purest you could buy unsalted.
Using a cutter that’s the same diameter as your ramekins, cut circles out of the bread. Chop the offcuts into small pieces and leave to one side.
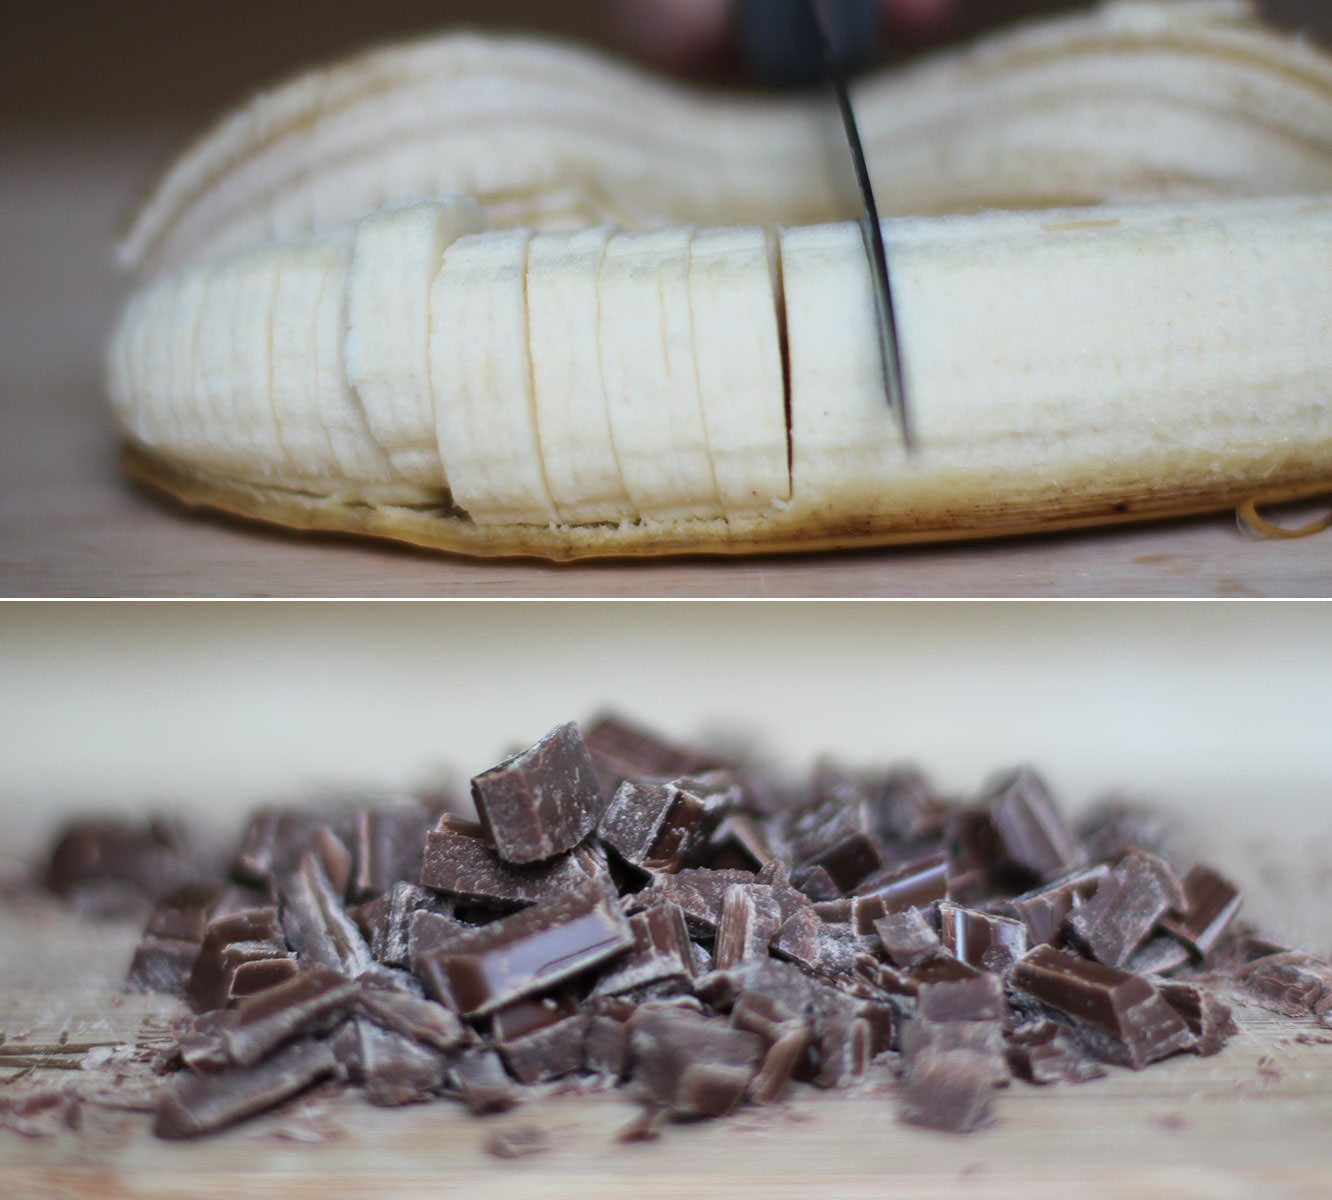
Step three
Slice the banana into thin pieces and chop the chocolate into small chunks (as if I haven’t said it enough – a bread knife is the best way to do this).
Step four
Assemble!
Butter the ramekins and layer up the puddings. Bread, banana, chocolate, sugar, repeat. Finish the last layer with bread using the offcuts and sprinkle some caster sugar on top, this will make a lovely crisp topping.
Step five
Once all the ramekins are layered up, pour the custard mixture on top, try to fill them evenly.
Leave to sit for 20 minutes to let the custard soak into the bread.
Step six
Bake in a pre-heated oven for 35 minutes on 180C/350F/gas mark 4.
Step seven
While you are baking the puddings, place all the ingredients for the salted caramel into a saucepan (minus the cream).
Heat gently until melted and then bring to a simmer. Simmer for 10 minutes. Stir regularly so that it doesn’t catch and burn. Leave to cool for about half an hour.
Step eight
Once cooled, stir in the 100ml double cream.
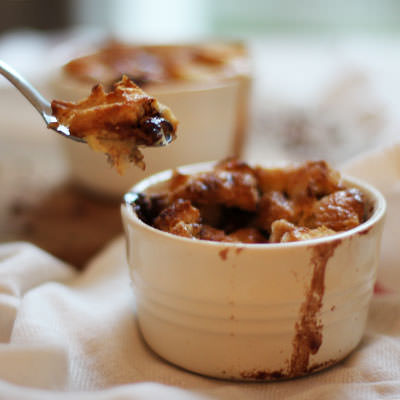
Not the prettiest things but they aren’t too shabby to eat. Bon apetit!
Chaps! Welcome back, apologies for my prolonged absence. Holidays have been had, possessions been moved, and I’m back online.
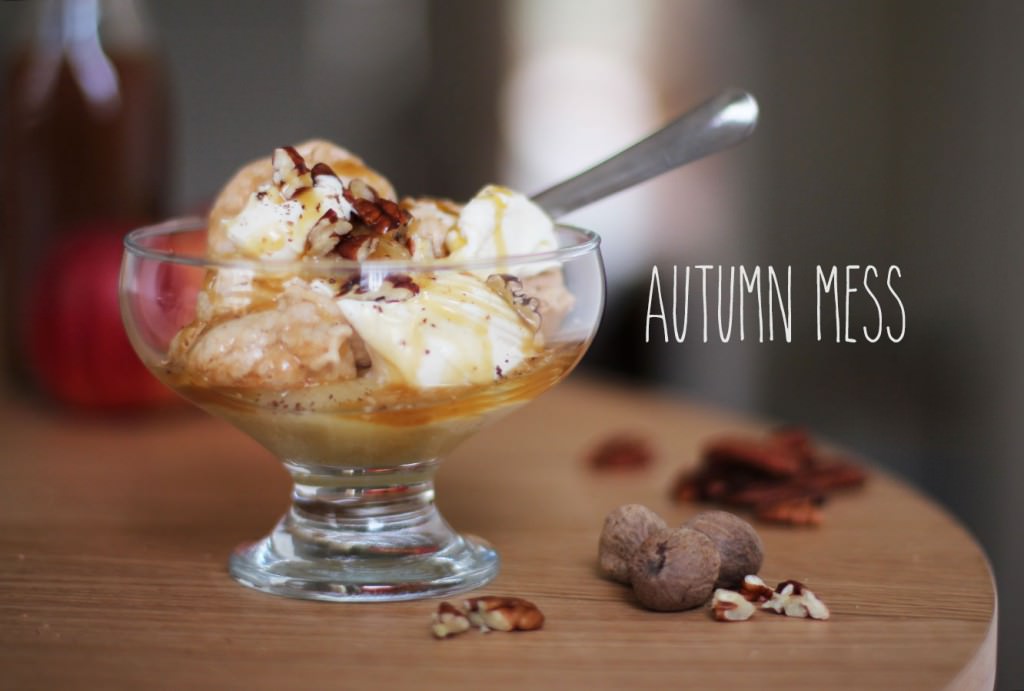
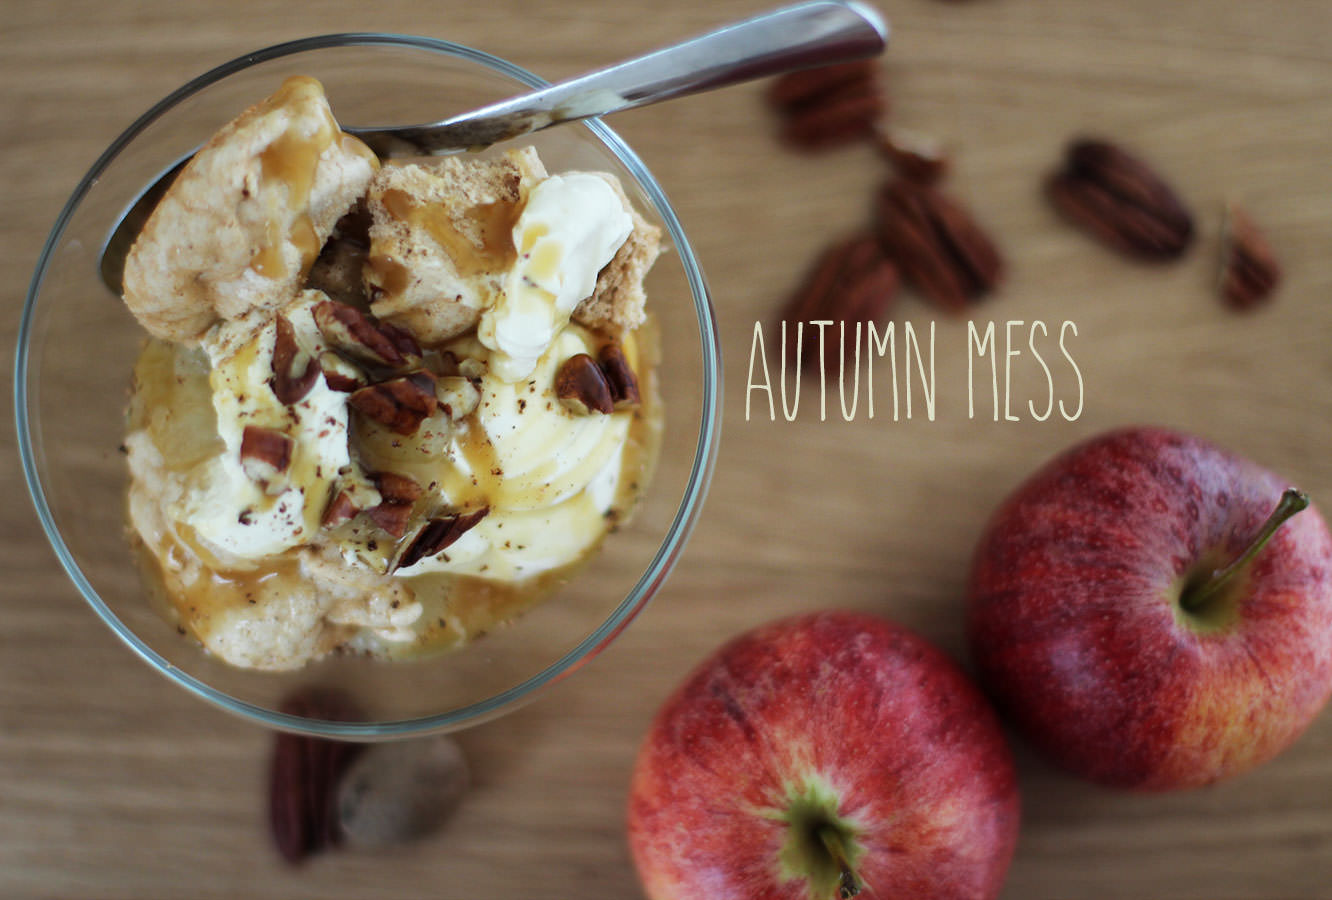
Still riding high on my summer vacay, everything I thought of for this post was just not seasonal. Autumn is my favourite season usually, but, quite out of character, I’ve actually enjoyed summer this year. To get myself into a cosy autumnal mood I decided to turn an old summer favourite – Eton Mess – into a pudding perfect for fall.
I present Autumn Mess (or Fall Mess, I guess, if you’re across the pond, but that sounds a bit too much like a road traffic accident).
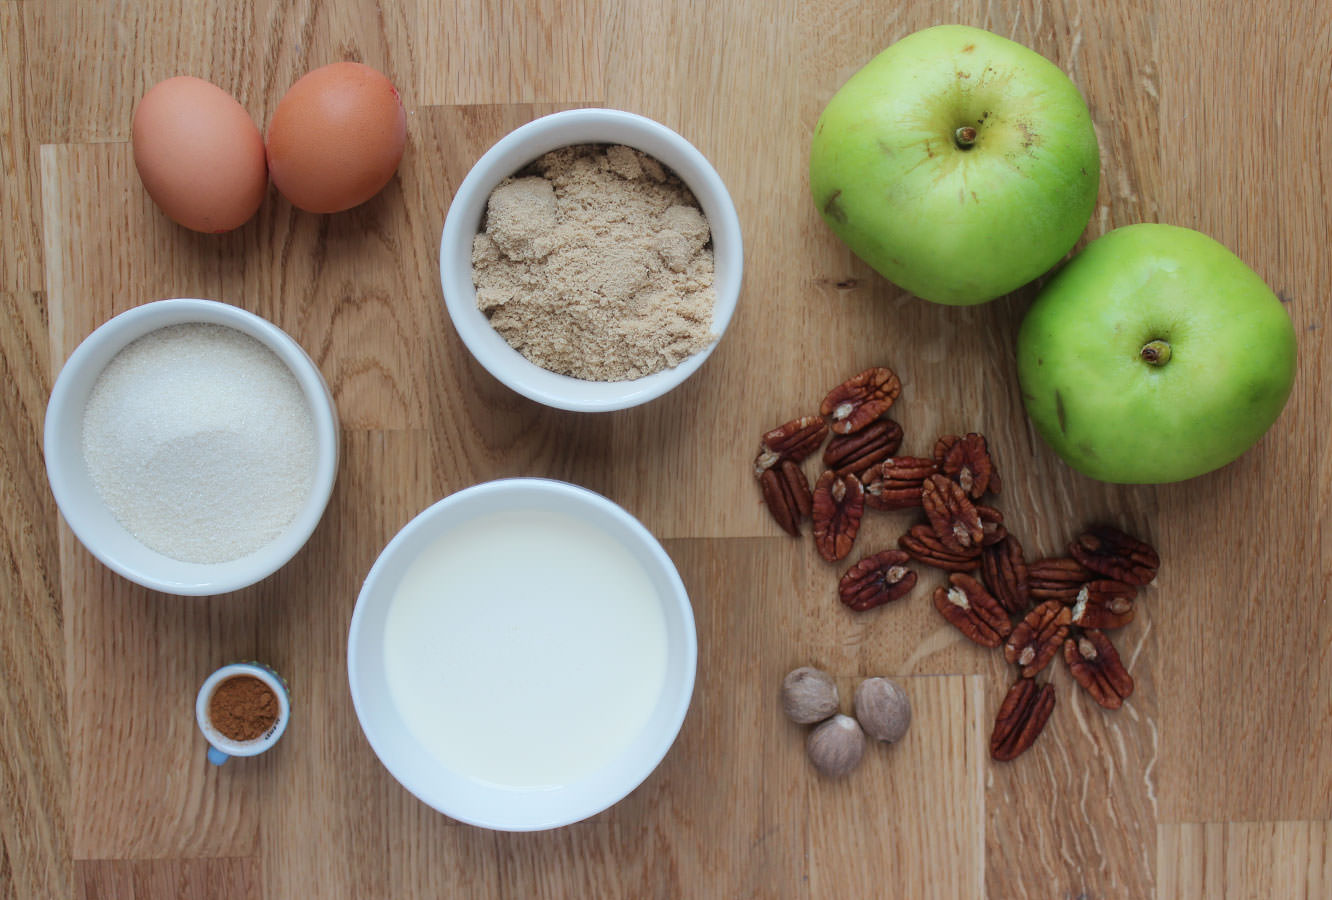
Things you need
For the meringue:
2 large egg whites
110g/4oz Golden caster sugar (that’s all I had – white would be fine – probably better)
1/4 tsp Ground cinnamon
For the salted caramel frosting:
100g/3.5 oz Salted butter
80g/3 oz Soft brown sugar
100ml/3.5 fl oz Double cream
2 tbsp Golden syrup
2 tsp Salt
For the rest:
50-100g Pecans (chopped)
300ml/10 fl oz Double cream
1-2 Bramley cooking apples
Nutmeg (optional)
Makes 6-8 servings
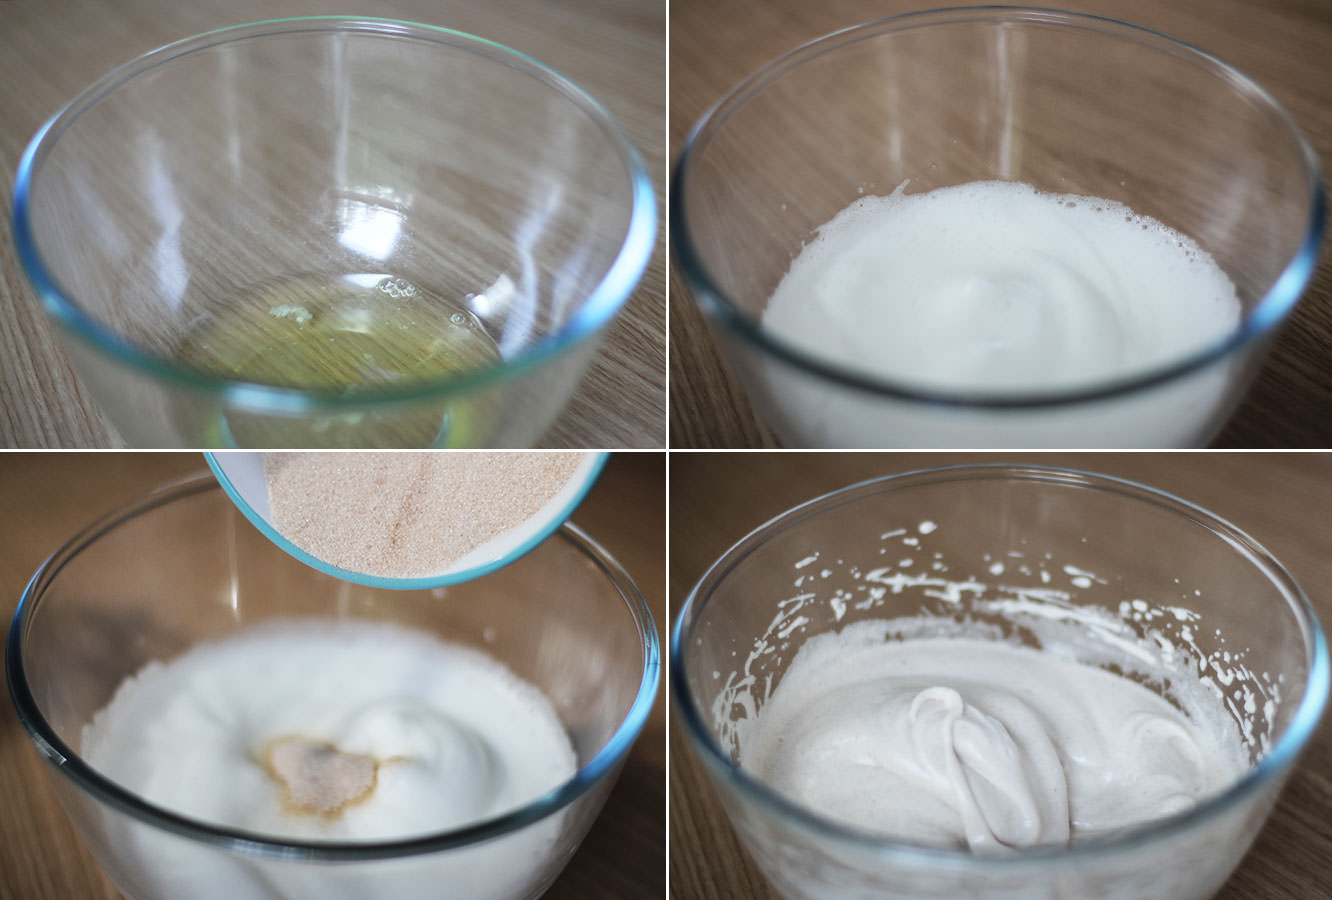
Step one
Mix together the cinnamon and sugar. I actually used 1/2 a tsp of cinnamon, but felt it was a little strong, others disagreed, so go with your gut. It depends on whether or not you are a cinna-fan.
Using an electric whisk whip the egg whites until they are three times their original size and starting to turn glossy.
Gradually whisk in all the sugar until you have stiff peaks (and can turn the bowl upside-down without the mix falling out).
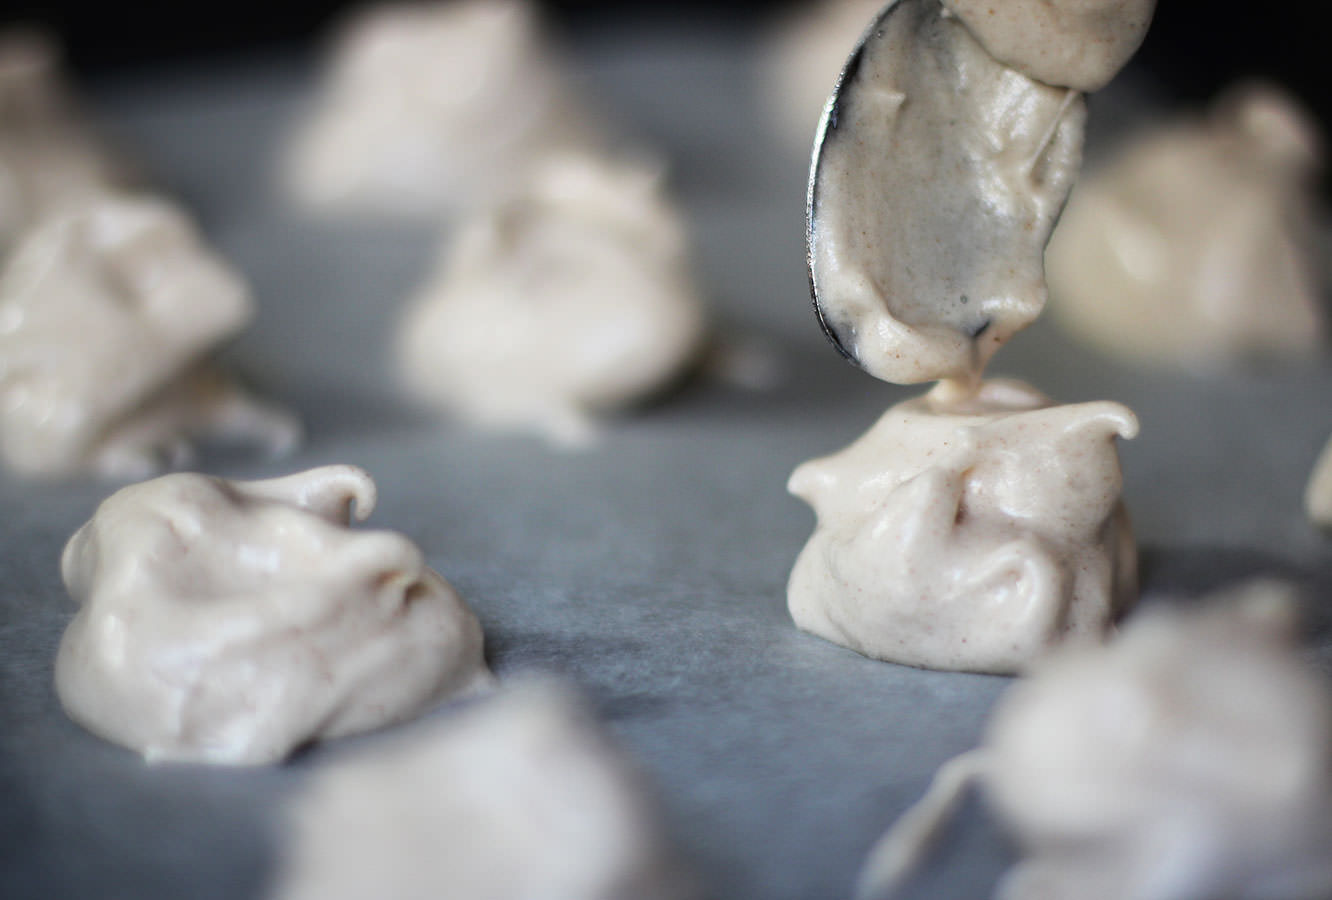
Step two
Using two teaspoons place blobs of the meringue onto a baking sheet lined with greaseproof paper. Don’t grease this to stick it down. If you need something to stop it curling up, dab a little of the mixture under each corner as glue.
This doesn’t need to be done too carefully as the purpose of this dessert is not to look pretty.
Step three
Bake on gas mark 1/2, 130 degrees C or 250 degree F for an hour. Turn off the oven and leave until completely cool before taking them out.
Step four
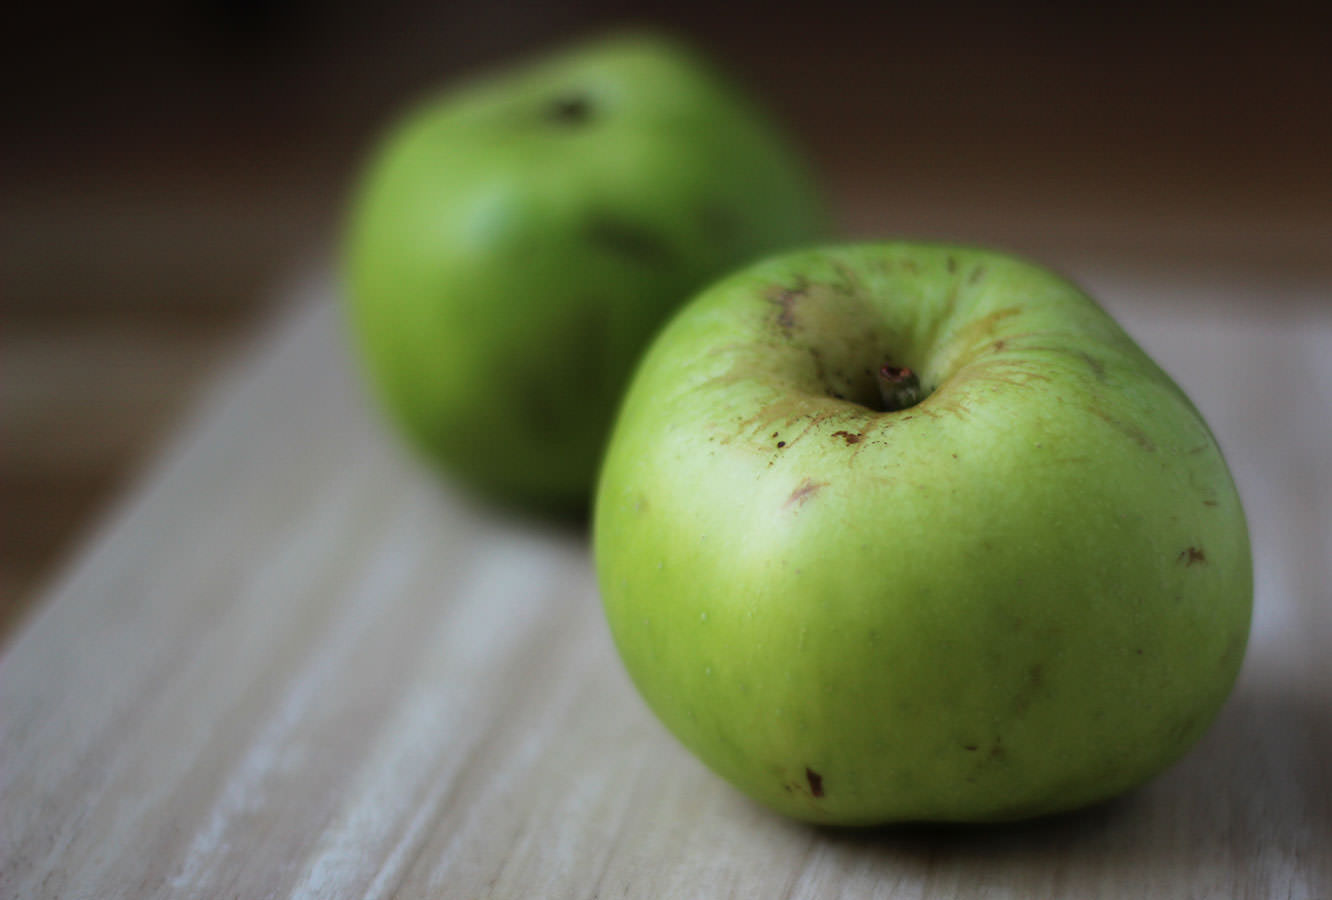
While the meringues are in the oven, you can get going on the rest of the components.
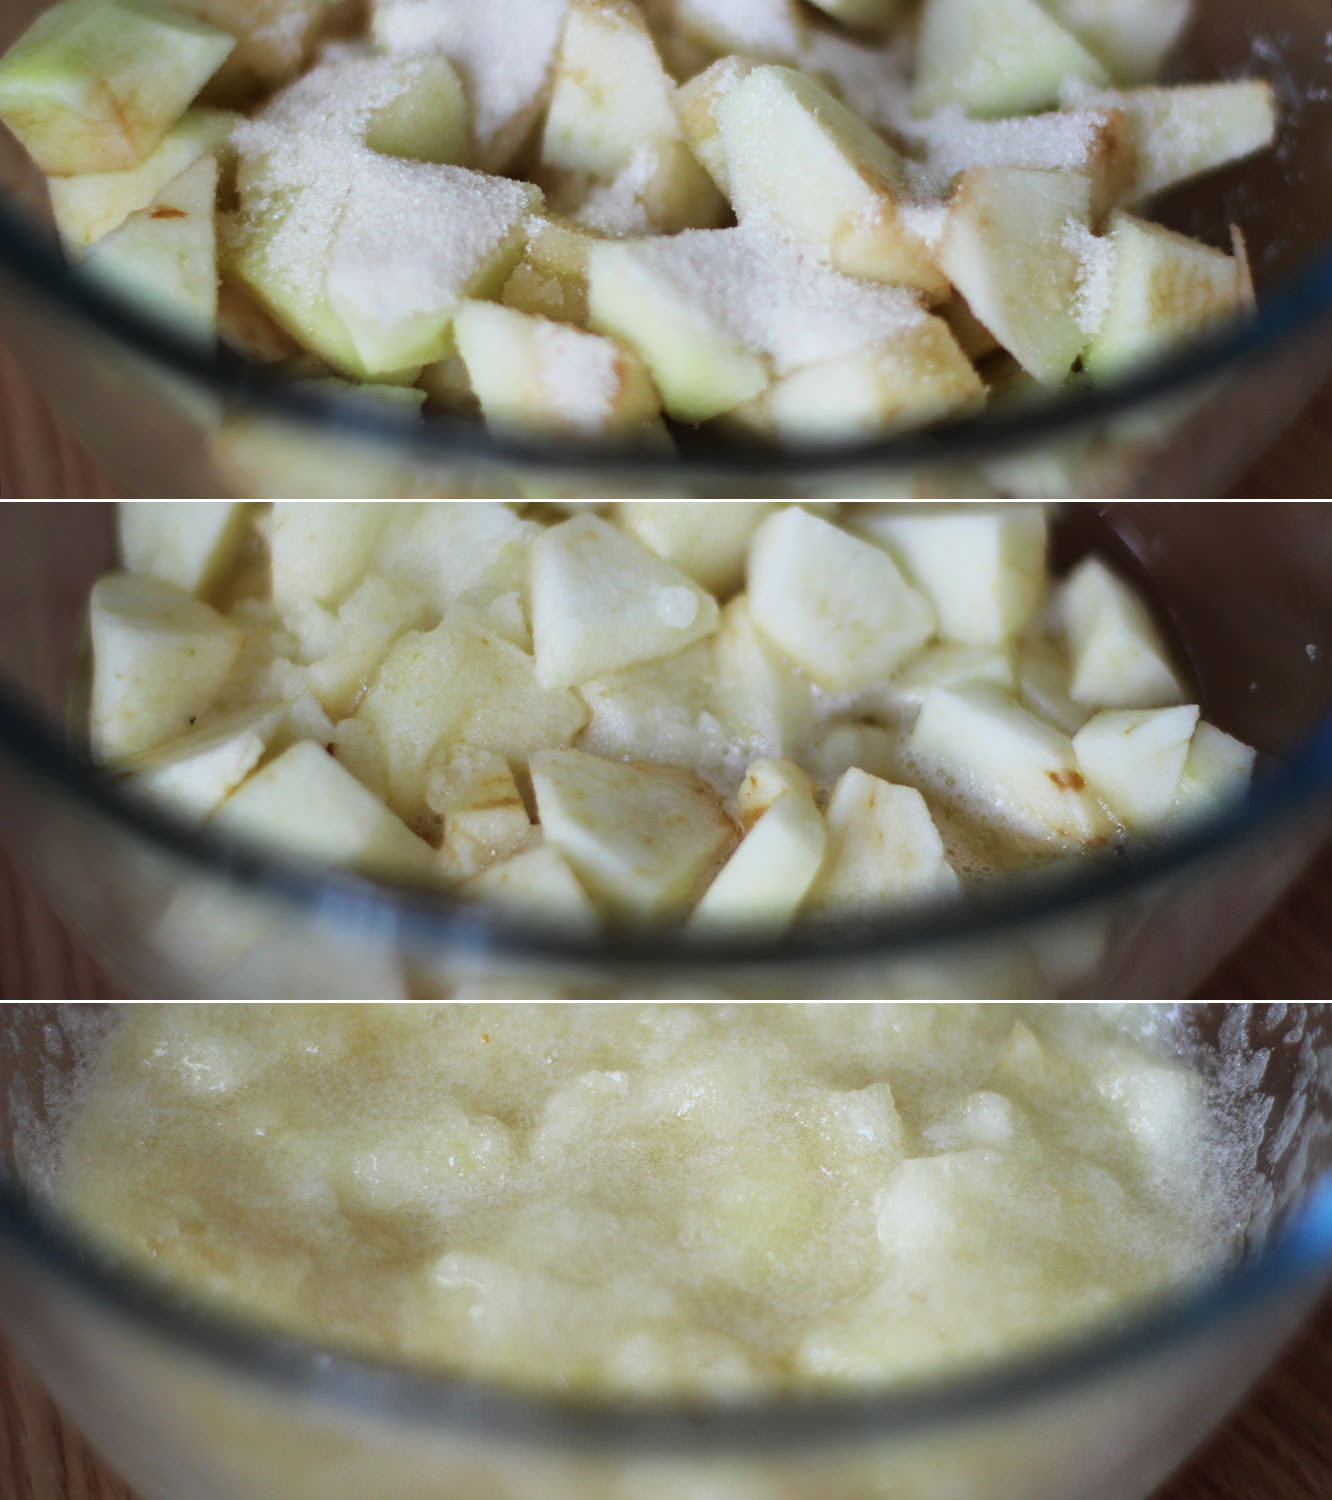
Peel and chop the cooking apples into small chunks. Place into a microwaveable bowl.
Step five
Add three tablespoons of water and three tablespoons of caster sugar and place in microwave.
Microwave on a medium-high heat until you have a pulpy consistency. This took about 10 minutes with fairly regular stop and stirs.
Step six
If you are thinking you have seen these pictures before, I’m sorry, I’m plagiarising myself. I know I know, in the very next post too.
In a saucepan add together the butter, brown sugar, golden syrup and salt. Heat gently until melted and then bring to a simmer.
Simmer for 10 minutes. Stir regularly so that it doesn’t catch and burn. Leave to cool for about half an hour.
Step seven
Stir in 100 ml of double cream and leave to cool.
Step eight
Whisk the remaining double cream until thick and gloopy.
Step nine
Once everything is cool combine the meringues, cream, caramel and apple to taste. I let everyone do this to their own preferences in individual bowls which worked really well.
Sprinkle chopped pecans and grate nutmeg over the top (if you like it) to finish.
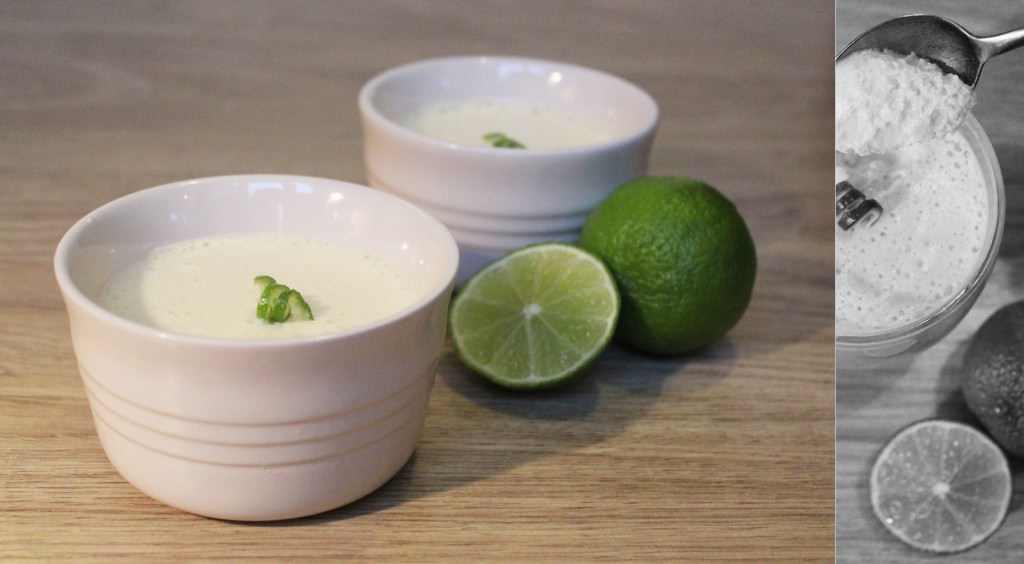
Riding on the success of a chocolate orange mousse I made for Ma’s birthday I thought this weekend would be a perfect time to flex my culinary muscles and invent a new recipe of my very own. It didn’t quite have as many bubbles as the other one I made (you know, from a recipe book by a French pastry chef…) but it was much lighter and fluffier than any syllabub I’ve ever seen. Hence the White Chocolate and Lime Moussabub was born.
A word of caution – make the day before your soiree, or early morning, as it needs a good few hours to set. Also, if you’re thinking to invite the kind of people who choose a cheeseboard rather than dessert then, a) you probably want to save this one for the sweet tooths instead, and b) de-friend them – there are better people in the world.
You will need:
200g White chocolate
110ml Double cream
40ml Full fat milk
3 eggs (or 2 if on the large side)
55g/2 oz Caster sugar
A lime
(Serves 4-6 depending on the size of your pots and tummies)
Step one
Chop chocolate finely. You will hear this time and again if you decide to follow this blog but it really is easiest to use a bread knife/one with a serrated edge for this. The smaller you can chop the better, as you will be using the cream mix to melt it. Place in a large bowl.
Step two
Place milk, cream and lime zest in a small saucepan and heat gently on a low heat. If you want to use a strip of the zest for decoration then put to one side now rather than covering in cream… nobody wants that on their pudding.
Once the mixture has started to boil, pour it through a sieve over the white chocolate and stir until fully melted. If the mix cools down before it fully melts the chocolate then you can place the bowl over a pan of boiling water to melt any stubborn bits.
Taste.
I added some lime juice at this stage – just under half the lime. It depends how much of a citrus taste you want, but I found that to be just right. Stir through thoroughly (and now say that out loud ten times as quickly as you can).
Step three
Separate the egg whites into another bowl. Glass or ceramic is best for this, as plastic bowls can tend to retain some grease, and that will scupper your efforts to whip up your whites.
I tend to crack the egg on the side of the bowl and pass the yolk from shell to shell until all the white has drained away, but whatever works for you.
Keep yolks to one side.
Step four
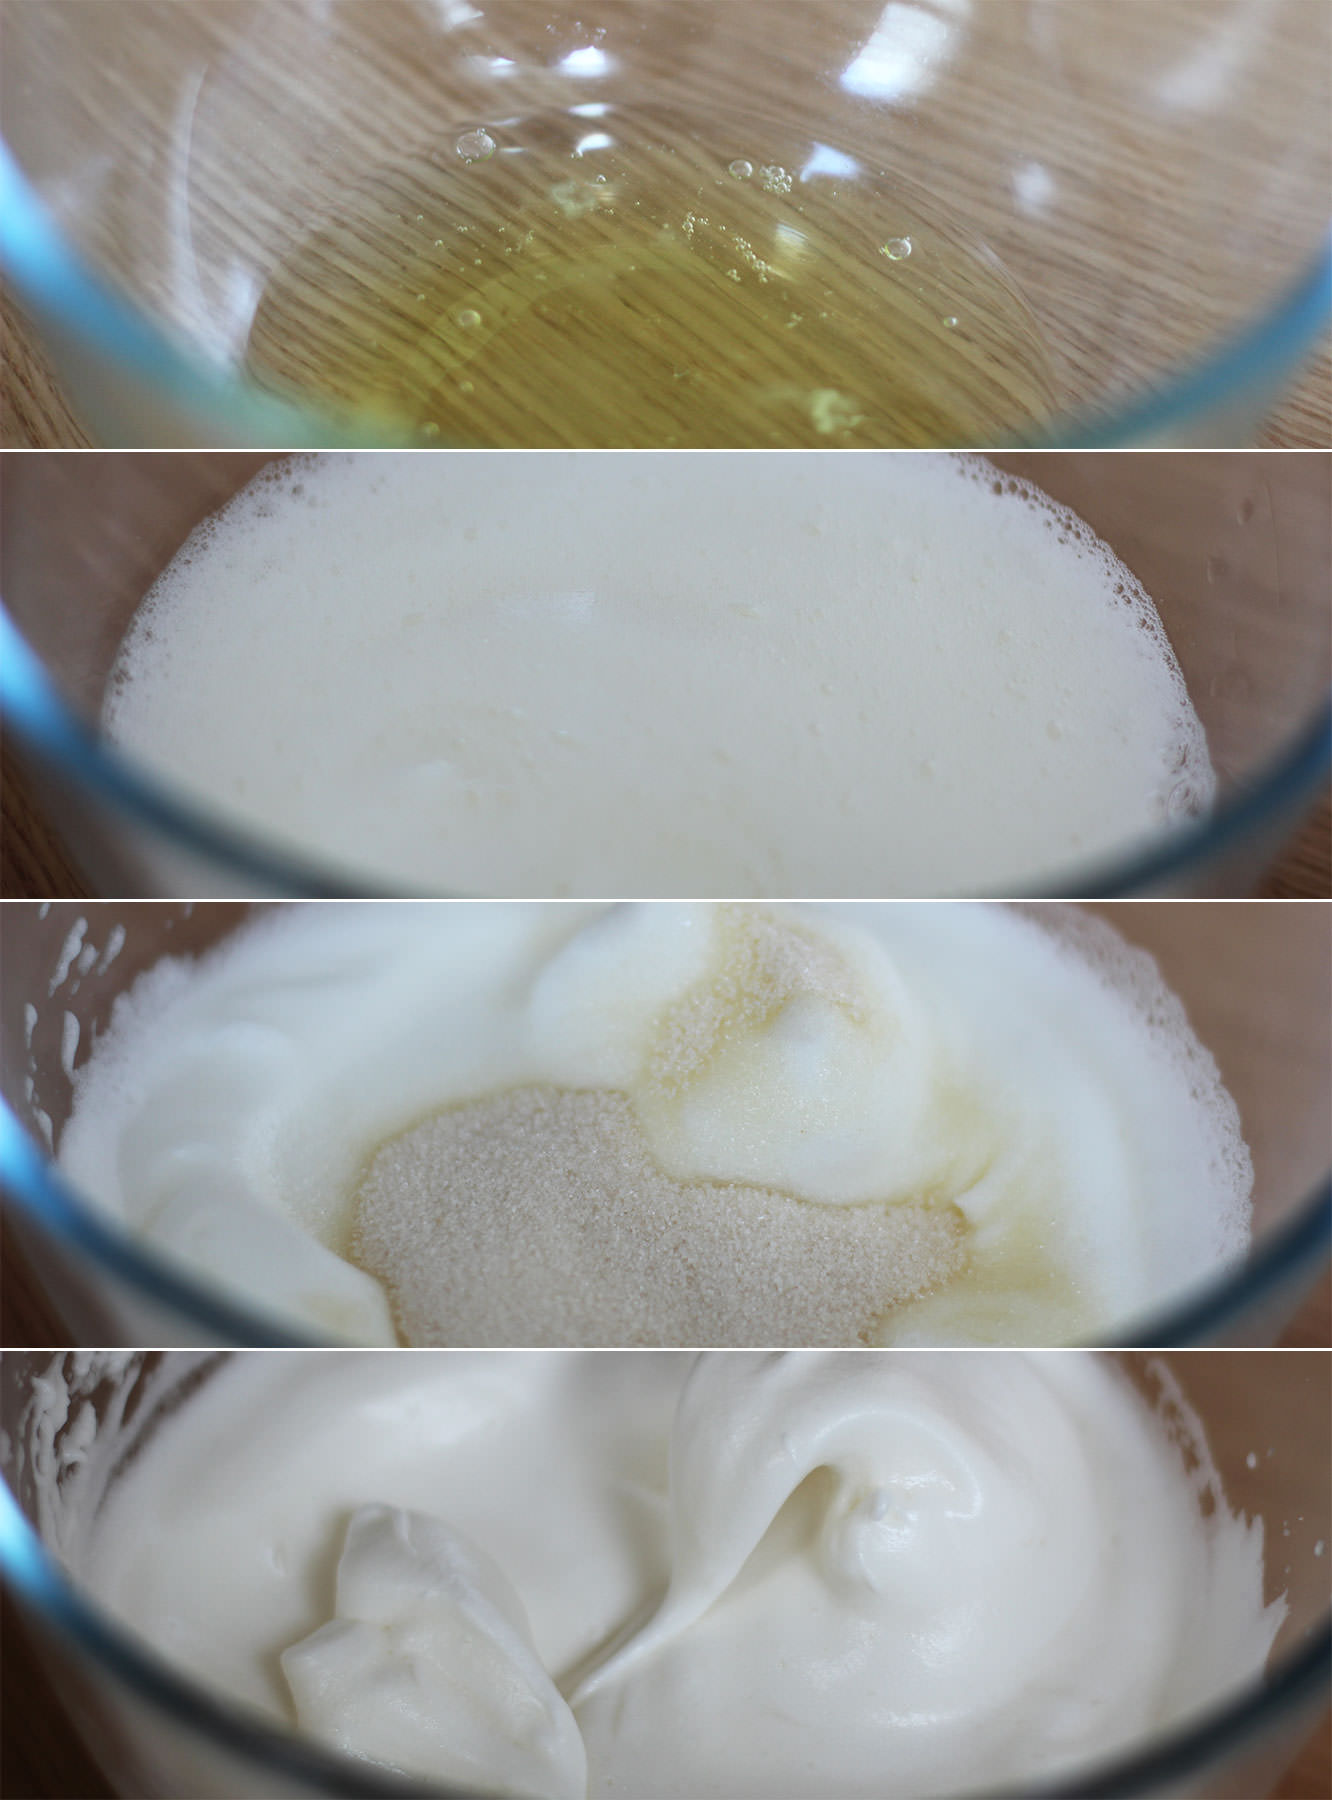
Whisk! If you don’t have a hand held whisk or a fancy stand mixer then hopefully the Lord blessed you with strong arms.
When the eggs start to fluff up, add the sugar and keep whisking until they are stiff and glossy. People are a bit precious about egg whites but generally I don’t think there’s anything to freak out about, just slow down a bit when they start to stiffen up – the sugar will help stabilise them and it’s unlikely you’ll go over if you’re looking at what you’re doing.
Step five
Whisk the egg yolks in. Your mixture should yellow a bit, and will loose a little of its structure – don’t panic!
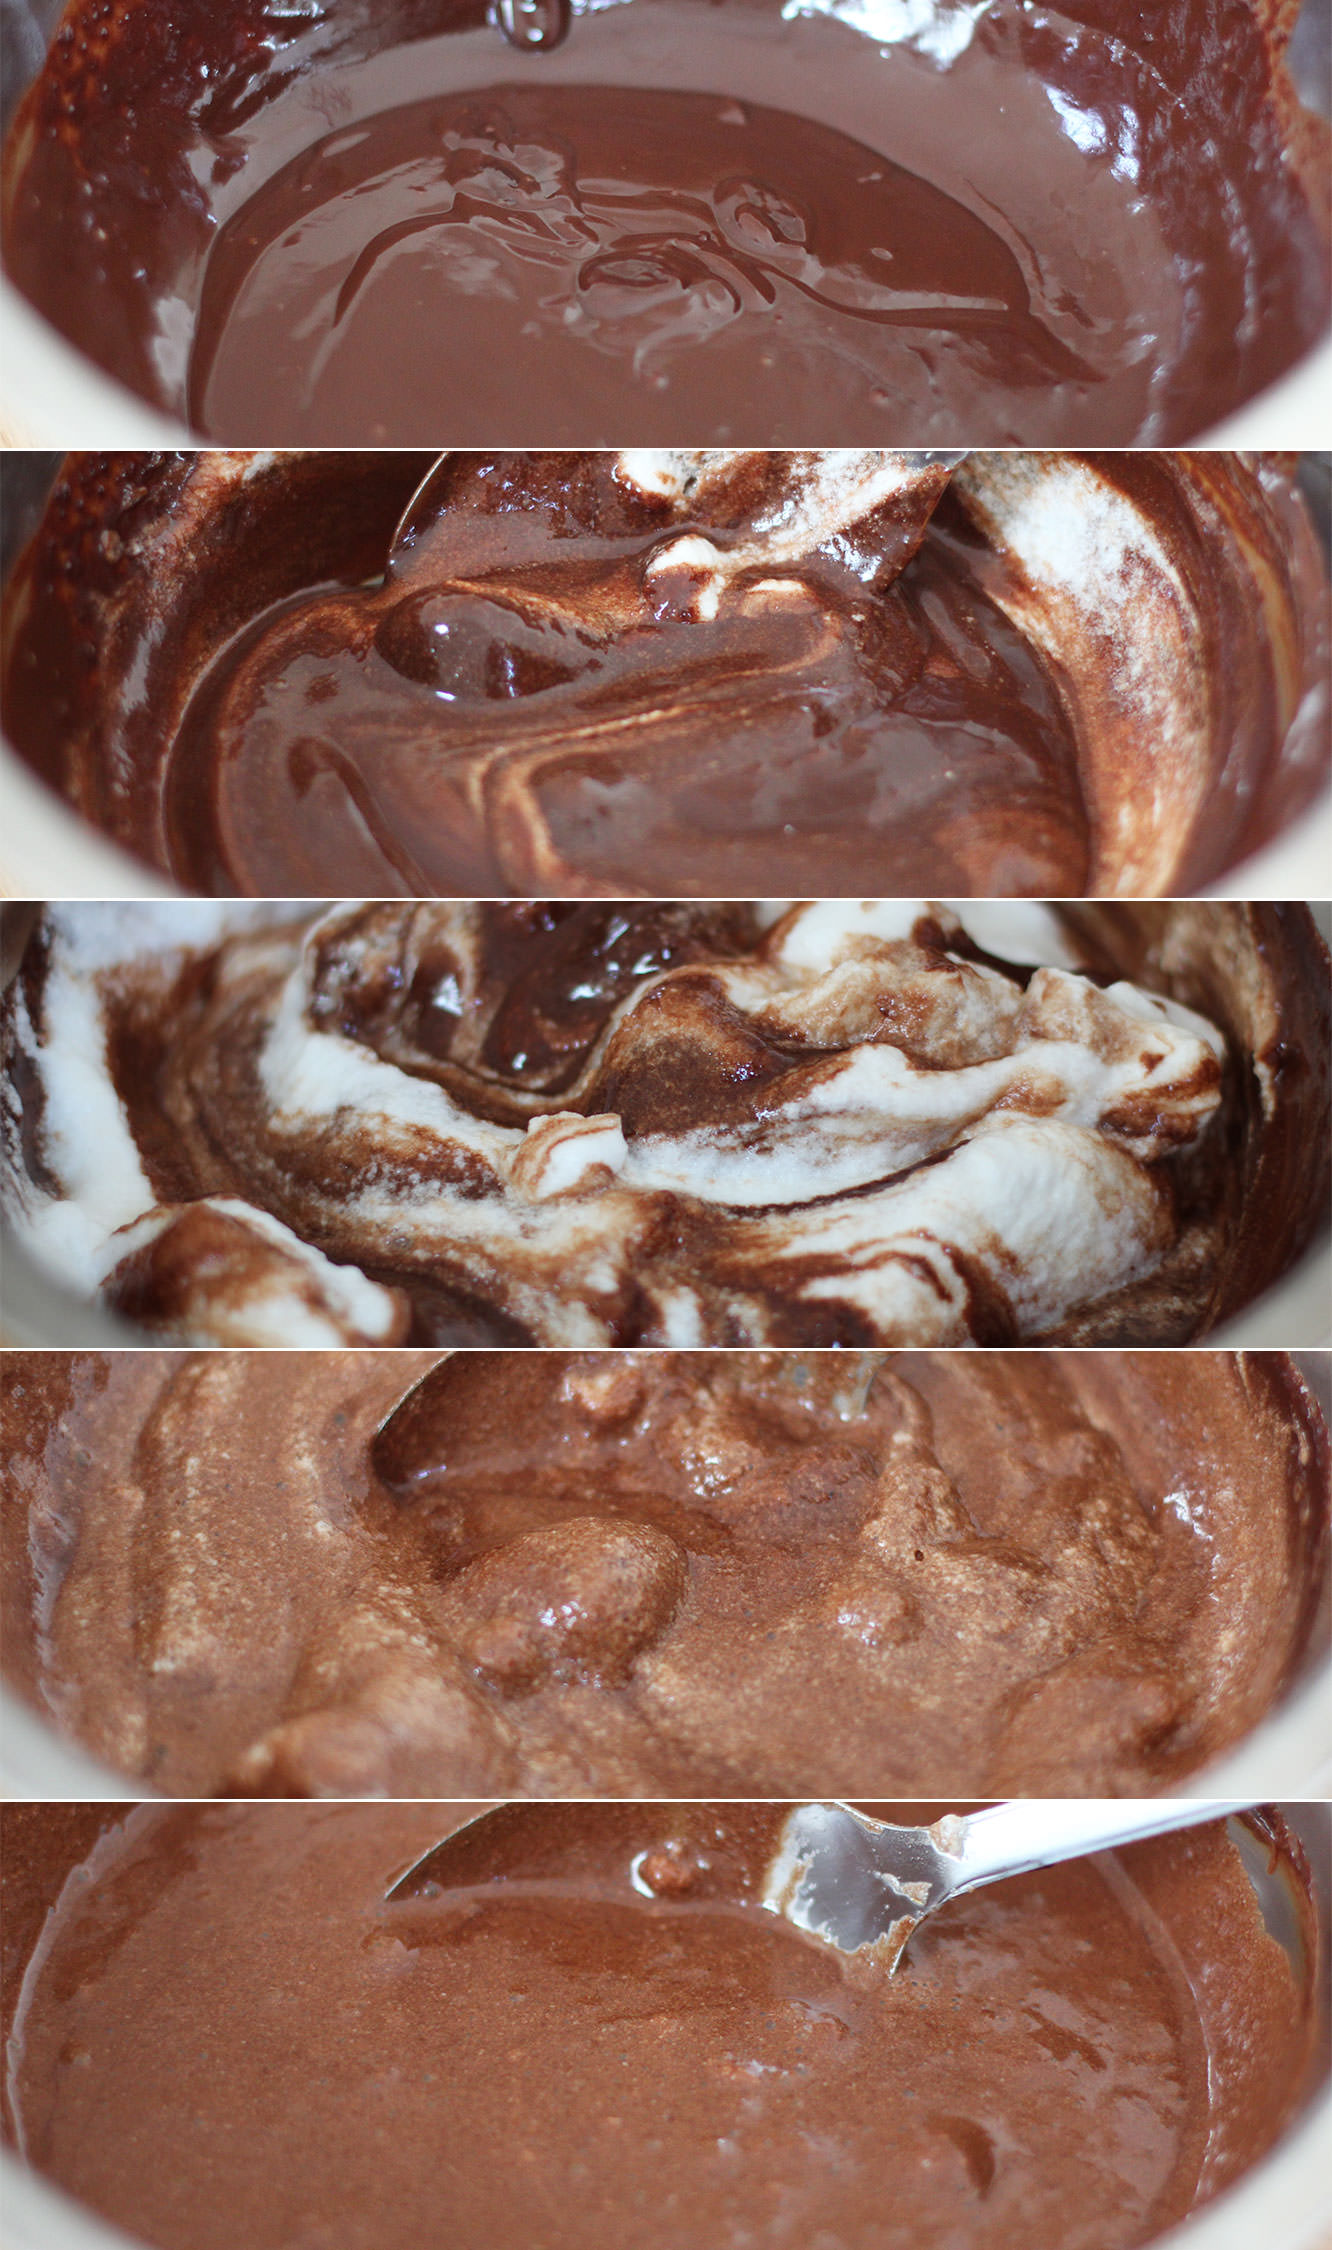
Step six
Put a scoop of your eggs (up to a third) into the chocolate mix and fold in to loosen it up (middle photo). This will help you to not knock out all the air from your moussabub, if you do it all at once you’ll lose your bubbles.
Add the rest of the eggs and gently fold the mixture together. Turn the bowl as you do so it to help you get everything together without flattening it. Patience is a must here.
Step seven
Spoon into serving dishes and put in the fridge (allow at least 4 hours I’d say). Try not to disturb them too much, and no poking, those bubbles are precious!
Step eight
Remember that bit of lime peel you put aside? Well, it makes lovely whirly bits for the tops. If you have one of those fancy zester tools then you won’t need my hillbilly method, but this is the best thing I could think of!! If you know how the professionals do it then answers on a postcard please.
At least 20 mins before serving make thin strips from your piece of peel. Curl them up and put them in the handle of a peg as shown above. Leave them to sit until you are ready to rock and roll. Place on top of each dessert.
NB: If you make your mousse the night before then either keep your peel in a bit of water and take out to dry an hour before serving, or wrap in tinfoil and put in the fridge. Don’t cut up and coil until just before you want to use it as they will dry out and shrink.
You might also try breaking up a biscuit (ginger would work well) or grating some chocolate on top for a bit of a different texture.