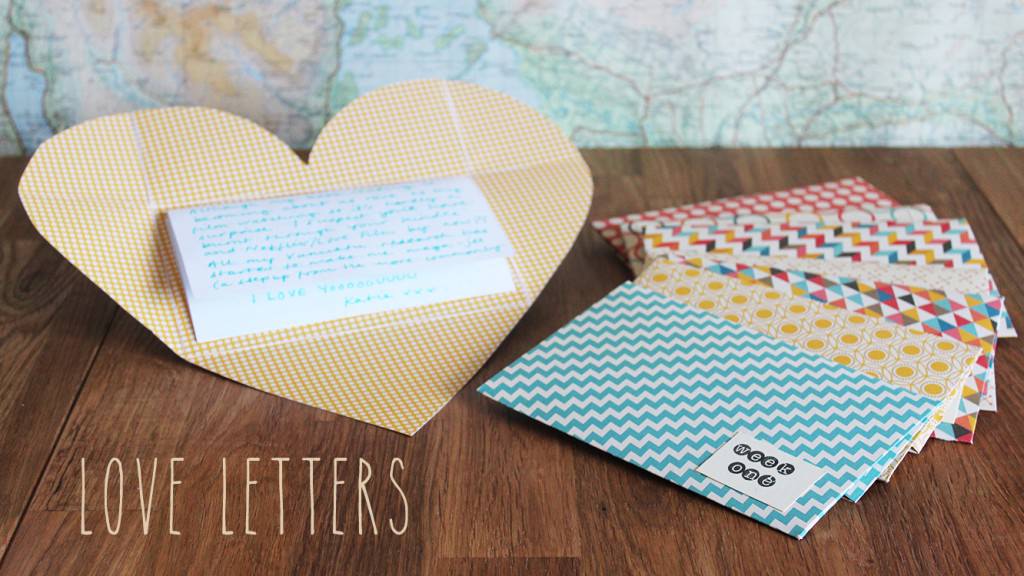
Yo. Another Monday, another blog from me. It’s sort of a cheat really, as it’s a spin off from this present I made for my friend Beth a few months ago. I made one for each week she was away travelling, I hope she’s having as much fun reading them as I had writing them. I MISS her.
I’ve been reflecting a whole lot lately on what wonderful friends I have. Beth is truly one of life’s diamonds (I promise I’m not usually this cheesy).
So if you have a special someone in your life, take a moment to make them a little love letter and let them know how much they are valued.
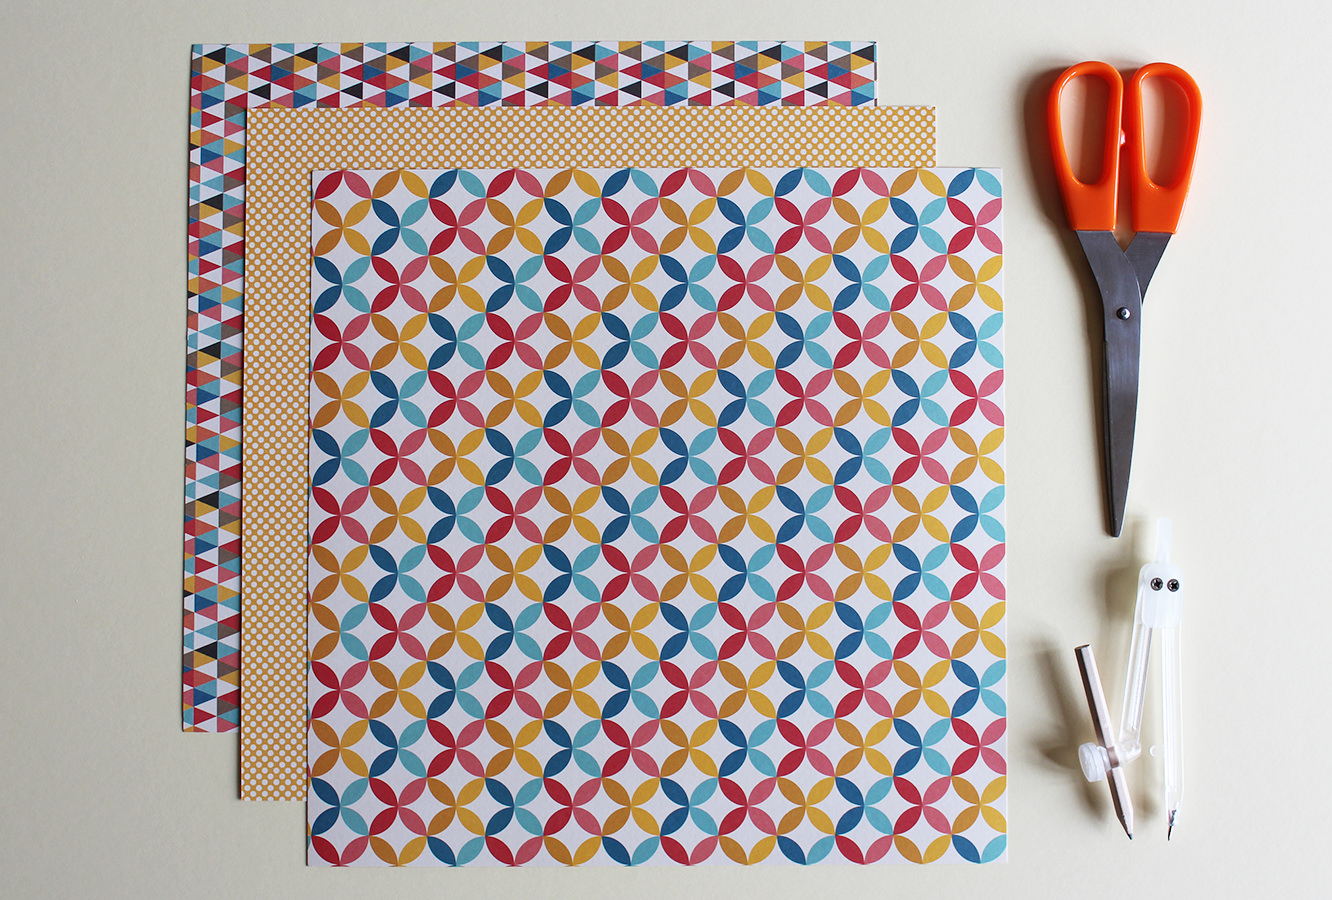
You will need
Large pieces of pretty card/paper (mine are scrapbook sheets 12″x 12″)
Something round/set of compasses
Scissors
The outpourings of your heart
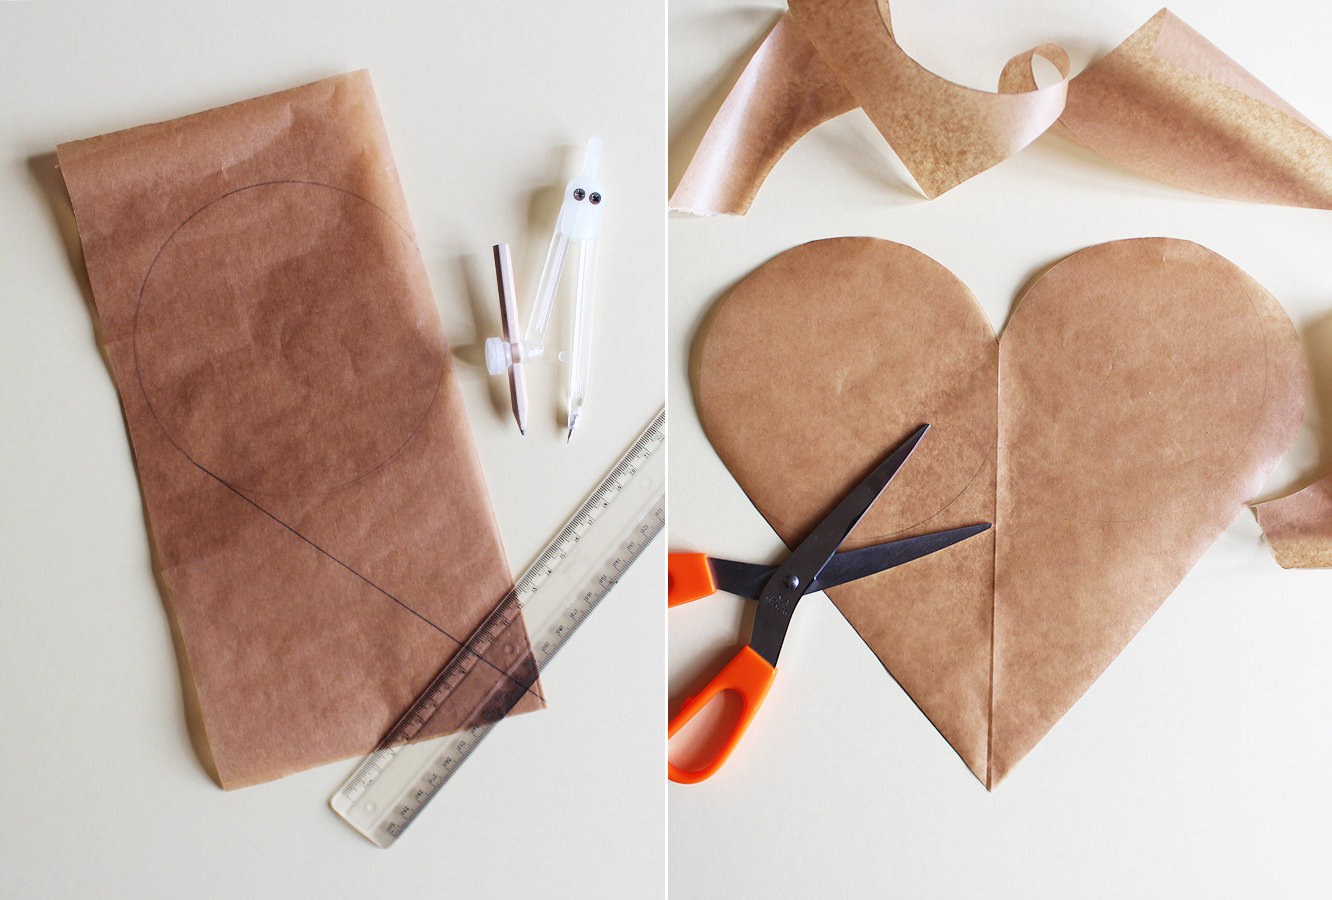
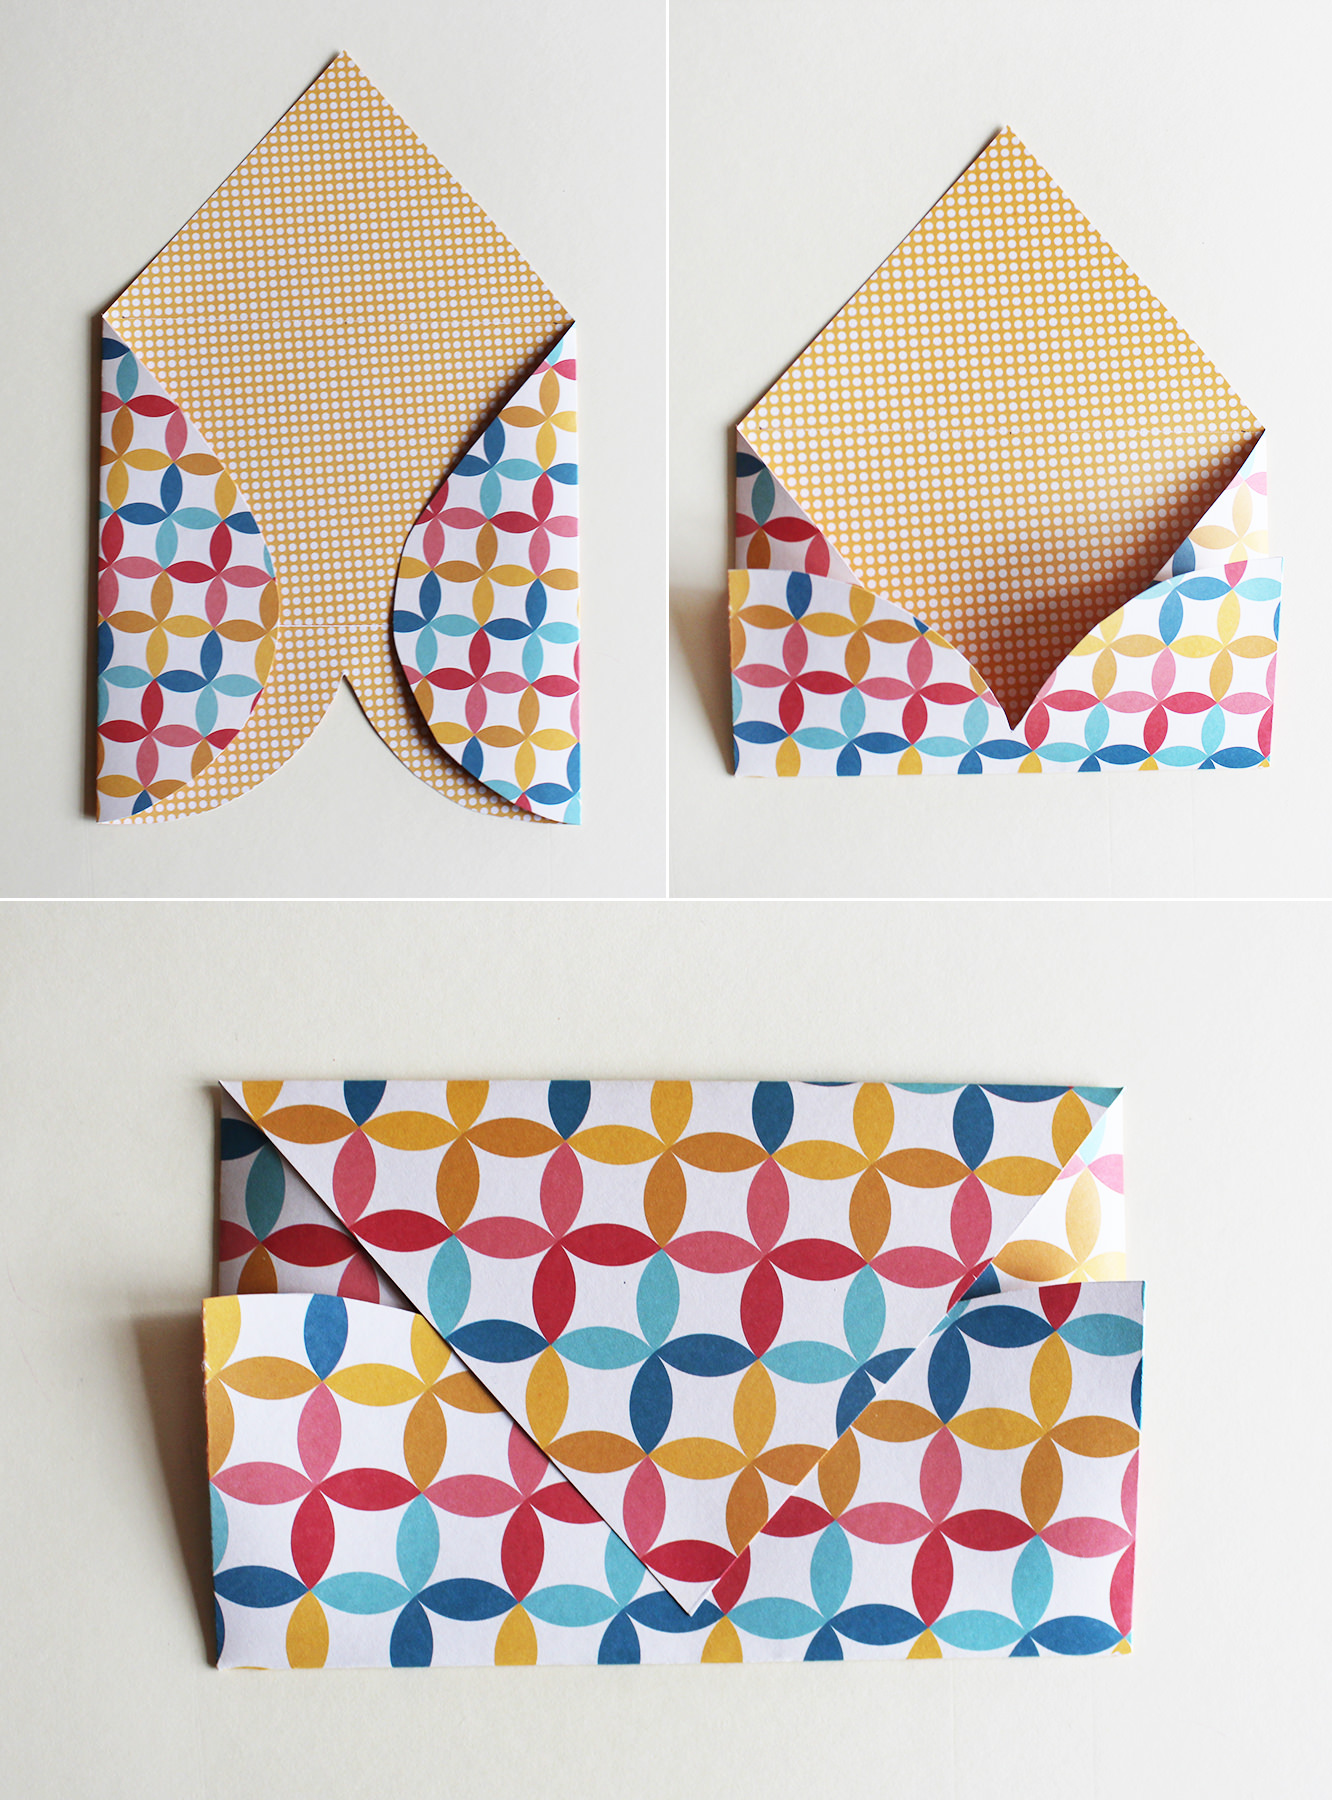
Step one
Using a piece of plain paper/newspaper/greaseproof the same size as your proper paper, make a heart template.
I did this by folding the template paper in half and drawing a circle to almost full width. Then use a ruler and draw a line from the edge of the circle towards the fold to make a point.
Cut out and unfold. Voila.
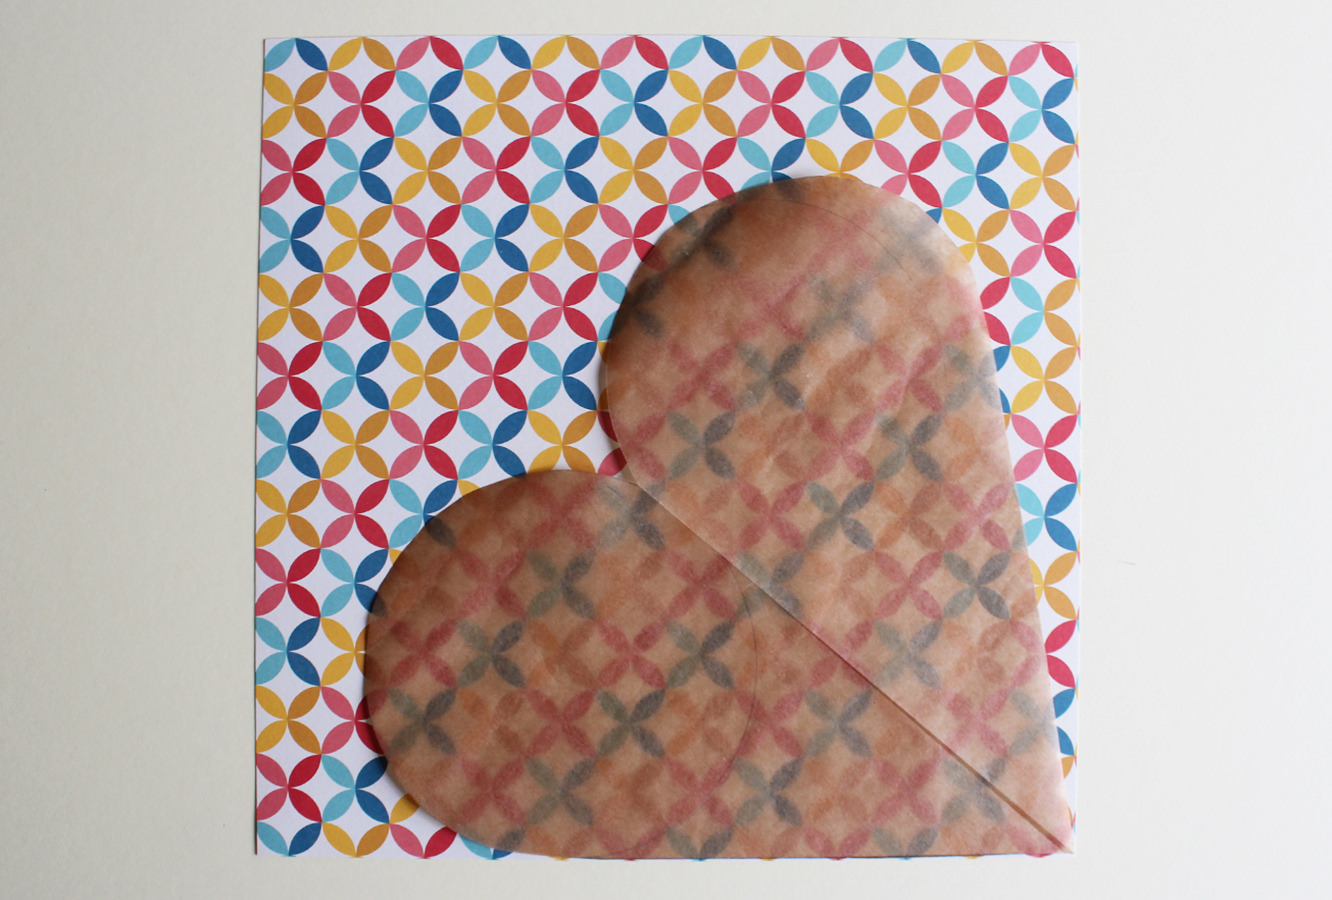
Step two
Draw round the template on your nice paper/card. Don’t be a peasant – use pencil.
Step three
Cut out as many as you need. I appreciate for you guys this might just be one, not everyone fancies their friends as much as I do.
Step four
Turn the heart around so the point is facing away from you, and fold the sides in. You might want to use the scissor blades to score the lines first if you are using thicker stock.
Fold the domed bits up to make the bottom of the envelope. Finally, fold the point down to make the flap.
A disclaimer for this step is to practice on the template version first so you have the right dimensions, to make sure your envelope doesn’t have any gaps. You’ll see what I mean.
Step six
Write away.
I folded strips of A4 and stuck one section to the back of the heart so it kind of pulls out. You might prefer to write straight onto the it if your paper doesn’t have such busy patterns.
I stuck a button on each of mine to close them.
Enjoy telling people the people you love that they are great!
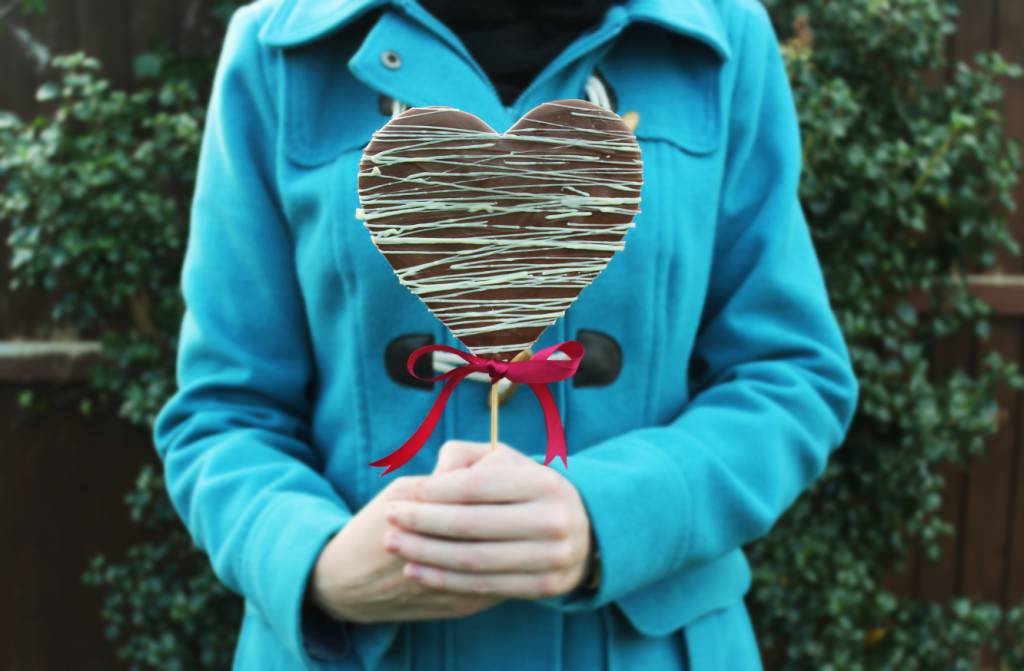
When making themaple truffles I ended up with a decent amount of left over chocolate from the dipping stage. So I decided to create another little Valentine’s treat. There’s still time to dash to the shop and whip one up tomorrow evening for a yummy treat that’s more heartfelt than hallmark.
This is a little bit of a cheat post (hence the mid-weekness of it all). I’m afraid there are no photographs of the stages, just the final product. But all is not lost…I do go through making homemade chocolate lollies here.
To create the heart shape you just need to create two circles next to each other and then sort of pipe down and drag to make the point. More info can be found on the Christmas Lollies post (link above). Once the outside is touch dry you can melt a couple of squares of white chocolate and drizzle over the top. Feel free to experiment with different decorations, types of chocolate, or just chuck a load of sweets on top while it’s still drying. You might even want to try piping a message to your beloved?
Wishing you a wonderful rest of the week, see you on Monday!
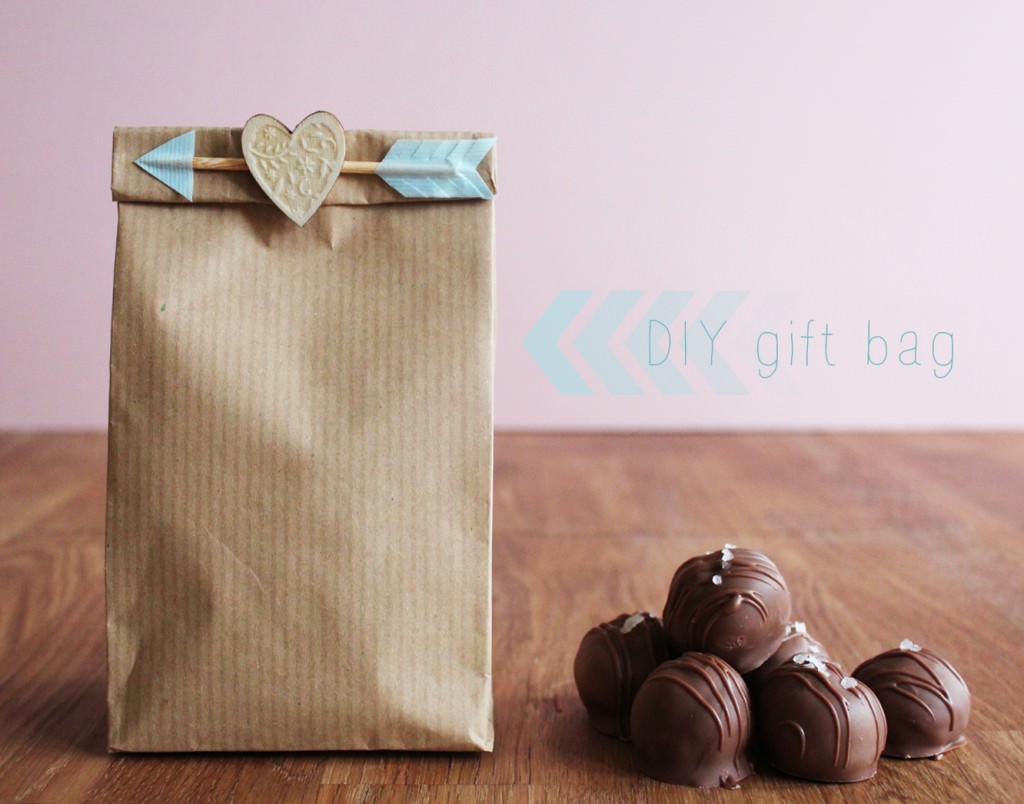
So, I missed Monday blog day. Apologies, but there was some urgent badge making to see to, for a very special nearly 8 year old who’s mum was tearing her hair out looking for an 8th birthday pin. Katie and her dusty old badge-it to the rescue.
Now to business…I know you spent your weekend making those lovely truffles and need something to gift them in. Here’s how to make a little bag. I warn you, it’s not really the industry approved method (I’ll do a tutorial for that another time) but it does the trick and is super quick and easy.
Step one
Choose your paper, I’m a sucker for a bit of brown parcel paper, but as long as it’s relatively thick you’re good to go with whatever takes your fancy.
Find a box whose dimensions match the rough size and shape you want your bag to be.
Cut paper to size as if you are wrapping a gift, but leave a little extra on the long side so you have some to fold down to close the bag.
Step two
Wrap the long side first. Fold over the edge that will appear on top so that it’s nice and neat and stick down with glue or double sided tape.
Step three
I don’t really want to patronise you and tell you how to wrap a parcel particularly when the above isn’t even the best. But wrap the bottom of the box, but make sure you leave the other end open!
Step four
Pull box out of the wrapping so you have the basic bag shape. You can go ahead and use it now (see I told you it was quick and easy) but I prefer to make it look a bit more authentic.
Pinch the edges to make crisper folds.
Step five
This step was a little difficult to photograph, but basically you want to create a fold in the centre of the long side. Put your index finger in between your two folds and use your thumb and middle finger to sort of pinch it together.
Step six
Fold the bottom under as shown above. This will give you the little triangular type bits, and also means that you can make a few and store them flat until you need them.
(note triangle bit I was talking about above – I’m not mad)
Step nine
For Valentine’s day decoration I used a wooden BBQ skewer. Chop with a pair of garden clippers to about the width of the bag.
Step ten
Use a bit of washi tape to create the feather of cupid’s arrow. Stick a bit on both sides and trim as above.
Step eleven
Fold down the opening of the bag and cut two slits through all layers of paper. Push arrow through to secure.
Step twelve
Use washi tape to make an arrowhead and secure to the end.
Step thirteen
Stick a heart over the centre.
In all honesty I am not a huge fan of this, but I think it’s probably partly because the woods don’t match. You could cut one out of coloured paper or card if you don’t have a little wooden heart in your supplies. Just make sure you don’t do what I did; hold it up first to see if you like the look of it rather than sticking it on and wishing you hadn’t.
Valentine’s Day is the marmite of all the celebrations; people seem to either love it or hate it (I’m actually fairly in the middle on the whole thing, much like my relationship to marmite). The US tends to go mad for Valentine’s*…but let’s be fair, they’re a lot more chipper about everything than the rest of the world anyway. We Brits stay true to form, far more cynical, but with the inherent sense of obligation that both forces us to celebrate something, and then resent the enjoyment we get from it.
Chocolates are a typical Val Day gift, but they tend to lack the personal touch that well, let’s face it, is the fault of the whole shebang. I figure if you’re going to do it, do it right, make your own.
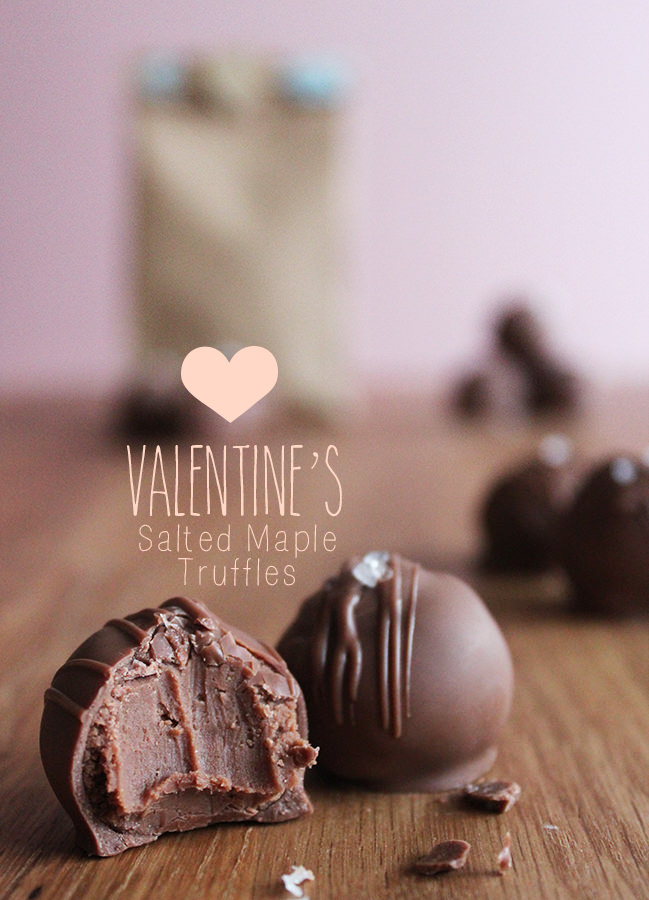
Whatever continent you live on, and whatever occasion you’re celebrating this February, here’s another recipe fresh from my kitchen. Great for gifting or gorging on, I present milk chocolate truffles with a hint of salty maple goodness.
* source: Pinterest…which is a completely accurate representation of American life.
You will need:
500g Milk chocolate
75ml Evaporated milk
50ml Double cream
1 to 1 and a half tbsp Maple syrup
2 tsp Salted butter
Pinch of table salt
Rock salt to decorate
Makes 20-30 truffles
Step one
Chop 250g of the chocolate finely, and place in a bowl. The more you chop the easier the cream will melt it. Use a bread/serrated knife for this…you can thank me later…I just changed your life.
Step two
Put the cream, evaporated milk, maple syrup, a pinch of salt, and the 2 tsp of butter in a small pan.
Don’t put more than a tablespoon and a half of maple syrup in your truffle filling – whilst tasting delicious it won’t set up, ergo it won’t be easy to cover in chocolate (yes, I did find out the hard way, but I’m kind enough to give you recipe 2.0).
Place on a low heat and bring to the boil, stir regularly. Leave that heat on low, I mean it! Patience is the way to go with cream, it’s the hormonal teenager of the baking world (volatile and breaks down easily).
Step three
Once the cream starts to bubble, take off the heat and pour it over the chocolate. Stir quickly with a hand whisk until all the chocolate is melted and it’s thick and glossy.
Step four
Wait.
Step five
Once your truffle mix is holding its shape (pull the whisk out and dribble it around, if it’s not merging back into one clump then it’s good to go) put into a piping bag/good quality sandwich bag. If you’re impatient then stick it in the fridge or freezer to help it along (but don’t forget about it – you don’t want it to be un pipe-able)
Snip off the corner and pipe into evenly sized blobs. Don’t worry if they are a bit misshapen, this is just to ensure evenly sized truffles more than anything. My mix wasn’t quite solid enough when I did it above (this is partly because it was the too-much-maple batch) so wait a while longer than that.
Leave for another 15-20 minutes.
Step six
Roll truffles into balls. You will need cold hands for this, I found washing them in cold water a few times throughout helped. You might need to give them a little squash first so that they roll (you’ll understand when you get there).
Step seven
Melt the remaining chocolate (keep about 50g back for a moment). You want to put it in a fairly small bowl so it’s nice and deep for dunking.
Do this in a microwave, but watch it closely, it turns in seconds. Pop it in for 30 seconds to start it off and then 10 second intervals, stirring in between.
Once it’s fully melted put the remaining 50g in and allow the heat from the rest of the chocolate to melt that too. This will help to temper it making the texture and shine better in the end product.
Step eight
Find something to dip with. You can buy fancy tools for this but I happened to have a metal kebab skewer with a whirly bit on the end. If you don’t, then snap the middle two prongs off a plastic fork.
Step nine
Dip.
I’ve tried to show the stages above, but essentially: 1. Tilt bowl and put truffle on dipper 2. Drop into melted chocolate 3. Lift out using dipper 4. Flip over and drop back in to coat the other side 5. Lift out and allow excess chocolate to drip off.
Don’t tap dipper on the side of the bowl, or your truffle will get stuck onto it. If you are overwhelmed by the urge to tap, then sort of thwack it on the melted chocolate, sounds counter productive but it does work.
Step ten
Dip all the truffles and rest on greaseproof paper in rows, leave to set for 10 minutes or so before decorating.
Step eleven
Put excess melted chocolate into a piping/sandwich bag and snip a small opening in the bottom. Allow the chocolate to start pouring from the bag and move your hand back and forth over the rows of chocolate. This creates the stripey bits on the top. There’s no need to squeeze really, it will pour out of the bag at the right speed.
Don’t worry about the bits that fall down the middle, you can put them on top of your ice cream. Nothing wasted when it comes to chocolate.
Step twelve
Put a little bit of rock salt on the top of each truffle. Don’t overdo this or it will be unpleasant, but a little salt is actually really nice with sweet or caramelly things like maple syrup and chocolate.
Step thirteen
Leave them to set. Have a little taste. Go on. You’ve got a few to spare. They’ll never know. Unless of course you write a blog about it, and then never actually produce any of the chocolates (sorry boyfriend).
Oh, and I made a little baggy…
Step fourteen
Stay tuned to fabrefaction for the making of the bag, and the using up of the left over dipping chocolate.