Apologies for the day late post friends. I had a miniature pie melt down at the weekend (#myblogginglife) and as a result didn’t fancy posting yesterday. Instead I took an evening of sitting on the kitchen counters with the housemates eating pumpkin pie.
Speaking of the housemates. A while ago one of mine professed herself to be a food innovator. Bold claim? Yes. I thought so. When I asked for proof of this theory, she was ready with it. “Well,” she said calmly, and with an air of smugness, “I’ve had an excellent idea for mince pie truffles”. Lover of mince pies I am. Did I think this idea was a good one, worthy of the self proclaimed food innovator title? No, reader, I did not.
About a week of scorning later (I cannot put words together to explain how disgusting I thought the idea was and how aggressively I communicated that to her) she returned home with a box of mince pies to prove her idea, totally unfazed, a quality all struggling food innovators must no doubt possess. I’m sure Heston could empathise.
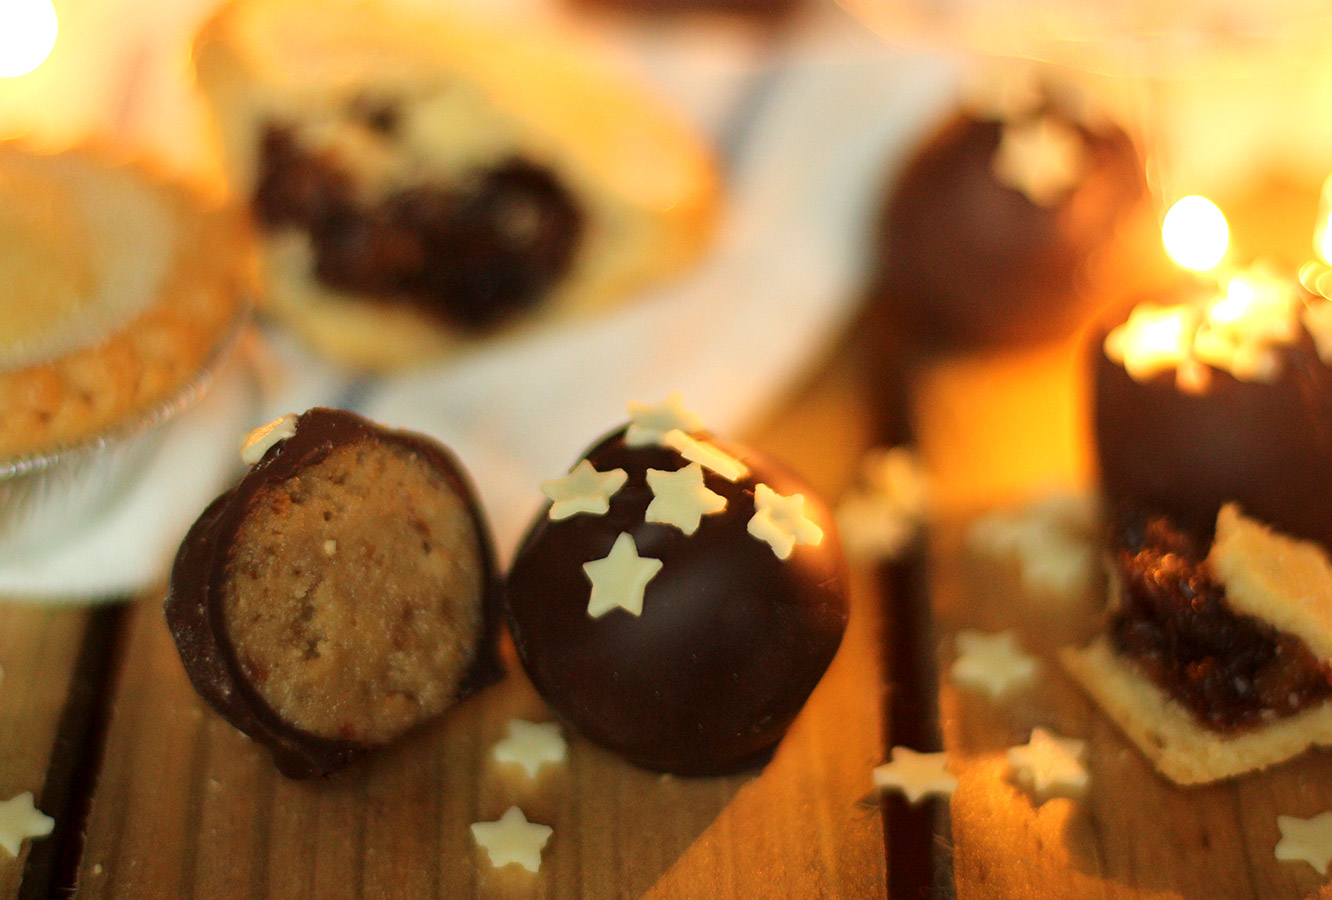
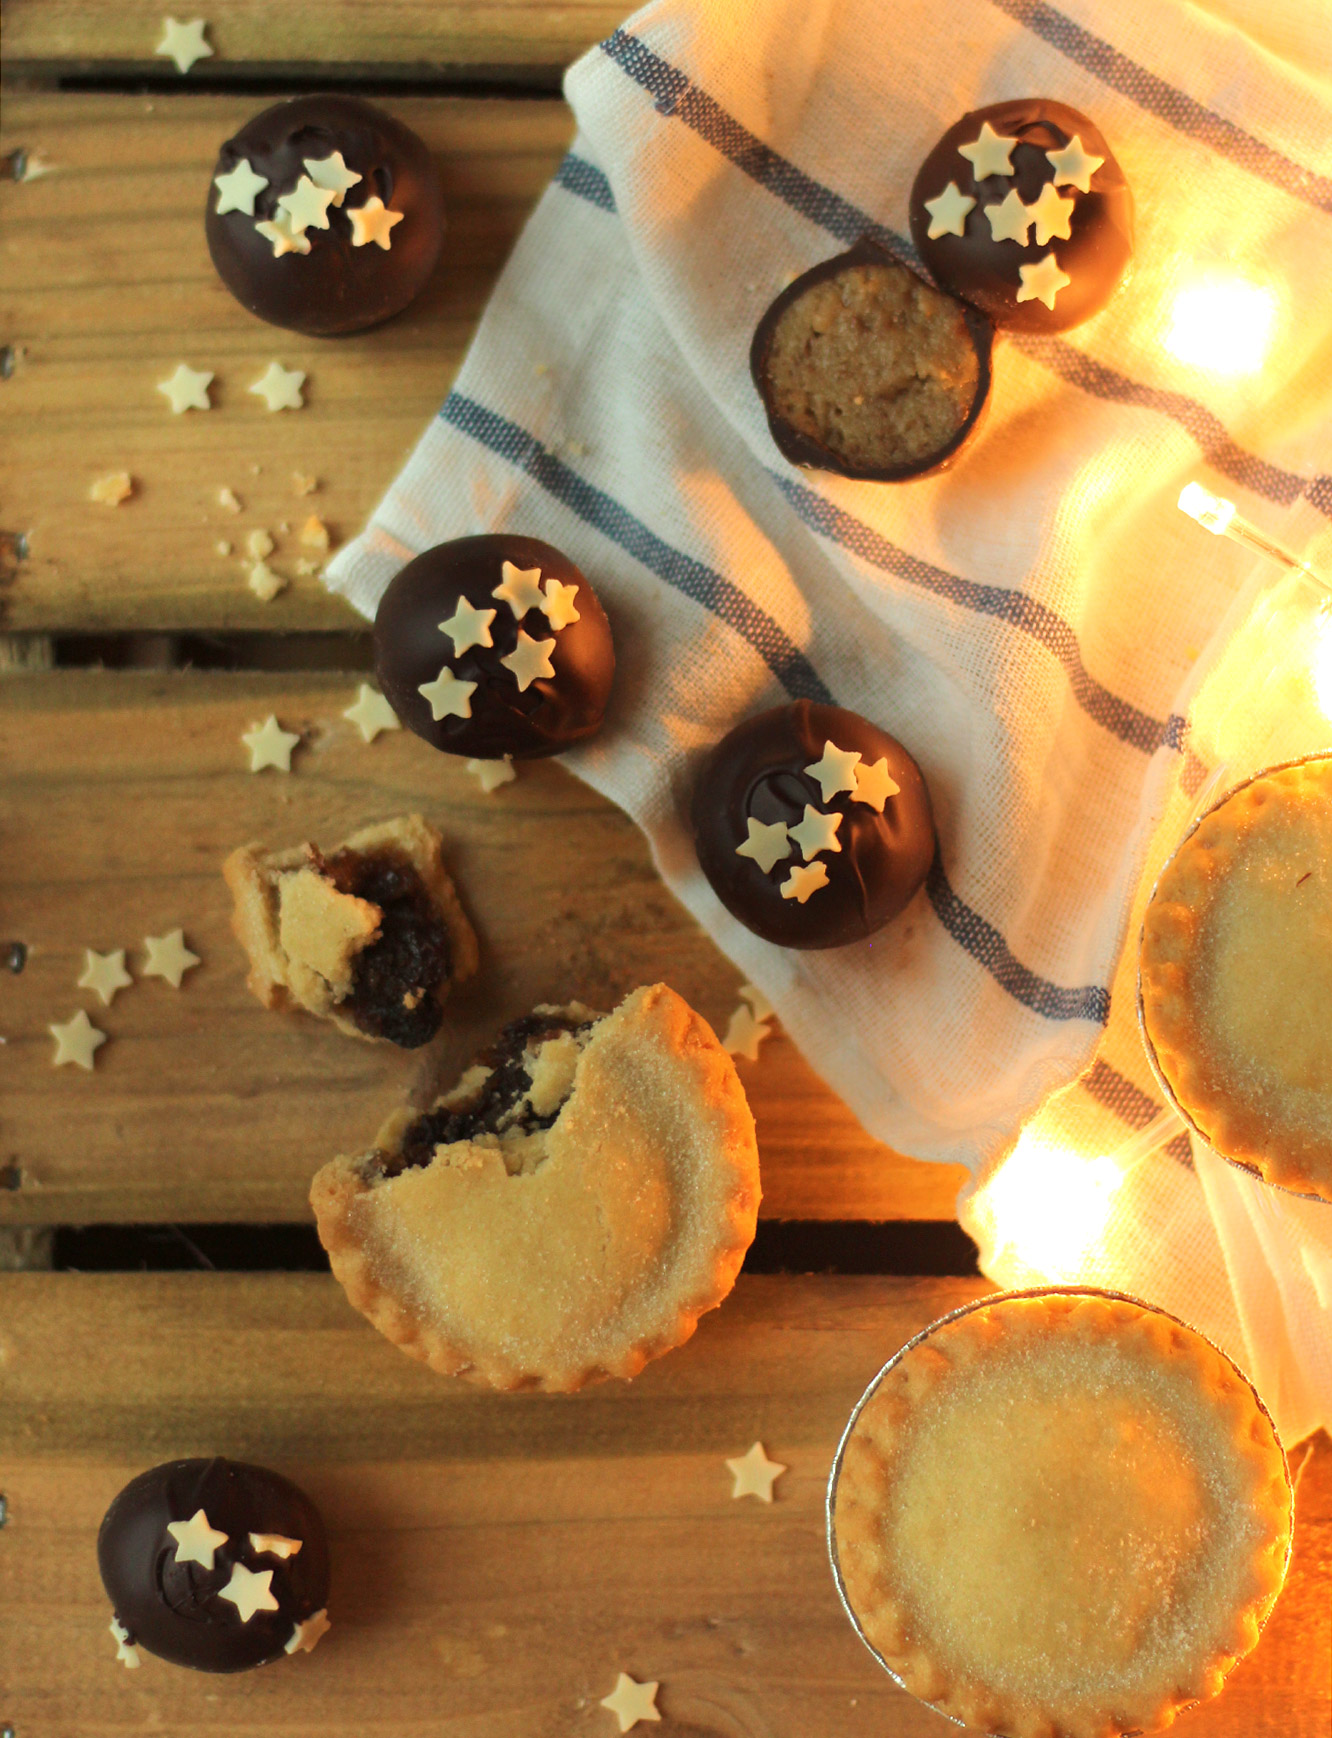
Anyway. Turns out, I like mince pie truffles. You’ll have to trust me on this one. Best eaten from the fridge, sound and look entirely unappetising, ladies and gentlemen, I bring you the recipe for the humble (but great) mince pie truffle.
This post is dedicated to one Ms Afua Addai-Diawuo, food innovator.
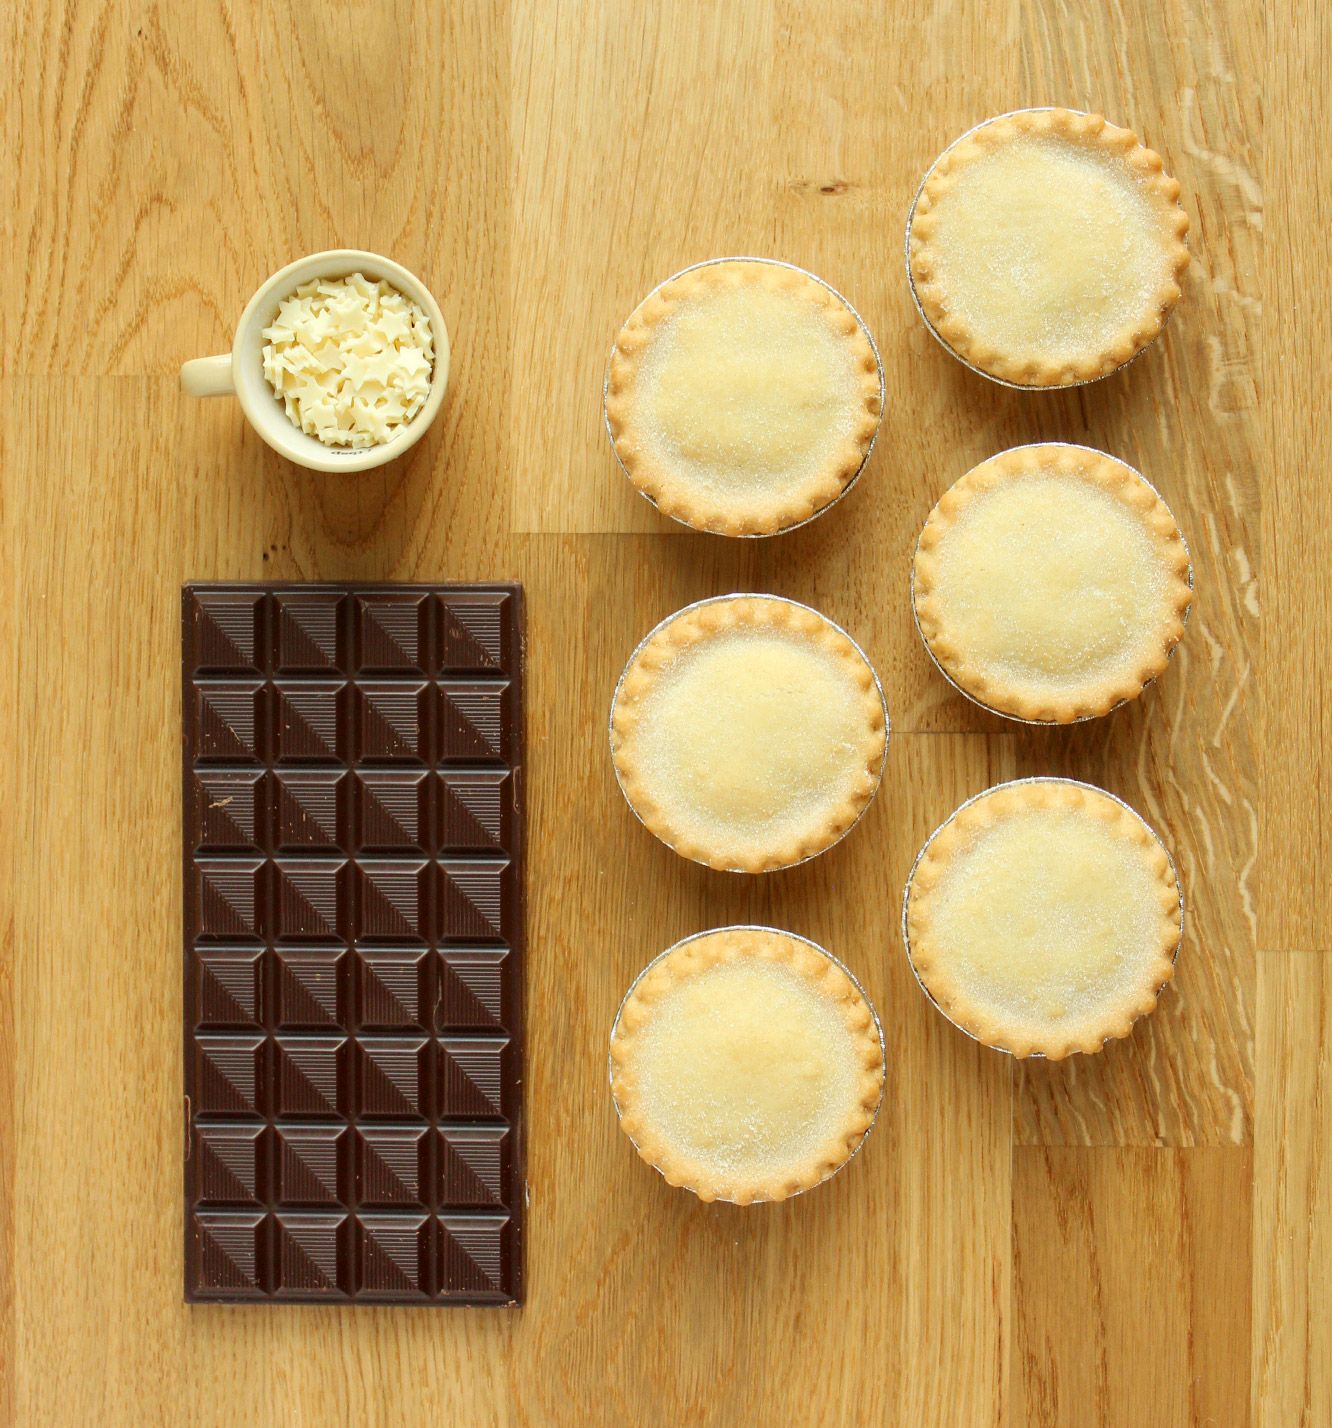
You will need
6 mince pies
300g/10.5 oz dark chocolate
Some sprinkles if you have them
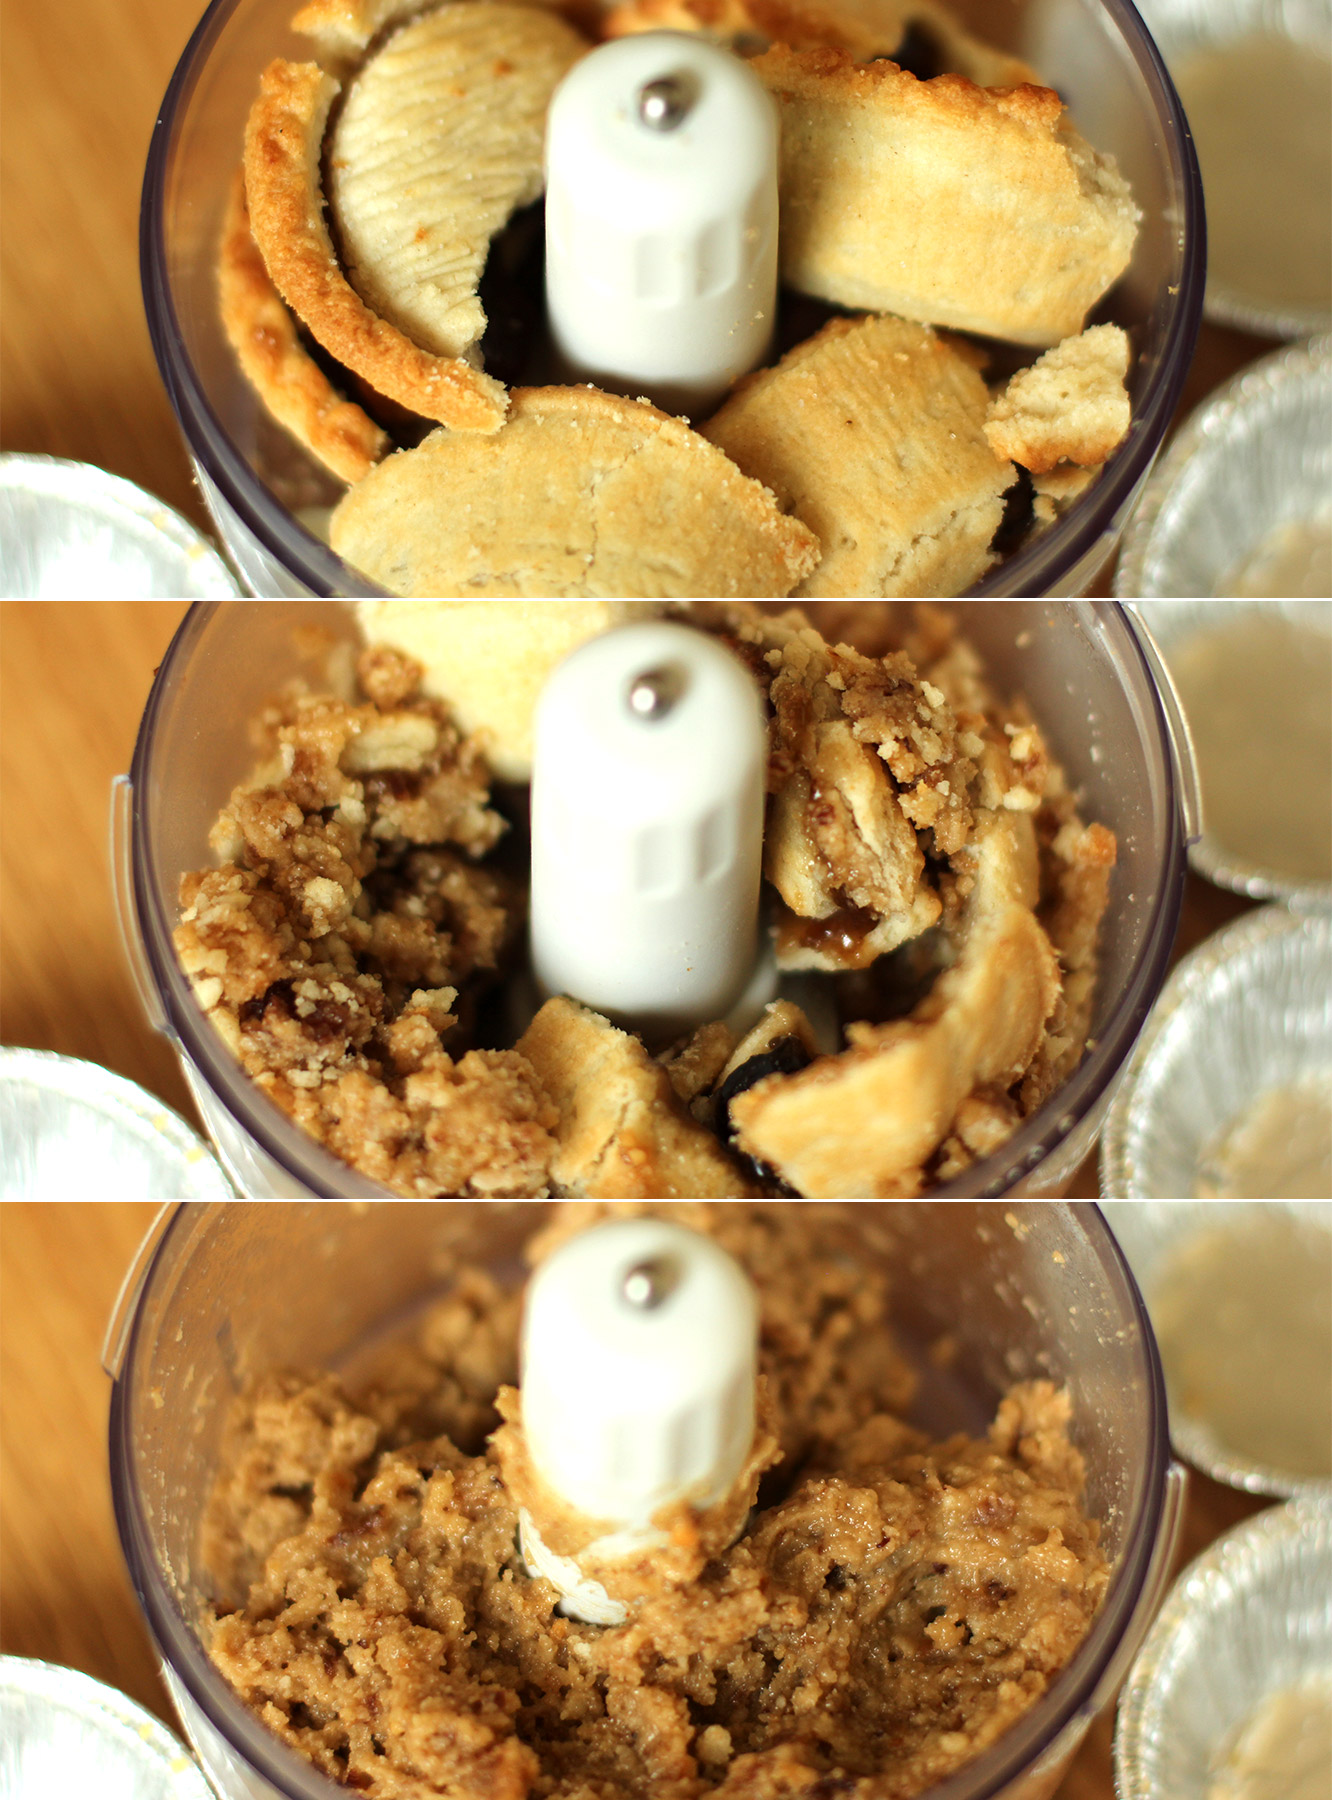
Step one
Using a food processor blitz the mince pies until they are a dough like consistency. It will be very sticky so you will probably need to put the mixture into the freezer for about 30mins to an hour.
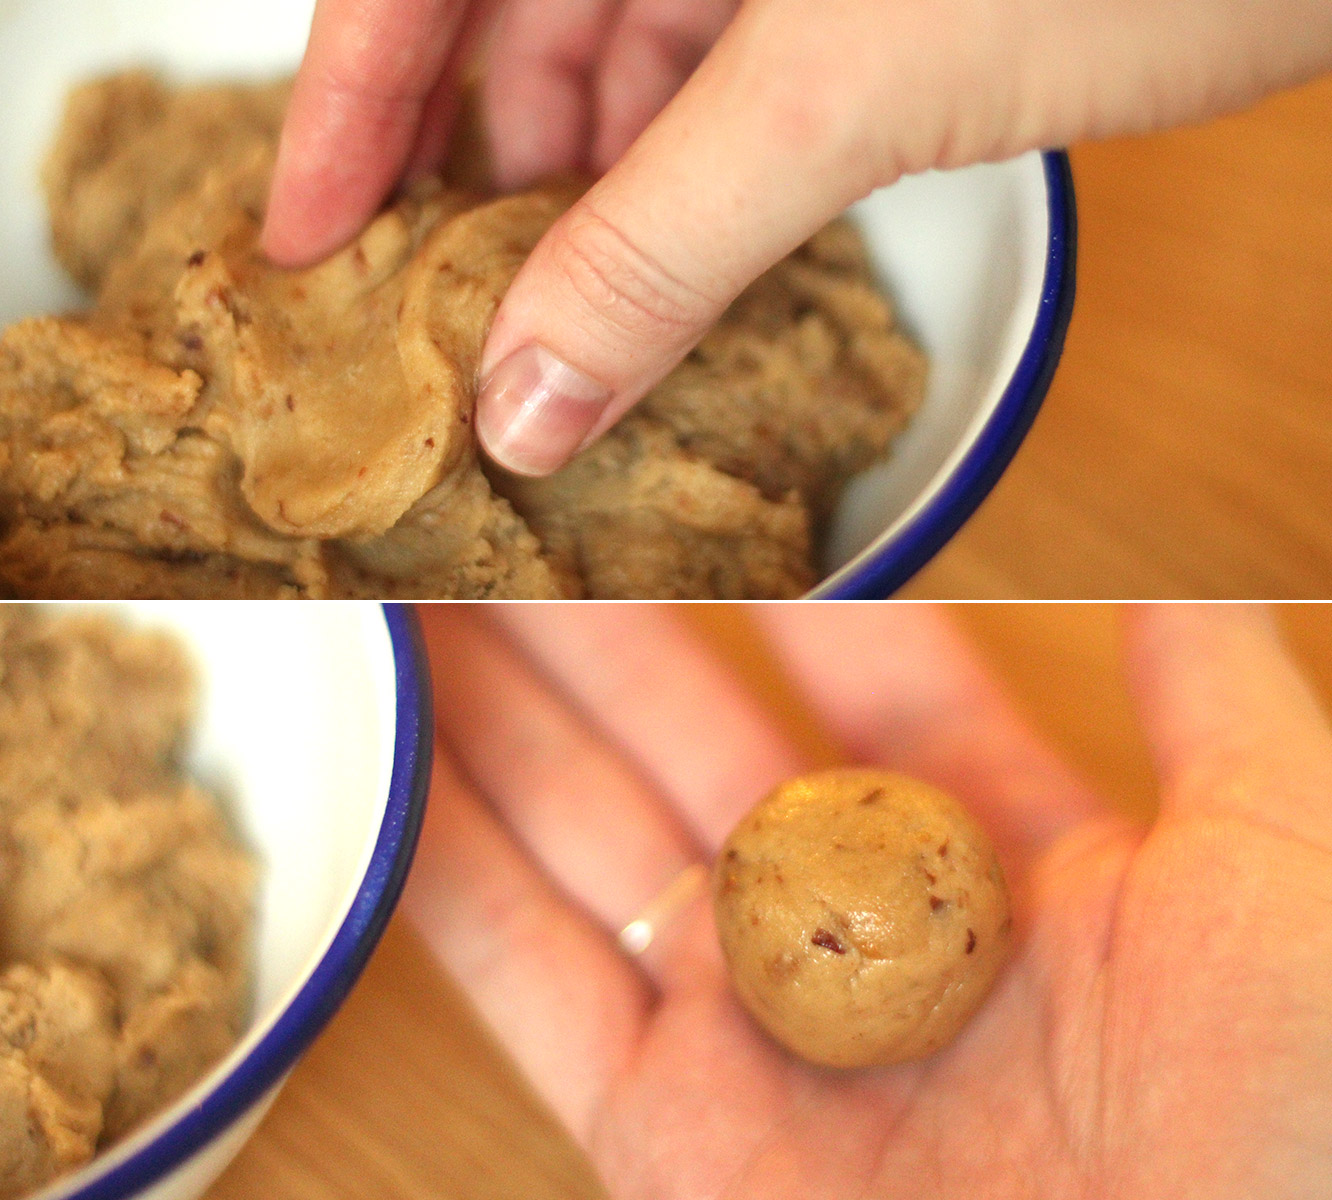
Step two
Roll the dough into evenly sized balls.
Put them back into the freezer for a while longer, until solidified.
Step three
Melt the dark chocolate and dip the truffle centres to coat them and leave them on some cellophane or greaseproof paper to dry.
If you want to see how to dip them, I cover it a little more thoroughly in this post from two weeks ago.
And there we go, early festive treats in three easy steps.
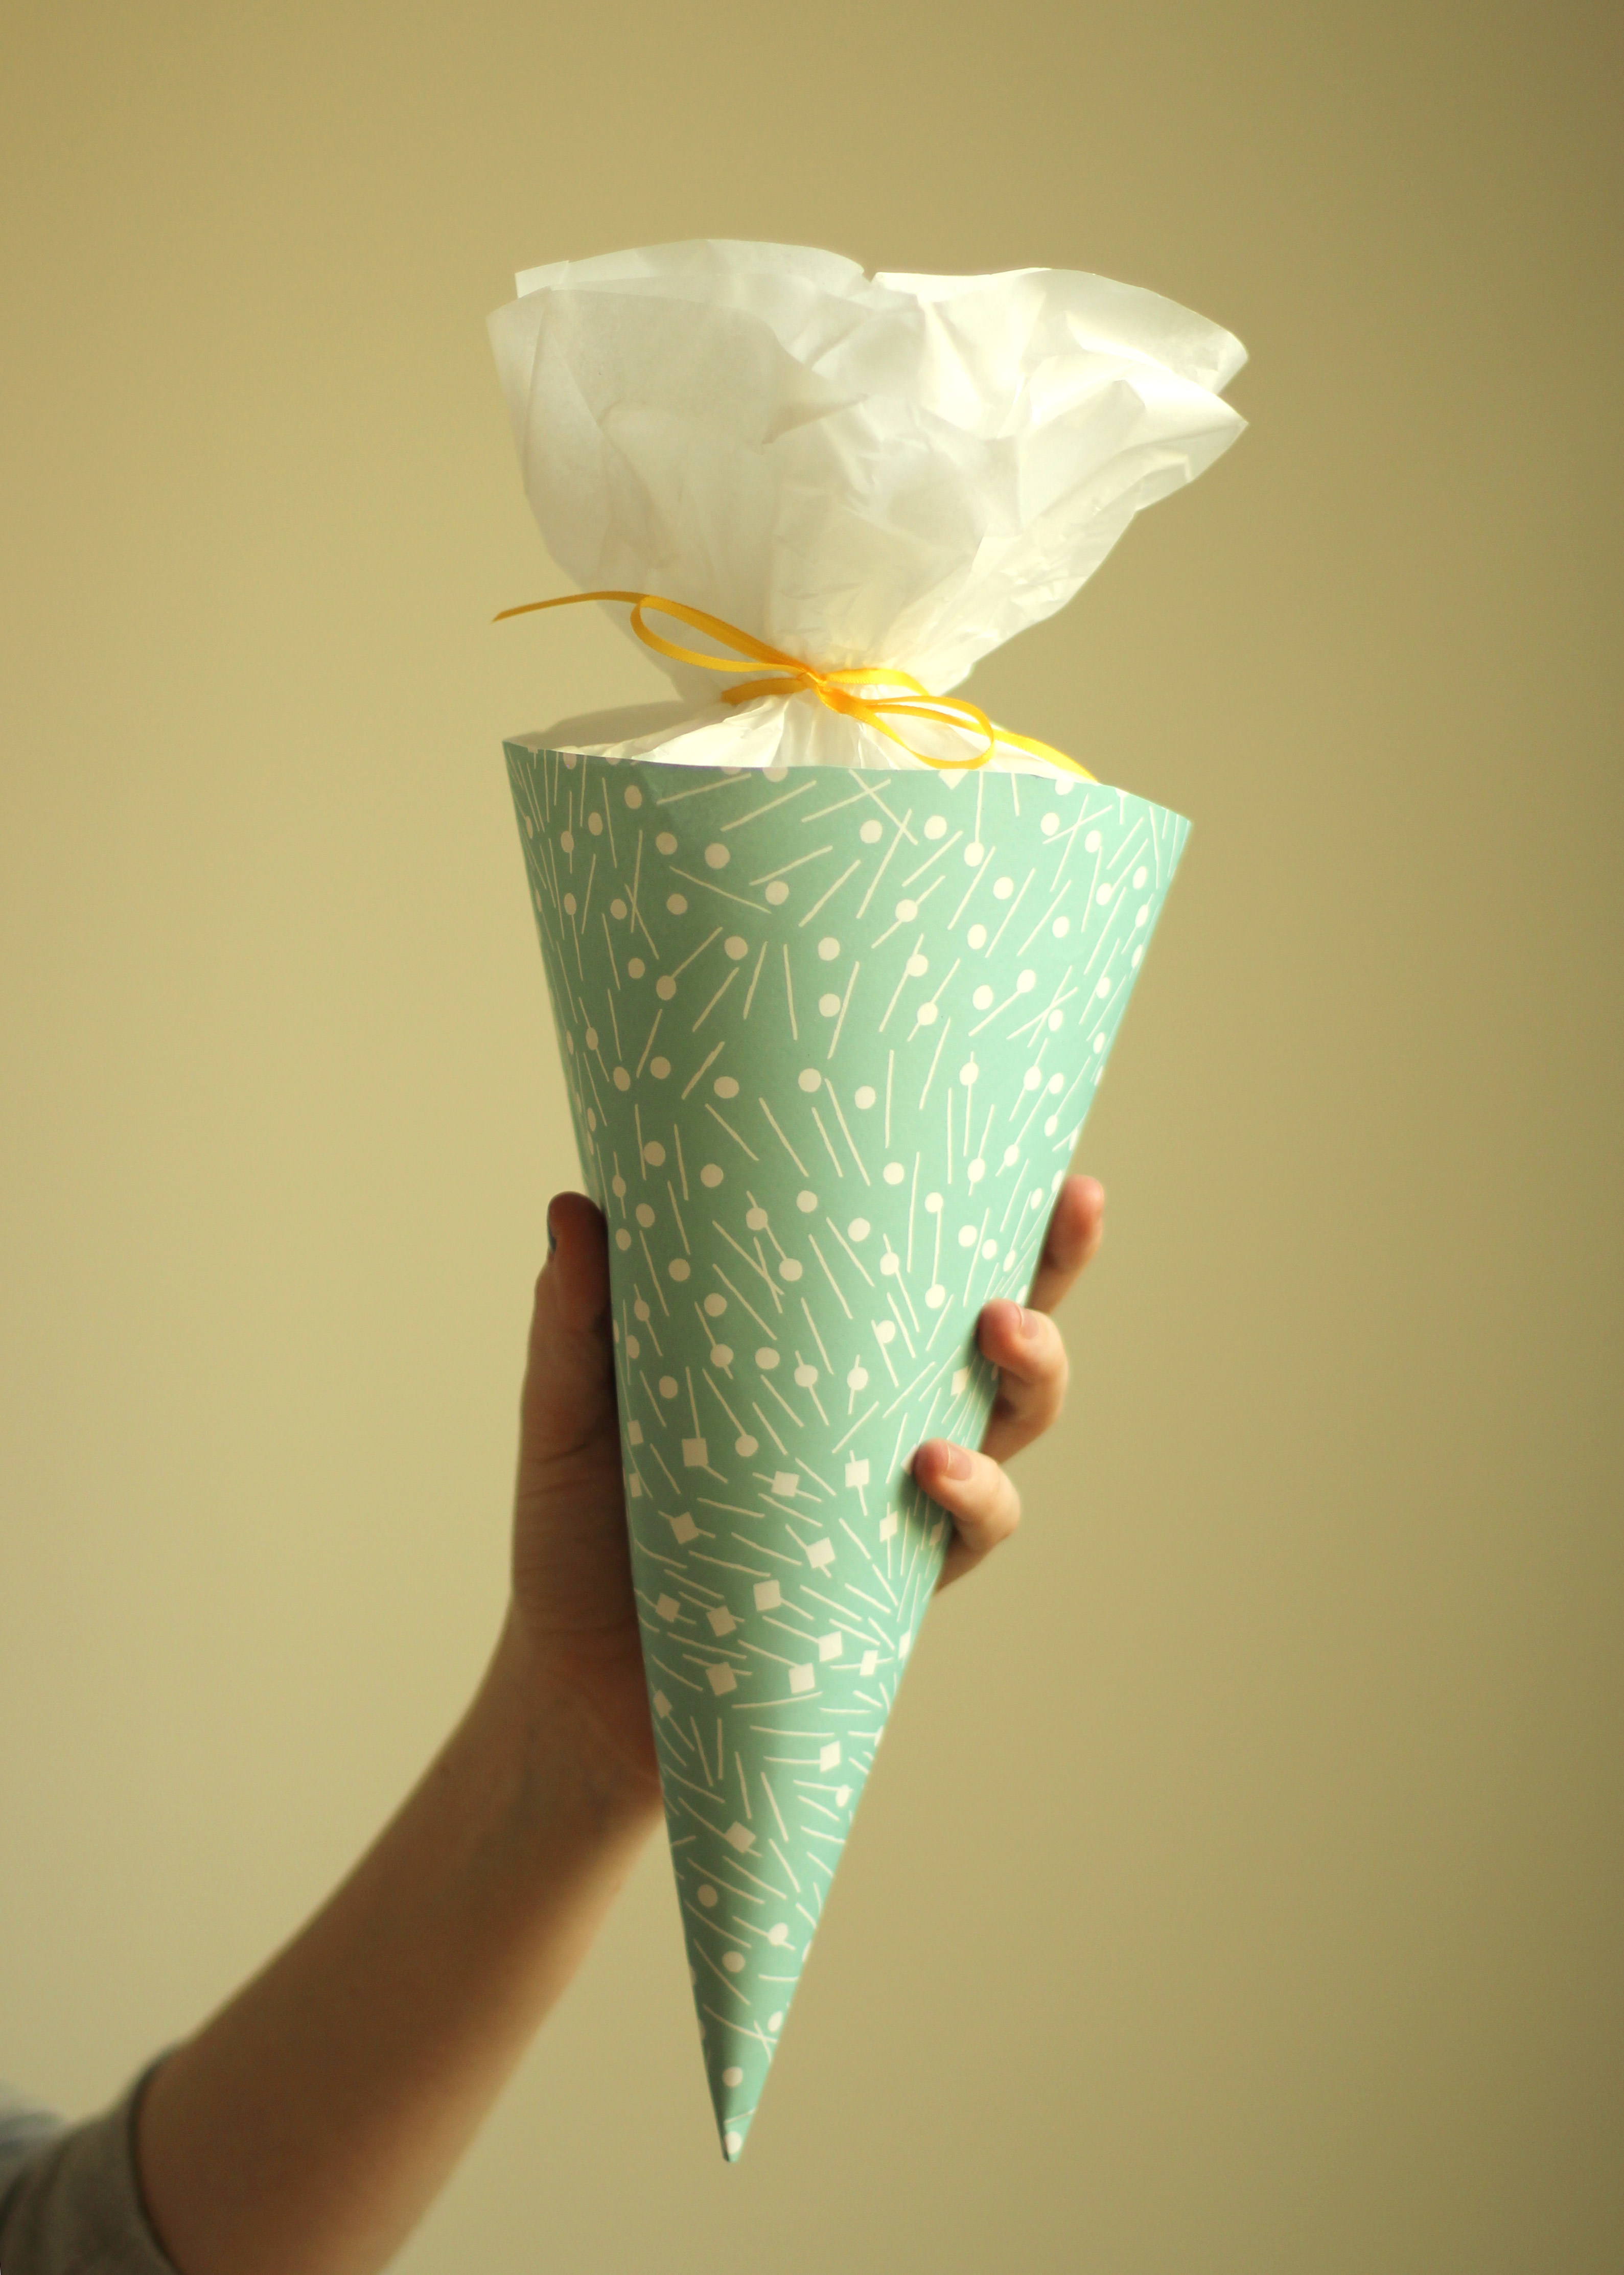
Guten Tag friends! This week’s blog post is inspired by a lovely German tradition that warmed my little heart when I was told about it.
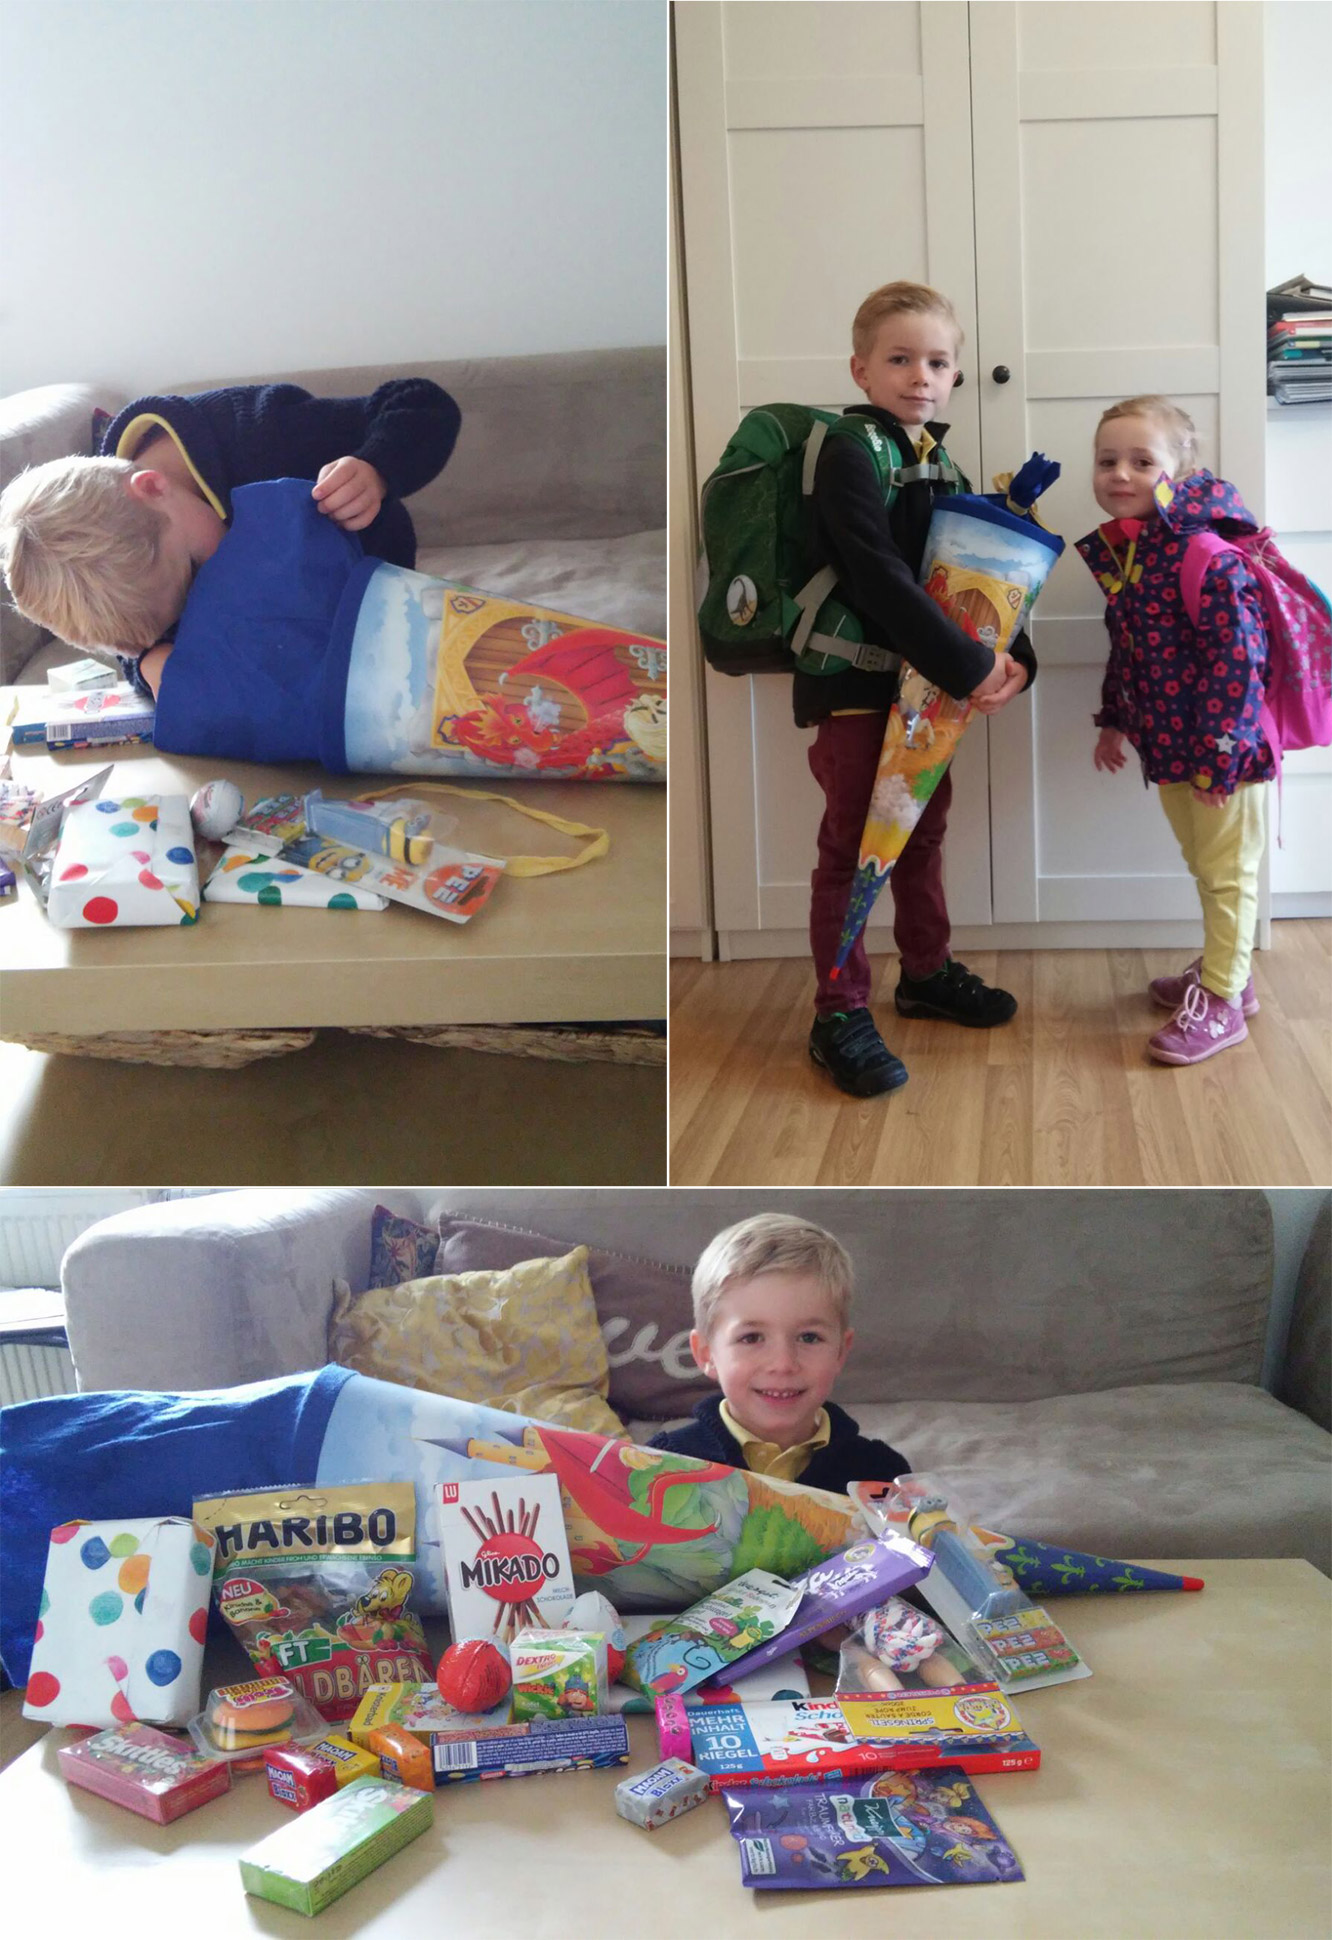
A few weeks ago I was sent these photos of a very beloved little boy; you might remember way back when we helped him make birthday party invites? Well, about 18 months later and it was the first day of school for our young sir.
What is that thing he’s holding I hear you cry? My exact response, and I didn’t have the benefit of seeing the contents like you guys at first. Well, I’m reliably informed that in Germany children get a Schultüten on their first day of school, a cone full of lovely treats. The best part is that sometimes adults get a mini version for their first day at a new job. Cute or what?!
I considered making myself one for my new job a few weeks ago, but that is mildly tragic. Thankfully, to rescue me from celebrating myself in that slightly embarrassing way, my friend Matt (who also happens to be Vicky’s husband) managed to land himself one starting this week, yay Matt. Enter Katie and her Schultüten.
By the way, I did take some of these truffles into work myself, and to brag not to brag, but one of my new colleagues described them as “chocolates worthy of a transcontinental move”. I may have asked her to workshop her review a little until we got to that point, and in return I will probably end up making some for her to give her boyfriend to encourage such a move.
Moving on. From THE LONGEST introduction to any blog post ever, I really shouldn’t write these tired.
You will need
For the truffles:
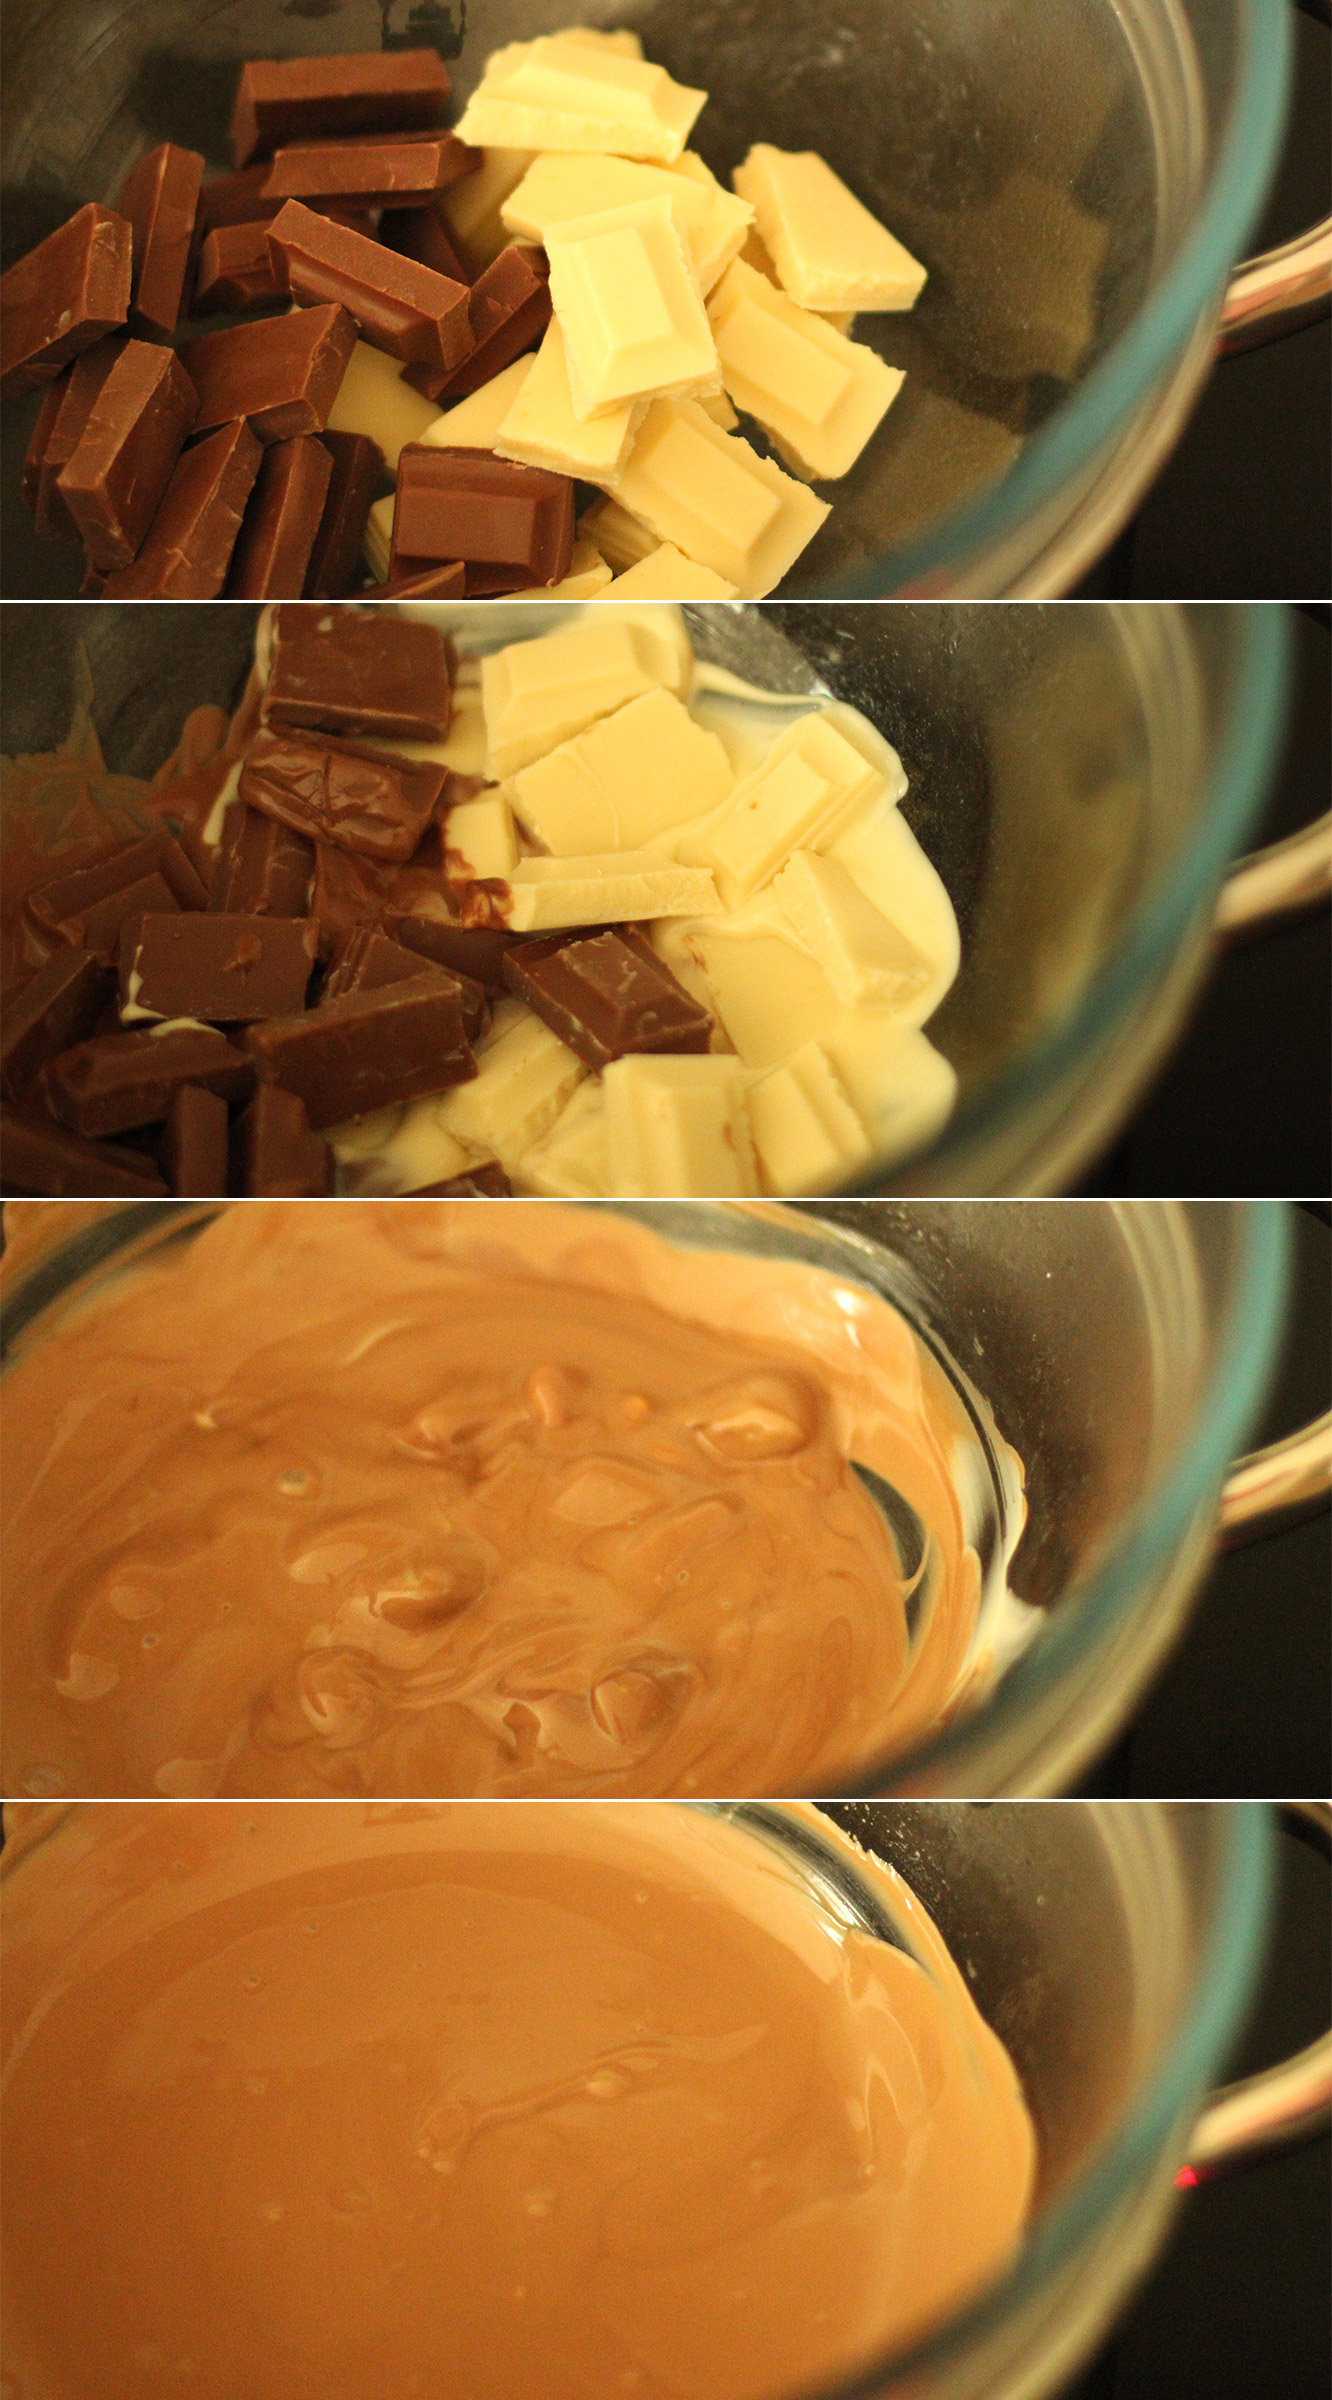
400g/14 oz milk chocolate
400g/14 oz white chocolate
180ml/6 fl oz double cream
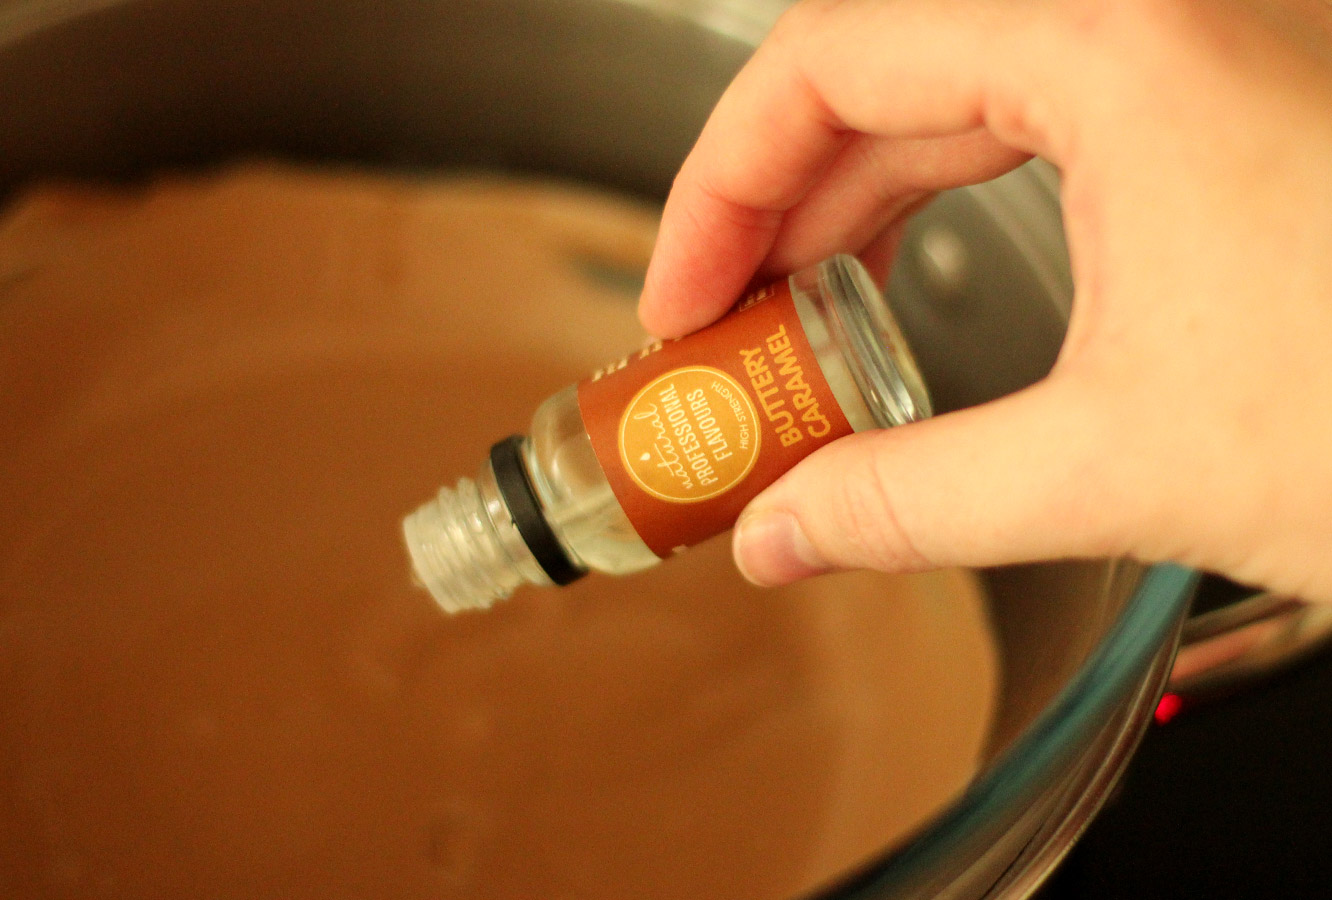
Caramel flavouring (I swear by Natural Professional Flavours – buttery caramel)
(makes up to 40 truffles)
For the cone:
Nice quality wrapping paper (I got mine from Foyles if you’re in the UK)
Tissue paper (preferably a colour that doesn’t clash with your choice of paper)
Ribbon
Double sided tape
Step one
Melt 200g of each chocolate in a heatproof bowl over a pan of simmering water.
Step two
Add 1 tsp or so of the caramel flavouring (you can use other brands of flavouring by the way, a lot of supermarkets offer a caramel flavour now).
This is really just a great excuse to taste test the melted chocolate until you’re happy with it. It’s ok if this takes a few spoonfuls, being a perfectionist is a good thing.
Step three
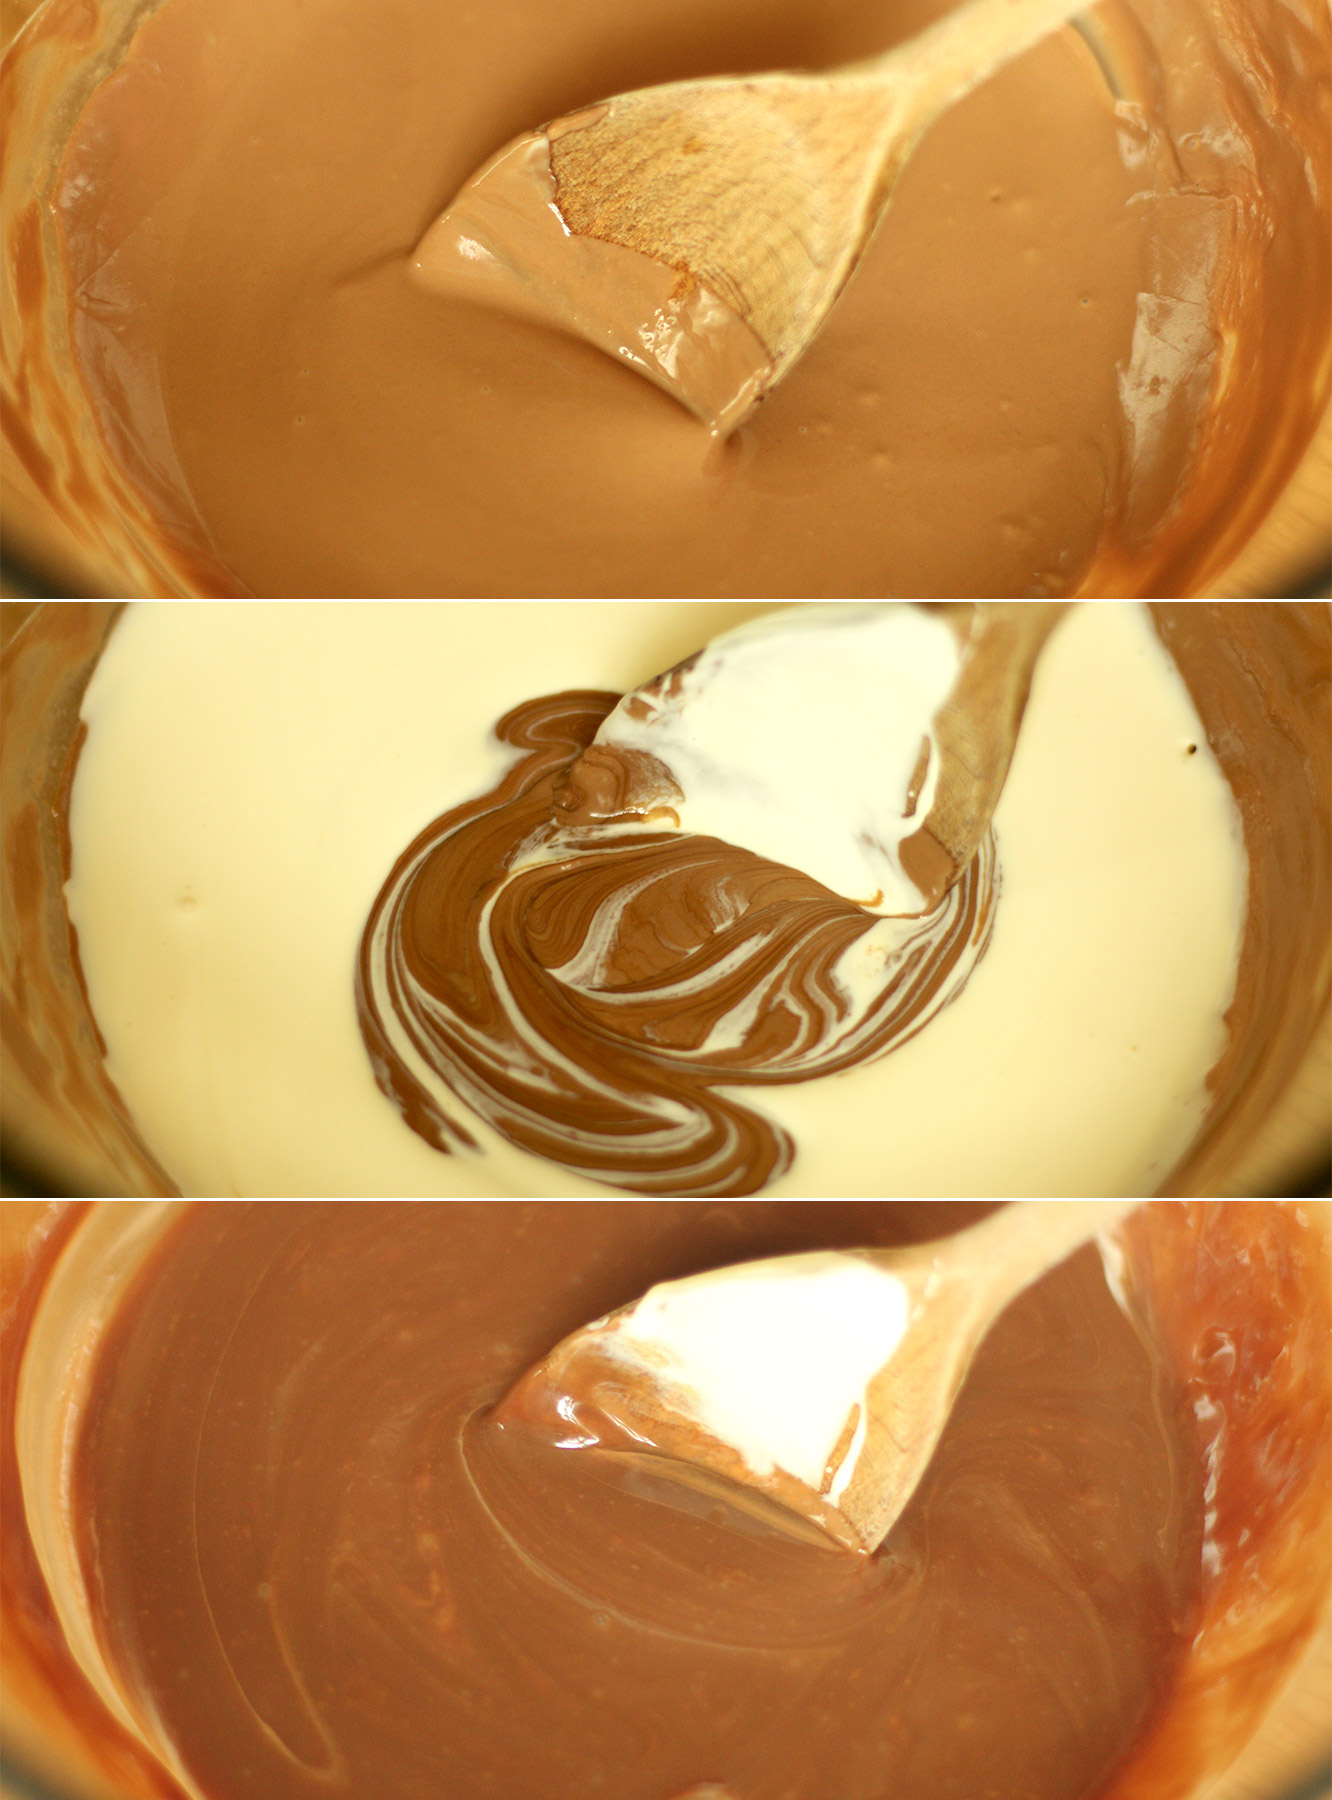
Remove the chocolate from the heat and stir in the cream until fully combined. You will probably need to leave this to set for a while.
Leave it on the side if you have time, the fridge if you’re slightly hurried, or even the freezer if you’re desperate to take photos for your blog in the fading natural light (thanks winter).
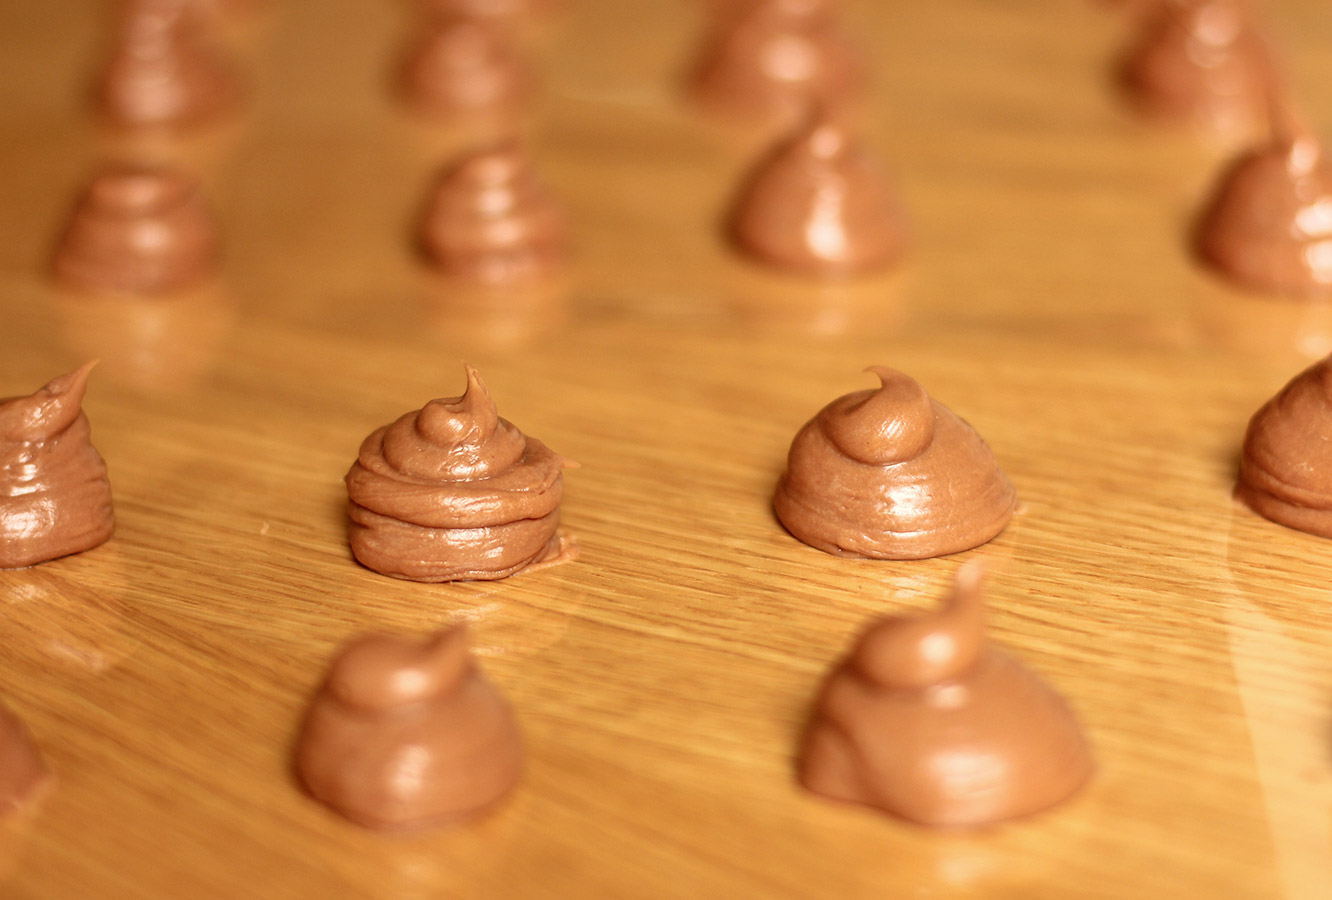
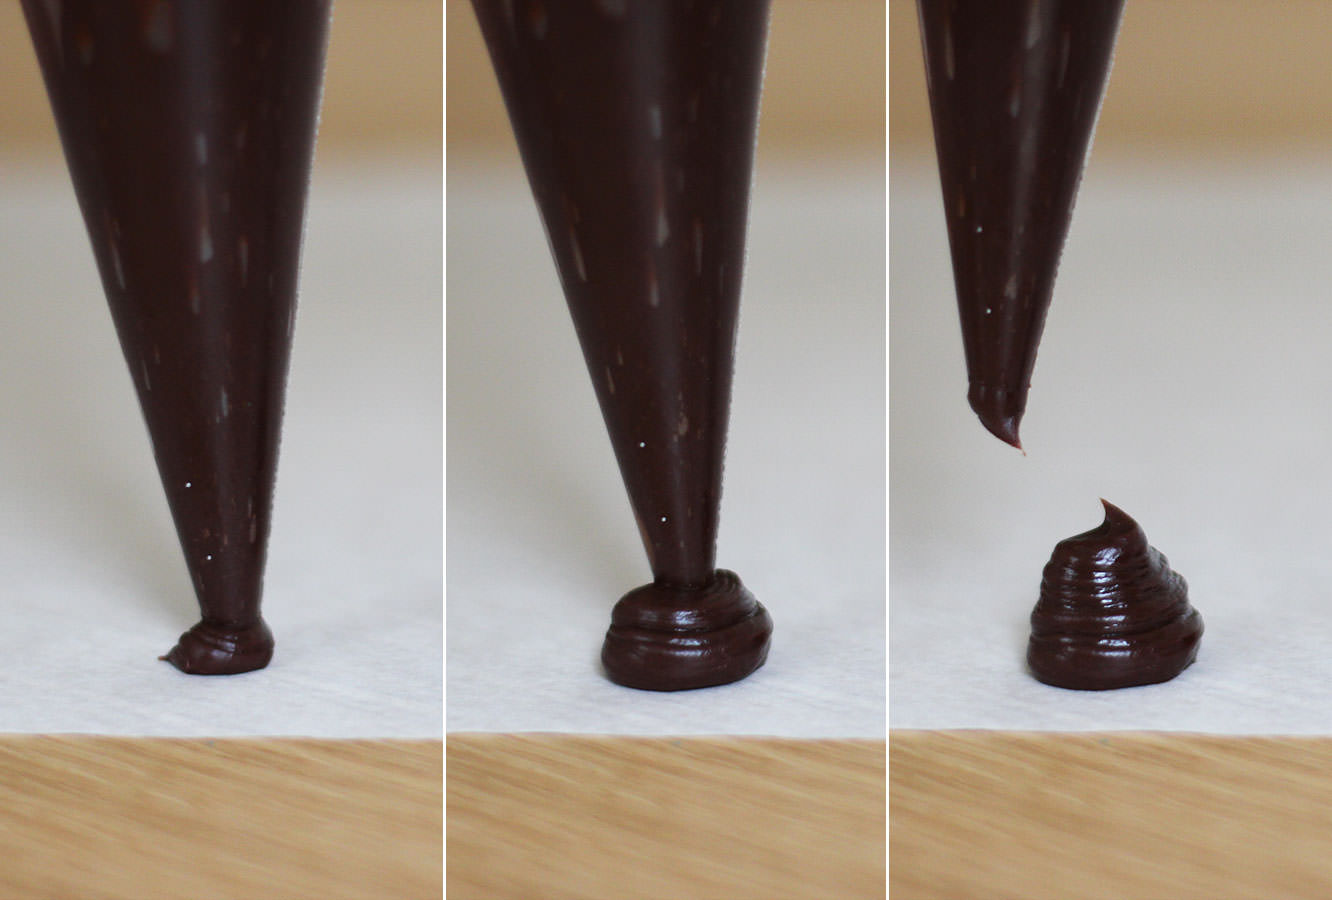
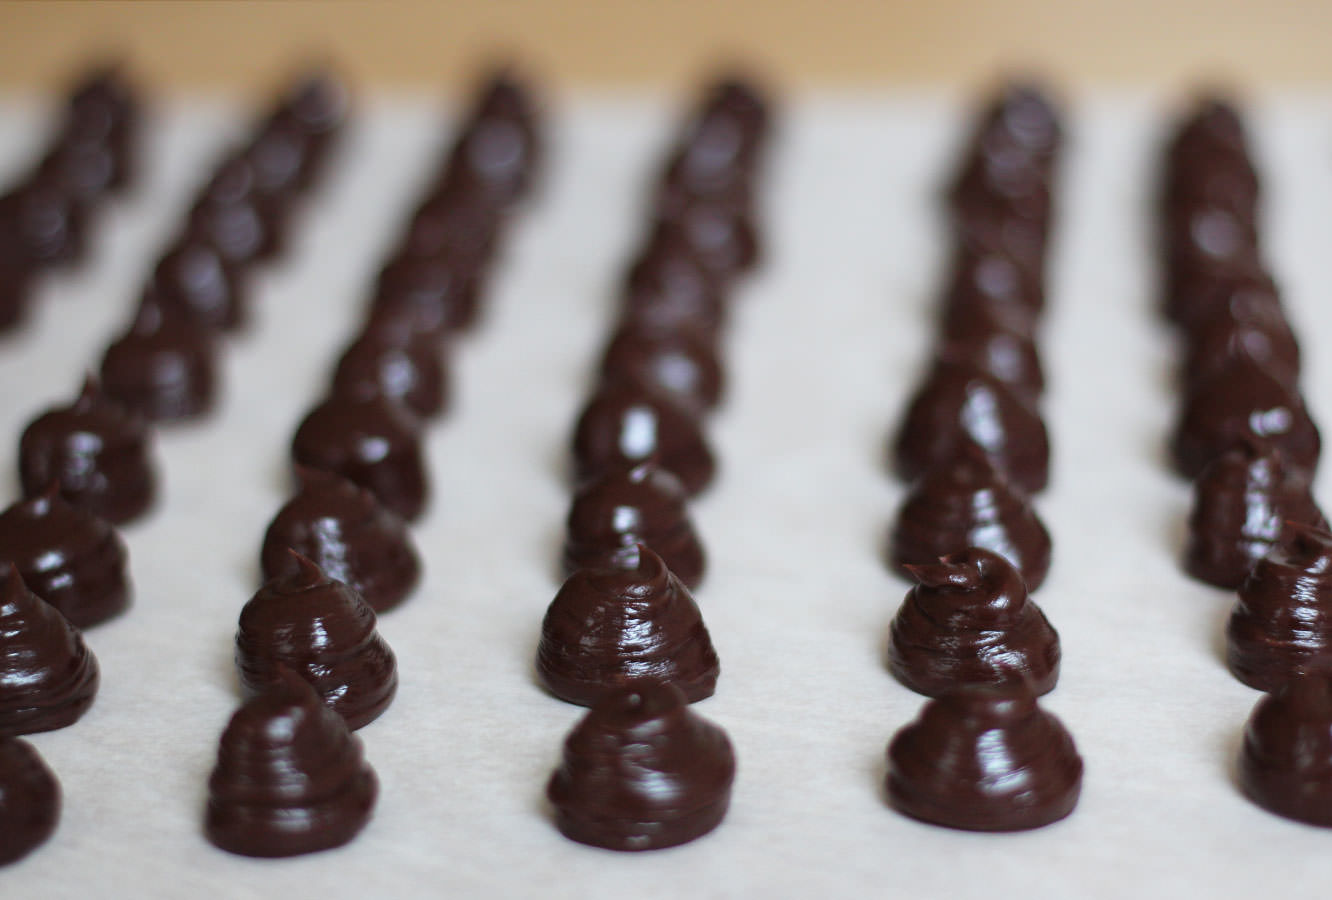
Step four
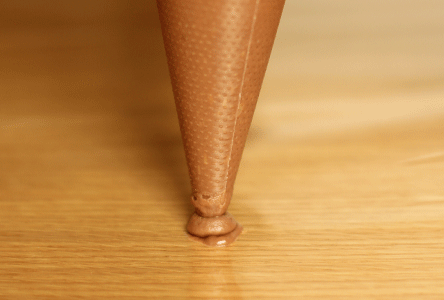
Once the mixture is pipe-able, lay out a sheet of cellophane or greaseproof paper and pipe out evenly sized blobs (yes, that’s the technical term). They need to be about, well, truffle sized, whatever that means to you pal.
Step five
Leave to set, you can put them in the fridge if you want to.
They look appetising, don’t they?
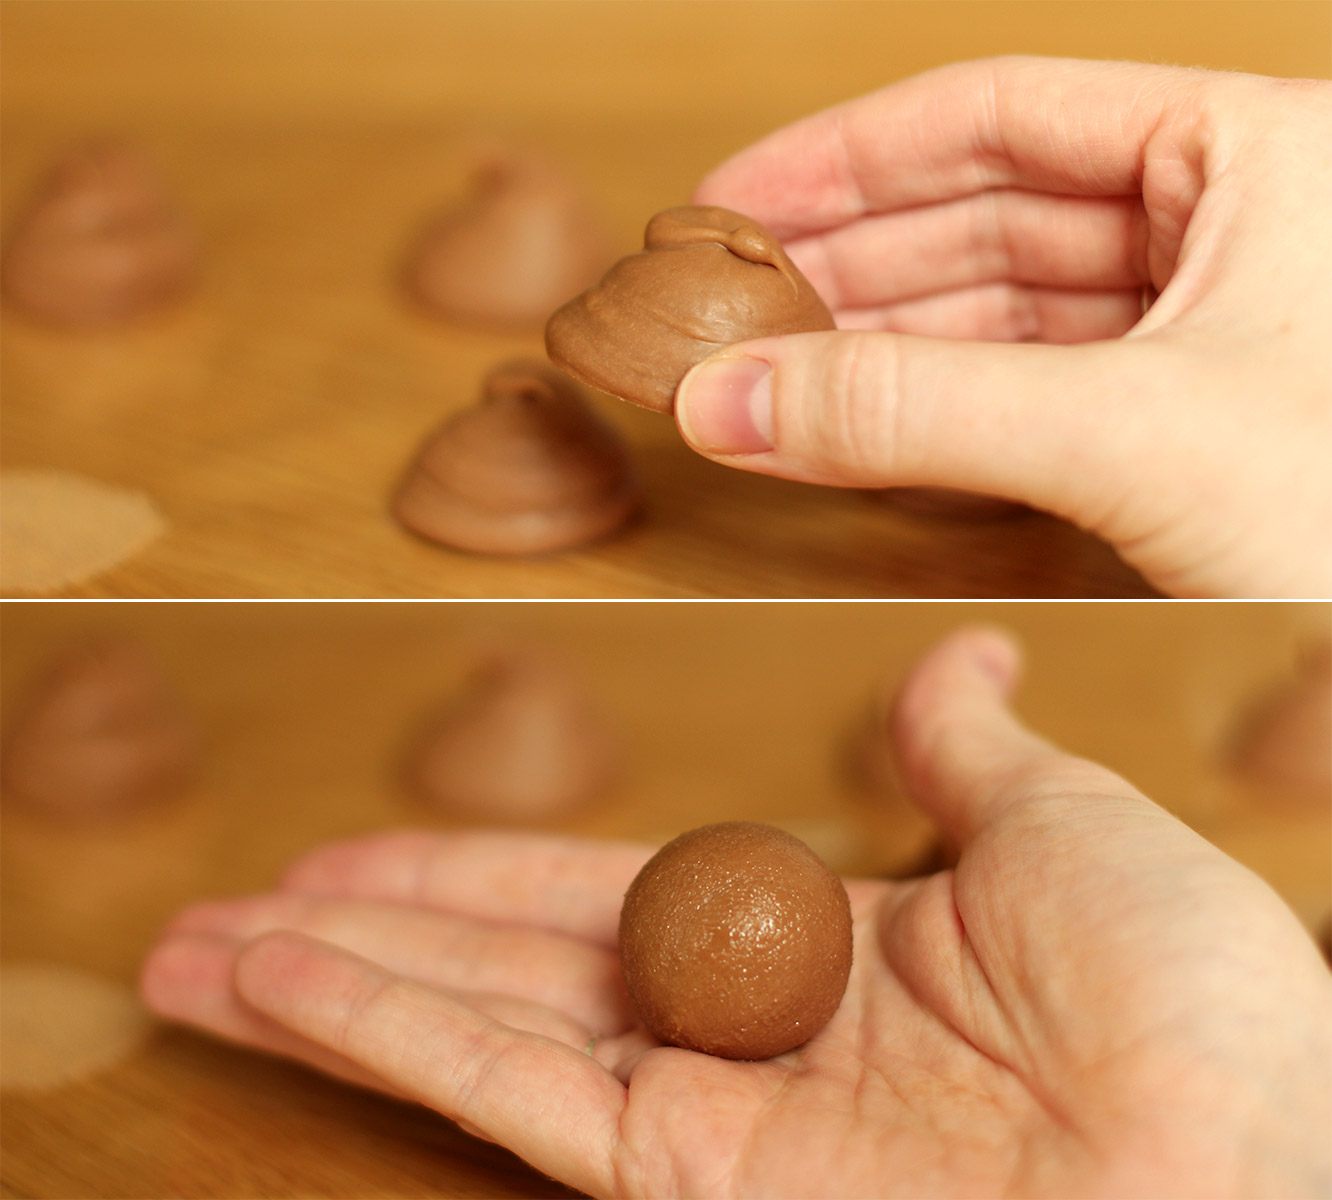
Step six
With clean and cold hands (clue: wash them under the cold tap). Squash the piped shapes a little with your fingers and roll into a ball between your palms.
You will probably need to wash your hands a few times as you go as they will start to melt as your hands warm up.
I then put mine back in the fridge while I melted the chocolate for coating.
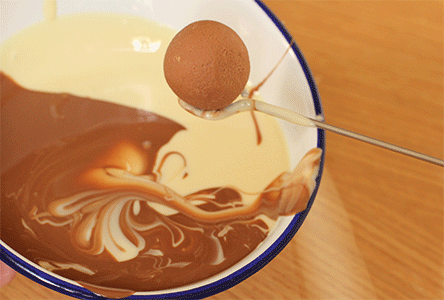
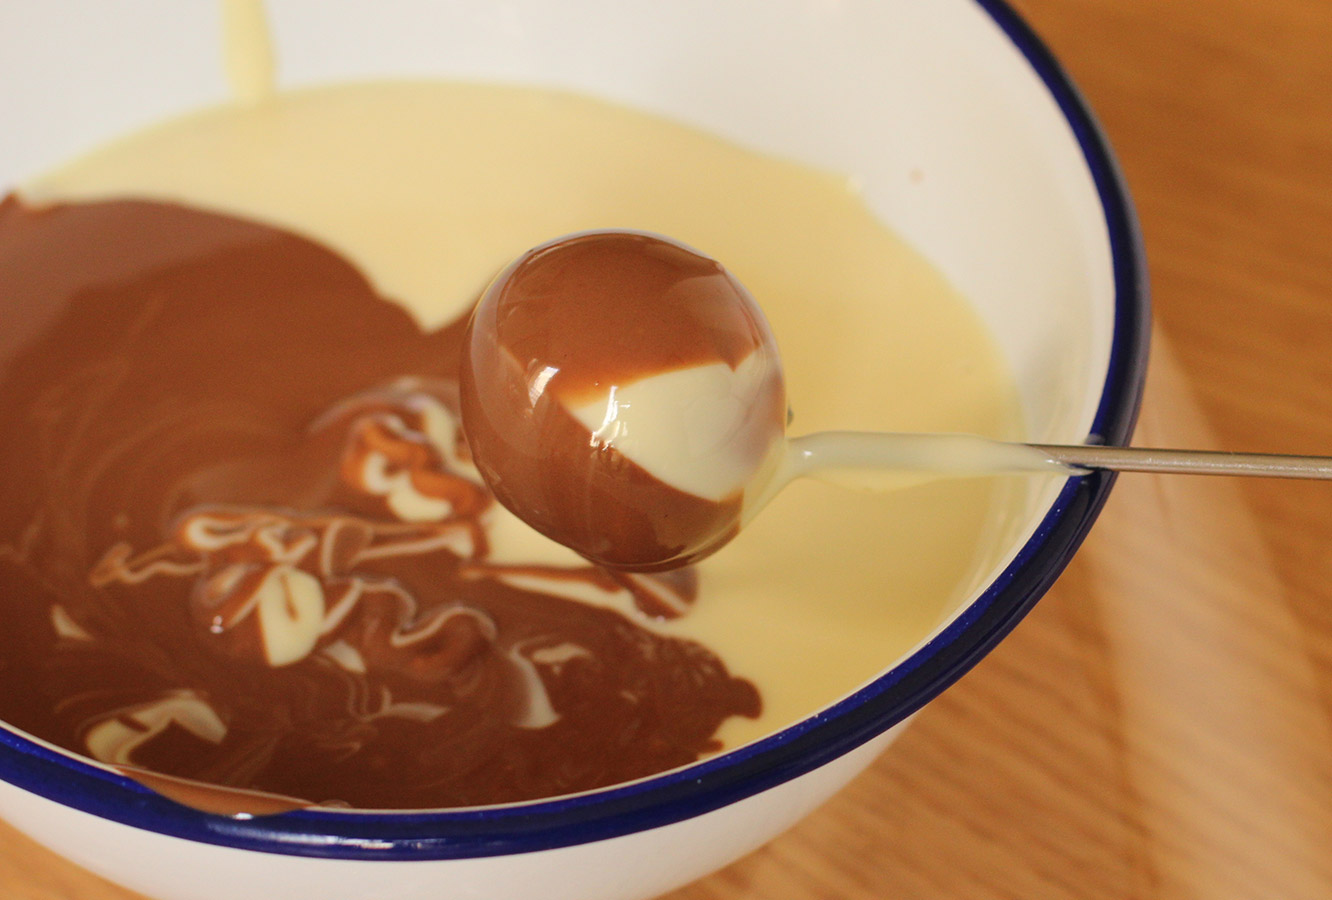
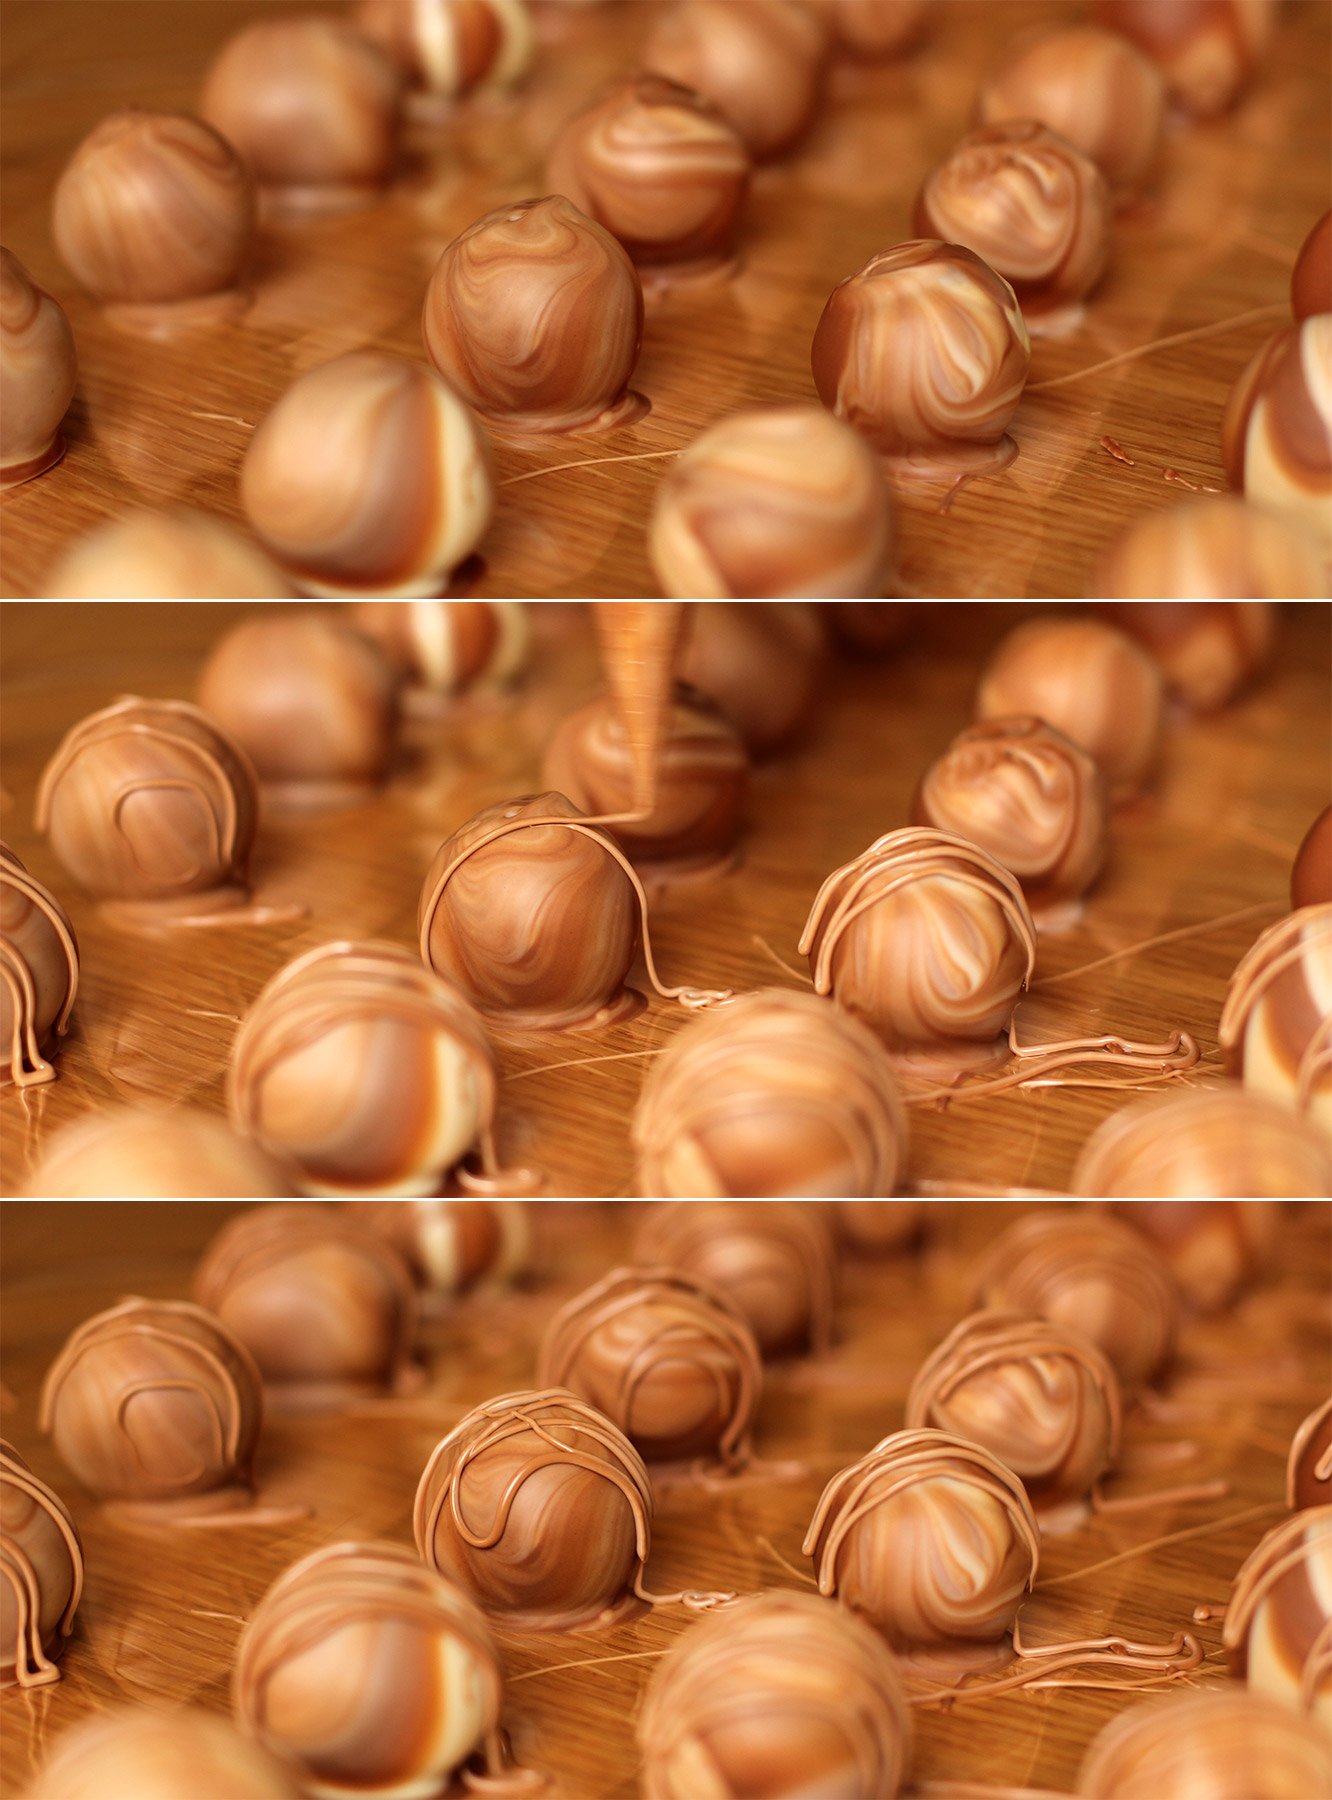
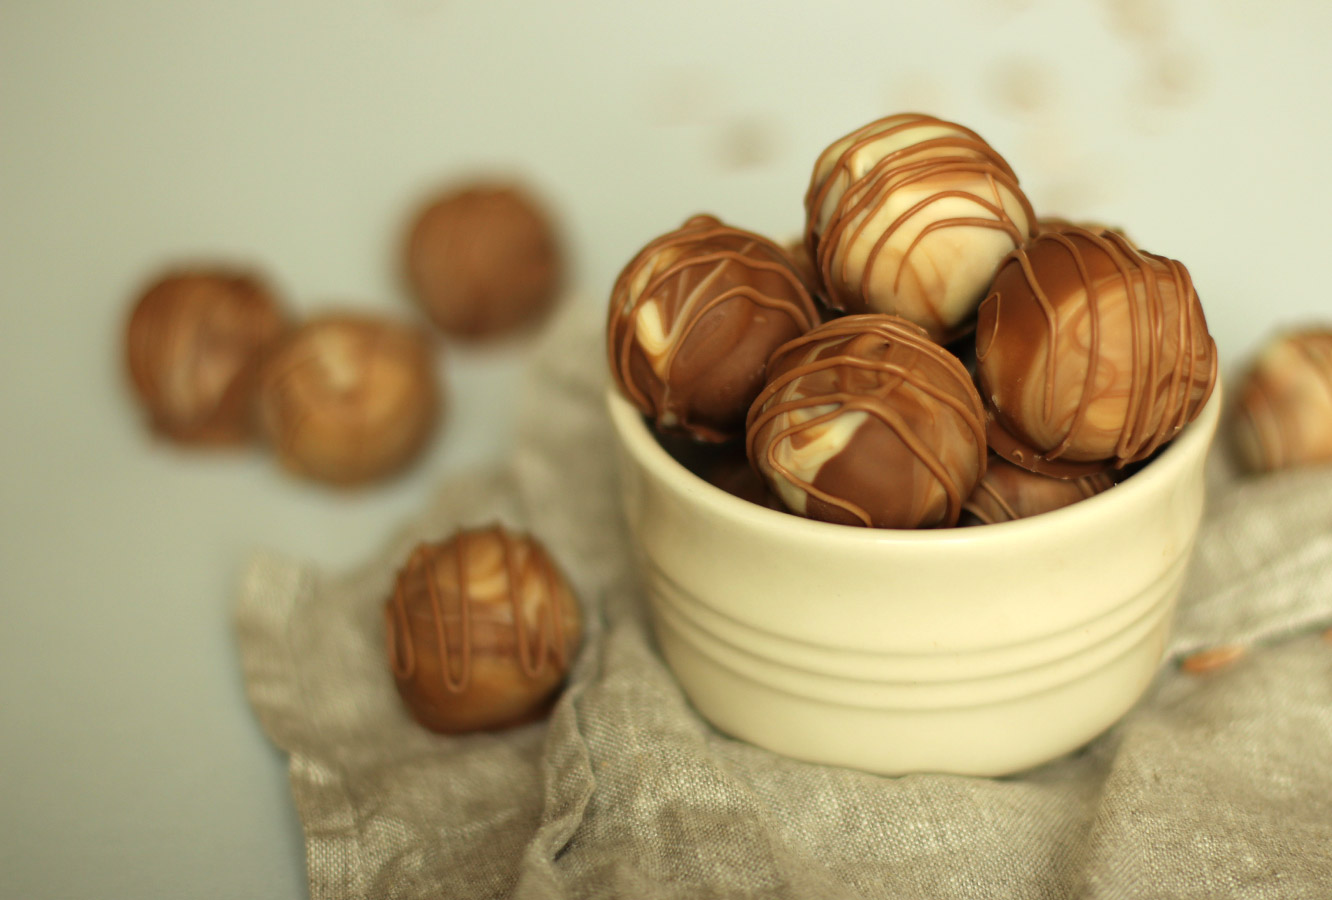
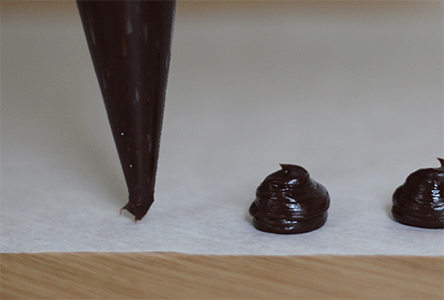
Step seven
Melt the remaining white and milk chocolate separately and pour simultaneously into a small, deepish container or bowl. This is to get a marbled effect on the outside, but you could always stir them together if you don’t fancy the look of that.
Using either a plastic fork with the middle prongs taken out, or the end of a metal kebab skewer, dip the truffle centres in the chocolate.
Step eight
Repeat until you’re out of truffles. Leave to set. This time, don’t shortcut with the fridge, you want them to set at room temperature so that they don’t melt at room temperature.
Step nine
Put the leftover dipping chocolate in a piping bag and drizzle over the truffles.
Put the remaining melted chocolate in your mouth with a spoon. Or just pipe it straight in there.
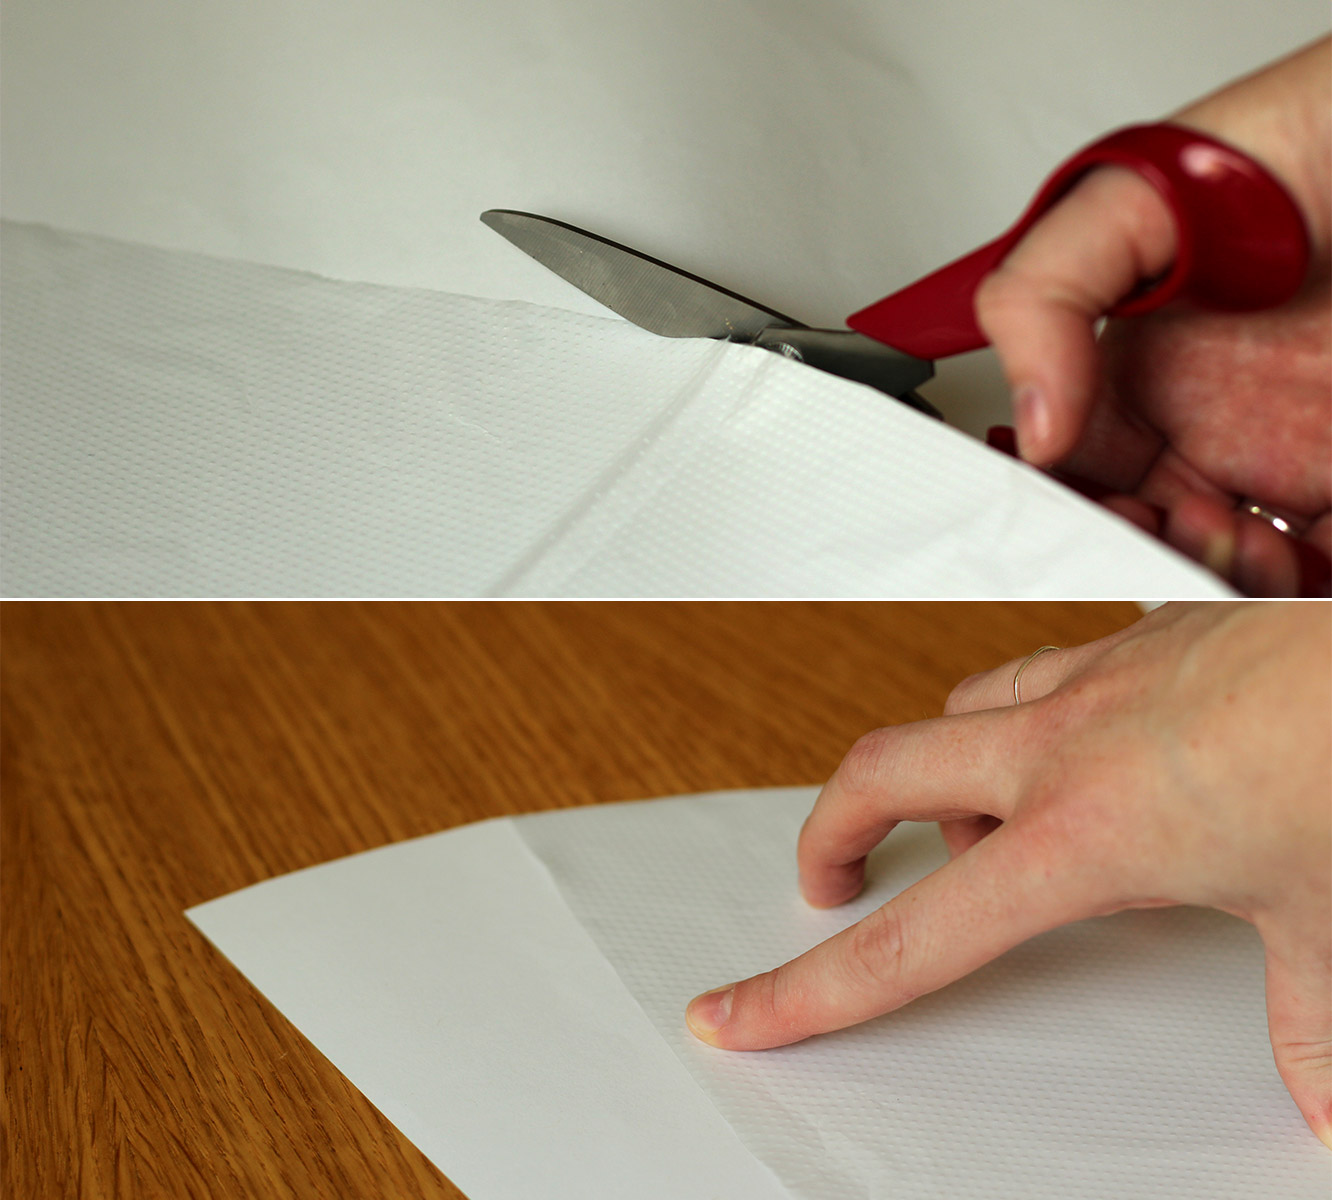
Step ten
Cut open a piping bag so that it lies flat and use it as a template to cut round. Add a little extra on one side for overlap, and snip the pointy end off the bottom so it’s flat.
Step eleven
Cut three or four sheets of tissue paper to the same shape, but add another 10 cm to the top.
Tape the straight edges of the tissue to the wrong side of the wrapping paper.
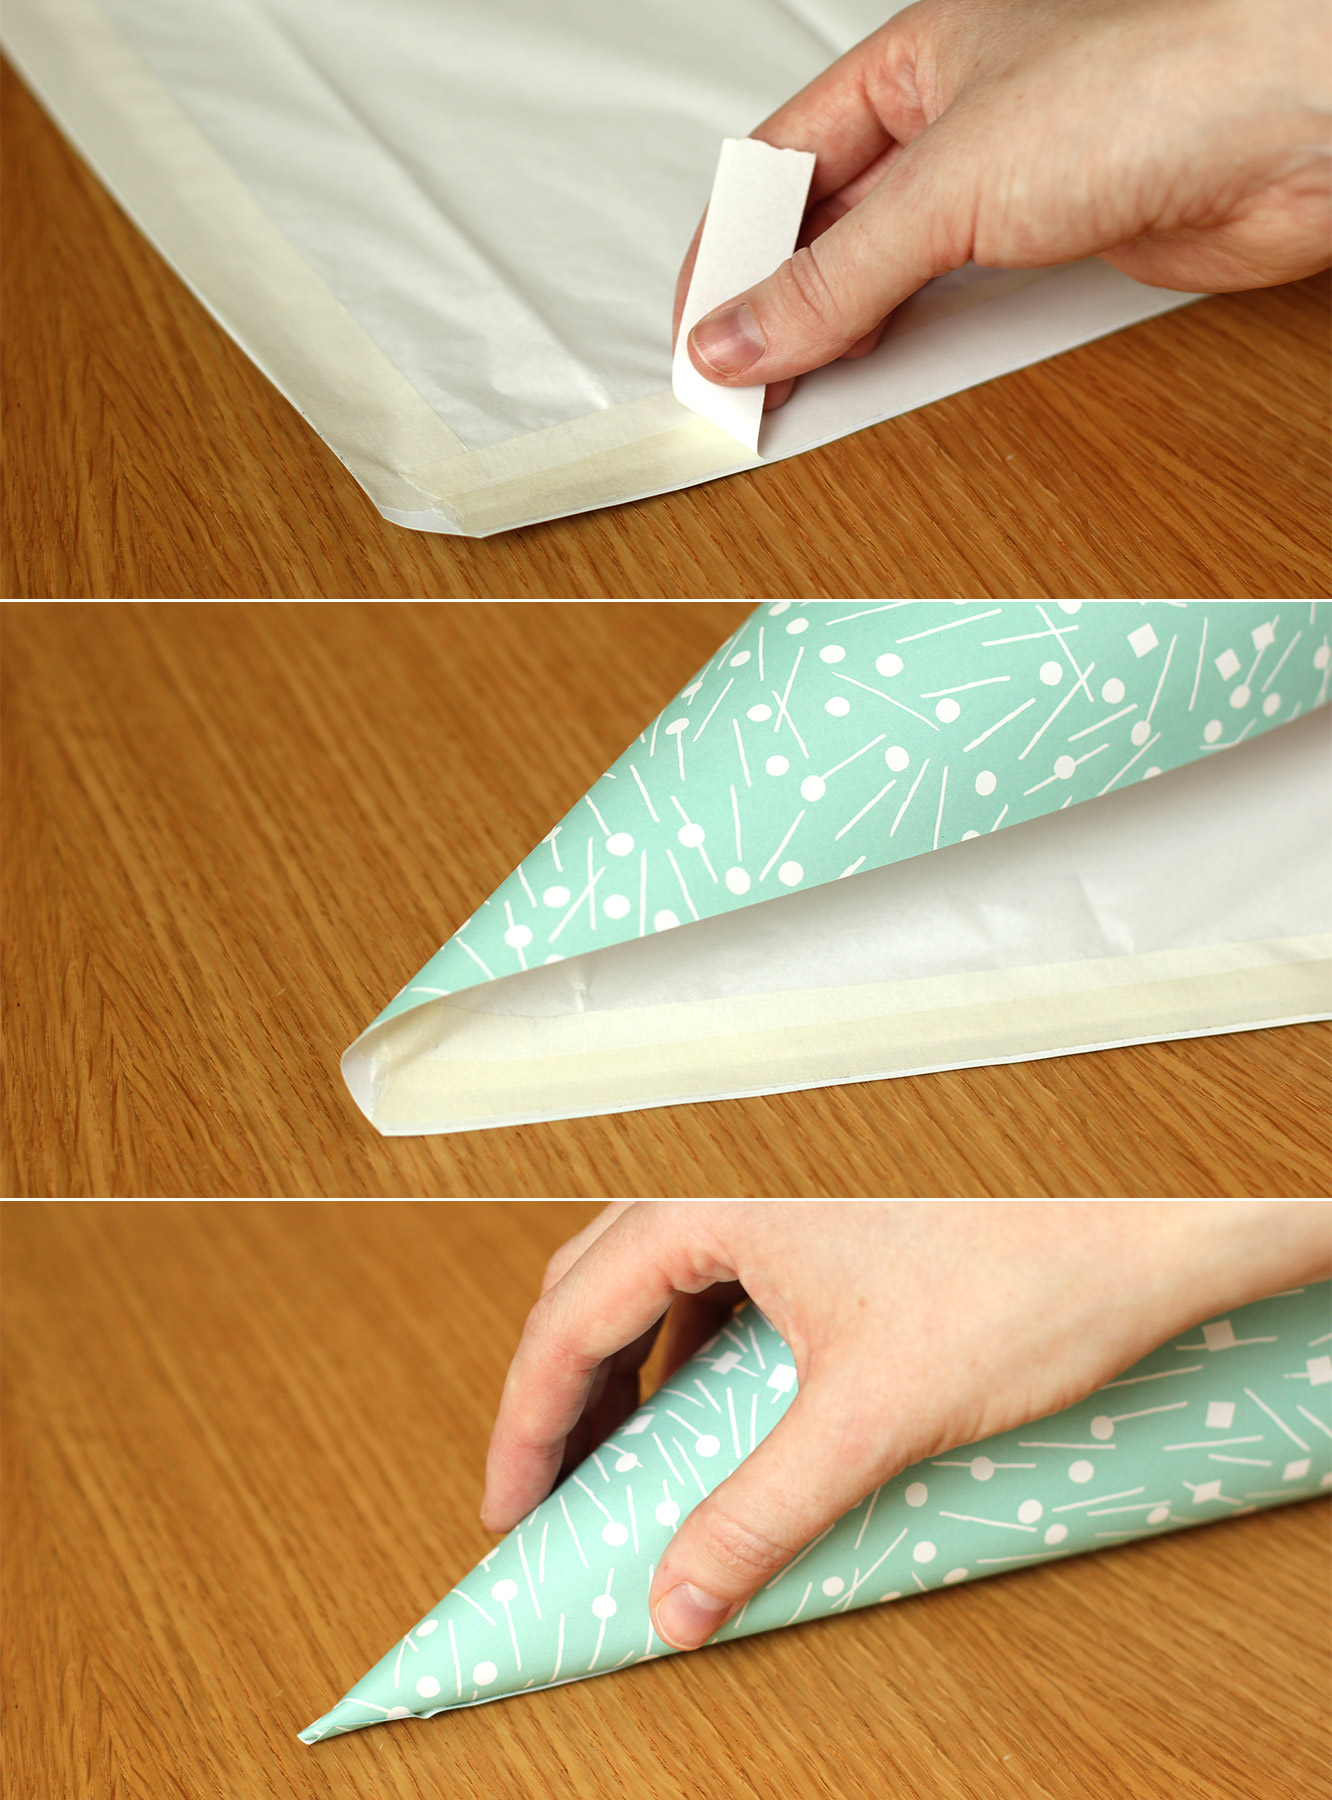
Step twelve
Fold back the top of the tissue paper on the large curved edge. Place double-sided tape around the edge and fold the tissue back over so that it is stuck the whole way round the top.
Step thirteen
Use another strip of double-sided tape down the straight edge to roll the paper into a conical shape. You should have something like the below.
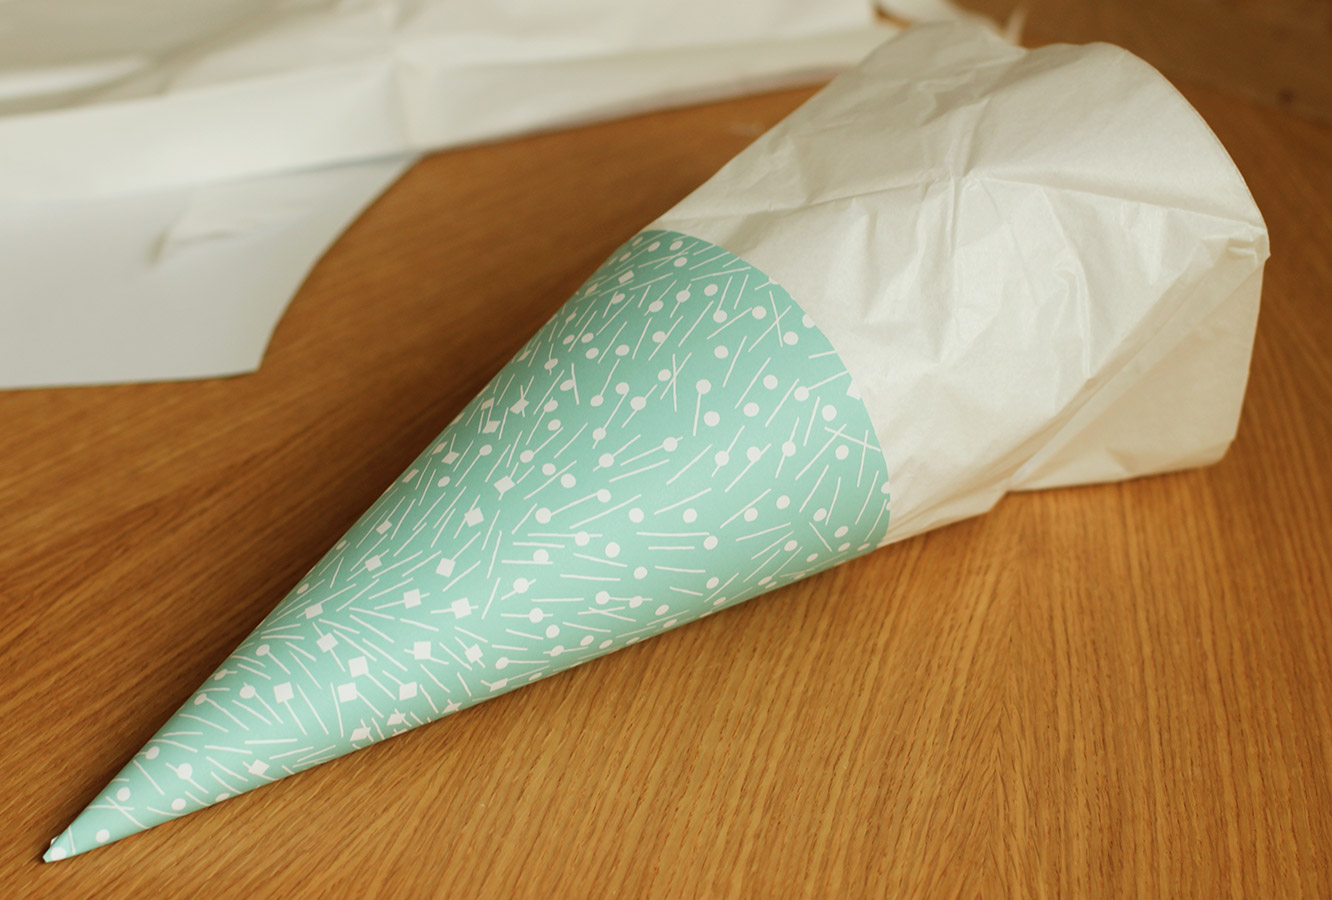
Step fourteen
Fill another piping bag with truffles and place in the cone, or Schultüten, and tie up the top with a piece of ribbon.
This week two celebrations collided when my lovely teacher at college had a special birthday and we crept ever closer to the 25th December. Thankfully, teach didn’t mind the seasonally confused gift – Happy Birthday Lana!
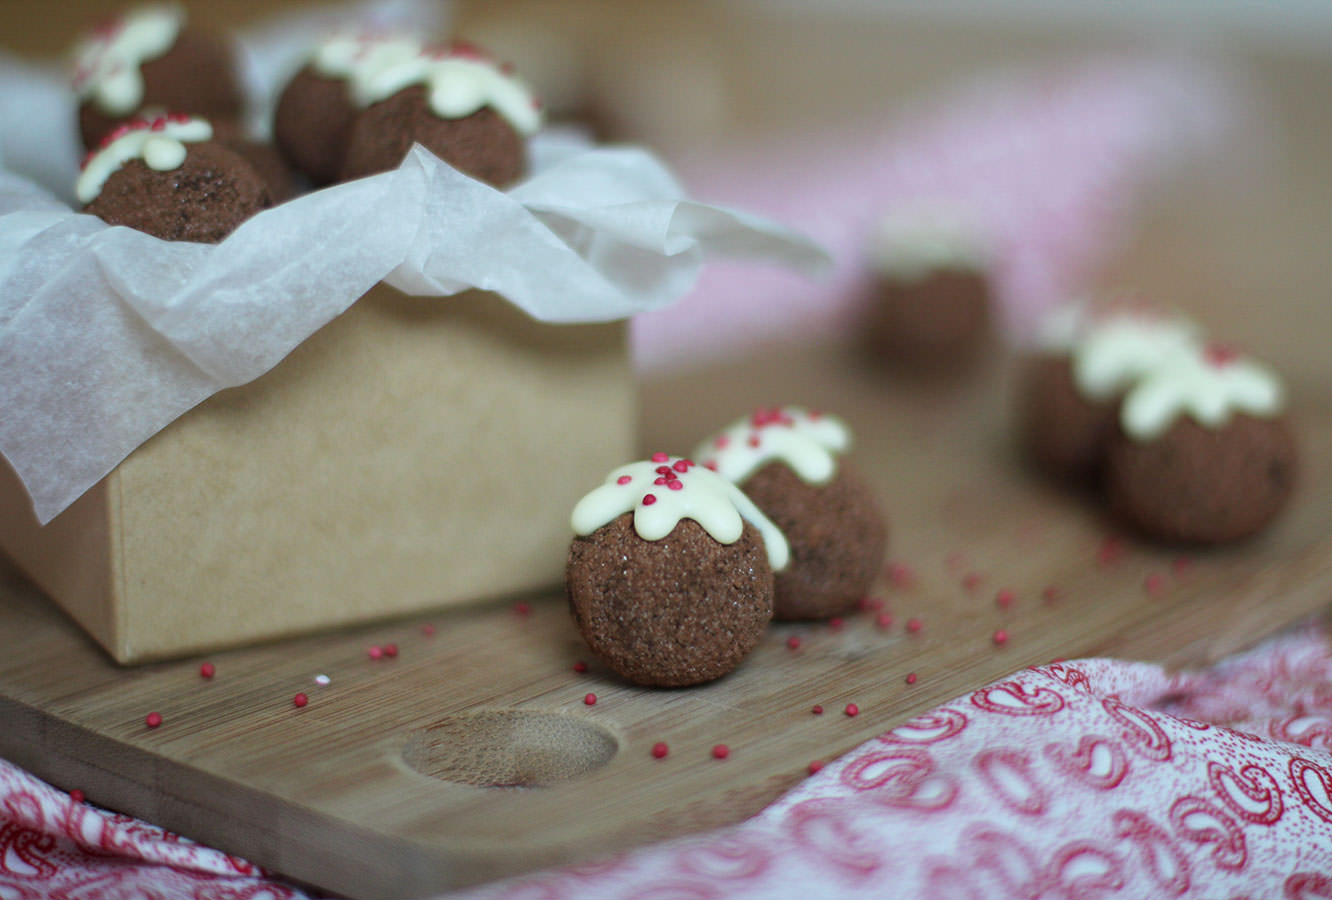
This week it’s Christmas pudding truffles, surprisingly easy to make, and with a large yield they are perfect for last minute gifts on a budget.
You will need
300g/10.5 oz Dark chocolate
100g/3.5 oz White chocolate
300ml/10.5 fl oz Double cream
30g/1 oz Unsalted butter
Red sprinkles
Cocoa and caster sugar for dusting
(Makes 60-70)
Step one
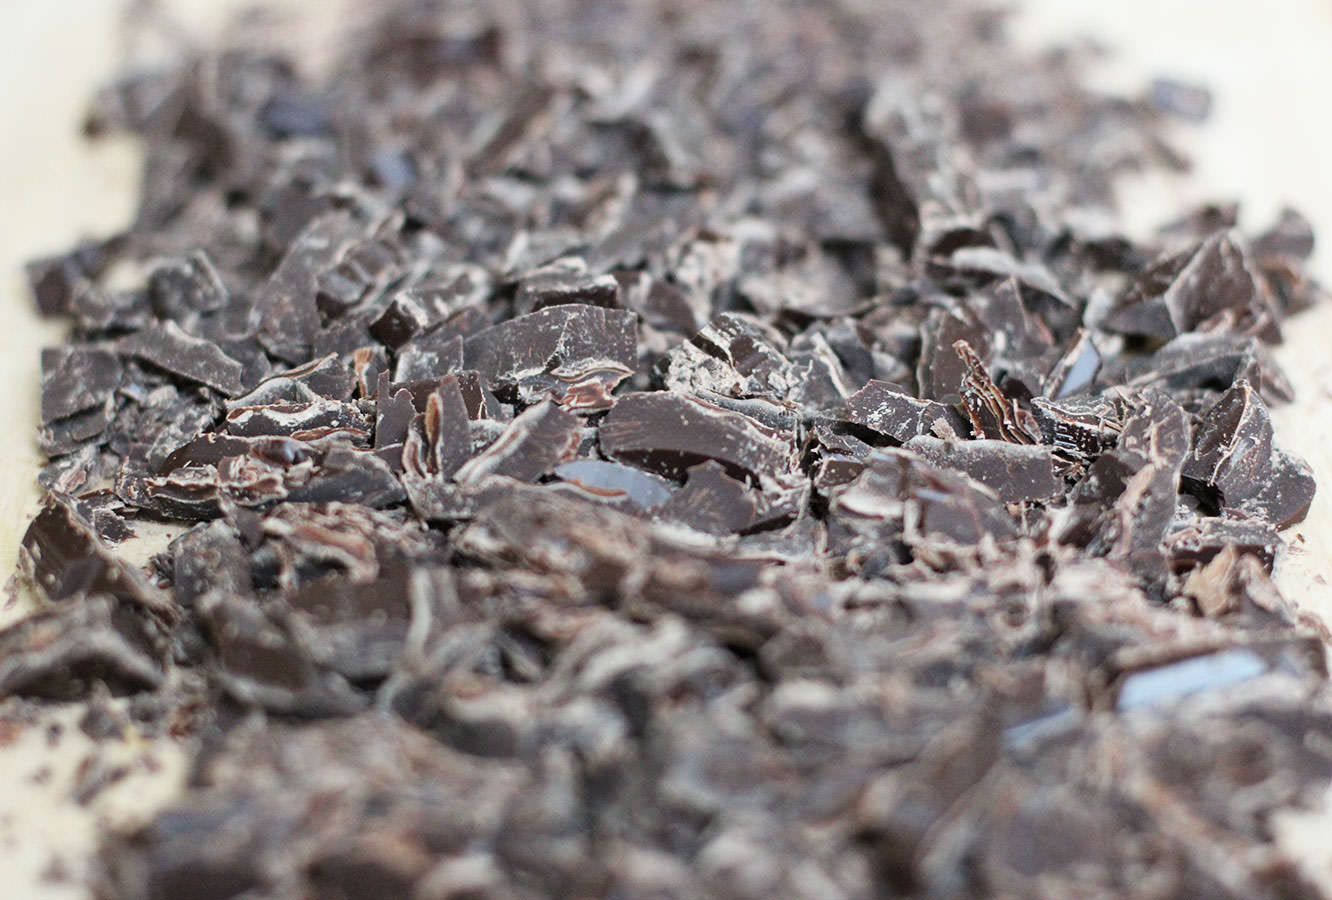
Chop the dark chocolate finely using a bread knife. Resist the urge to eat it all.
Step two
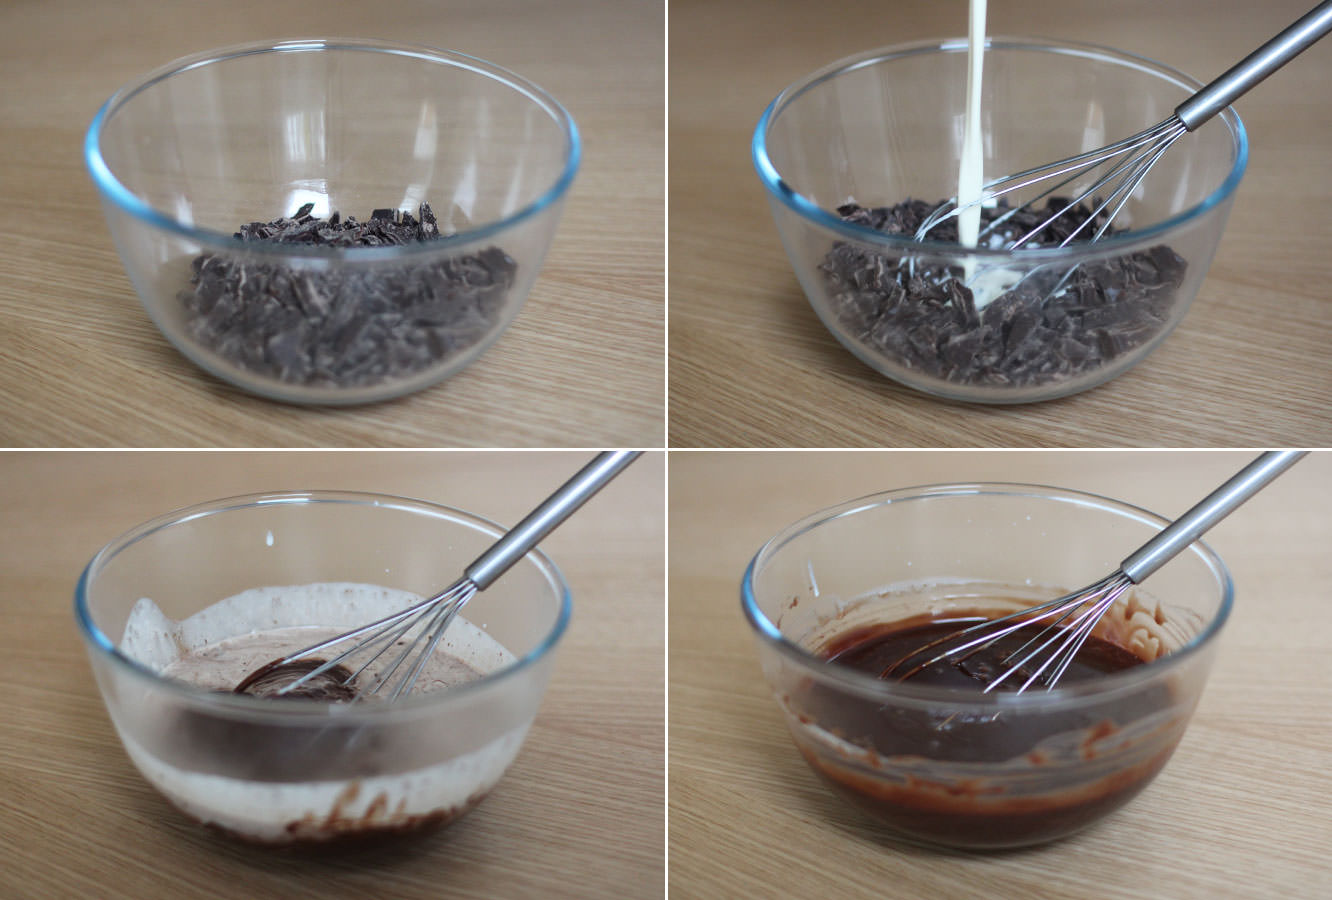
Heat the cream and butter gently in a saucepan. Wait until it starts to bubble and steam dances across the surface. There is no need to let it boil, as Mary Berry always says – chocolate melts in a child’s pocket.
Step three
Take the cream off the heat and whisk into the chocolate until fully melted. Place in the fridge to speed up the setting process.
Step four
Check regularly on the truffle mix, don’t let it harden fully. Once a spoonful holds its shape when dropped onto the rest of the mixture it’s pipe-able.
Place into a piping bag, and, holding it perpendicular to the greaseproof paper (which you have put down as instructed, um, nowhere in this post) squeeze downwards. Don’t worry if these are a bit misshapen, it’s just to make sure they’re roughly the same size.
Step five
Pipe pipe pipe.
Leave to set a bit longer, preferably with a window open to cool the truffle down quickly. The truffles won’t thank your winter central heating.
Step six
When the truffles are set roll them into balls. You will need fairly cold hands for this, so rinse them in cold water.
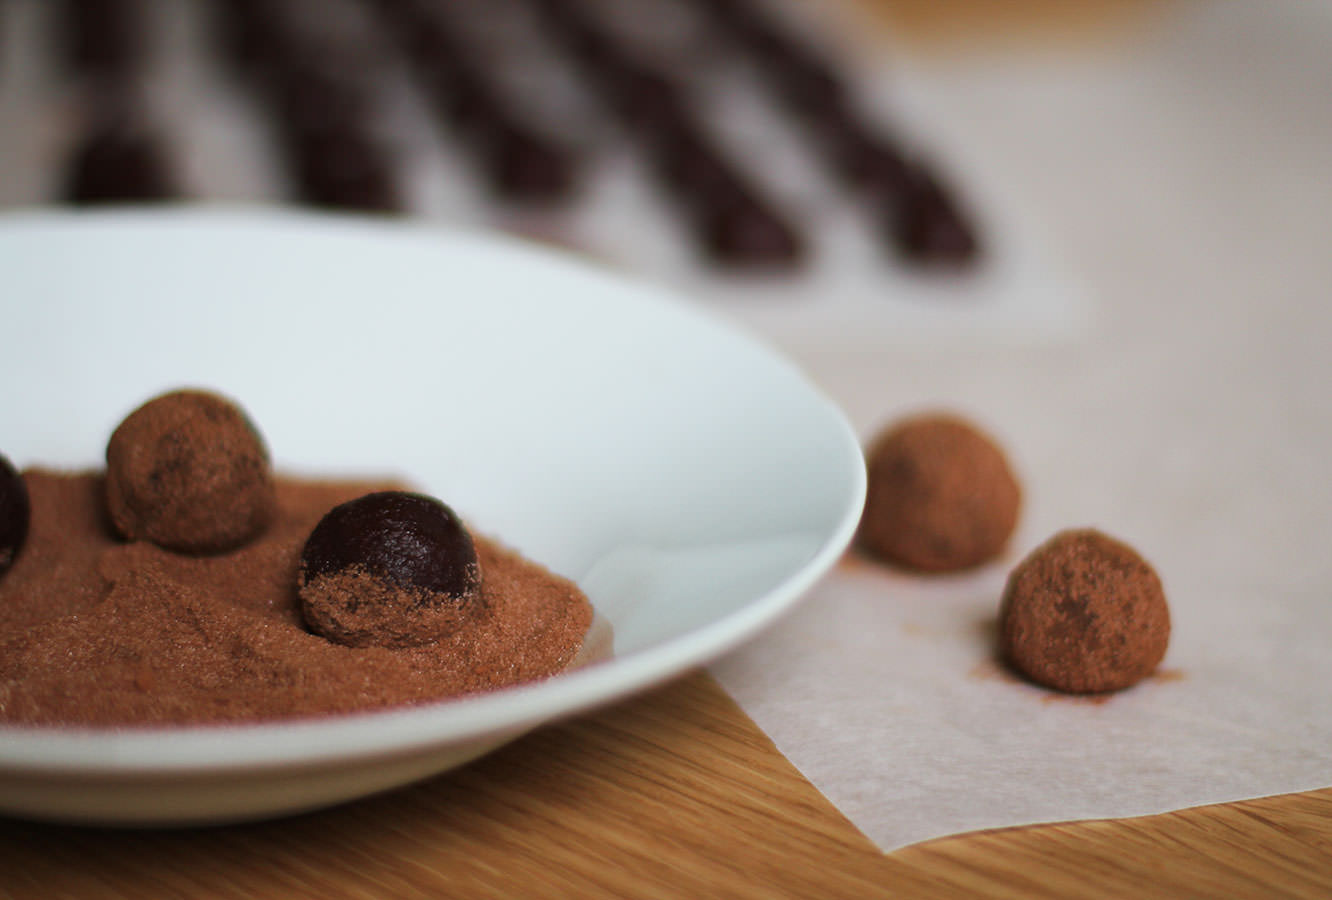
Step seven
Dust the truffles in cocoa and caster sugar. I mixed these at random so I’m not sure on quantities, but I used about two thirds caster sugar to a third cocoa powder.
I dusted as I rolled, as hands warm the outside of the truffles so the caster sugar will stick.
Step eight
Melt the white chocolate slowly in the microwave, pipe little splodges and drop some red sprinkles on top. I got these from Sainsbury’s, so not too hard to track down.
Leave the white chocolate to set and pack away your truffles into little bags or boxes and spread the Christmas (or Birthday) cheer!
So, I missed Monday blog day. Apologies, but there was some urgent badge making to see to, for a very special nearly 8 year old who’s mum was tearing her hair out looking for an 8th birthday pin. Katie and her dusty old badge-it to the rescue.
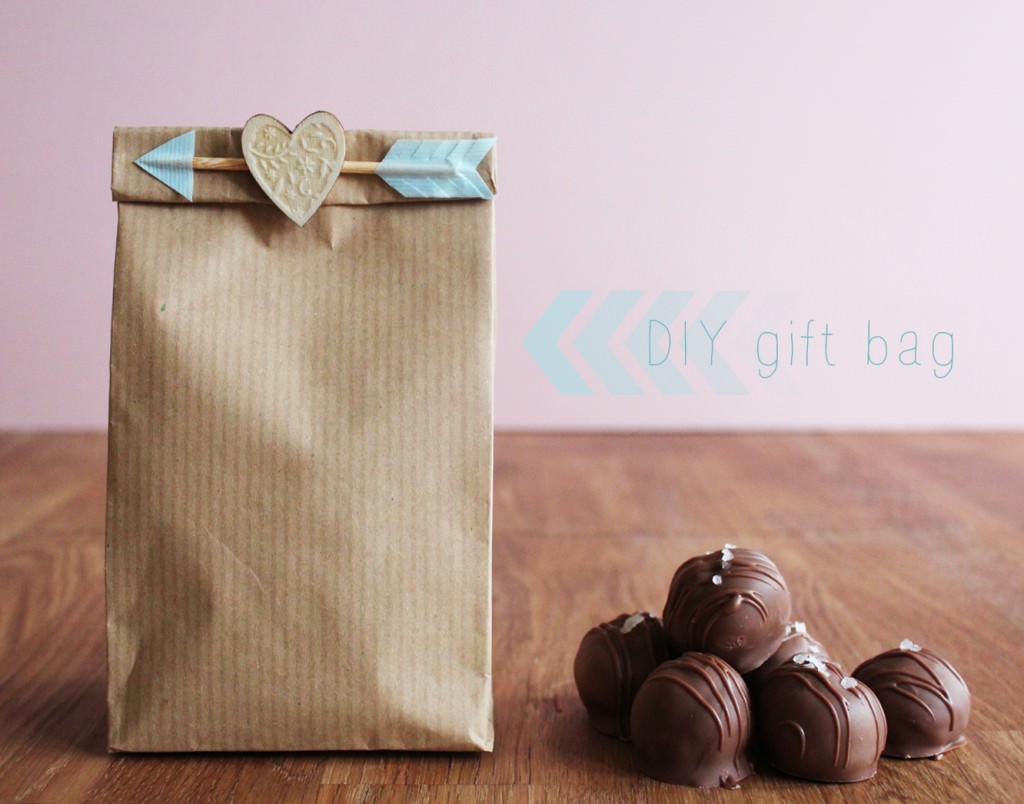
Now to business…I know you spent your weekend making those lovely truffles and need something to gift them in. Here’s how to make a little bag. I warn you, it’s not really the industry approved method (I’ll do a tutorial for that another time) but it does the trick and is super quick and easy.
Step one
Choose your paper, I’m a sucker for a bit of brown parcel paper, but as long as it’s relatively thick you’re good to go with whatever takes your fancy.
Find a box whose dimensions match the rough size and shape you want your bag to be.
Cut paper to size as if you are wrapping a gift, but leave a little extra on the long side so you have some to fold down to close the bag.
Step two
Wrap the long side first. Fold over the edge that will appear on top so that it’s nice and neat and stick down with glue or double sided tape.
Step three
I don’t really want to patronise you and tell you how to wrap a parcel particularly when the above isn’t even the best. But wrap the bottom of the box, but make sure you leave the other end open!
Step four
Pull box out of the wrapping so you have the basic bag shape. You can go ahead and use it now (see I told you it was quick and easy) but I prefer to make it look a bit more authentic.
Pinch the edges to make crisper folds.
Step five
This step was a little difficult to photograph, but basically you want to create a fold in the centre of the long side. Put your index finger in between your two folds and use your thumb and middle finger to sort of pinch it together.
Step six
Fold the bottom under as shown above. This will give you the little triangular type bits, and also means that you can make a few and store them flat until you need them.
(note triangle bit I was talking about above – I’m not mad)
Step nine
For Valentine’s day decoration I used a wooden BBQ skewer. Chop with a pair of garden clippers to about the width of the bag.
Step ten
Use a bit of washi tape to create the feather of cupid’s arrow. Stick a bit on both sides and trim as above.
Step eleven
Fold down the opening of the bag and cut two slits through all layers of paper. Push arrow through to secure.
Step twelve
Use washi tape to make an arrowhead and secure to the end.
Step thirteen
Stick a heart over the centre.
In all honesty I am not a huge fan of this, but I think it’s probably partly because the woods don’t match. You could cut one out of coloured paper or card if you don’t have a little wooden heart in your supplies. Just make sure you don’t do what I did; hold it up first to see if you like the look of it rather than sticking it on and wishing you hadn’t.
Valentine’s Day is the marmite of all the celebrations; people seem to either love it or hate it (I’m actually fairly in the middle on the whole thing, much like my relationship to marmite). The US tends to go mad for Valentine’s*…but let’s be fair, they’re a lot more chipper about everything than the rest of the world anyway. We Brits stay true to form, far more cynical, but with the inherent sense of obligation that both forces us to celebrate something, and then resent the enjoyment we get from it.
Chocolates are a typical Val Day gift, but they tend to lack the personal touch that well, let’s face it, is the fault of the whole shebang. I figure if you’re going to do it, do it right, make your own.
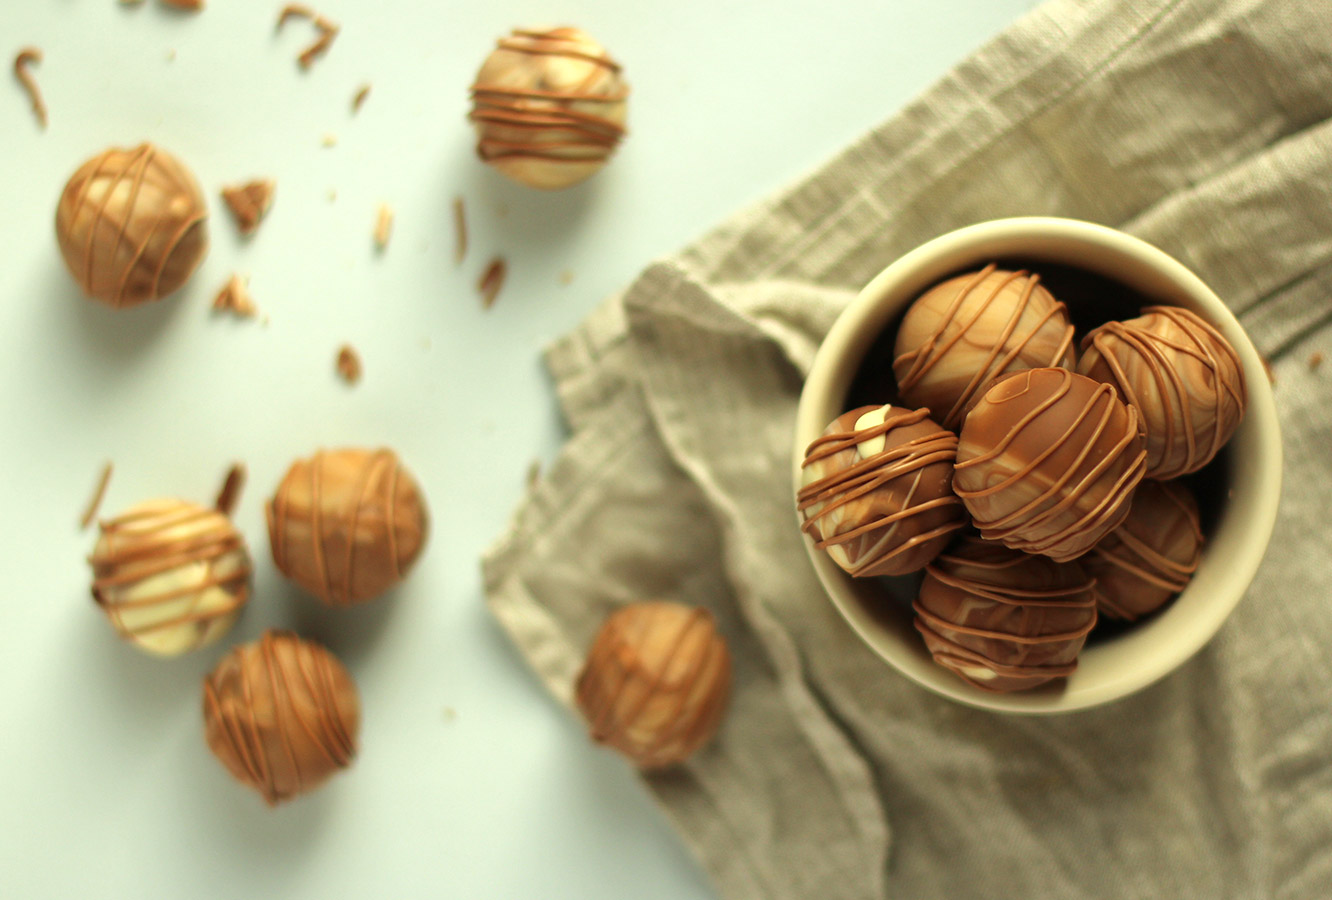
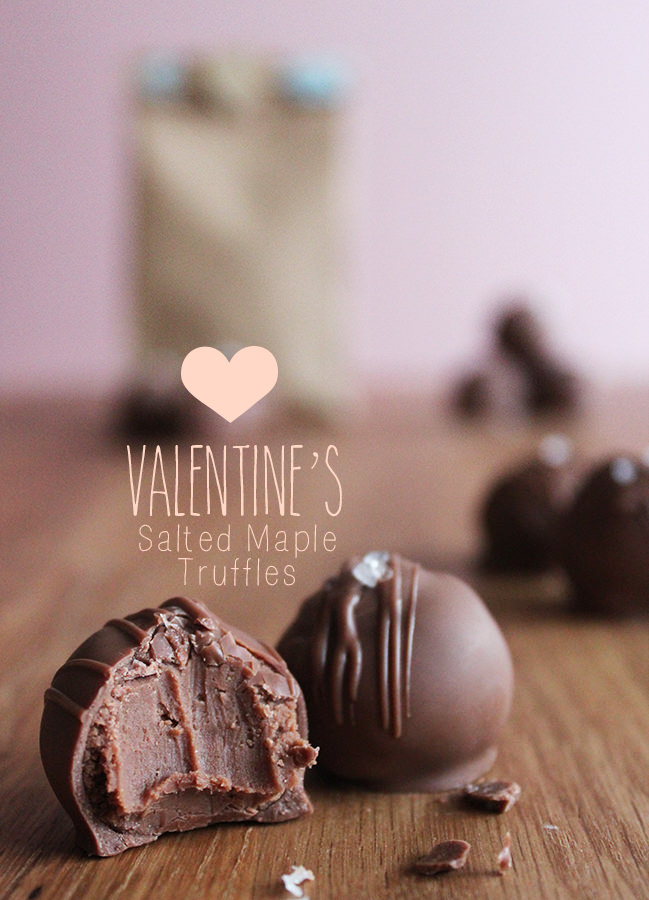
Whatever continent you live on, and whatever occasion you’re celebrating this February, here’s another recipe fresh from my kitchen. Great for gifting or gorging on, I present milk chocolate truffles with a hint of salty maple goodness.
* source: Pinterest…which is a completely accurate representation of American life.
You will need:
500g Milk chocolate
75ml Evaporated milk
50ml Double cream
1 to 1 and a half tbsp Maple syrup
2 tsp Salted butter
Pinch of table salt
Rock salt to decorate
Makes 20-30 truffles
Step one
Chop 250g of the chocolate finely, and place in a bowl. The more you chop the easier the cream will melt it. Use a bread/serrated knife for this…you can thank me later…I just changed your life.
Step two
Put the cream, evaporated milk, maple syrup, a pinch of salt, and the 2 tsp of butter in a small pan.
Don’t put more than a tablespoon and a half of maple syrup in your truffle filling – whilst tasting delicious it won’t set up, ergo it won’t be easy to cover in chocolate (yes, I did find out the hard way, but I’m kind enough to give you recipe 2.0).
Place on a low heat and bring to the boil, stir regularly. Leave that heat on low, I mean it! Patience is the way to go with cream, it’s the hormonal teenager of the baking world (volatile and breaks down easily).
Step three
Once the cream starts to bubble, take off the heat and pour it over the chocolate. Stir quickly with a hand whisk until all the chocolate is melted and it’s thick and glossy.
Step four
Wait.
Step five
Once your truffle mix is holding its shape (pull the whisk out and dribble it around, if it’s not merging back into one clump then it’s good to go) put into a piping bag/good quality sandwich bag. If you’re impatient then stick it in the fridge or freezer to help it along (but don’t forget about it – you don’t want it to be un pipe-able)
Snip off the corner and pipe into evenly sized blobs. Don’t worry if they are a bit misshapen, this is just to ensure evenly sized truffles more than anything. My mix wasn’t quite solid enough when I did it above (this is partly because it was the too-much-maple batch) so wait a while longer than that.
Leave for another 15-20 minutes.
Step six
Roll truffles into balls. You will need cold hands for this, I found washing them in cold water a few times throughout helped. You might need to give them a little squash first so that they roll (you’ll understand when you get there).
Step seven
Melt the remaining chocolate (keep about 50g back for a moment). You want to put it in a fairly small bowl so it’s nice and deep for dunking.
Do this in a microwave, but watch it closely, it turns in seconds. Pop it in for 30 seconds to start it off and then 10 second intervals, stirring in between.
Once it’s fully melted put the remaining 50g in and allow the heat from the rest of the chocolate to melt that too. This will help to temper it making the texture and shine better in the end product.
Step eight
Find something to dip with. You can buy fancy tools for this but I happened to have a metal kebab skewer with a whirly bit on the end. If you don’t, then snap the middle two prongs off a plastic fork.
Step nine
Dip.
I’ve tried to show the stages above, but essentially: 1. Tilt bowl and put truffle on dipper 2. Drop into melted chocolate 3. Lift out using dipper 4. Flip over and drop back in to coat the other side 5. Lift out and allow excess chocolate to drip off.
Don’t tap dipper on the side of the bowl, or your truffle will get stuck onto it. If you are overwhelmed by the urge to tap, then sort of thwack it on the melted chocolate, sounds counter productive but it does work.
Step ten
Dip all the truffles and rest on greaseproof paper in rows, leave to set for 10 minutes or so before decorating.
Step eleven
Put excess melted chocolate into a piping/sandwich bag and snip a small opening in the bottom. Allow the chocolate to start pouring from the bag and move your hand back and forth over the rows of chocolate. This creates the stripey bits on the top. There’s no need to squeeze really, it will pour out of the bag at the right speed.
Don’t worry about the bits that fall down the middle, you can put them on top of your ice cream. Nothing wasted when it comes to chocolate.
Step twelve
Put a little bit of rock salt on the top of each truffle. Don’t overdo this or it will be unpleasant, but a little salt is actually really nice with sweet or caramelly things like maple syrup and chocolate.
Step thirteen
Leave them to set. Have a little taste. Go on. You’ve got a few to spare. They’ll never know. Unless of course you write a blog about it, and then never actually produce any of the chocolates (sorry boyfriend).
Oh, and I made a little baggy…
Step fourteen
Stay tuned to fabrefaction for the making of the bag, and the using up of the left over dipping chocolate.