Afternoon folks! Making the most of my lunch break to post this week because we are officially in Christmas party season. You know what else we’re in? CHRISTMAS TREE SEASON.
Yes. That’s right, get yours out of the attic or head down to your local festive pop up, it’s time.
There’s a lovely nostalgia people have with their generations old decorations; almost everyone I’ve talked to about their tree has some kind of heirloom ornament that takes centre stage each year.
I still think it’s nice to freshen it up from time to time though, and with December costing a fortune, here are some quick and easy christmas tree decorations you can make with things lying around the house/garden.
Pine cone ornaments
Pine cones
Picture frame hangers (screw in ones)
Tip-Ex (white out)
Ribbon or string
Screw the picture hangers into the bottom of the pine cones, attach a loop of string/ribbon an paint the ends of the pine thingys with the Tip-Ex. It dries so quickly you don’t even need to put paper down.
Paper circles garland
White card
Contrasting thread
Circle punch
Sewing machine (or you could use glue/double-sided tape if you don’t have one)
Punch a load of circles out of the card. Put them through a sewing machine. Yup. THAT easy.
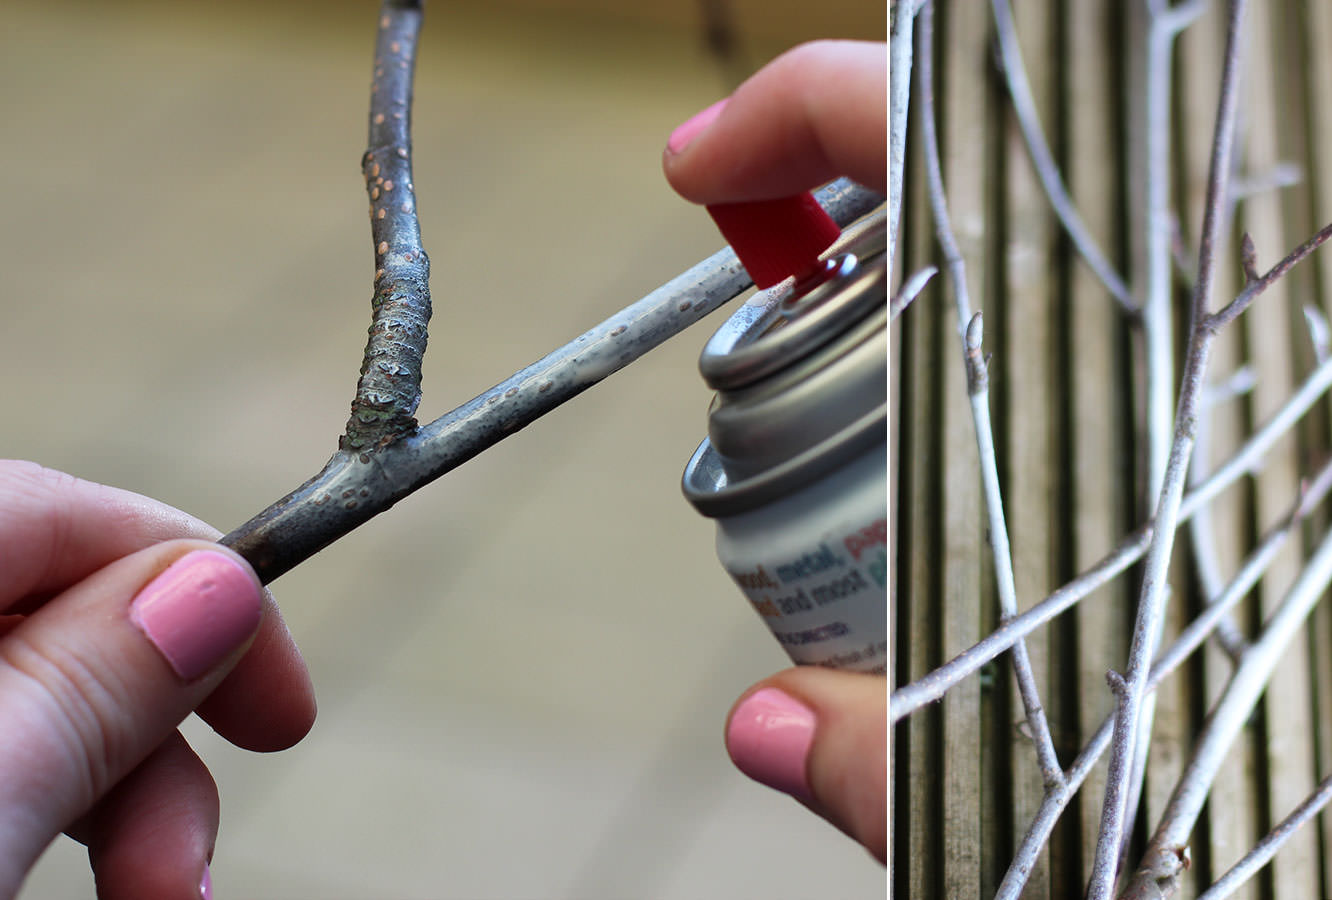
Christmas tree star
Five reasonably straight twigs
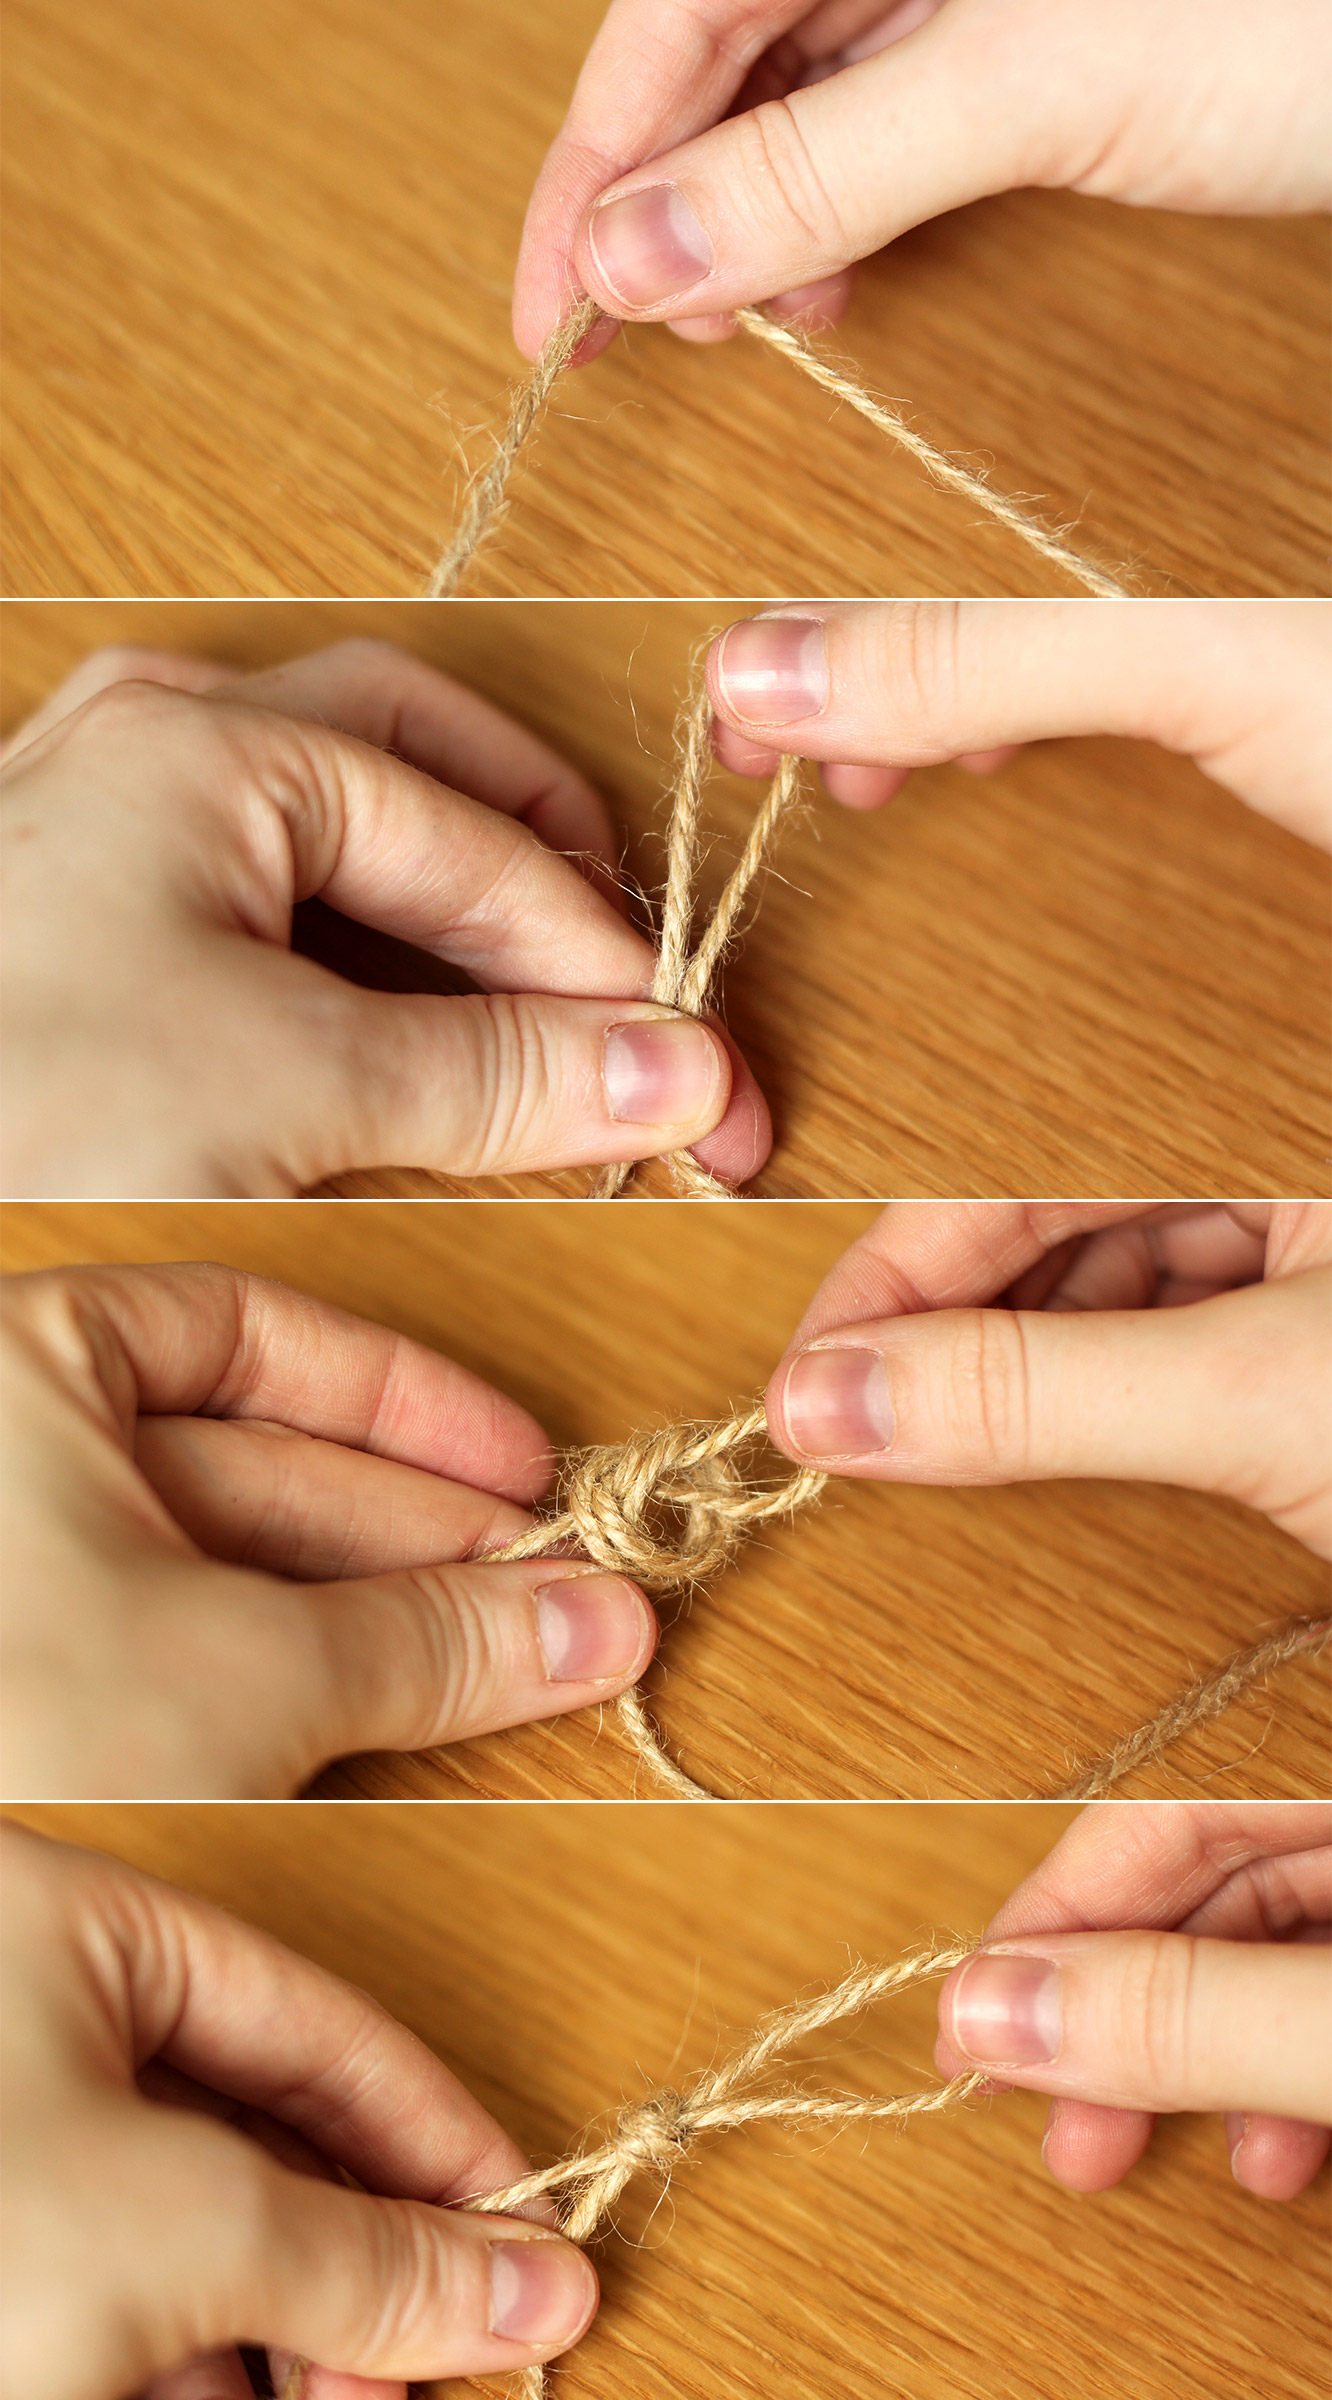
Some twine
Cut the twigs to the same length using secateurs or scissors. Tie the ends together at 45 degree angles or less. Make sure that when a twig is on top of another at one end that it goes under the next one at the other end. The only exception is the twig you started with, which when you tie it to complete the star, will probably be under both those it’s attached to. Add more twine to secure the cross overs in the middle too.
Hi all, massive sorrys this week as I’m afraid I went away for the weekend. Working full time again and running out of my little stash of ready posts has meant that I’m empty handed so far as new ideas go this week.
BUT, fear not, for I have now been blogging for two whooooole years. I also quite like Christmas. Here are a few ideas from the last couple of years to keep you ticking over until next week.
Two years of fabrefaction.co.uk friends. Yup. THAT HAPPENED. Thank you for the support and the loving, please keep sharing, commenting and messaging me; I love hearing from you and seeing what you’ve made.
In keeping with my first post ever, and the one year anniversary post of this little blog, here’s another lovely advent calendar for you to make.
“Oh but advent starts next week, I don’t have time!” Yes, yes you do. I made this in a day. Less than really when you consider I went out for breakfast and dinner. You could even take the easy way out and glue instead of sew.
This particular calendar is a labour of love for my very hardworking and wonderful sister. Poor duck got jealous of mine once, and this year I thought it was about time she had something a little more permanent so she never forgets again. Thanks for your love and support sib.
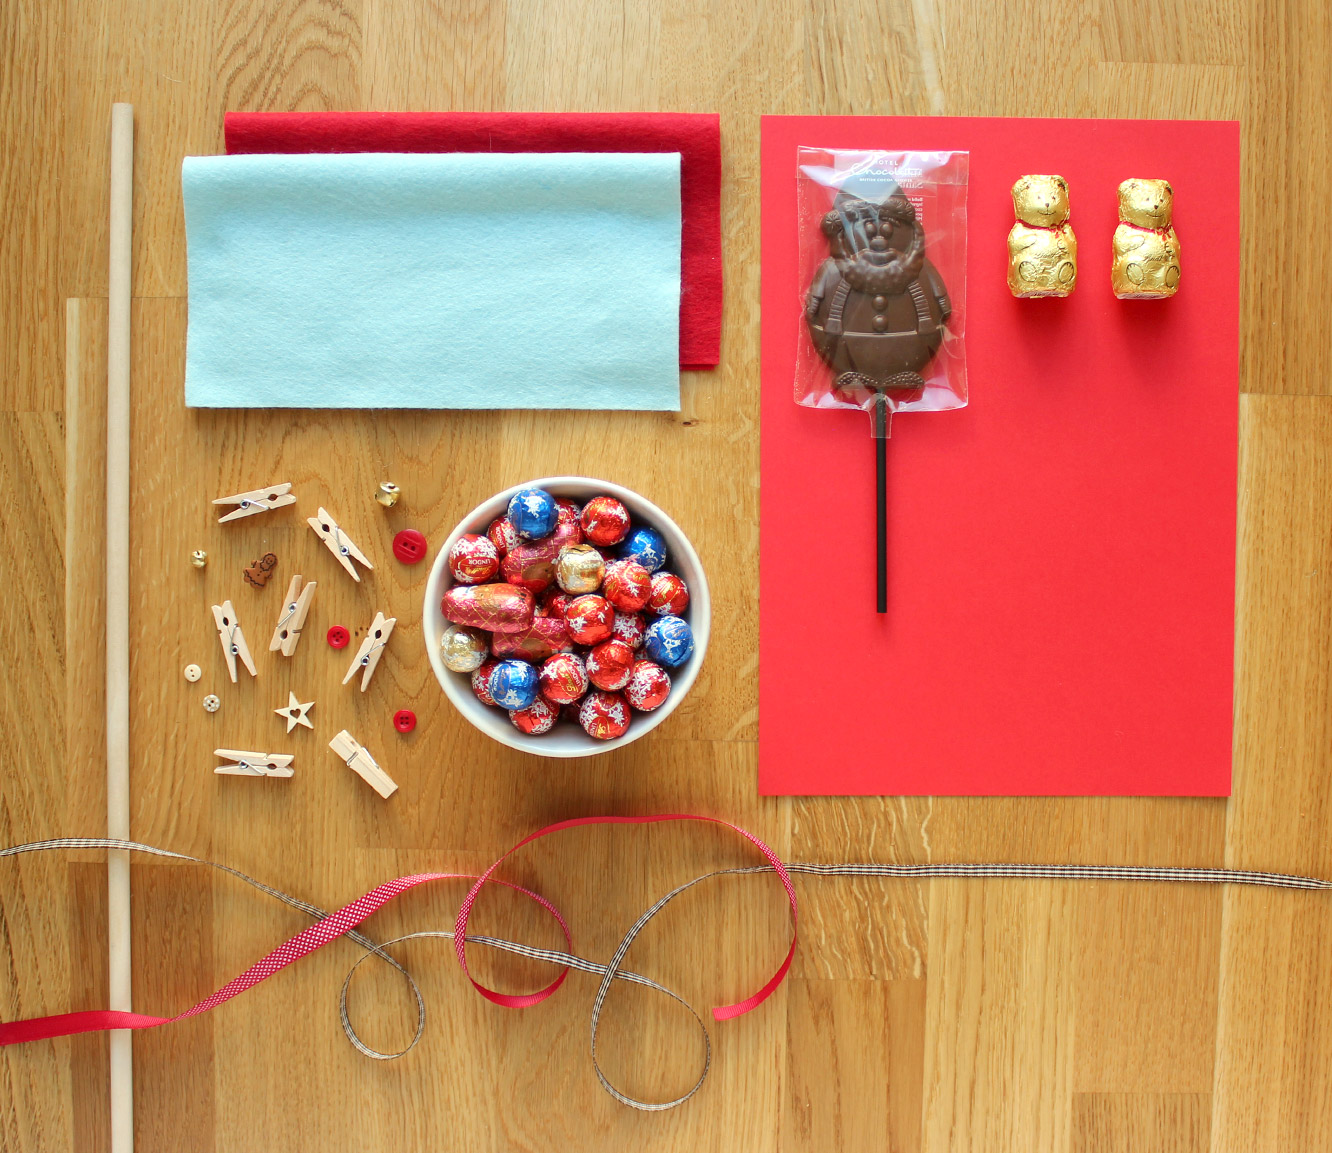
You will need
A dowel rod (40cm) (or a wire coat hanger)
Festive looking string or ribbon
Felt (I bought two packs of 5 felt squares from John Lewis, you’d probably need 6 or so A4 sheets)
24-48 chocolates (I used mini Lindor truffles (there are 22 in a bag) and some woodland friends from Waitrose)
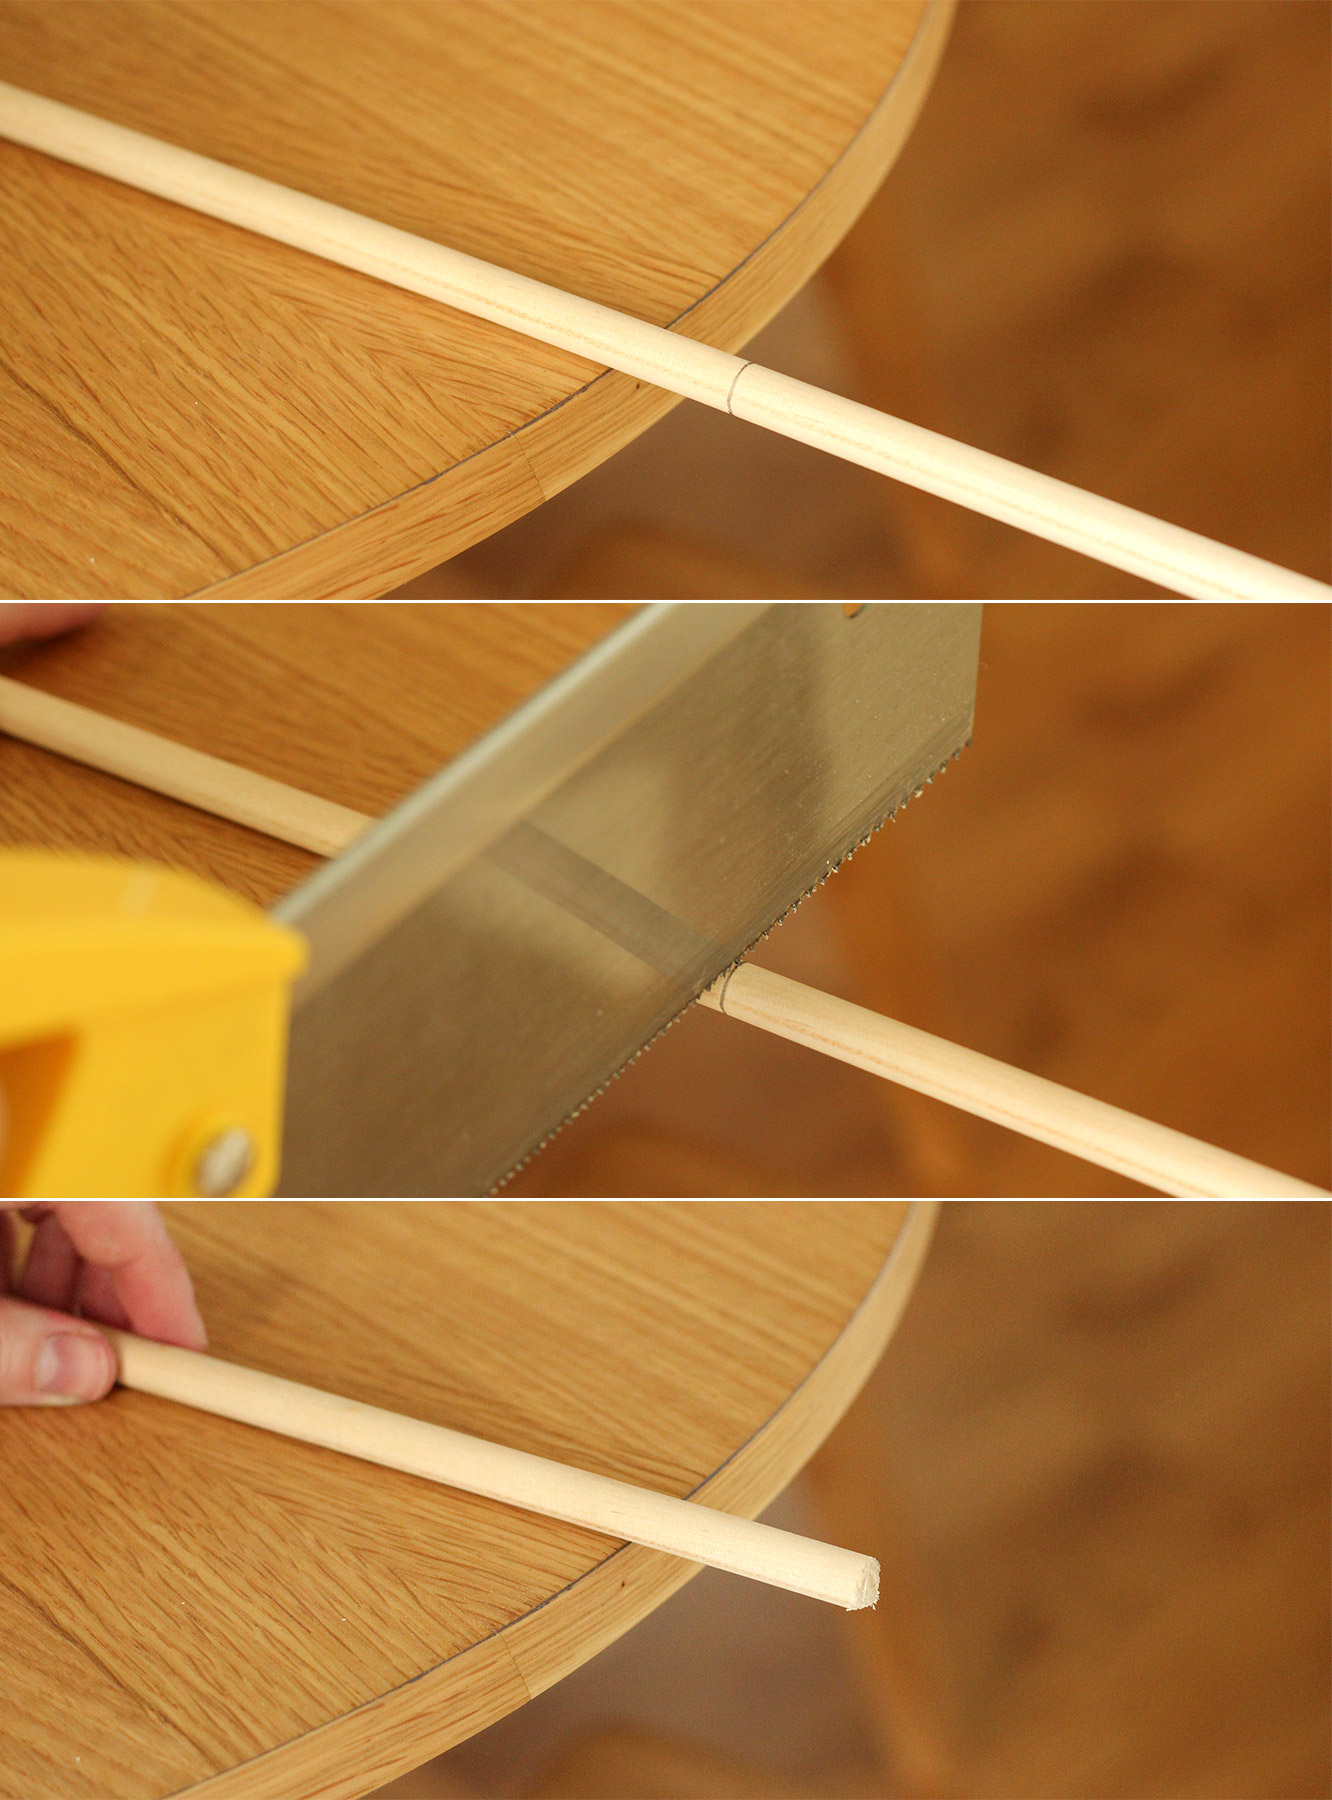
Depending on the length of your dowel you might need to cut it down. Mark the cut point at 40cm.
Step two
Cut the end of the dowel off. Those of you into wood work (of which I am sure there are plenty) don’t judge me for my saw, I’m relatively confident after using it that it wasn’t the right choice.
Step three
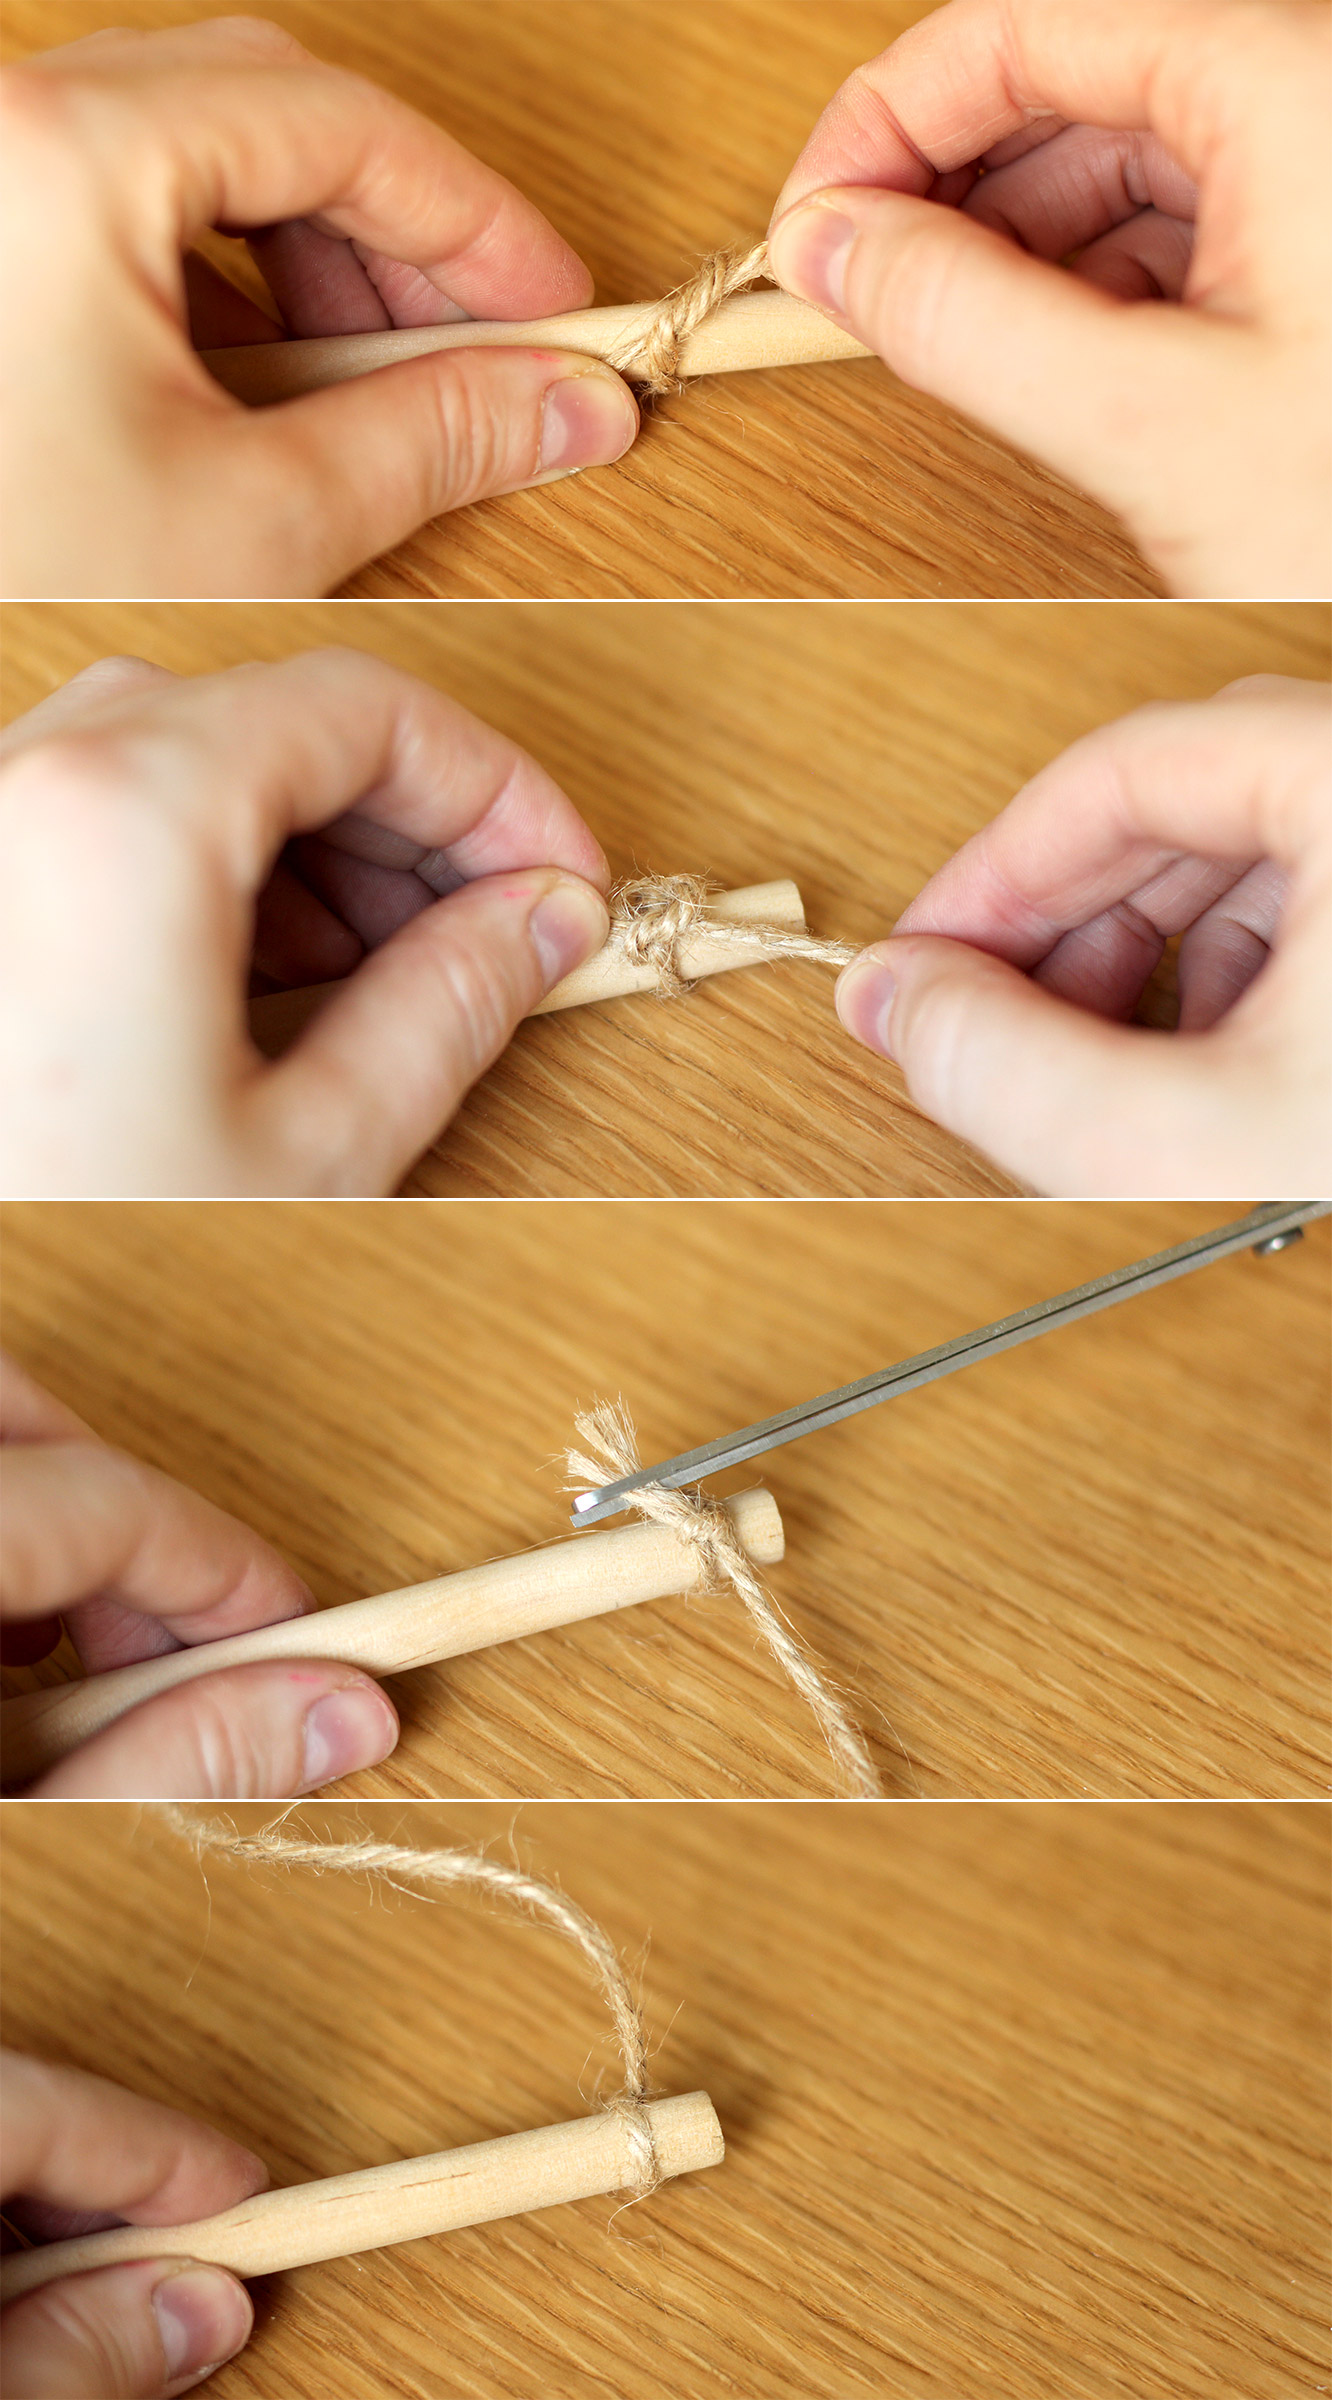
measure a length of twine/string/ribbon about twice the length of the wood and double knot tie it onto either end. You might want to add a little glue to secure it. Make sure to turn it so the knot is at the back.
Step four
Hold the centre point of the twine and allow the rod to hang off the side of the table. Make sure it’s level and tie a knot in the middle so that you have a loop to use for hanging.
Step five
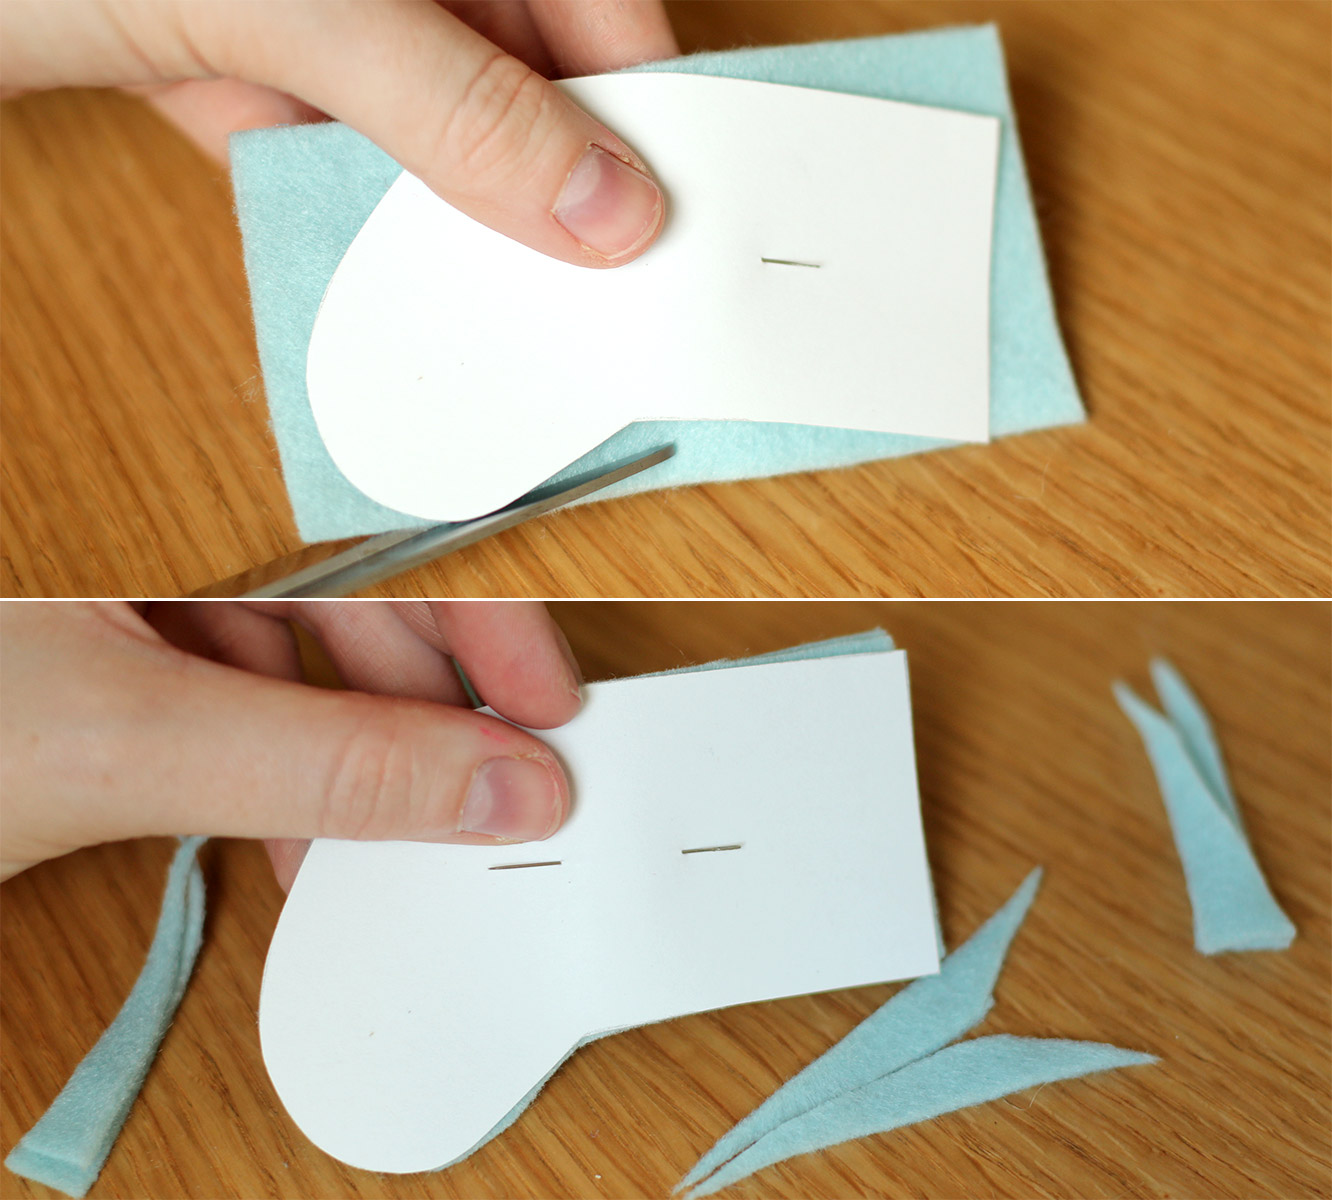
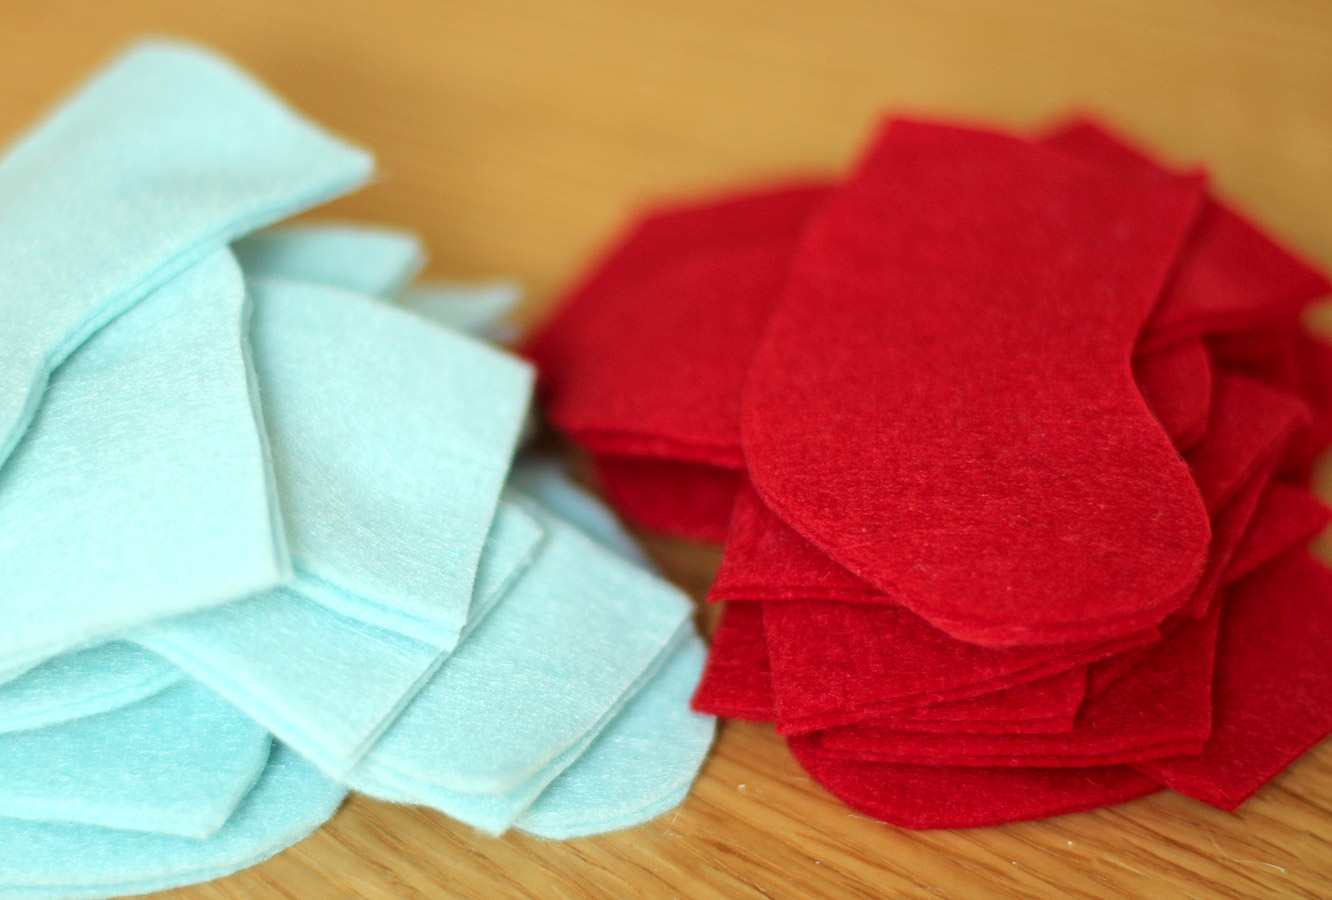
Using the template cut out 23 mini stockings (2 pieces of felt for each). I cut through two layers at a time, and squeezed 8 cut outs from each square of felt. If you bought A4 sheets I imagine you’ll get 10-12.
Step six
Keep cutting.
Step seven
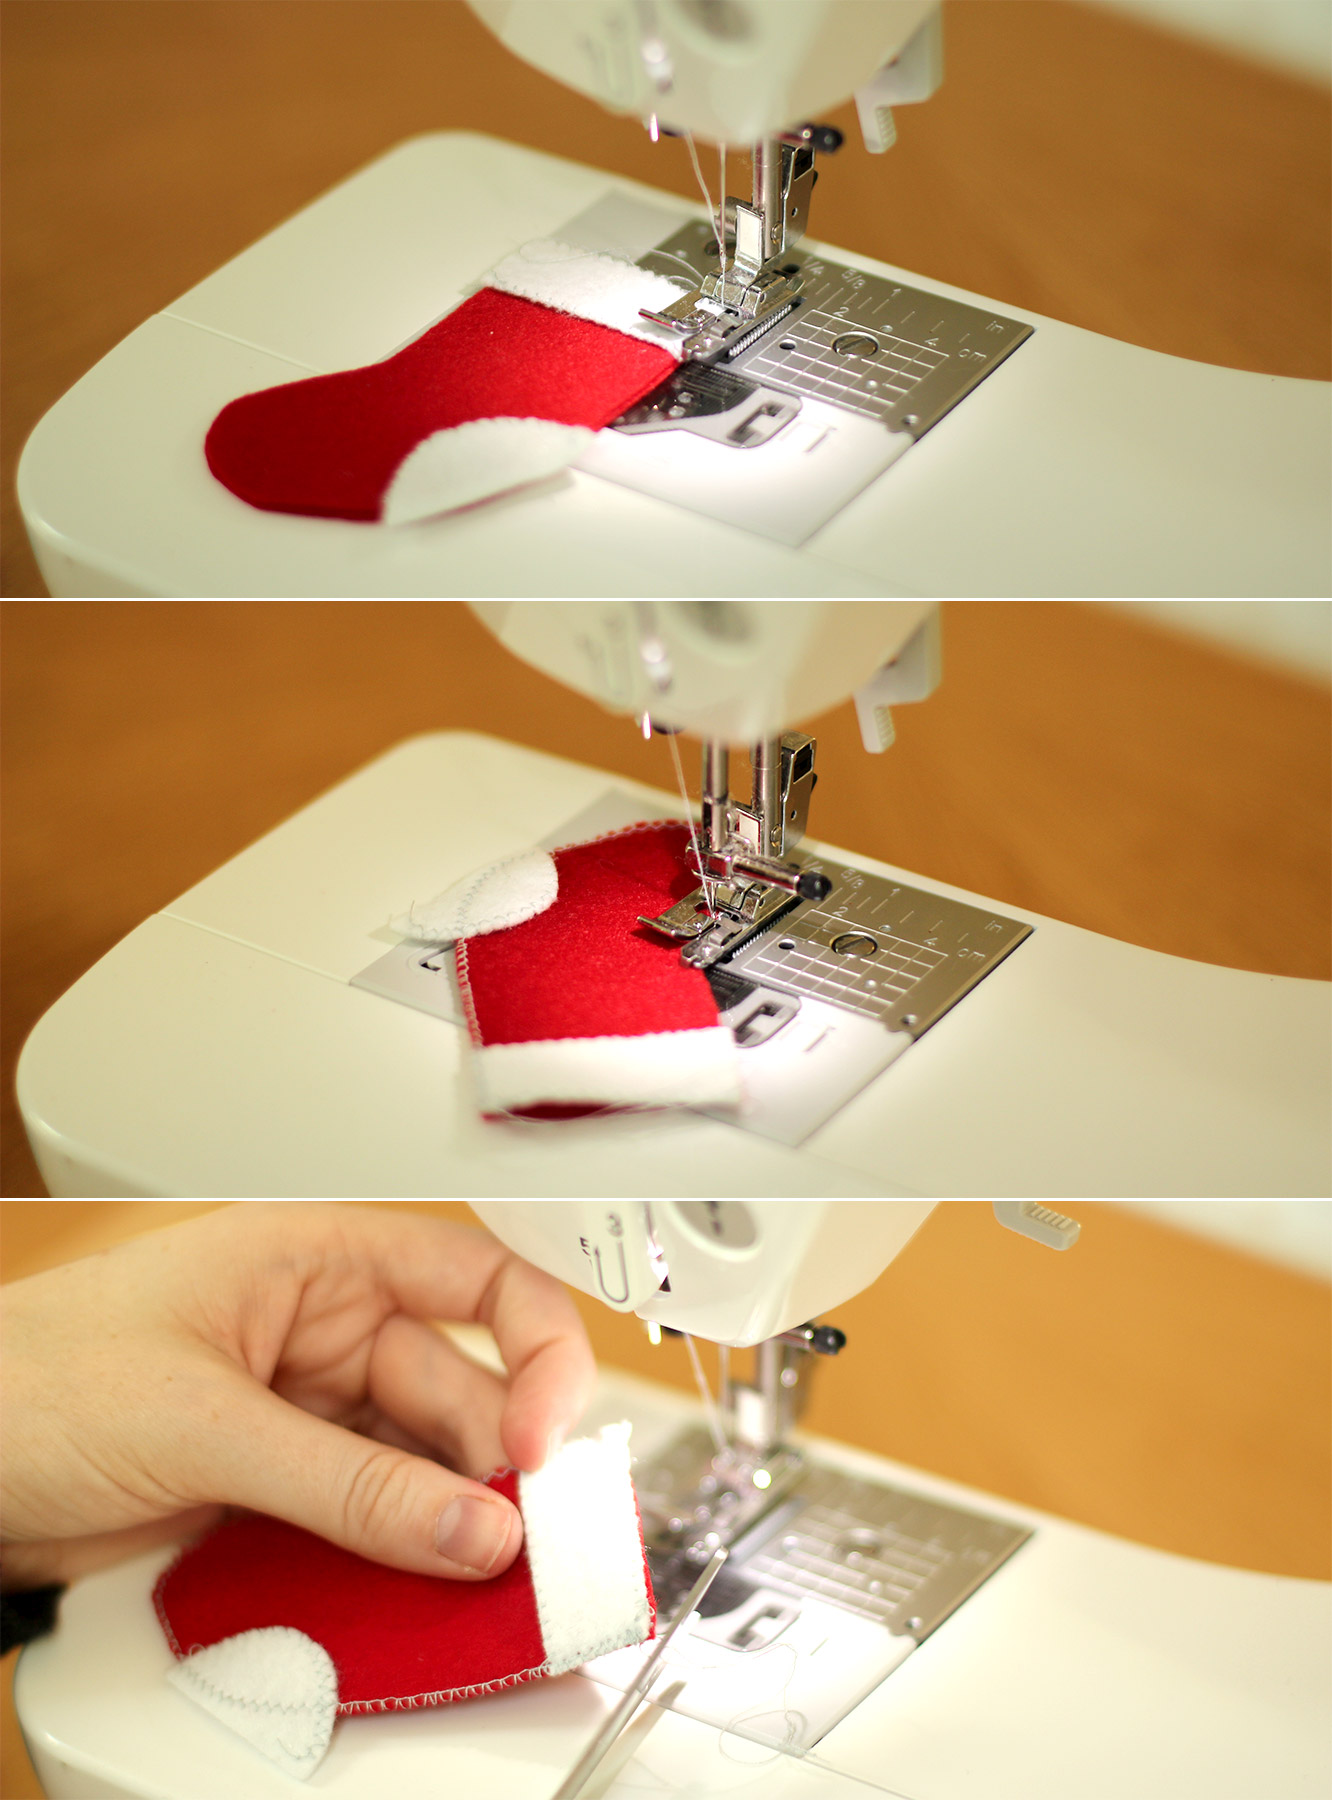
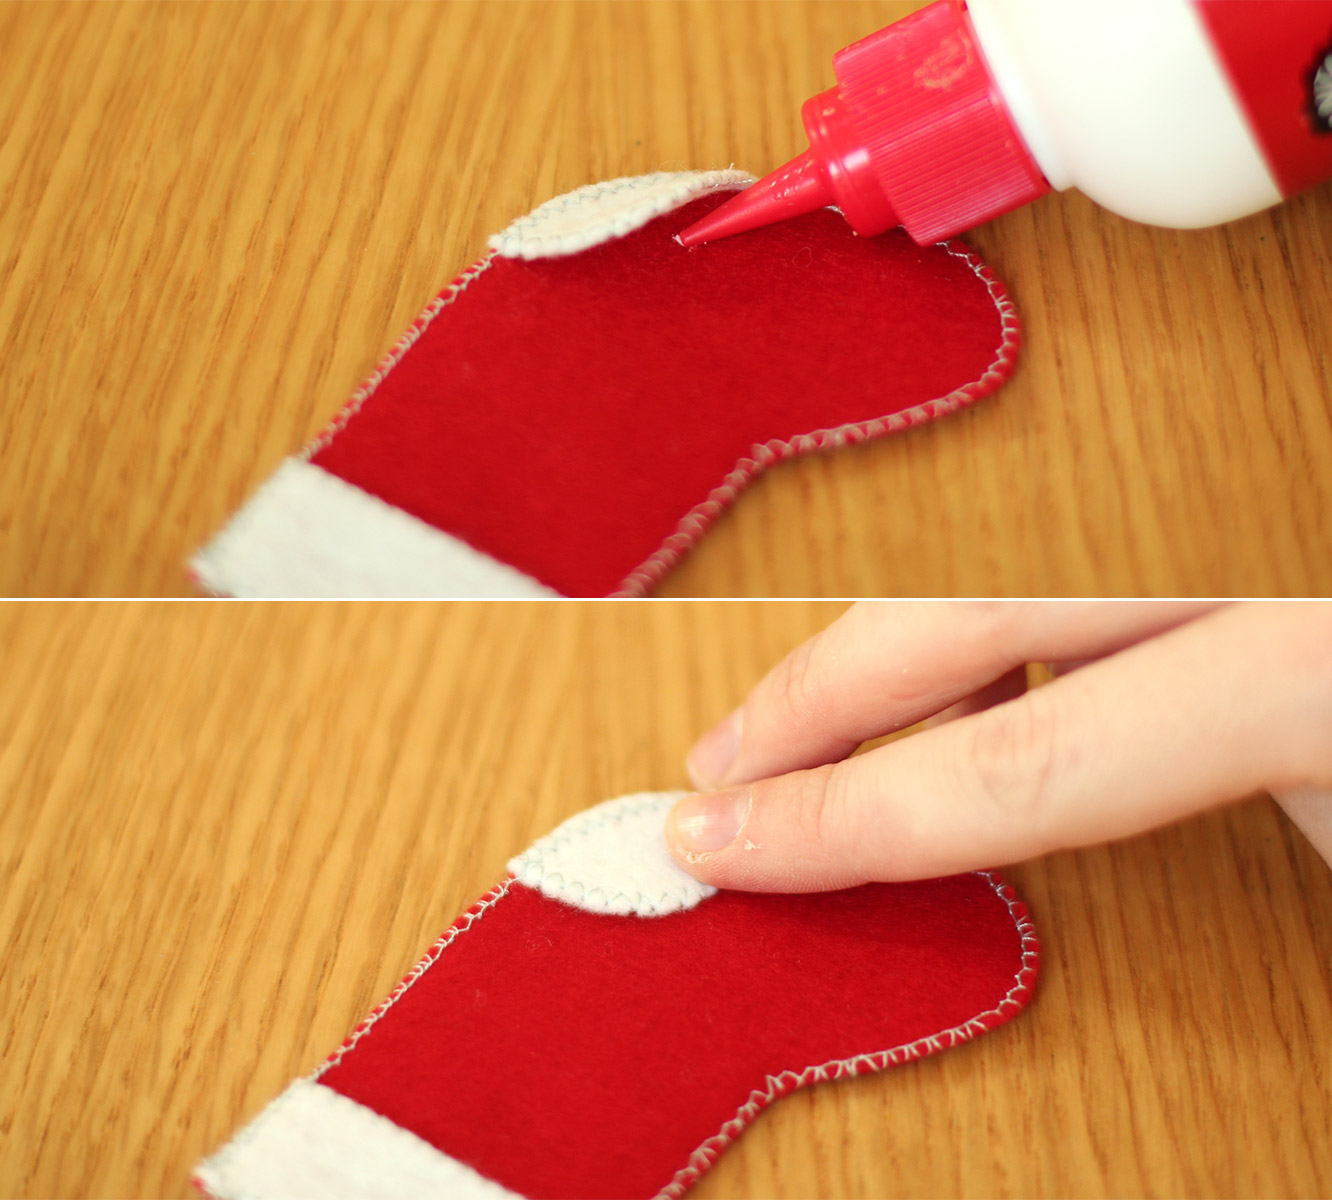
Sew the stockings together using an overlocking or zig zag stitch. I edged the white bits separately before attaching them and left the heel hanging over the edge.
If you are making this for next Christmas, feel free to hand sew. I cover how to blanket stitch here. If you want this ready in time for this advent I recommend borrowing a sewing machine or using glue.
Step eight
Cut the excess off the heel of the stocking and any loose threads.
Step eight and a half
(Totally missed this step on the original post)
Secure the heel with a little dab of glue, but make sure it doesn’t soak through and stick the stocking together.
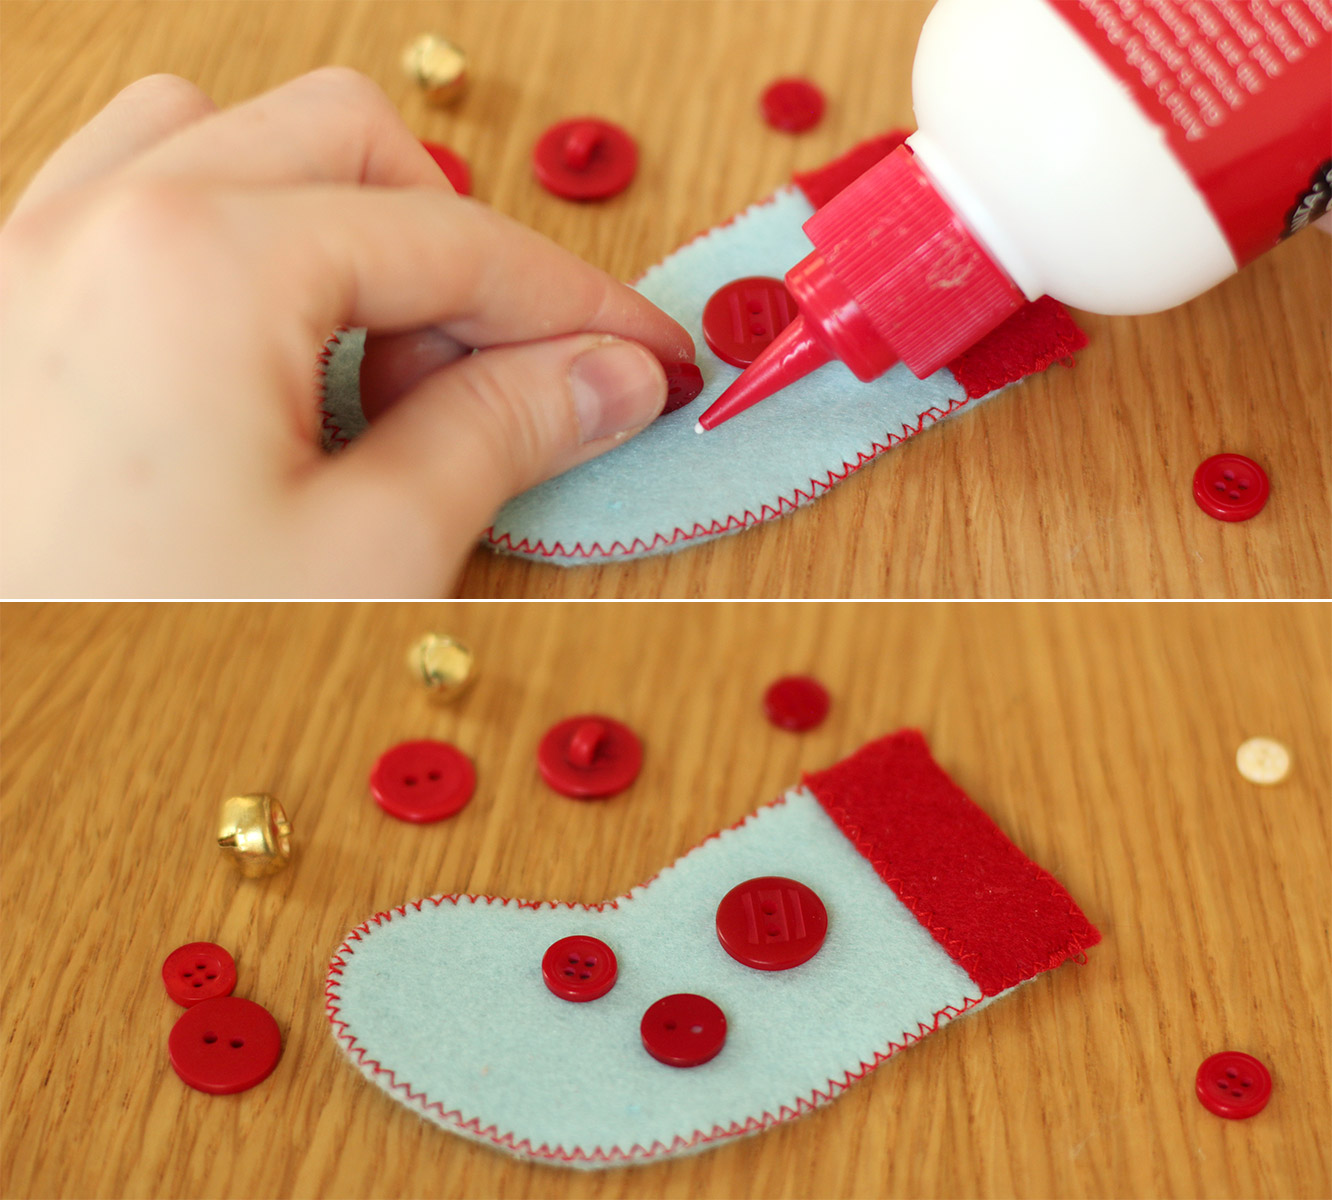
Step nine
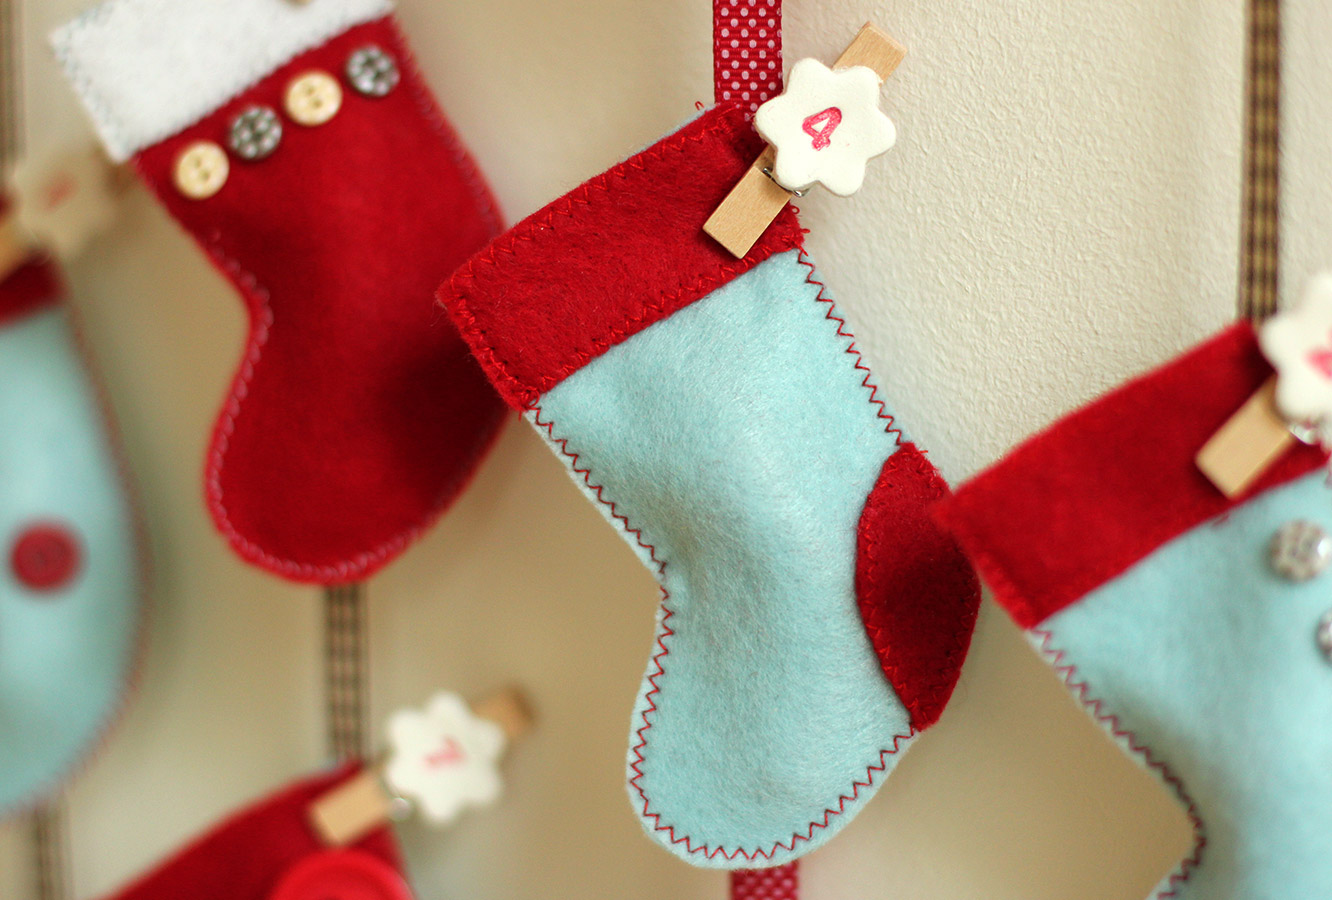
I decided not to sew heels on all of them as I wanted a bit of variation. So I used some of the embellishments from last year’s advent calendar to decorate. Glue is acceptable here I reckon, otherwise you really need to sew them on before sewing them together.
Repeat until you have 23 little stockings and one big one.
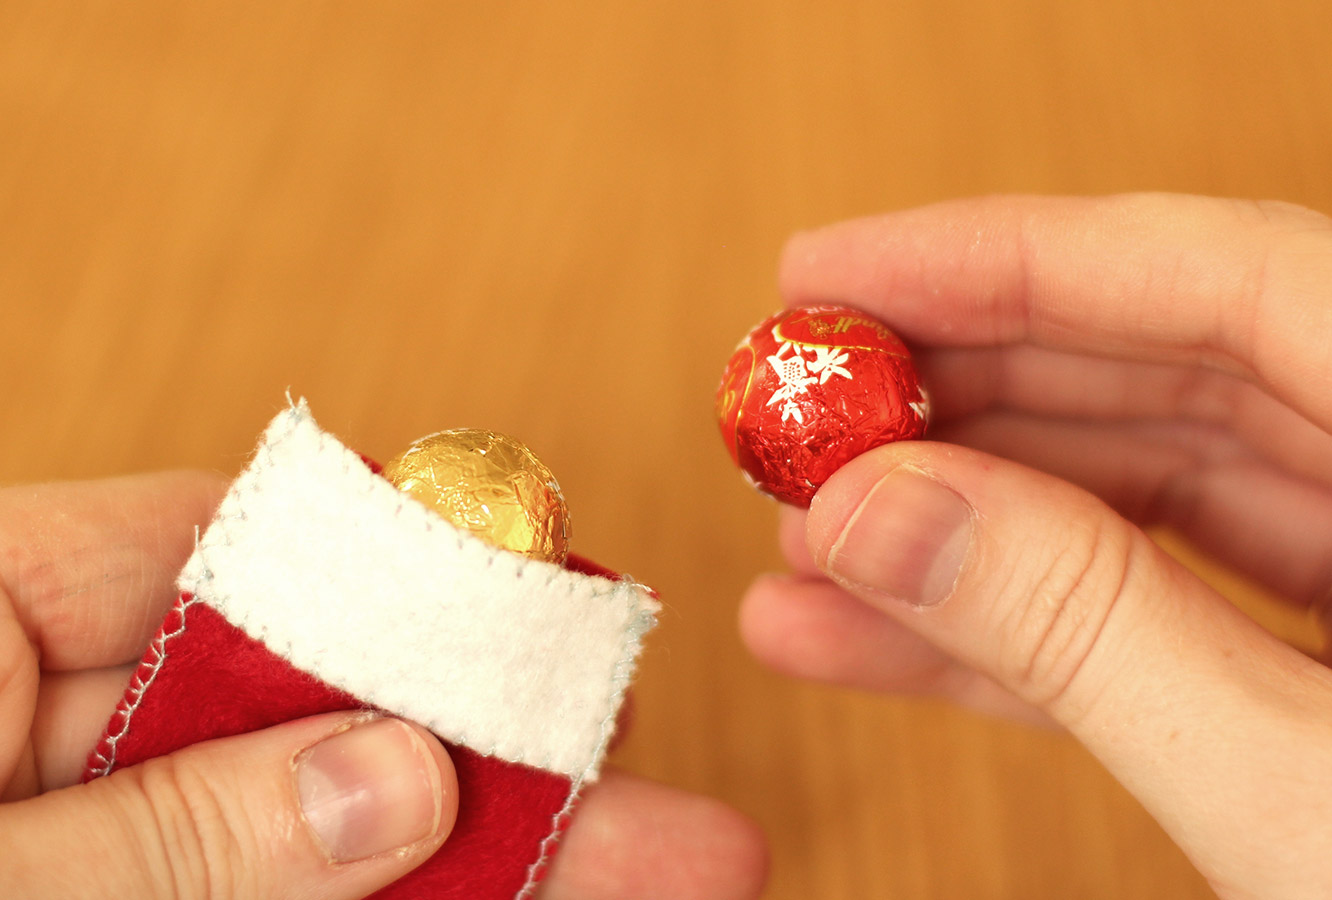
Step ten
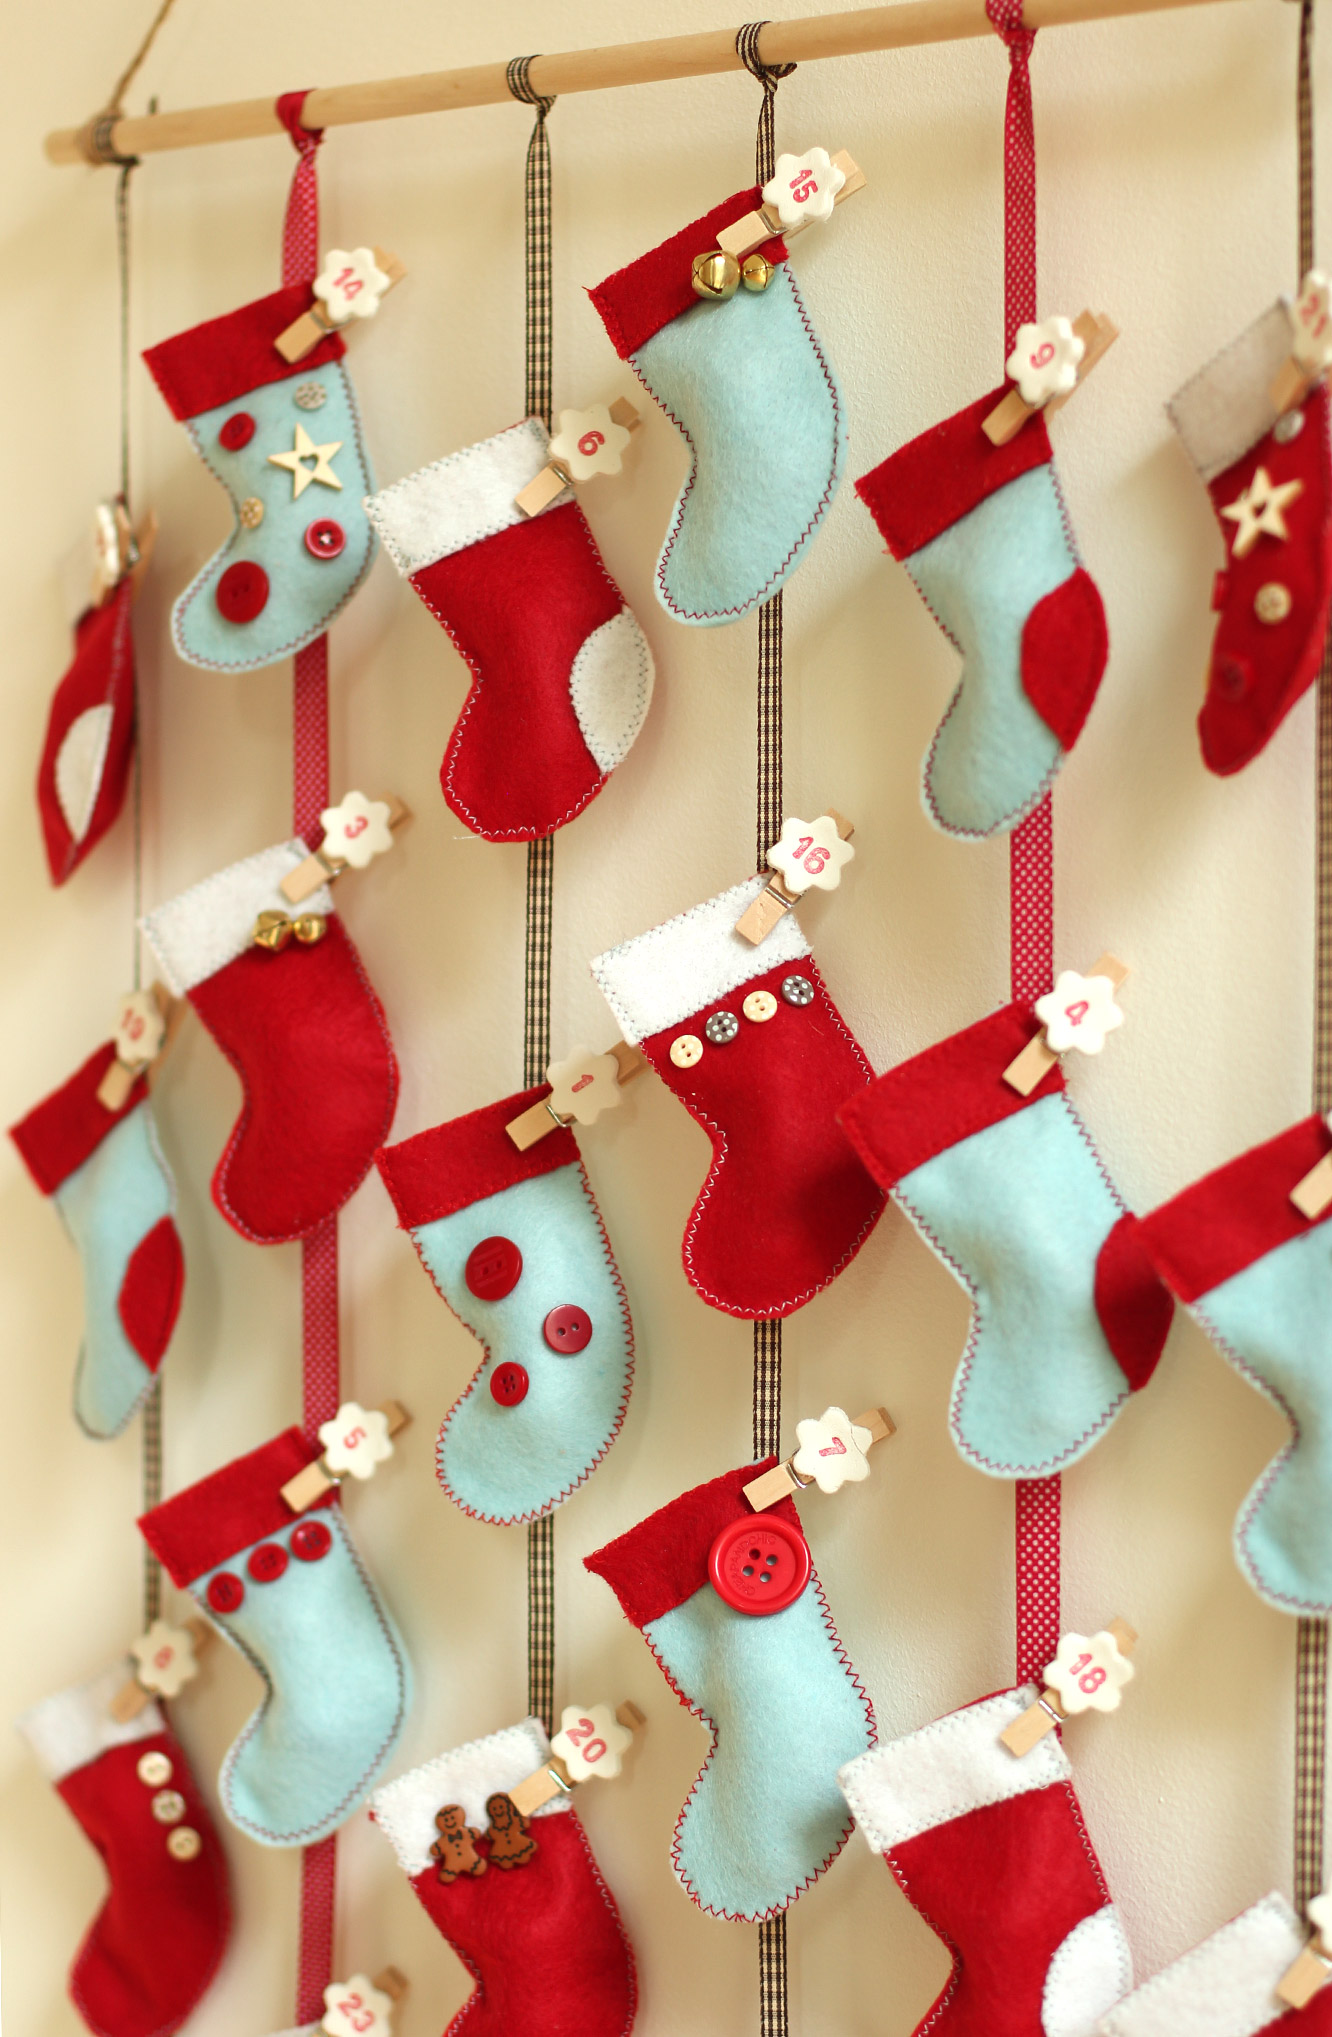
Fill your little stockings as you go, they look very cute as they stack up.
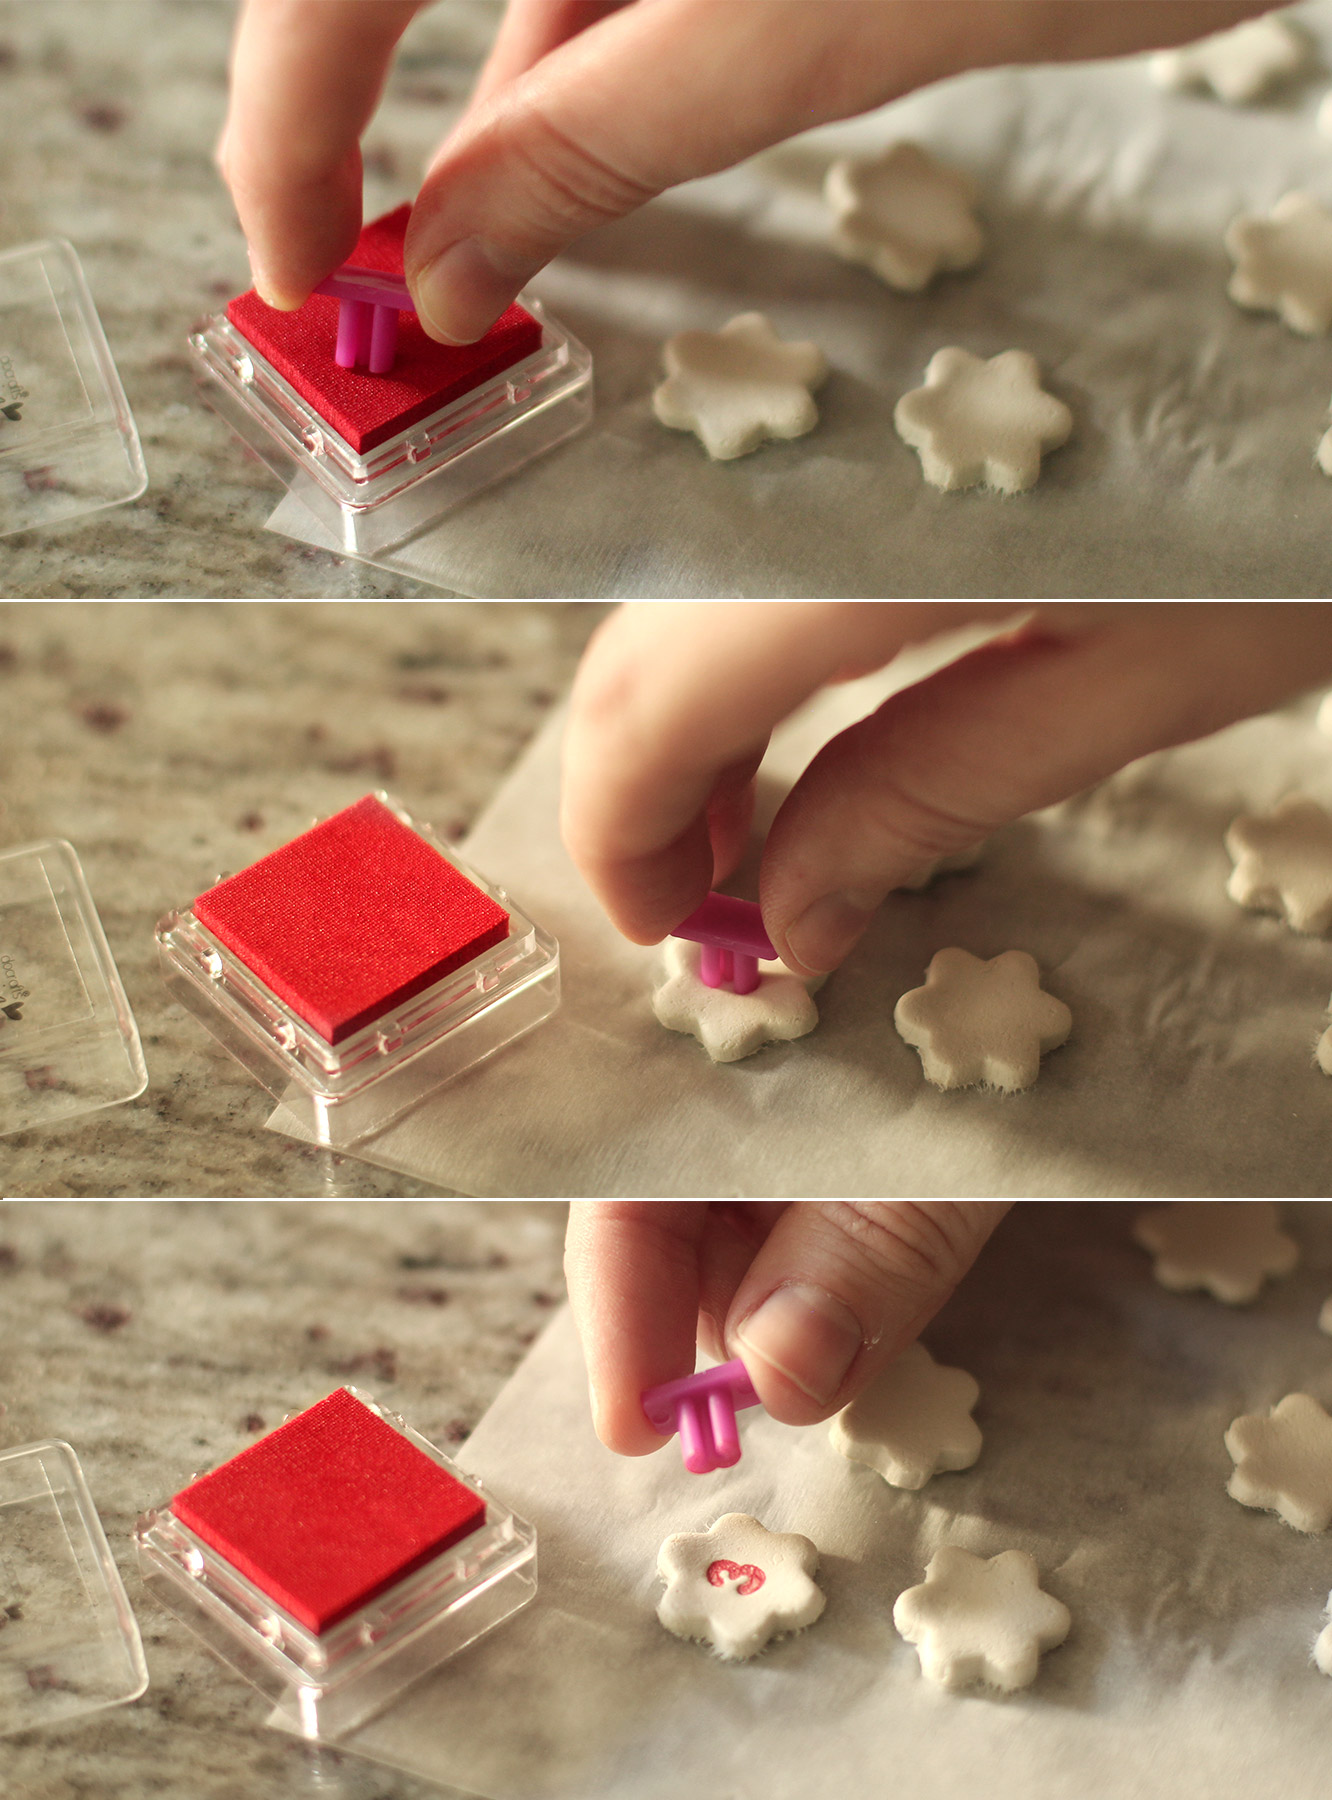
Step eleven
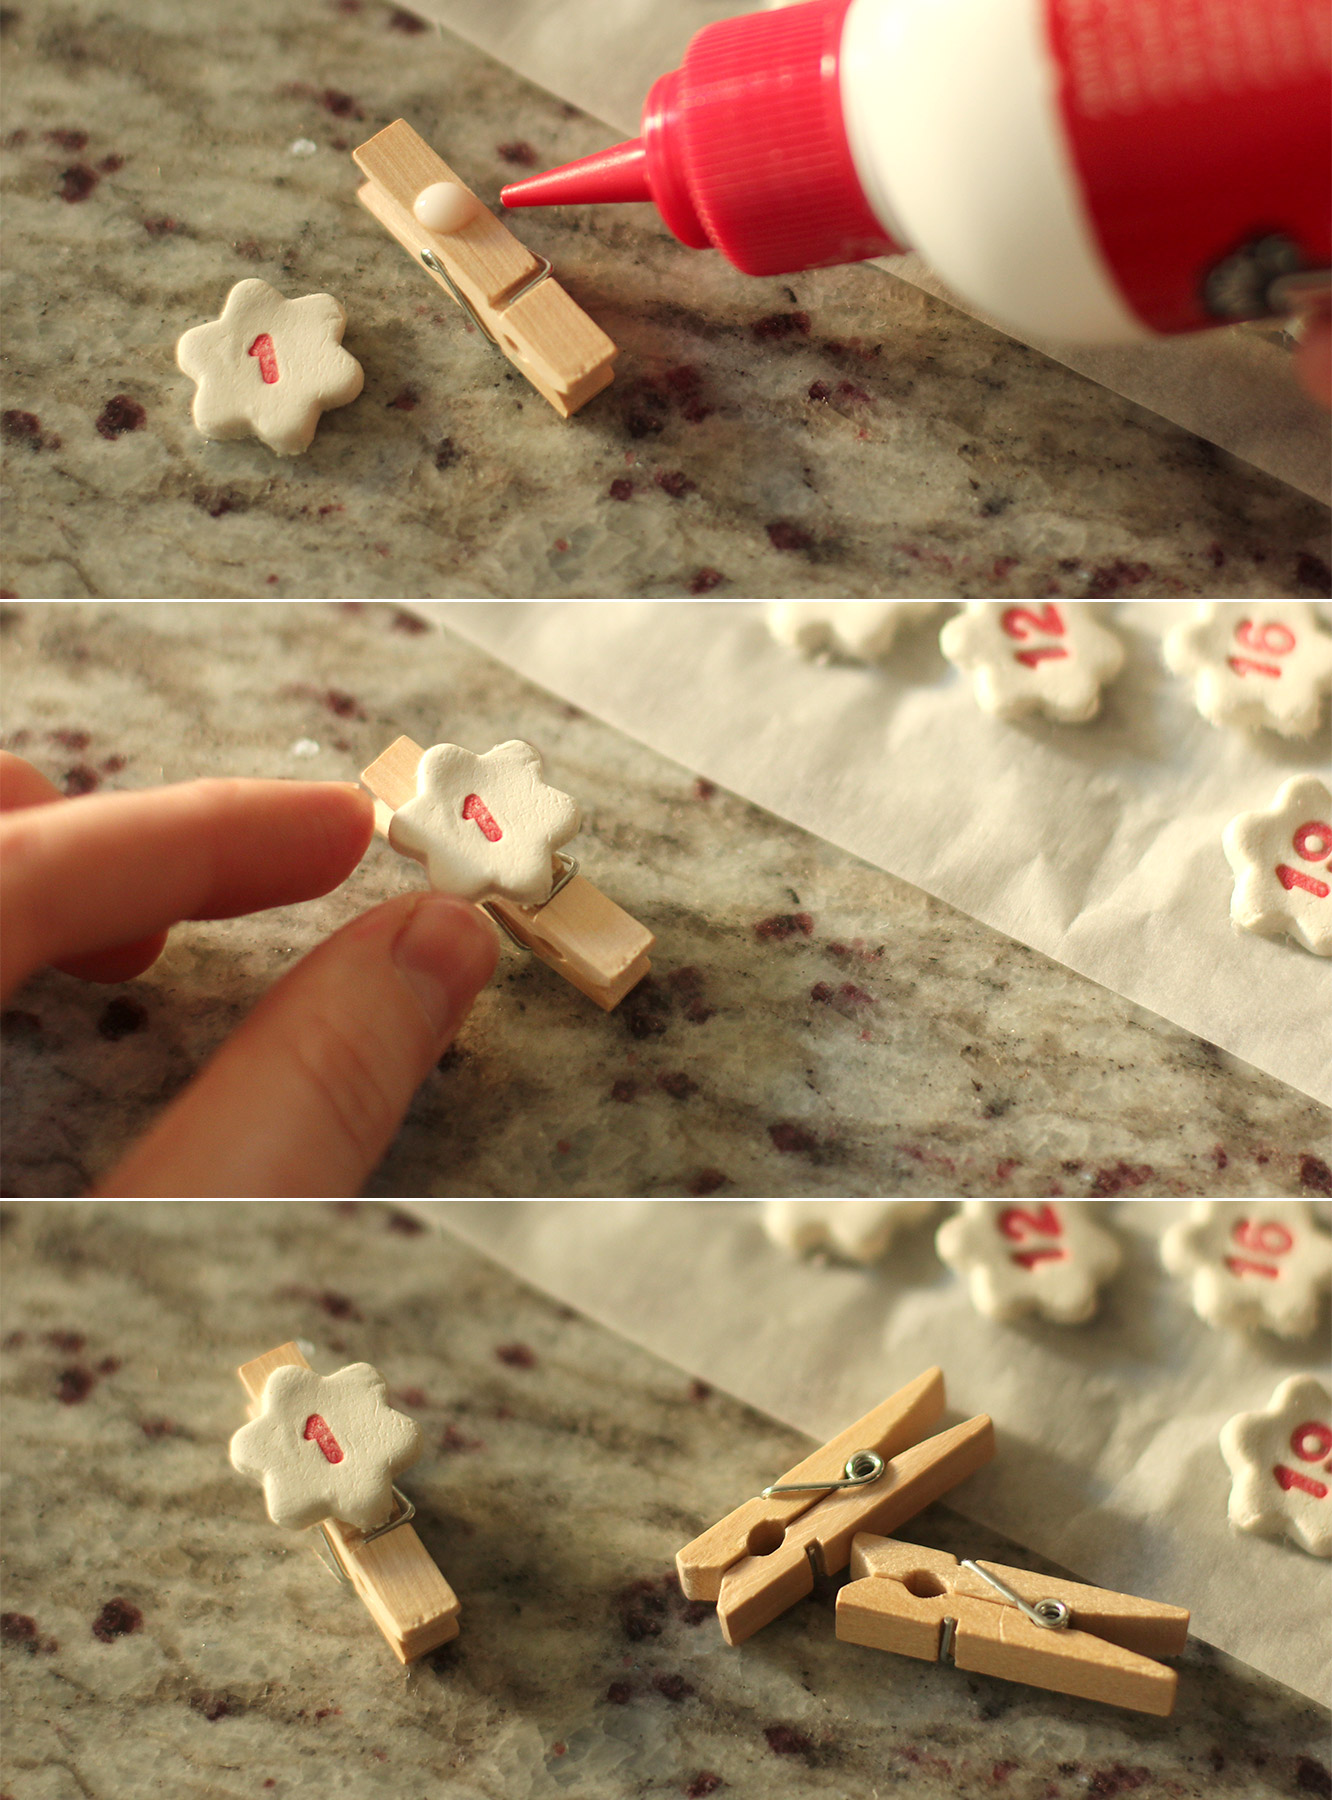
After a few learning lessons from last week, I made the number markers with air dry clay. I found it easier to work with than FIMO. It also worked really well to ink the stamps before pressing them into the shapes.
This is entirely optional, you could write the numbers on the pegs, stamp them, make circles of card instead etc etc.
Step twelve
Once the shapes have dried out (no cooking required with this clay), stick them to the pegs with enough space at the top to open and shut the peg without squashing them.
Step thirteen
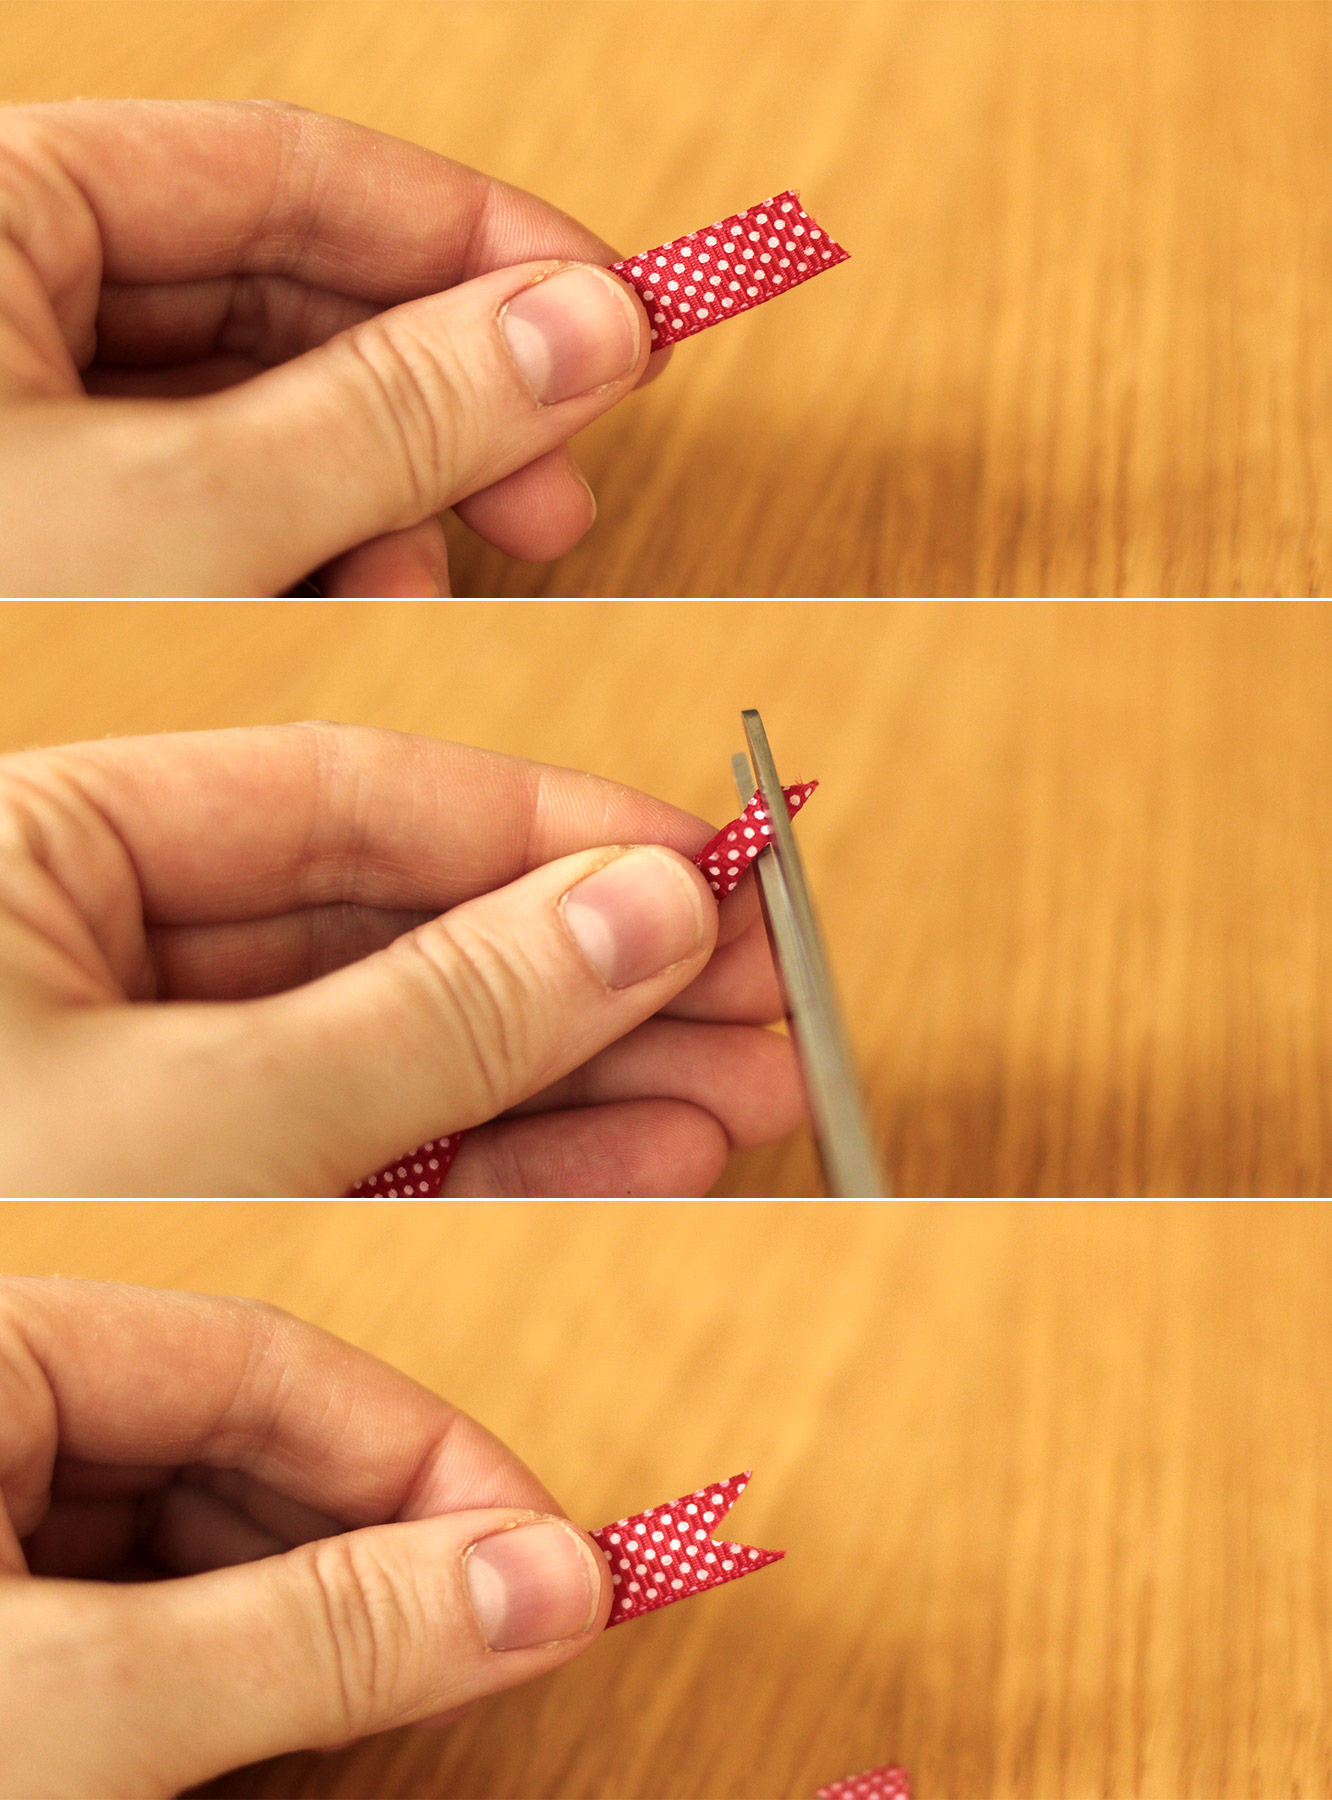
Cut 6 lengths of ribbon. I decided to taper mine at different lengths, as you can see in the final photos. To shape the ends nicely, fold the ribbon in half and cut diagonally on the fold to create a v-shaped cut.
Step fourteen
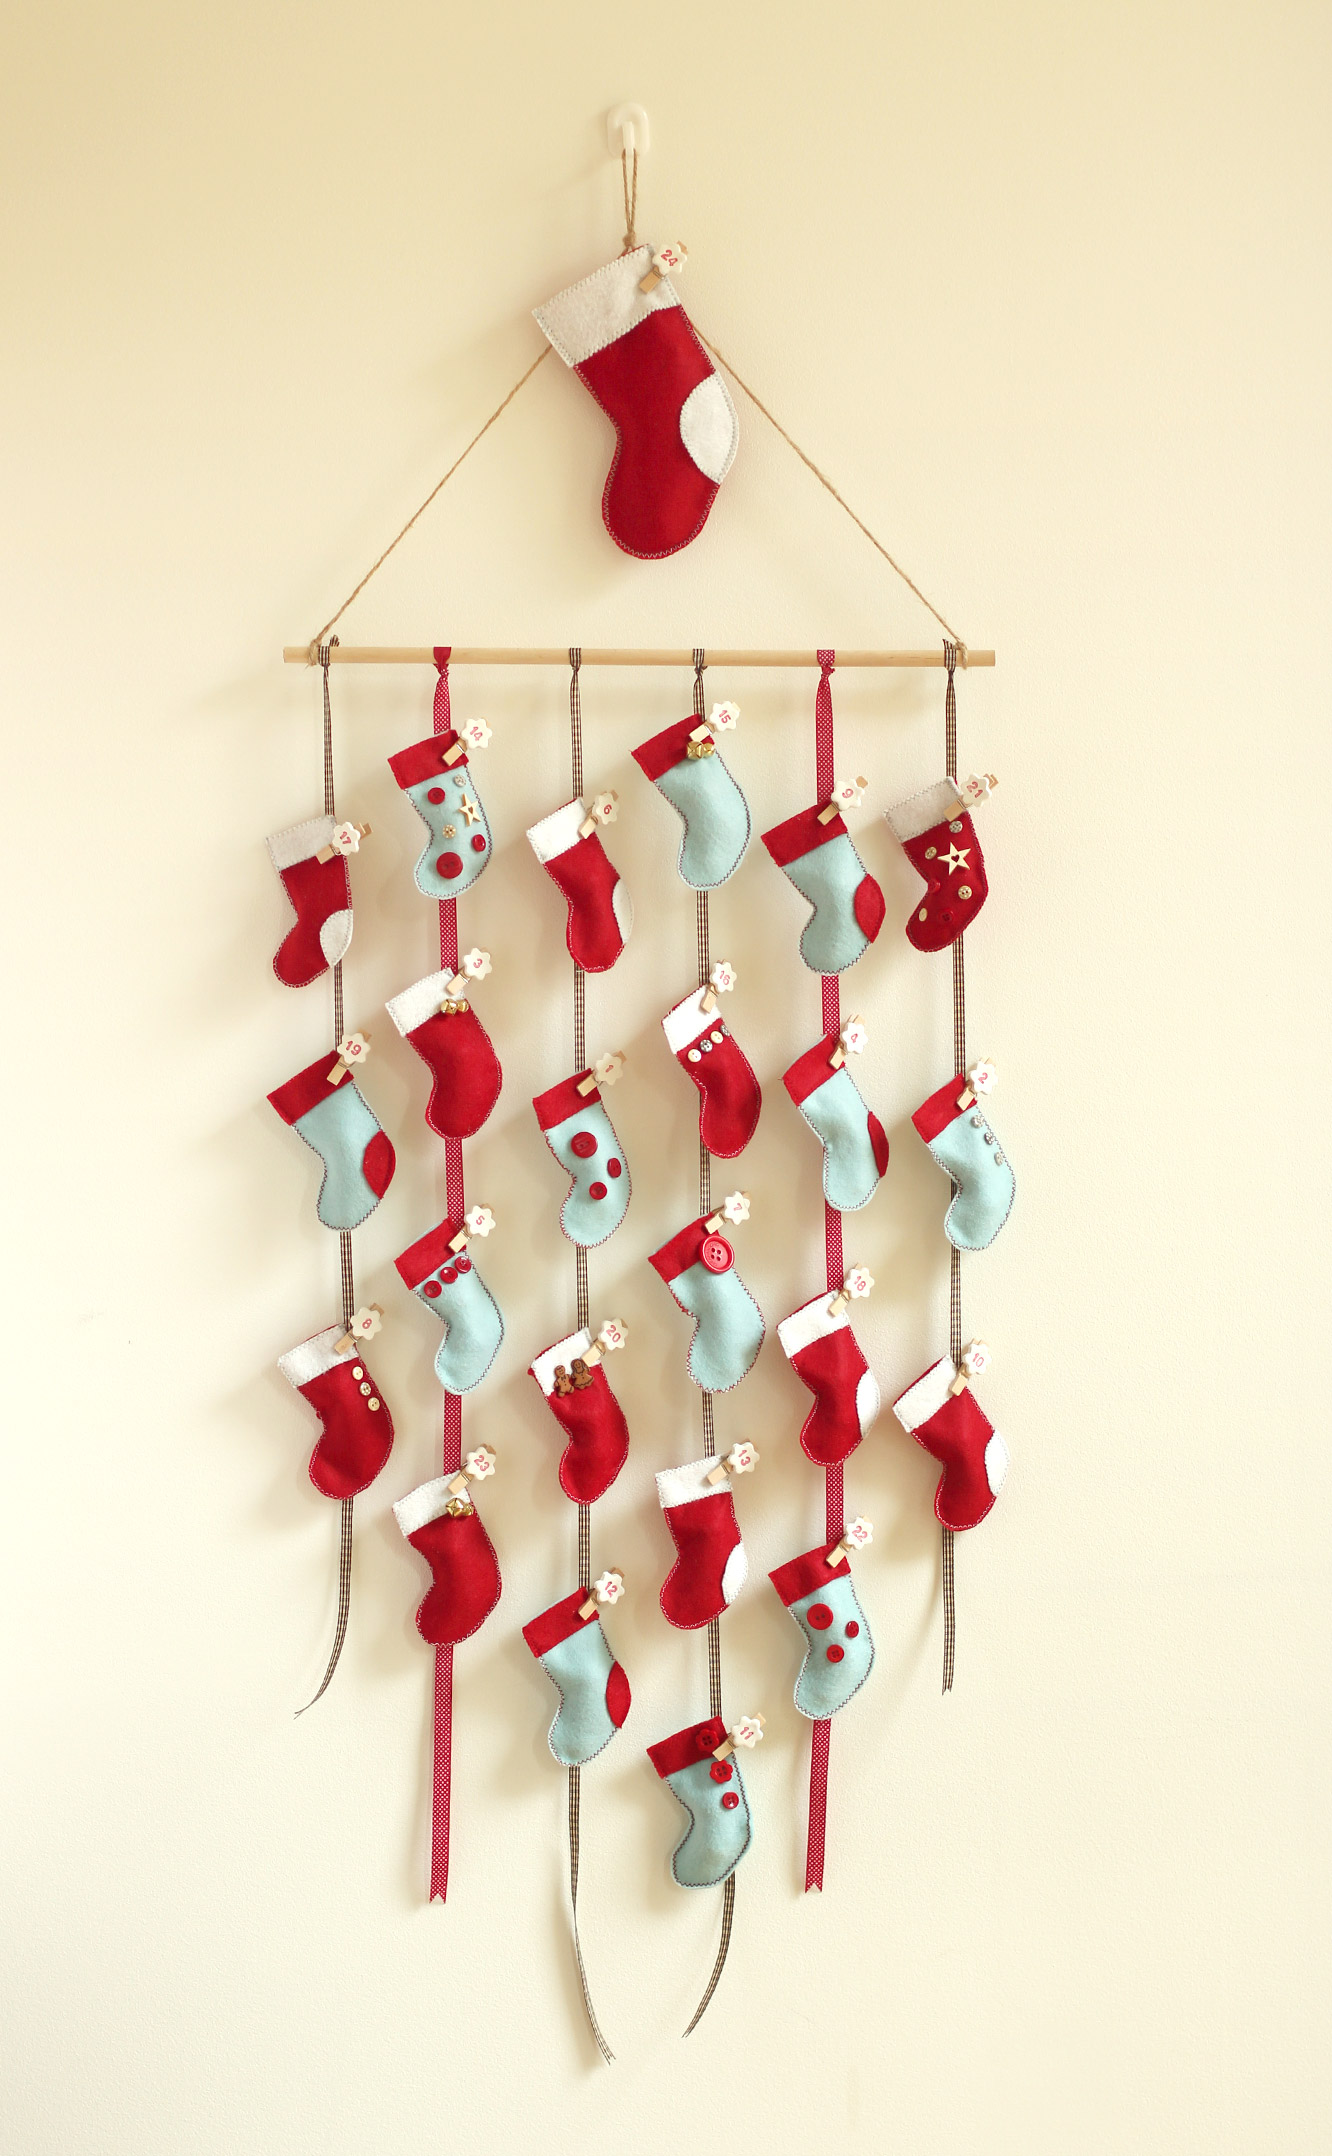
Tie the ribbons onto the rod and peg the stockings on.
A classic case of things not turning out quite how they were meant to this week. I’m not sure exactly what I was expecting, but my housemates managed to cajole me into embracing the rustic charm of these makes nonetheless. By the end I managed to accept them as ‘not too bad after all’ and the lack of precision means that they would be a great little craft for kiddies as the winter creeps in.
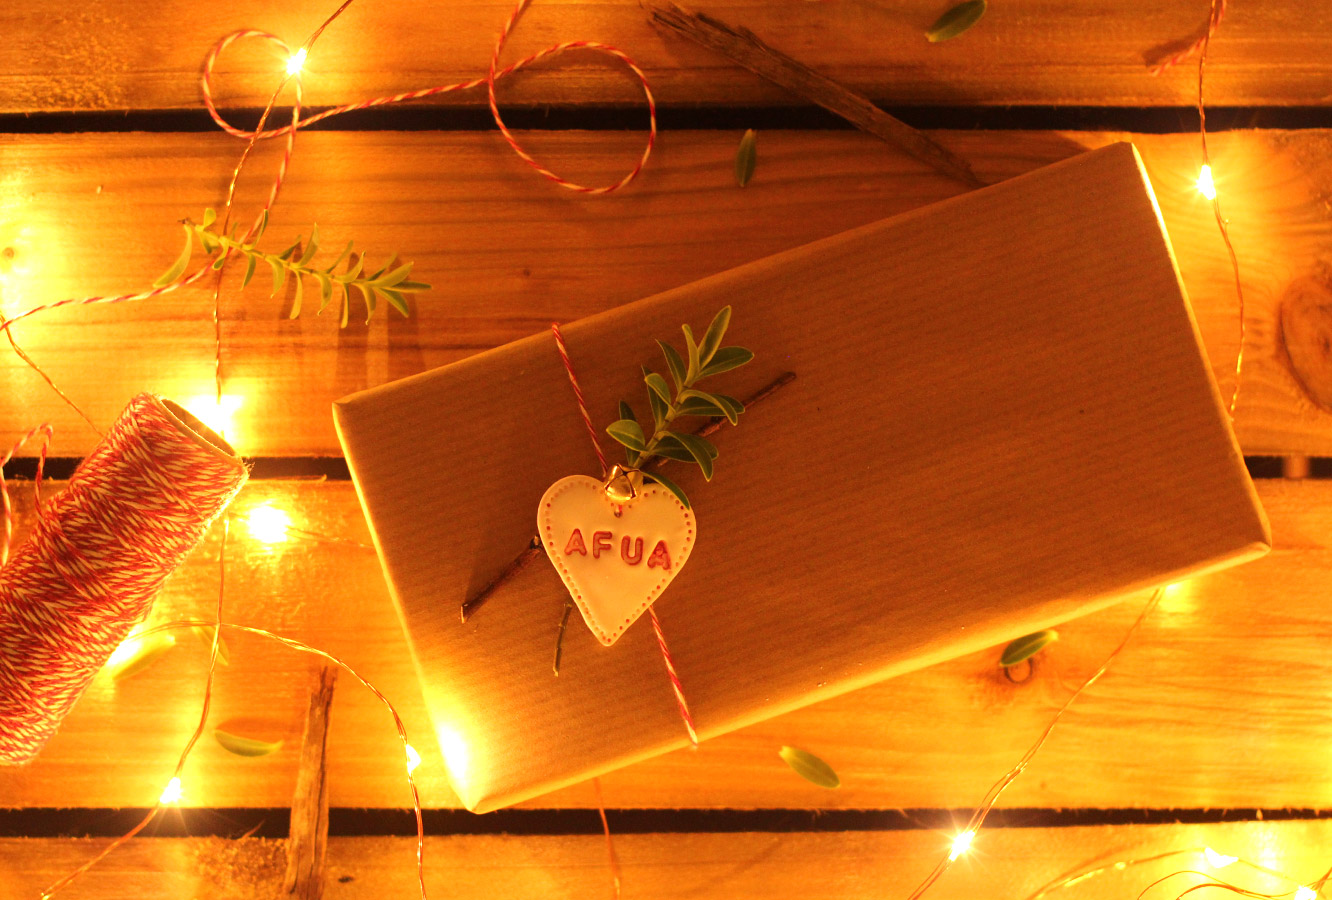
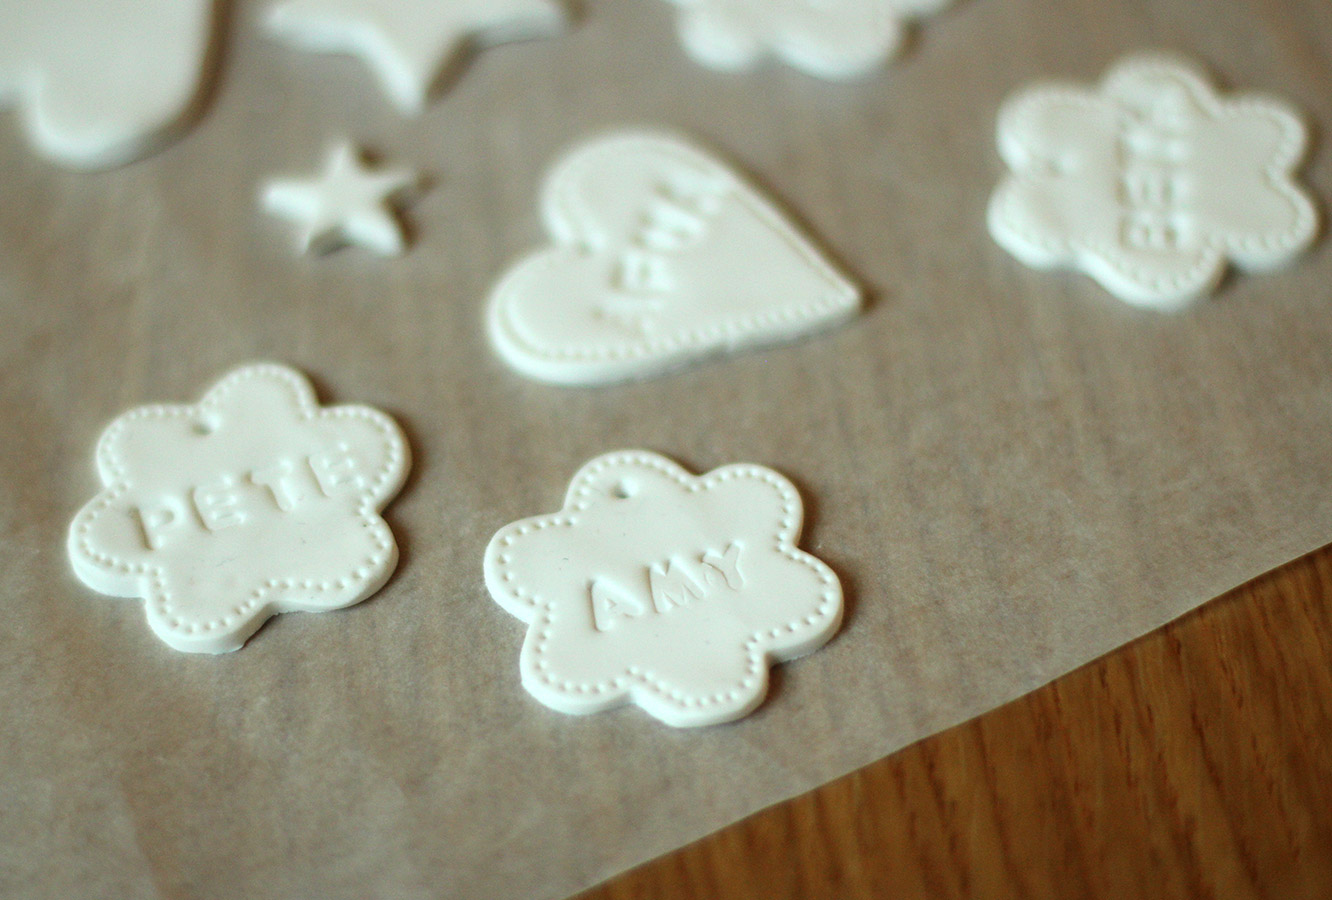
With Christmas decorating just around the corner these guys are a great finishing touch as tree decorations, tags on presents and for card making. They are cheap to make and are cute little token gifts for the people you love, or at least those you like enough to want to give them something, but not enough to actually apply yourself to Christmas shopping.
You will need
A block of FIMO modelling clay
Shape cutters
Festive string or ribbon
Acrylic paint and a small paint brush
Alphabet cookie stamp, I go this from Tiger recently (or regular stamps might work)
A paperclip
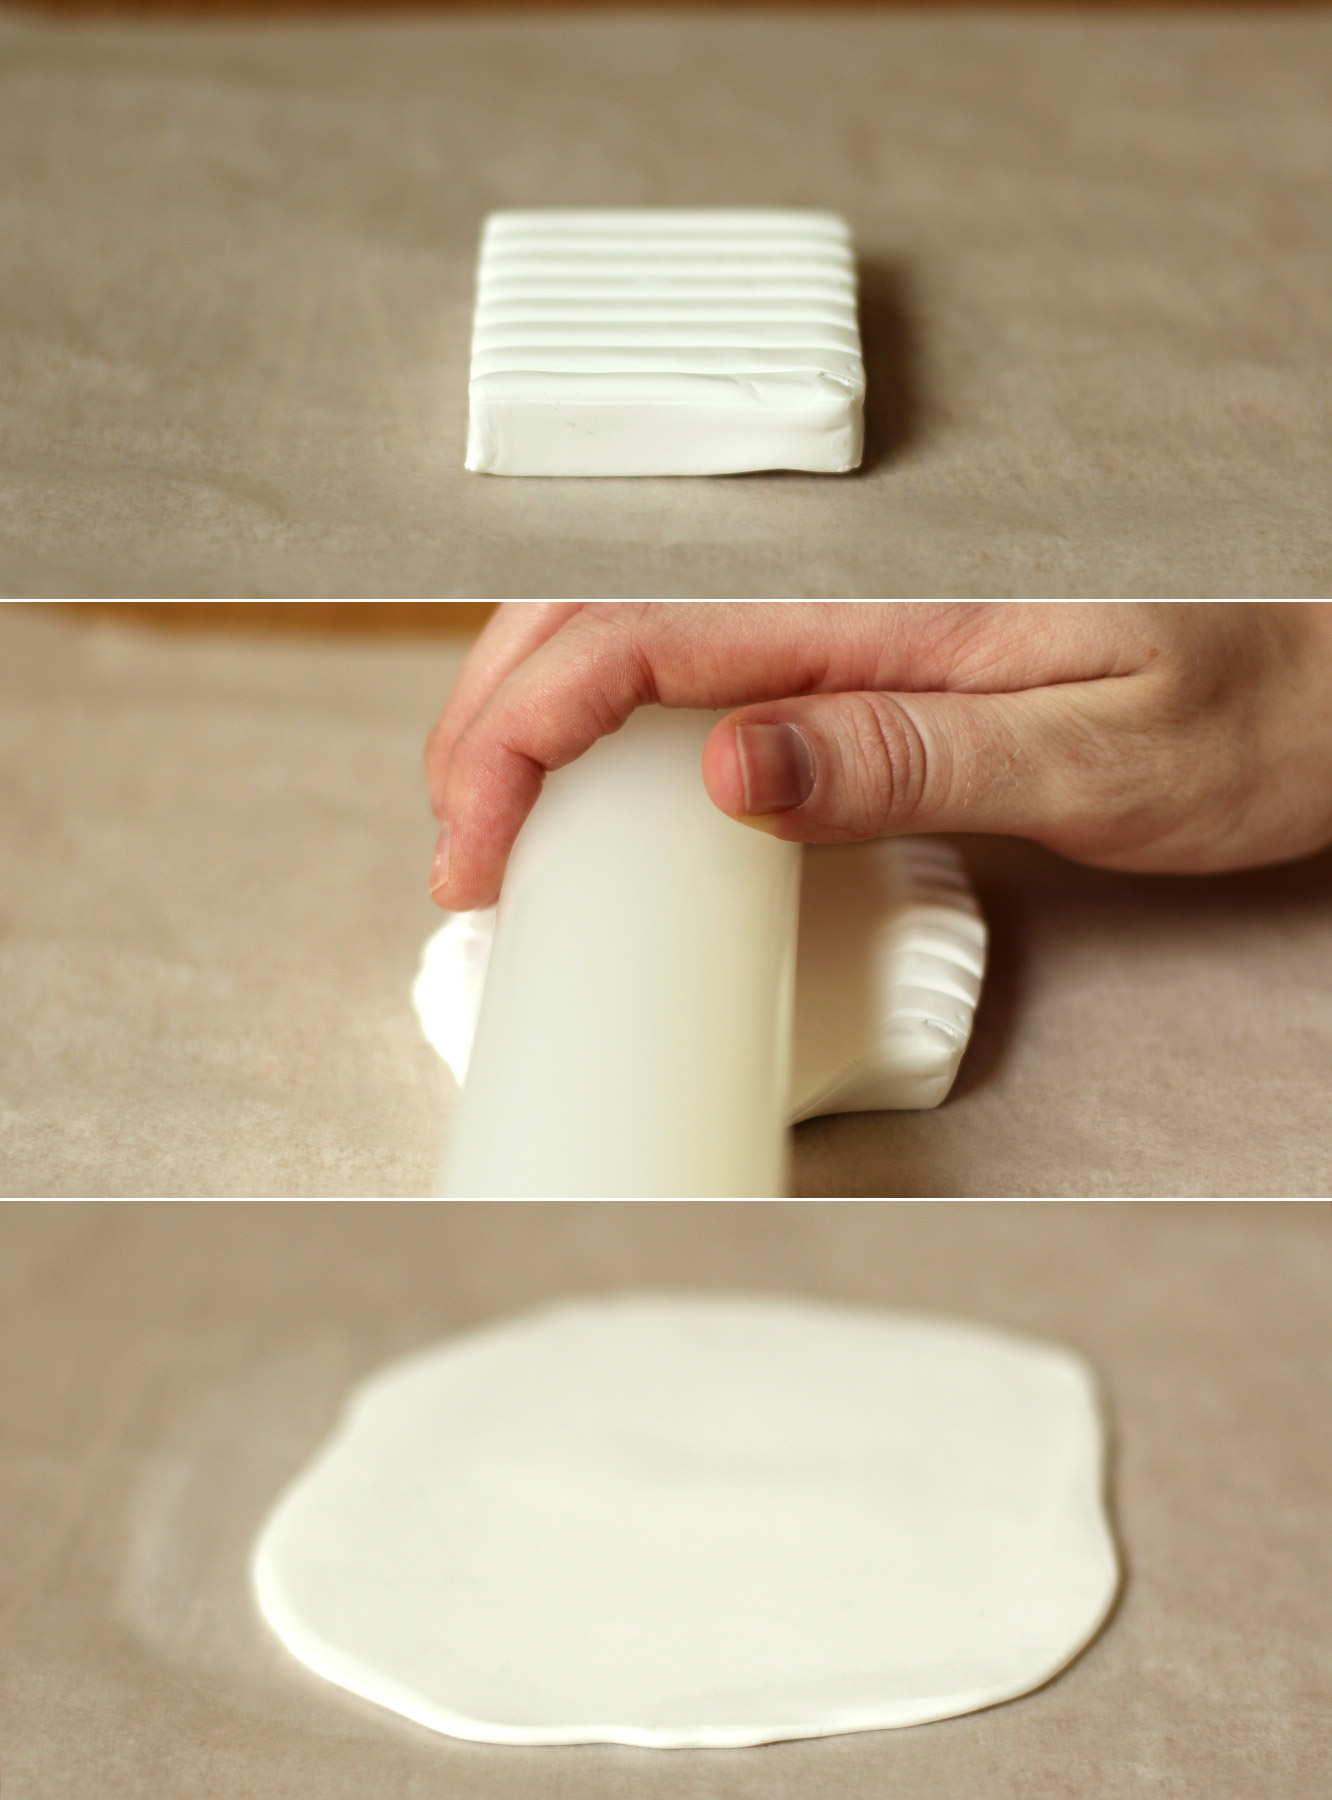
Step one
Roll the FIMO out into a thin sheet, about 2-3mm thick.
I learned a few things here. Greaseproof paper is not the easiest thing to roll this out onto, a clean surface would be better. Roll the FIMO into a ball with your hands first to warm it up a bit as it will be easier than just rolling straight onto the block. Dust will get into the FIMO so easily, it picks up EVERYTHING, so make sure you wipe your rolling pin and surface carefully.
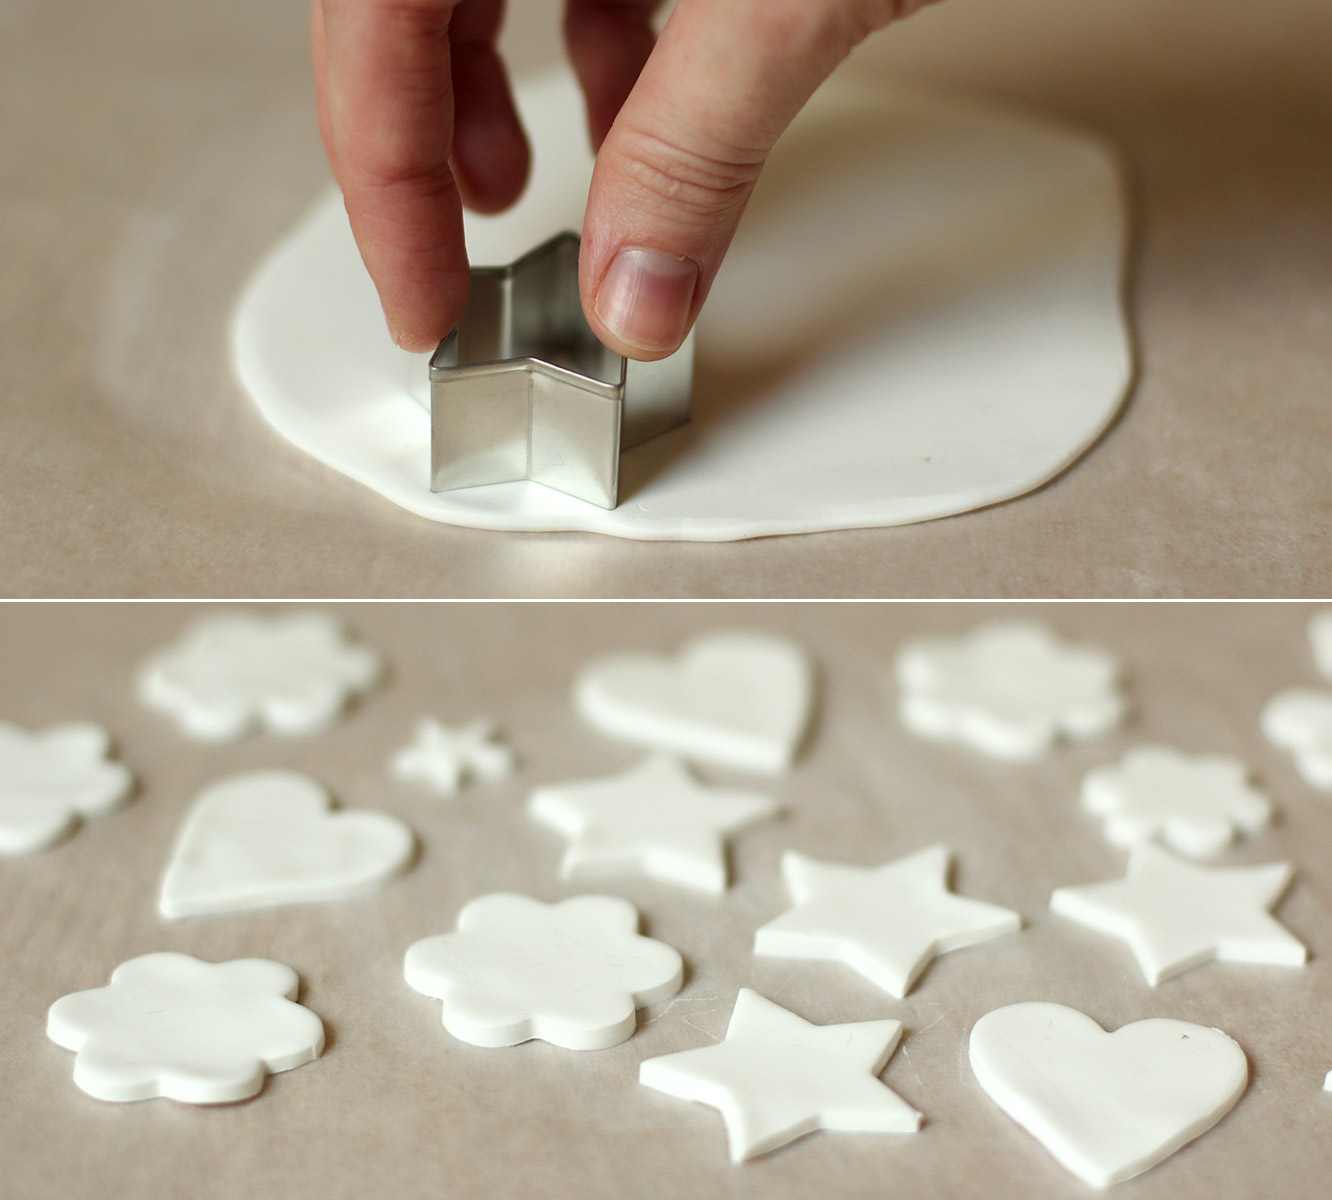
Step two
Cut out a variety of shapes. Re-roll and keep cutting until you have used all the FIMO. It’s surprising how many you get in the end out of such a small block.
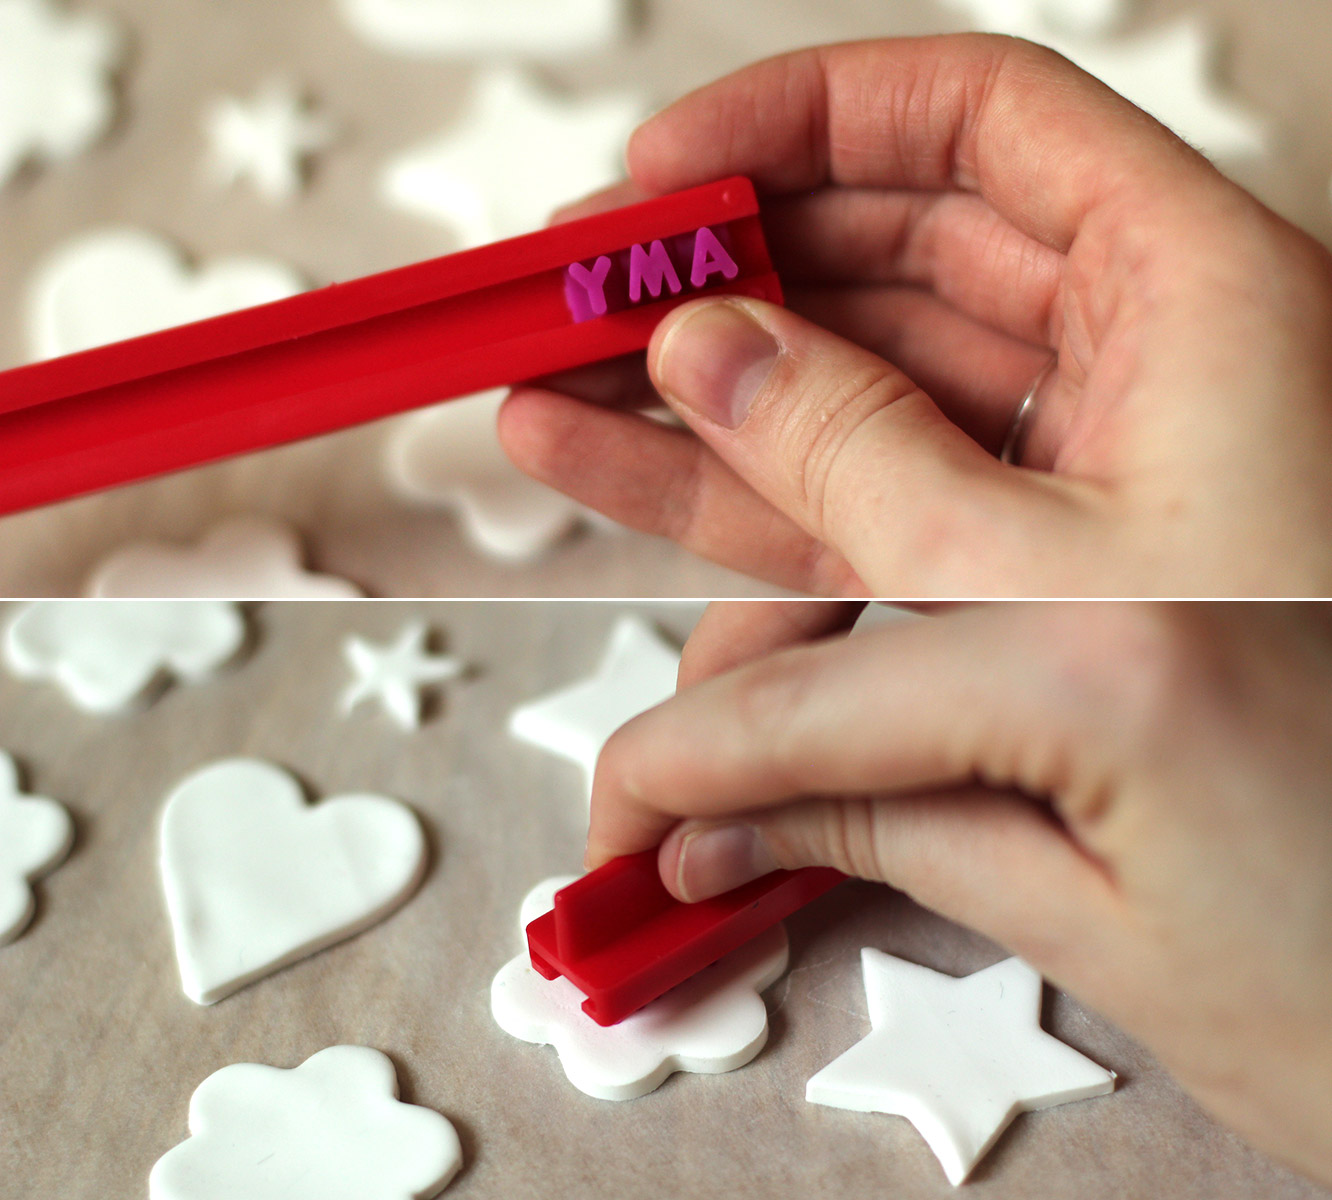
Step three
Stamp the names of your nearest and dearest into the shapes. I found that words longer than four letters were problematic. I employed some creative shortenings, although my housie Marianne was not impressed with Matz as her new nickname. It will depend on the sizes of your cutters, but you might want to do initials or words like ‘love’, ‘joy’ and ‘noel’ if there’re some long names knocking about.
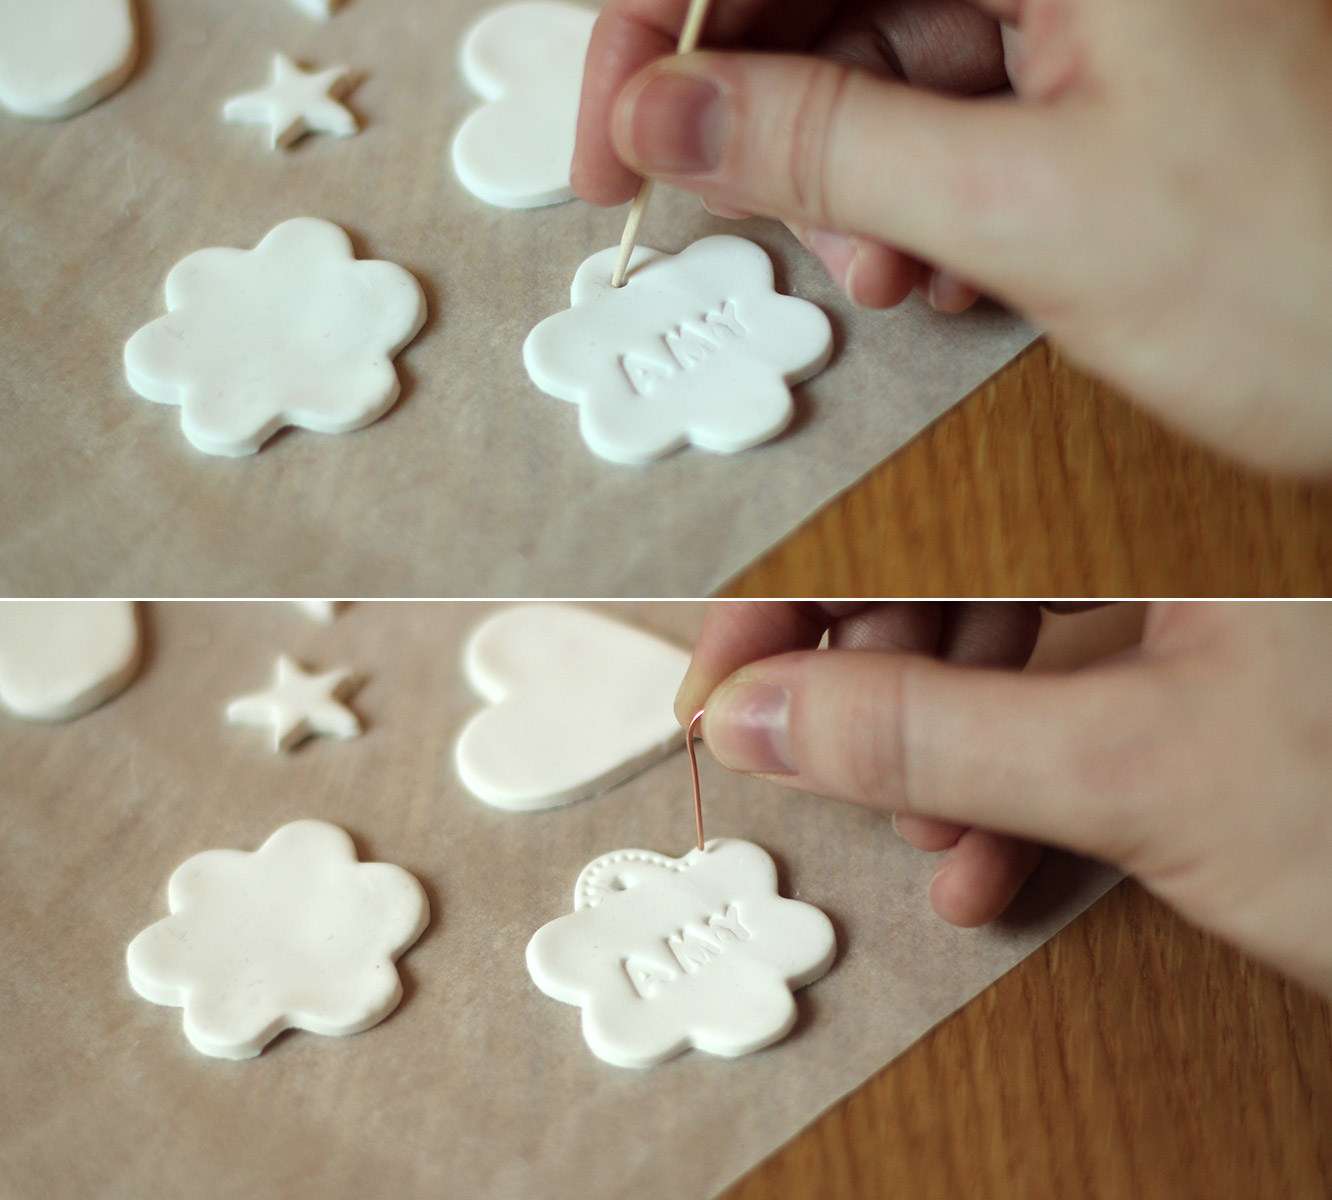
Step four
Using a cocktail stick or bent out paperclip make a hole at the top for the hanging. Wiggle the stick about in a circular motion to make sure the opening is big enough for your string or ribbon.
I then made dots all around as an edging with a paperclip.
Step five
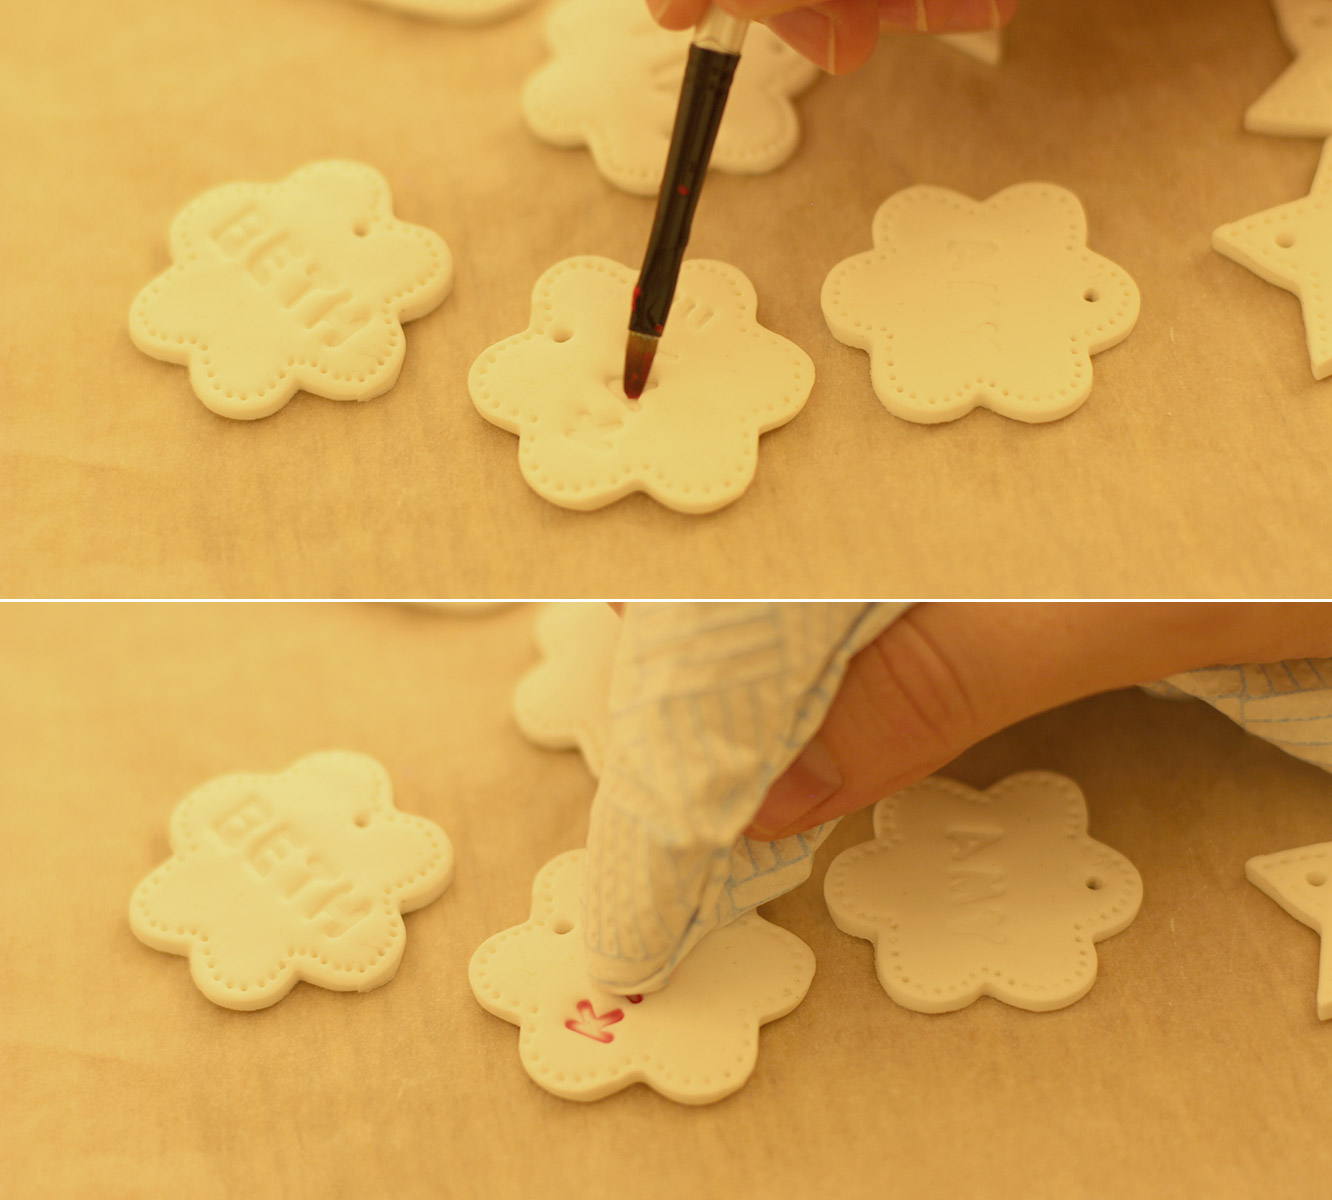
Place on greaseproof paper and onto a tray. Bake in the oven on 100C/200F/gas mark 1 for about 30 minutes. I guessed because the packet provides zero instructions, other than to not heat it above 130C. You can tell by picking them up as they start to feel less soft and a bit lighter as they cook.
Step six
Using very watery acrylic paint, brush over the letters and the edging. Quickly dab away the excess with some clingfilm to create a rustic look.
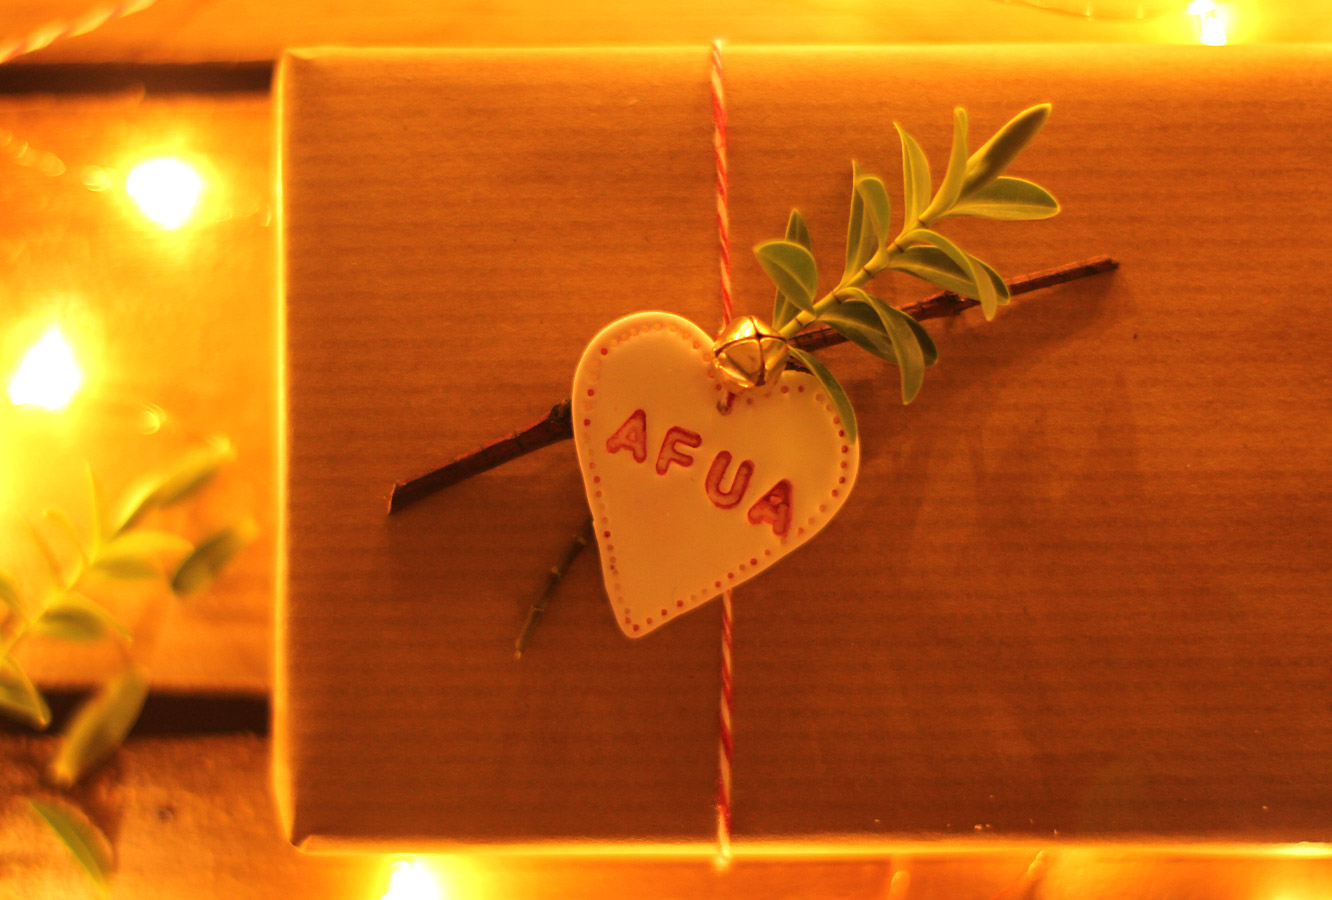
Use one: Tie up with a couple of trimmings from the garden, maybe a button/pom pom/little bell like mine. Tie with the string around a gift wrapped in brown paper.
Use two: String up and hang from a jug of twigs or your Chrimbo tree.
Use three: Make mini ones with initials and create a simple Christmas card with a piece of wash tape and brown card.
This weekend saw the baby shower of a rather lovely lady by the name of Anna. You may (but probably won’t) remember us celebrating Anna’s hen party a while back, well now she’s about to pop a sprog would you believe?
Anna is a rather large fan of gnomes. Yeah, that was my reaction too, but you learn to embrace it after a while…she’s very endearing that way. Well, our friend Taylor (party planner extraordinaire and all round kindred spirit when it comes to carrying things out to obsessive levels of detail) decided to throw Anna a woodland themed shower. I know right? Cute. I totally took my camera and promptly forgot to take photos of all the lovely things; gingerbread fawns, woodland creature bunting, sausage roll snails and toadstool cupcakes to name just a few.
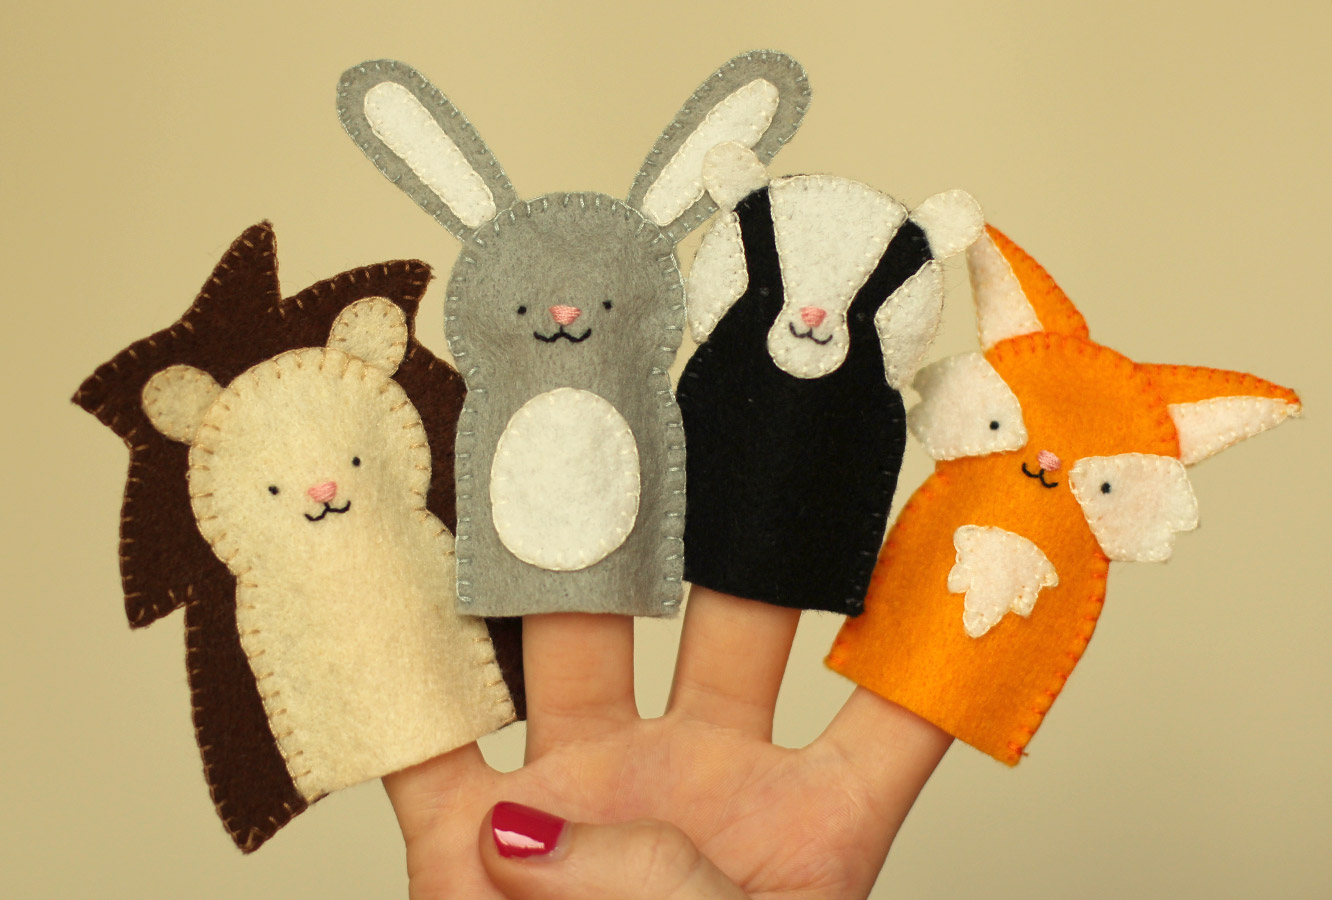
Anyway, other than baking some little flowerpot grassy gnome type cupcakes, I decided my contribution would be to carry the theme into my present and make a small selection of woodland characters to entertain baby upon her arrival into the world.
So here’s how to make your very own arsenal of woodland animal finger puppets, with a downloadable template of course.
You will need
Felt (for the patterns I have provided you need brown, beige, white, black, grey and orange)
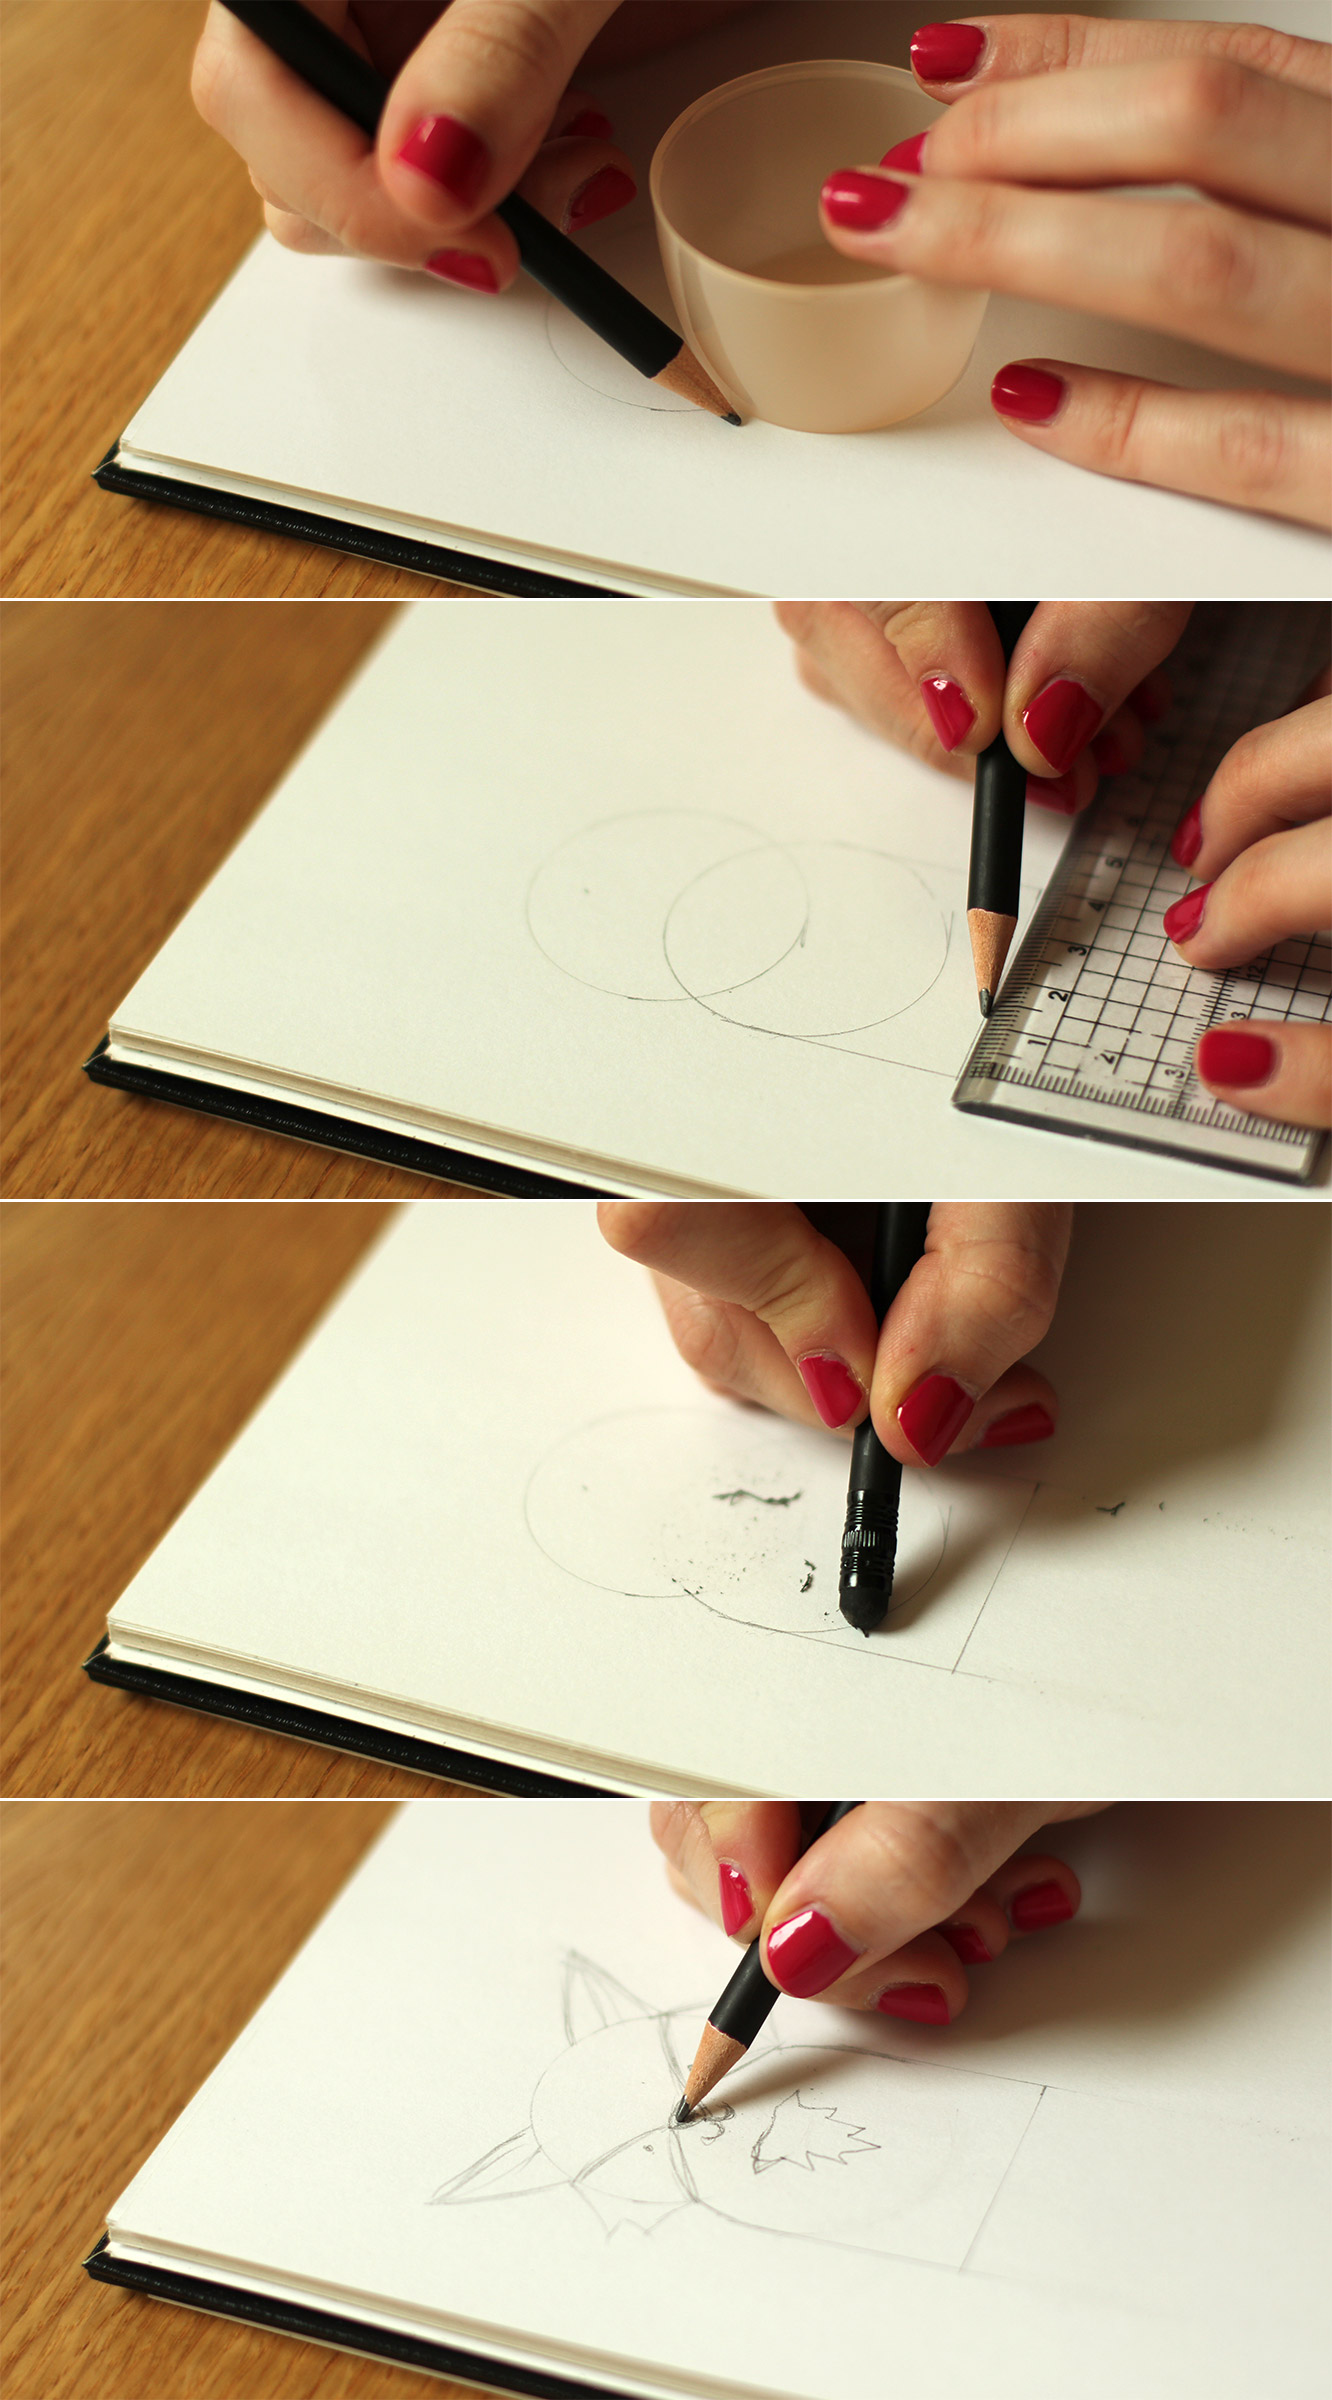
This is entirely optional. If you want to draw your own characters (or expand on the set I’ve provided) You will need to draw out a few designs. I used a deodorant can lid and a ruler to keep basic shape of my characters consistent.
If you want to cheat you could just trace the shape off the printable and add your own features to it.
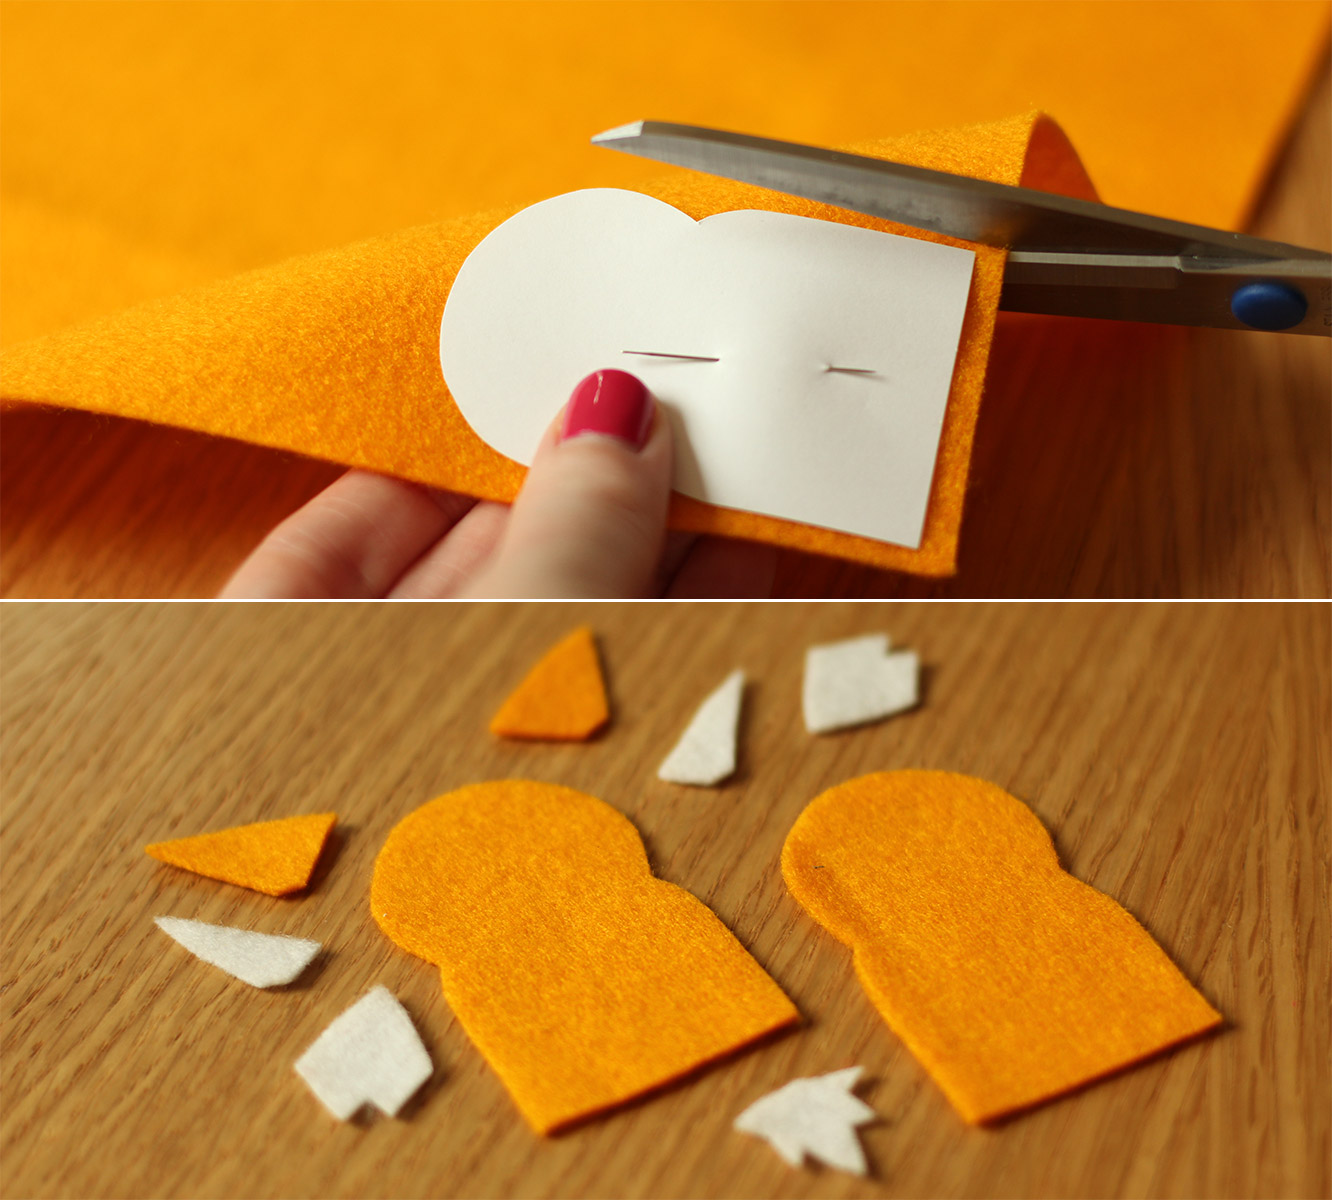
Step two
Cut out all the shapes in the relevant coloured felt.
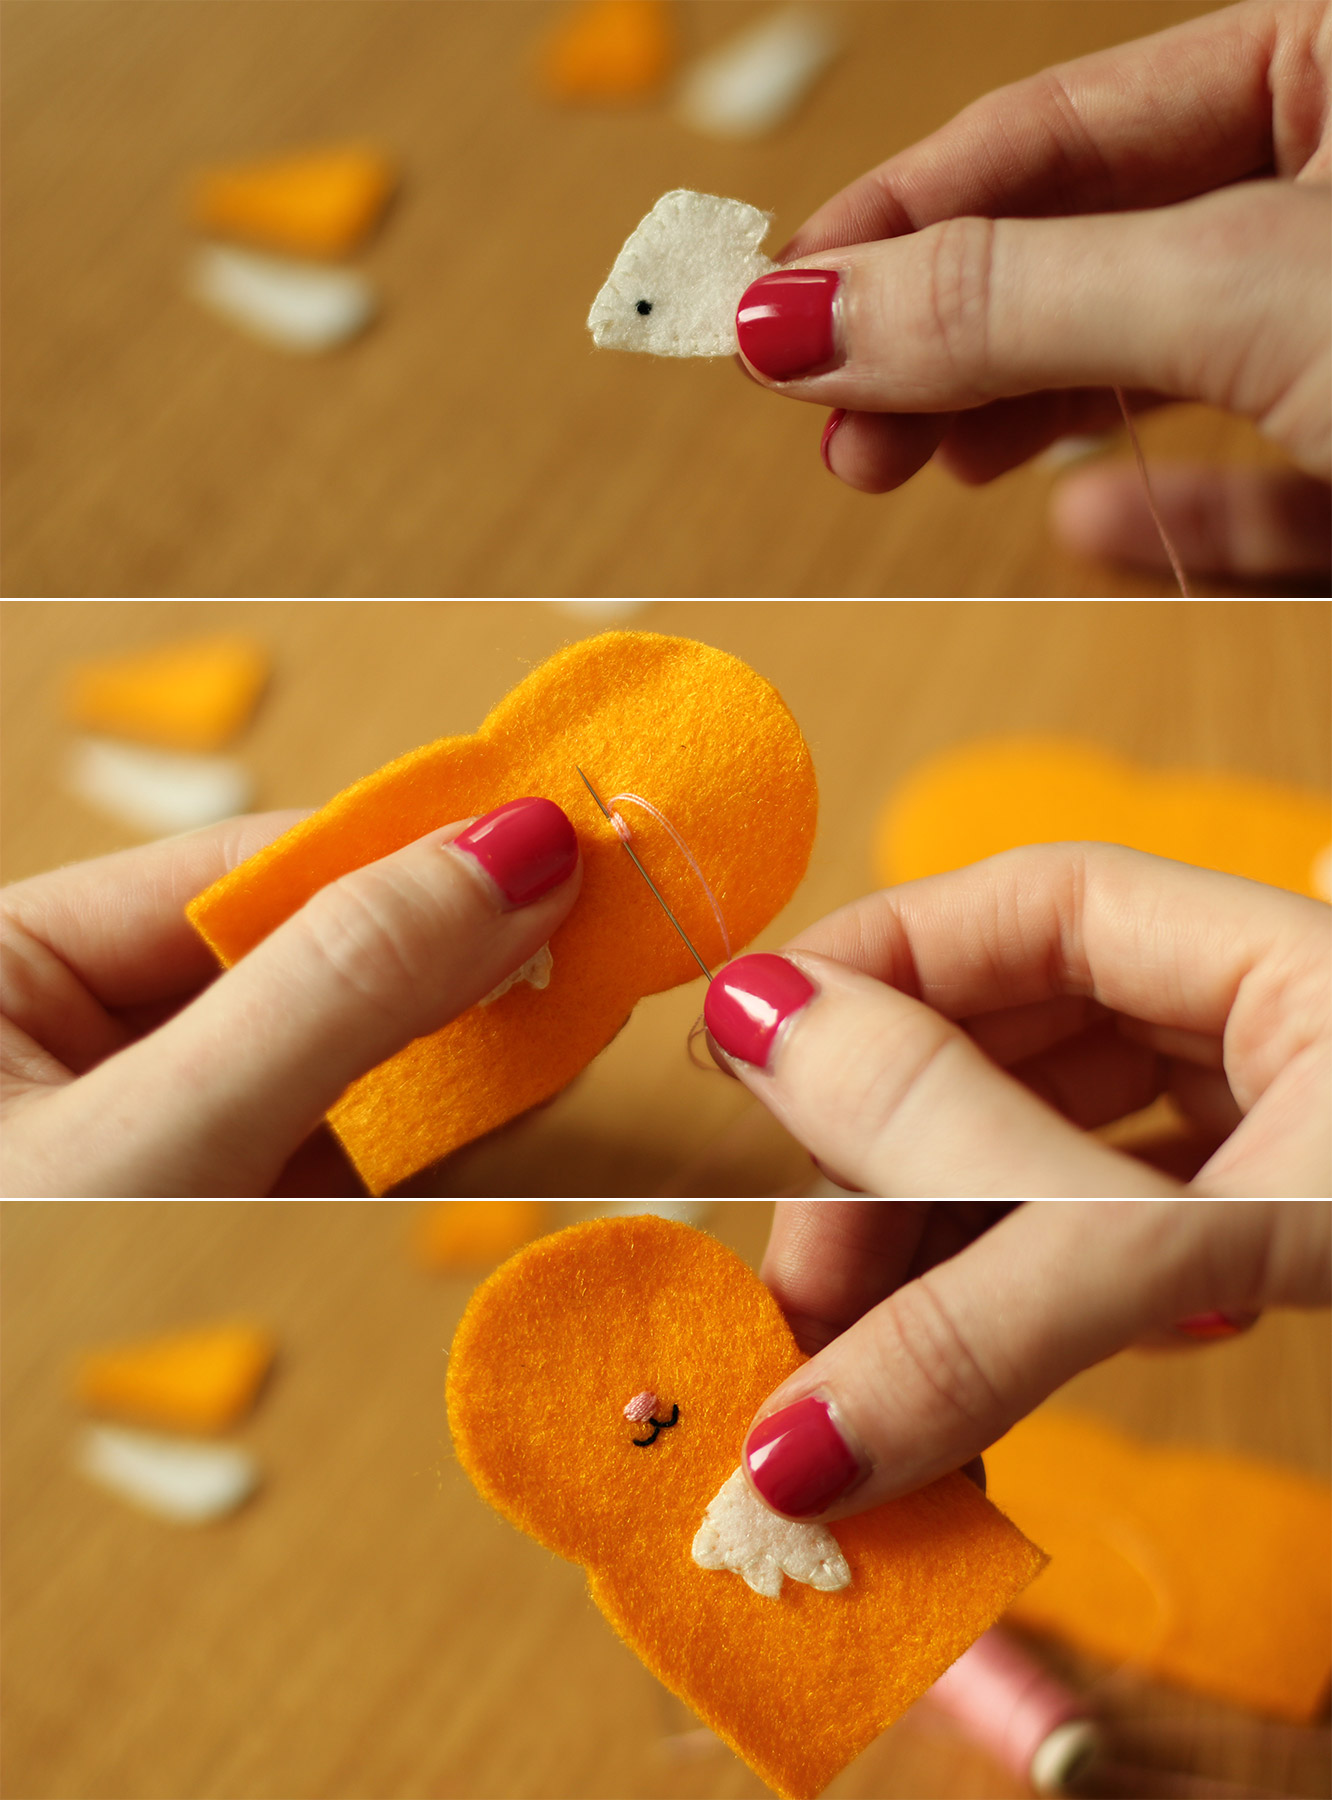
Step three
Sew on the faces, I just used simple stitches overlapping them for the noses and just a little line of backstitch for the mouths. No fancy embroidery techniques here.
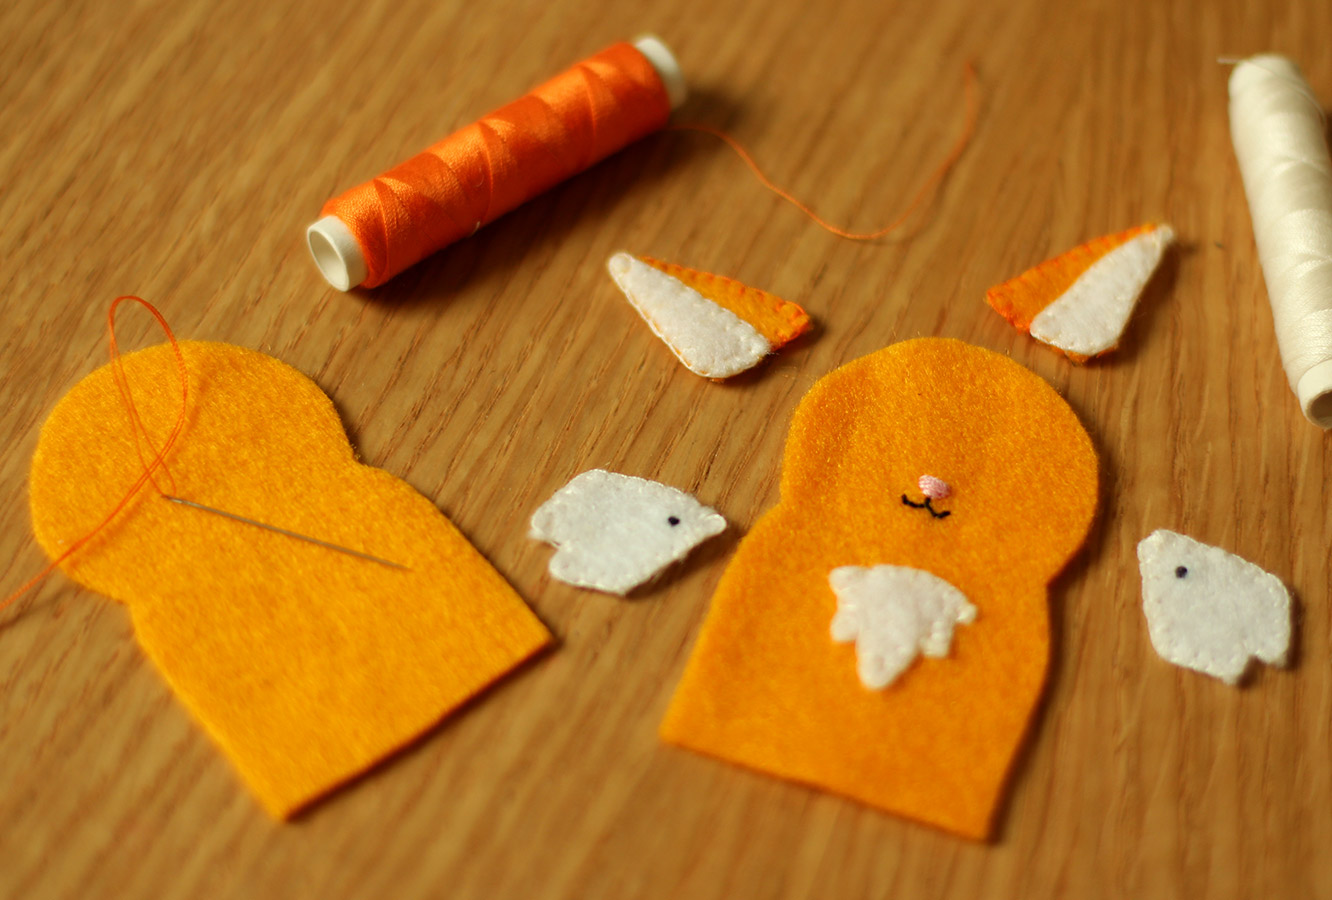
Step four
Edge all the remaining features/bits of fur with blanket stitch (see below). You will notice that for the fox I sewed the tummy fur straight onto the puppet but left the cheeks separate to glue on later. With the badger I sewed his cheeks straight on because they followed the shape of his face and I just found it less logistically challenging somehow.
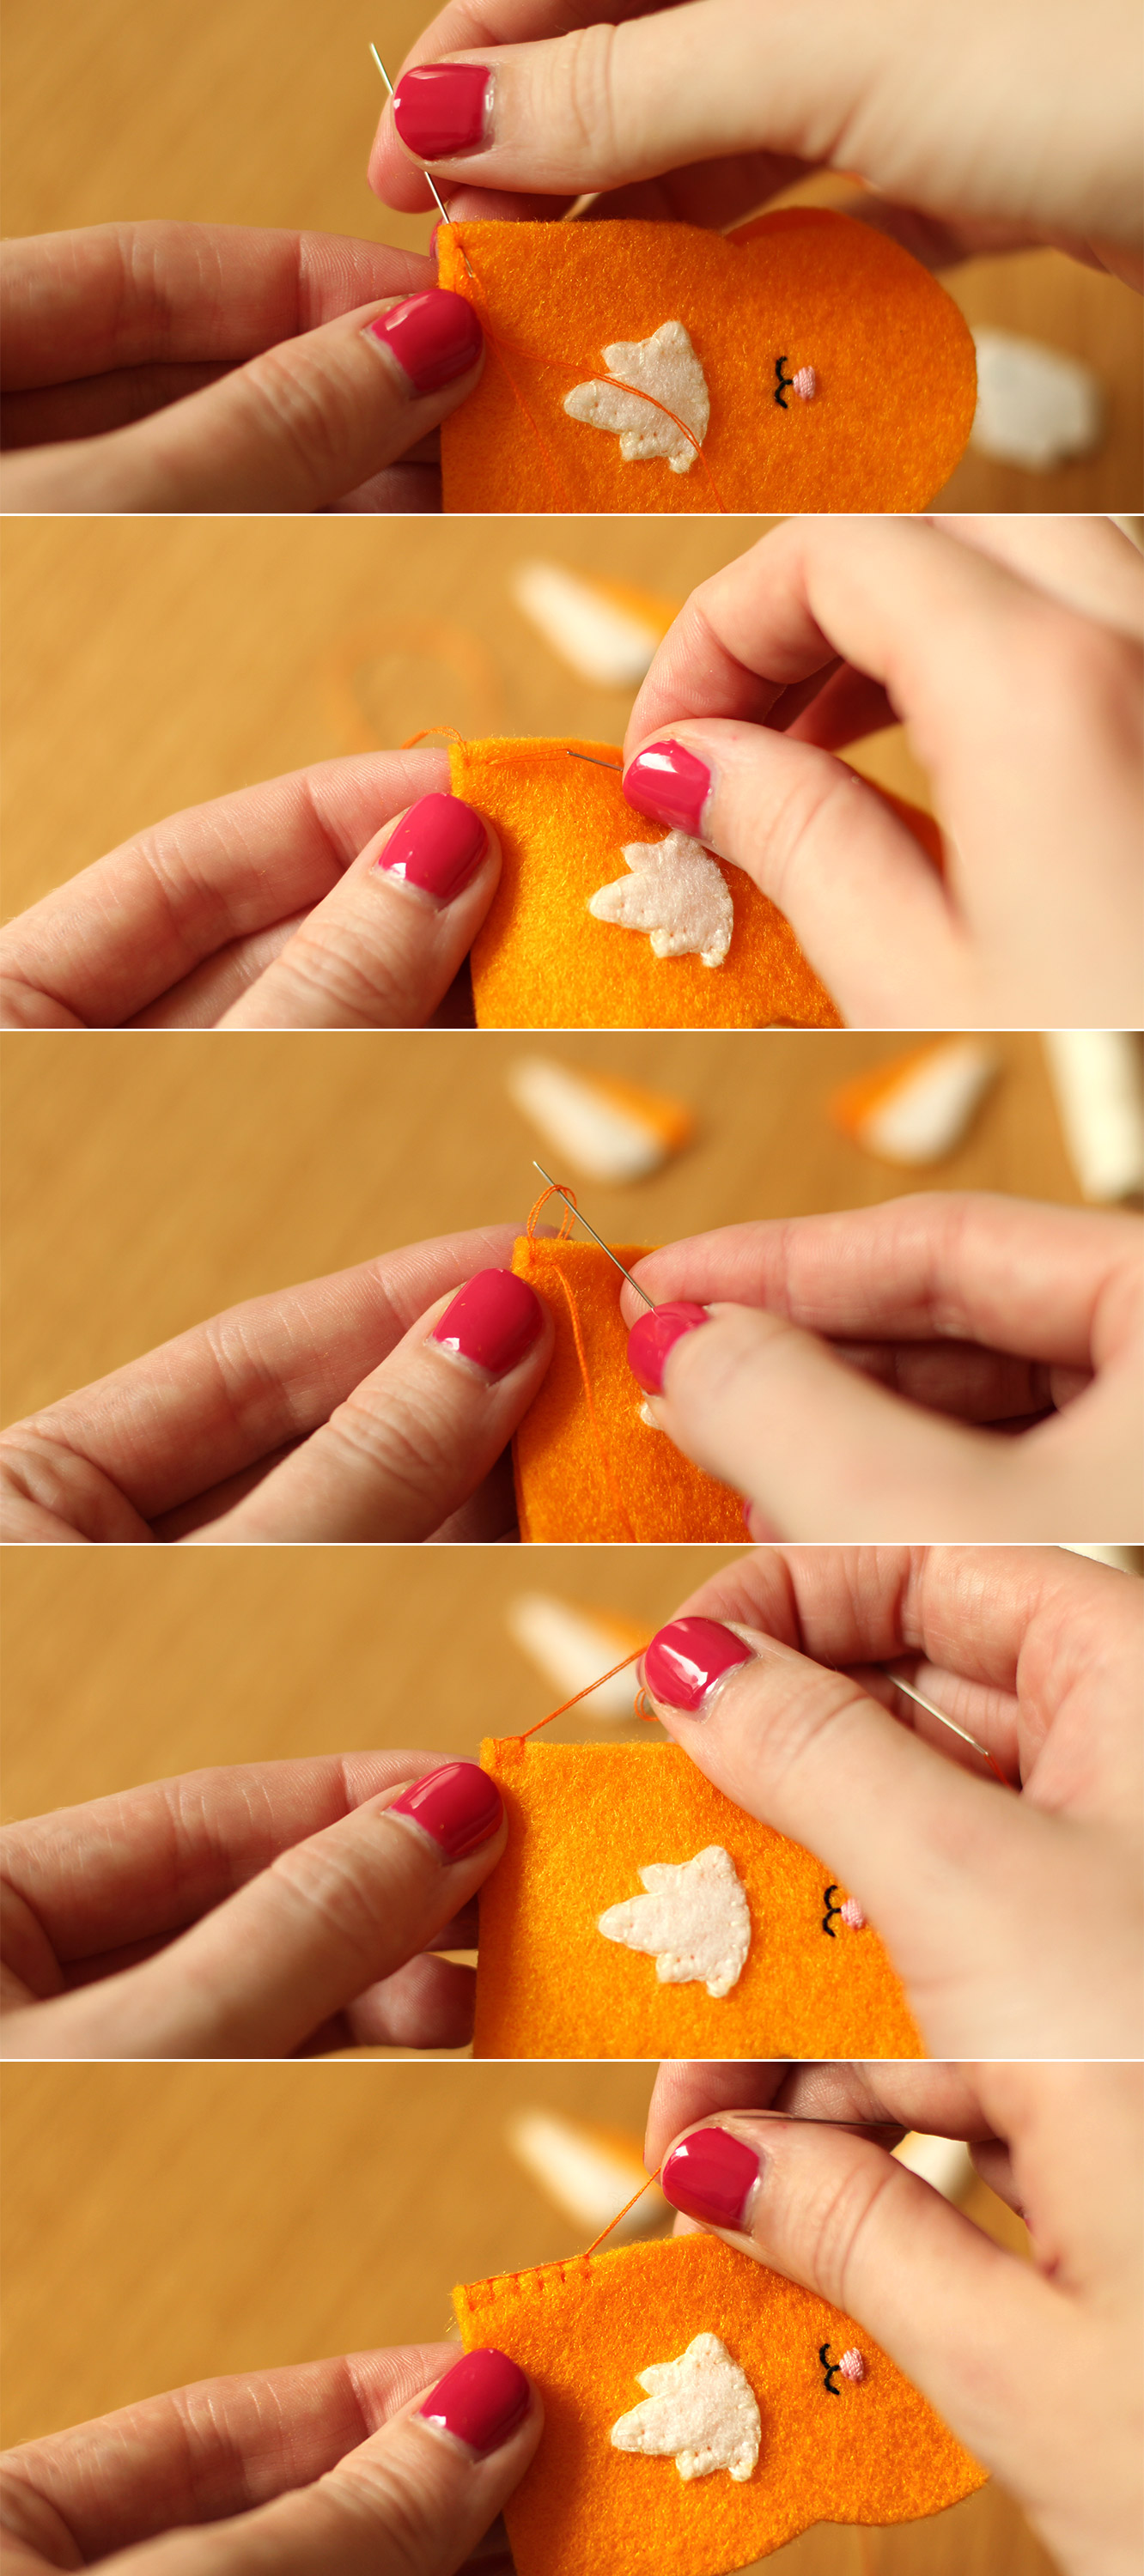
Step five
Blanket stitch the back and front of the puppet together. Utilising the memory bank of primary school sewing club for me, thanks Mrs Gothard, nailed it.
You basically need to put the needle through the felt at the height you want your stitching, and as you pull the thread through catch the loop so that it is held at the top. I’m sure the youtube can furnish you with a useful tutorial if my description and photos fail to do the job.
You need to include the ears as you go round, I just came back through at the top of the first stitch so my loop was on top of the felt to keep the effect going. I know, I wouldn’t understand that explanation either.
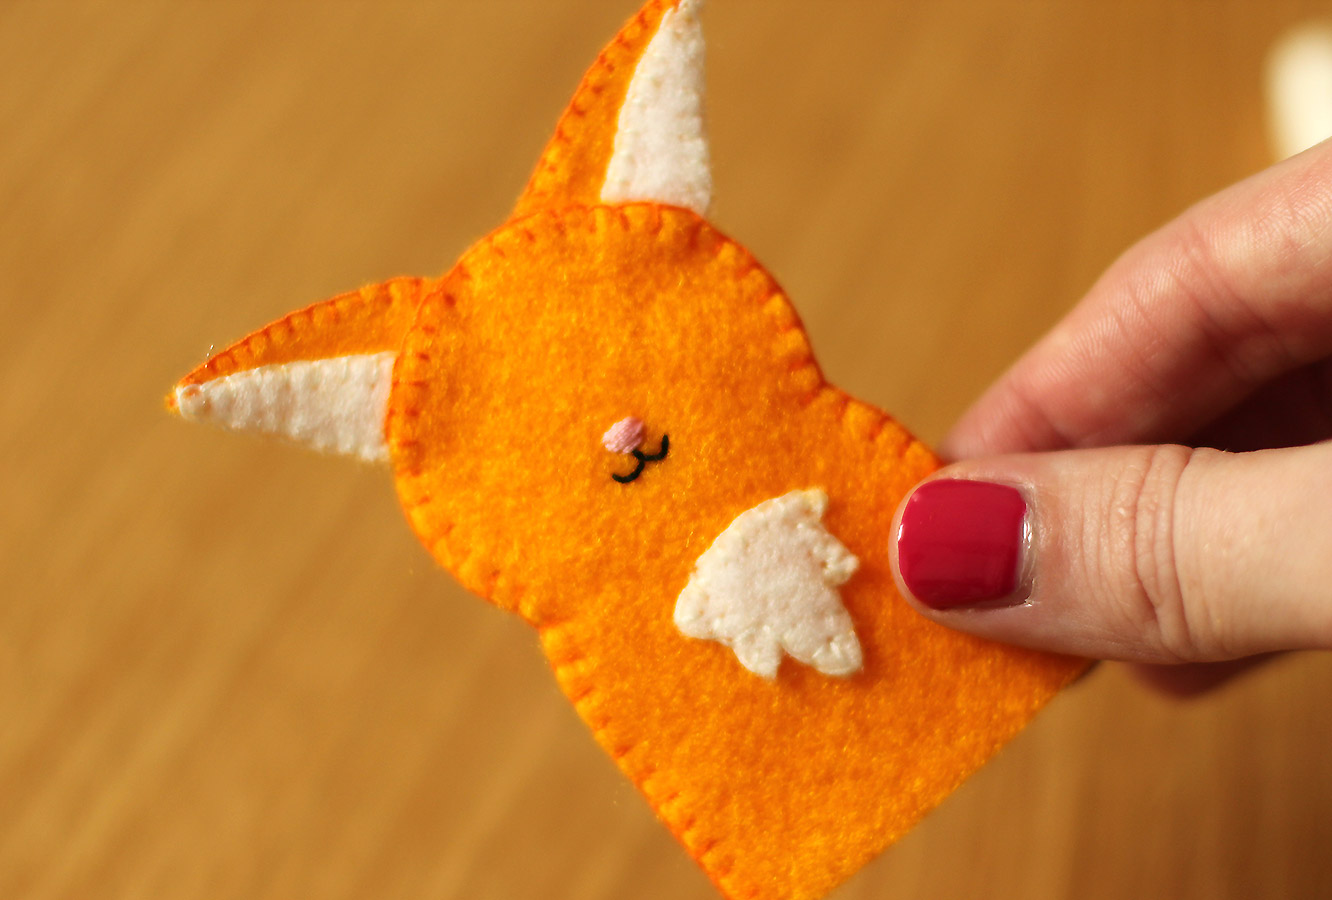
Step six
By this point if you’ve managed to follow any of my hapless instructions you will have yourself a blind little fox. On second thoughts, maybe we should have just started with the hedgehog.
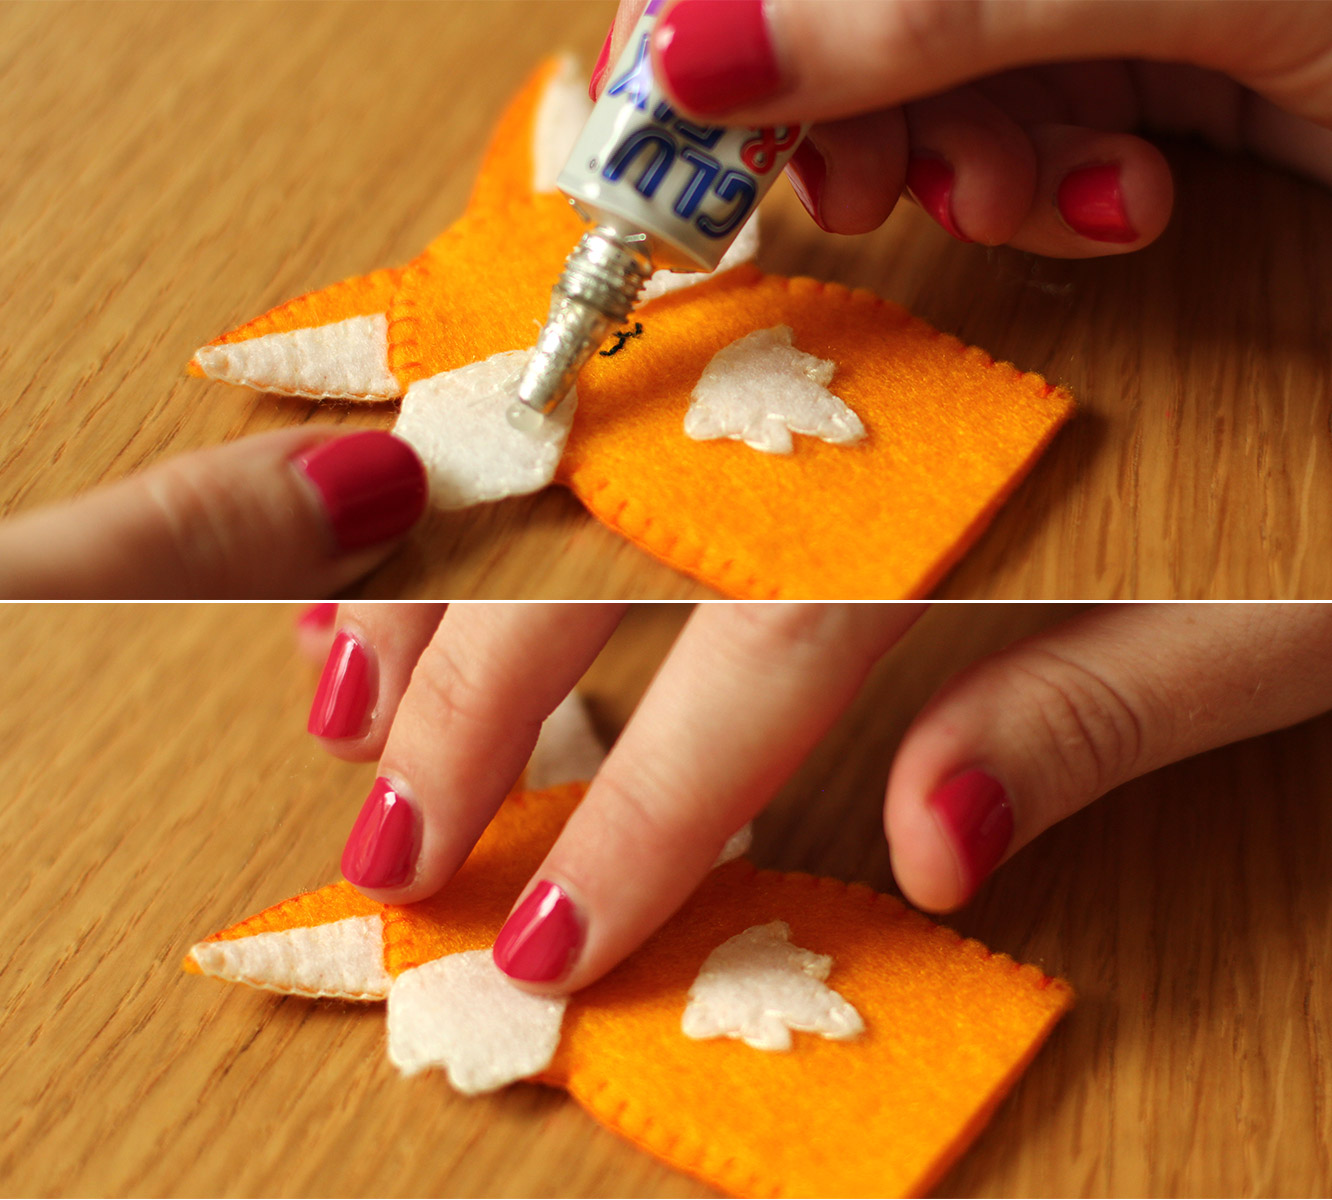
Step seven
It’s ok to cheat. Just glue his eyes and fluff on, pop him over a fork or something just to make sure the glue doesn’t soak through and seal him shut.
February. For me, the pits of the calendar. Nobody really needs February. It just extends winter for too long, and personally, by the time we’re a week into it I’m ready to bid farewell to the chilly winds and rains and usher in March and April.
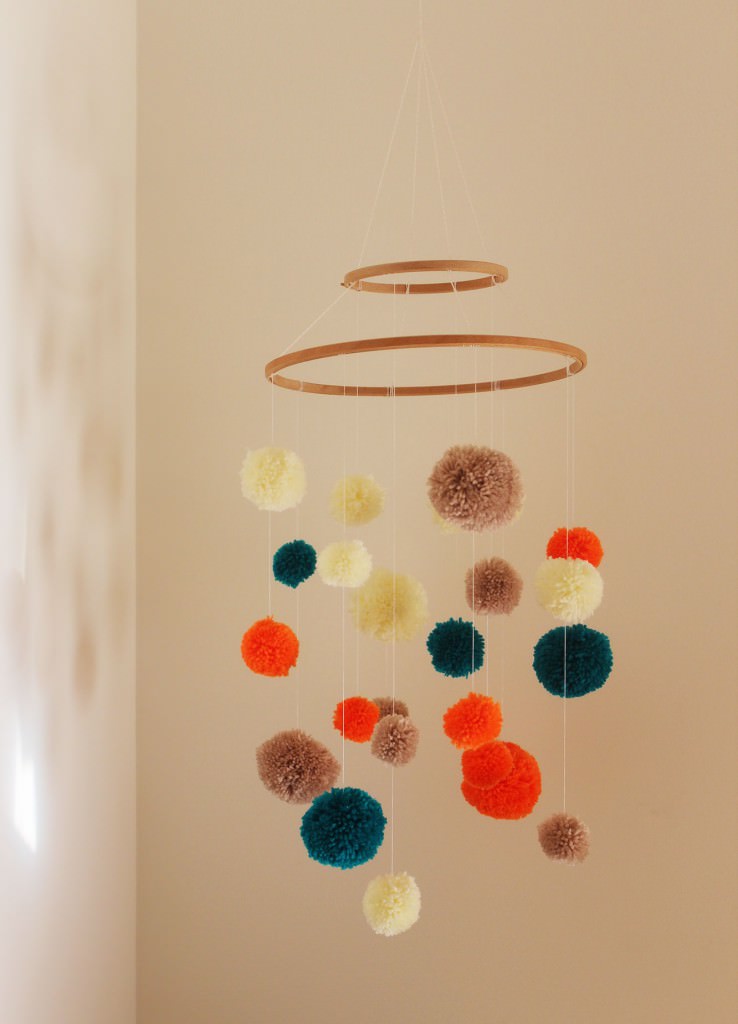
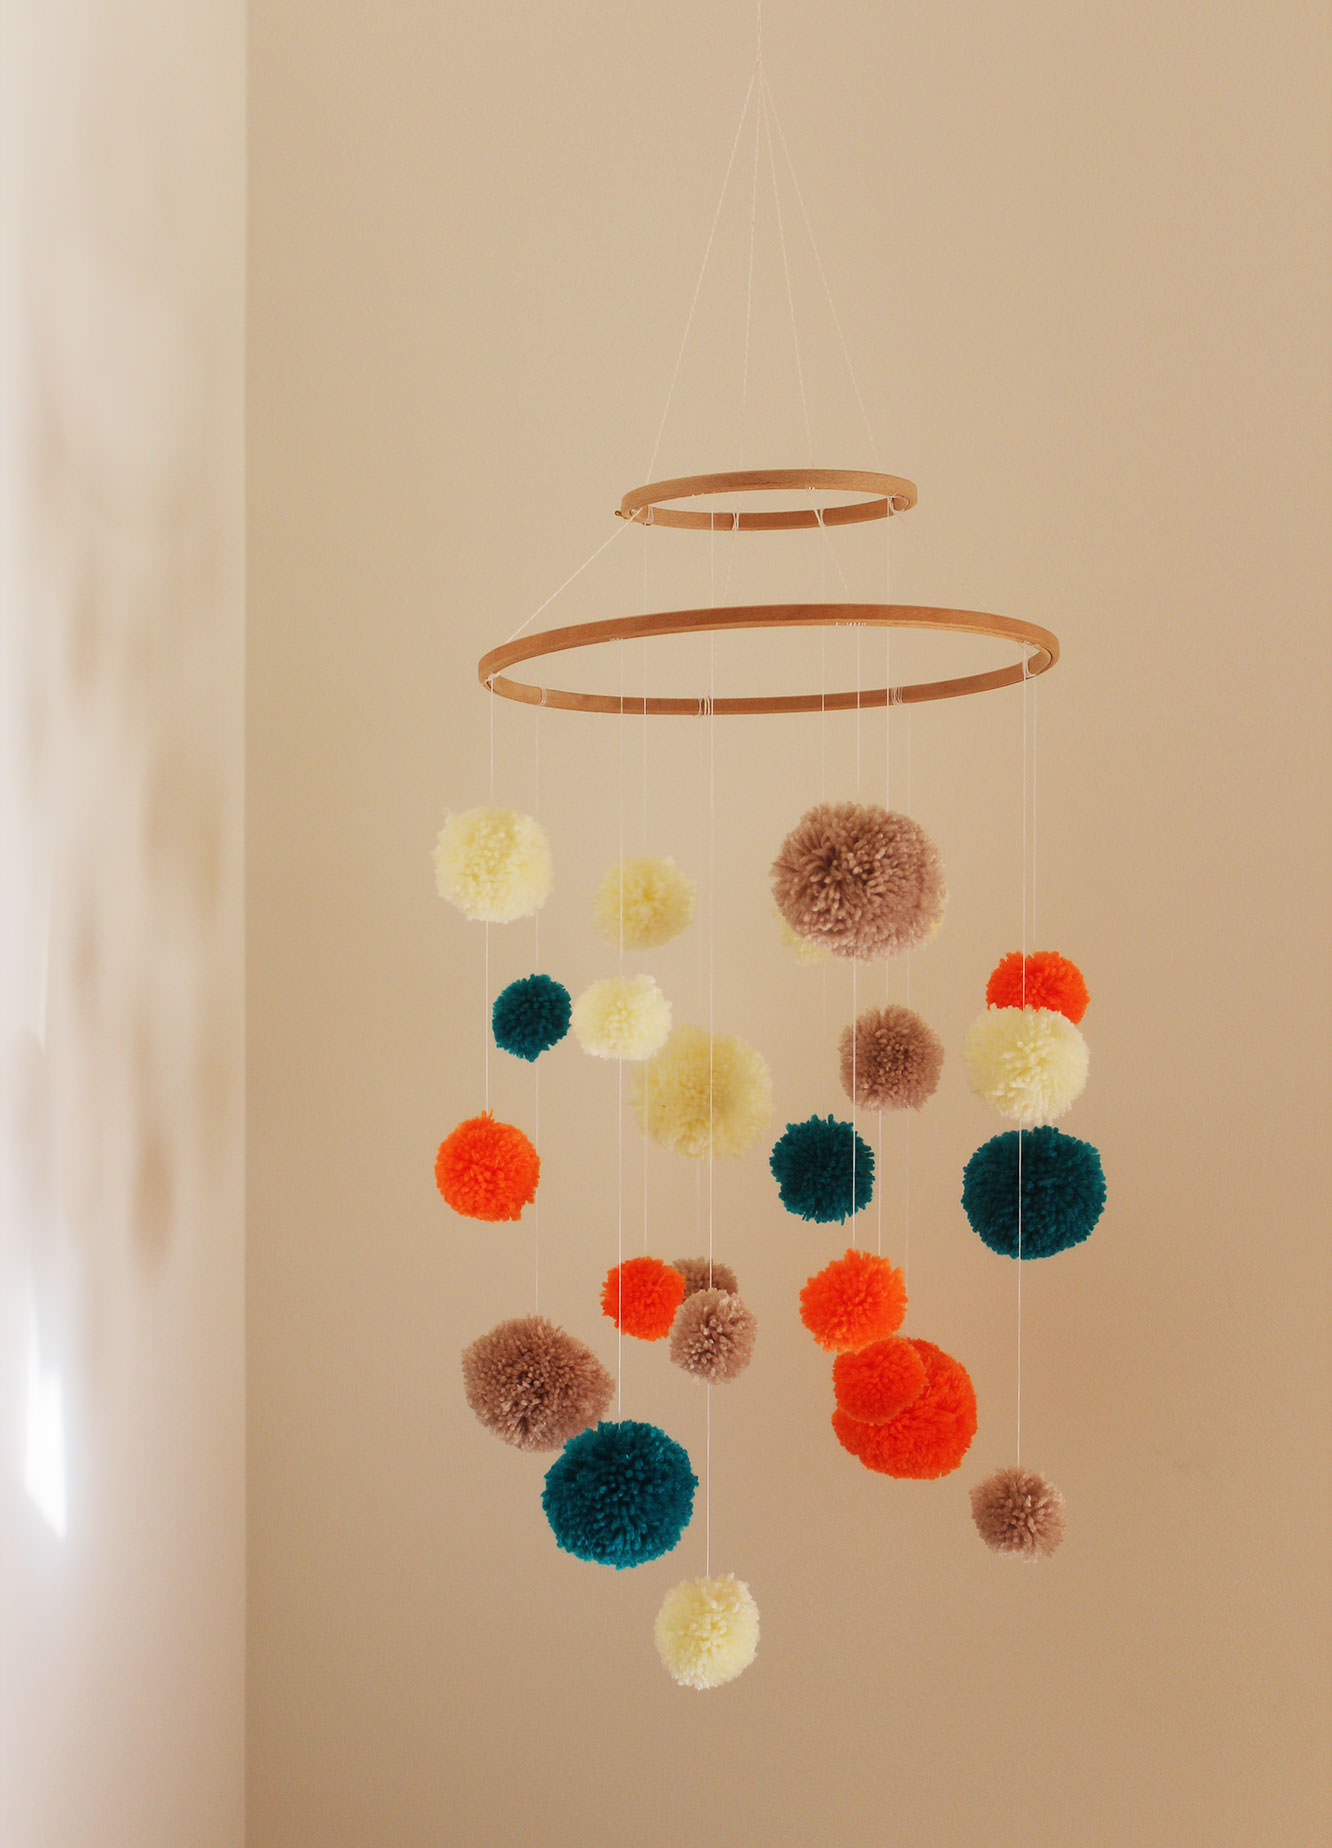
This time round however, Spring came early to a very special household. My wonderful friends Hannah and David had a BEAUTIFUL baby boy earlier this month, shaking off the winter blues. I’m head over heels for the little bundle already and can’t wait to see him grow.
As if I needed an excuse to craft eh?
This is a great little project if you already have kiddies and are expecting another, as the older siblings can definitely lend a hand.
For the impatient ones, yes, there is a picture of bubba at the bottom.
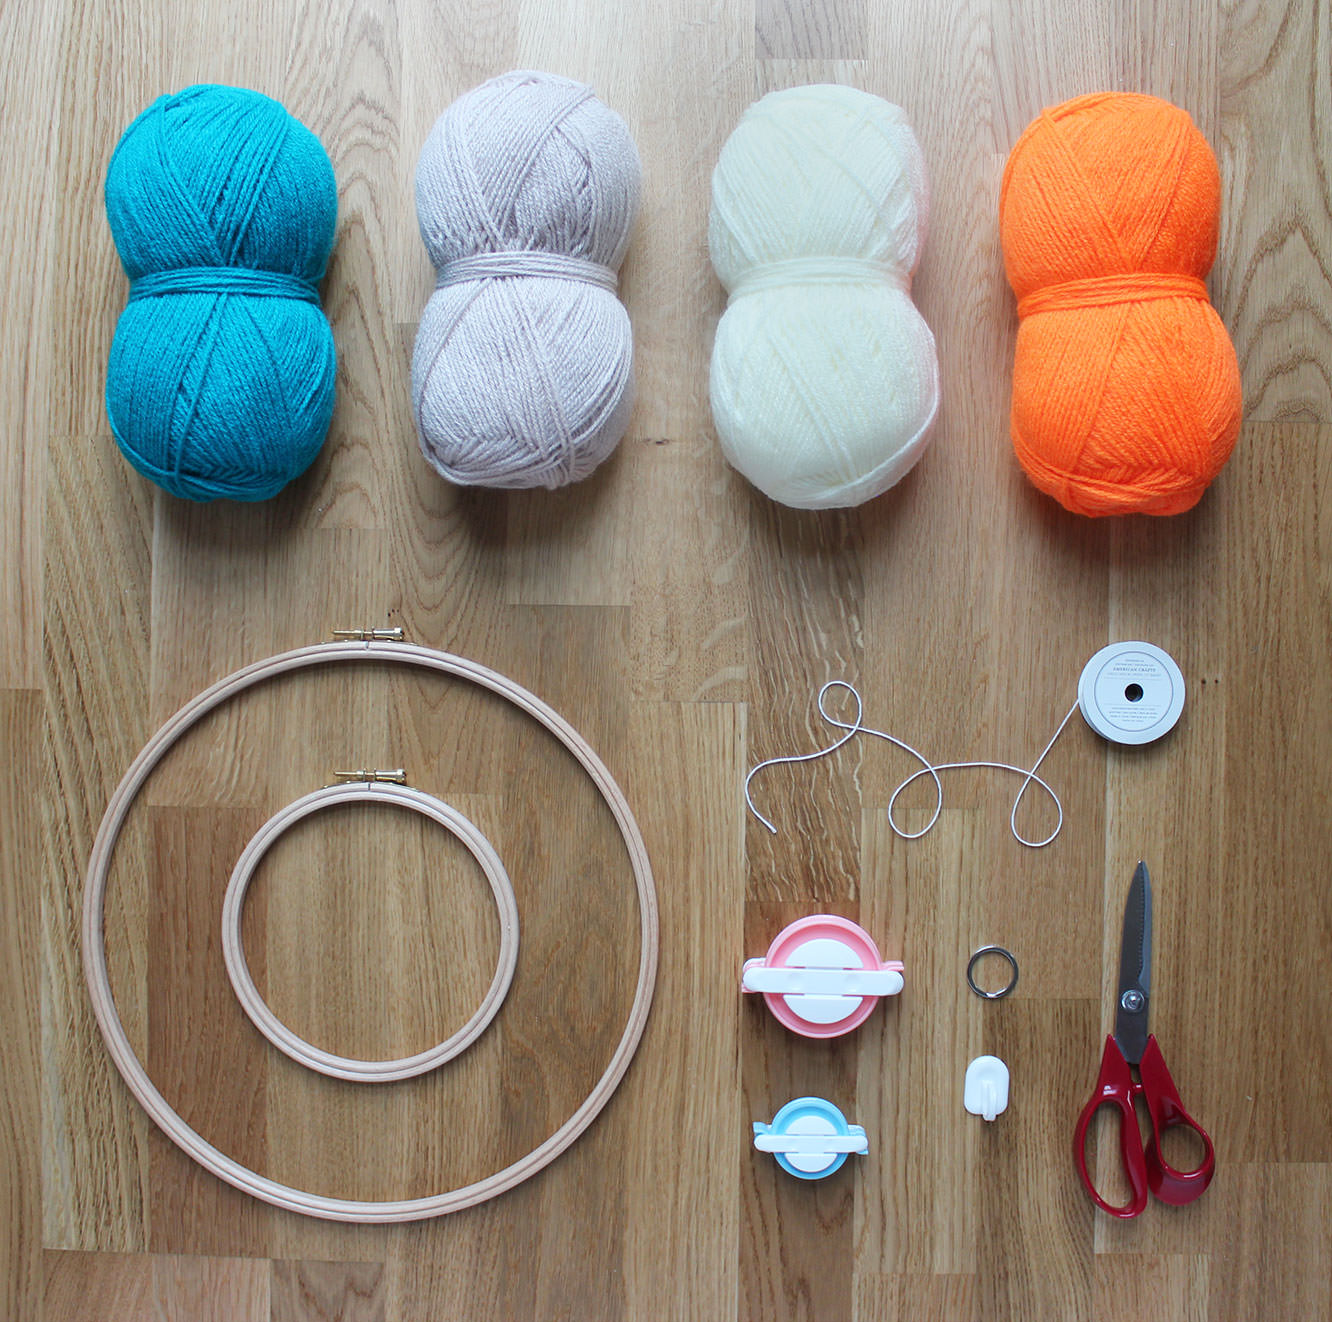
Things you need
12″ Embroidery hoop
9″ Embroidery hoop
Wool in a variety of colours (perfect for using up offcuts)
Pom pom makers in a variety of sizes (or cardboard, see below)
Double sided tape
Needle and thread
A sticky hook
A keyring
2-3m String
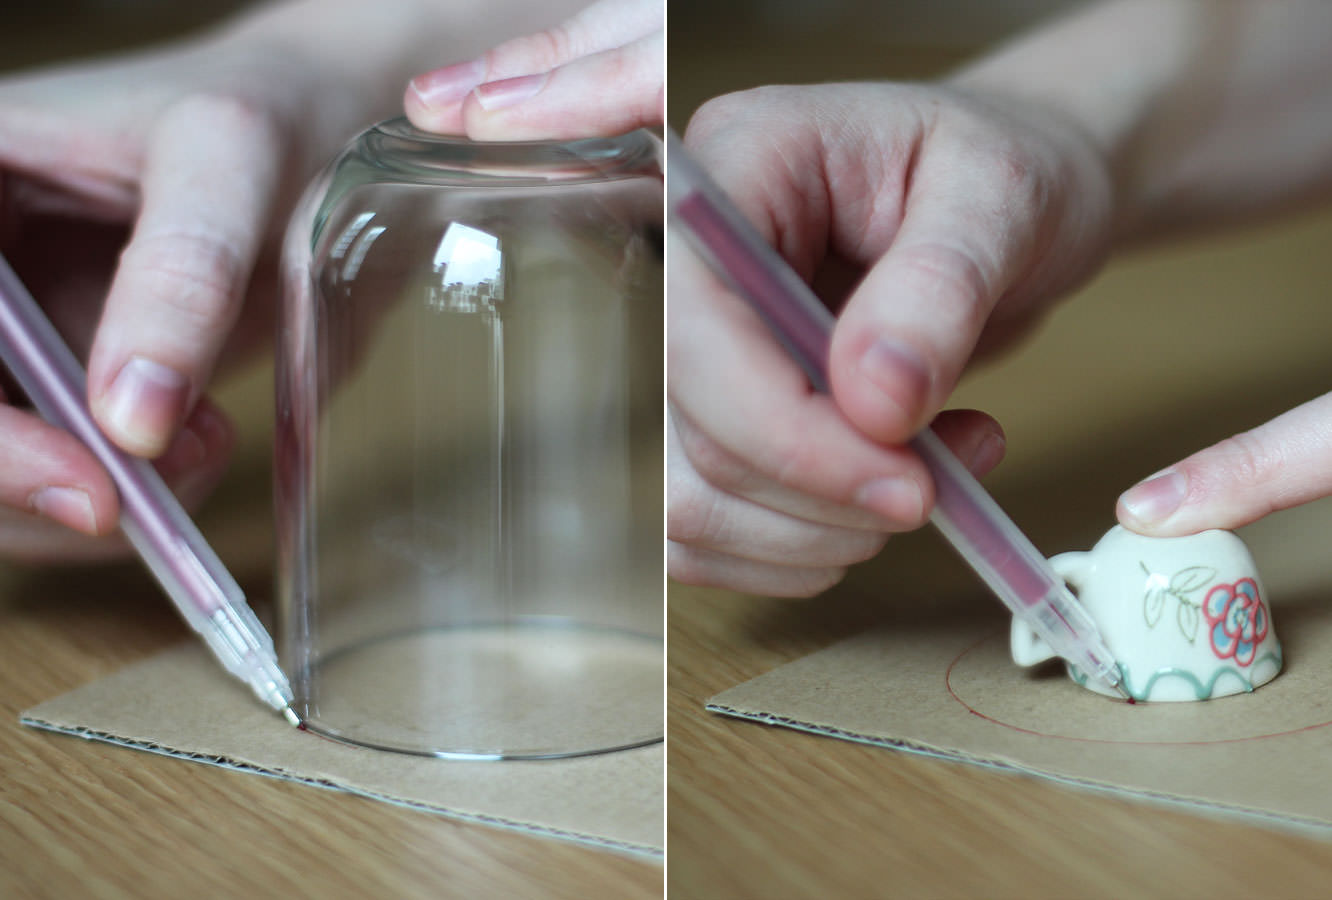
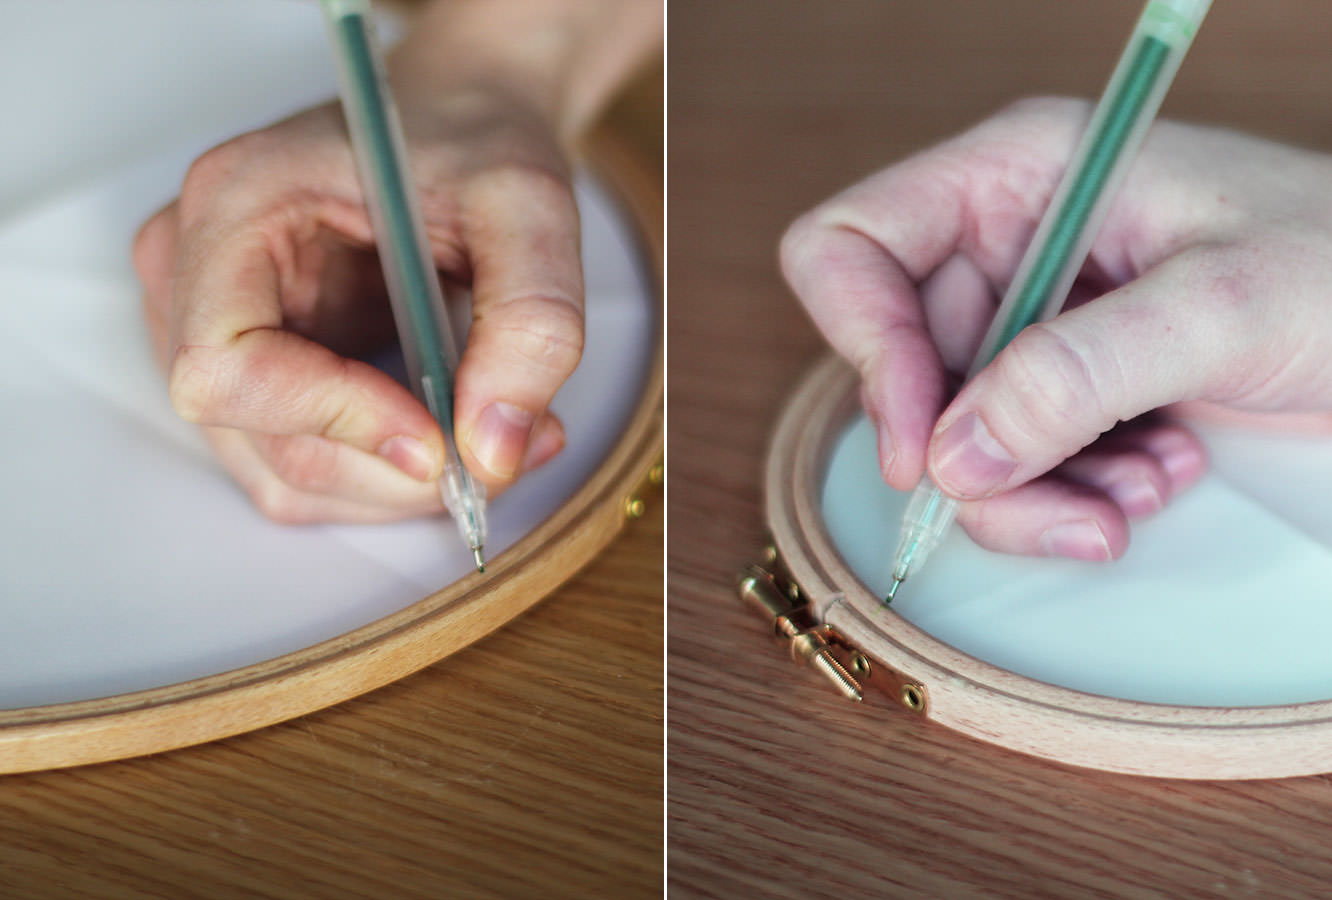
Step one
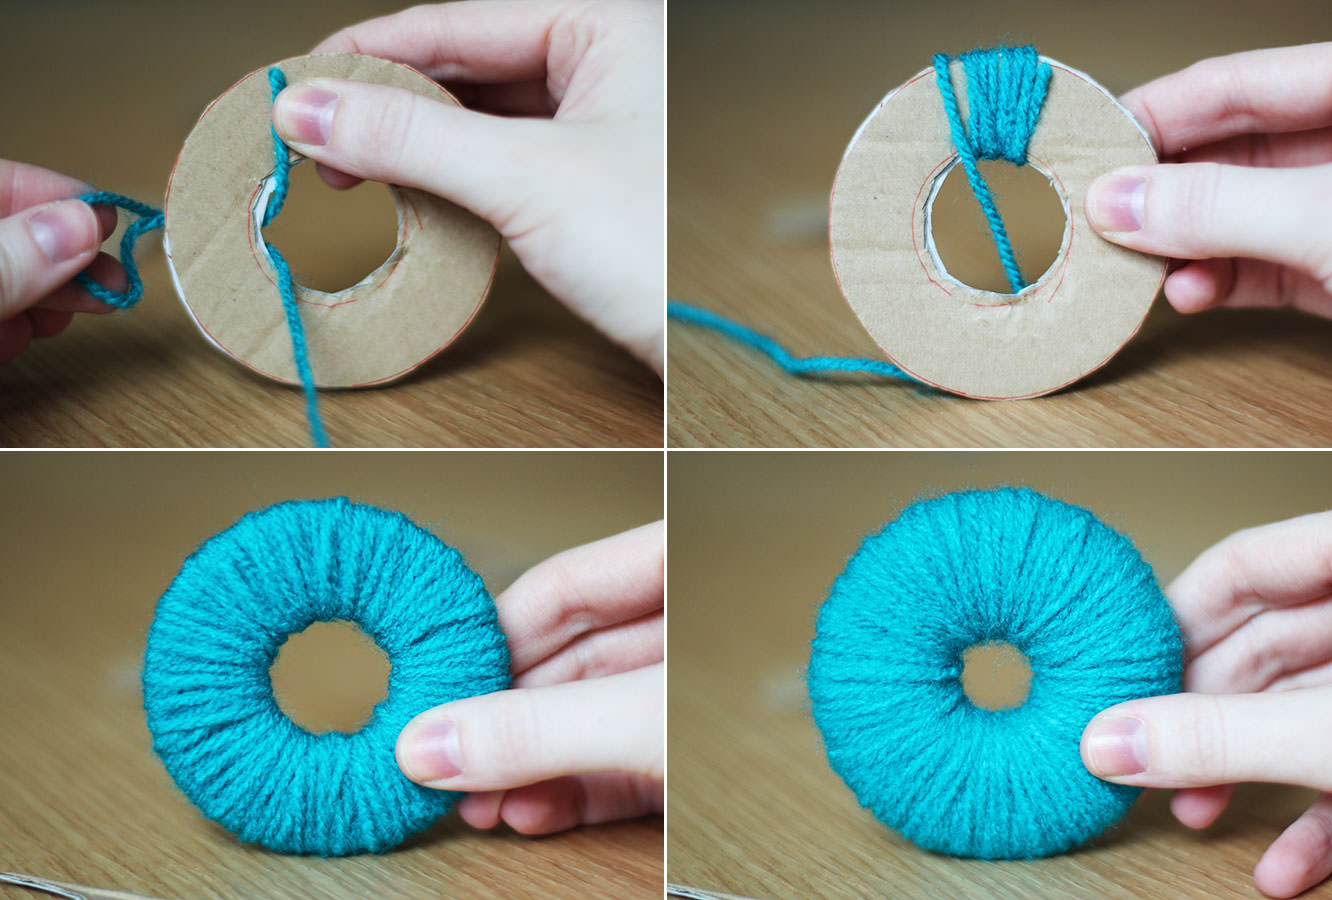
For those of you without pom pom makers (for goodness sake buy some) draw round a variety of circular objects to make differently sized cardboard hoops for your pom poms. You will need to make two hoops per size.
If you have pom pom makers, none of this is for you, skip to step 8 and relish in the fact you loved yourself enough to shell out £4 to save your sanity. All you guys need to do is follow the, in all likelihood hilariously translated, instructions on the back of your packet of pom pom makers. I bought mine on eBay from China, I strongly suggest you do the same.
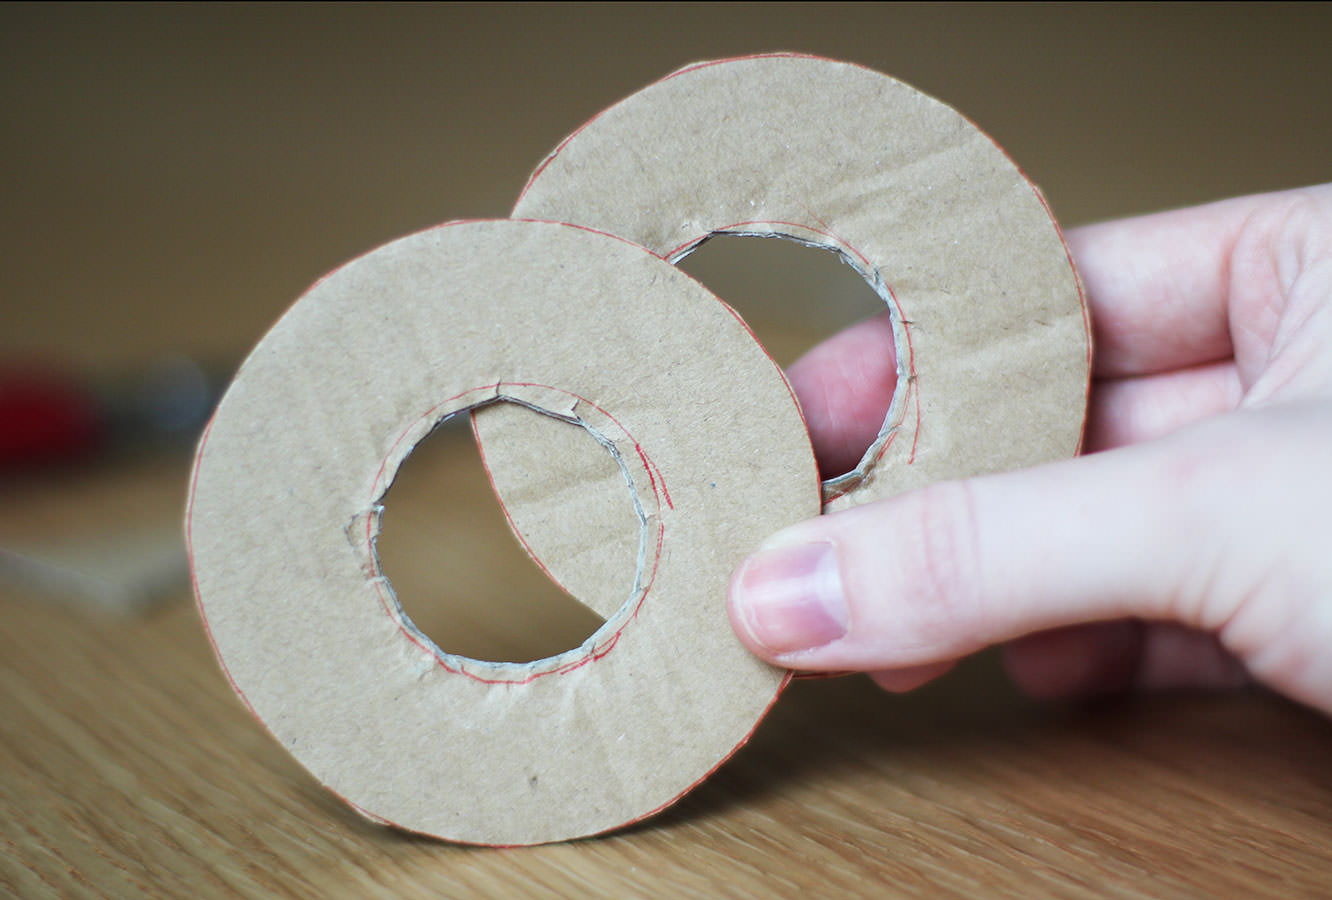
Step two
Cut out the hoops so that you have a hole in the centre. Don’t worry if they’re messy, it won’t impact your poms.
Step three
Sandwich the two pieces of cardboard together and wrap lengths of wool around and around.
You do this by pulling the end of the wool through the centre of the disk and back over the edge.
Keep going as long as you can, but essentially the fuller the hole in the middle the plusher your pom pom will be.
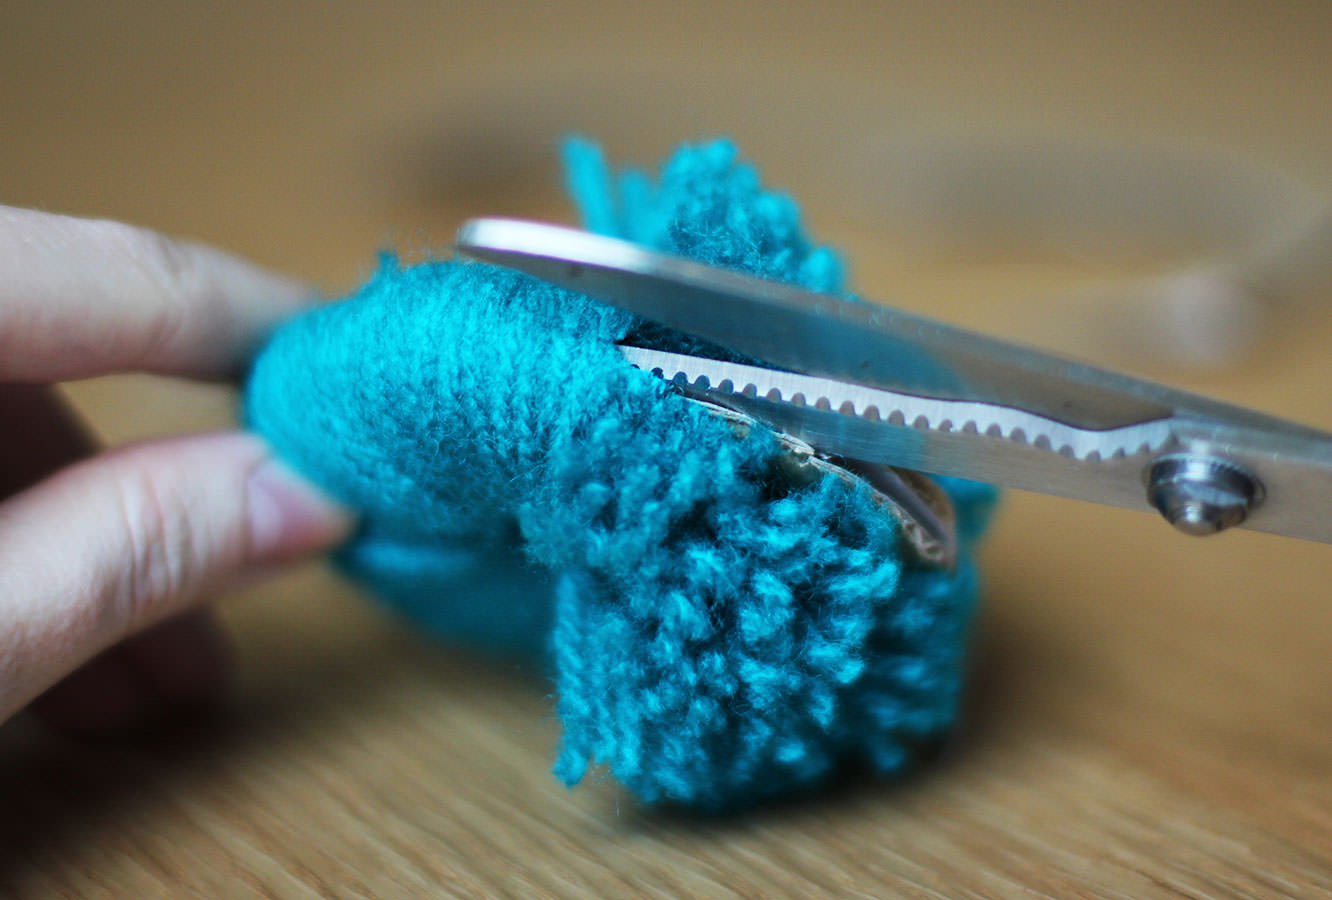
Step four
Using scissors cut round the circumference of the ring.
Once you’ve made a few snips you should be able to get the scissors between the two layers of card which then makes this very quick.
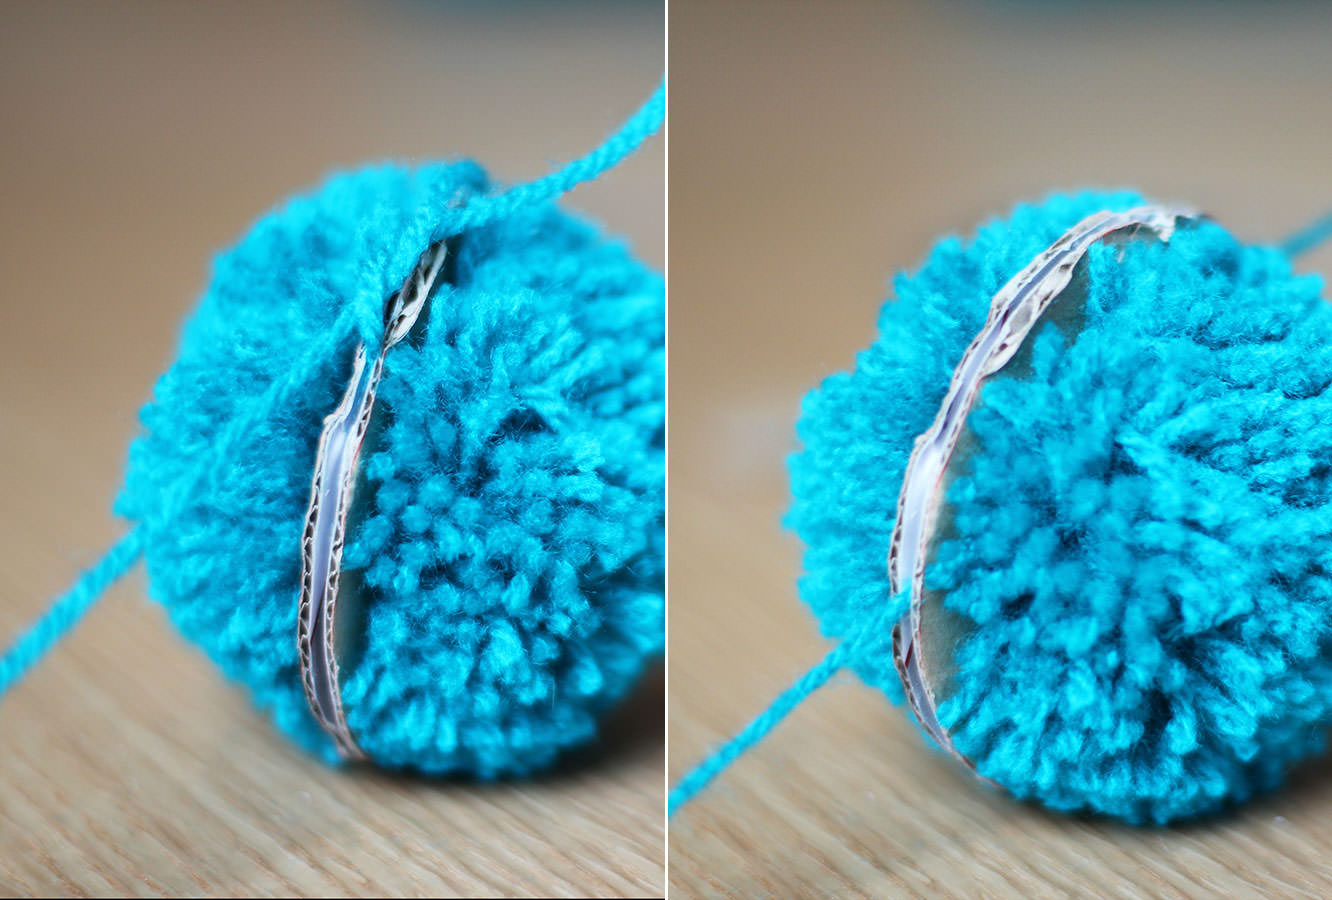
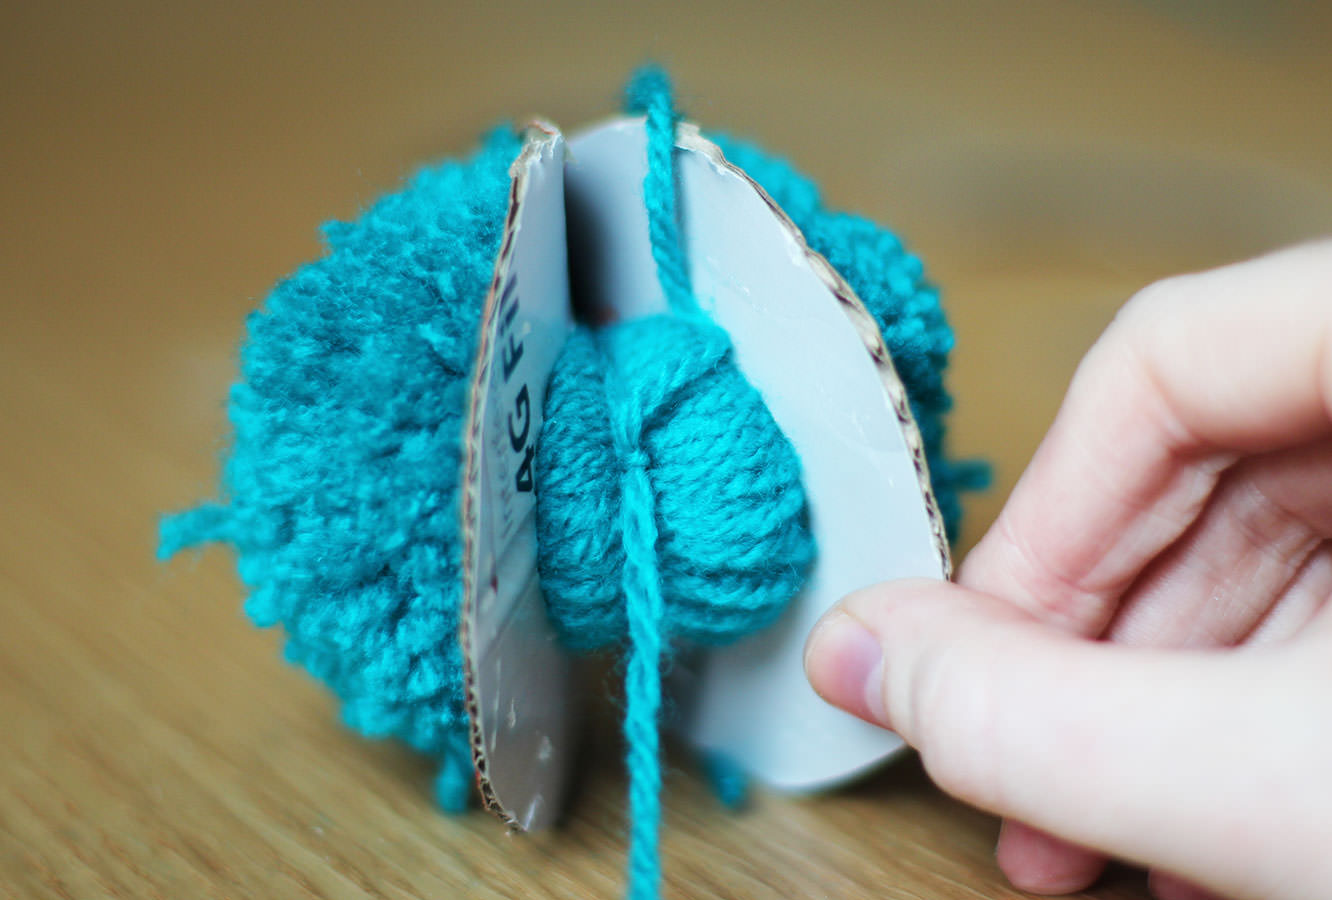
Step five
Wrap a length of wool around the edge and tie a knot in between the cardboard layers. I always do a few for good measure.
Step six
Pull the cardboard rings off to release your pom pom.
Step seven
Trim any straggly bits to neaten it all up.
Step eight
Repeat until you have at least 24 pom poms of different sizes and colours.
Step nine
Sew the pom poms to varying lengths of cotton thread in twos (or if you’ve made more, then keep adding them!)
I went back and forth through each pom pom a few times so they didn’t slip down/fall off the end.
I recommend doing this randomly, or you’ll drive yourself crazy! Plus it looks better for baby if they are dotted about as the different levels of perspective means you can see more.
Step ten
Cut a paper/newspaper circle that fits inside the embroidery hoops. Fold each in half three times so you get 8 equal segments.
Placing the paper circles into the hoops mark out the eighths.
Step eleven
Remove the outer hoops and stick a small strip of double sided tape by each marker.
Step twelve
Attach two pieces of string to hang the mobile by. They need to wrap around both the outer and inner hoops and be as even as possible.
Try to make it so that the string comes out from under the hoop at all points. Otherwise you’ll do what I did and put the outer hoop on top, one will be over and the whole thing will hang a bit wonky. Distressed isn’t the word.
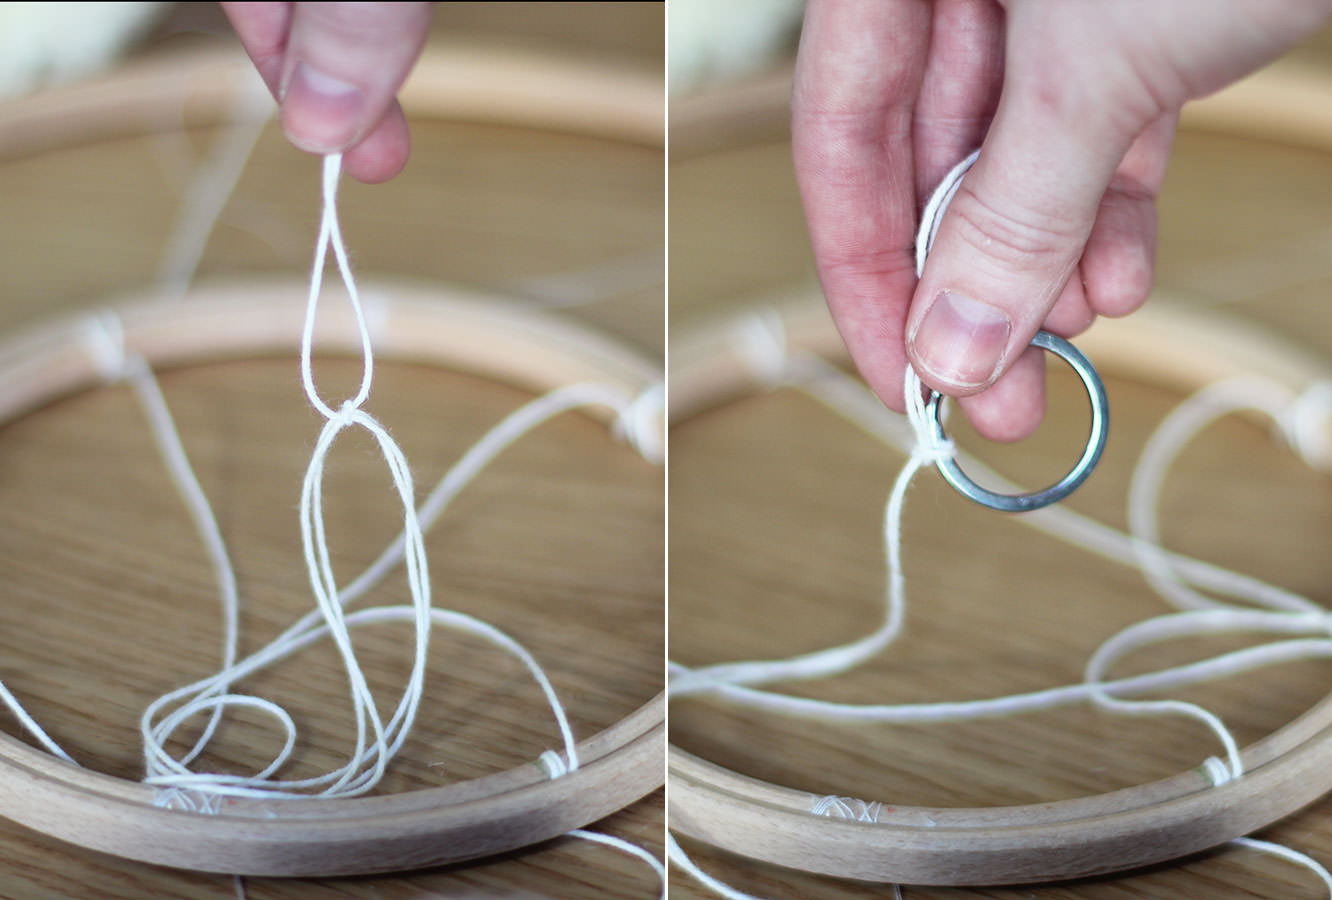
Step thirteen
Tie a longish piece of string (this will totally depend on your ceiling to cot distance) to connect the crossed over pieces you just attached to the hoops. Still with me?!
At the other end of that length of string tie a keyring. This is the bit that will enable your mobile to spin round.
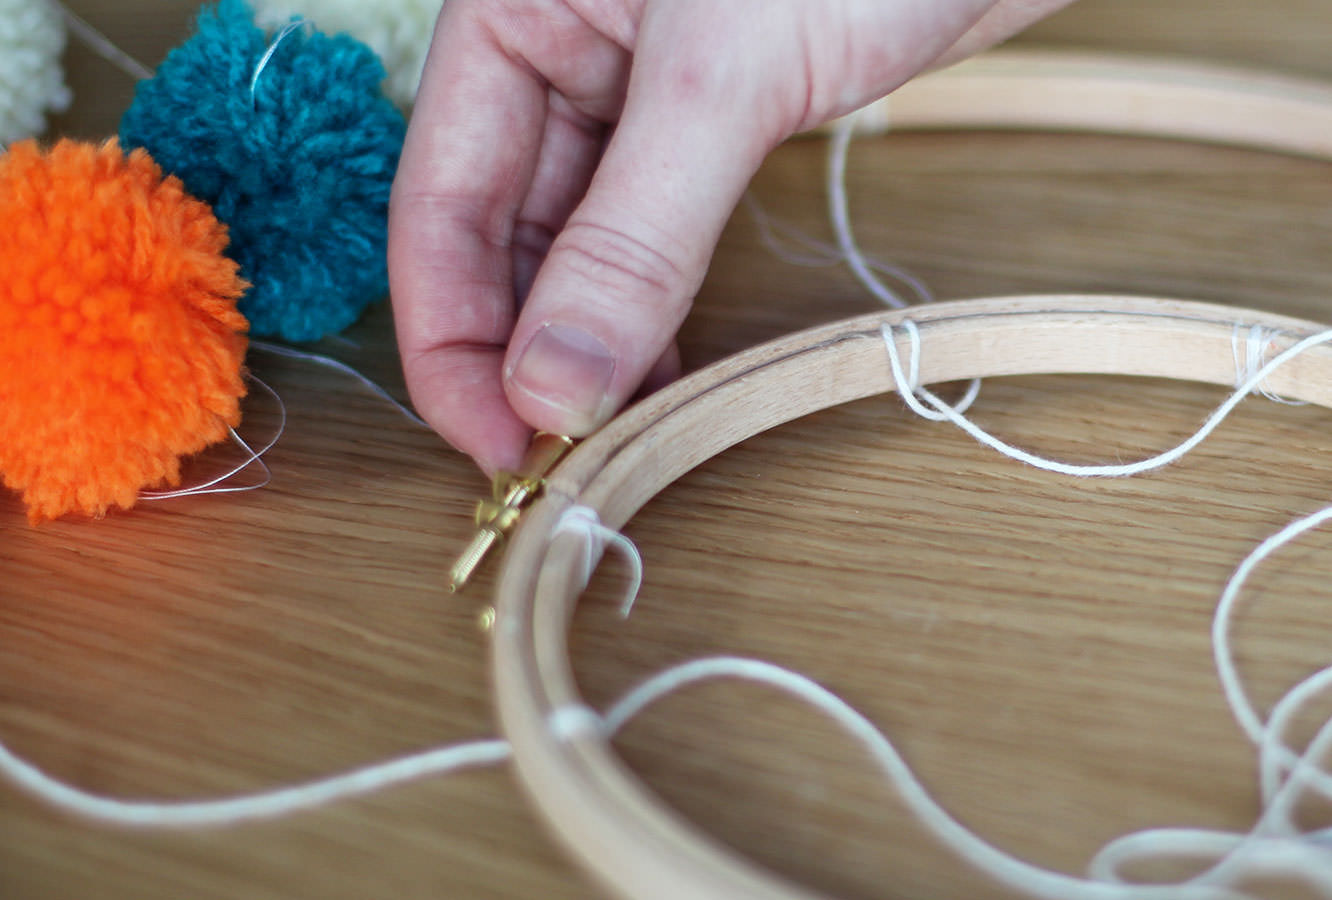
Step fourteen
Attach your pom pom lengths, 8 around the outside, 4 around the inside by wrapping the thread round the hoop a few times. The tape should hold them in place quite well.
Step fifteen
Reattach the outer hoops and tighten.
Step sixteen
Using the sticky hook hang from the ceiling.
Step seventeen
Lie under it for a little while. It’s relaxing being a baby.
Wait, that’s not all.
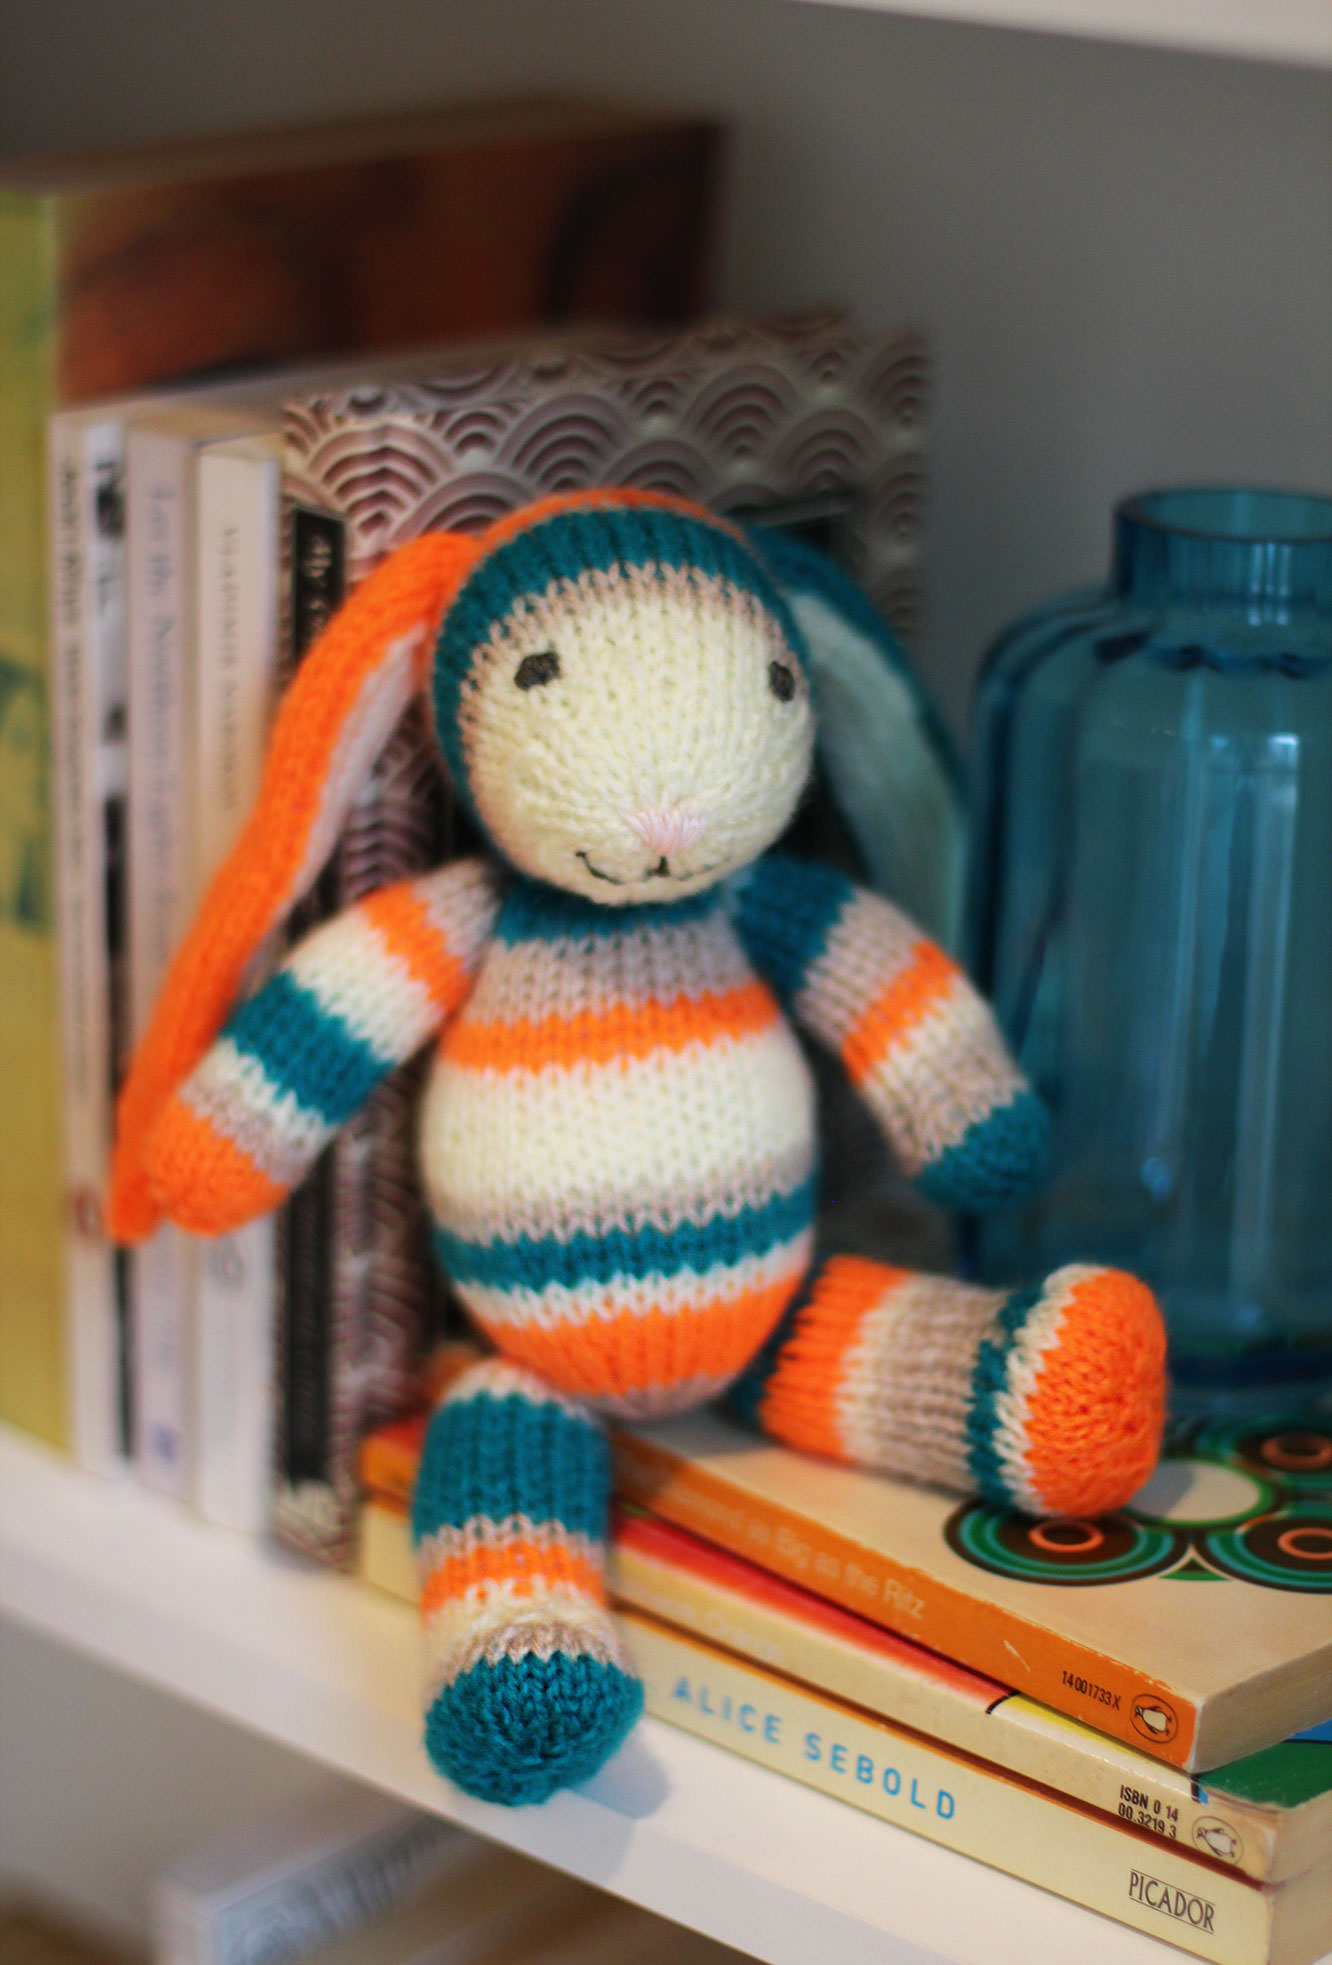
I also couldn’t resist making baby a little friend to match his mobile. Introducing Bernard the bunny.
I haven’t included a step-by-step for Bernard because he’s not my pattern. In fact, this was the first time I’ve ever knitted a ‘creature’ before. He’s not quite the masterpiece I envisaged when I started but full of character and a great beginner knit.
Bernard was knitted from the free fuzzy lamb pattern by Barbara Prime (I just added longer ears). I urge you to visit fuzzymitten.com where you can buy all kinds of super cheap cute and quirky patterns including a bikini clad alpaca and a sloth in a poncho. Barbara’s patterns are adorable and easy to follow.
Another plug goes out to Hannah Melin whose ‘Hello World’ print I couldn’t resist at a craft fair just before Christmas. I think it would look lovely on the wall of any nursery.
I should probably make it clear that I’m not being sponsored for either of the above, I just think it’s good to support one’s fellow craftspeople from time to time.
Without further ado, here’s the man of the hour LOOKHOWCUTE.
Spring is in the air! Well, not really. It’s actually been so cold that I’ve cracked out the woollens for the first time this winter. BUT, if you get knitting now, you will have a perfect little snood to make the transition from winter to spring a cosy one.
I don’t want any excuses that you don’t know how to knit. I didn’t know how to knit a few years ago. This is a really easy and quick project to get you started. Plus I set up a youtube account to facilitate teaching you, so really, you owe me a try.
You will need
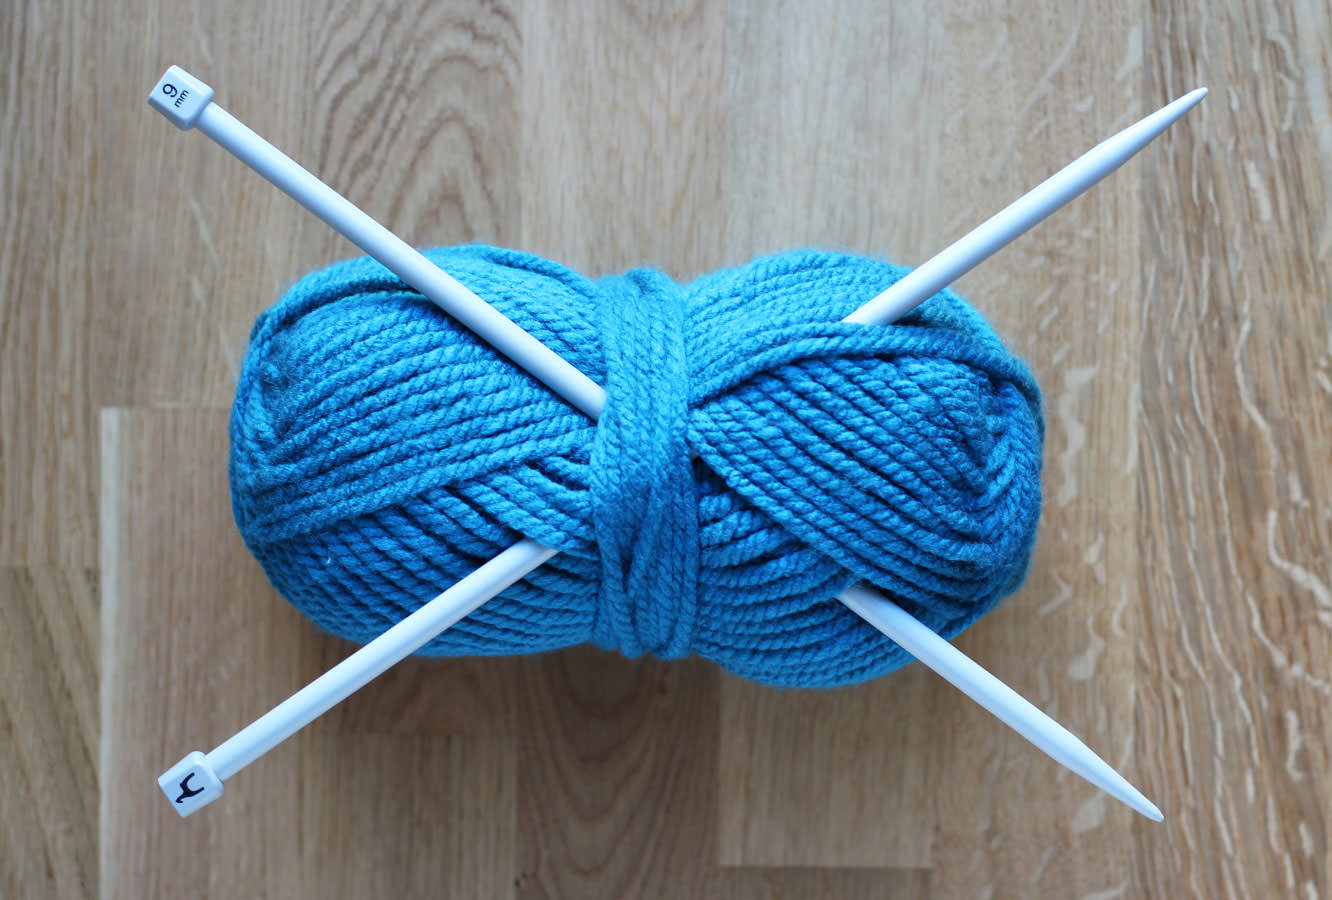
9mm knitting needles
200g of bulky (or extra chunky) wool, my ball was by Patons. If you want a longer/bigger snood, just double up and get 400g.
Pattern
For those of you who know what you’re doing:
co 22 st.
k1, p1 to end of row.
Repeat k1, p1 until close to the end, cast off keeping enough yarn to sew ends together.
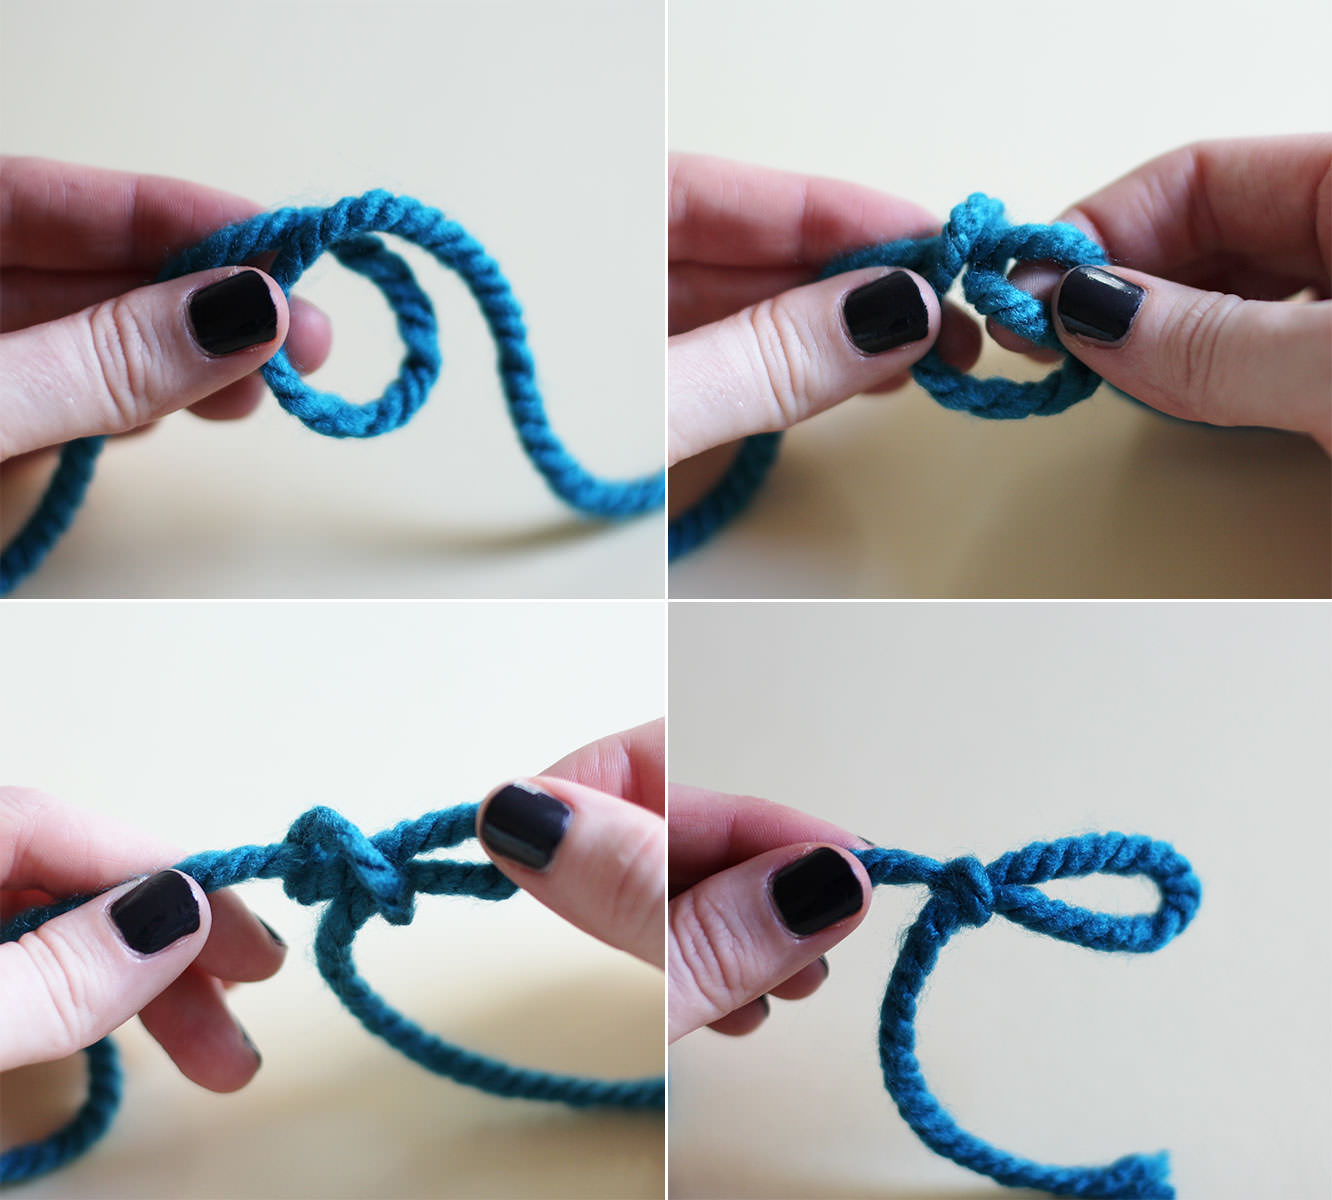
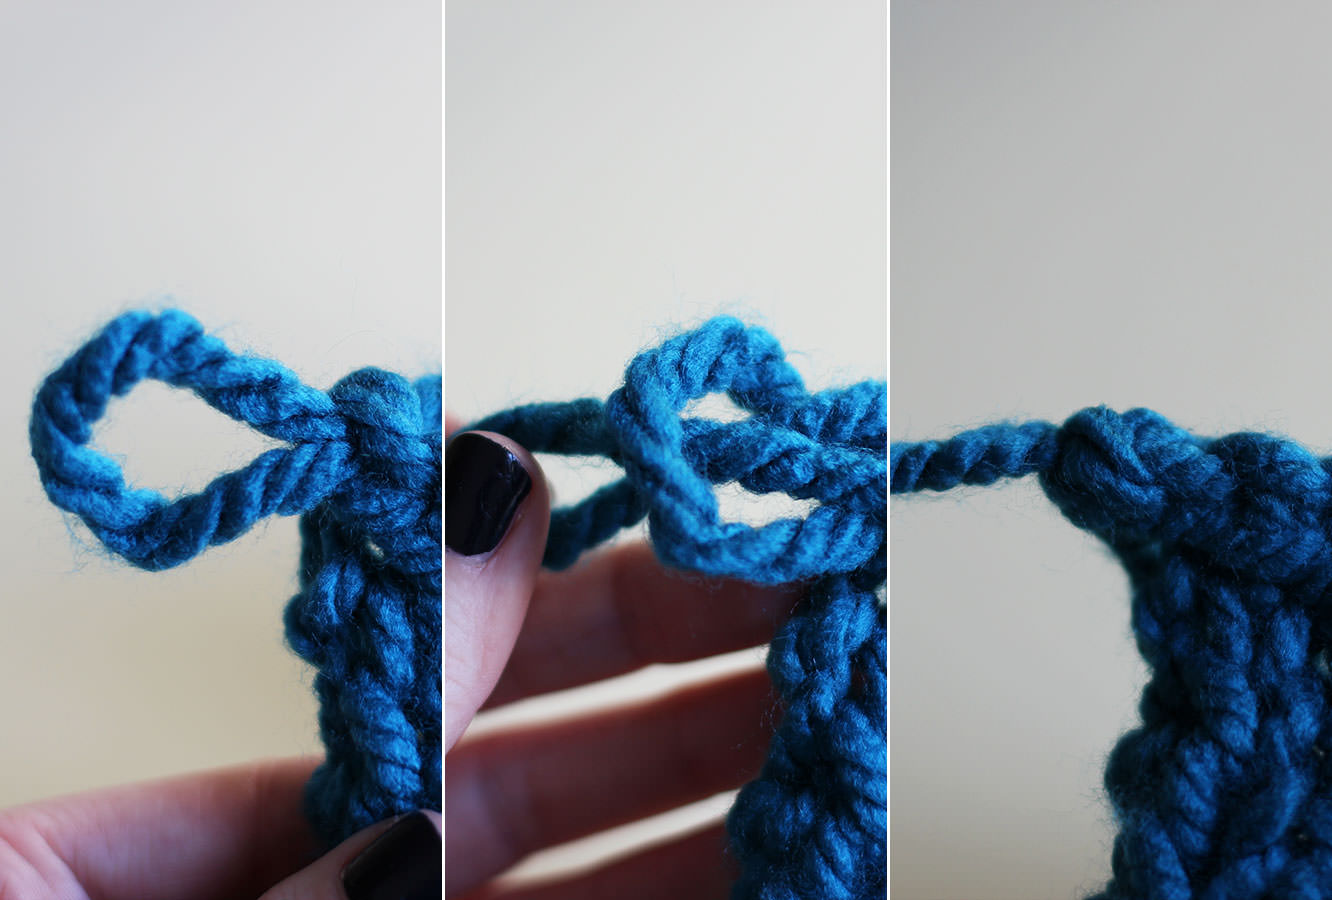
Step one
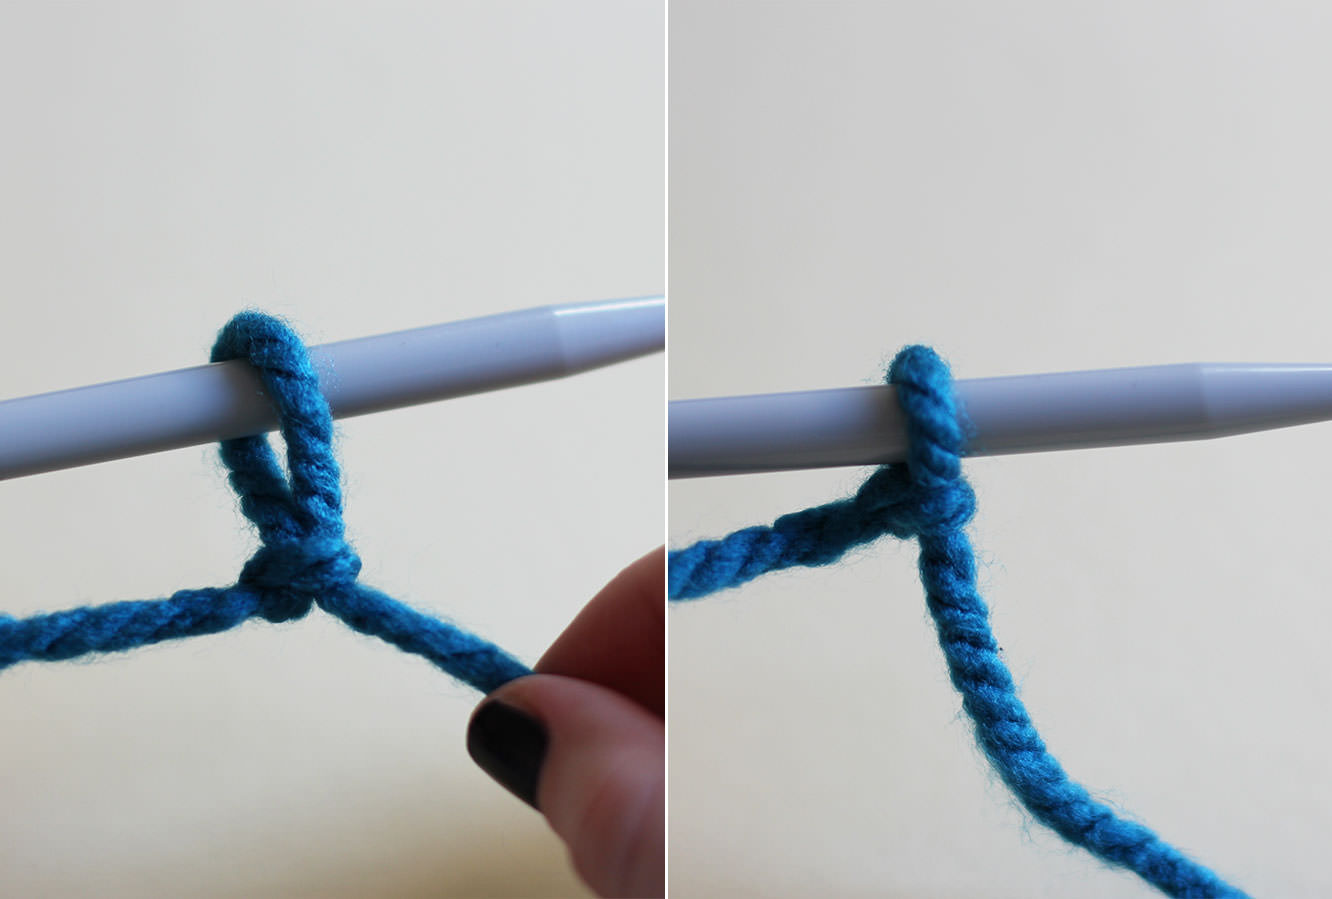
Make a slip knot by overlapping the end of the wool to make a circle and looping it back through.
Step two
Place the loop over the end of the knitting needle and pull to tighten.
Step three
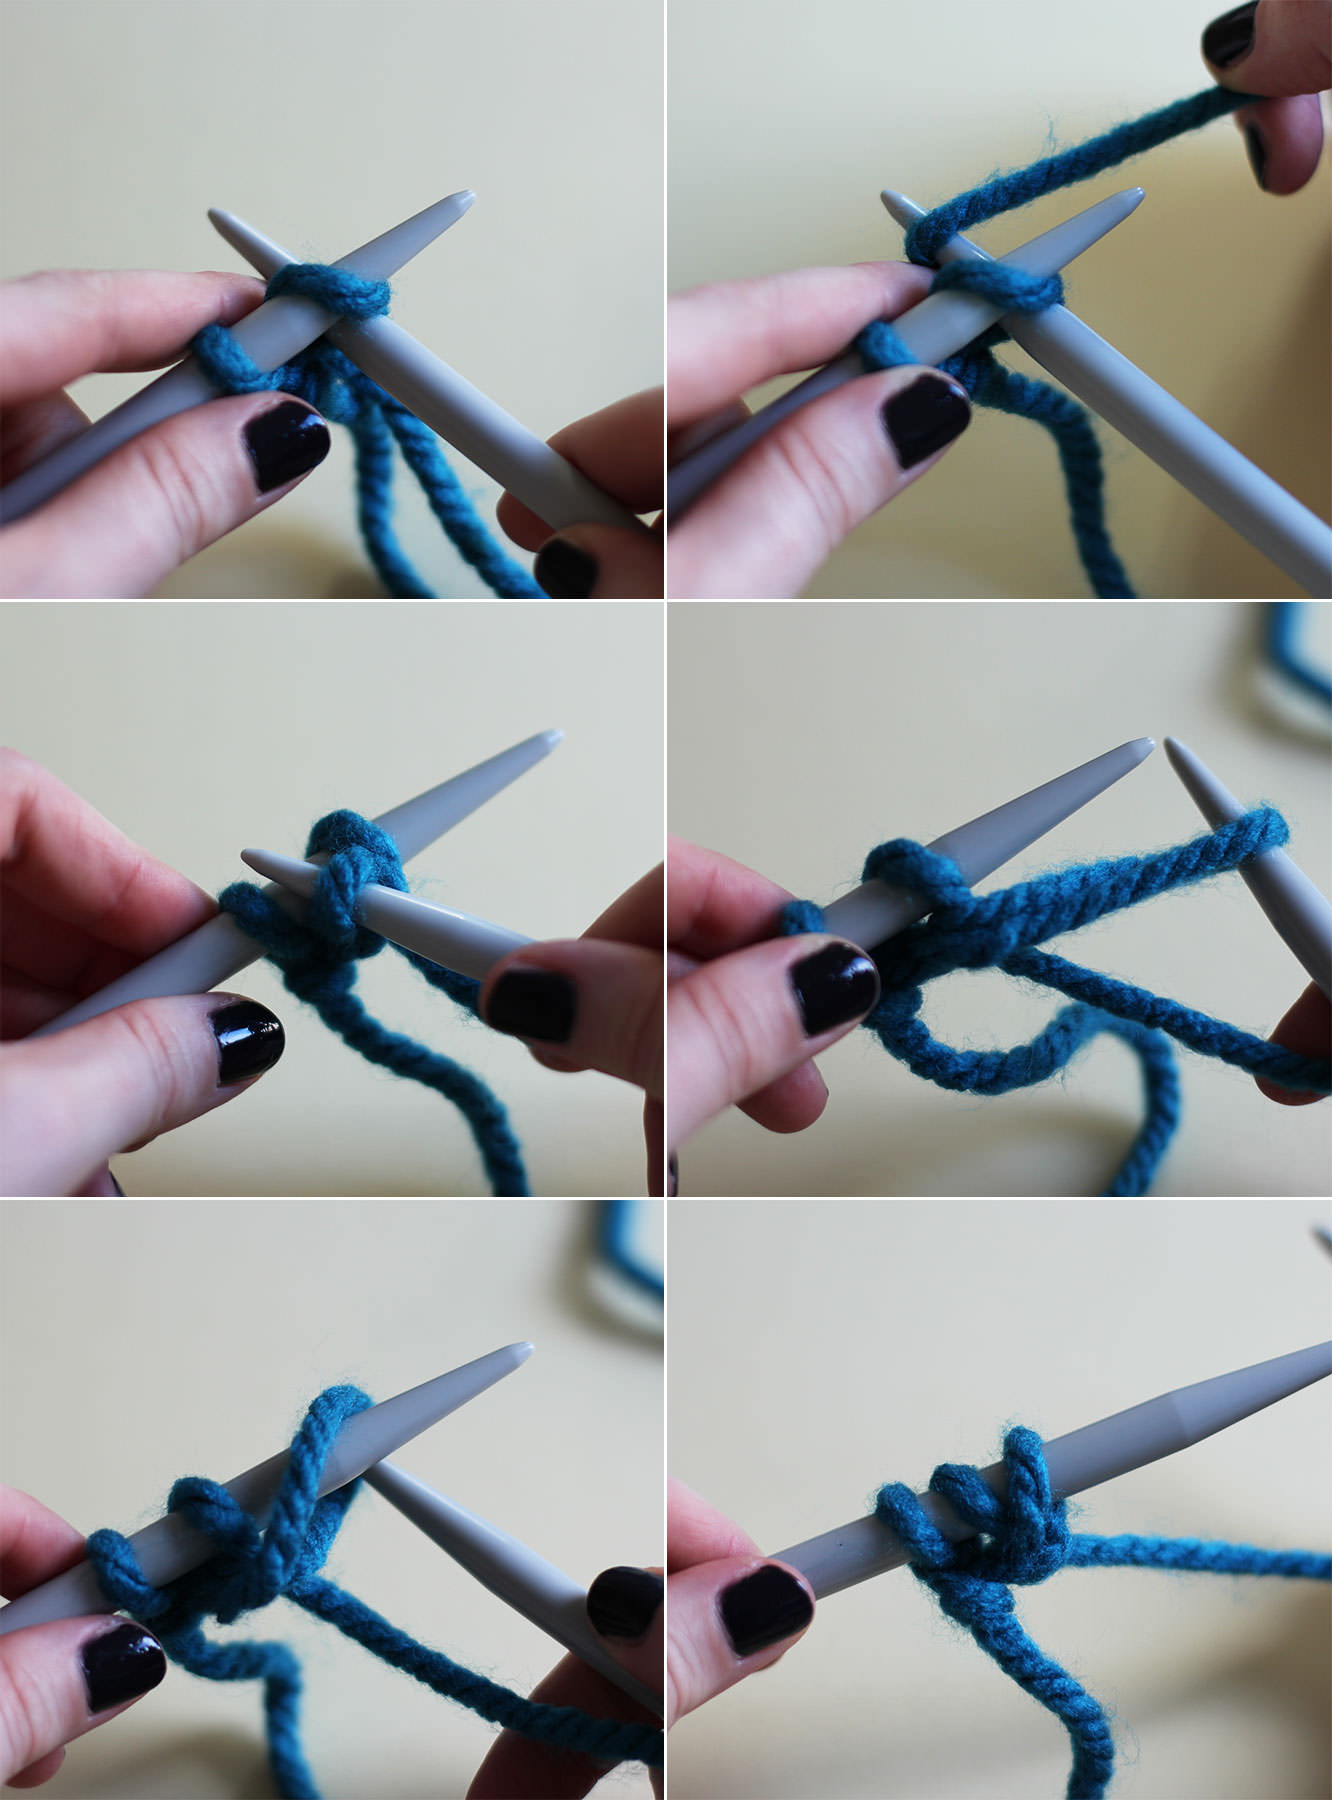
Time to cast on.
Push the right needle through the loop behind the left one. Wrap the long end of the wool (the bit that leads to the ball) around it so that the wool sits between the two needles.
Pull the right needle under the left, taking the wool with you and through the loop. Tug it through until you can loop it over the end of the left needle and tighten.
Do this 22 times.
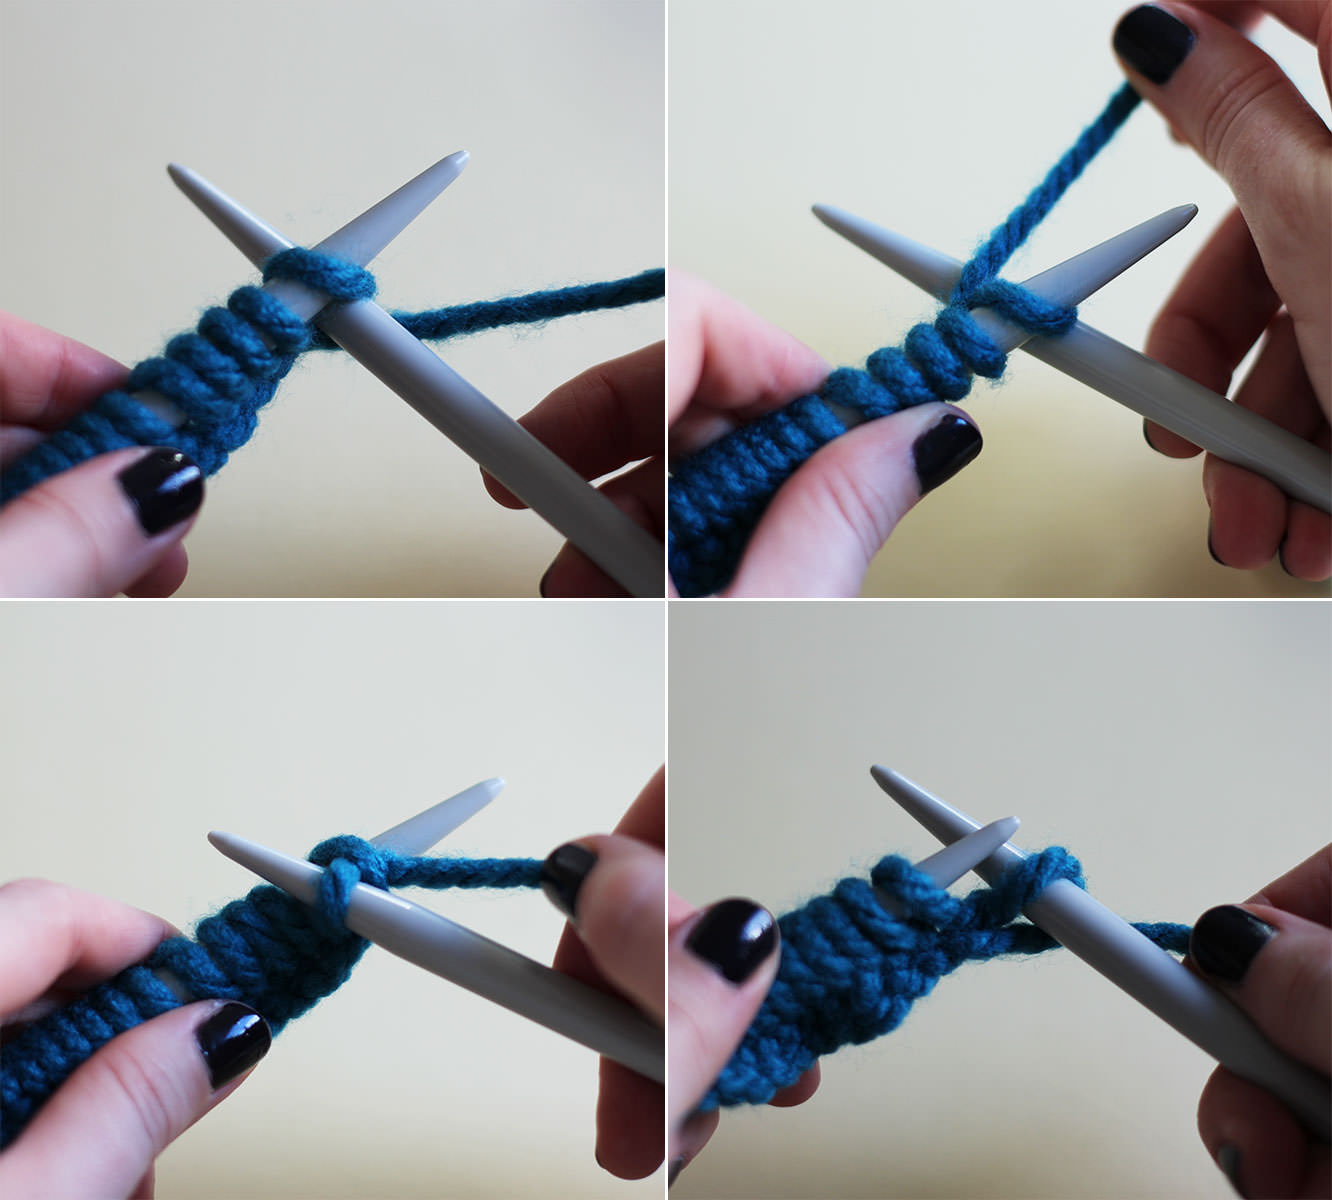
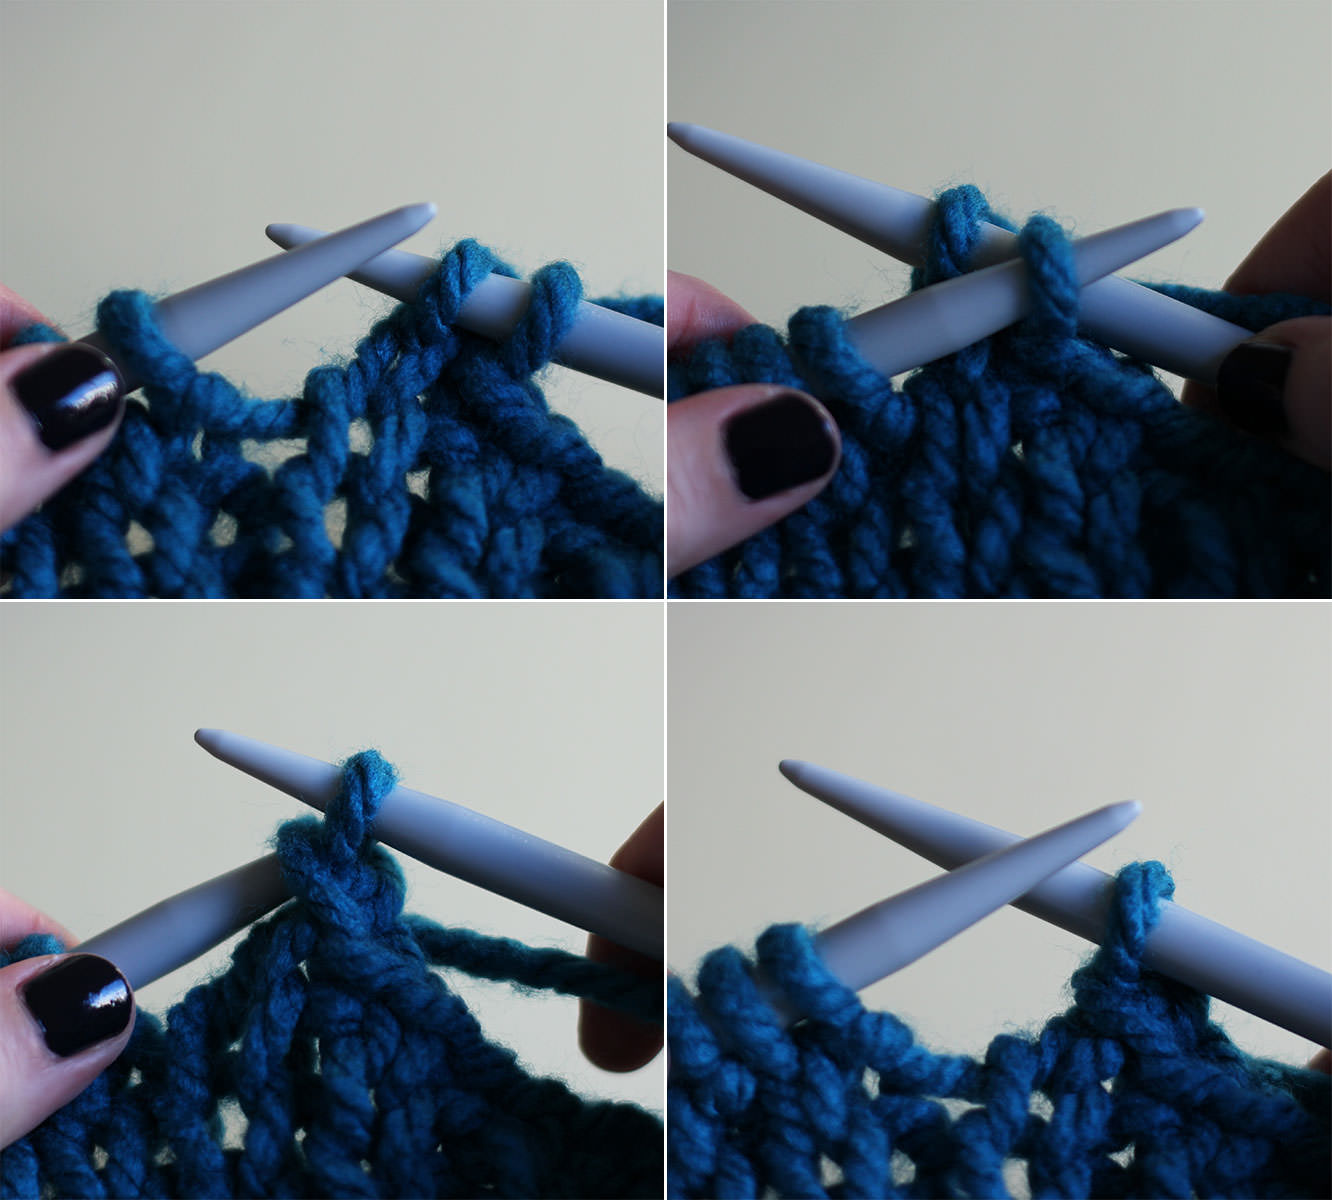
Step four
The pattern is just knit one, purl one, they are the two basic stitches.
You knit a stitch basically in the same way as casting on, but instead of hooking it back onto the left needle leave it on the right one.
Step five
The second stitch is a purl. For this one place the wool in front of the knitting and push the right needle through the loop in front of the left. Wrap the wool around it and take it through to the back and pull the stitch off.
HAVEN’T GOT A CLUE WHAT I MEAN AND CAN’T UNDERSTAND FROM THE PHOTOS?? That’s ok. I have the youtube.
The video shows a knit, purl, knit, purl sequence. Yeah. I’ll work on my videography skills, but you get the gist.
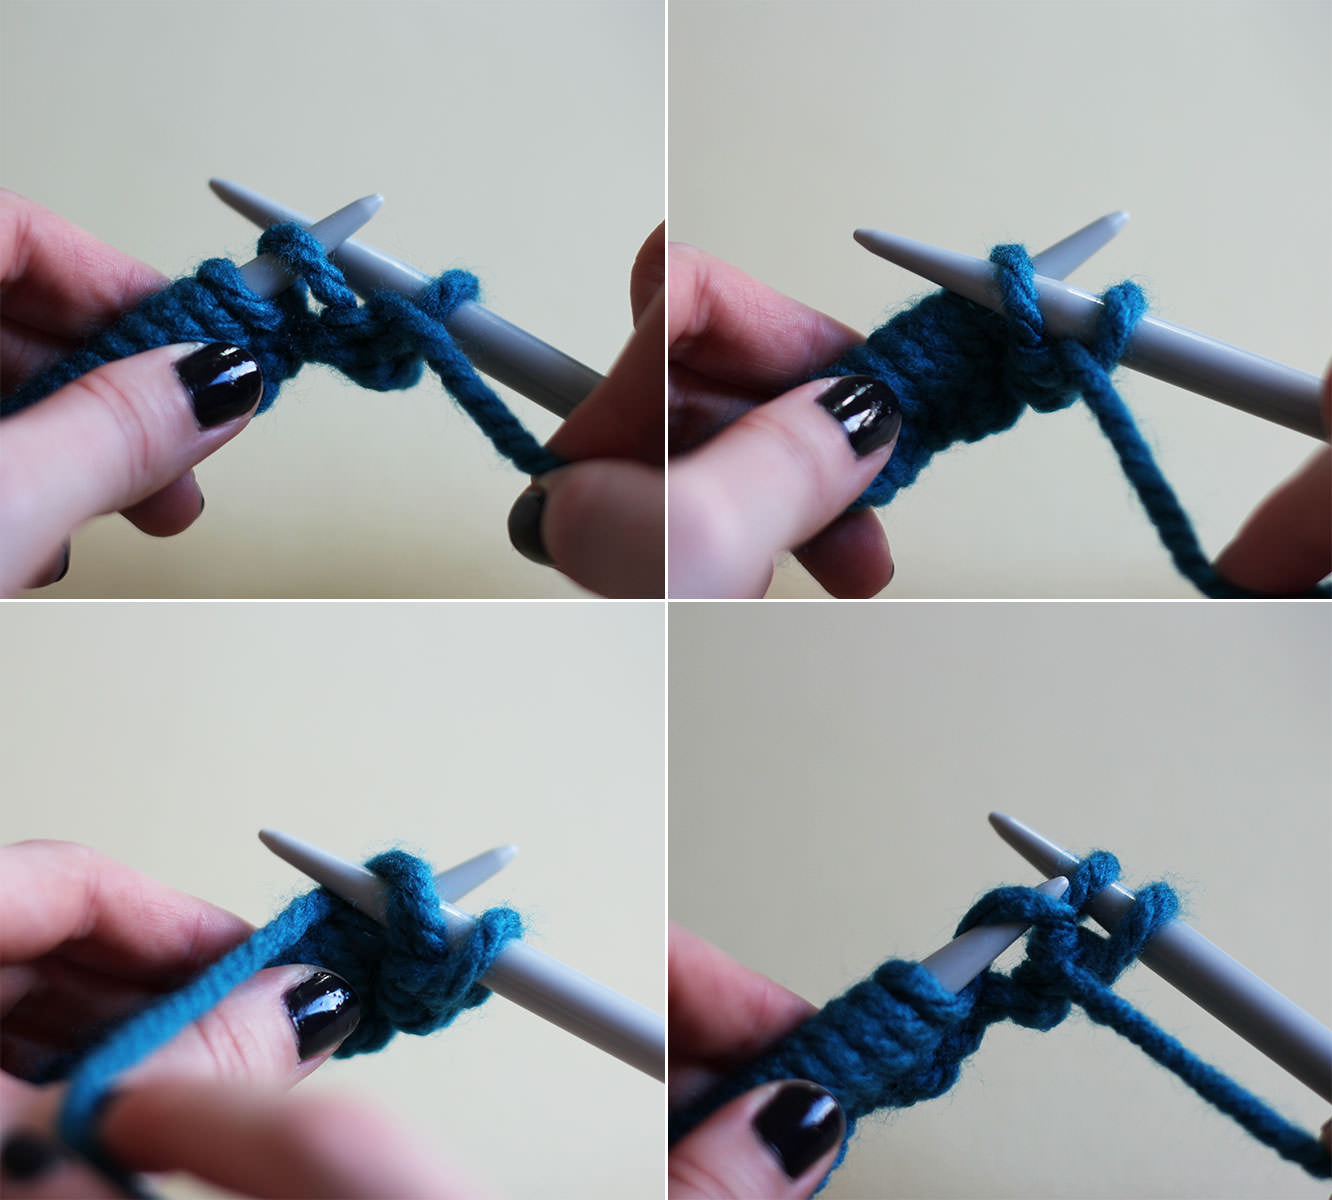
Step six
Repeat the knit, purl, knit, purl until you get to the end of the row. Turn the knitting round and k1 (knit one), p1 (purl one) until the end. Keep going.
The picture above shows the difference between a knit and a purl just in case you get lost at any point. On the left is a purl, you can see a little bump (sort of like a pearl, geddit?) and on the right is a knit. They are basically the same stitch but in opposite directions.
This is where I got a bit carried away with my new youtube account…
Don’t worry, I know I’m super cool.
Step seven
As you get close to the end of the wool you need to make sure you’re keeping enough to cast off and sew your snood together. Once the ball has basically unravelled so you can grab the end without getting in a mess, measure five times the width of the knitting from the end and tie a slip knot to remind you to stop as close as possible to that point.
To cast off, knit two, then loop the first over the second. Knit another one and repeat.
Sorry, what’s that? You could really do with another youtube video? Of course.
Step eight
Once you get to the last stitch remove the needle and pull the end of the thread through the loop and pull to tighten.
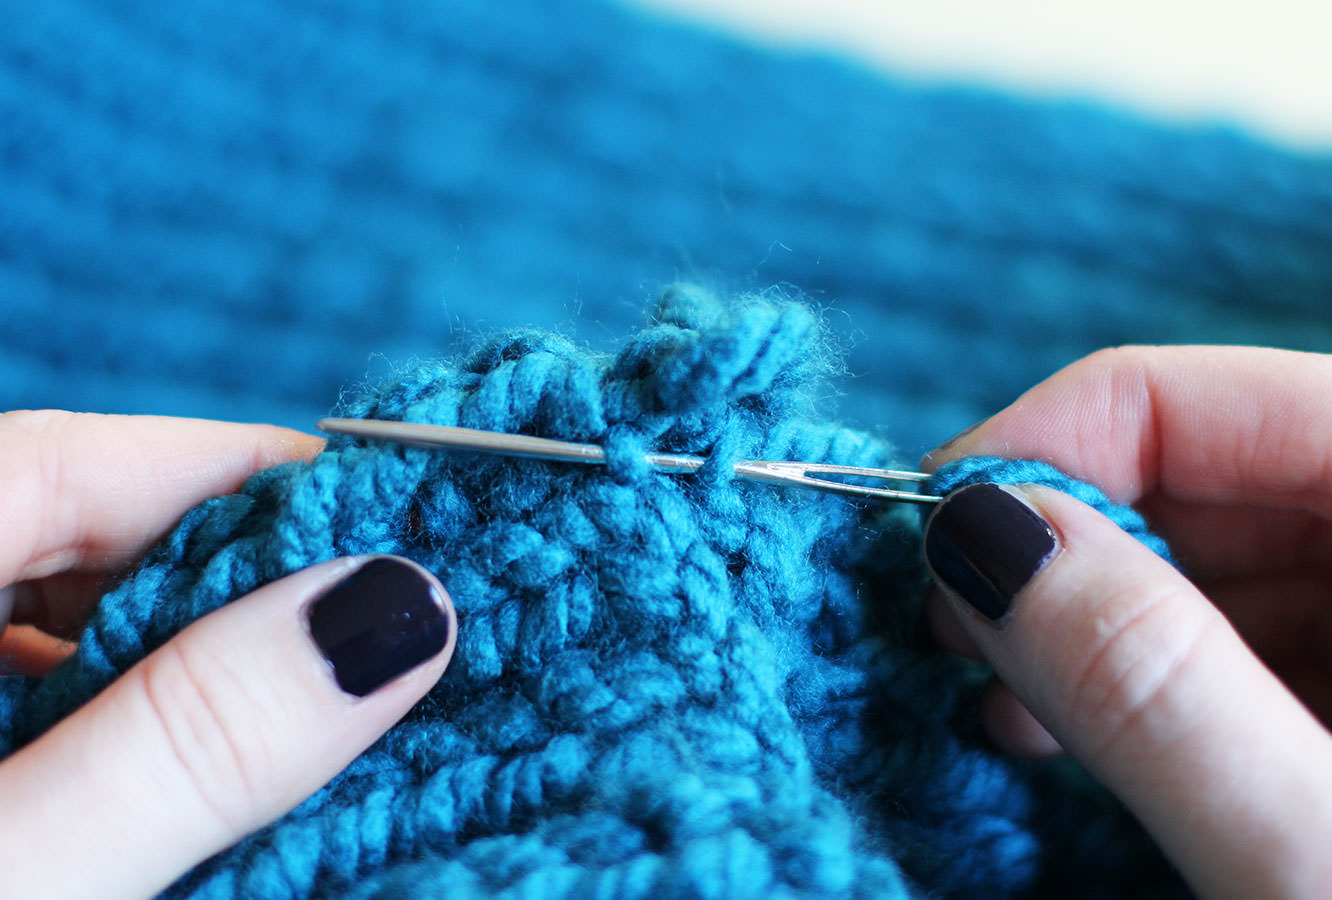
Step nine
Place the two ends together use a wool needle or a crochet hook to sew together. I find it best to go side to side like this.
After I did this I stretched it using the backs of two chairs, I tend to knit a little tight, you might not need to do that. The other way would be to dampen it and pin it out on the carpet but the chair method just seemed a bit easier.
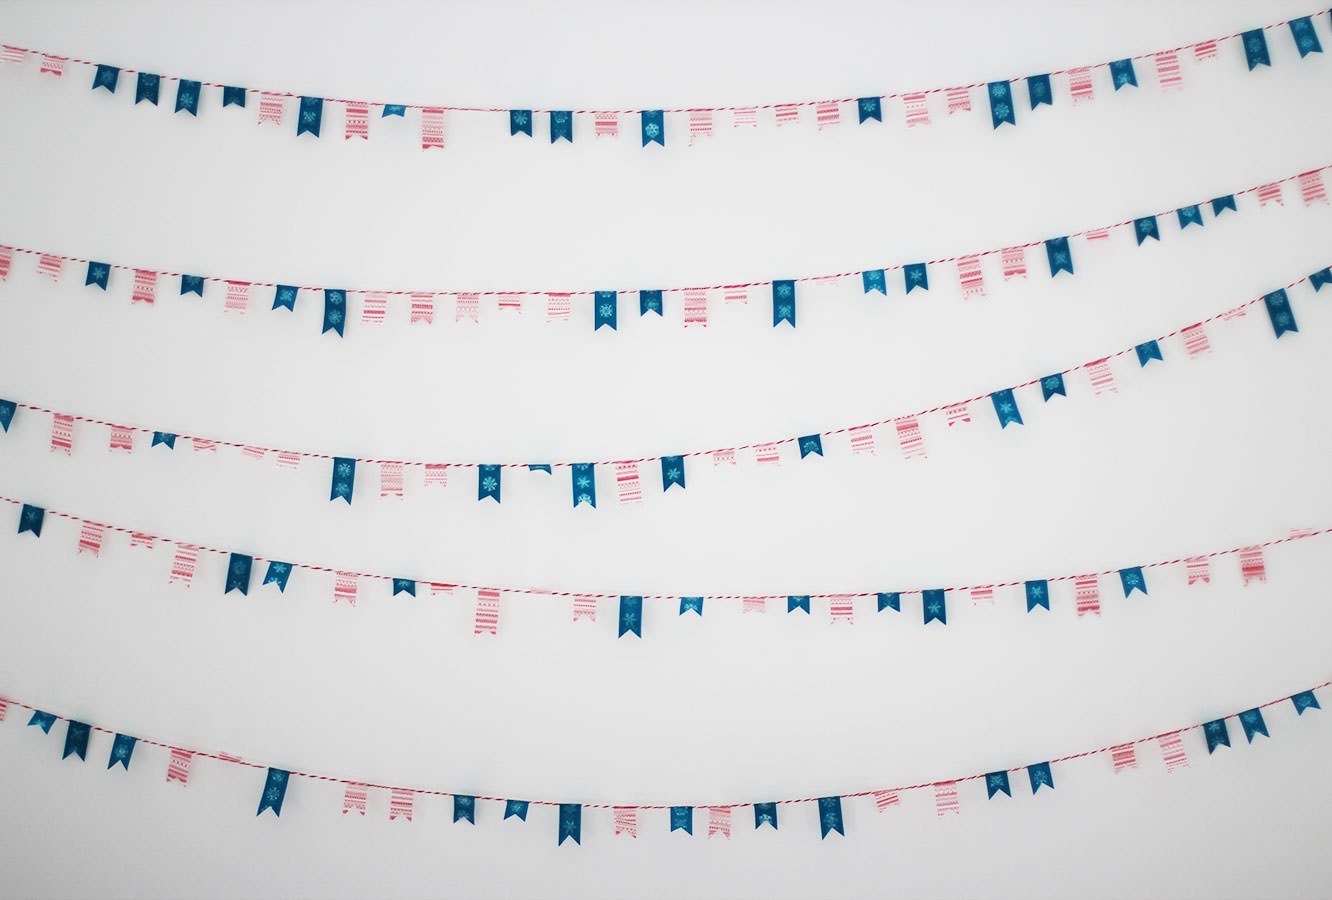
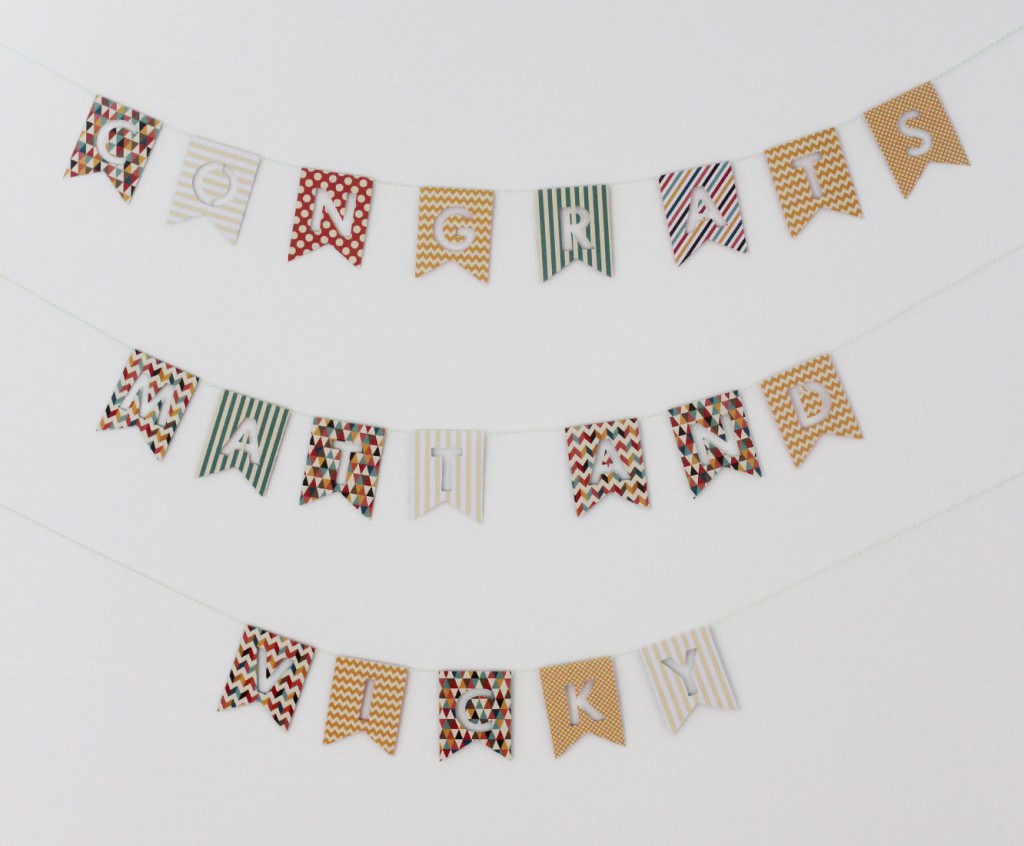
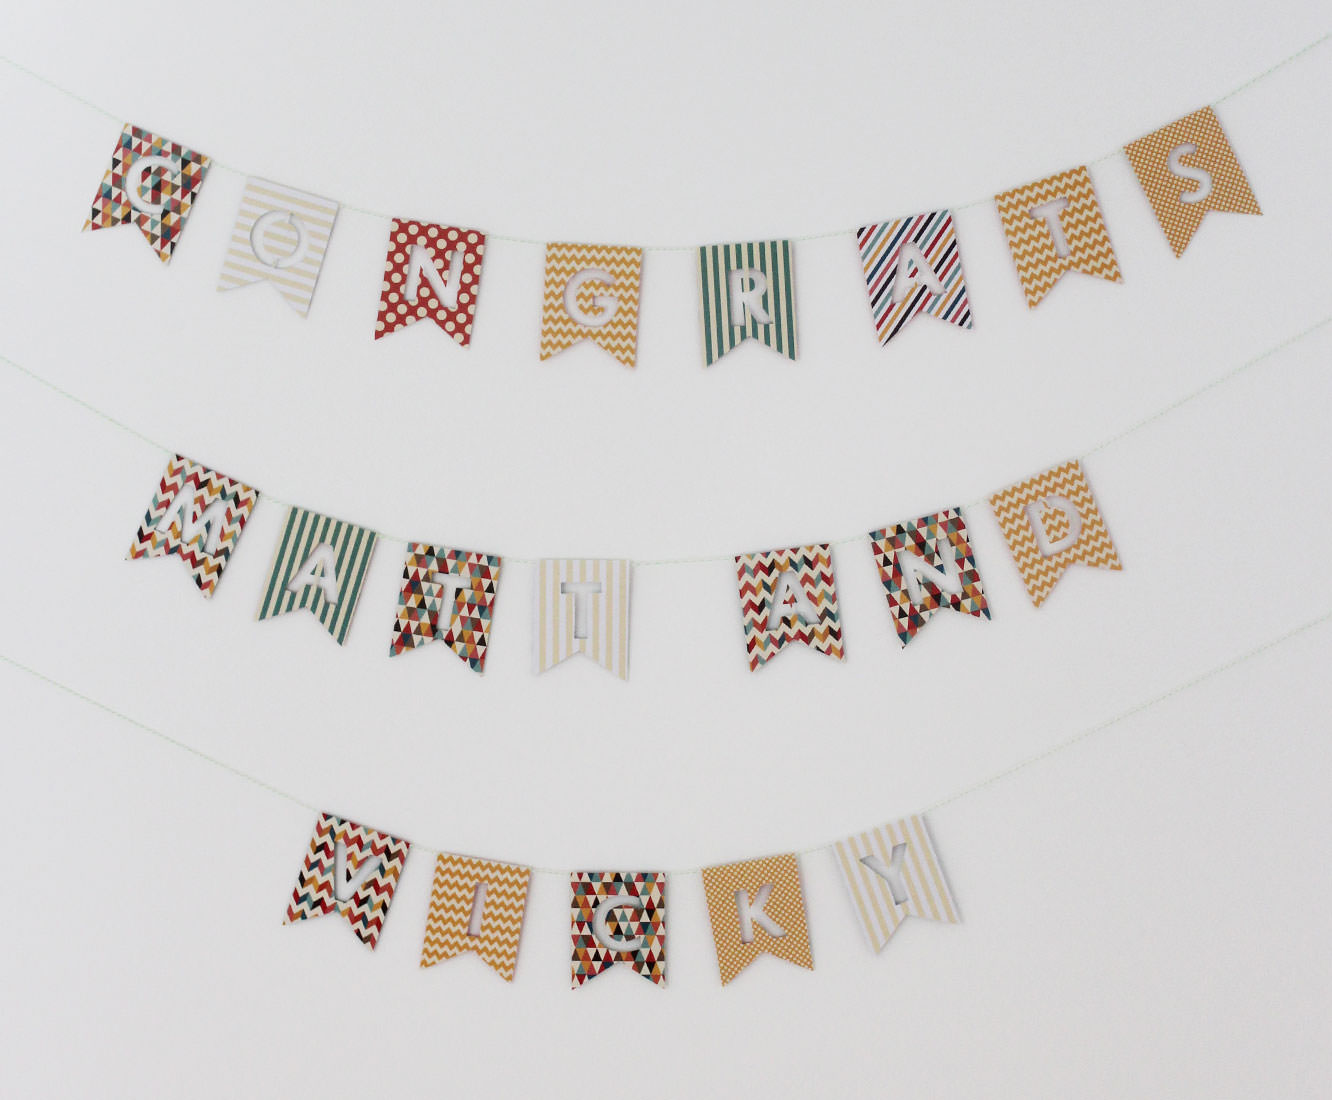
I’m finally going to wrap up my little series of posts from Matt and Vicky’s engagement party this week. I know, you didn’t think there could possibly be more right? Well, no party is complete without a banner.
Just in case their guests forgot, I made a little congratulations banner. A congrats banner, let’s be honest, congratulations is a long word.
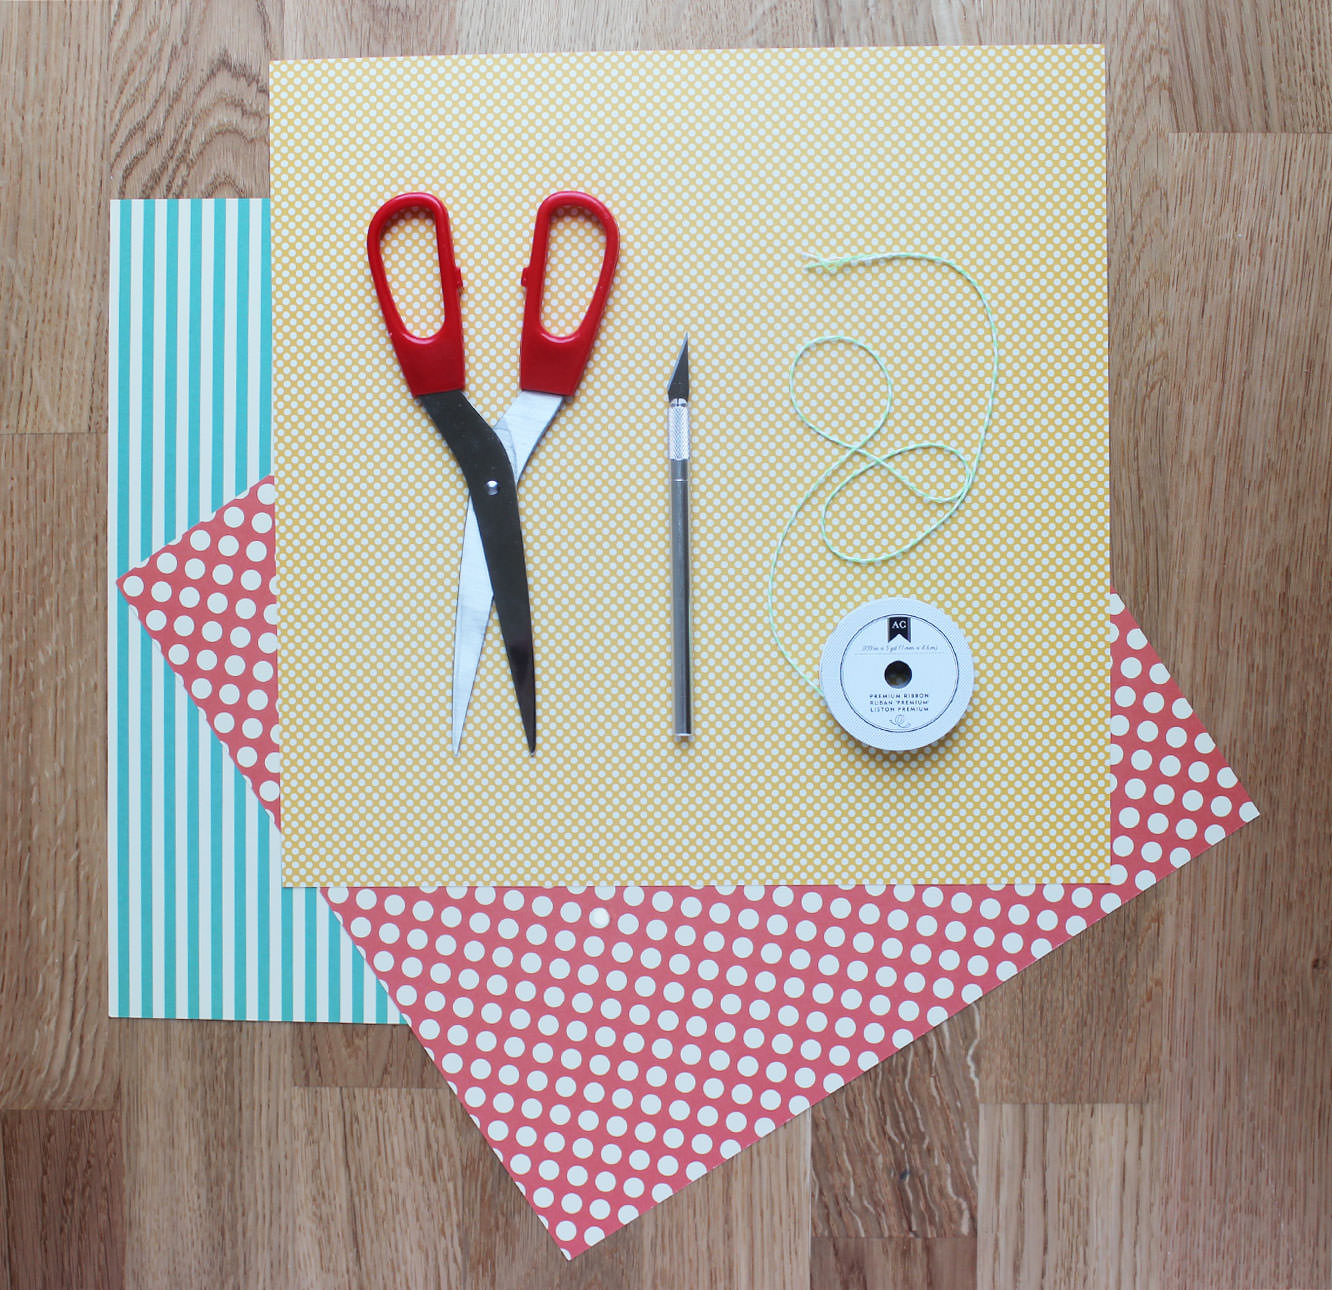
You will need
Some pretty paper or card
A craft knife and a cutting mat (or chopping board)
Double-sided tape
String
Step one
Using a chunky font, type out the message for your banner. I think this was Futura in case you want to copy exactly (but then you would also need to find a Matt and a Vicky to congratulate).
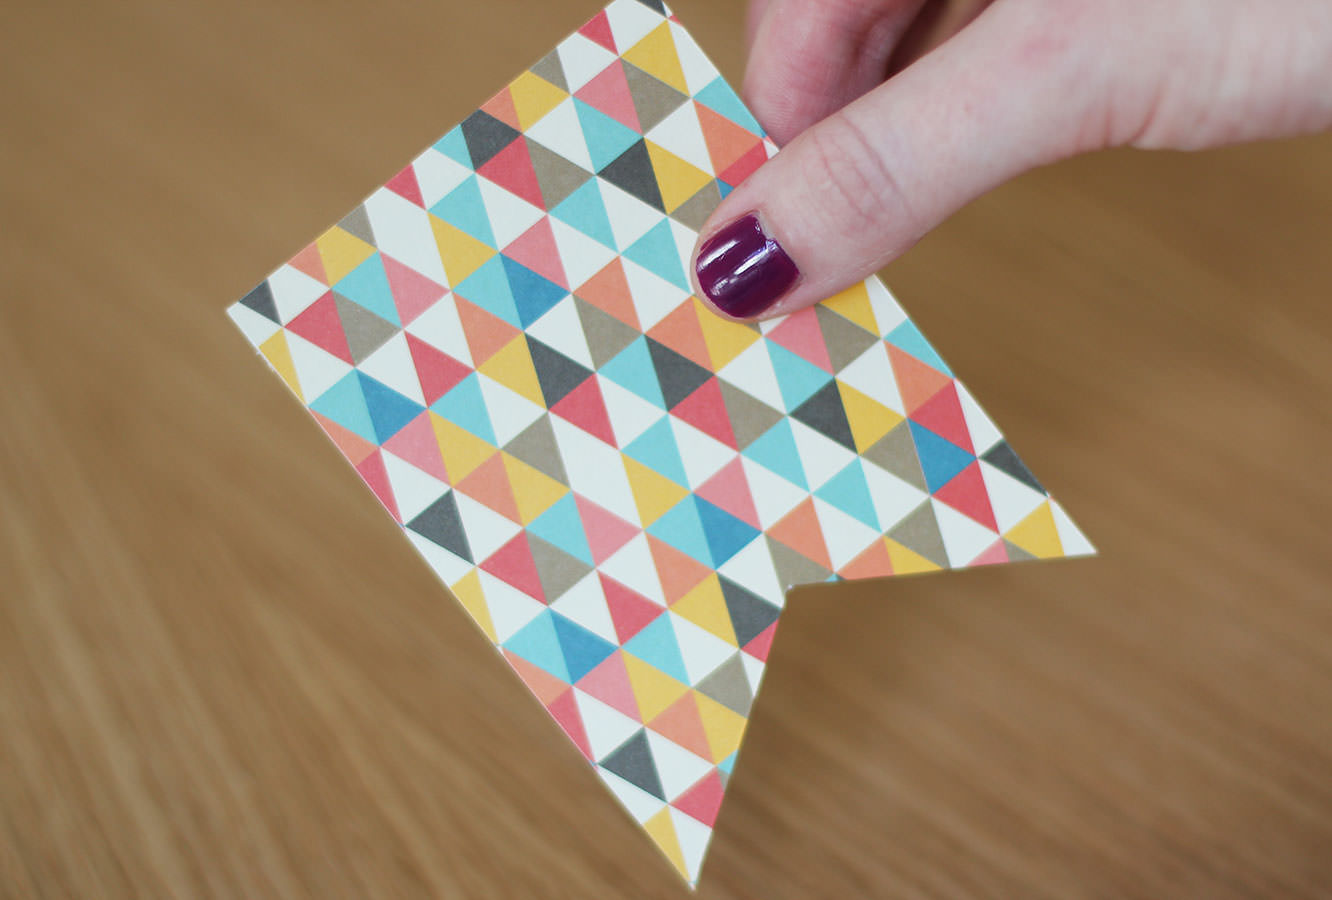
Step two
Cut out little flag shapes big enough to house your letters, remember to leave at least half a centimetre at the top to fold over.
These are super simple to get even, just draw a rectangle with a line down the centre and then draw two diagonals from the corner to the same point on the central line. Use the first one as a template.
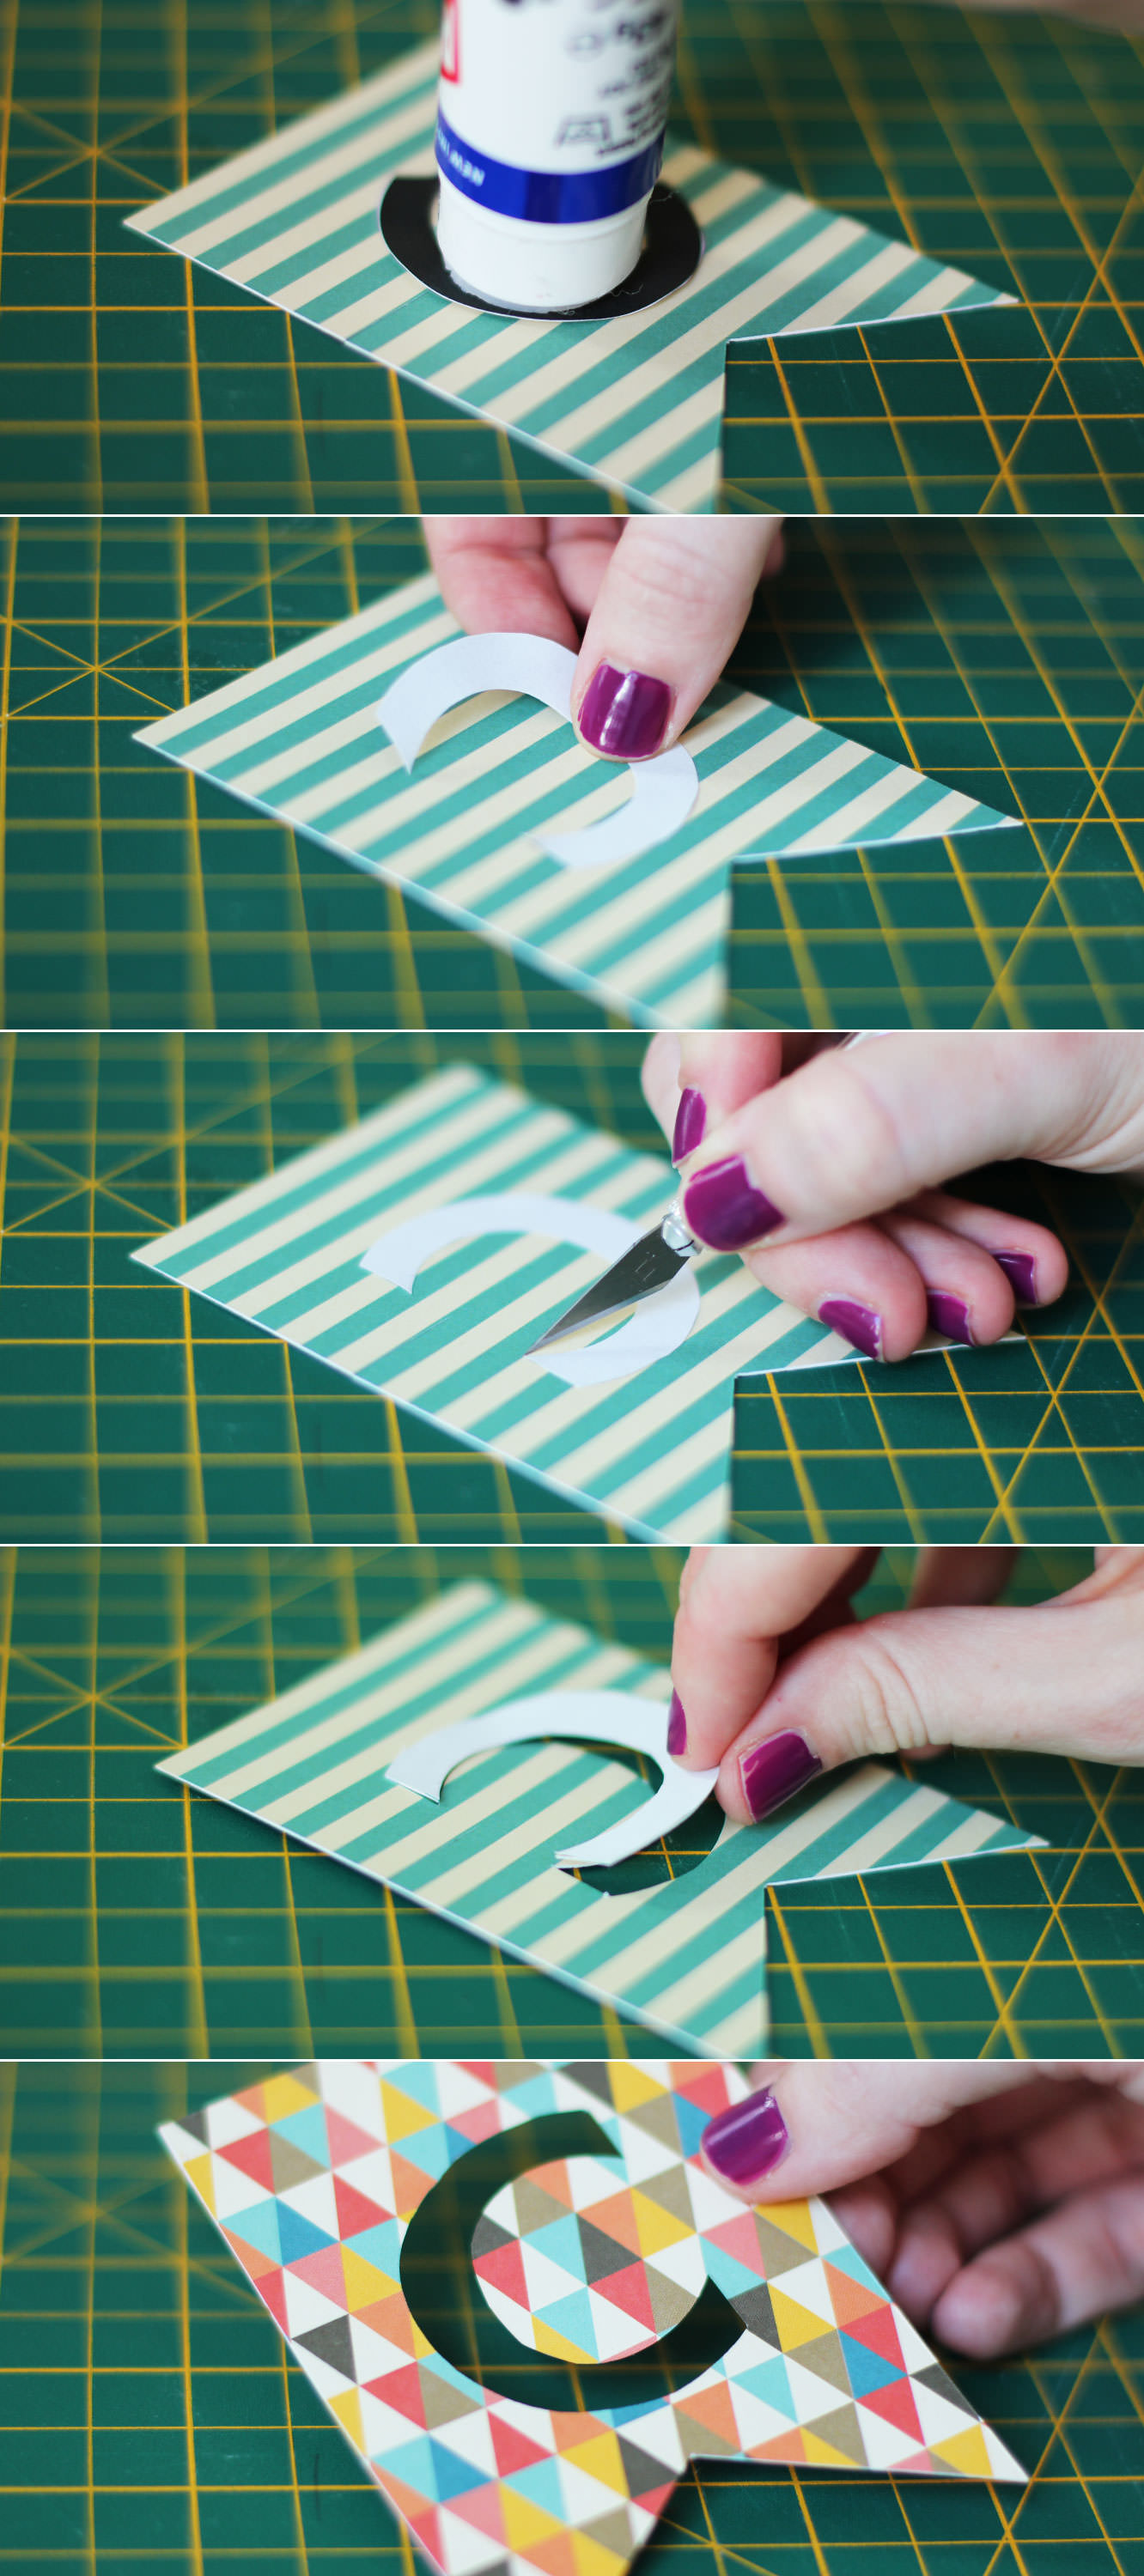
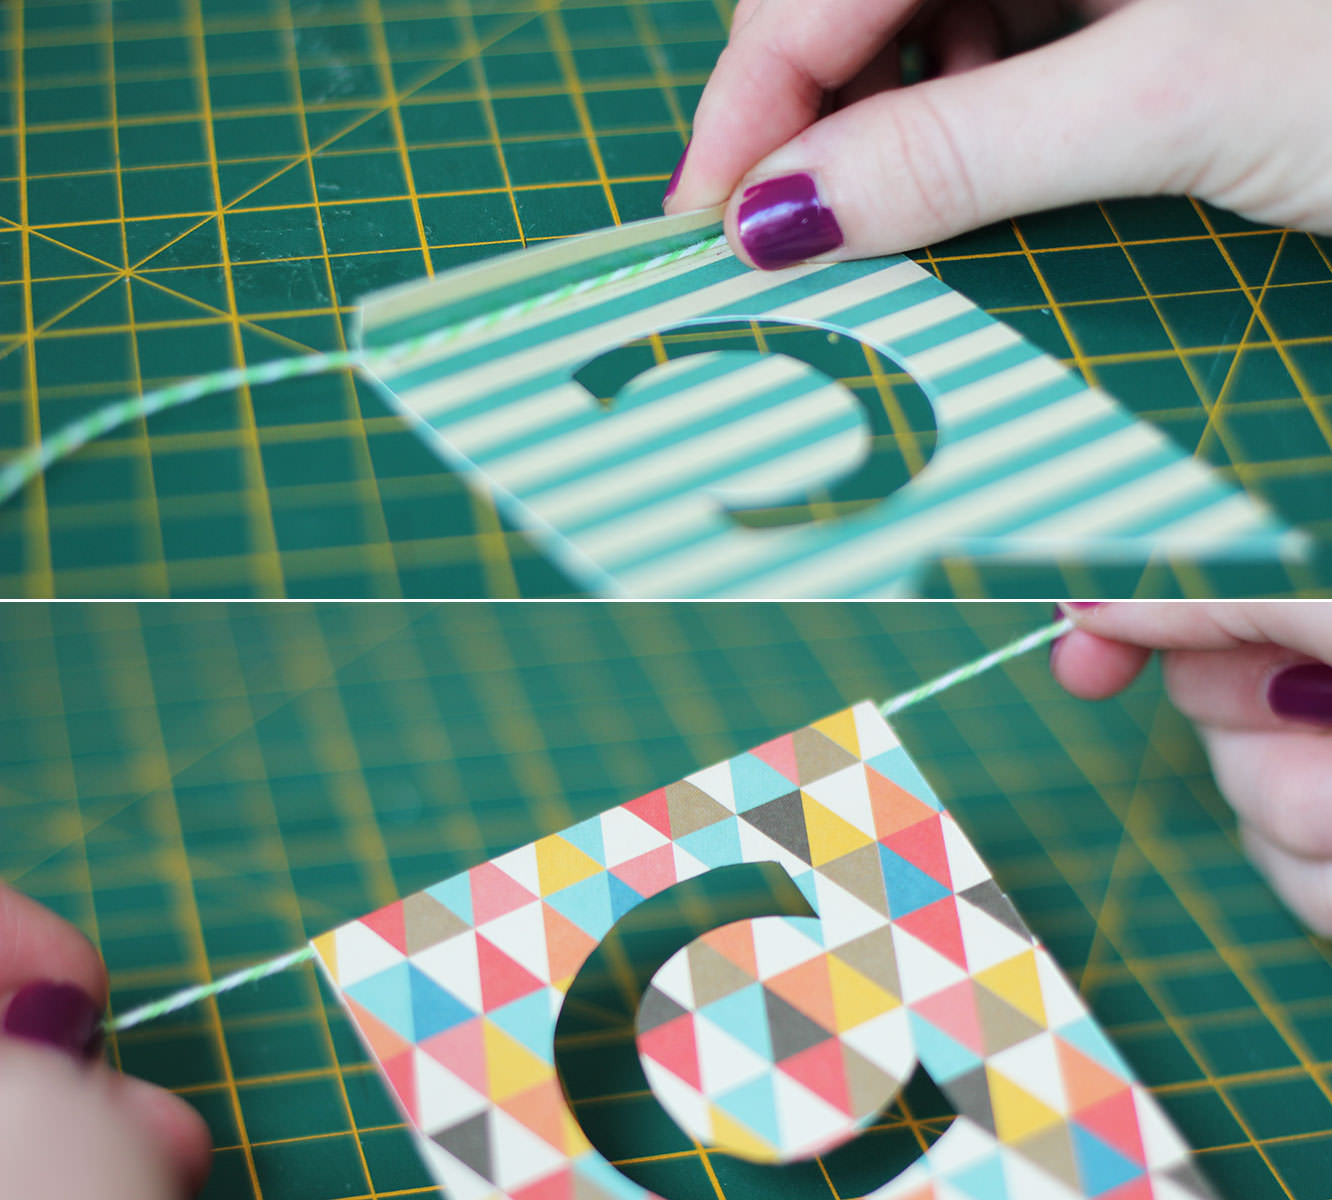
Step three
Glue the front of the letters and stick them face down on the back of each flag.
Use a craft knife to cut around the edge of the letter. The child in me was bizarrely satisfied by punching these out.
When cutting out letters like A and O which have a counter in them remember to keep a small stem so you don’t totally hollow them out.
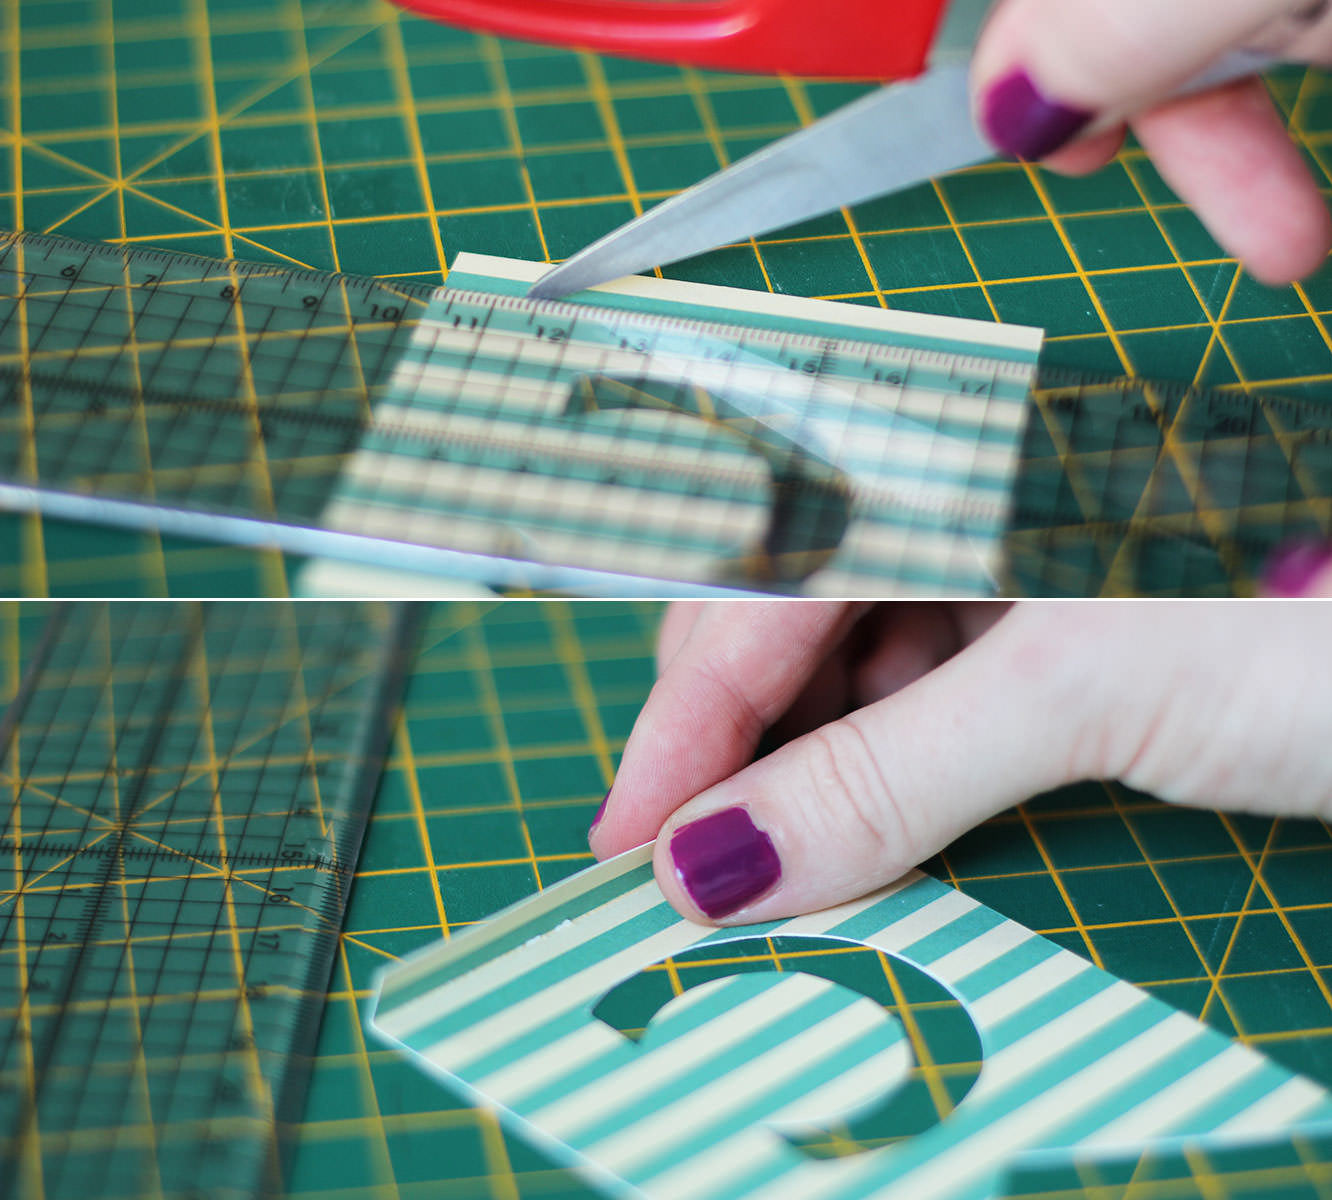
Step four
Using open scissors score the top of the flag (on the back) to create a fold.
Step five
Stick double sided tape inside the fold, making sure it’s right to the top edge. Place the string in the fold and stick down.
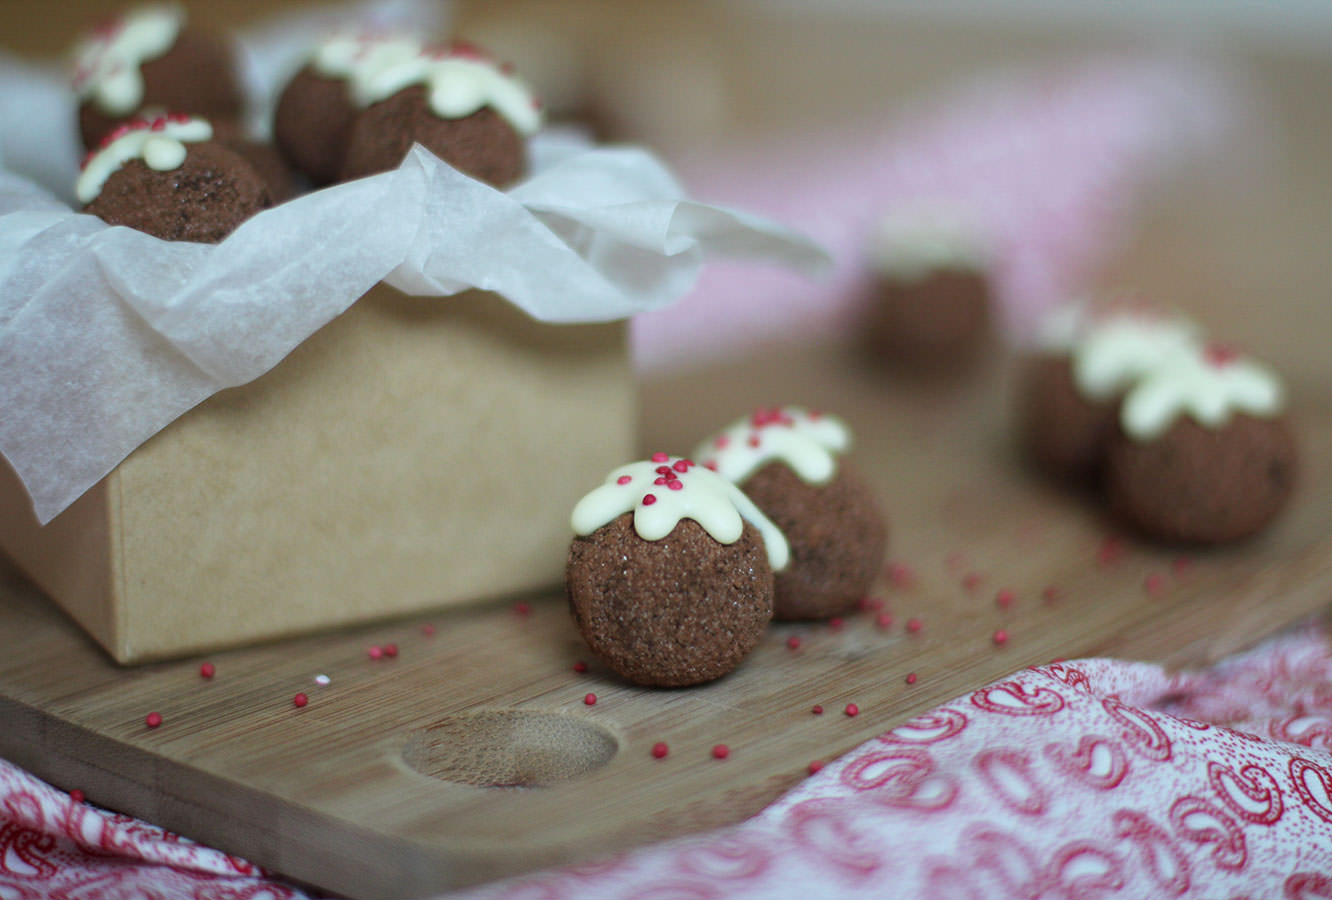
Some years (every year) I have grand plans for home made gifts and decorations at Christmas. Rarely does this materialise in the lovely relaxed and whimsical way it looks in my head. Generally I end up covered in the contents of my baking cupboard feeling totally harassed by the number of hampers I’ve decided to make.
If you’re anything like me, or if you’re completely handmade/craft-phobic in the first place, this one is for you. Three super quick festive crafts to brighten up the house and fill up stockings at the last minute. You don’t need an ounce of artistic/baking ability for any of these. So no excuses.
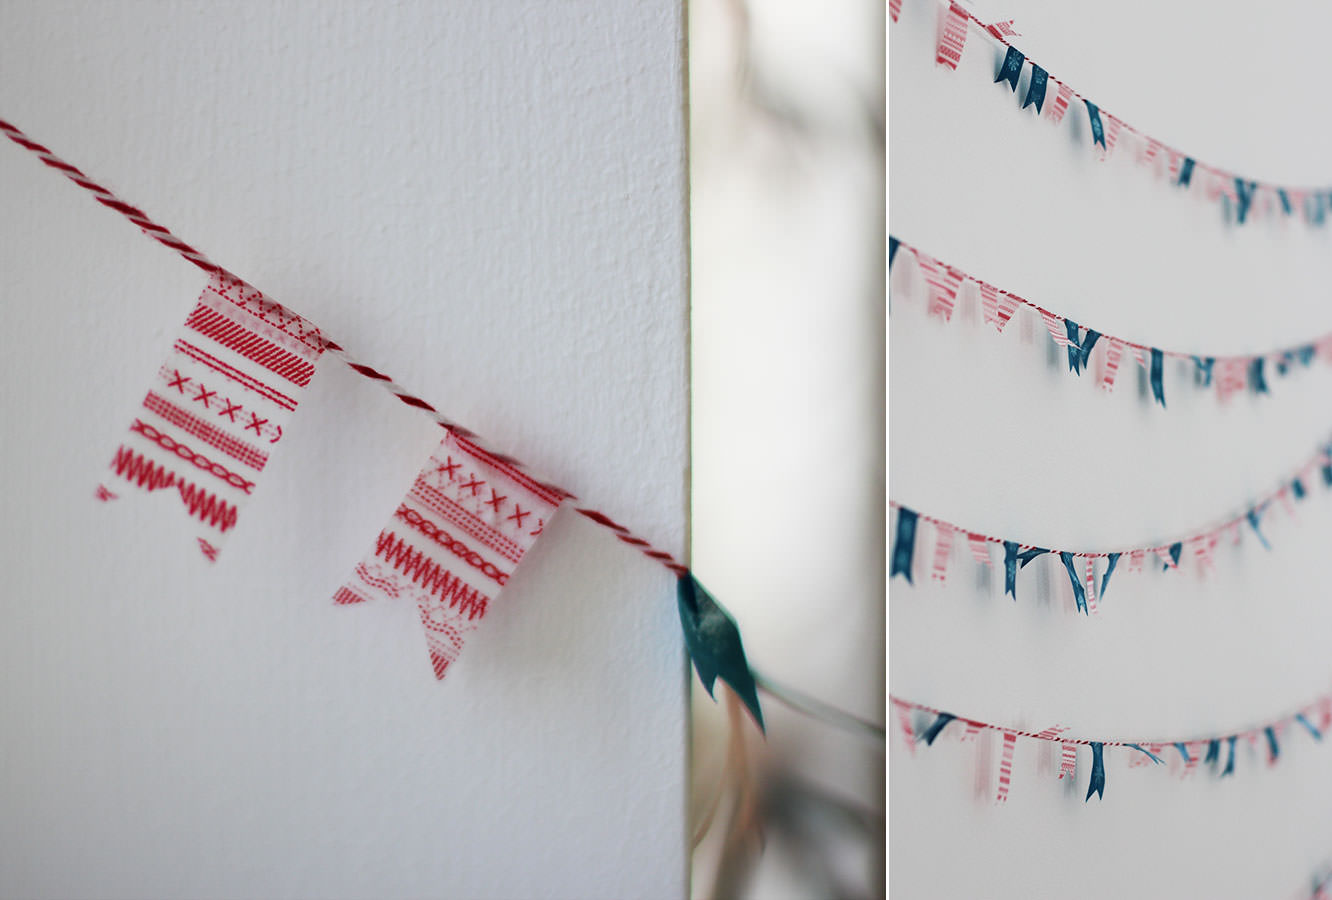
#1: Cute Christmas bunting
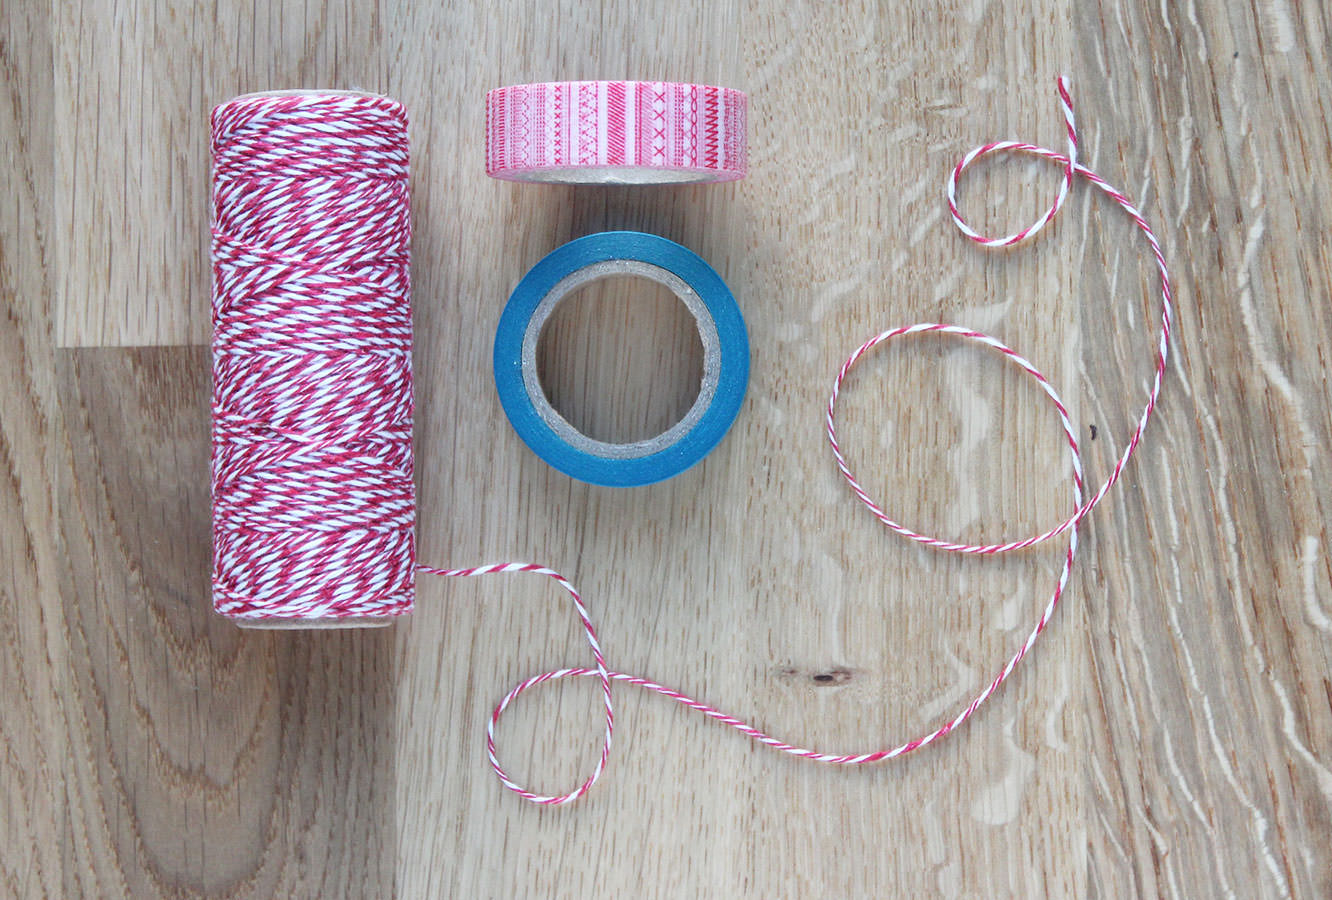
You will need
String (I got this two colour spool from Tiger for £1)
Christmassy washi-tape
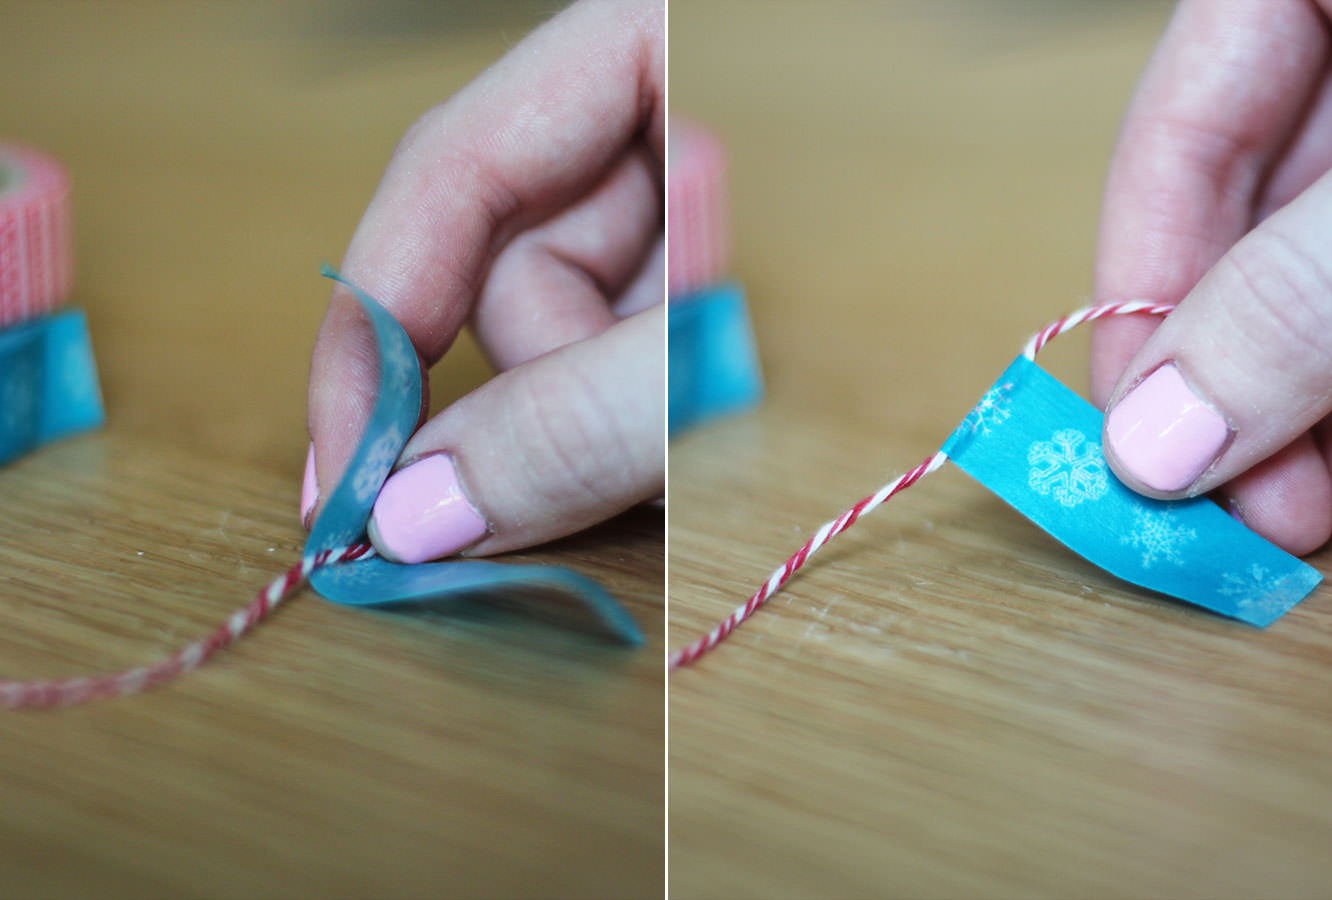
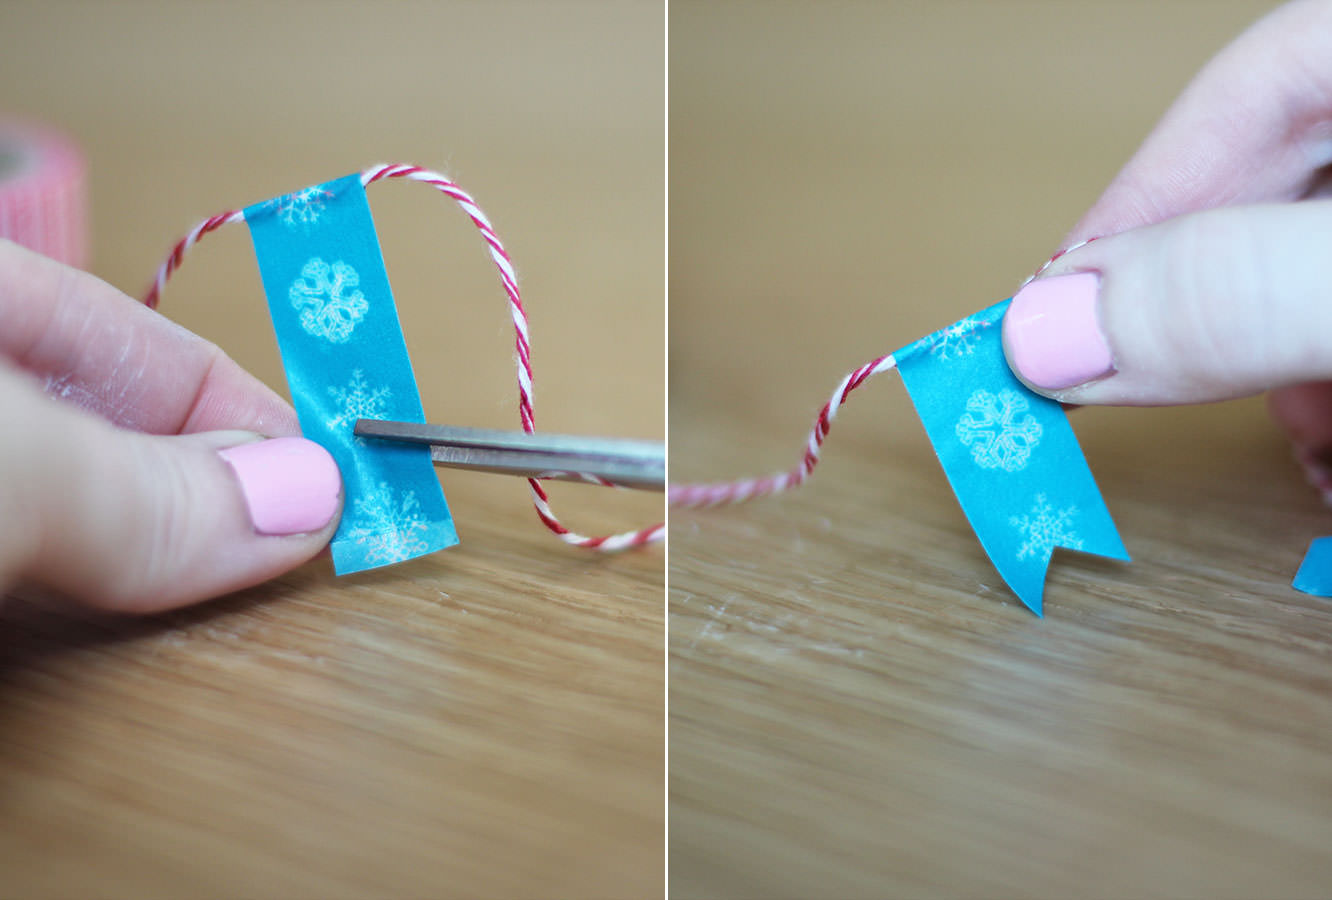
Step one
Cut a random length of tape and place the string in the middle. If you really want to punish yourself you can try and make them all the same length, but I really like them random and it’s much easier that way too.
For this step I cut loads and stuck them on the edge of the table so I had them ready and did them in batches so I wasn’t constantly cutting one then sticking it etc etc.
Step two
Fold over the wash tape and stick together. Again, I found it easier to do this step in bulk and then snip them in one go (see below).
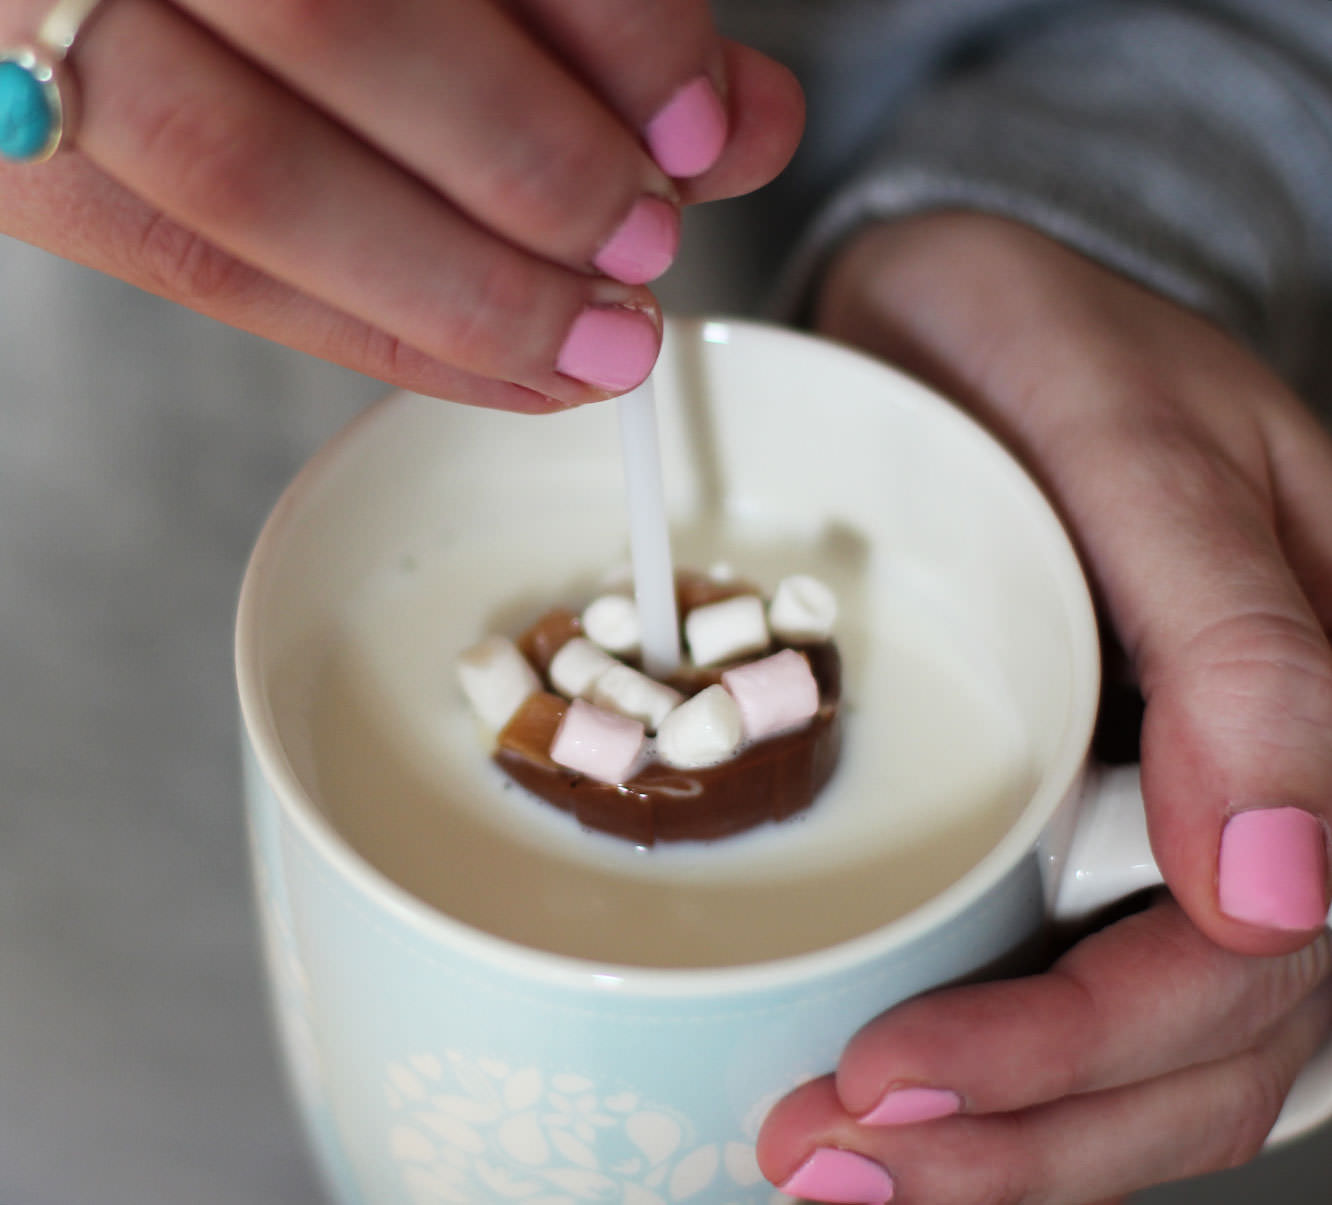
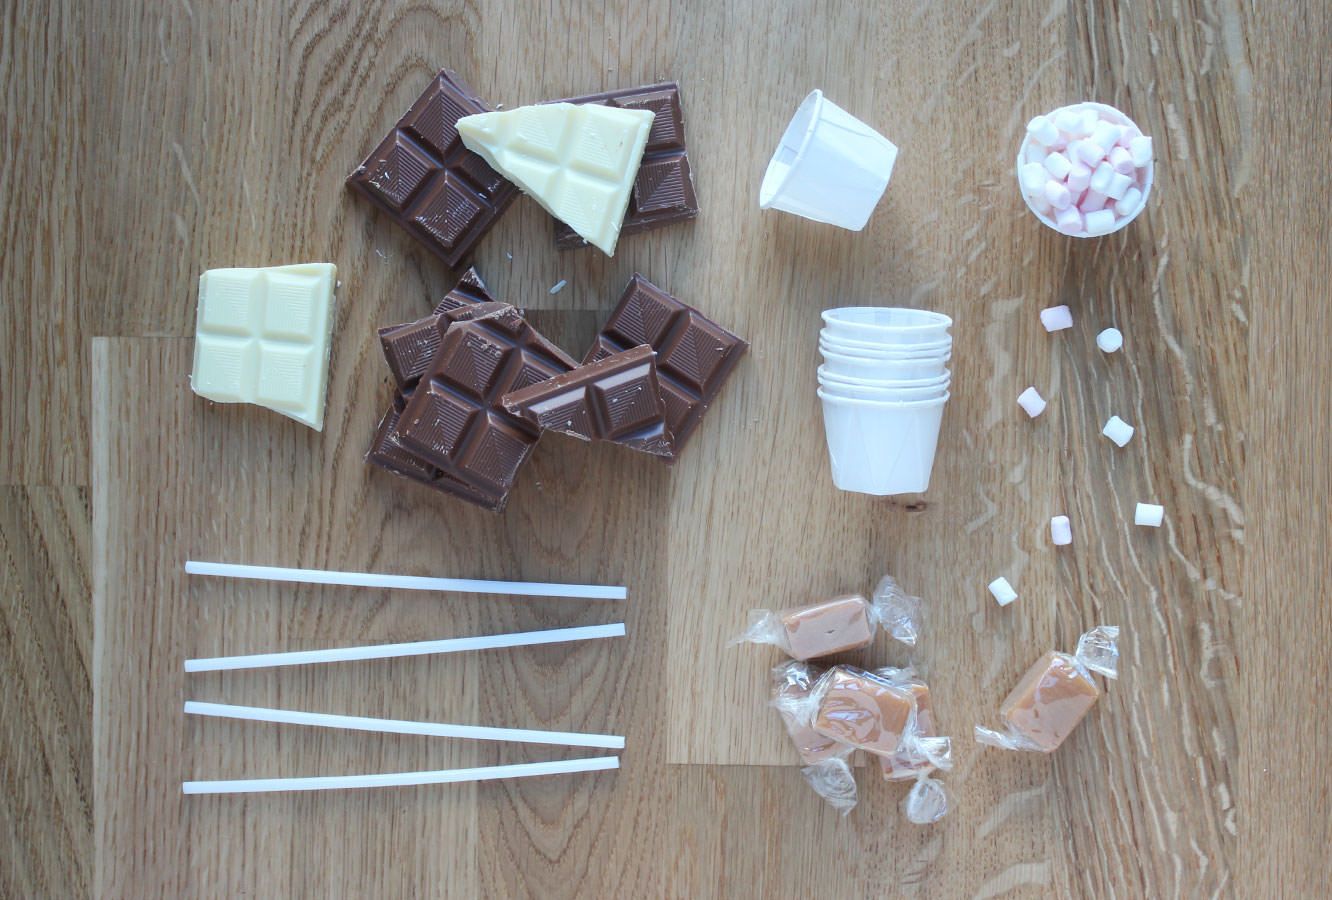
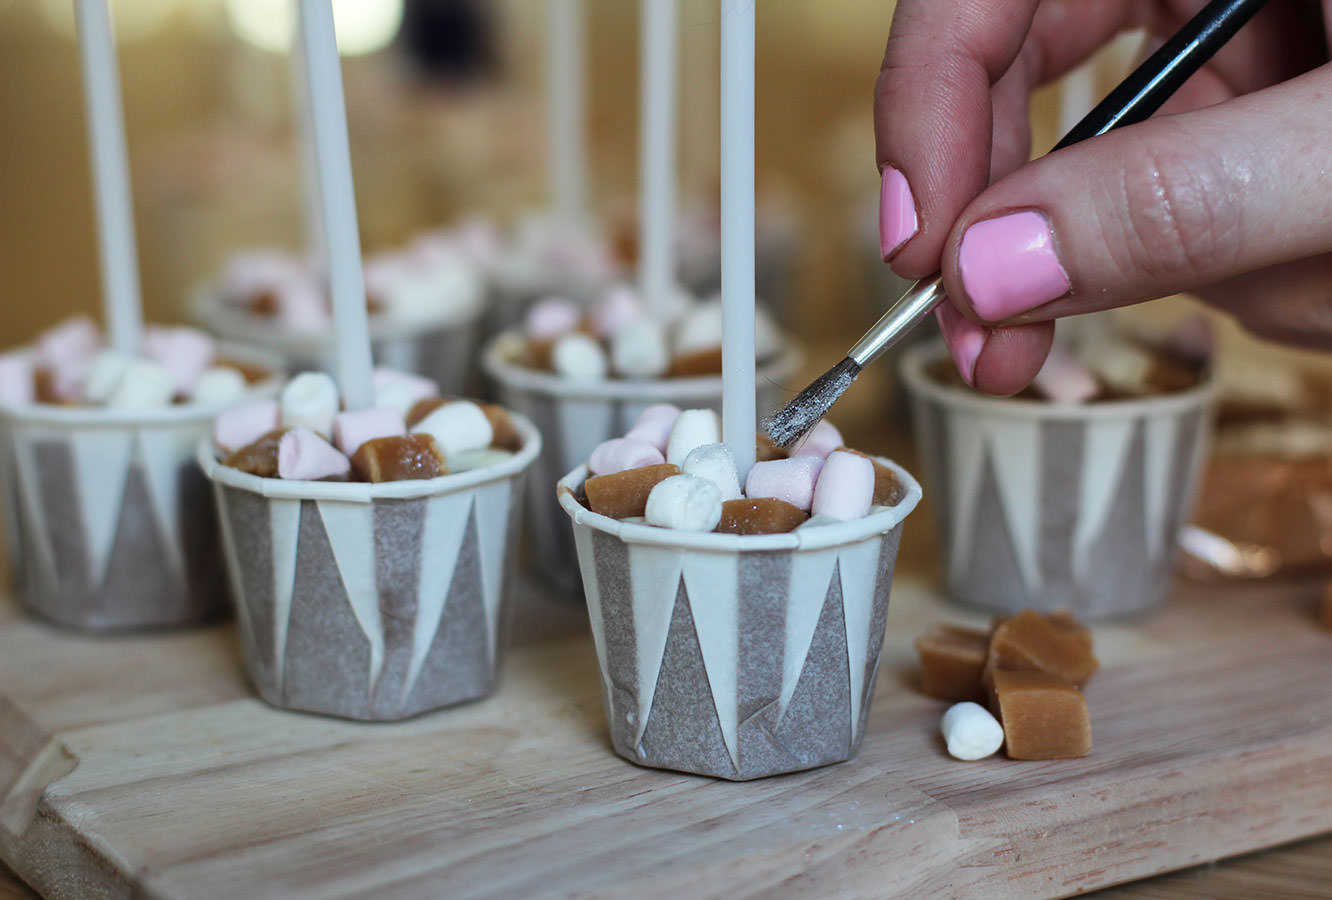
I saw one of these at the shops today, it was £3! These make a great little stocking filler, present topper-upper or gifts for the neighbours. Just swirl into hot milk for a luxury hot chocolate.
You will need
400g/ 14oz Milk chocolate
50g/ 1.5oz White chocolate
Condiment cups (if the closest McDonalds doesn’t have these you can buy them online, or use mini-muffin cases)
Mini mini marshmallows (these tiny fellows are from Waitrose)
Fudge pieces
Cake pop sticks
Edible glitter (optional)
(Makes 10-12. You need roughly 35g chocolate per cup so adjust the above to suit the number of hot chocolates you want to make).
For wrapping
Cellophane roll (available online or from craft shops)
Chrismassy ribbon or string
Step one
Chop the fudge into little chunks so that they’re roughly in proportion with the marshmallows.
Step two
Melt the chocolate slowly in the microwave and put into piping bags. You can temper it if you want, but given that you won’t see much of it, it might not be worthwhile. I go into a bit more detail as to how to temper chocolate here.
Step three
Fill cup to near the brim with milk chocolate. Add a little white and swirl in with a cocktail stick.
Place stick in and surround with fudge and marshmallows.
Leave to set.
Step four
Dust on a little glitter.
Step five
Wrap up. Cut a square of cellophane wrap and place cup in the centre, bring corners up to the middle and secure. I used a loom band to do this, you could use a small elastic band or go straight in with the ribbon/string.
Trim off the corners and ‘foof’.
Go on. There must be one spare you can treat yourself to?
On the first day of December it feels a little rude to not present you with a Christmas post. I’m a huge fan of the festive season, so you’re lucky I held back as long as I did.
Last year I was meandering around a craft fair and spotted a lino print stall. Now I tried lino printing at secondary school, and it made me a bit cross. I am a big fan of precision and this craft definitely comes with a dollop of ‘rustic handmade’.
This was my first bash at lino cutting and printing since the age of 14 I figure the extra years of ‘get over yourself’ and the added dexterity contributed significantly to making this a very satisfying little project.
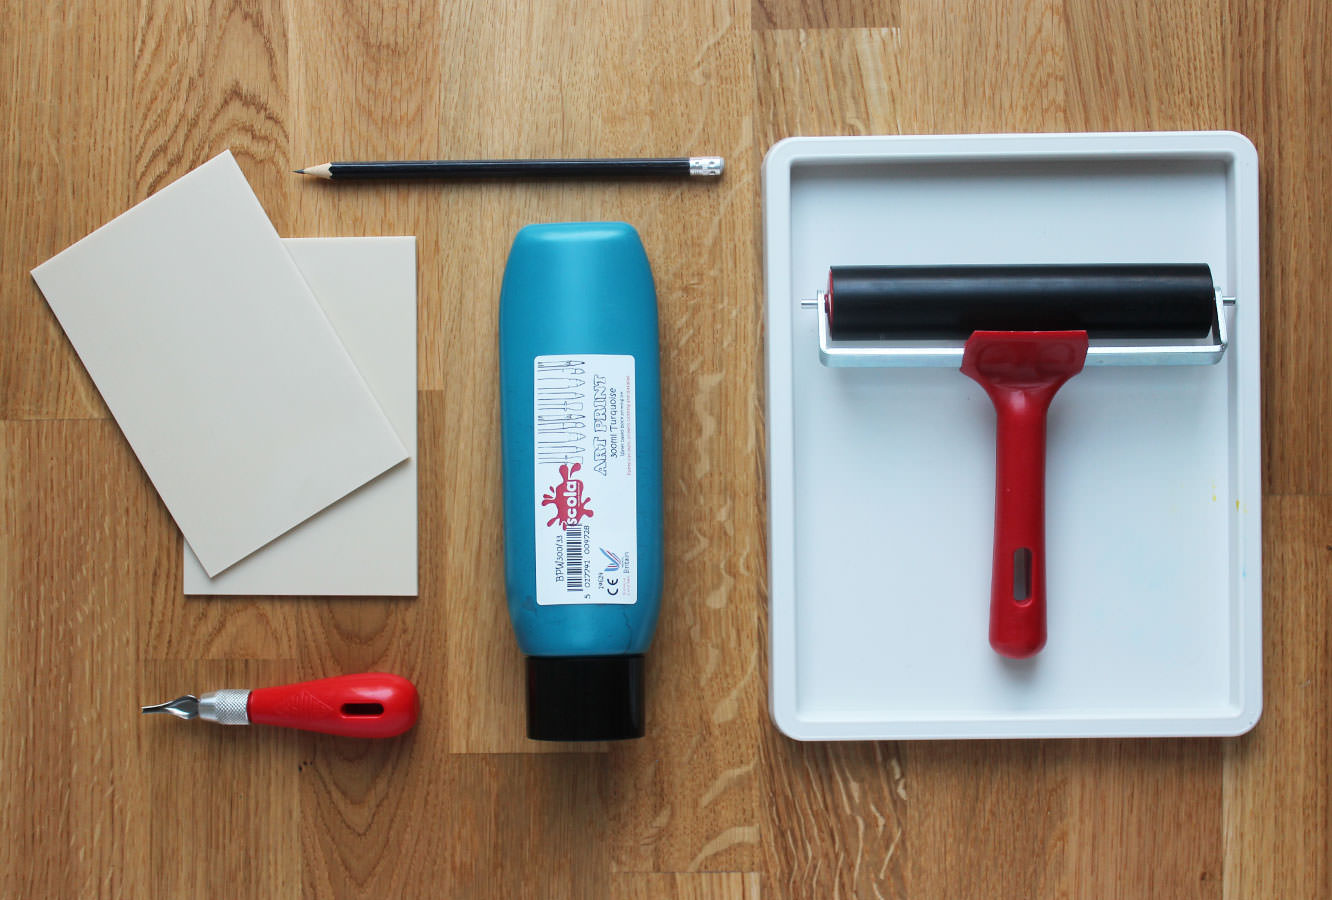
You do need a little more ‘specialist’ equipment this time than usual, but you can set yourself up relatively cheaply with the kit. I used a combo of Amazon and Handprinted.
You will need
Ink tray
Ink brayer
Ink
Lino cutter (preferably with a choice of blades)
Greeting card blanks
Soft cut lino sheets (the size of your card blanks)
Tracing paper or greaseproof
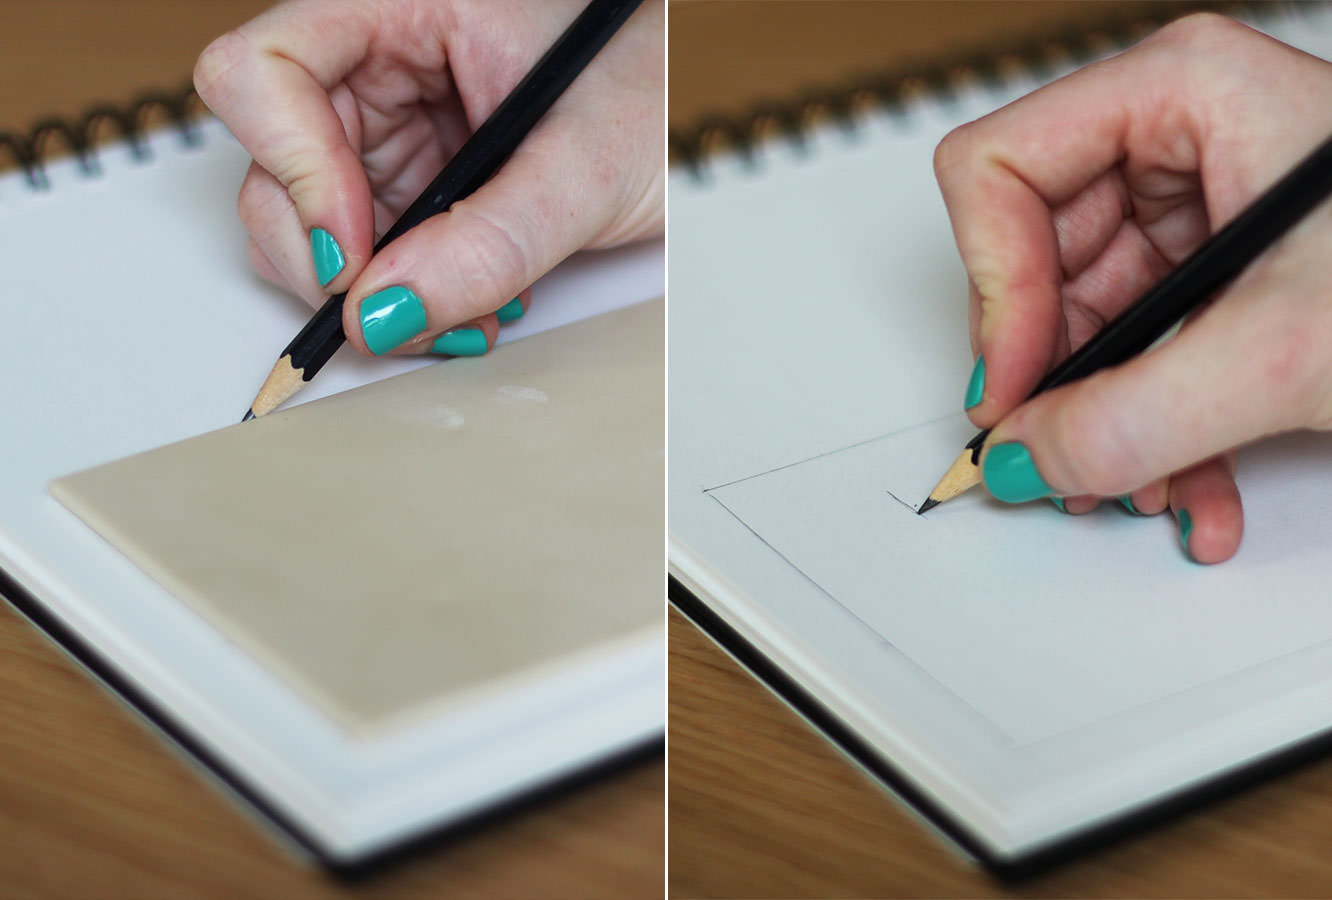
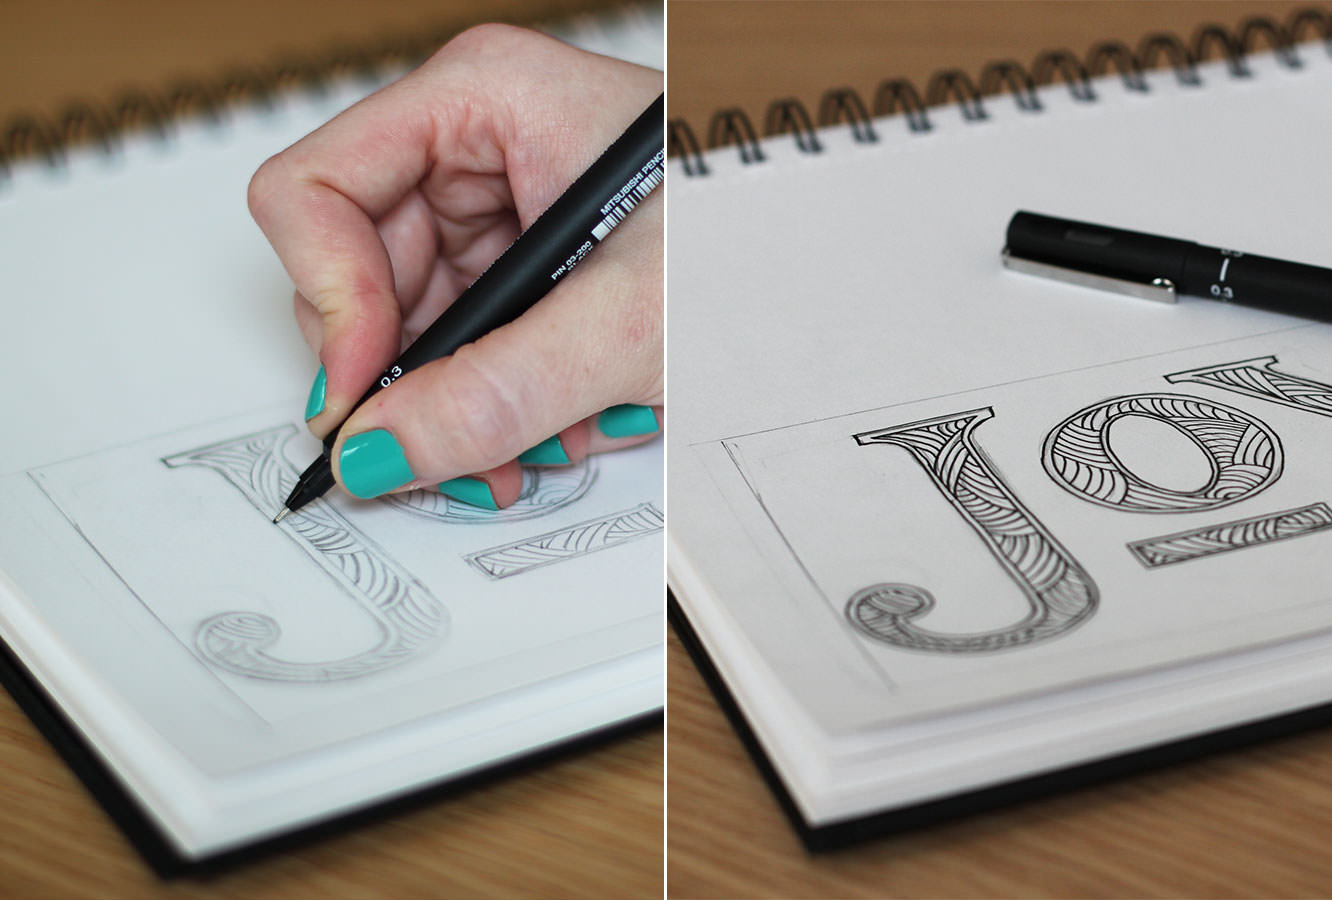
Step one
Draw around the outside of your sheet of lino so you don’t make your design too big.
Sketch out a word/picture. For your first cut I would avoid anything too intricate or with lots of corners. I went with letters in the end so I could cover up mistakes if I went wrong… I figured a lopsided squinty eyed penguin might just look a bit sad.
Step two
This is not essential but I outlined the design to make it easier to trace. This also helps neaten out/correct any mistakes.
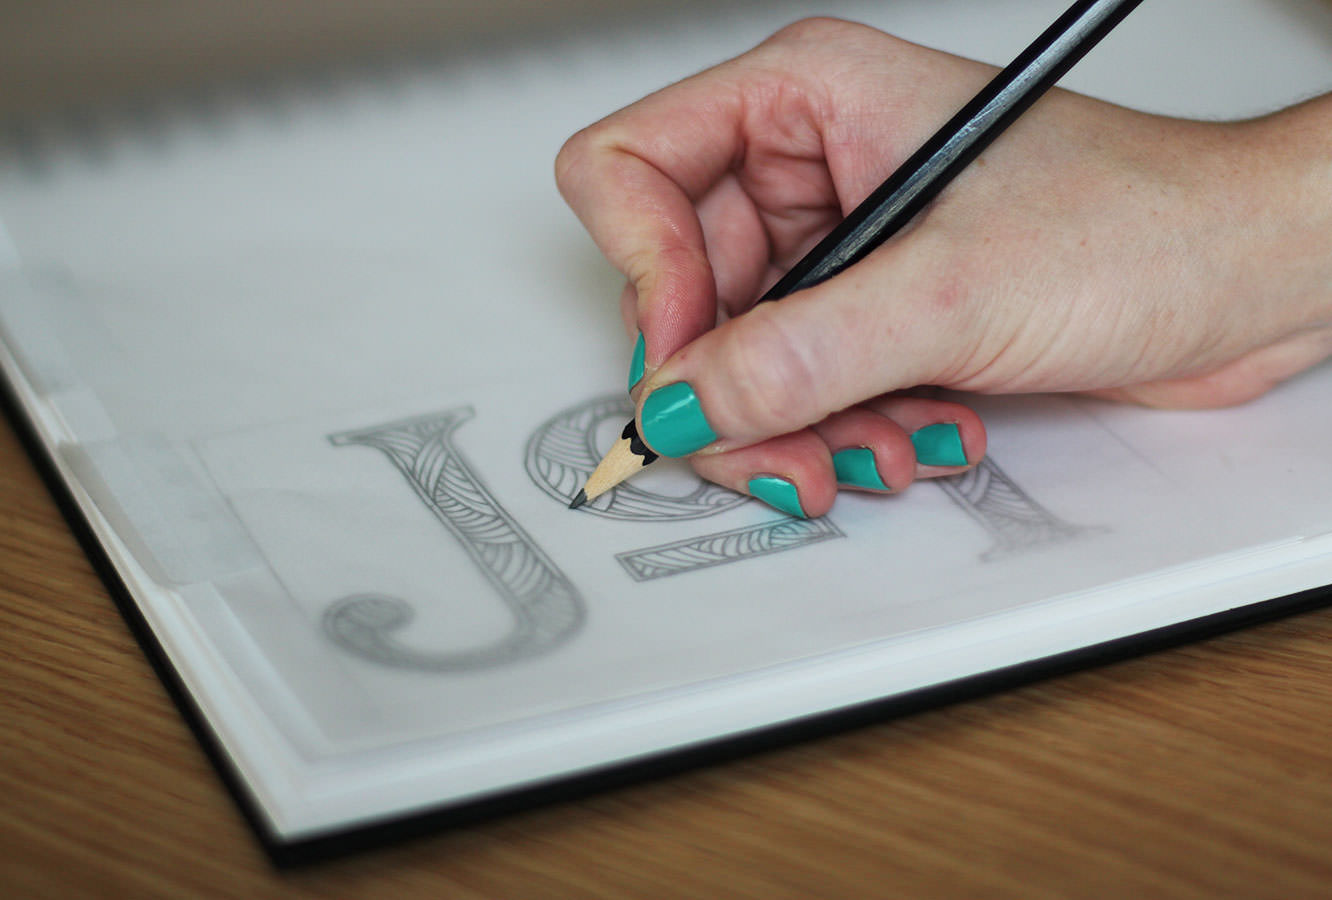
Step three
Tape a piece of tracing paper or greaseproof to your design and draw over quite firmly in pencil.
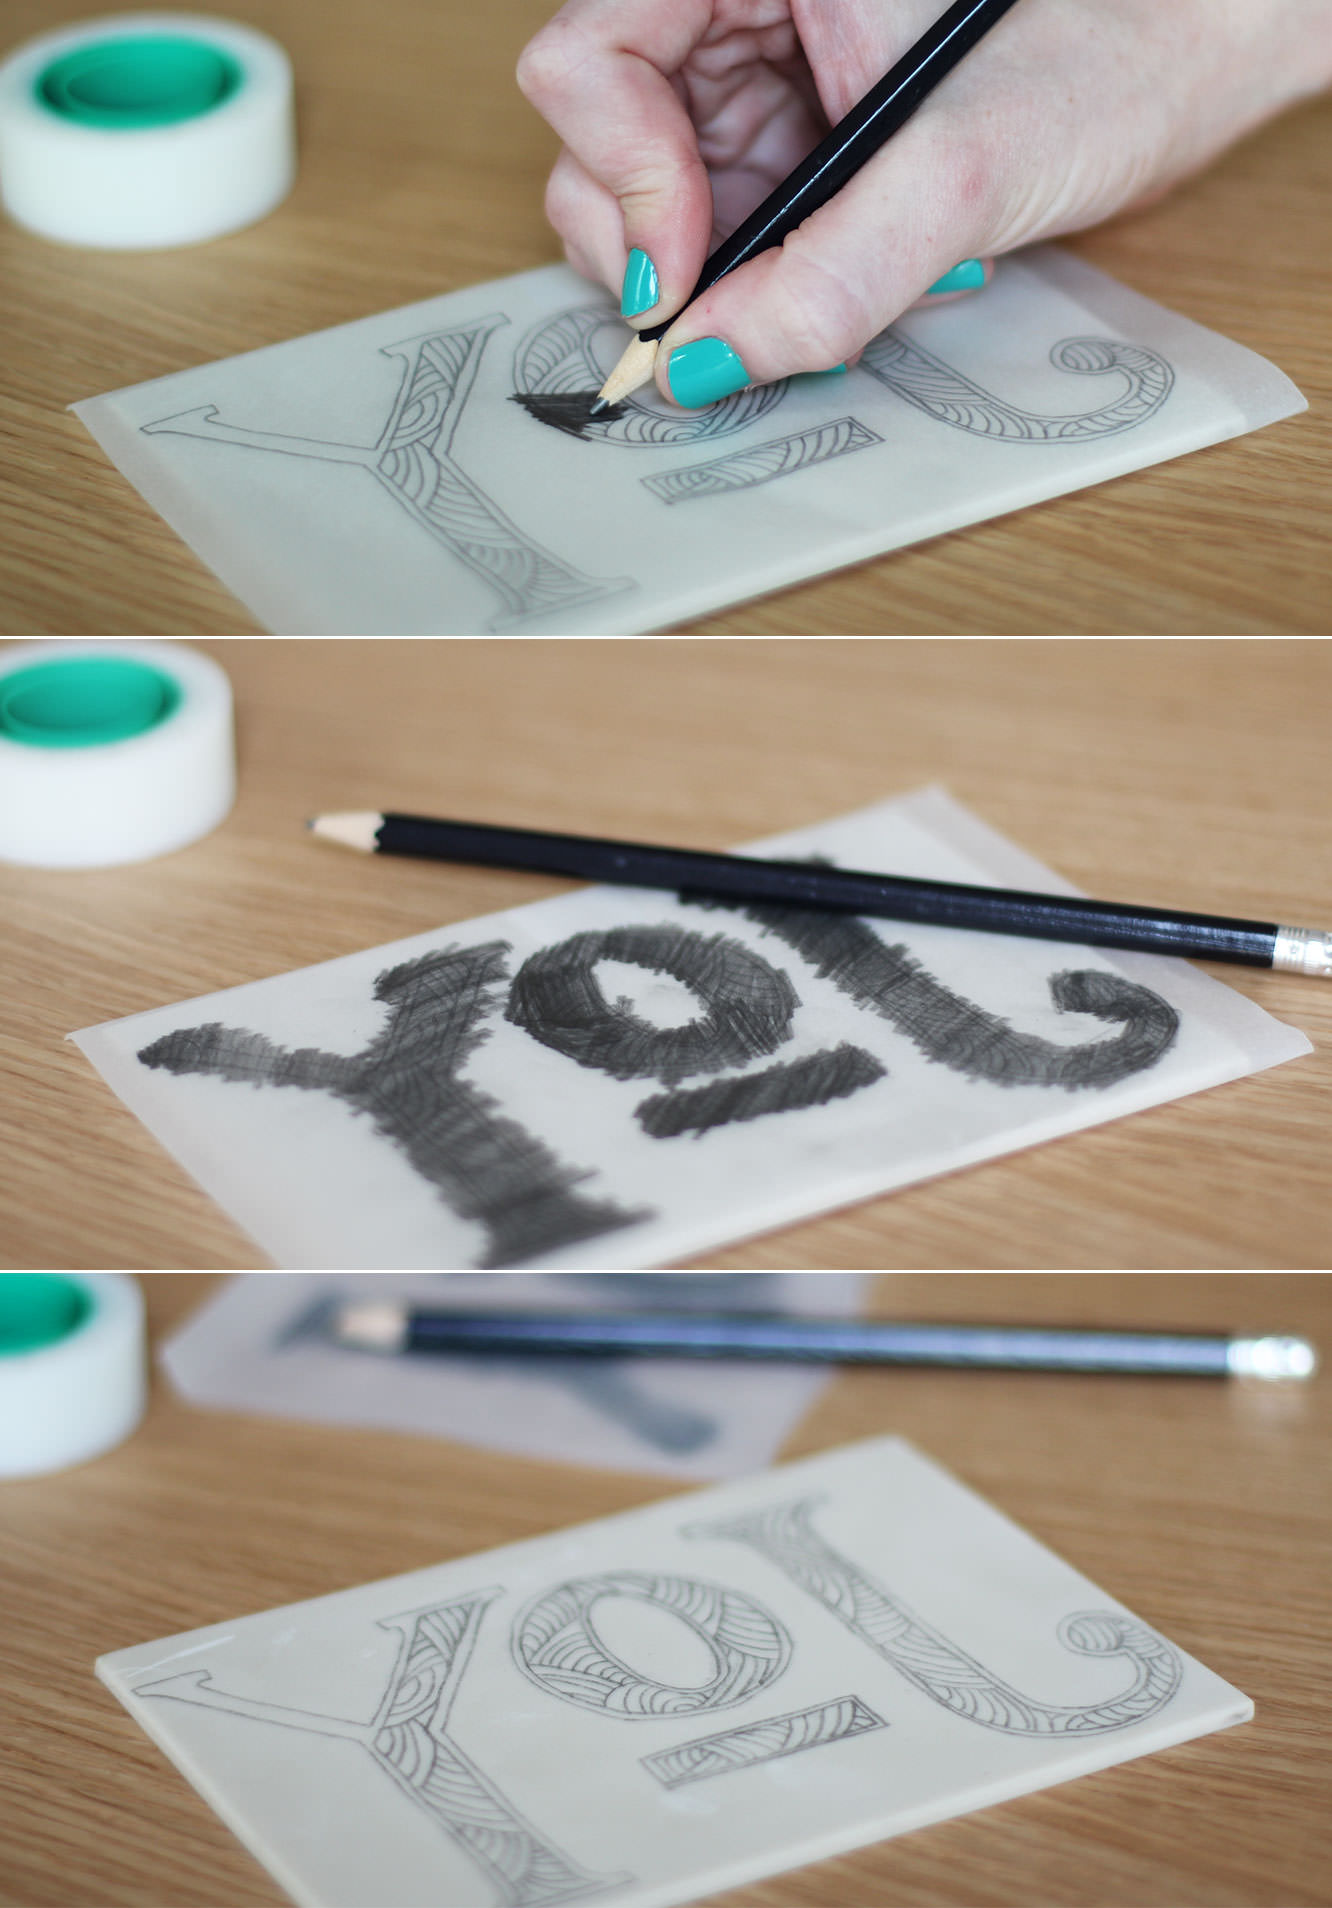
Step four
Place the traced image upside-down on your lino tile, so that the pencil marks you just made are touching the surface, not facing out.
Scribble over the top to transfer the image to the tile. Be careful to use pressure without being too forceful otherwise you might make an indent on the lino that you don’t want.
NB: As an alternative to steps 1-4 you might prefer to draw straight onto the tile. However, again, be careful not to press too hard with the pencil and remember that your design will be reversed when printed, so any lettering needs to be back to front.
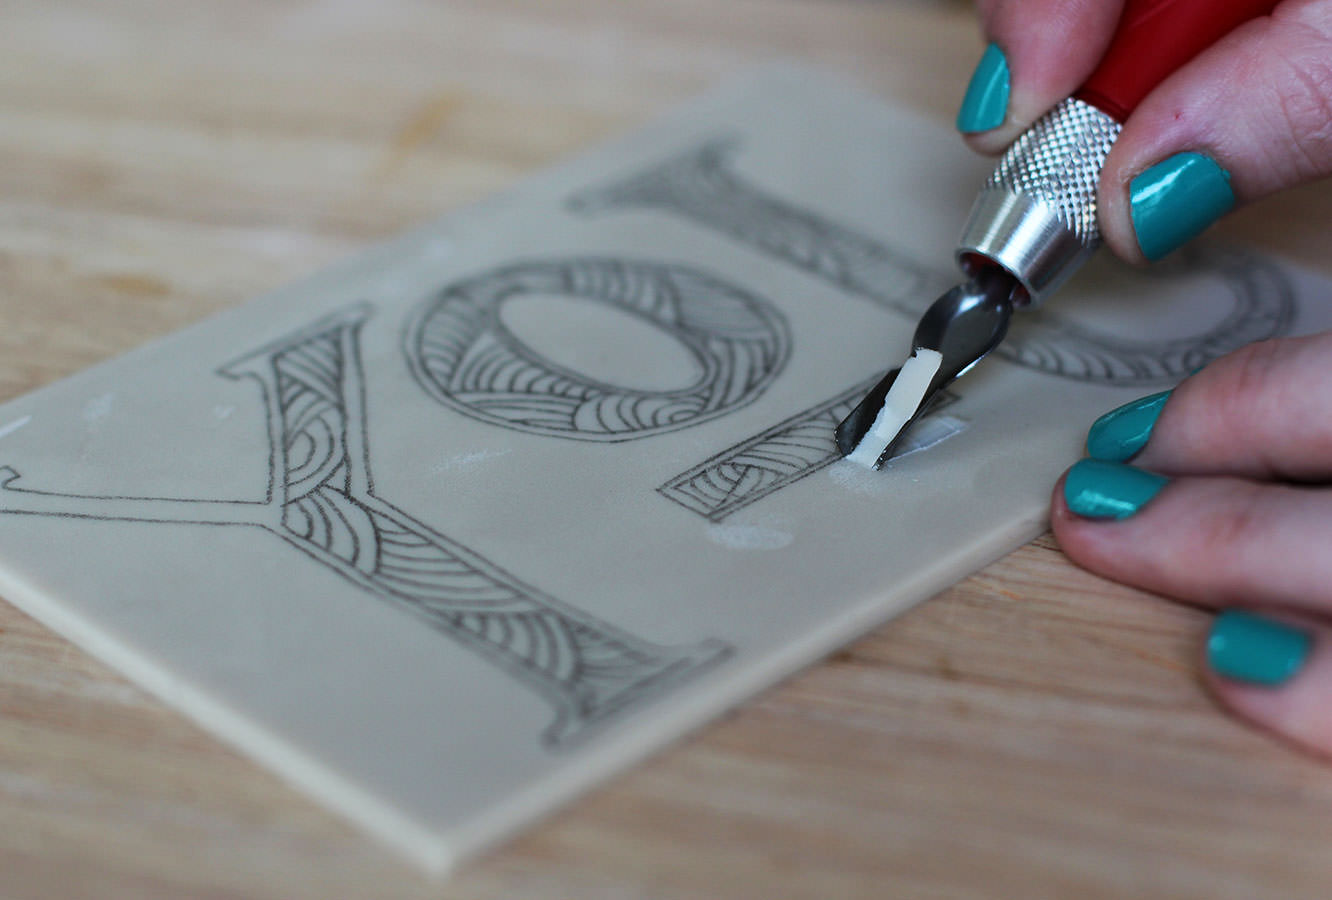
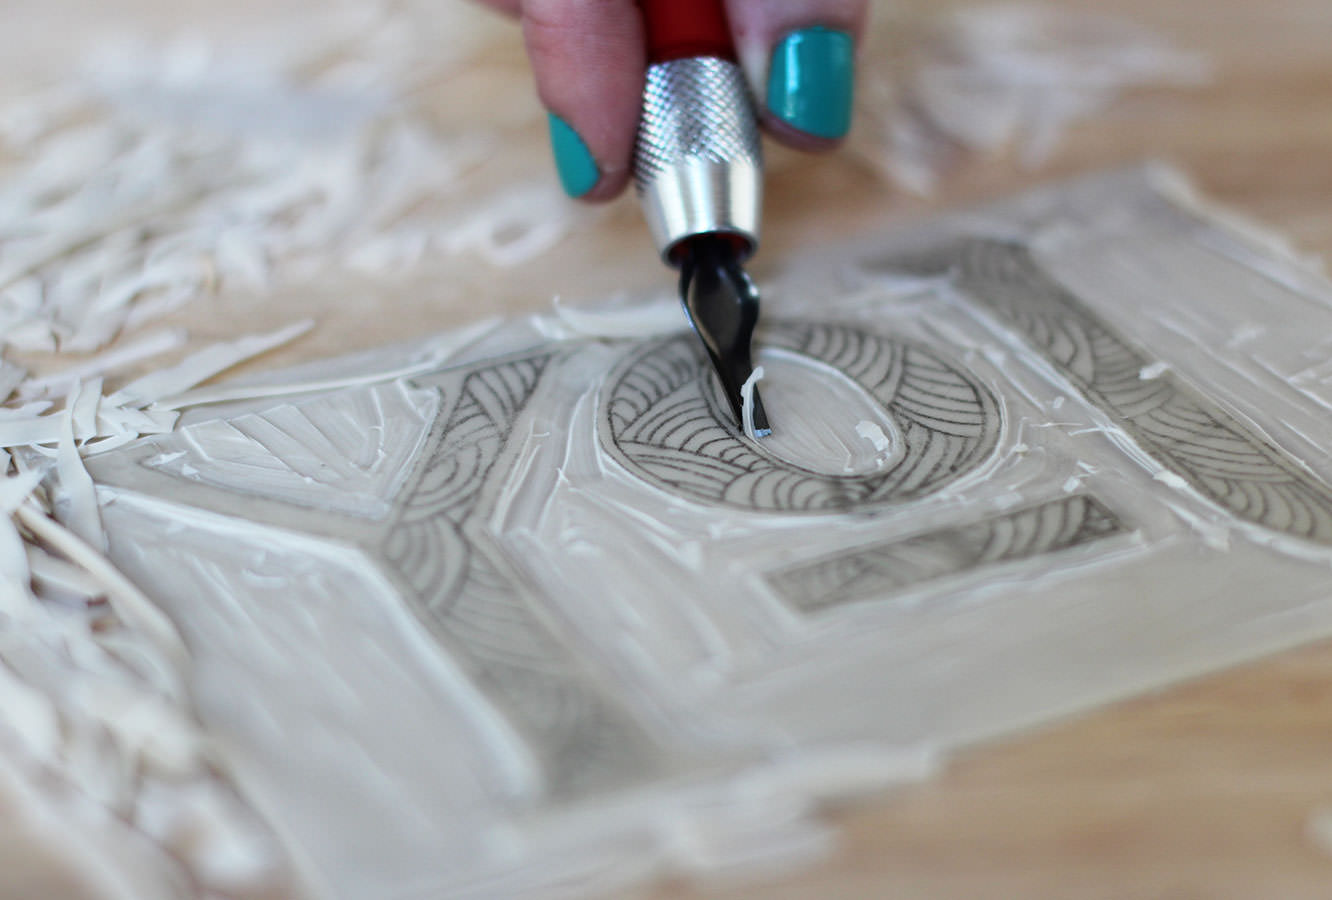
Step five
Place the lino in the middle of a chopping board. Nobody needs to go gouging any holes in their dining room table under my instruction thank you very much.
Using one of the wide cutters (labelled #10 in my pack) remove as much background space as you can. I started by making a gutter around my letters to avoid accidentally slipping into them.
My lino cutting skills leave a lot to be desired, but I’ll get better and so will you. Try not to worry too much if you accidentally cut something you’re not meant to.
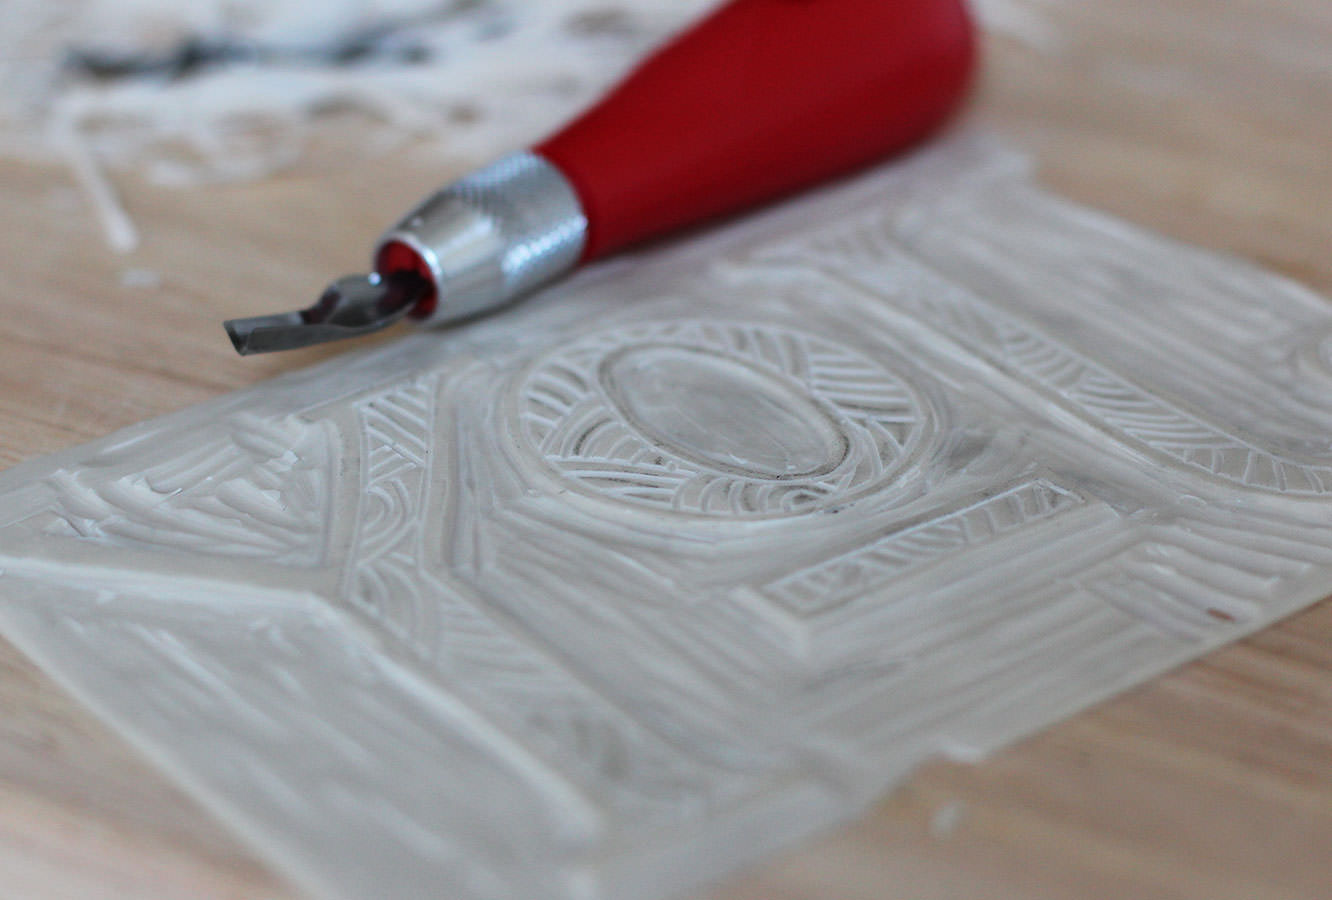
Step six
Using a blade with a deeper and narrower u shape (I think this was #9) refine the edges around your design, ensuring there’s a fair bit of depth around them.
Step seven
Using an even finer, deeper v shaped blade (#2 was my choice) cut out any details. Doing things in this order enables you to practice a bit before working on the finer aspects of your design.
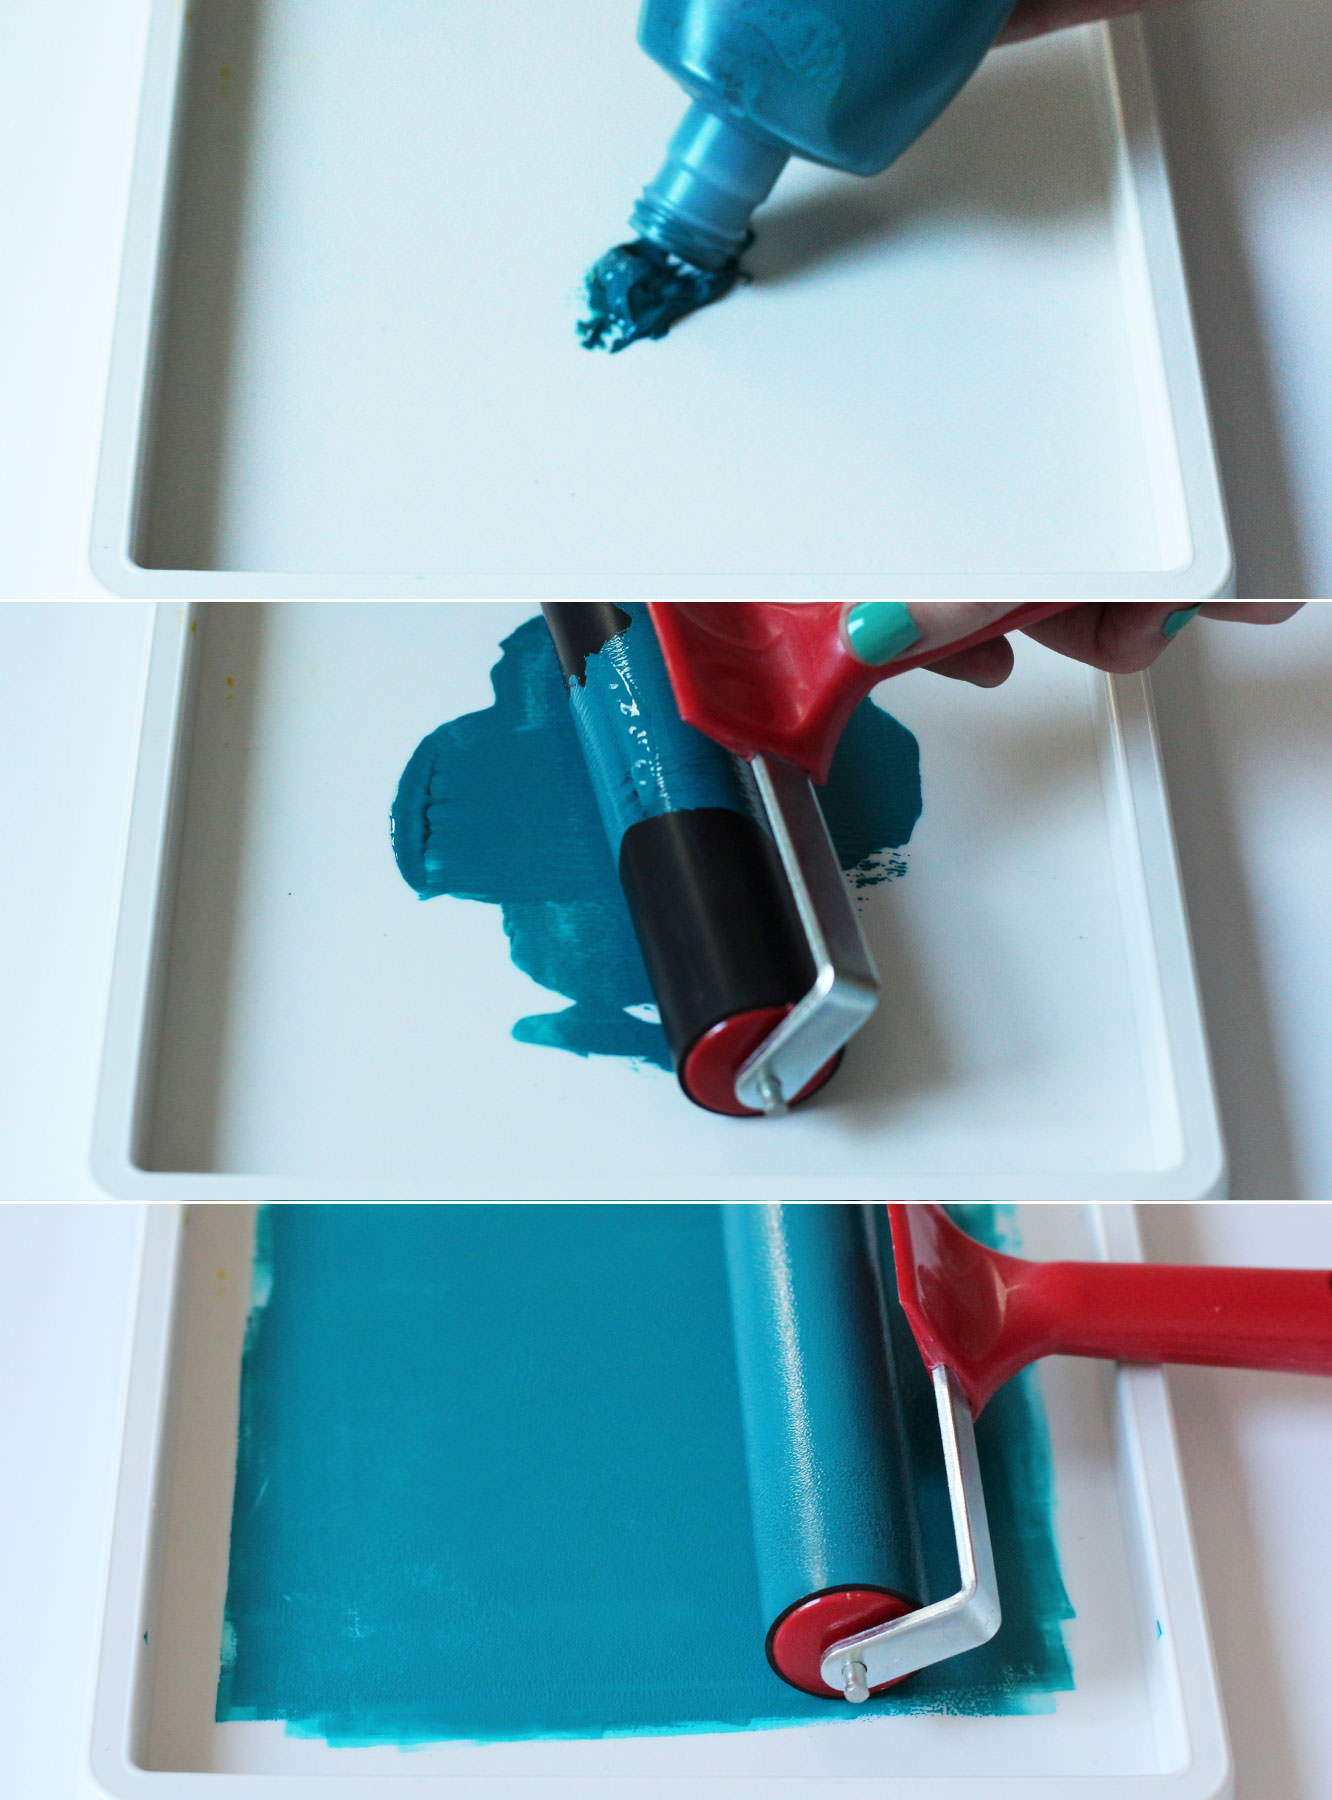
Step eight
Ink up your tray using a small splodge of ink and your brayer. You need less than you’d think so don’t over do it.
Roll the brayer back and forth until the ink looks like a smooth velvet. You’ll know it when you get there.
Step nine
Ink up your stamp by rolling the brayer back and forth. This took a bit more encouragement first time when the block was dry.
You can use the cutting tool to go back into the design where there’s ink and there’s not meant to be. I did that, and also lazily chopped a few corners off with scissors. Alternatively you can wipe excess ink with kitchen towel or even leave it there for that handmade look (which is pretty much unavoidable anyway).
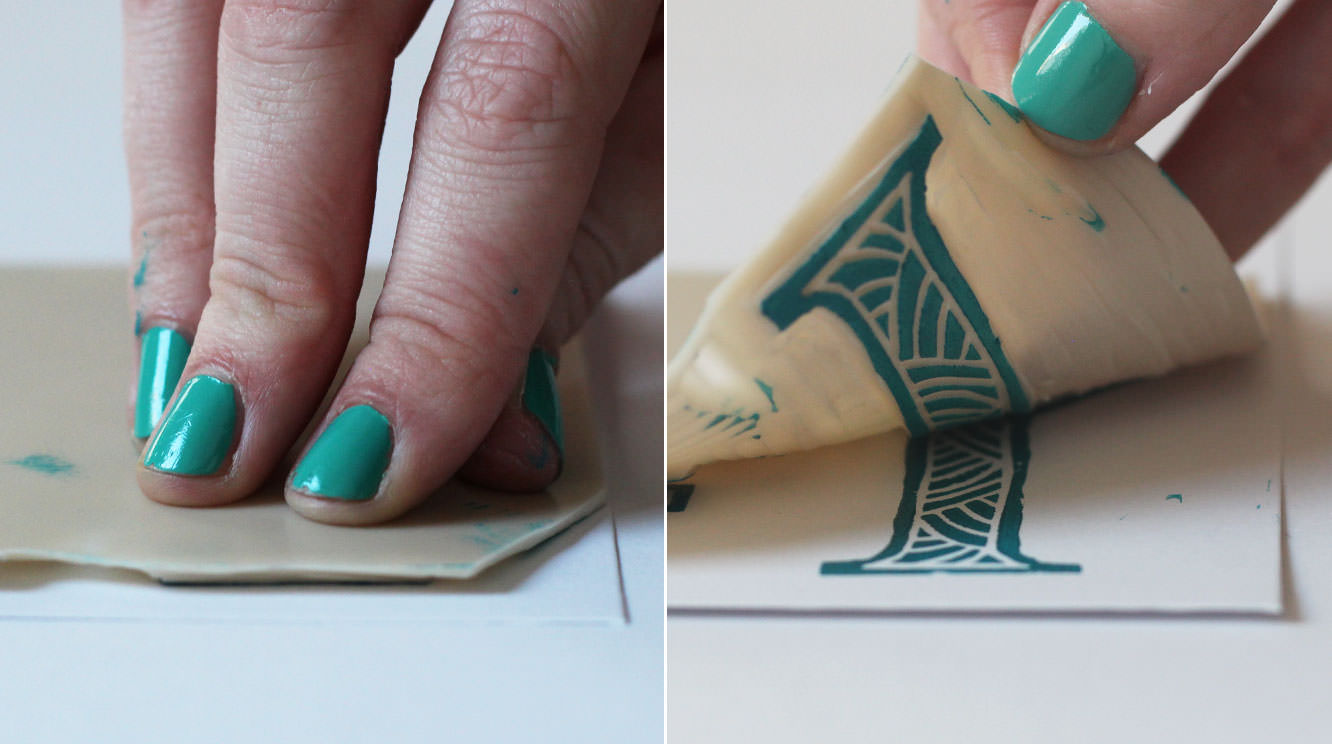
Step ten
Firmly press your stamp onto the surface of a blank greetings card or your chosen back drop. I paid particular attention to pushing down the areas I knew there was design. You can always peel it back to take a peek or put a book on top and push on that to ensure an even press.
You could do some prints and frame them as gifts if you don’t fancy cards.
Step eleven
Ink back up and print away to your heart’s content.