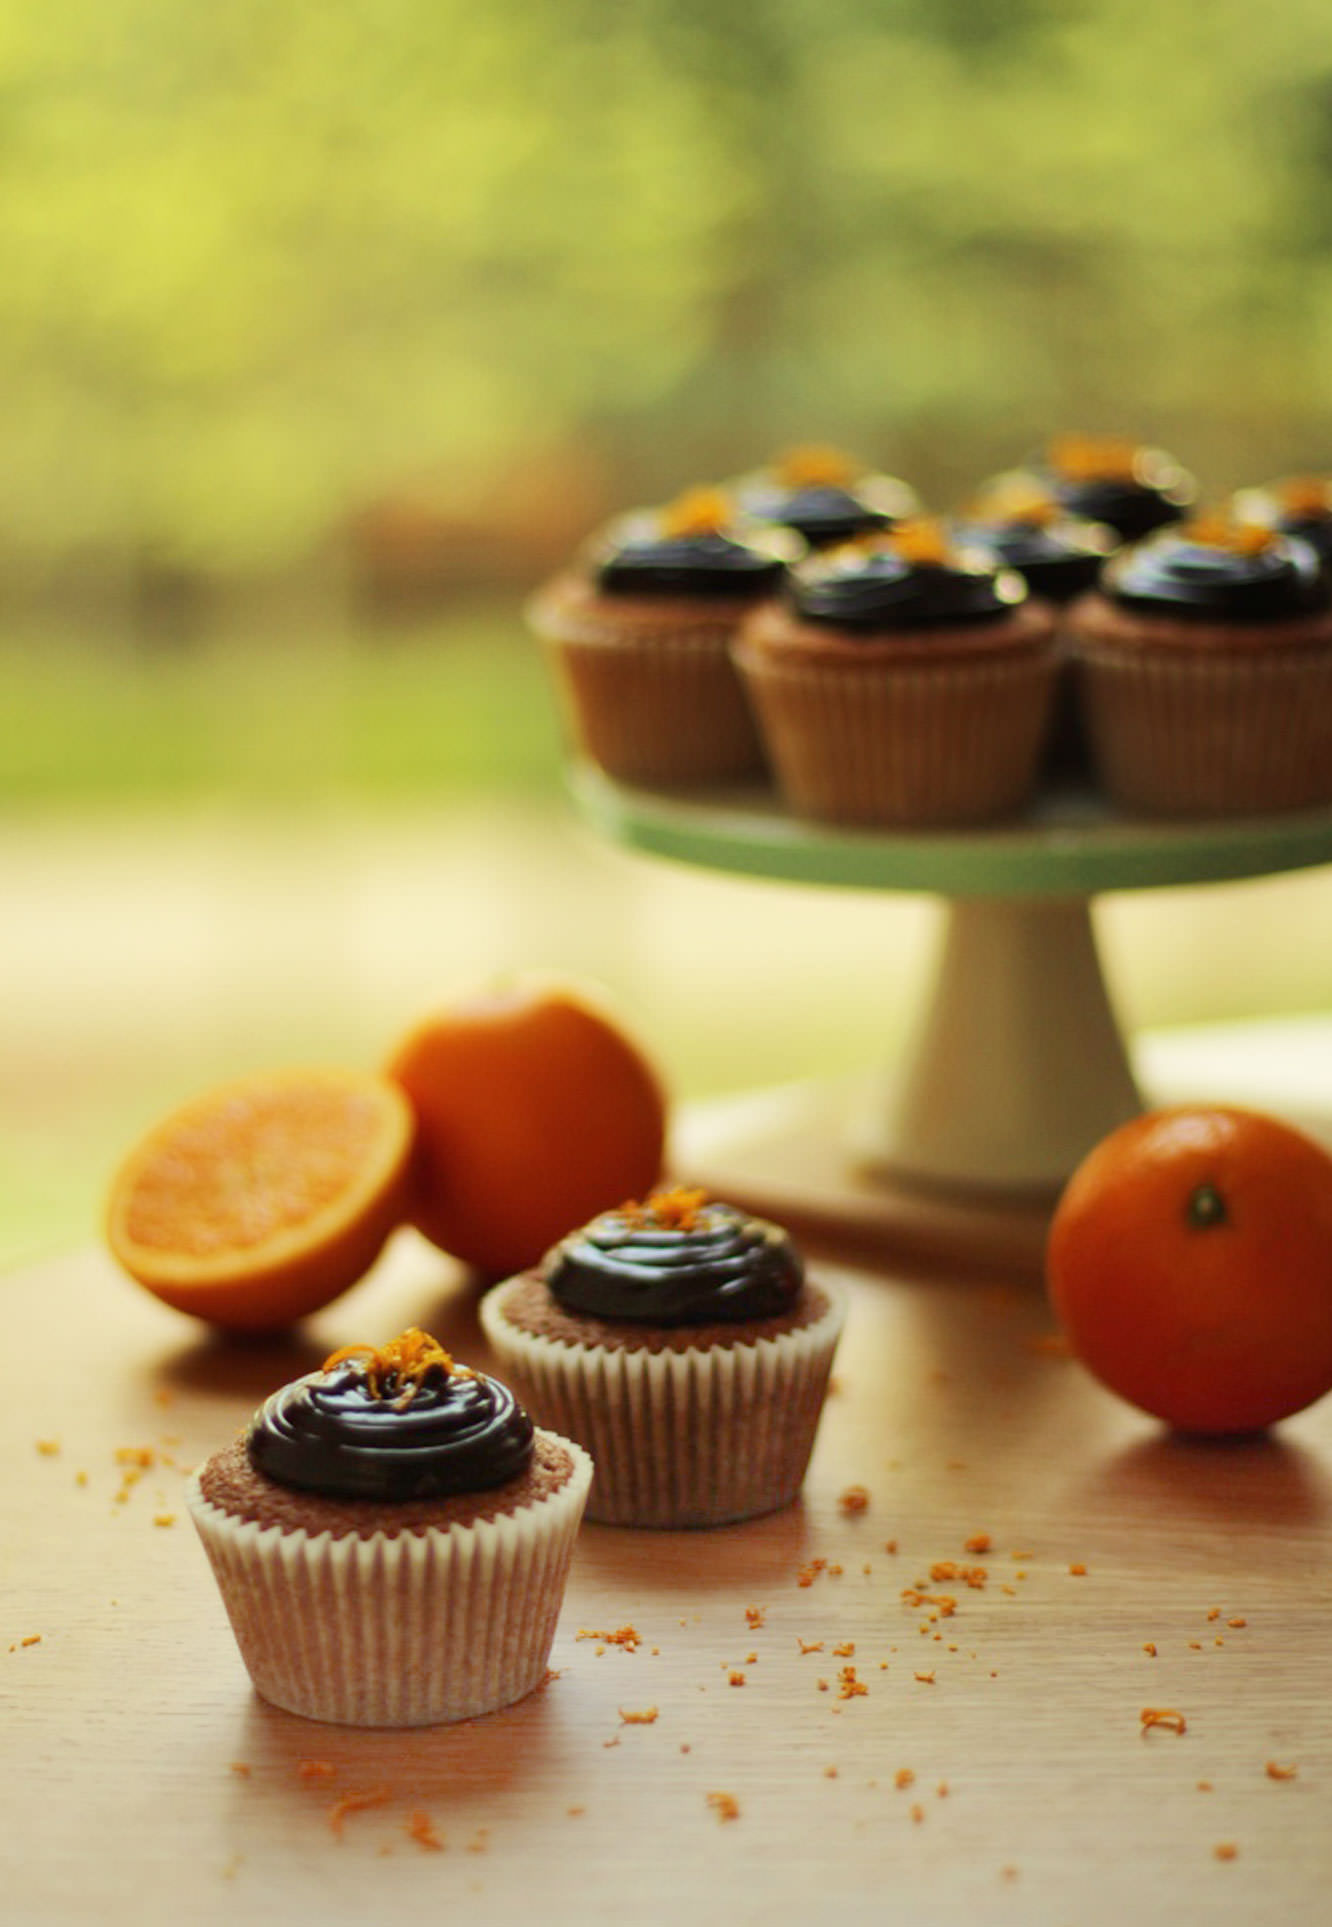
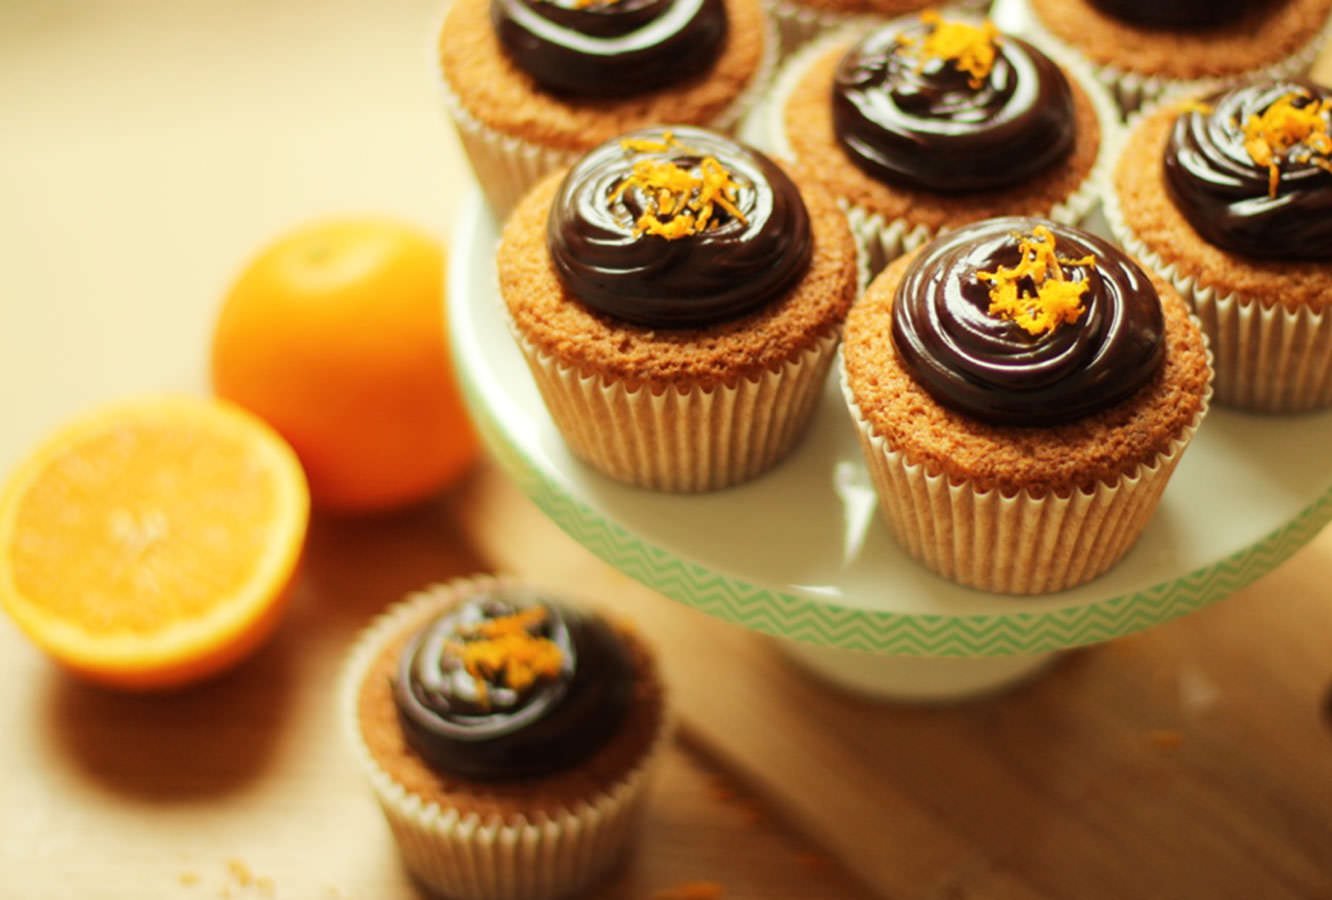
Week two of the British favourites series. One of the most heavily contested treats in GB, it had to go to court in 1991 to establish once and for all if it were a cake or a biscuit to make sure McVitie’s (its creators) were in the right tax category.
This version is 100% a cake and I dare say my favourite of this series, though there are a few still to be baked, so we’ll see.
Though this recipe contains an orange curd and a chocolate ganache it’s actually pretty easy to make, and has been met with universal approval by all who have consumed, so please don’t be put off.
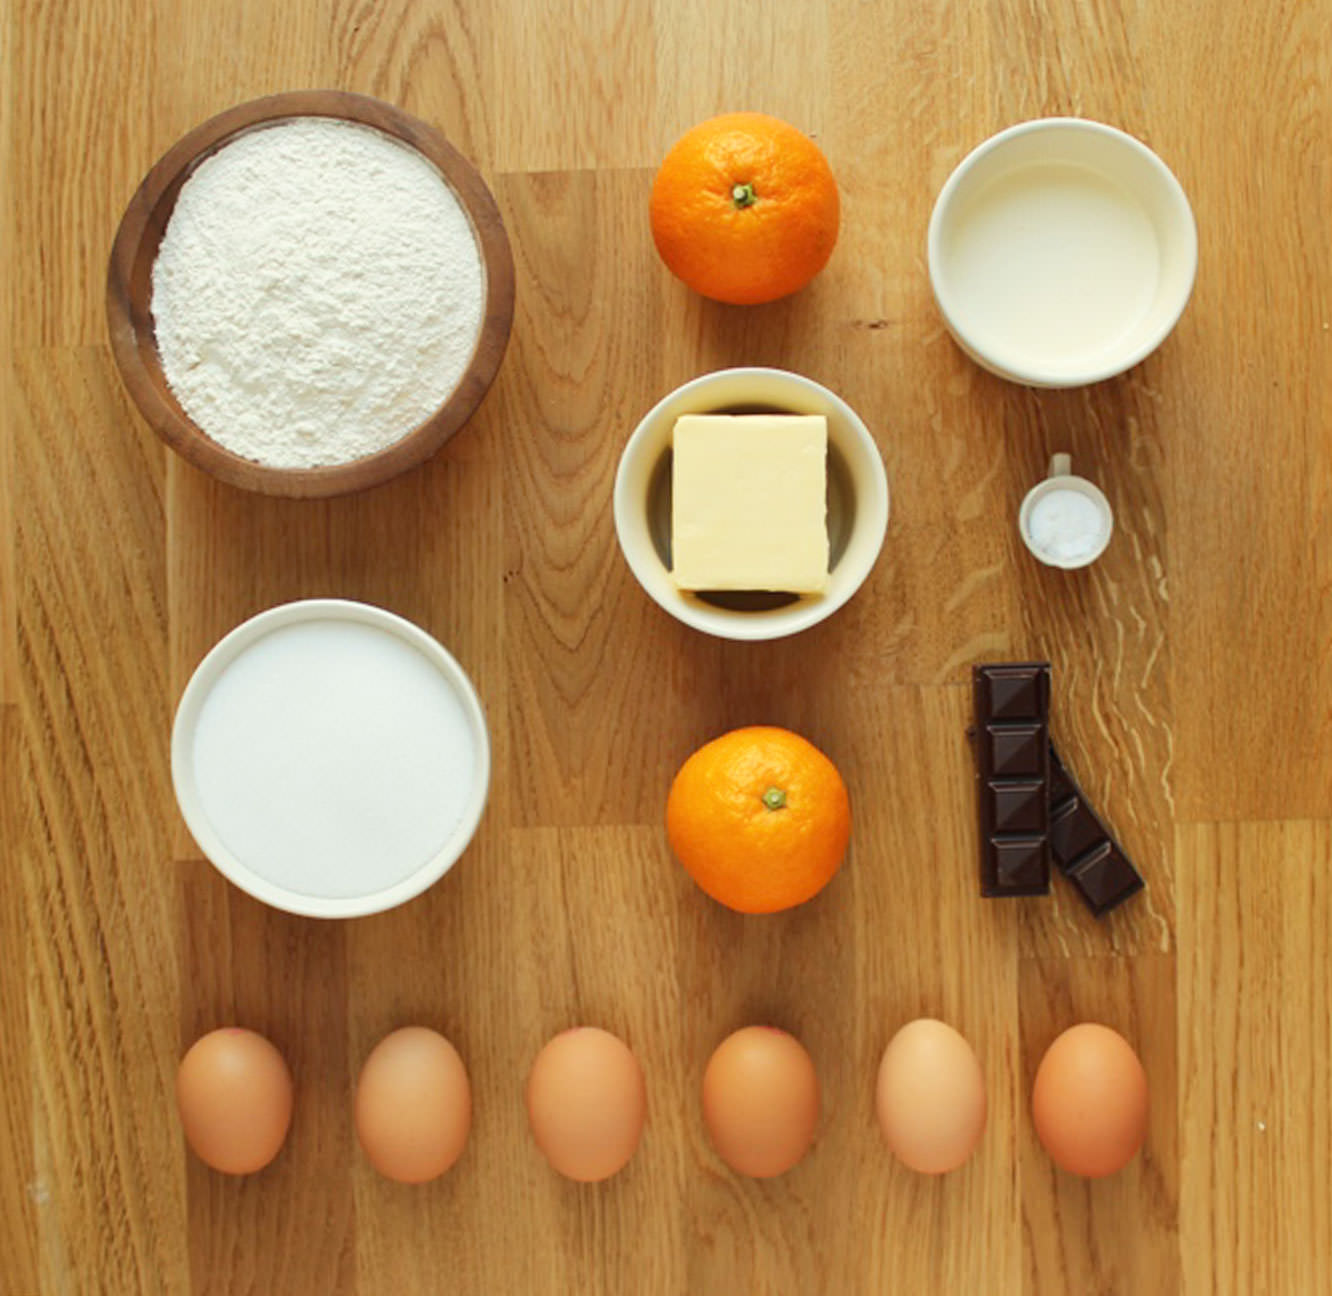
You will need
For the cake:
185g/6.5 oz self raising flour
185g/6.5 oz butter/margarine (I use Stork)
185g/6.5 oz caster sugar
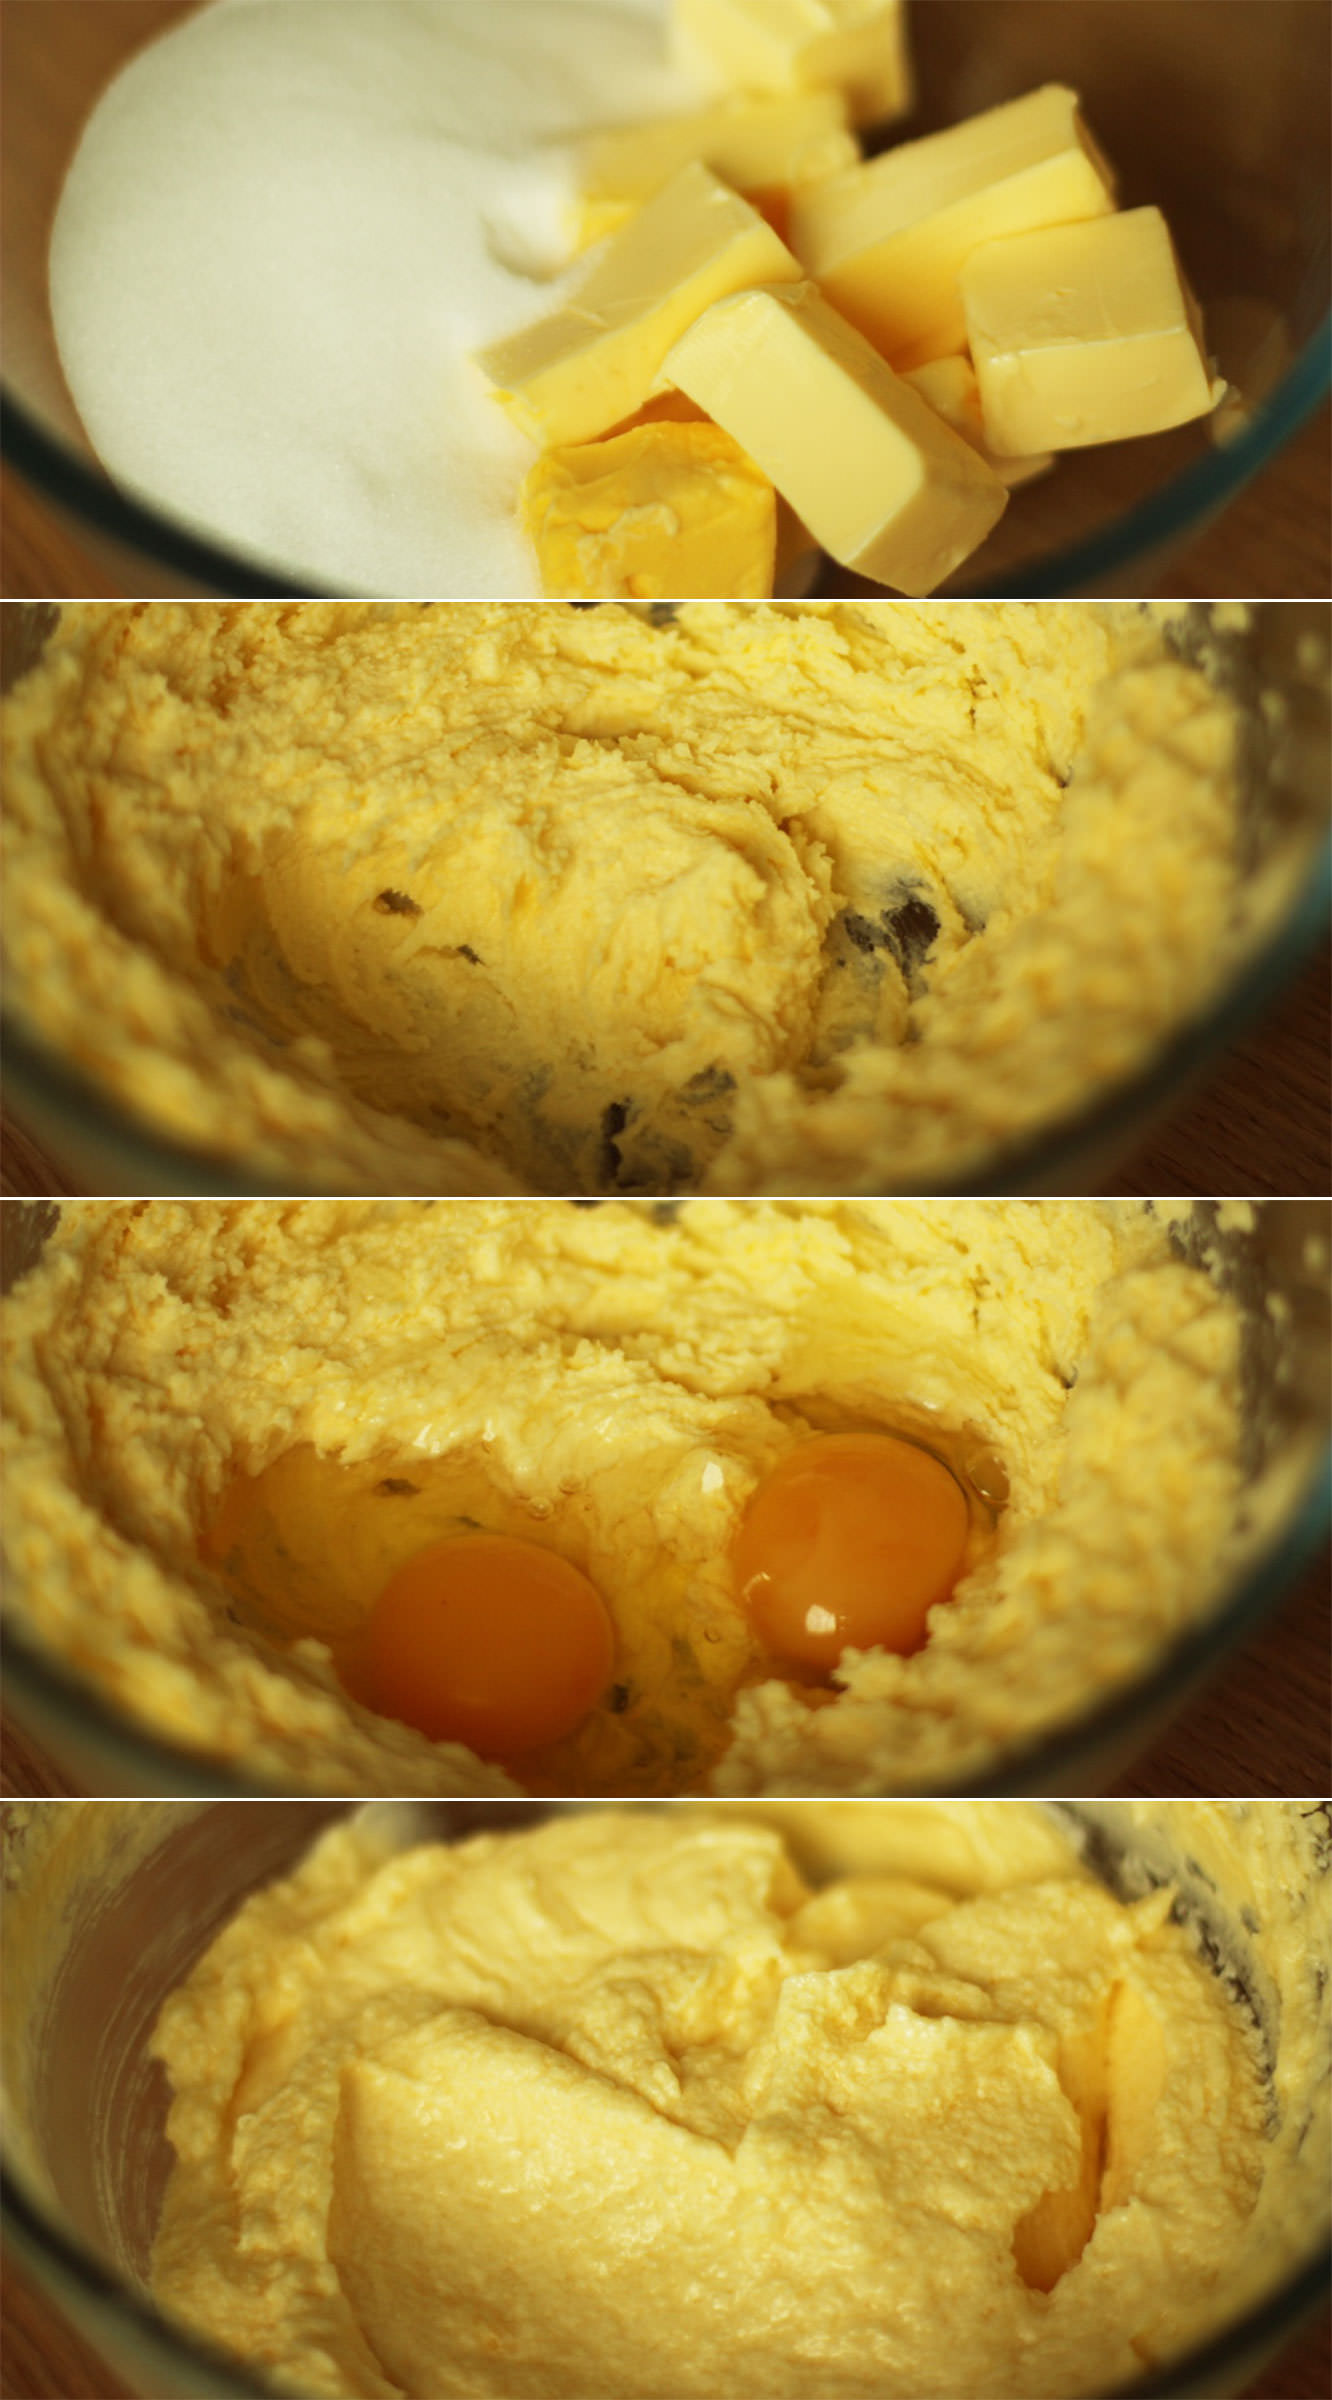
3 eggs
1 tsp bicarbonate of soda
1 tsp vanilla extract/paste
For the orange curd:
2 whole eggs
1 egg yolk
85g/3 oz caster sugar
60g/2 oz butter
90ml/3 fl oz freshly squeezed orange juice (2 oranges should do)
Zest of one orange
For the ganache:
150ml/5 fl oz double cream
200g/7 oz dark chocolate
(makes 12)
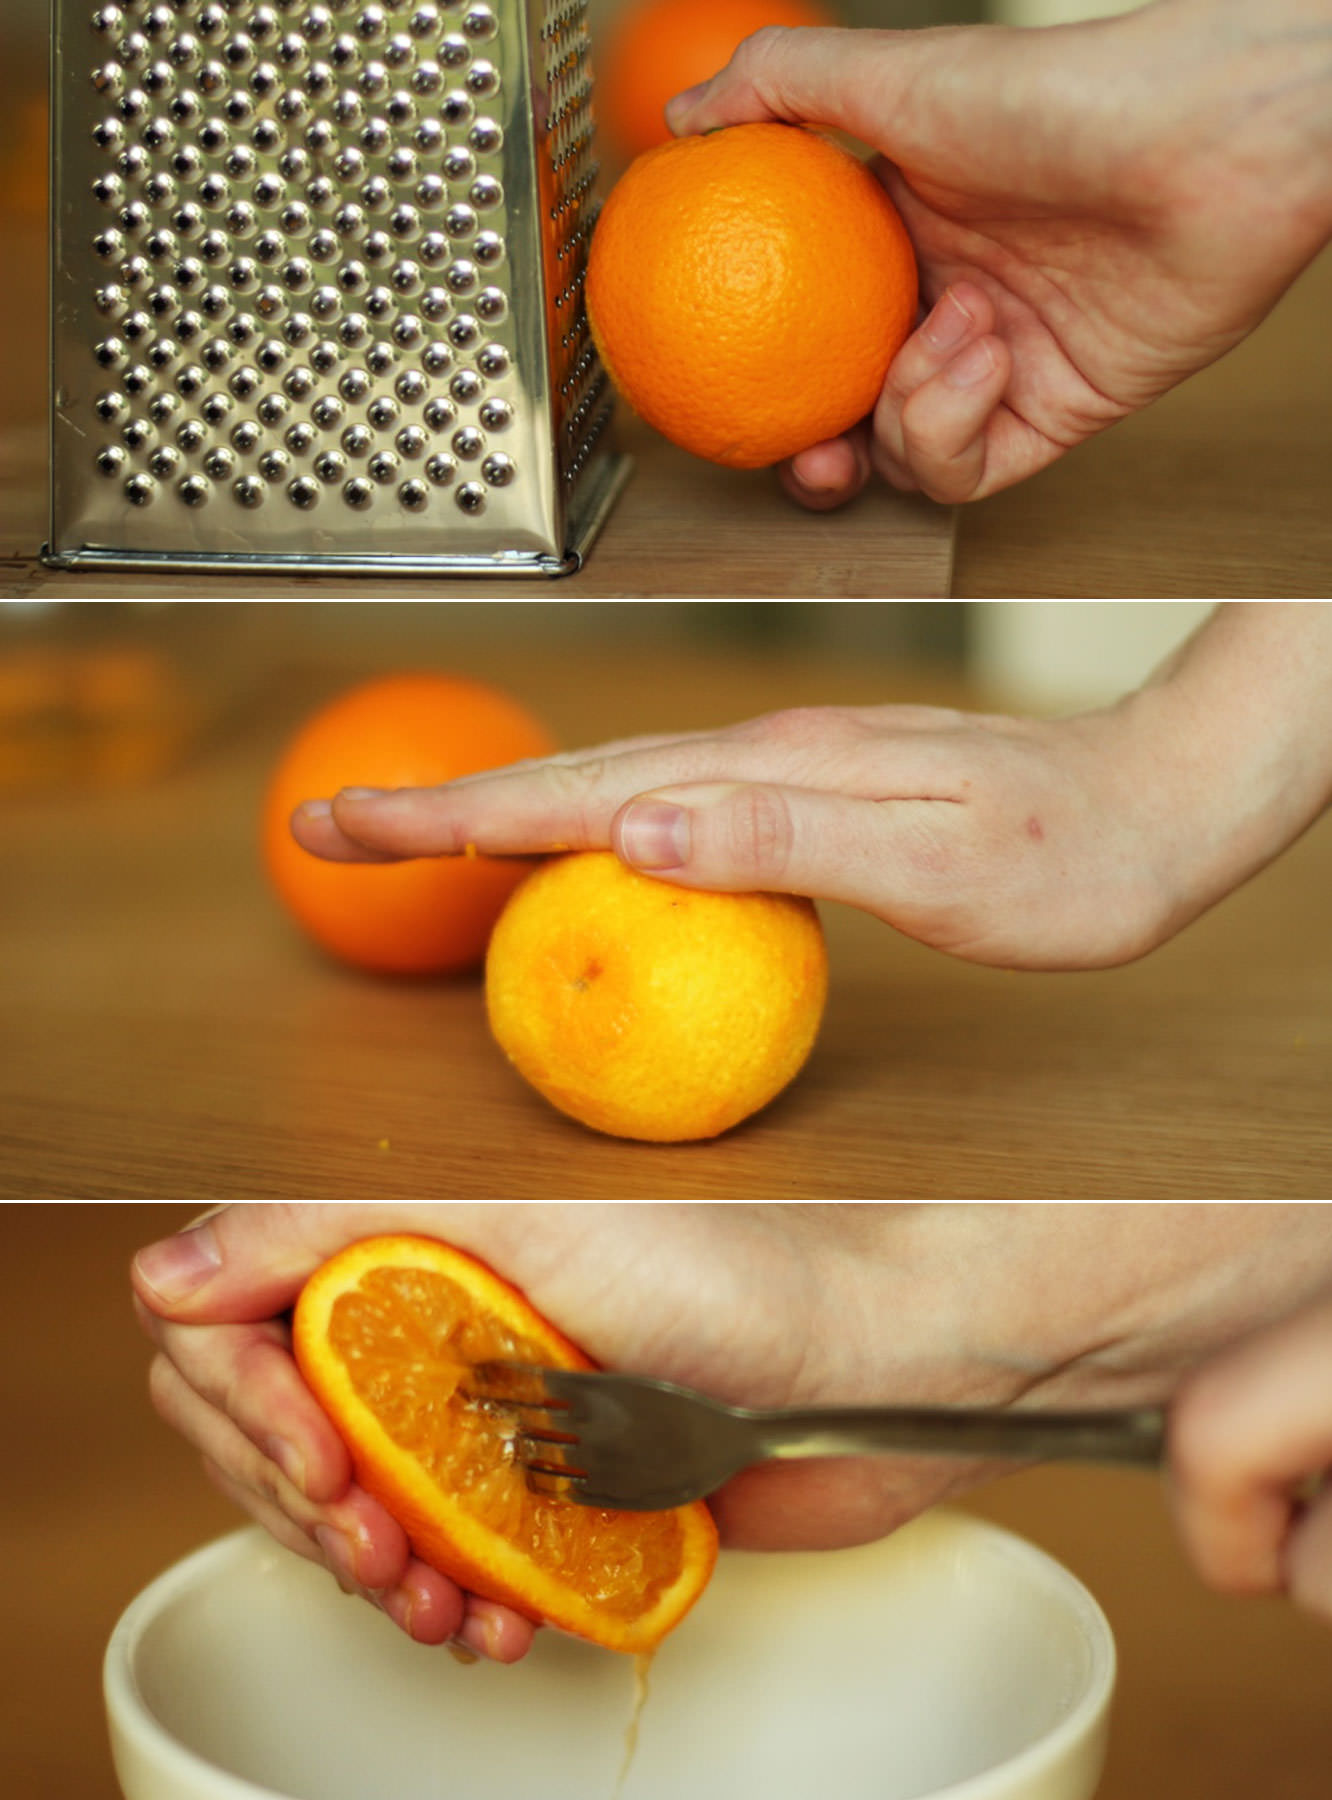
Step one
Zest one of the oranges on the smallest setting of your grater. If you don’t have a small setting don’t worry, we’re going to sieve it later. If you don’t have a small setting or a sieve then you’re stuffed, and a little odd.
Step two
Roll the oranges around to release the juices a little more. I also give them 10-20 seconds in the microwave.
Juice them using a juicer or a fork until you have the required 90ml.
Step three
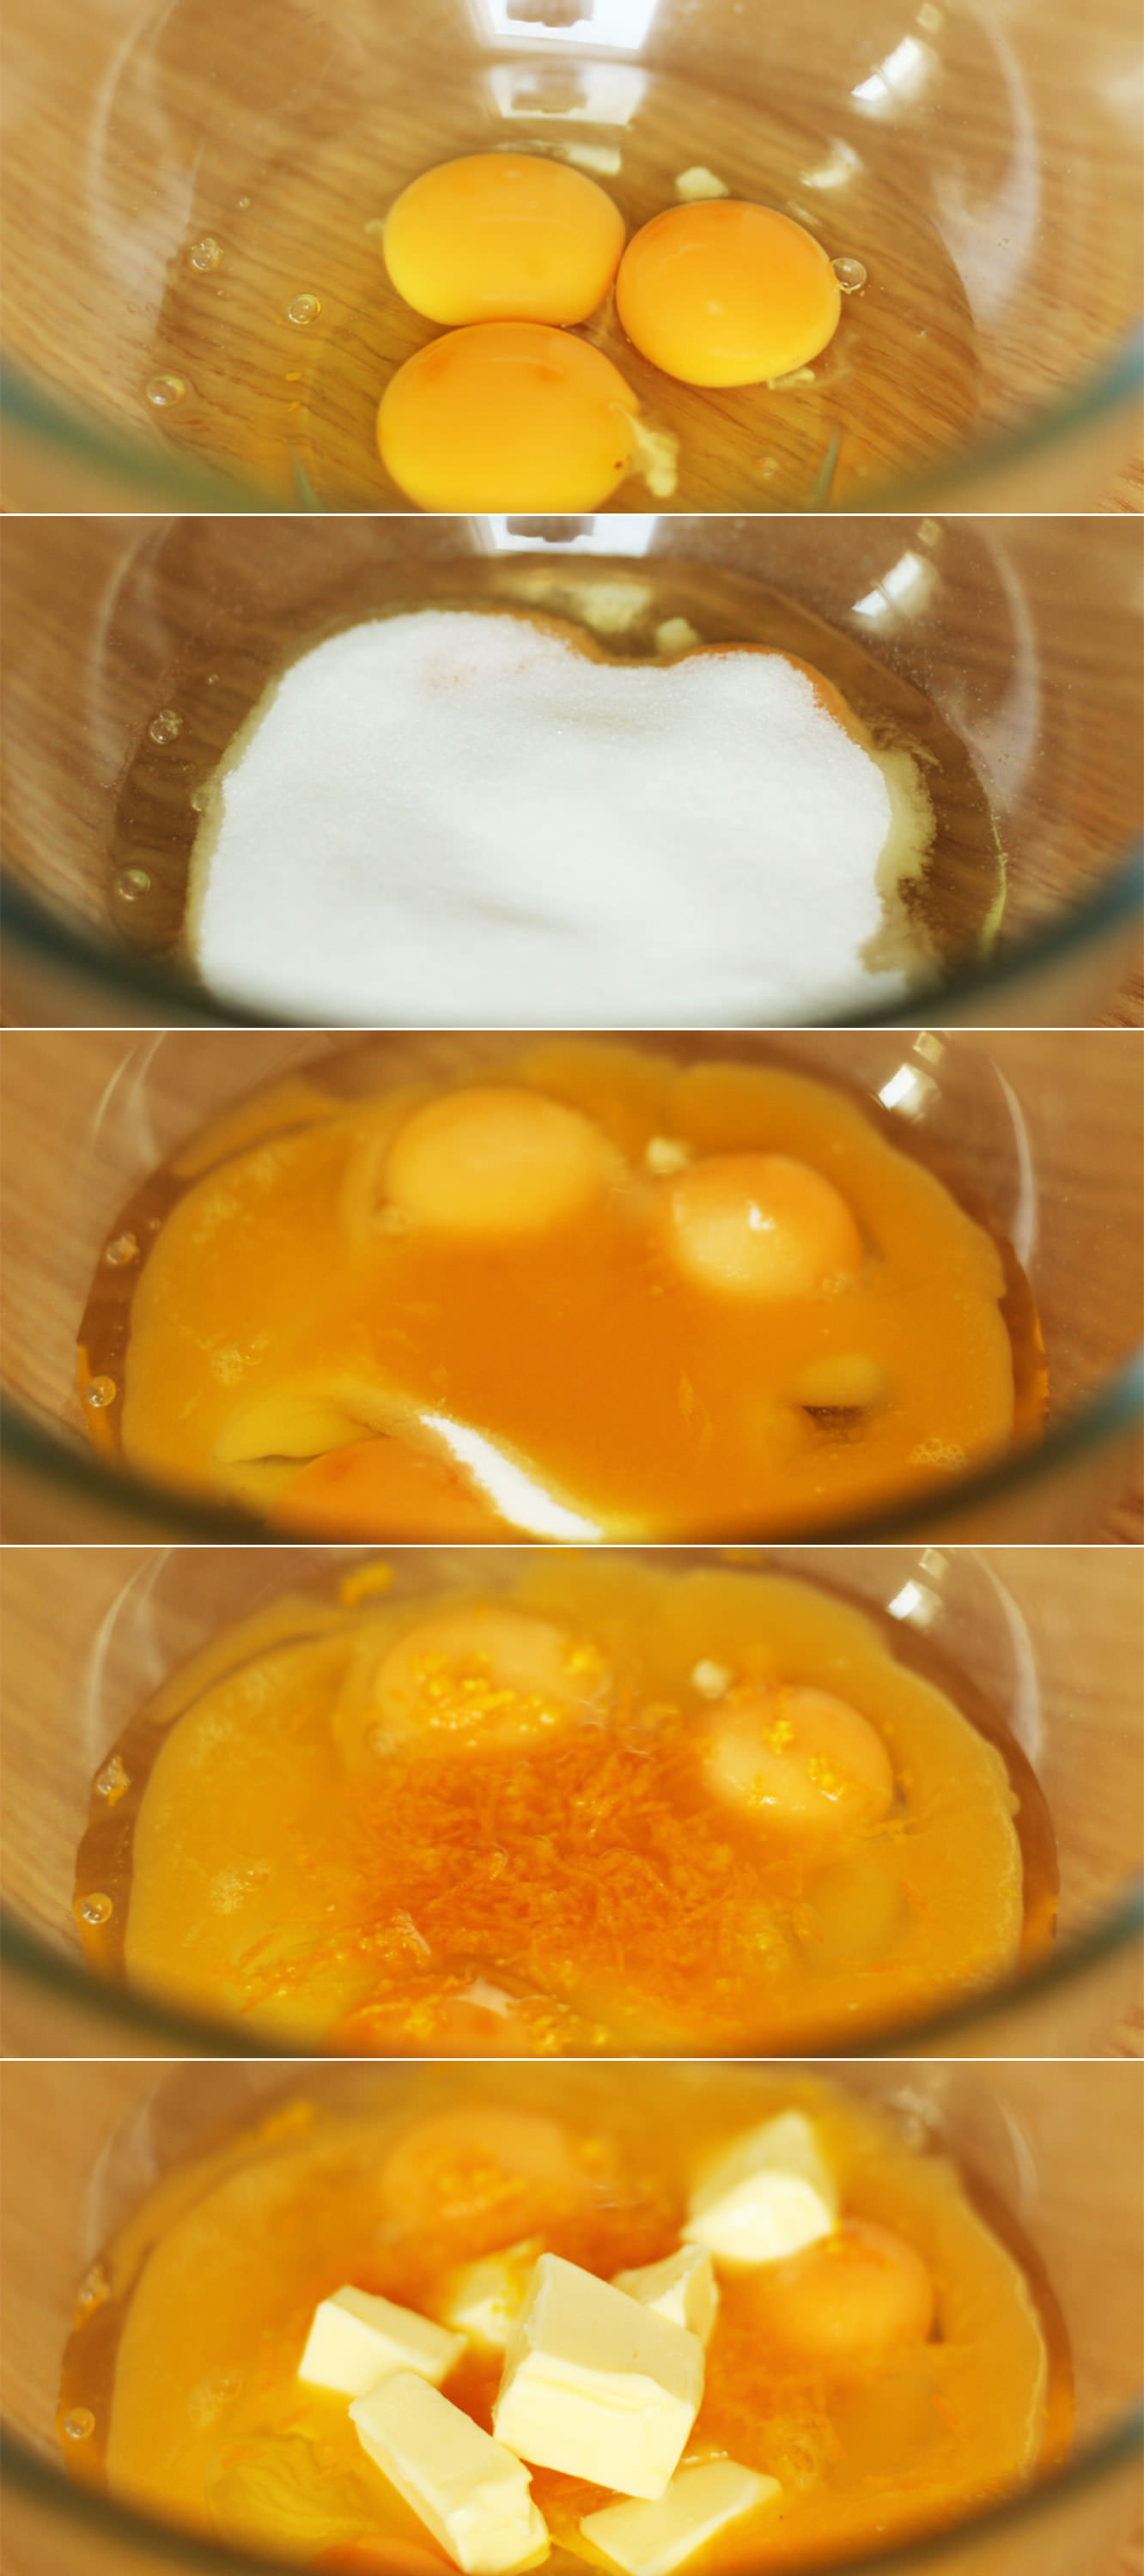
Combine the eggs and yolk, sugar, butter and the orange related ingredients into a heatproof bowl.
Set aside a little bit of zest aside to decorate with later.
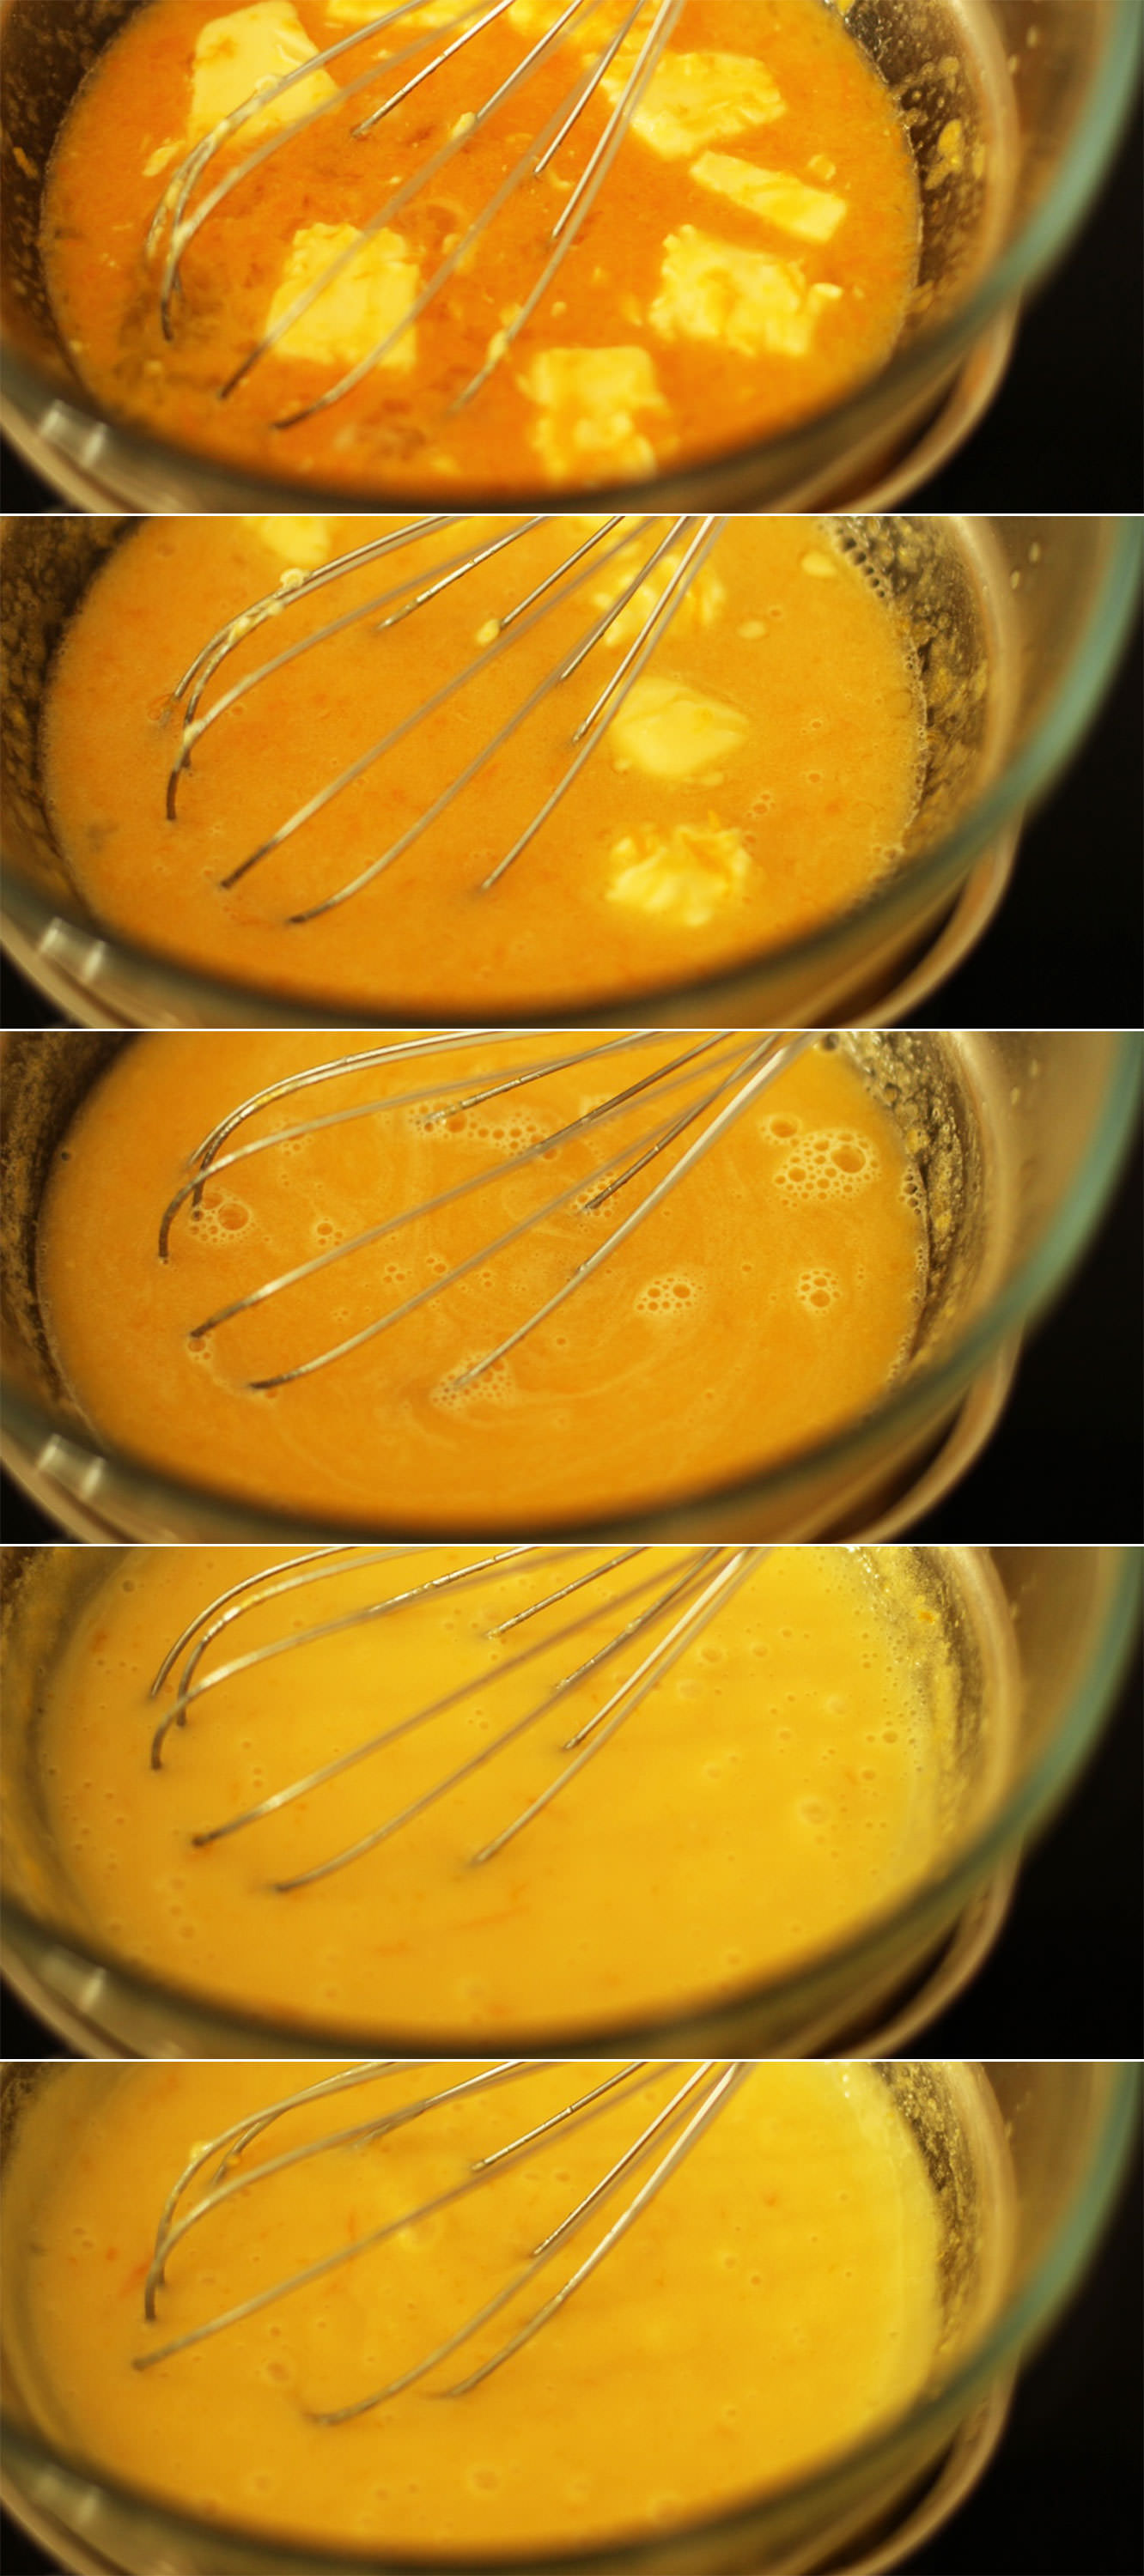
Step four
Place the bowl on top of a pan of simmering water. Stir regularly with a whisk until the mixture thickens. It should coat the back of a metal spoon without sliding off and will be fairly opaque and lighter in colour too.
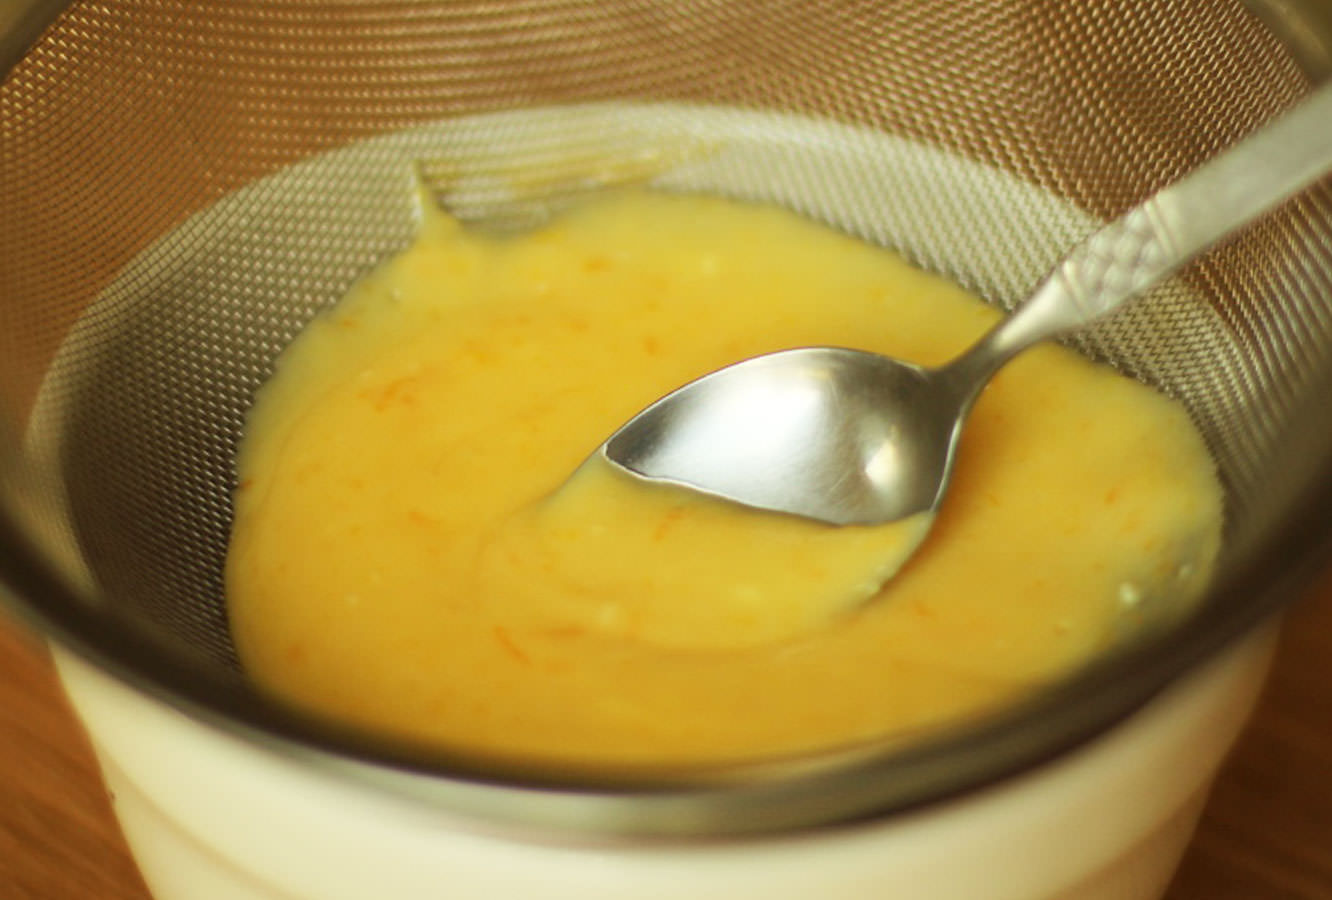
Step five
Sieve the mixture to remove the zest. Stir with a dessert spoon to get as much of the mixture through the sieve as possible.
Step six
It’s time to make the cakes! This is a basic sponge recipe as the base of a jaffa cake is not flavoured per se. If you want an extra boost of flavour you could zest the second orange and add it to the cake batter. I’ve not actually tried this (though I expect it would be nice) and they are good without so not to worry if you don’t fancy it.
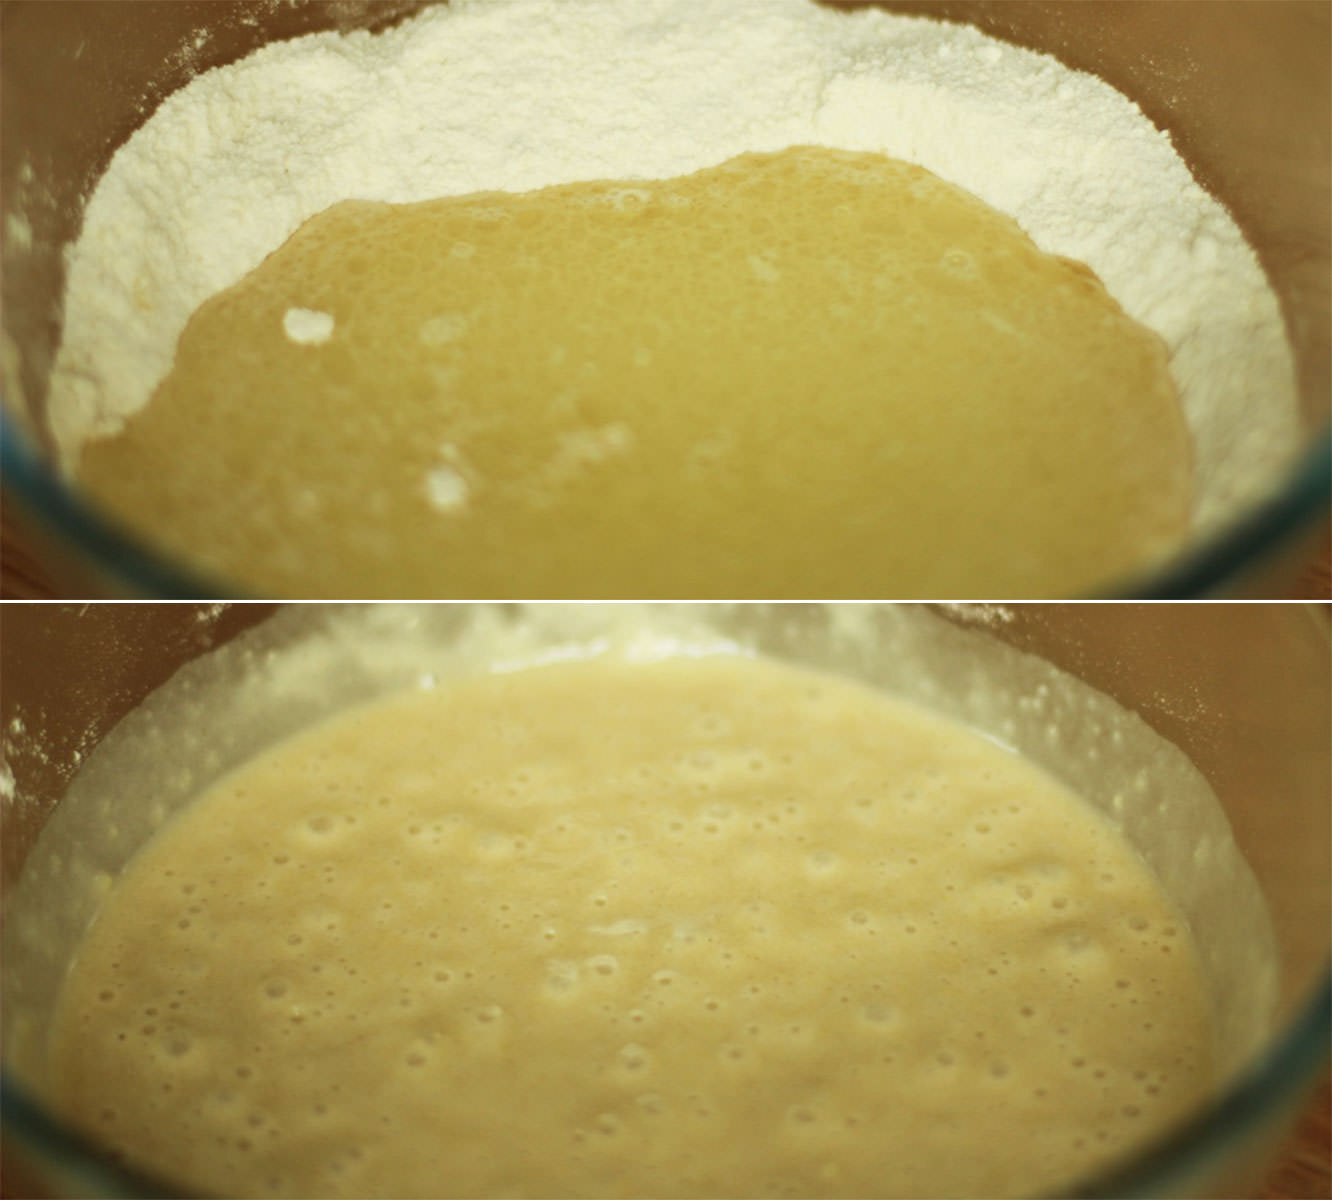
Combine the butter/margarine and the caster sugar. Using an electric whisk beat until smooth and fluffy. Add the eggs and whisk again.
Step seven
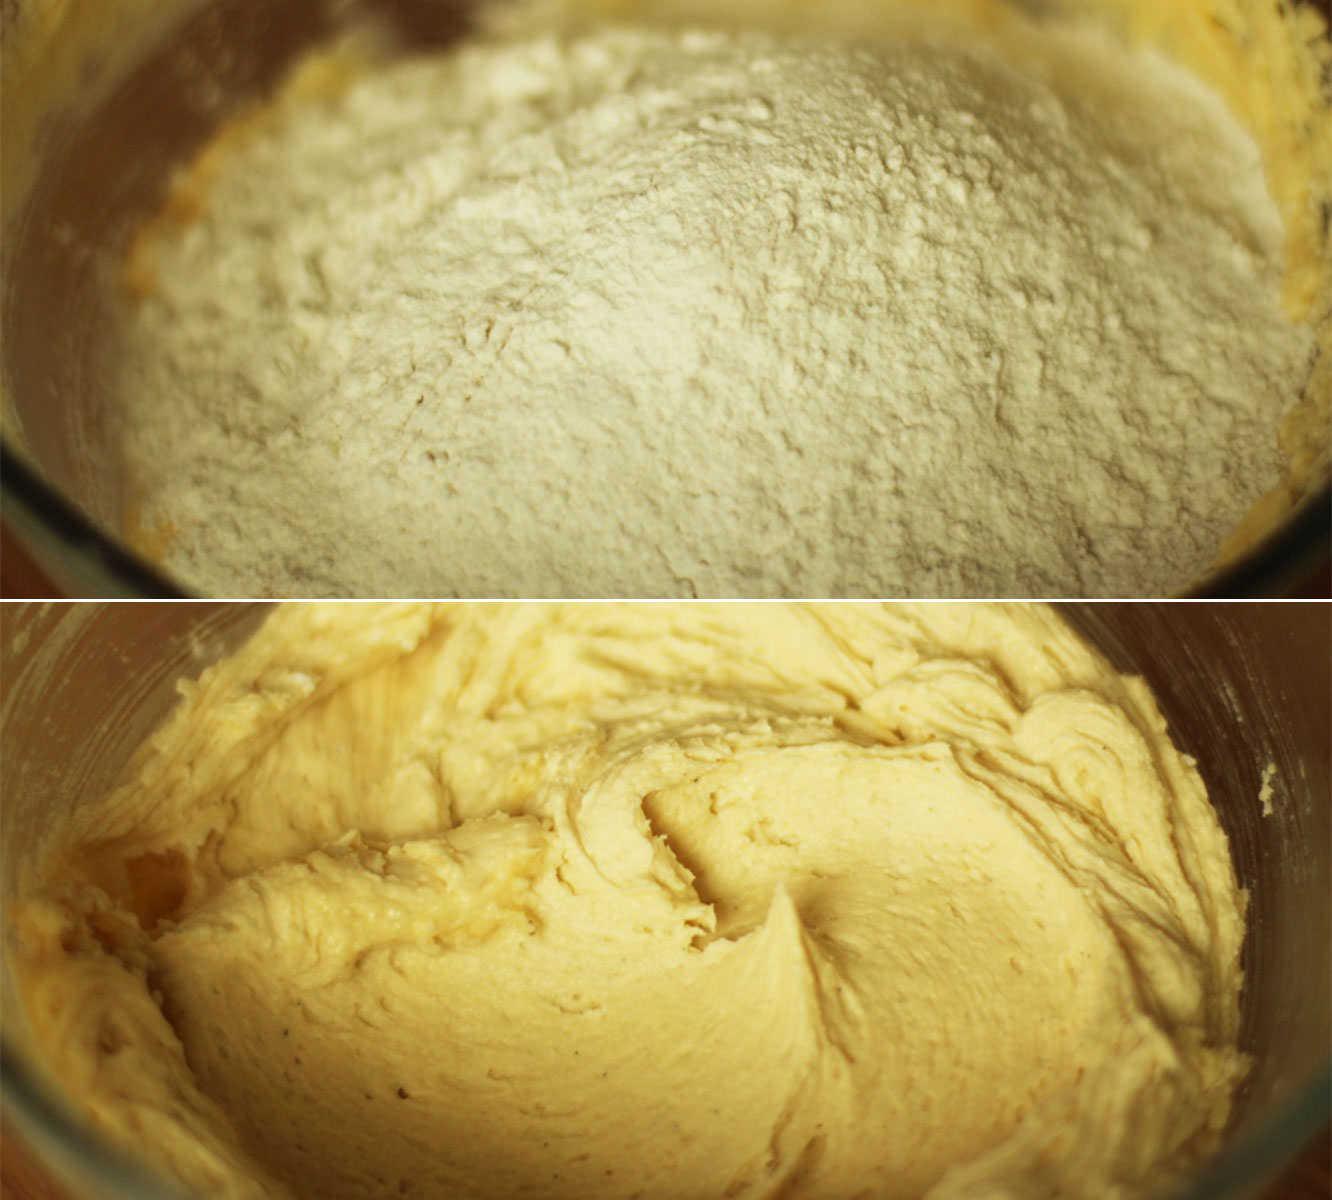
Beat in the flour, bicarbonate of soda and vanilla until fully combined.
Step eight
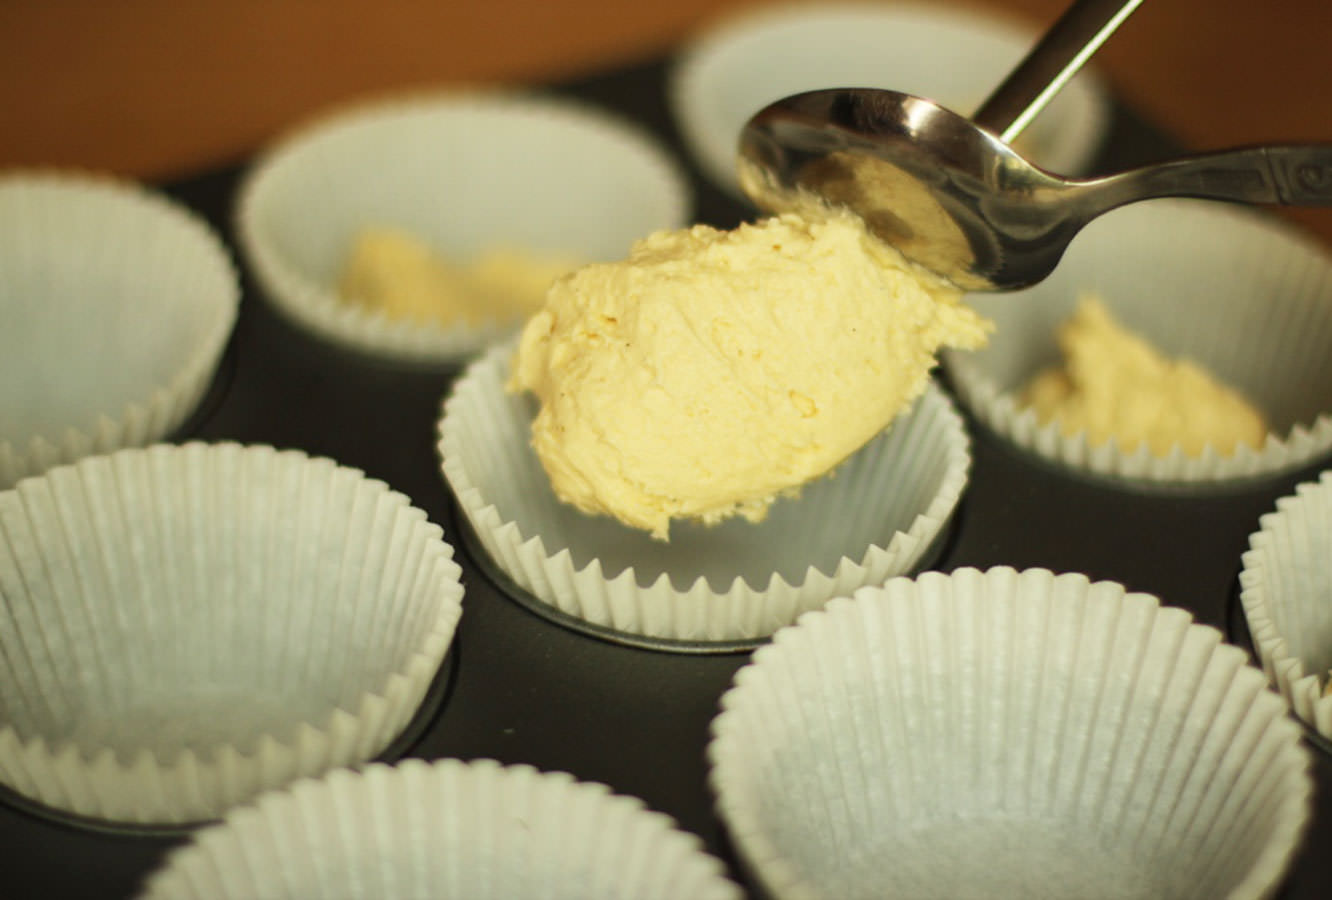
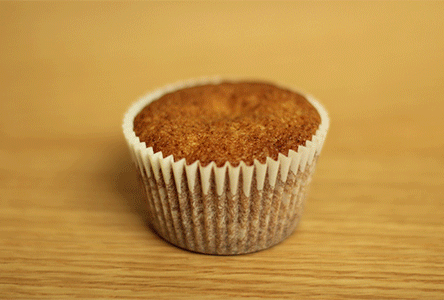
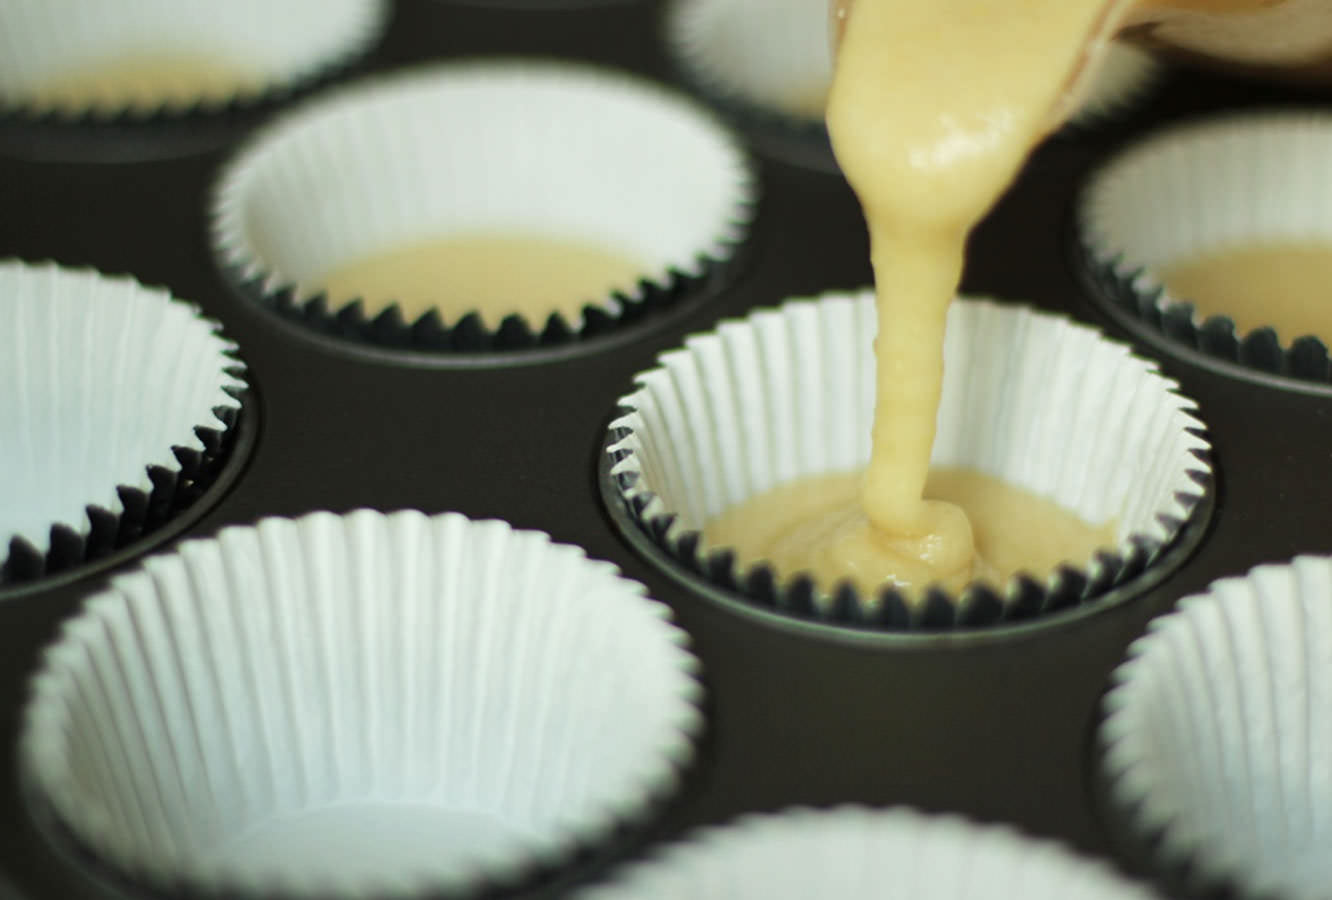
Spoon the mixture evenly into 12 cupcake cases. It’s about two dessert spoons per case, but just keep topping up until you run out.
Bake on gas mark 4/180C/350F for 20-25 minutes. Take care not to open the oven halfway through or your cakes will sink.
Step nine
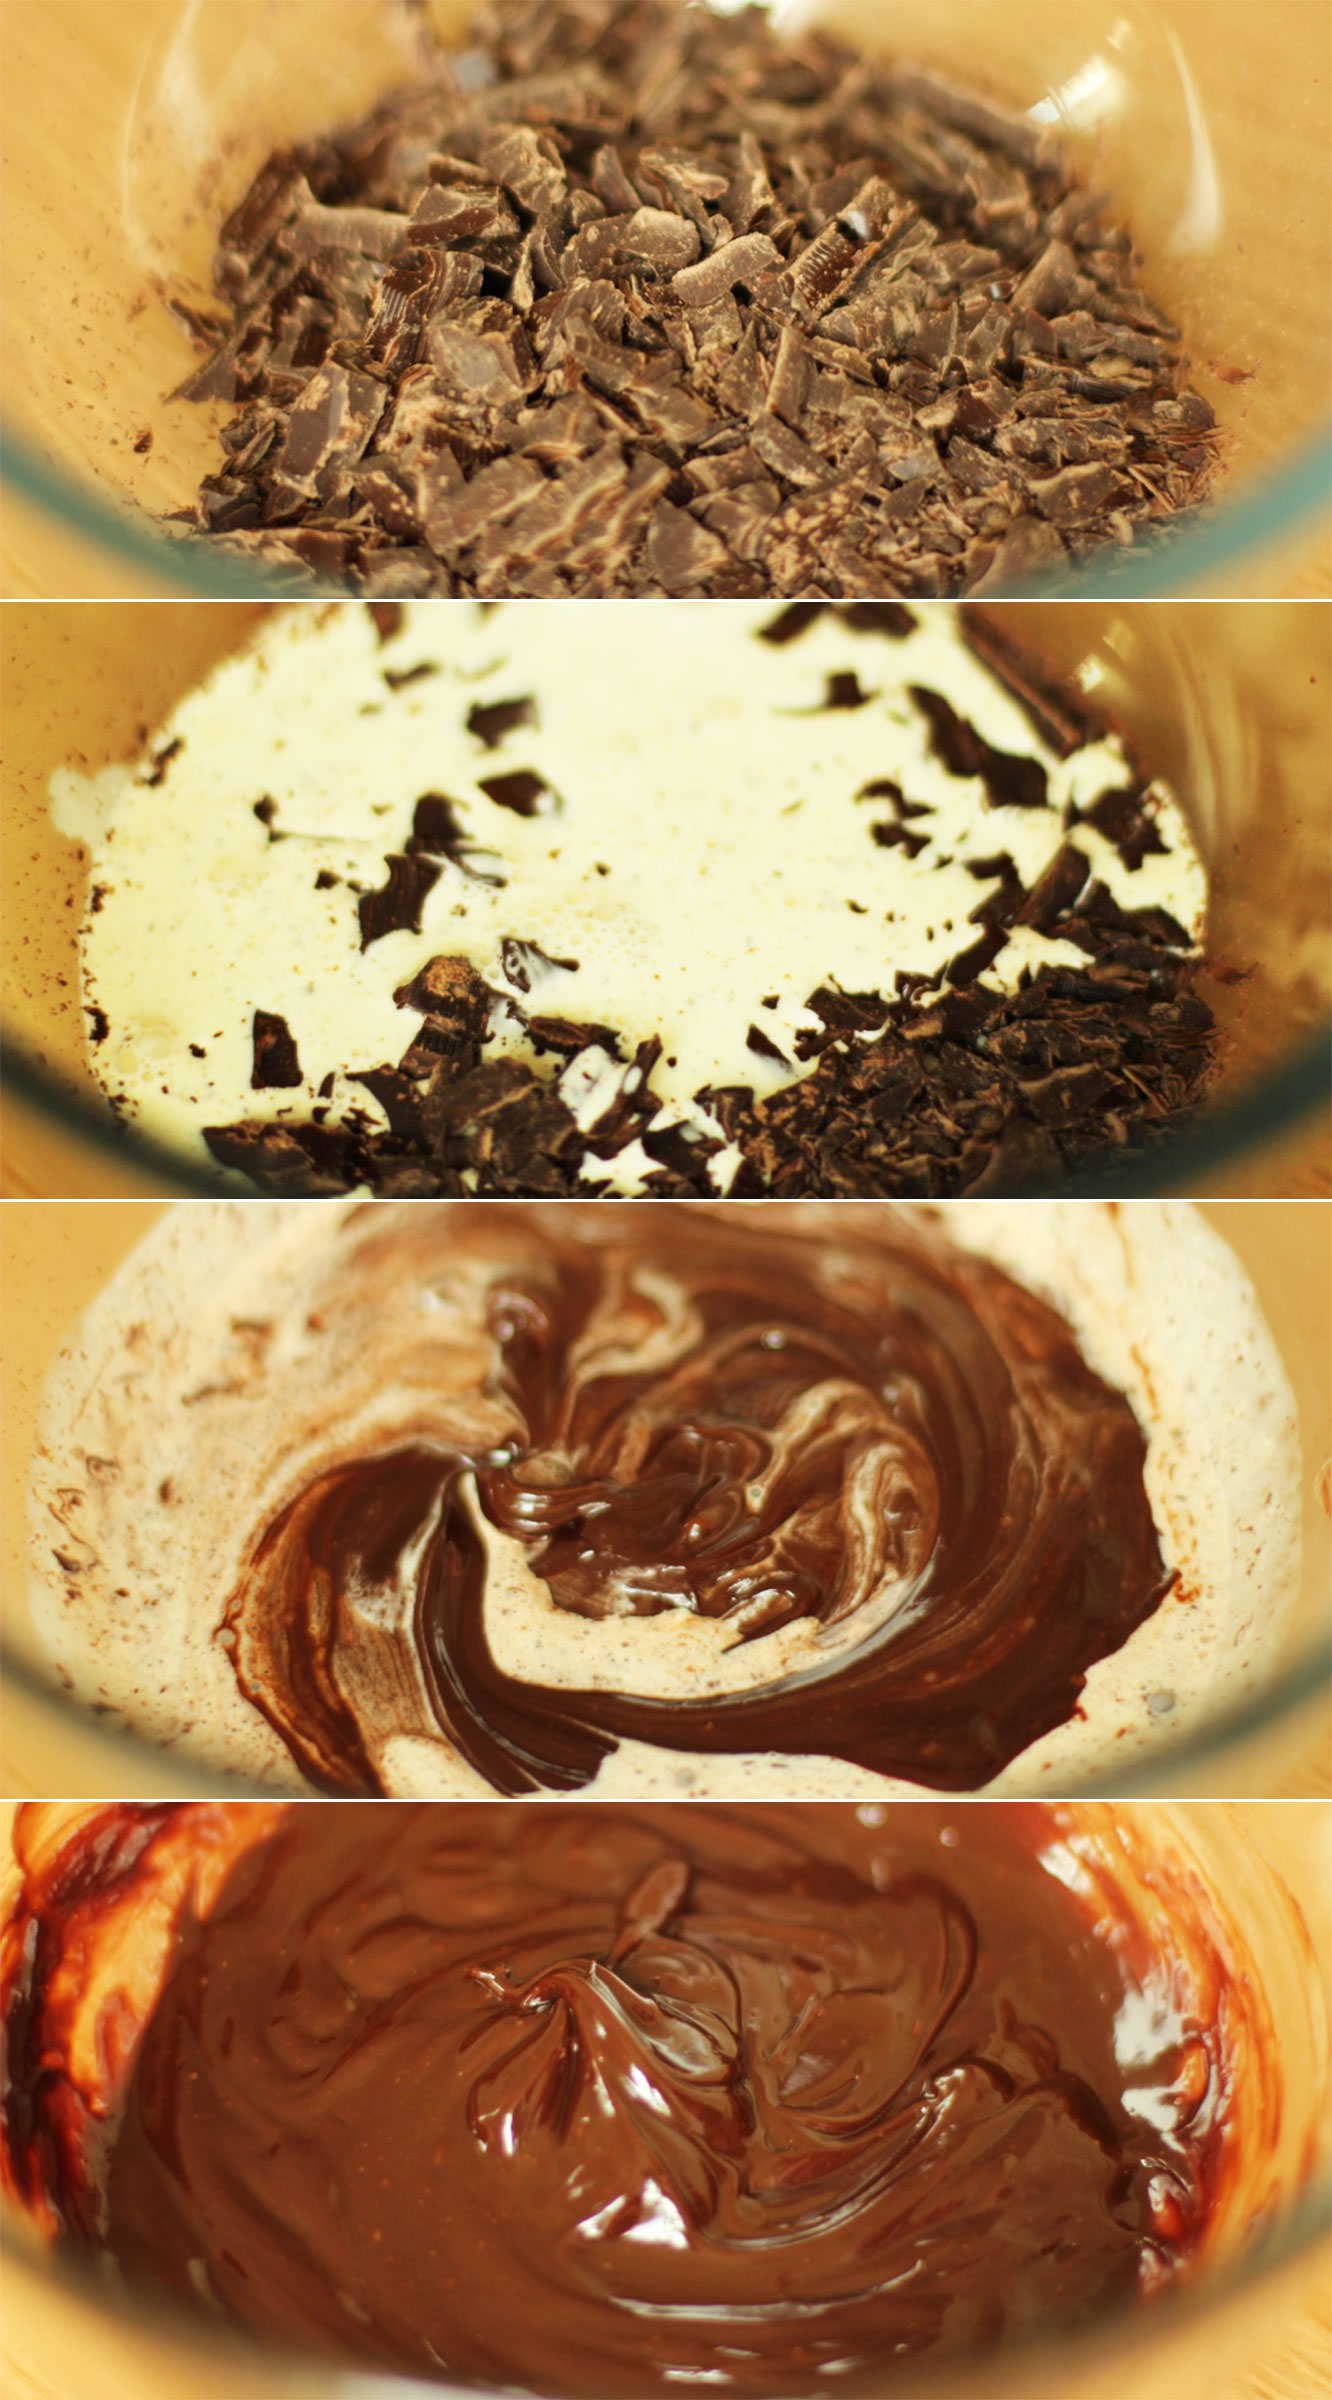
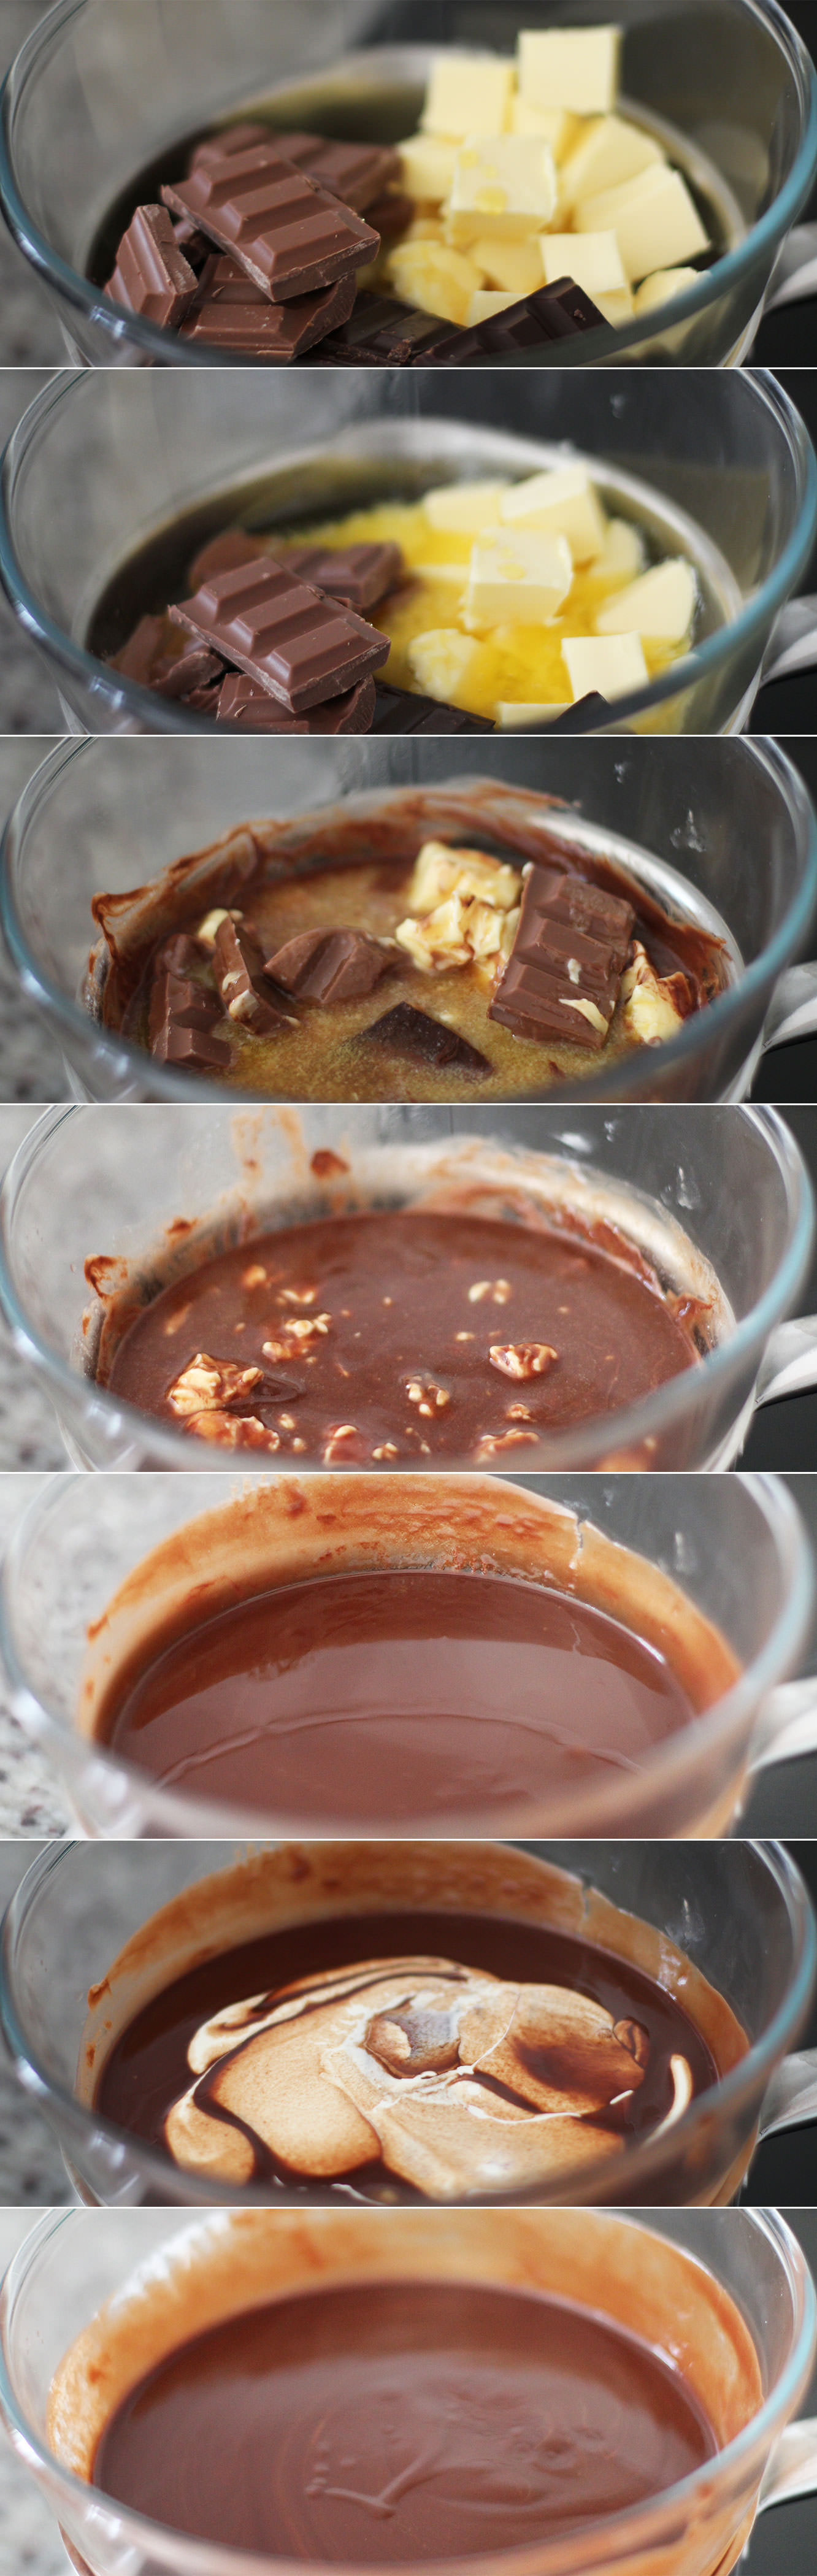
While the cakes are cooling make the ganache.
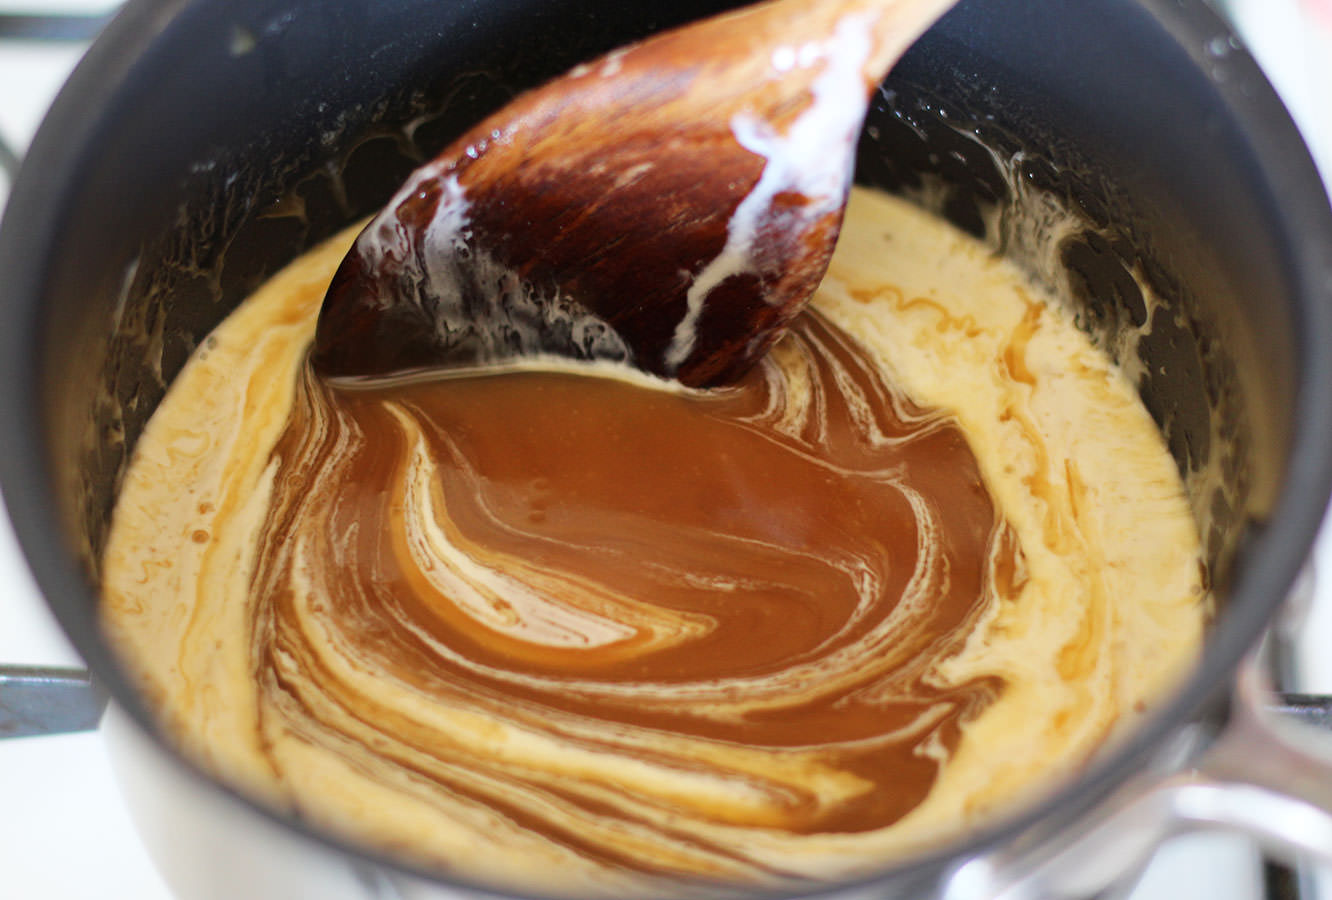
Finely chop the chocolate (or grate it if you’re super keen) and place in a clean bowl. Heat the cream in a saucepan. Do this slowly on a low heat, it burns quite easily.
The cream only needs to barely simmer before being poured over the chocolate and stirred until smooth.
The ganache won’t take long until it’s ready to pipe so only prepare it when the cakes and orange curd are nearly cooled.
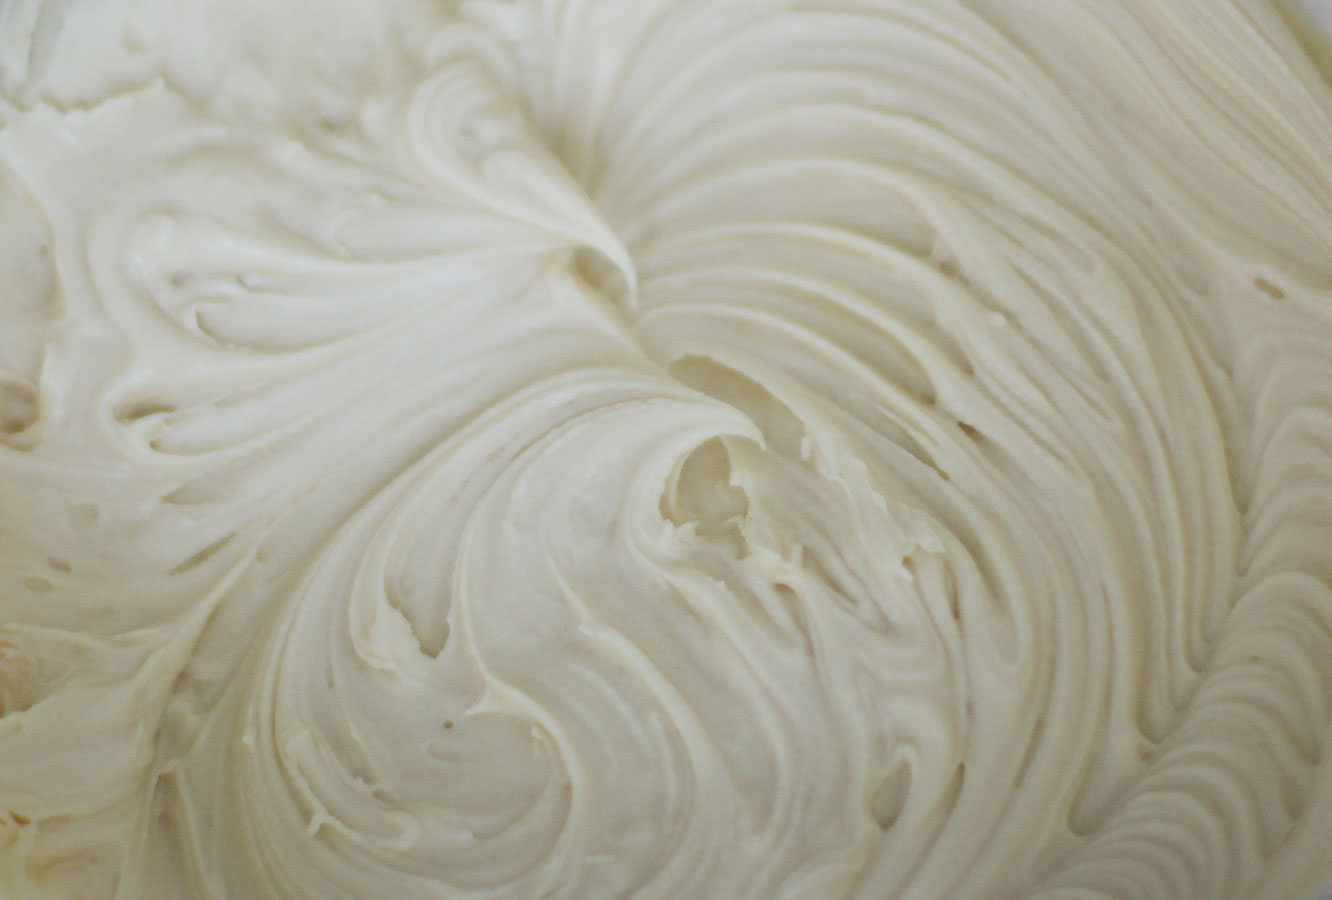
You will know it’s ready when you drop a spoonful back into the bowl and it holds it’s shape.
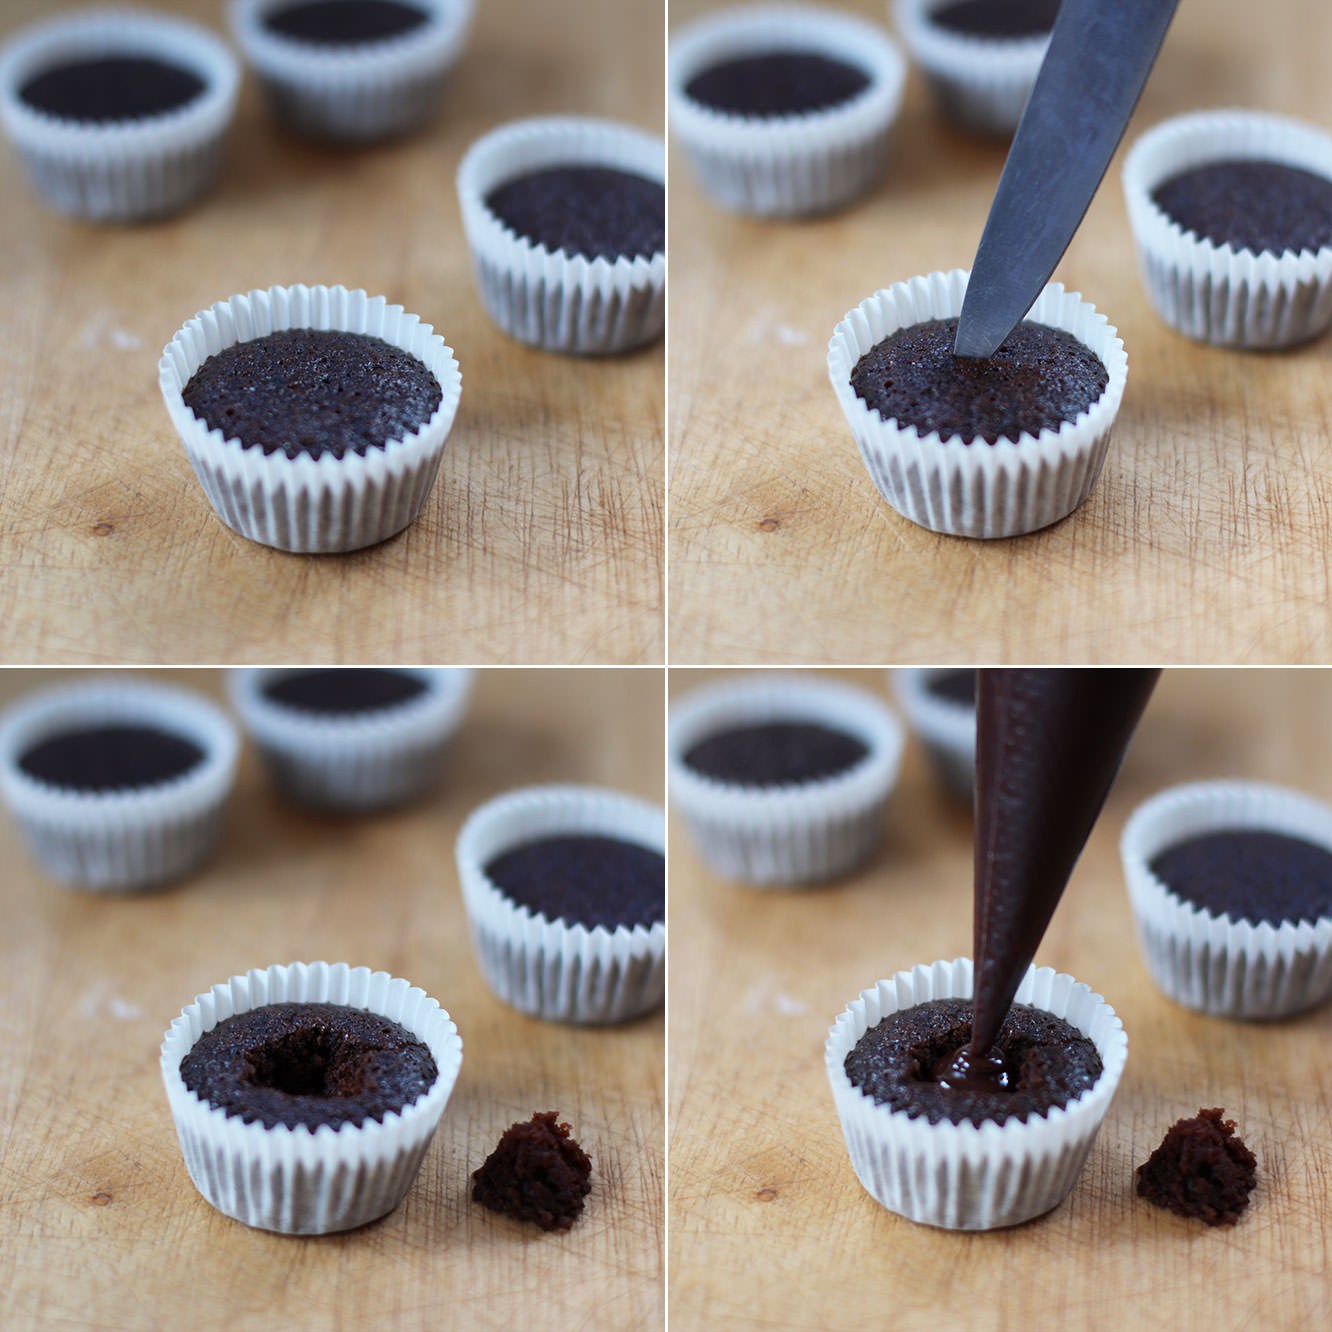
Step ten
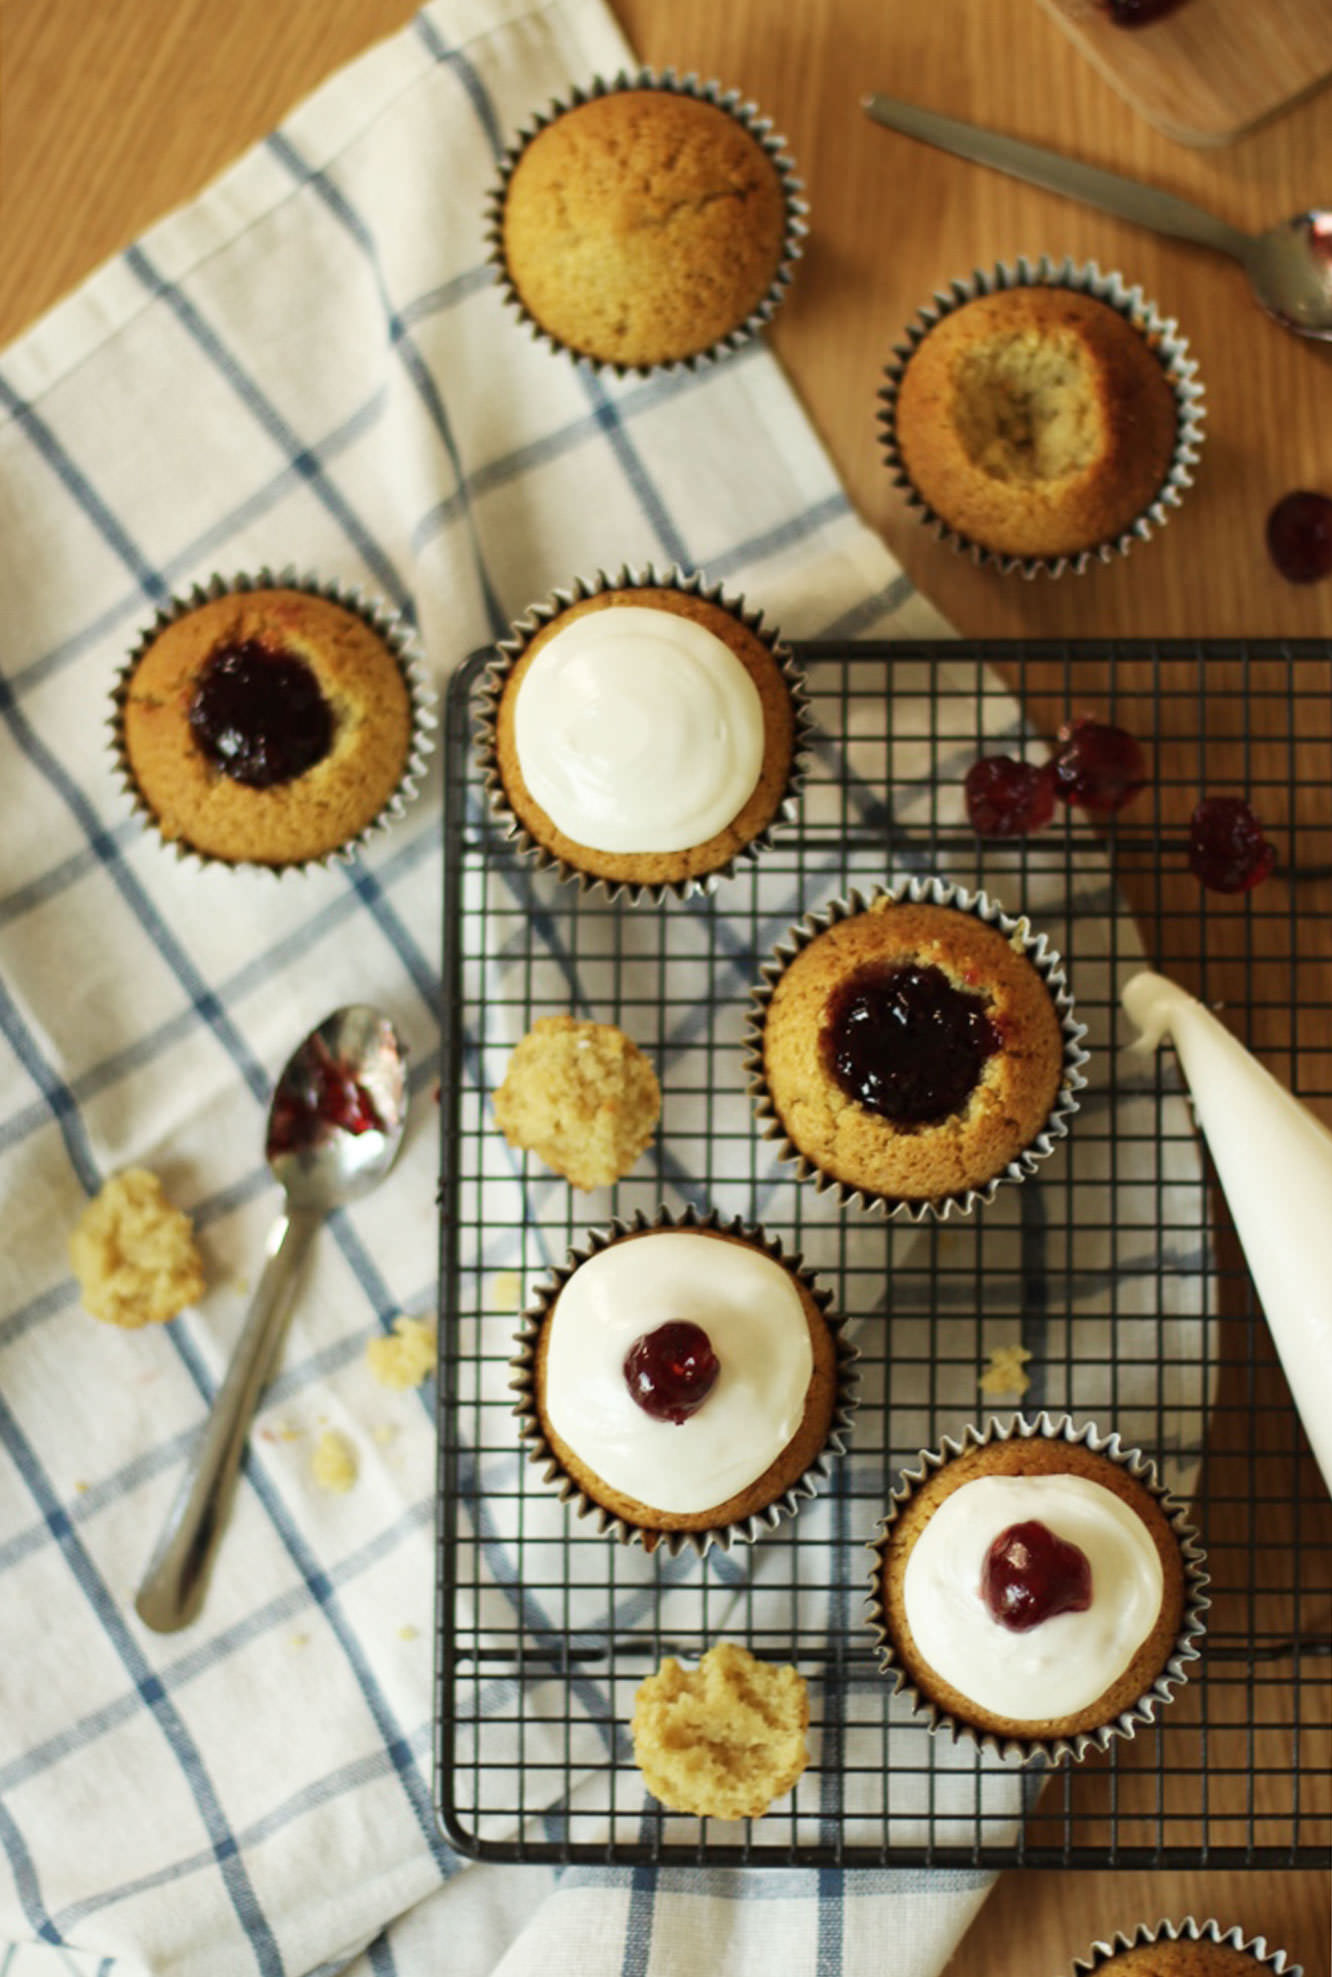
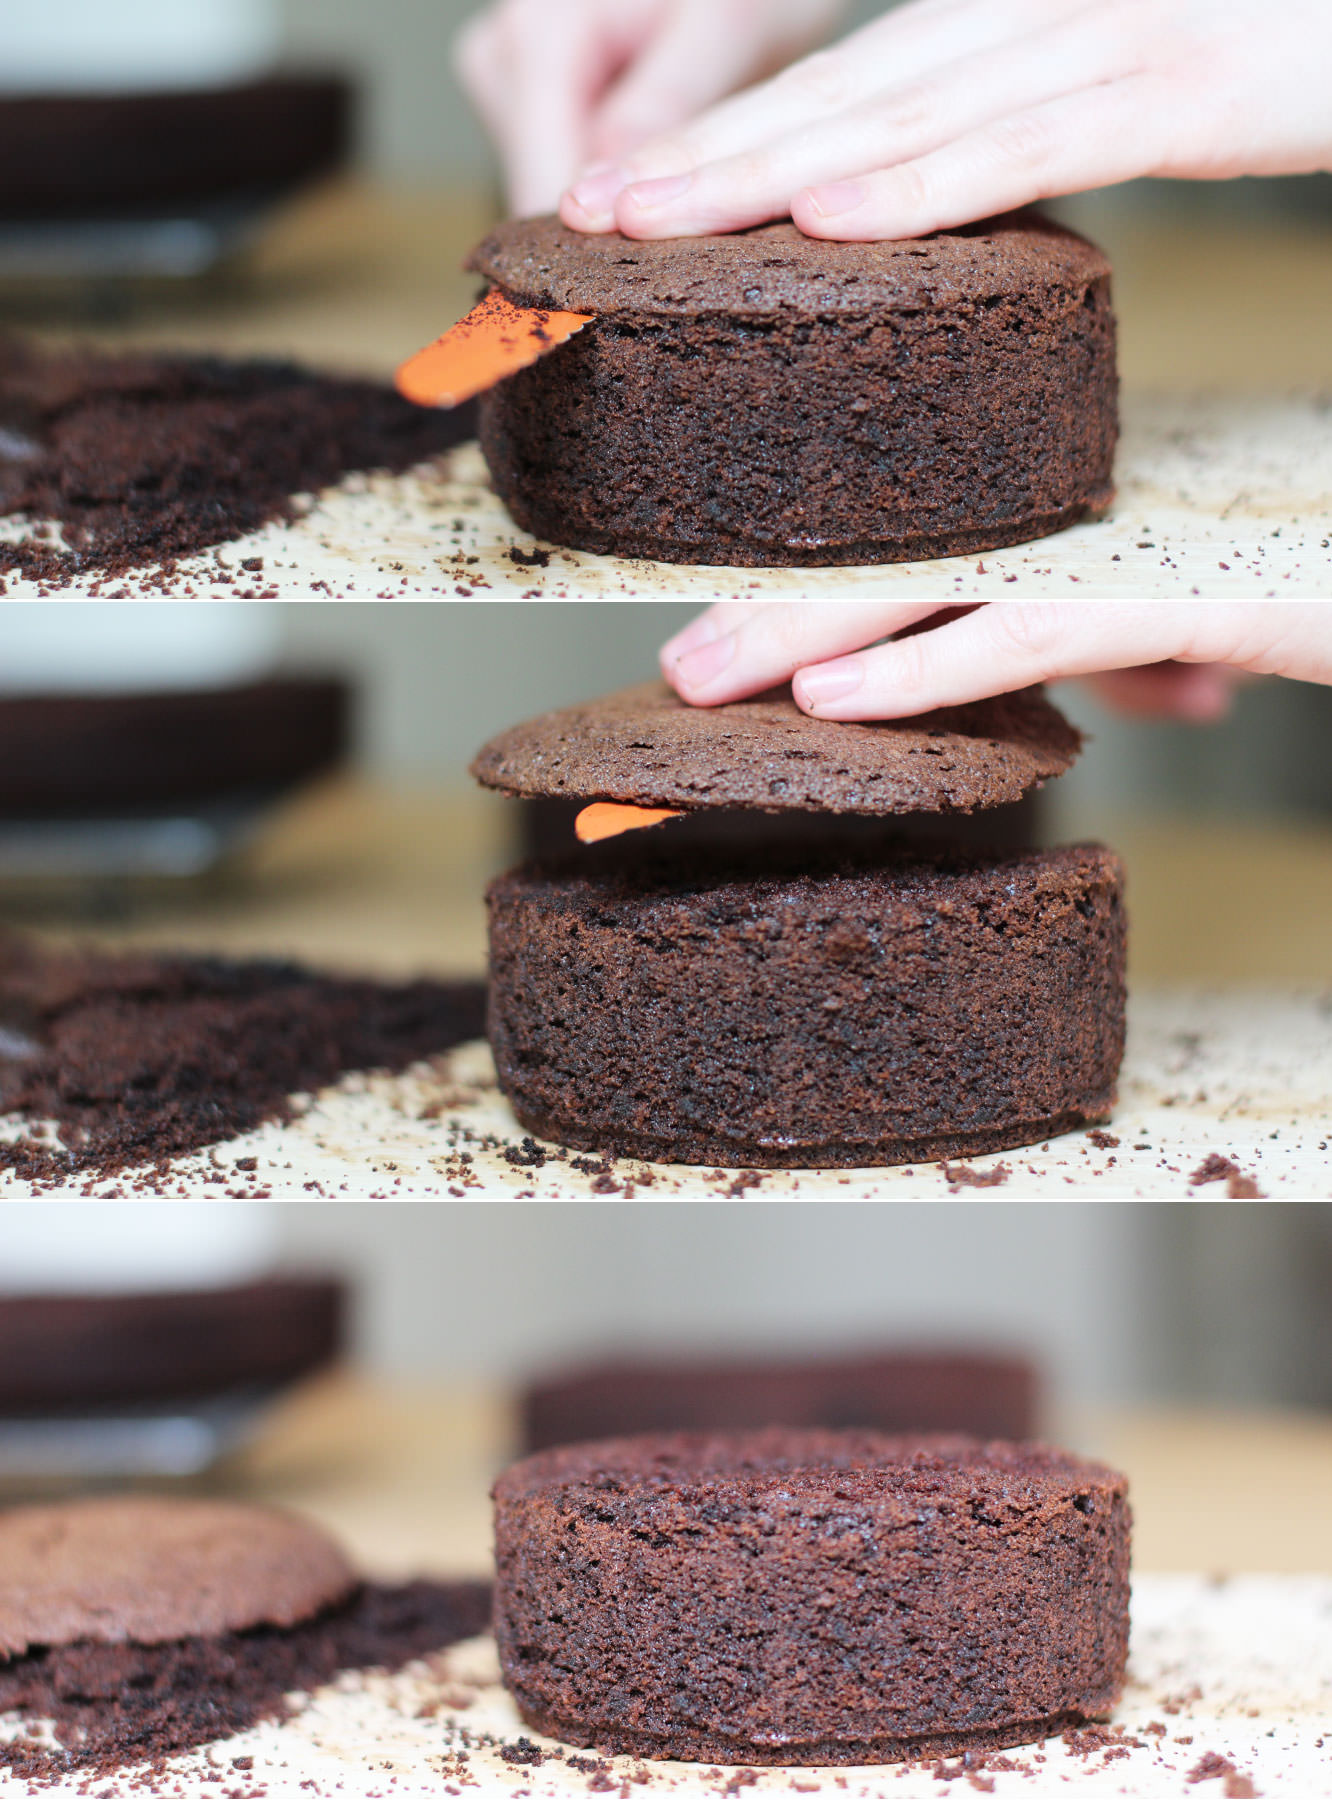
Cut a section of sponge out the middle with a small veg knife, and chop off the pointy bit, saving the lid.
Fill with curd and place the sponge lid back on.
Point a piping bag full of ganache straight down and squeeze. You may need to use the tip of the back to spread it out a little as you go.
Hullo again. I’ve decided to start a small series. I know, I can smell your excitement from here.
I will probably break it up a little every so often because it has one main theme (cupcakes) and I don’t want to bore. Not that cupcakes could ever be boring right?
The other day I was handed a Bakewell tart on the street (by a man in a co-op uniform, don’t worry, I’m not taking sweets from strangers). It’s been a while since I had a Bakewell tart, and you know what? I actually quite enjoyed it.
Then the thought struck me…a series of British sweets/puds baked into cupcakes is just what this blog needs.
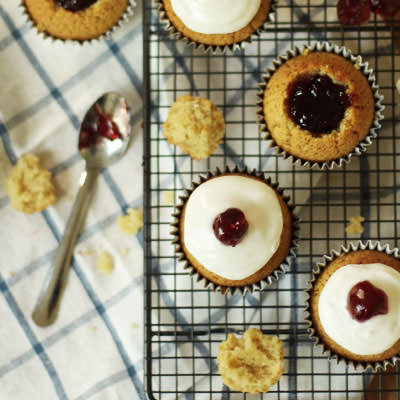
For anyone who doesn’t know, a Bakewell tart has a pastry case, full of frangipane (almond), cherry jam and is topped with a thick layer of icing and half a glacé cherry.
So without further ado let’s kick off with an easy peasy Bakewell tart cupcake, which are also handily dairy free for our lactose intolerant friends.
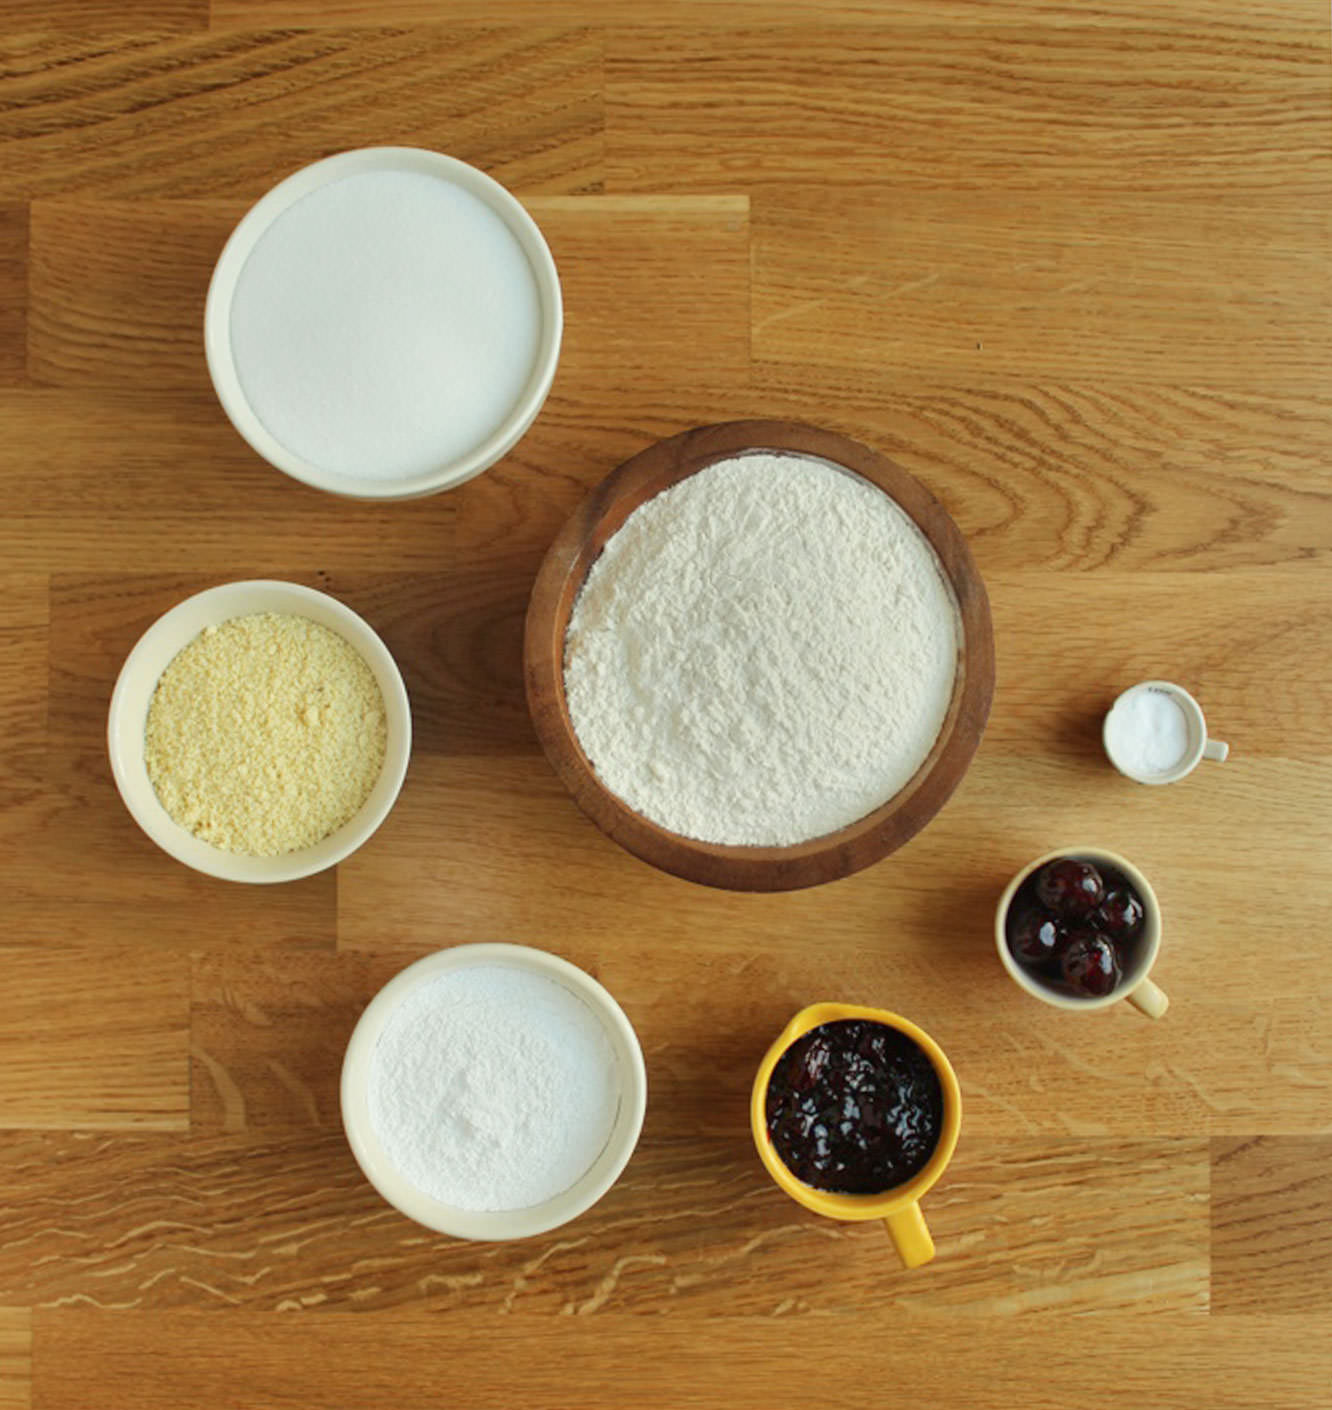
Things you need
200g/7 oz plain flour
200g/7 oz caster sugar
50g/1.75 oz ground almonds
5 tbsp vegetable oil
250ml/6.5 fl oz cold water
1 tsp vanilla extract
2 tsp almond extract
1 tsp bicarbonate of soda
1 tsp white vinegar (I won’t lie…I actually used cider vinegar, because I wasn’t about to buy a whole bottle for a single teaspoon)
To decorate:
Icing sugar (royal icing works well if you have it)
6 glacé cherries
Cherry jam
Silver foil cupcake cases (to add that authentic touch)
(Makes 12 cupcakes)
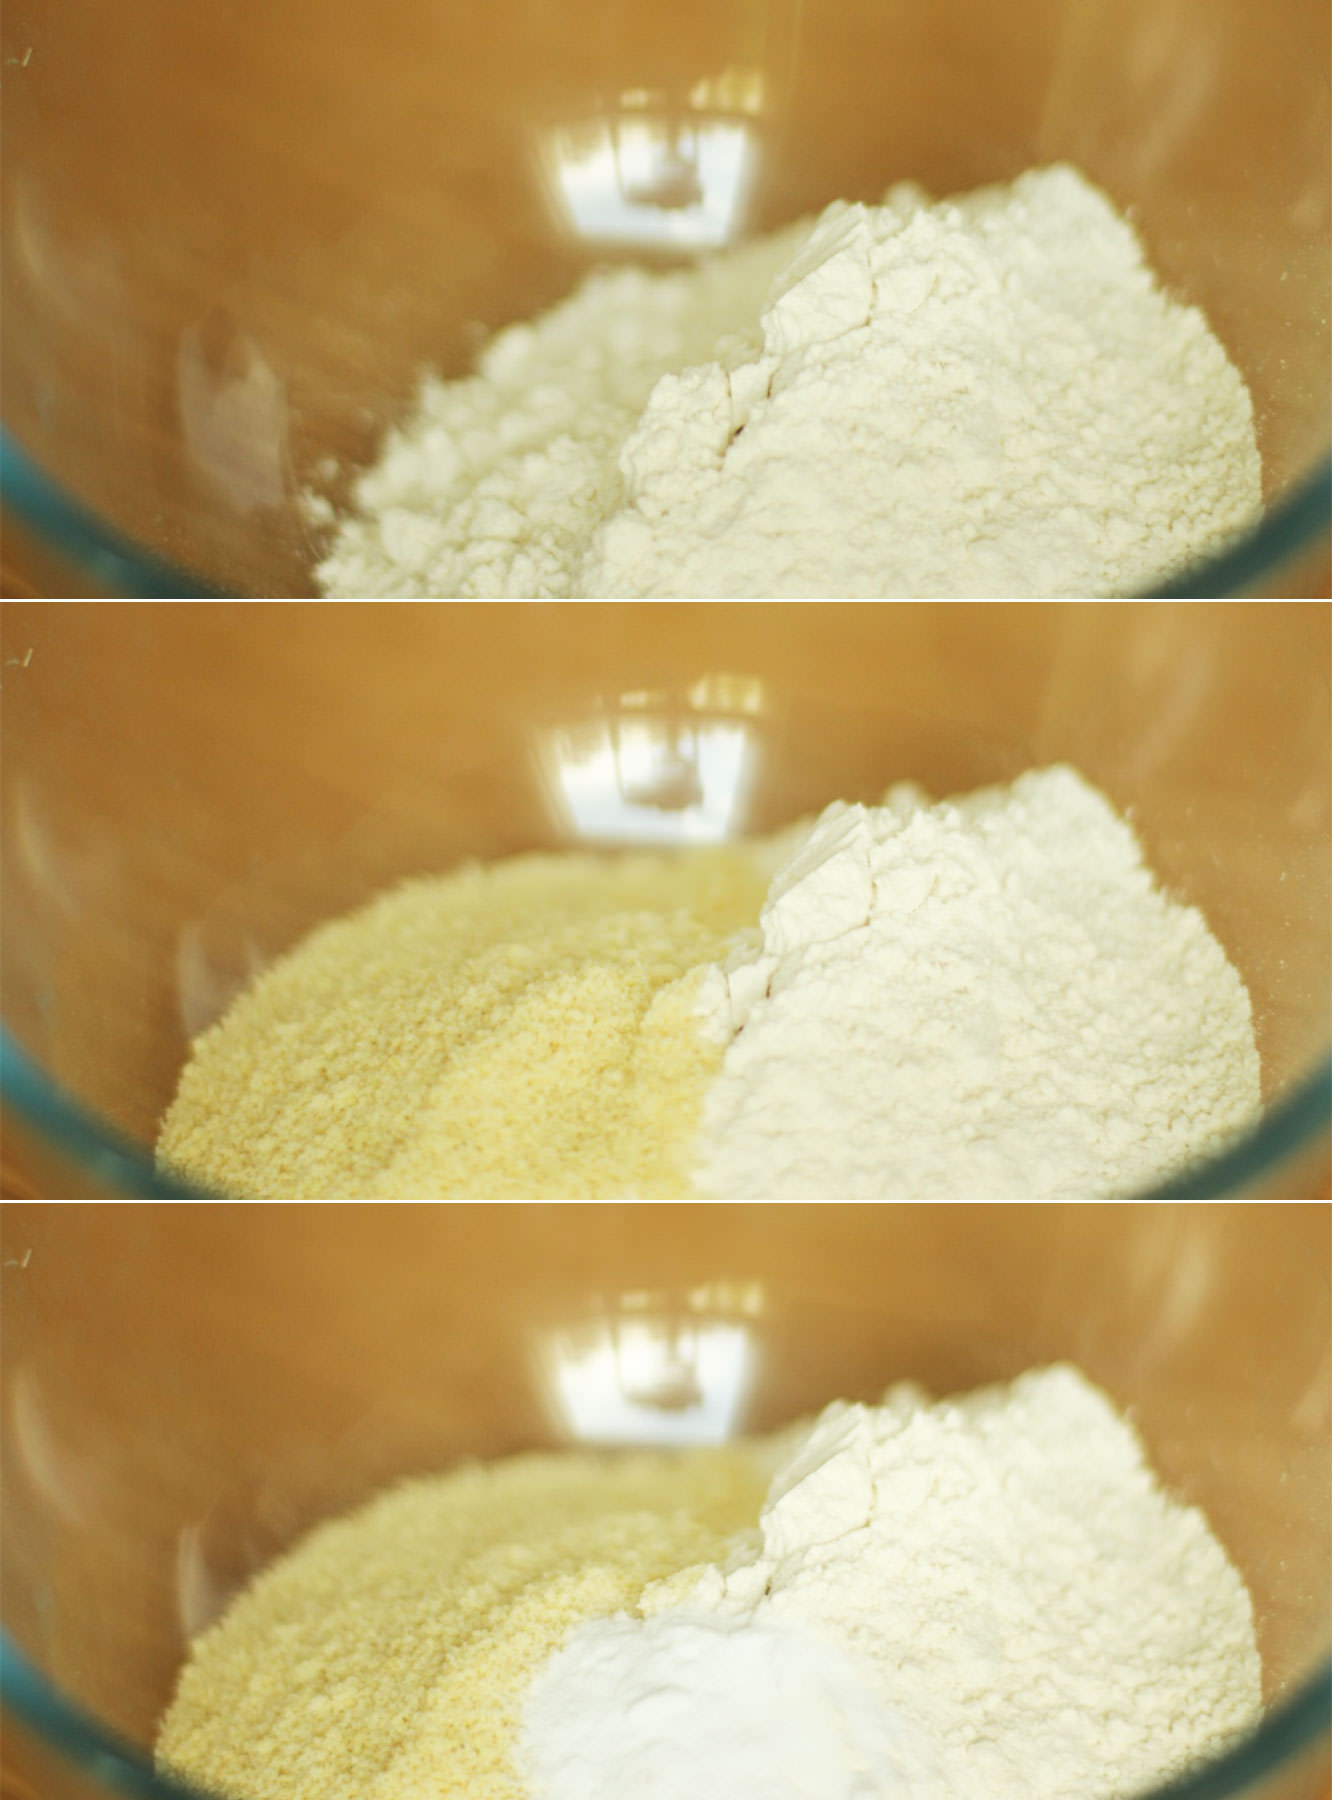
Step one
Mix together the flour, almonds and baking powder.
Step two
Add the caster sugar and stir again until combined. Yup, this is SUCH an easy recipe that I gave that its own step.
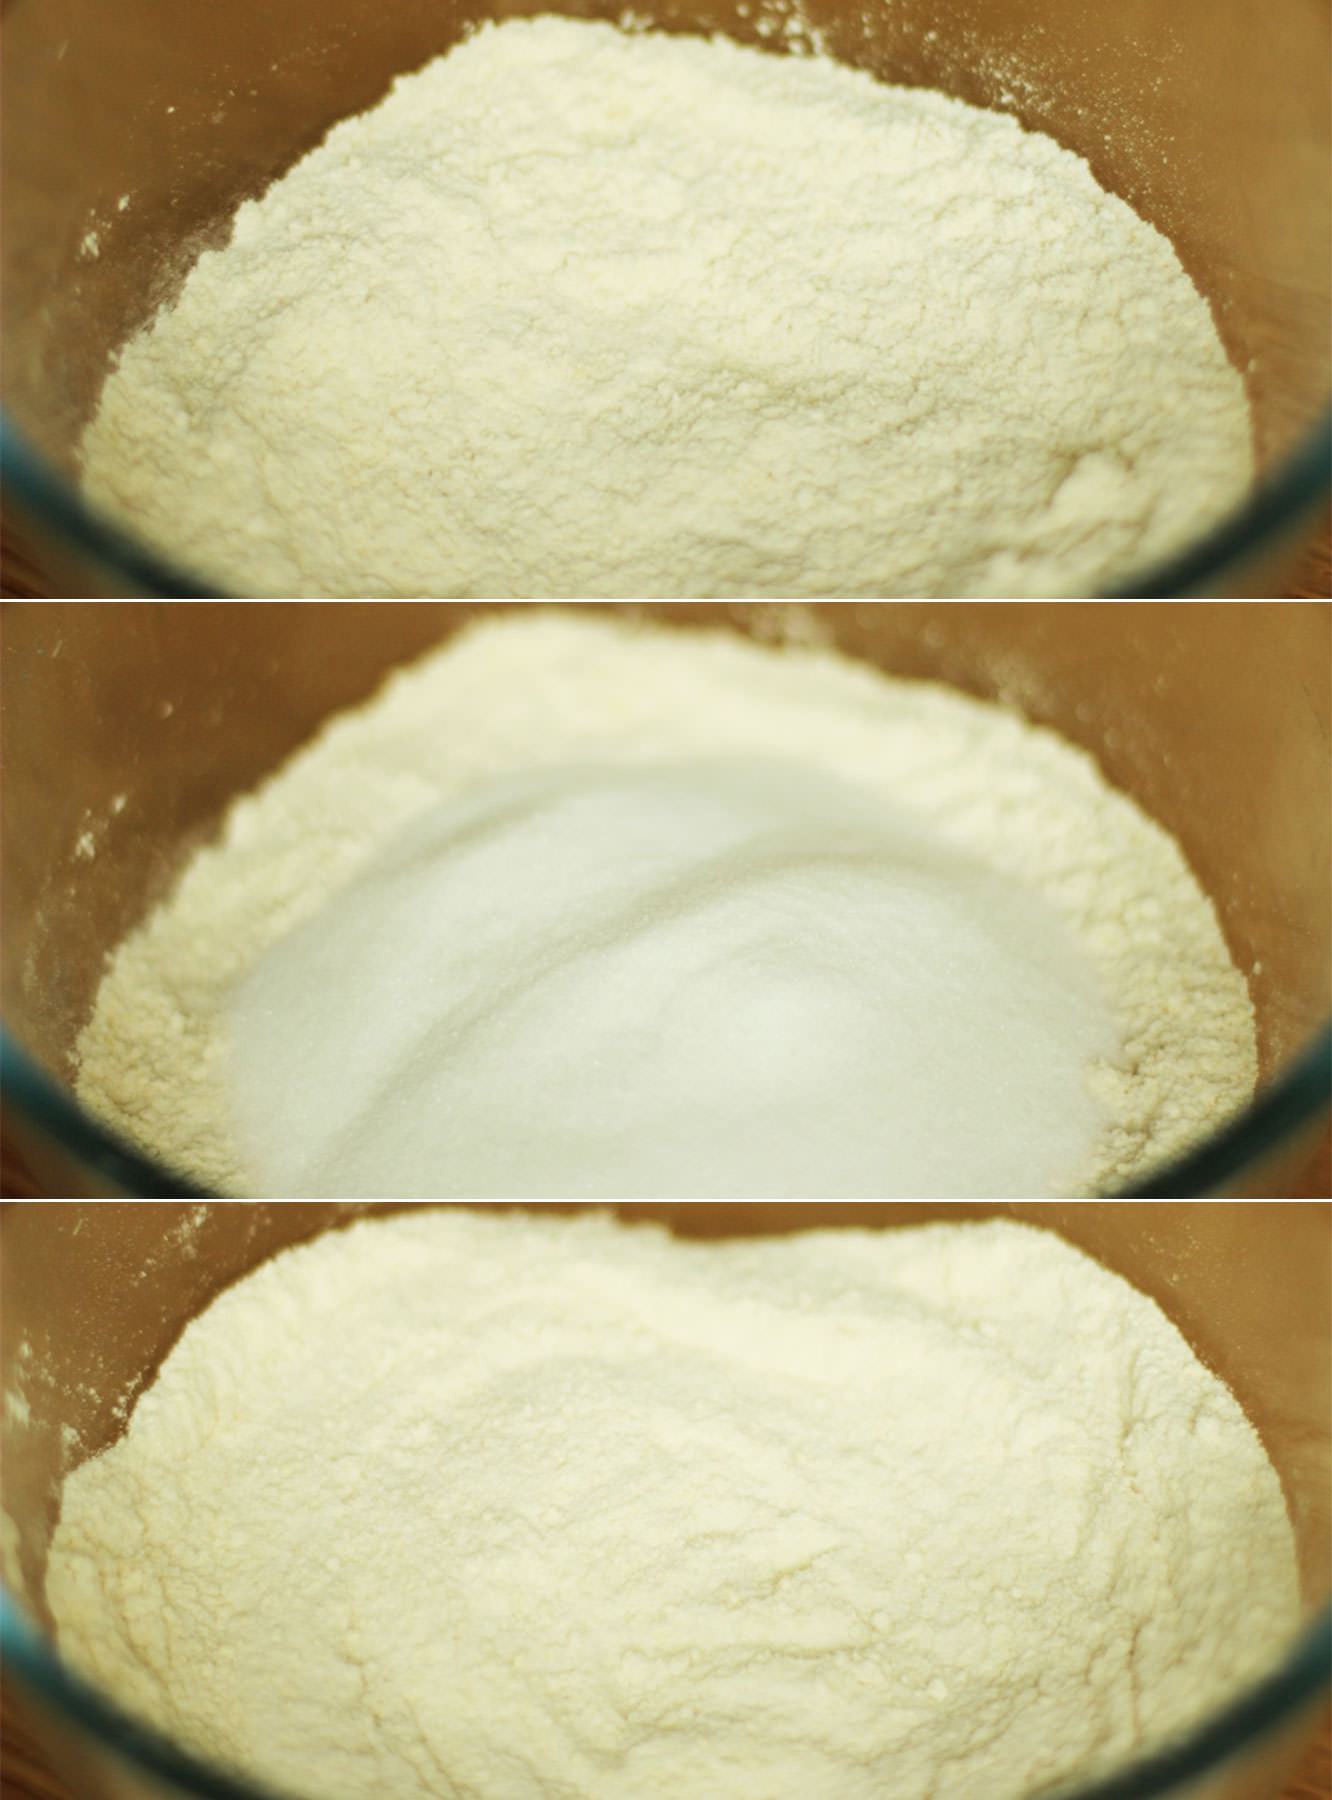
Step three
Make a well in the middle and add the water, oil, vinegar and extracts.
Using a hand whisk make small circular motions until all the flour mix is gradually incorporated. Doing it that way will reduce the number of lumps.
Step four
Using a jug distribute the mixture evenly between 12 cupcake cases. Trust me. You will want a jug.
Bake on gas mark 4/180C/350F for 20-25 minutes until they spring back when touched.
Step five
Cut a circular section out of the middle with a small knife and fill with cherry jam. Remove excess sponge from the bit you removed and put the lid back on.
Step six
Mix some icing sugar with water until you have quite a thick consistency. Royal icing is good for this because it’s thicker and more opaque generally.
Pipe onto the cupcake, try to get it as round as you can.
Another week another birthday. This time round it’s my lovely housemate who is bravely entering her mid-twenties; just another excuse for me to get in the kitchen.
Earlier in the week Vicky (the birthday girl in question), Matt (the fiance) and I, had sat down to watch The Princess Bride (a hilarious farce of a film), and we cracked open some Crabbie’s. It was such a lovely little evening, and I thought I would bake the experience into a cake to commemorate the little one’s birth.
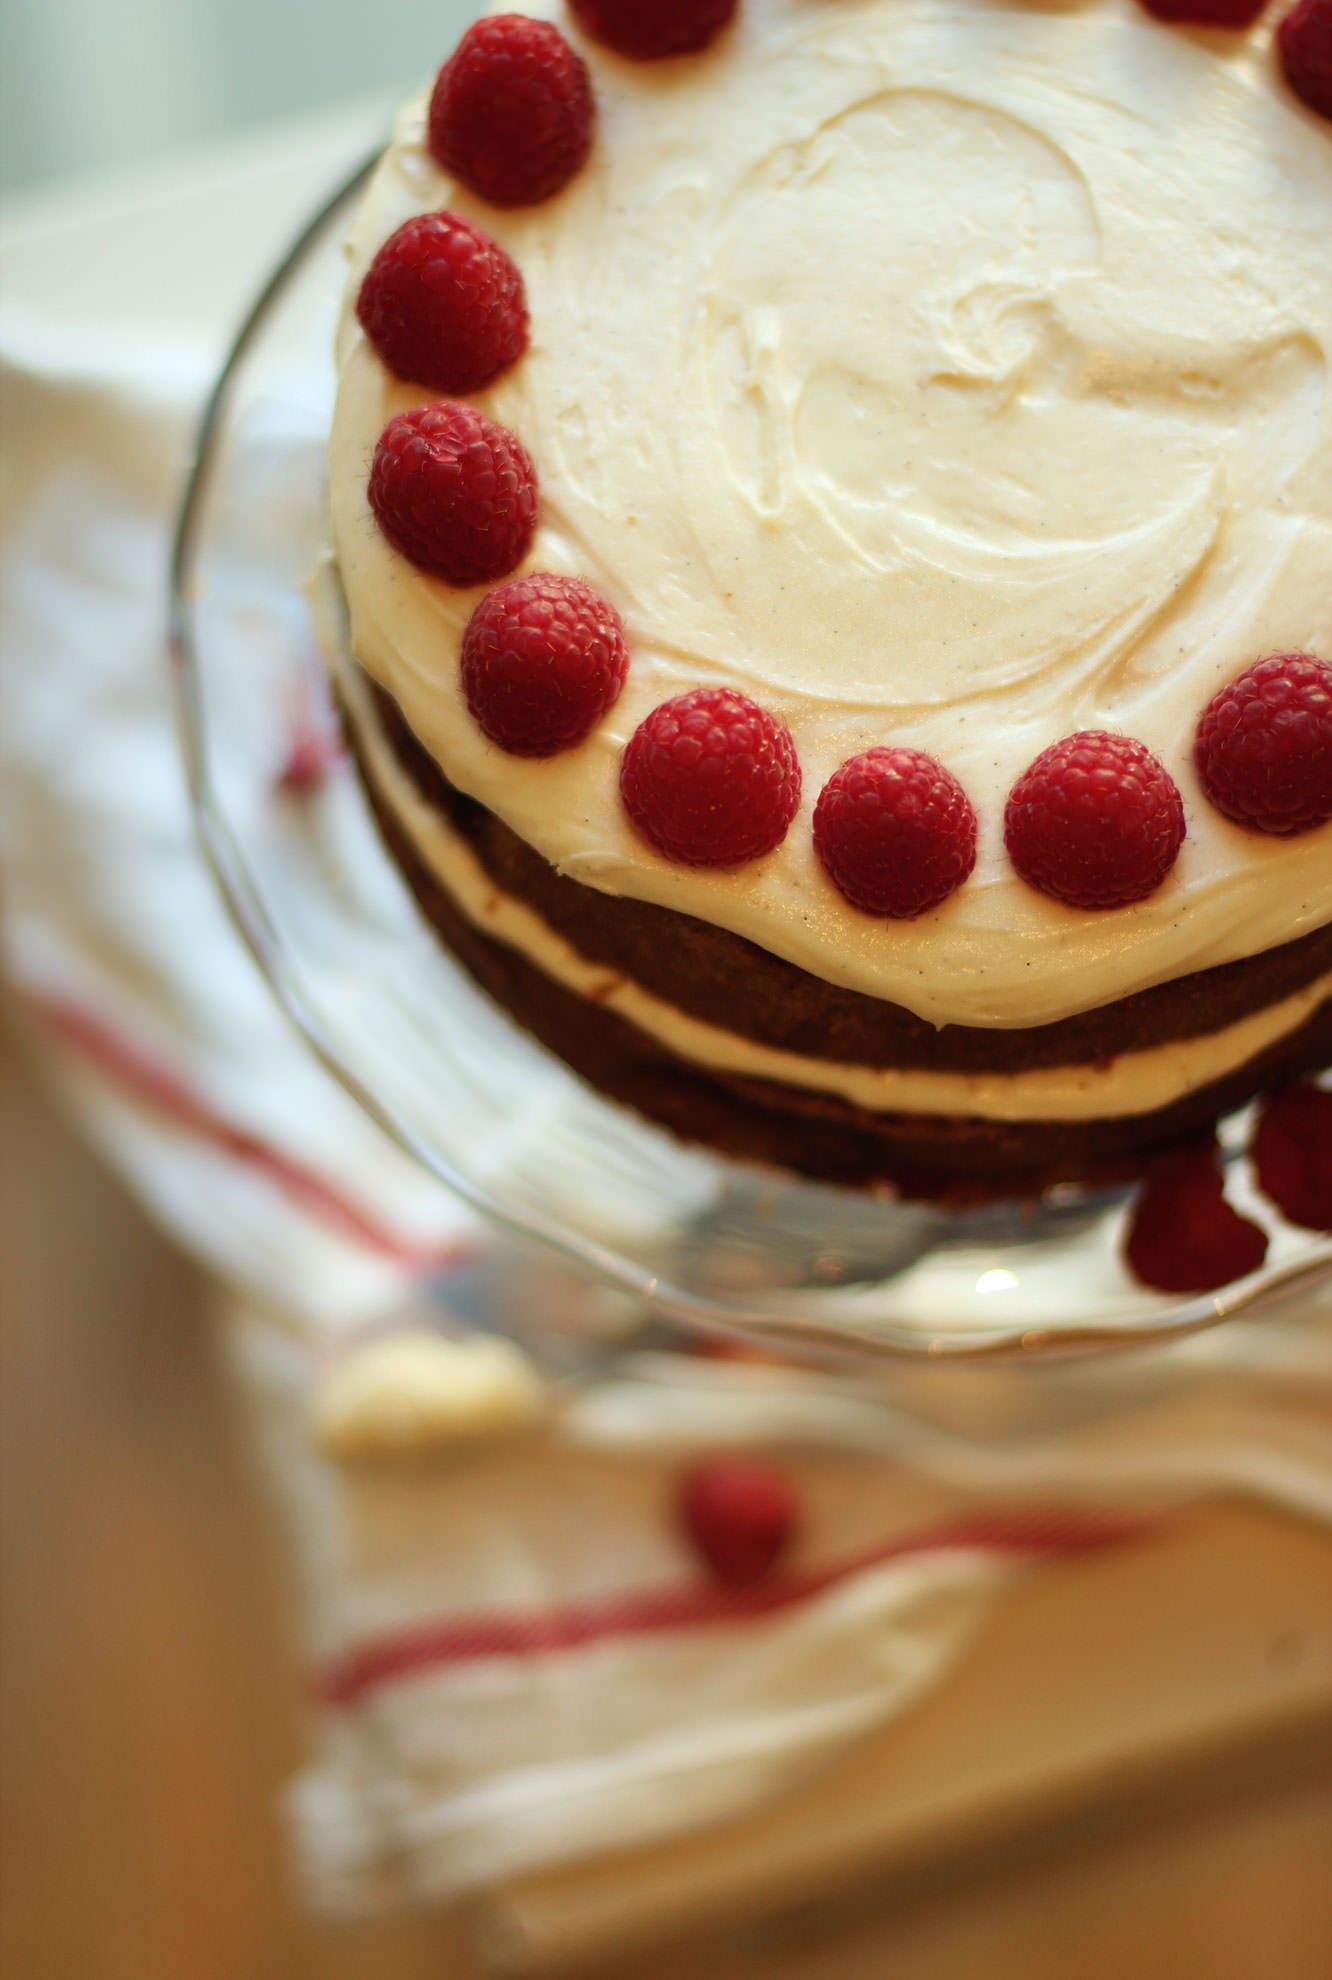
Crabbie’s, for anyone who doesn’t know (more fool you), is alcoholic ginger beer. This particular batch was raspberry flavoured, and nobody was more surprised than me to discover how nicely ginger and raspberry complement each other. Add to that a honey and vanilla icing and you’ve got a birthday cake fit for any 24 year old.
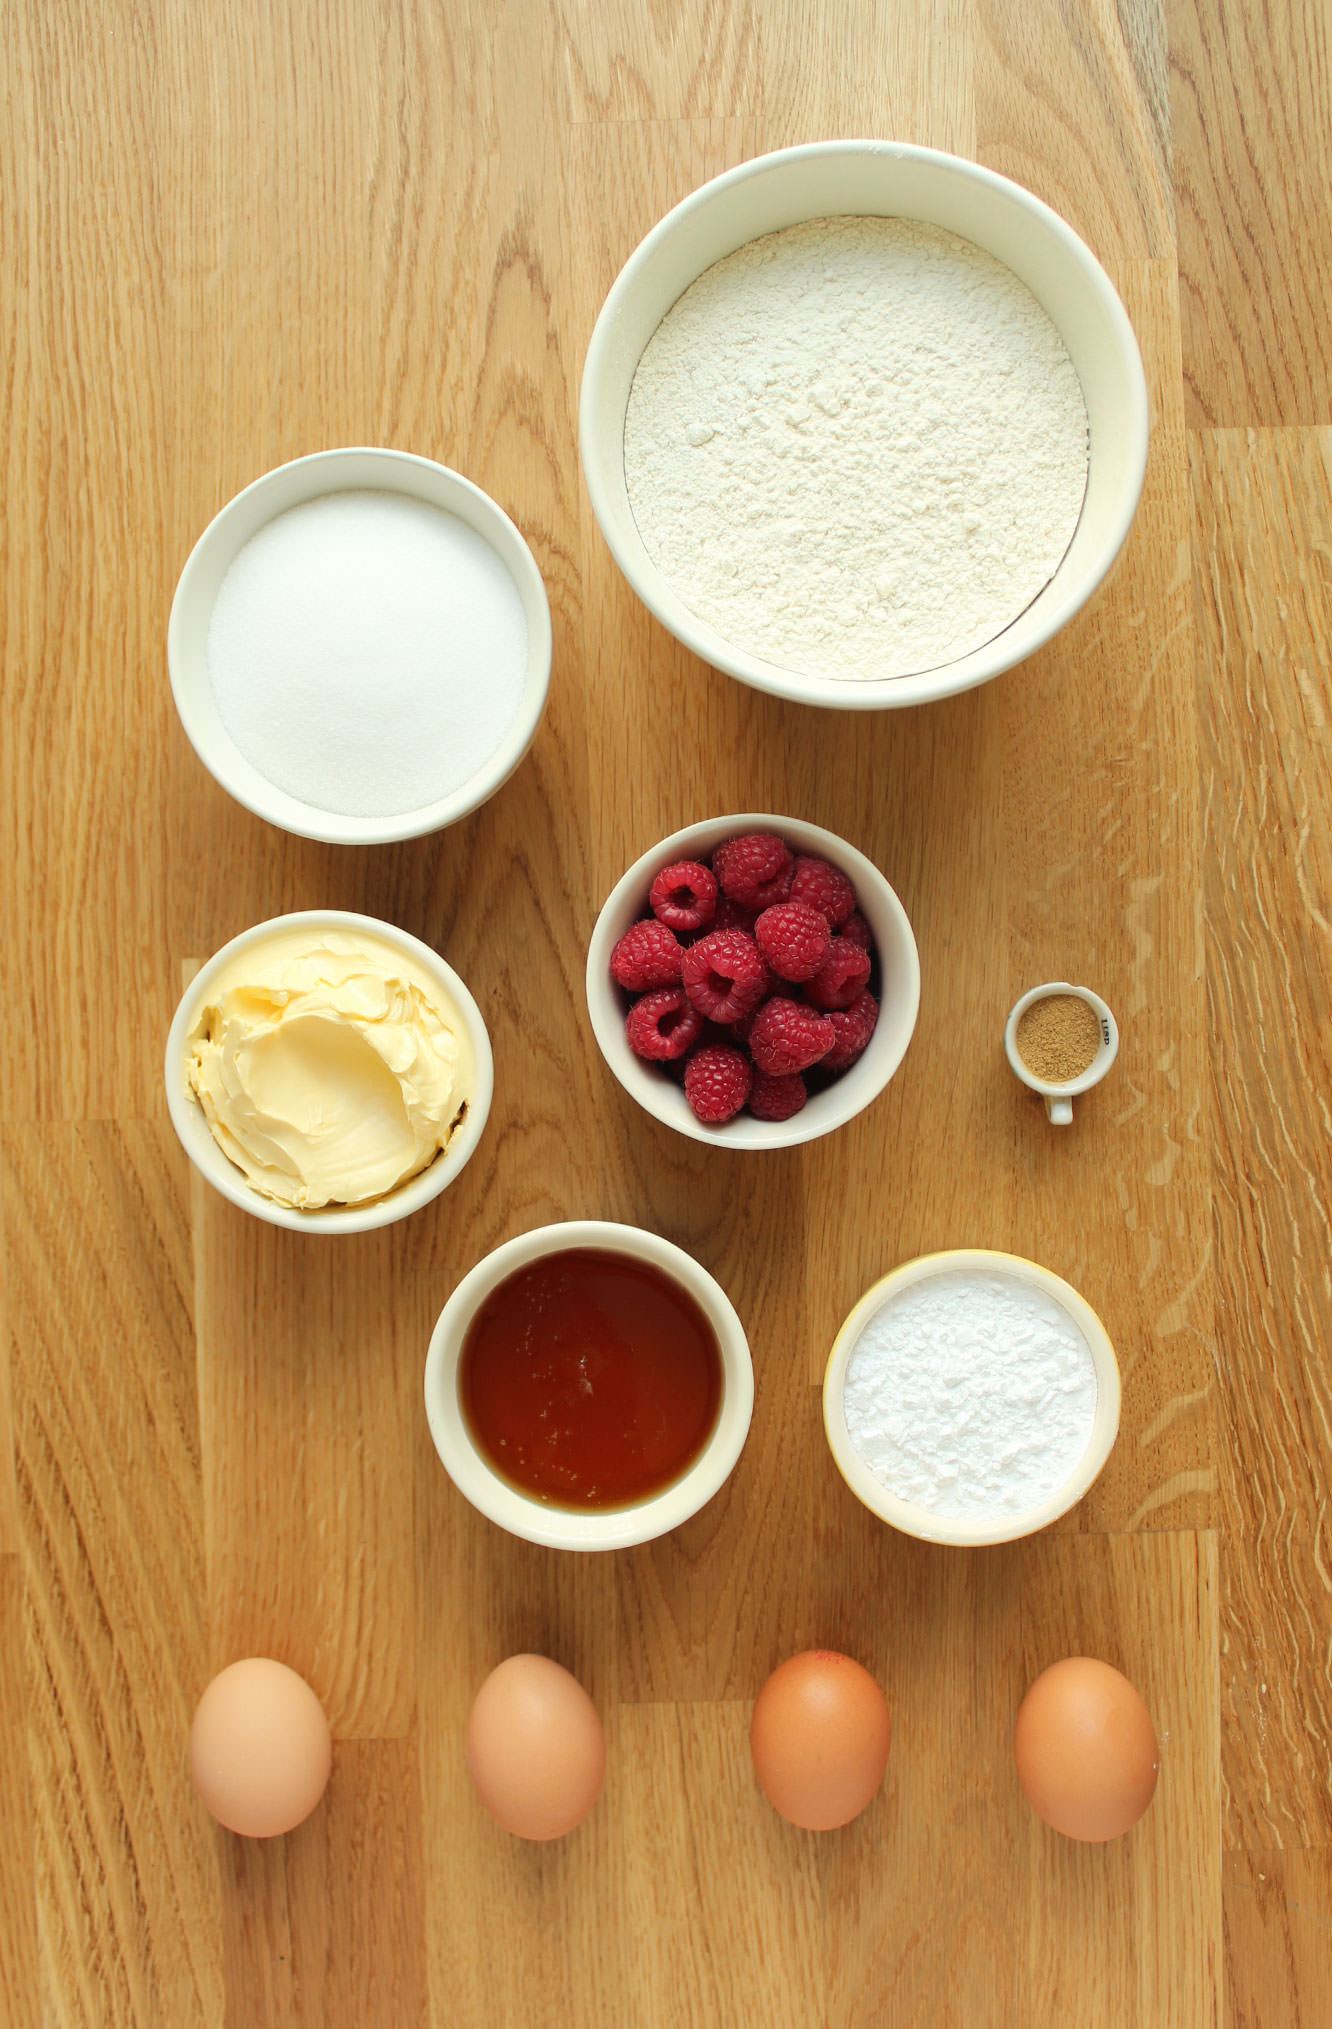
You will need
For the cake:
255g/9 oz self raising flour
255g/9 oz caster sugar
255g/9 oz margarine/butter (I use stork for cakes)
4 eggs
2 tsp ground ginger (add a bit more if you want a really strong ginger taste, 2 tsp is nice and subtle)
1 tsp vanilla extract/paste
1 tsp bicarbonate of soda
200g/7 oz raspberries
For the icing/decoration:
350g/12 oz icing sugar
150g/5 oz softened butter
170g/6 oz honey
1-2 tsp vanilla extract/paste (or even a pod if you have one so you get the lovely flecks)
100g/3.5 oz raspberries
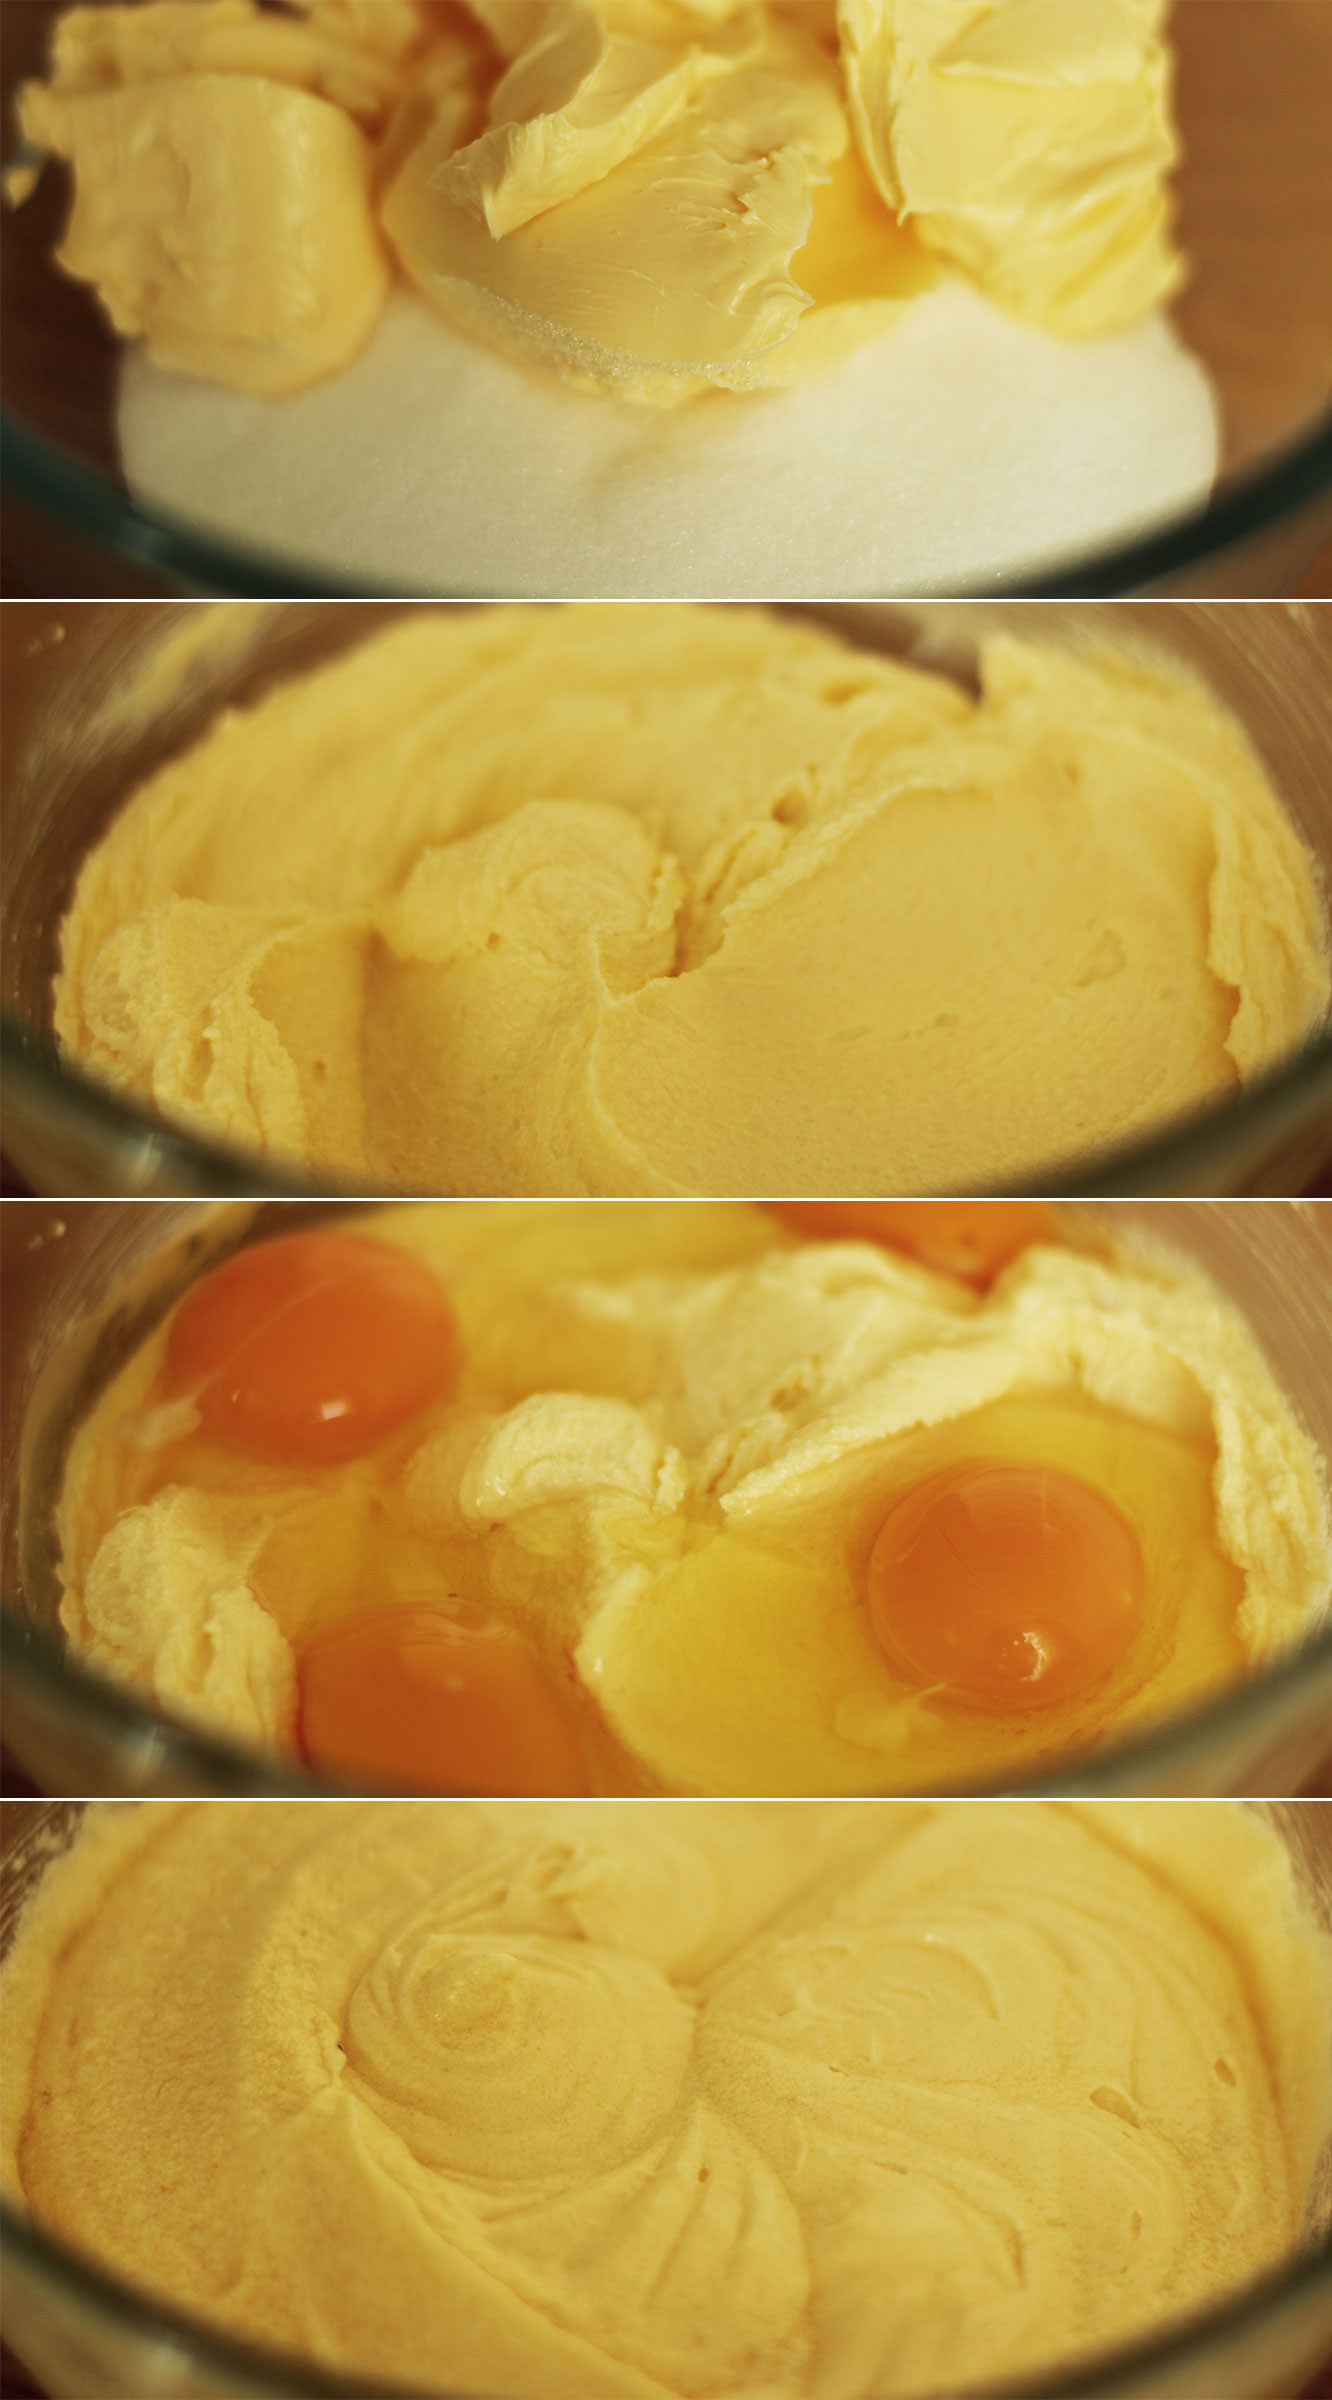
Step one
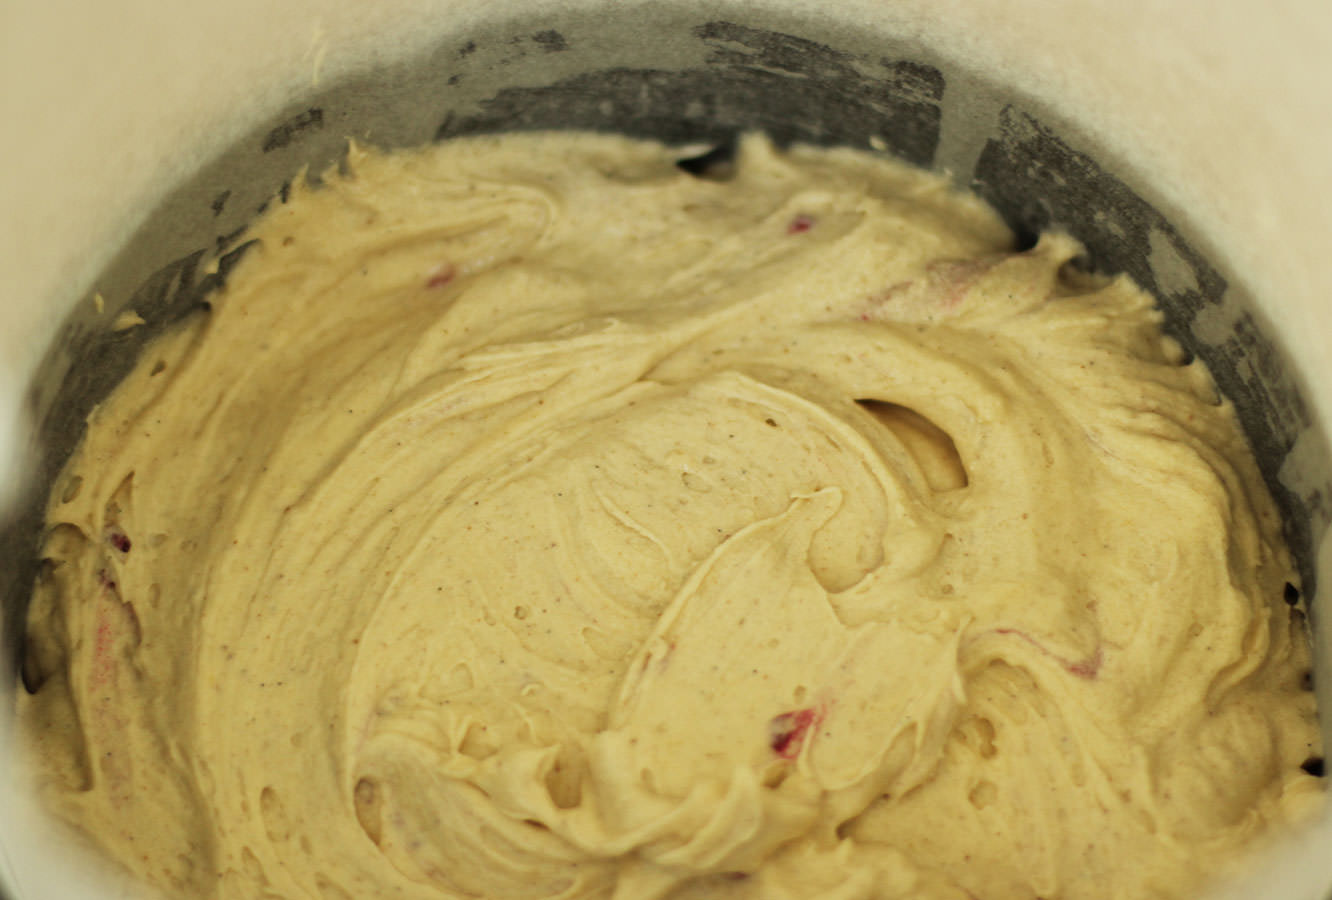
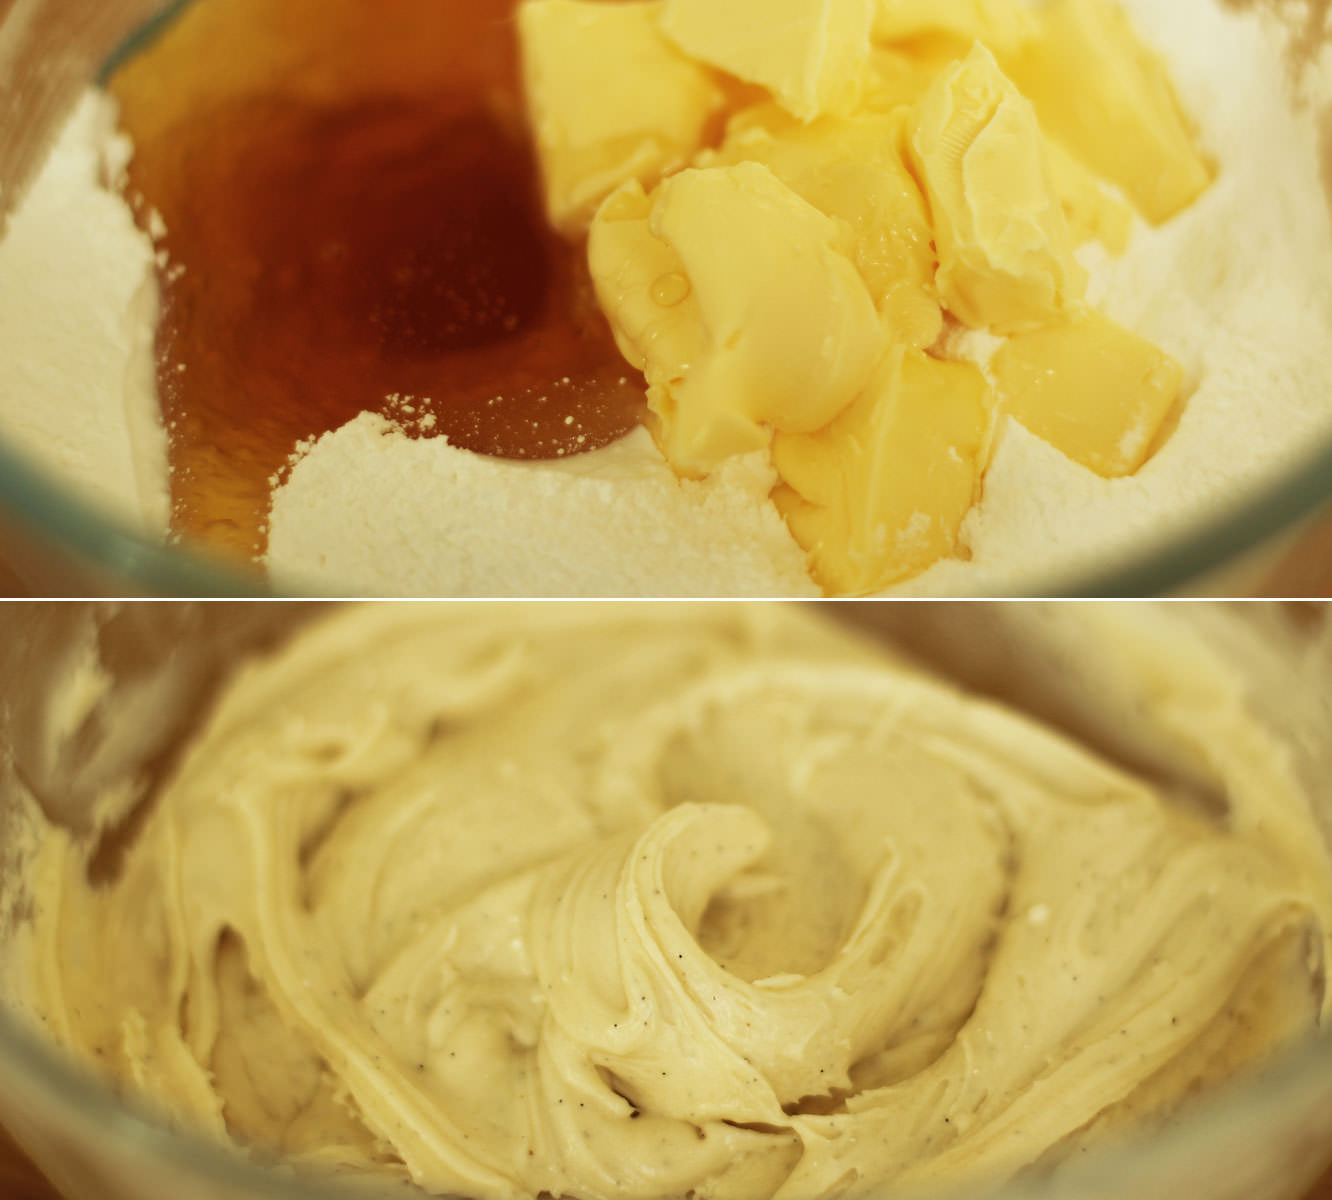
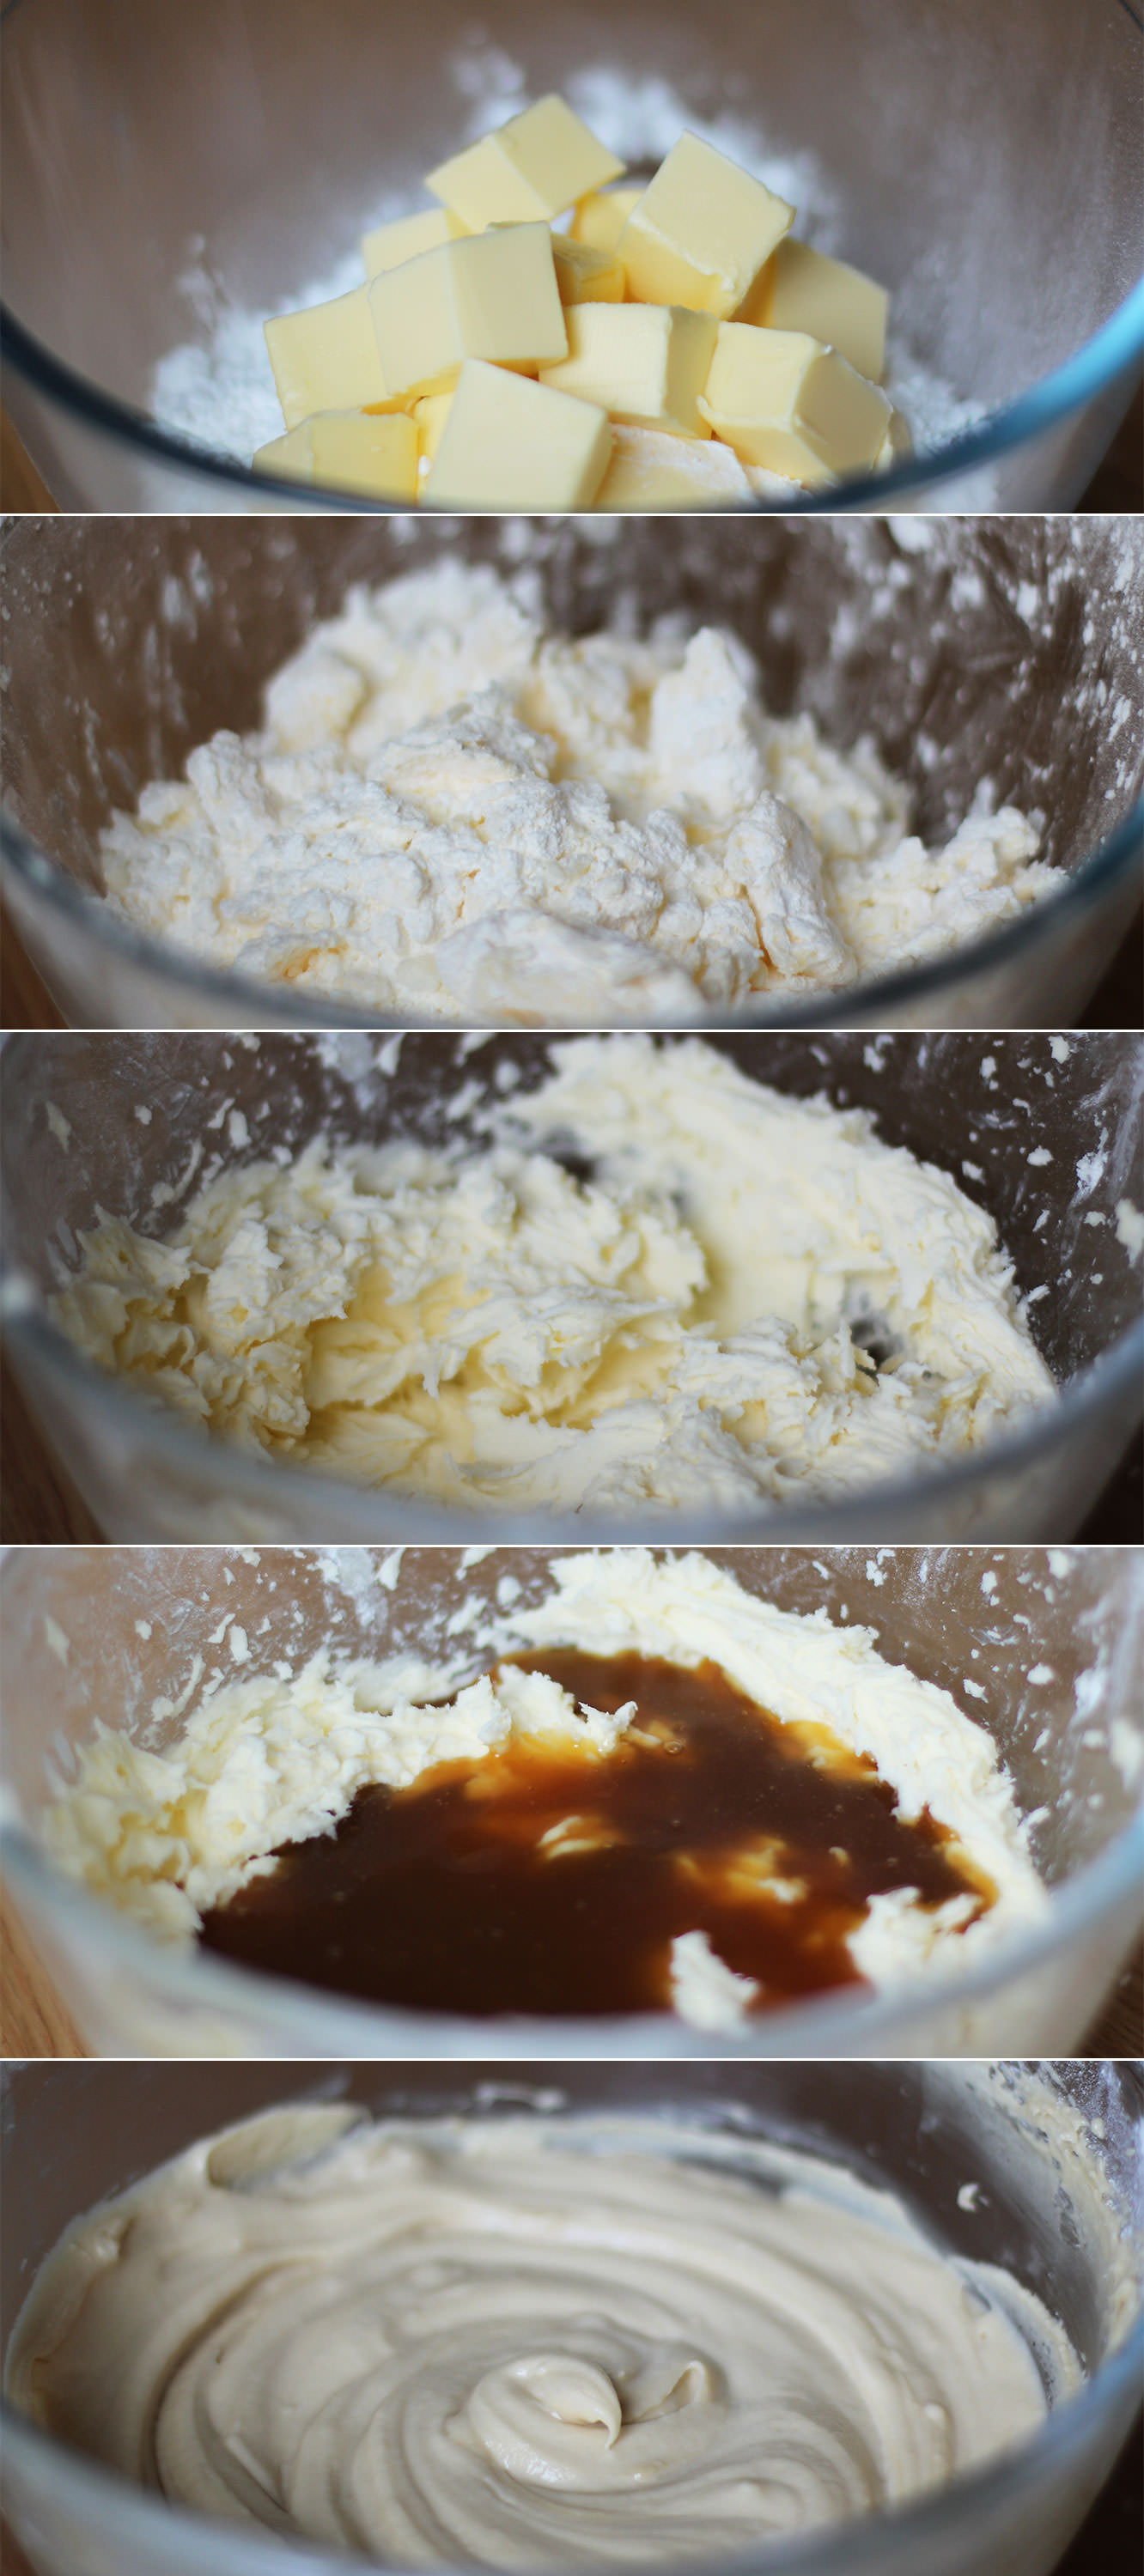
Using an electric whisk beat together the margarine and sugar until well blended and fluffy.
Step two
Add the eggs and beat again until combined. It looks a little split at this stage (see those little lumps at the sides) but you don’t need to worry, the flour never fails to sort that out.
Step three
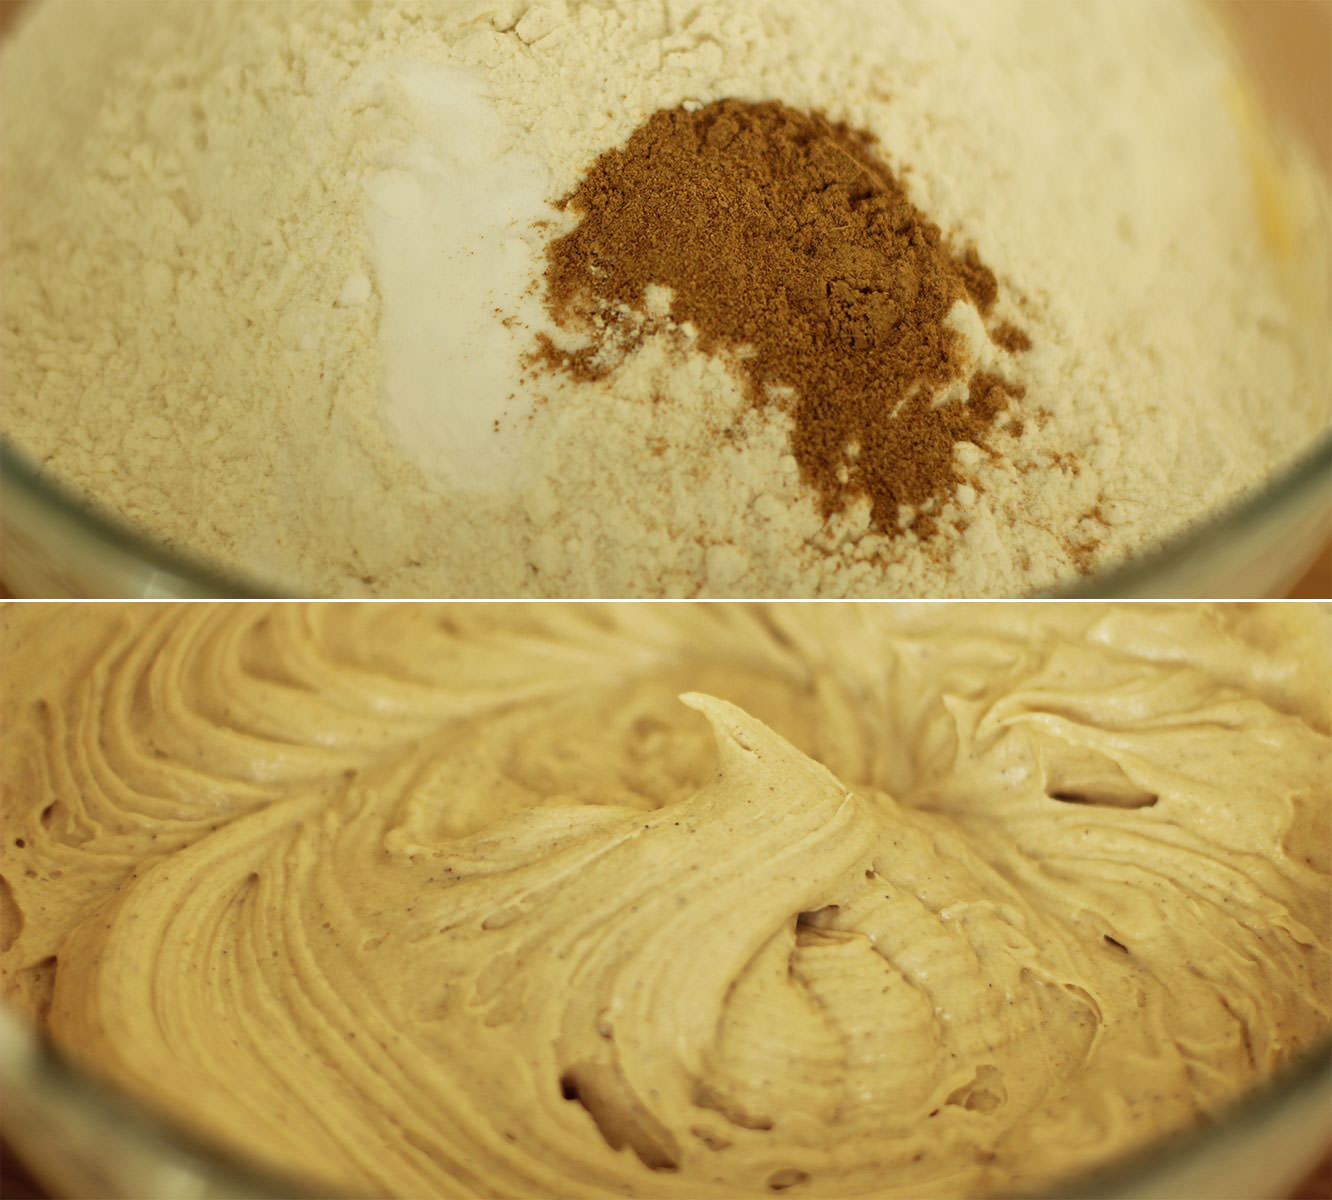
Add the flour, bicarbonate of soda and ginger and whisk again until smooth.
I also added the vanilla at this point which is in the form great paste my friend brought me back from Vanuatu, tastes delicious and has the beans in it. If you aren’t swinging by the South Pacific any time soon and don’t fancy the investment in a pod or some paste then extract will do the trick.
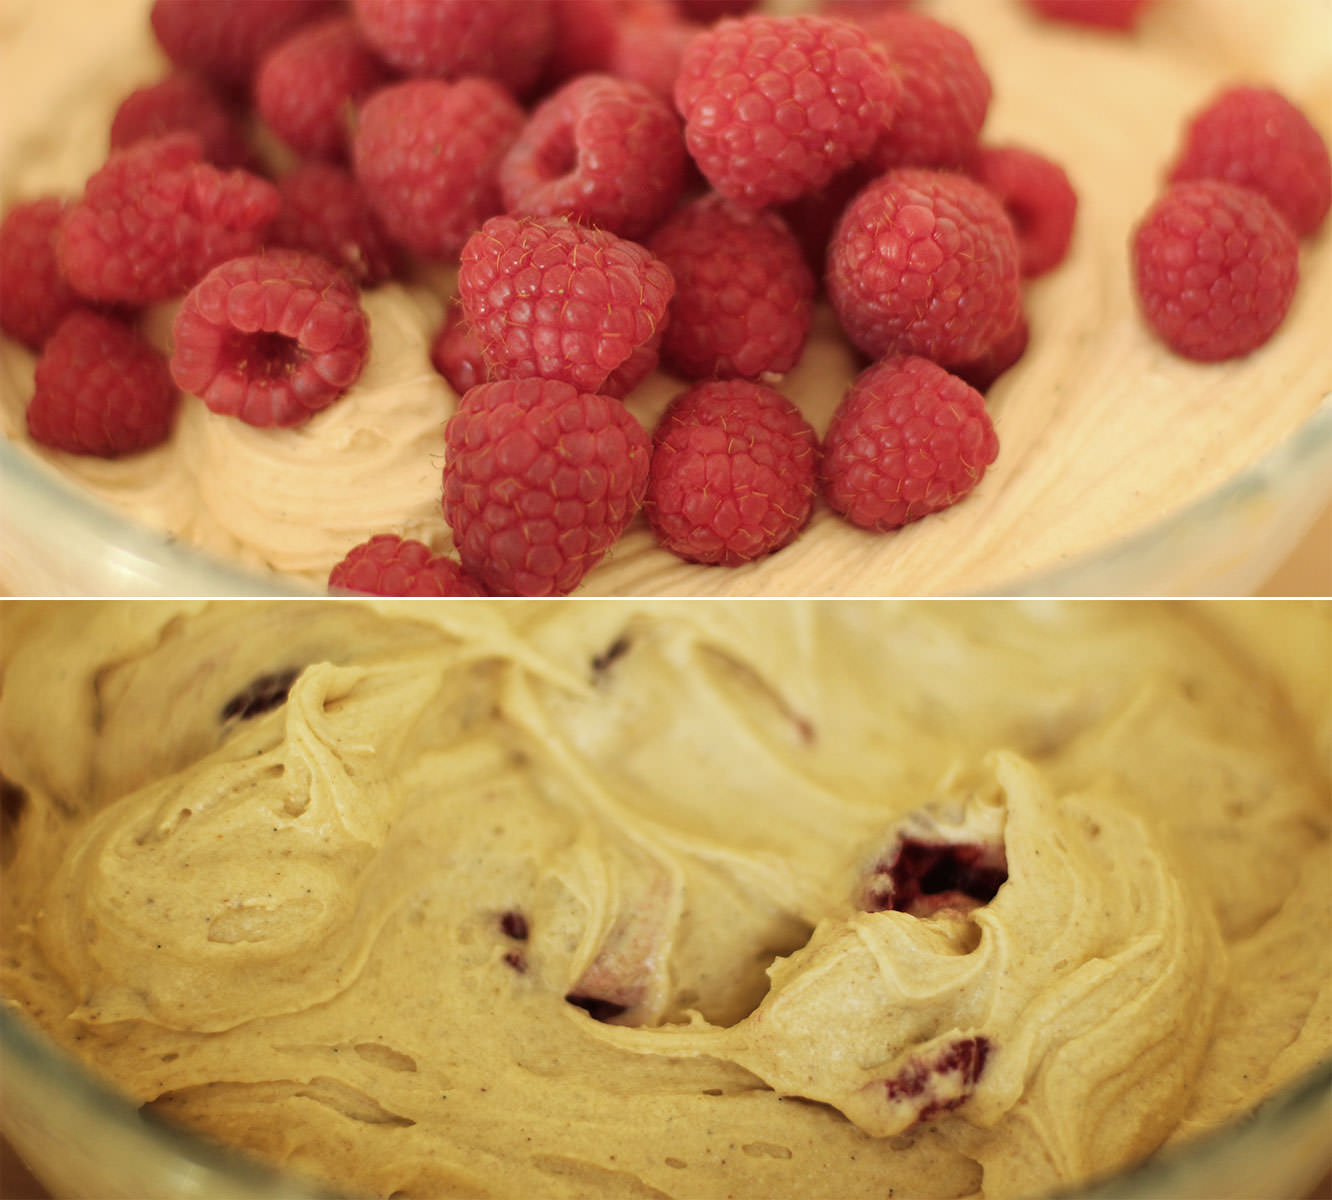
Step four
Add the raspberries and stir them in with a wooden spoon. I crushed some of them with the back of the spoon against the side of the bowl to help distribute them a little better.
Step five
Spoon into a greased and lined tin, or two tins. Bake on 180C/350F/gas mark 4.
If you are just using a single tin you need about 45-55 minutes and make sure you line the sides so that the greaseproof protects the sides and top of the cake from burning. If you are using two separate tins 35-40 minutes should do the trick, and you only need to line the bottoms of the tins.
Step six
Whisk together the butter, icing sugar, vanilla and honey for the icing. Cover the bowl with a tea towel before turning on the whisk so you don’t get covered in icing sugar.
Step seven
Once the cake has completely cooled assemble it. Use just under half the icing in the middle and the rest on top.
I then decorated with the remaining raspberries, but feel free to get creative!
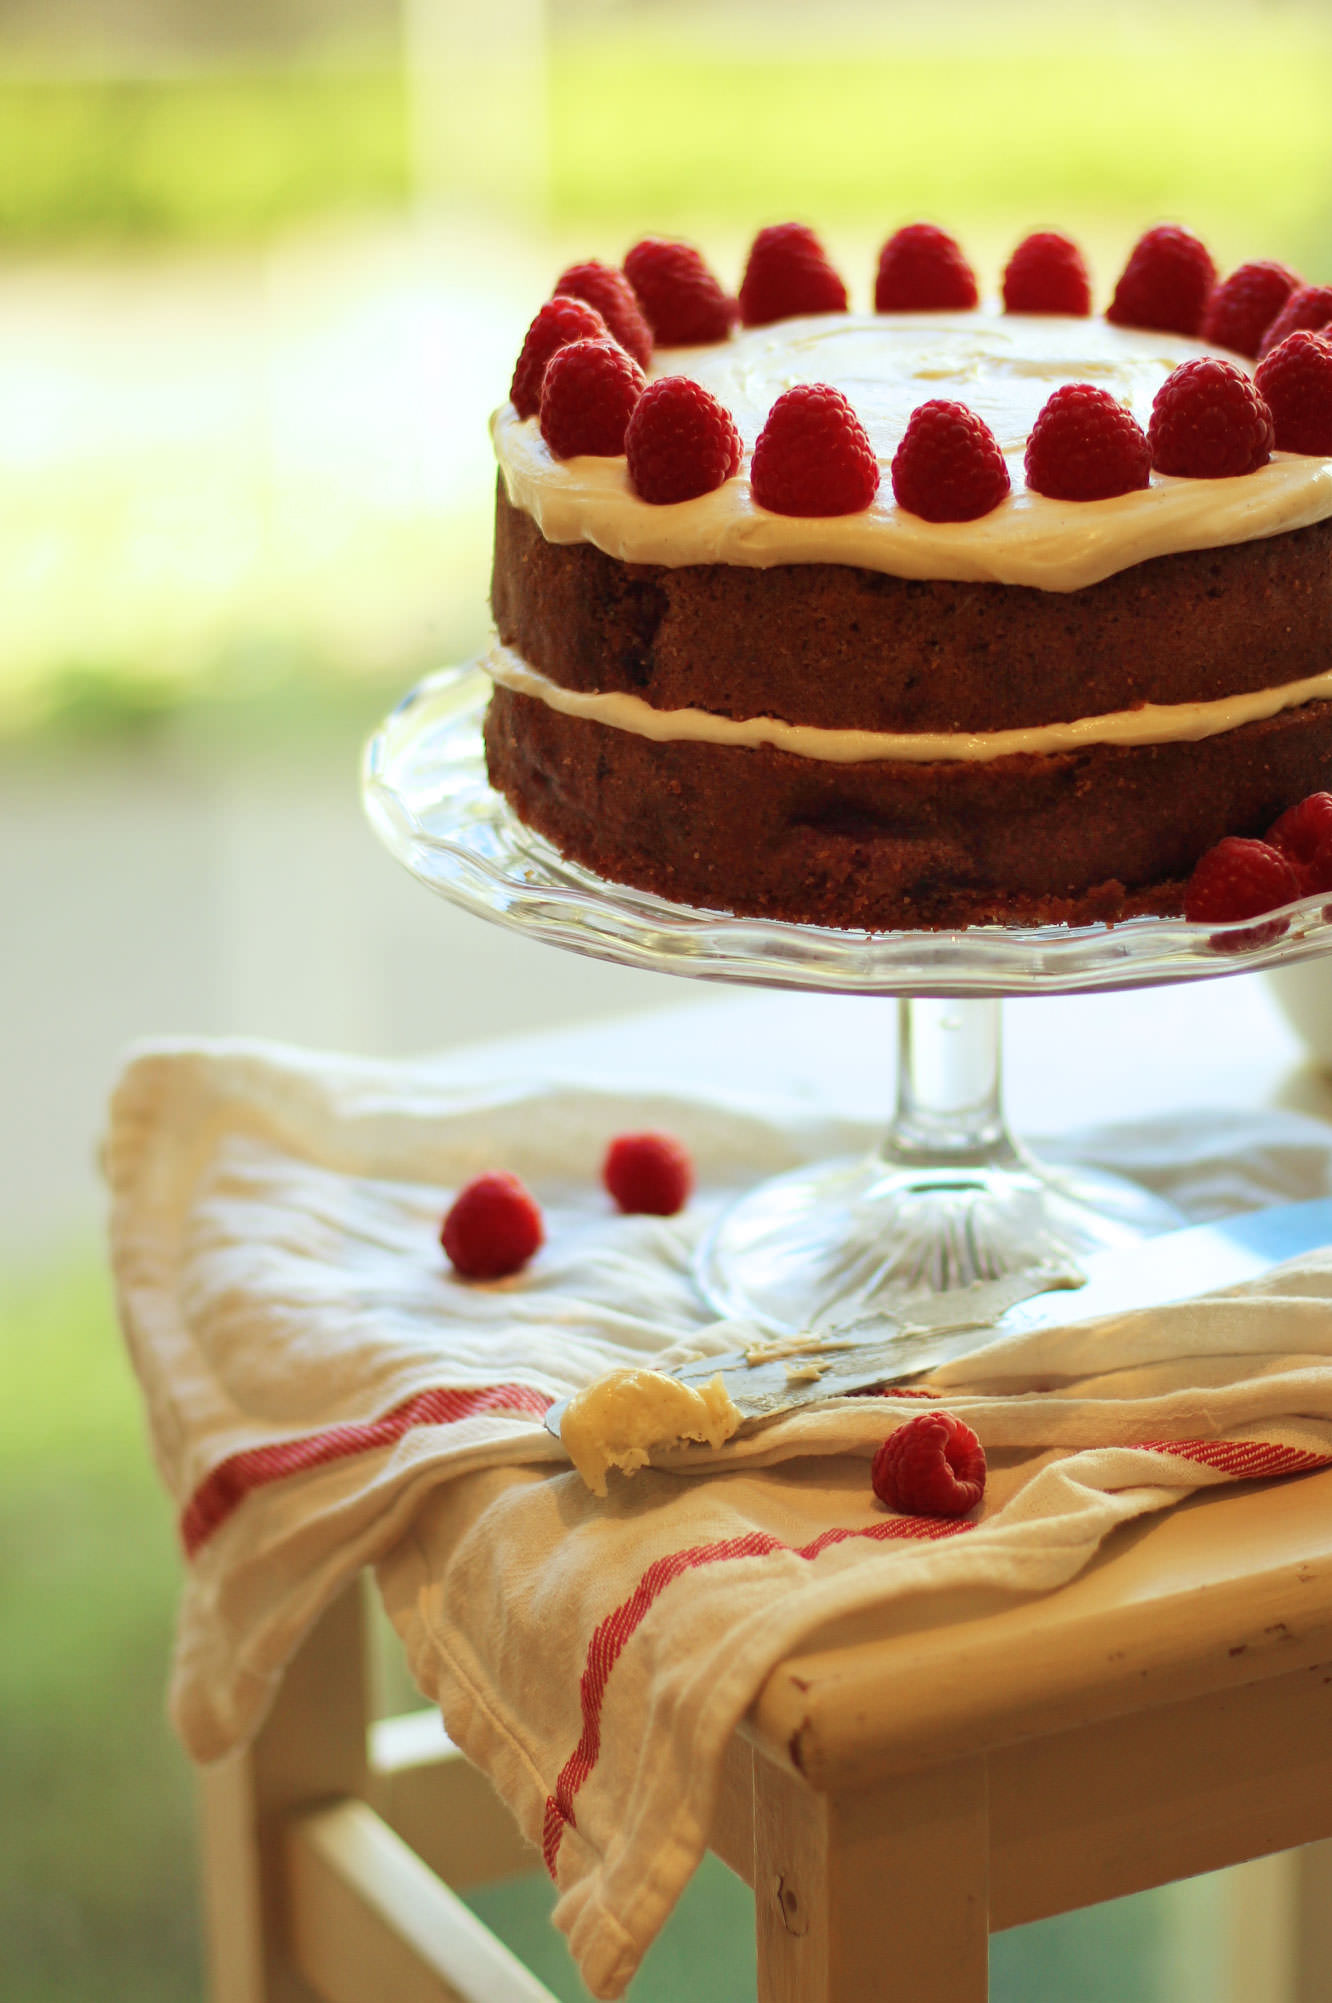
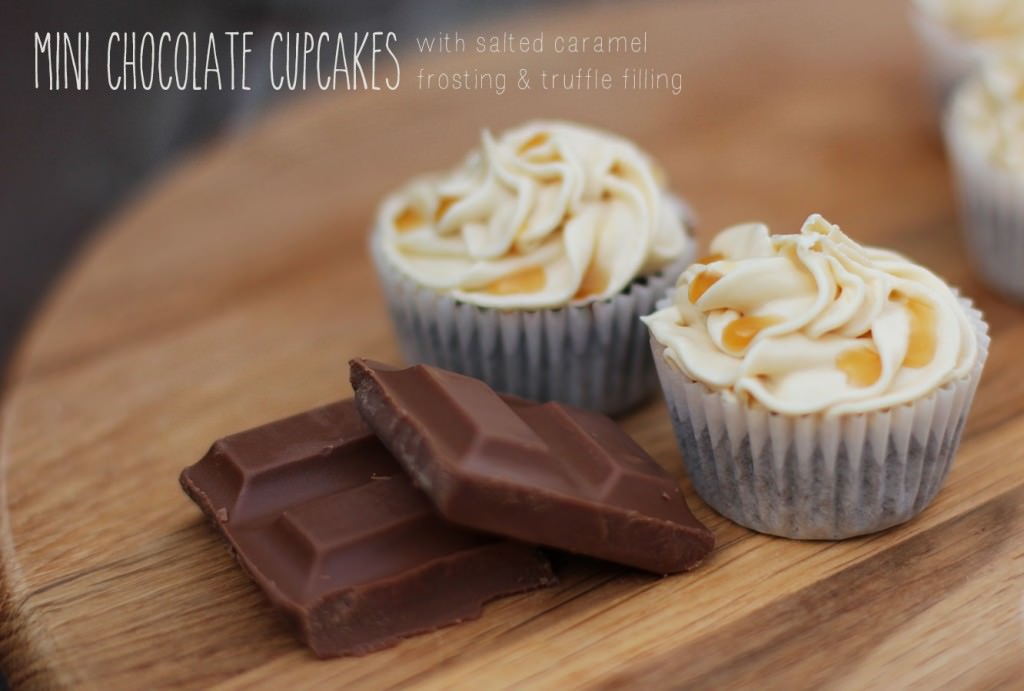
A couple of weeks ago one of my favourite colleagues had a special birthday, so for a special birthday we needed a special cake.
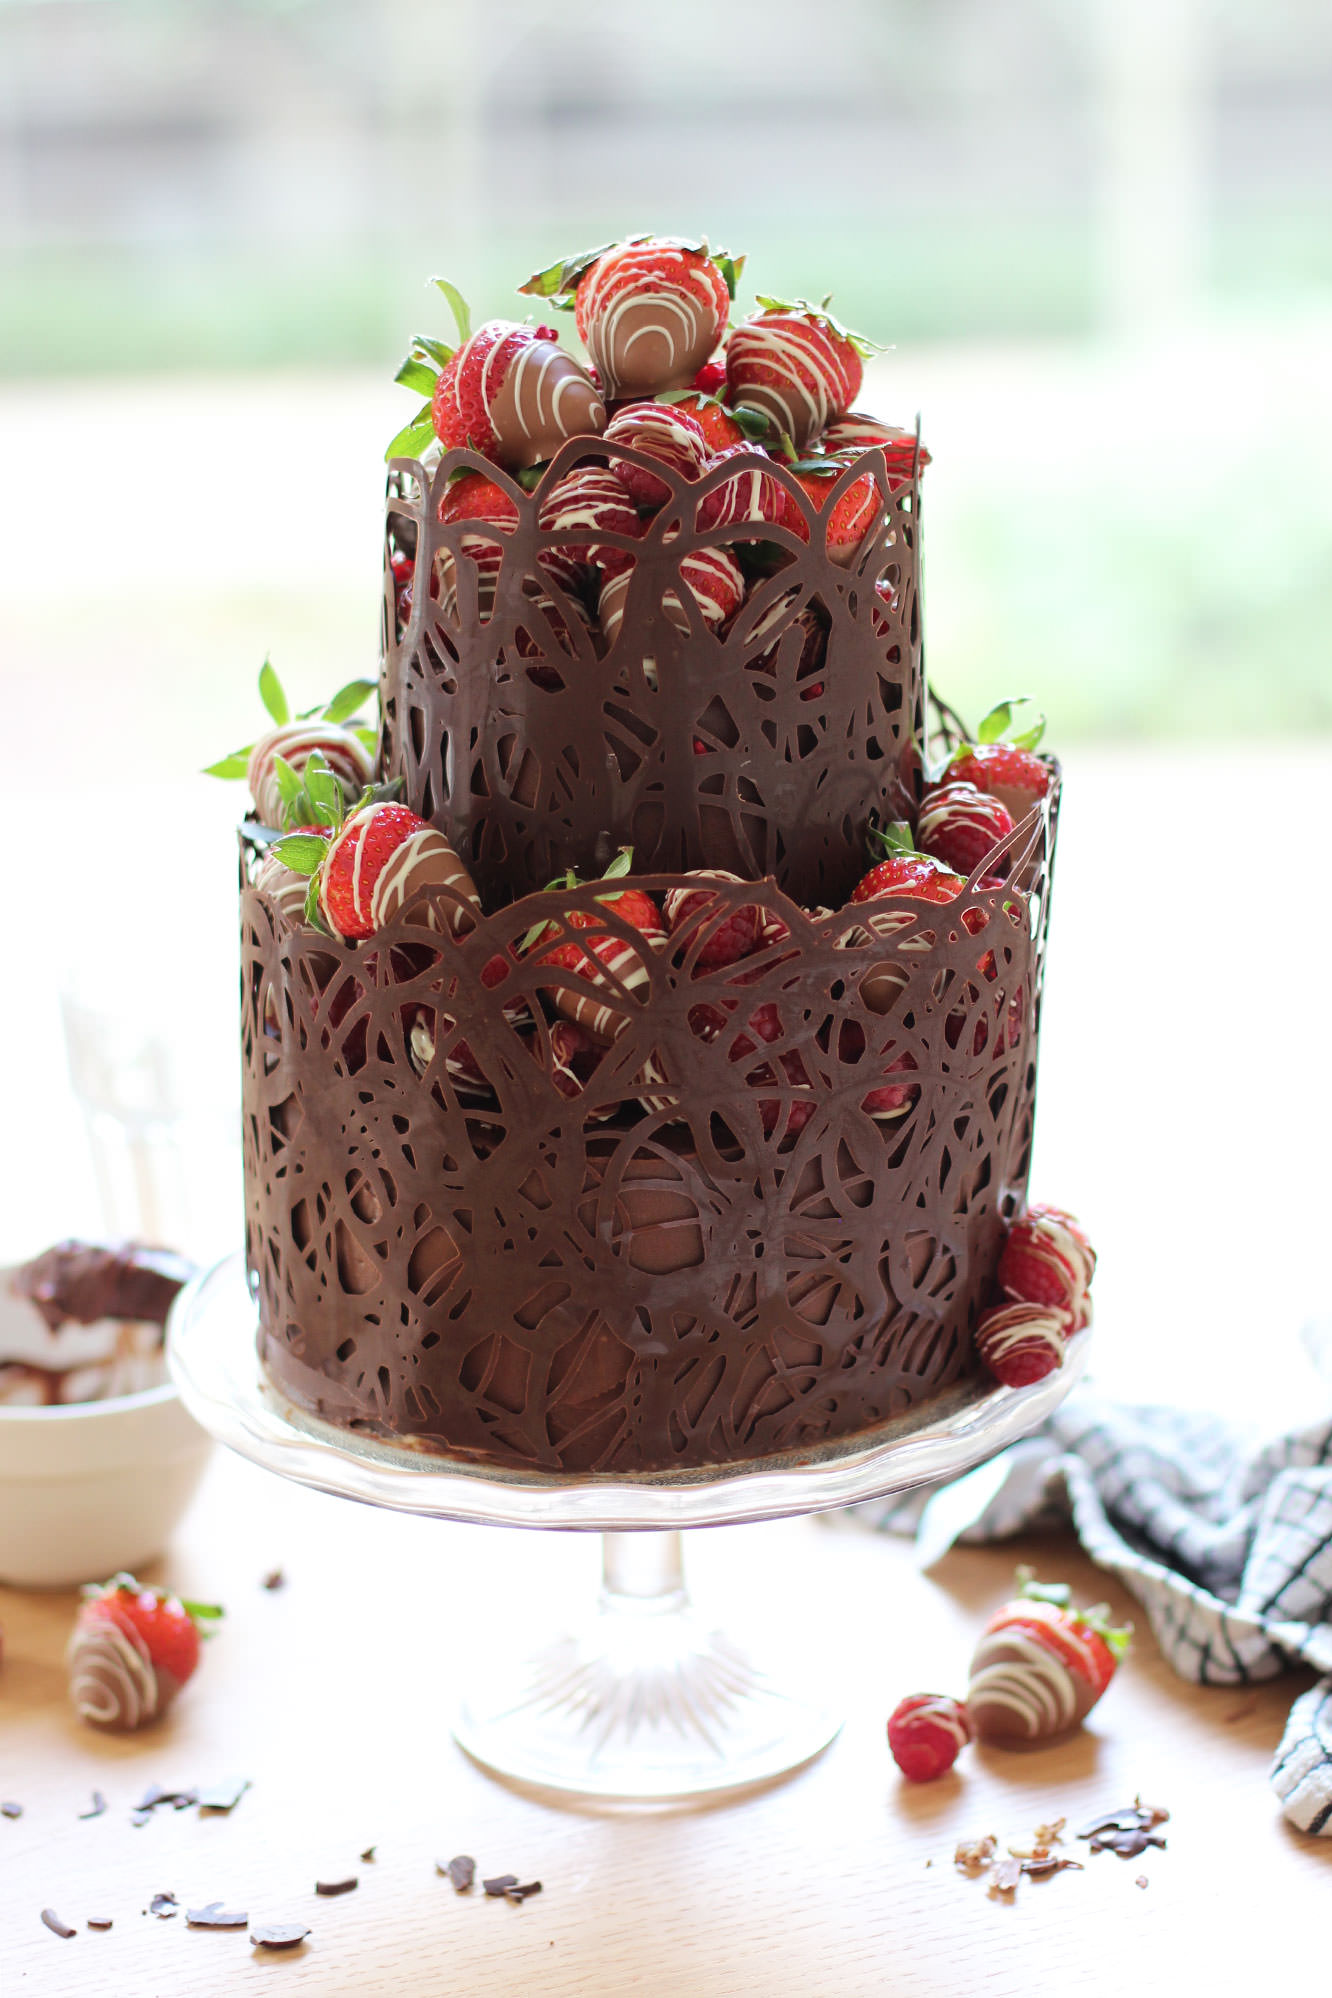
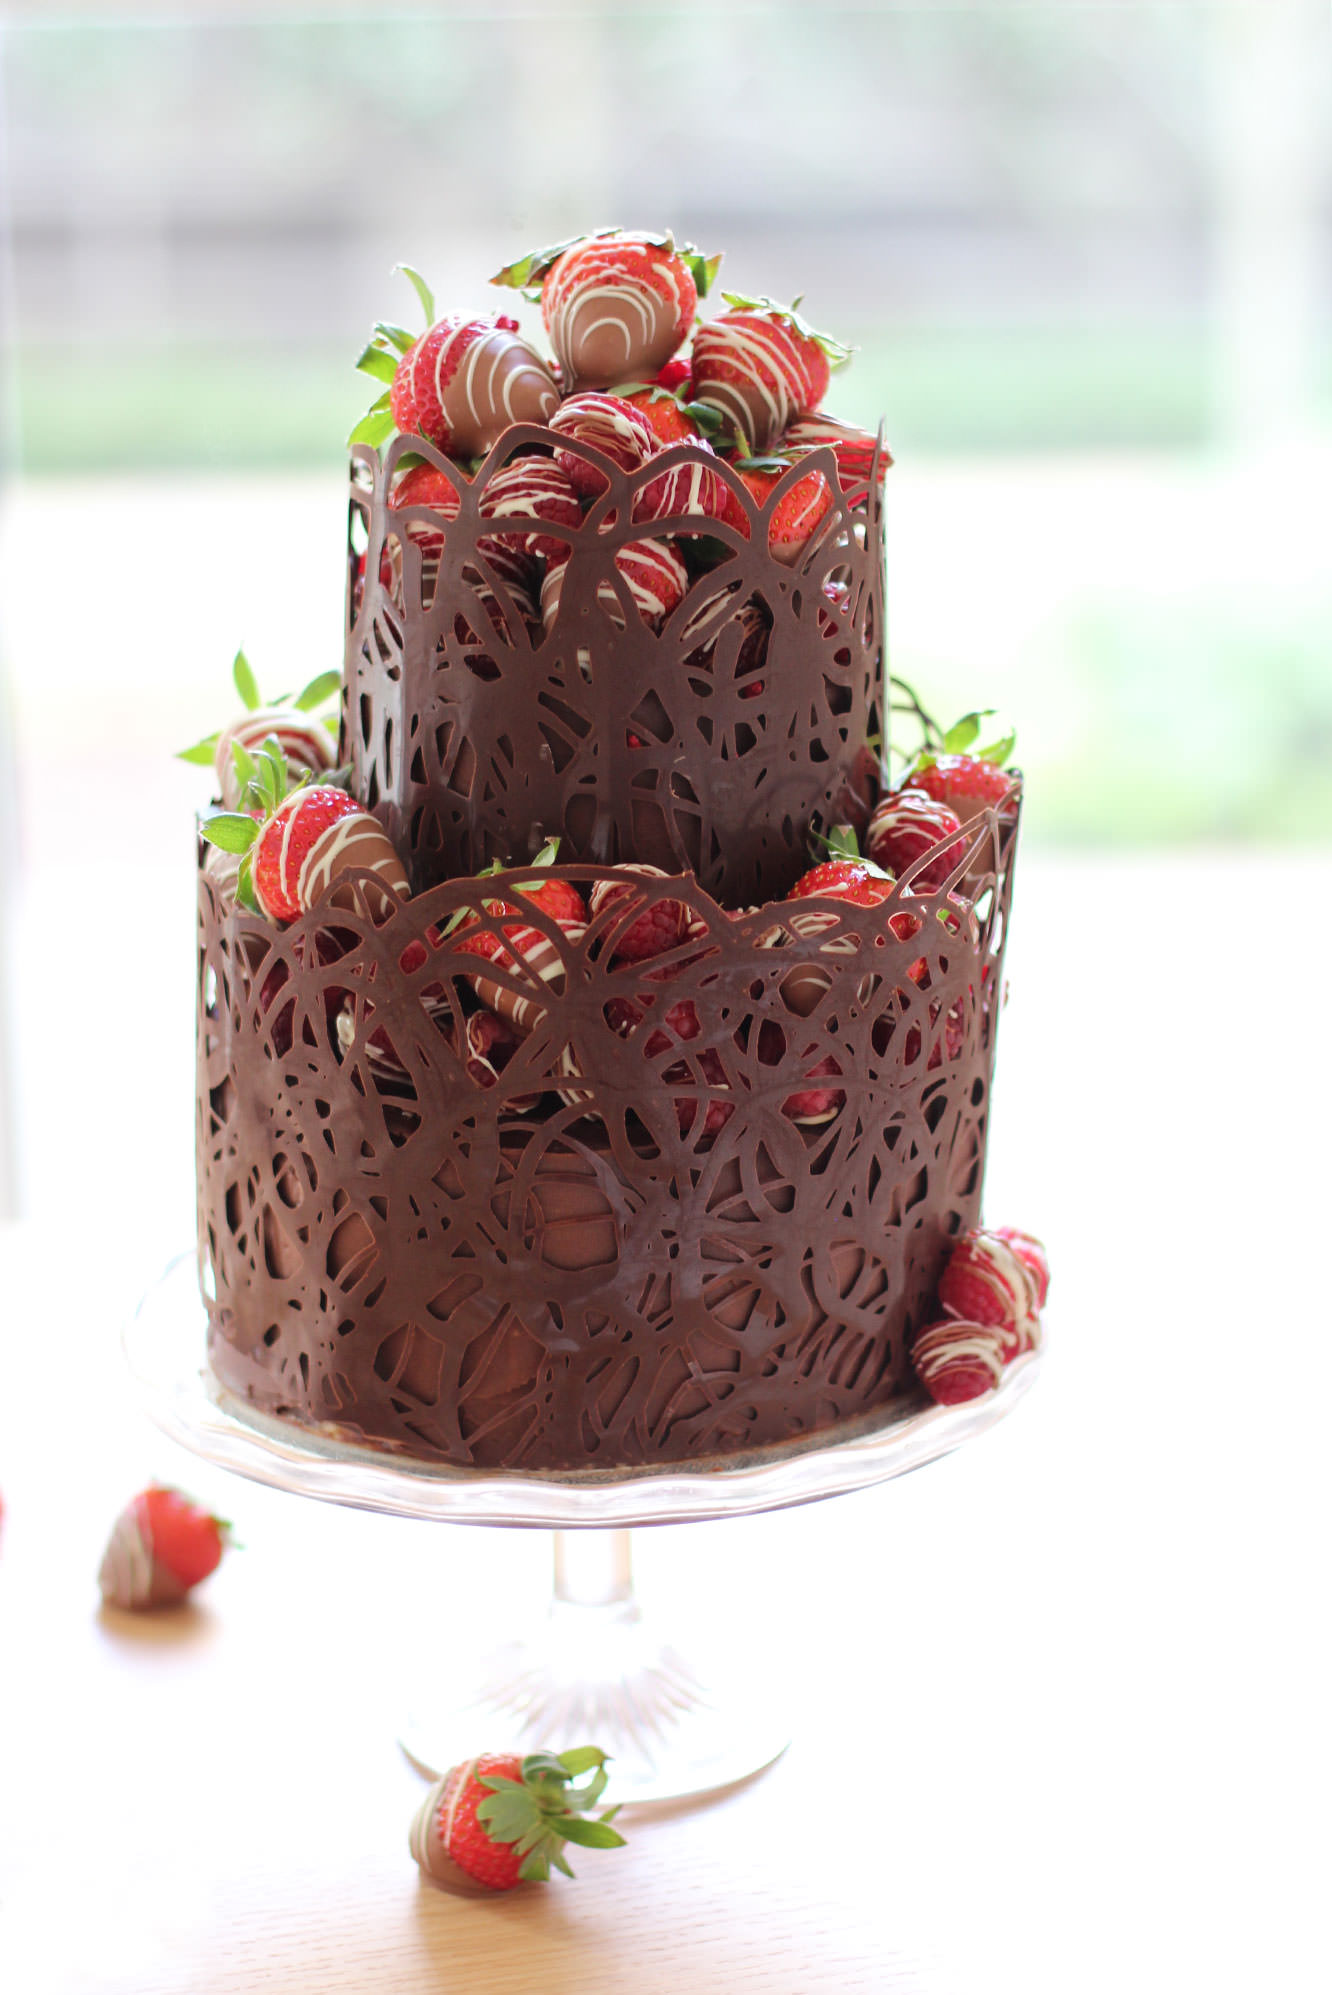
I had only attempted one two tier cake before and had never made the chocolate collar you’ll see below. Sure this cake was a bit more effort than your average victoria sponge, but if you’ve got a few hours and a bit of patience and determination this is very much possible.
I present to you a full step-by-step recipe for a two tiered chocolate fudge cake with salted caramel buttercream, decorated with a dark chocolate collar and chocolate dipped berries. I just wanted to say that out loud. Look away if you don’t like chocolate. This won’t please you.
Happy birthday Jane!
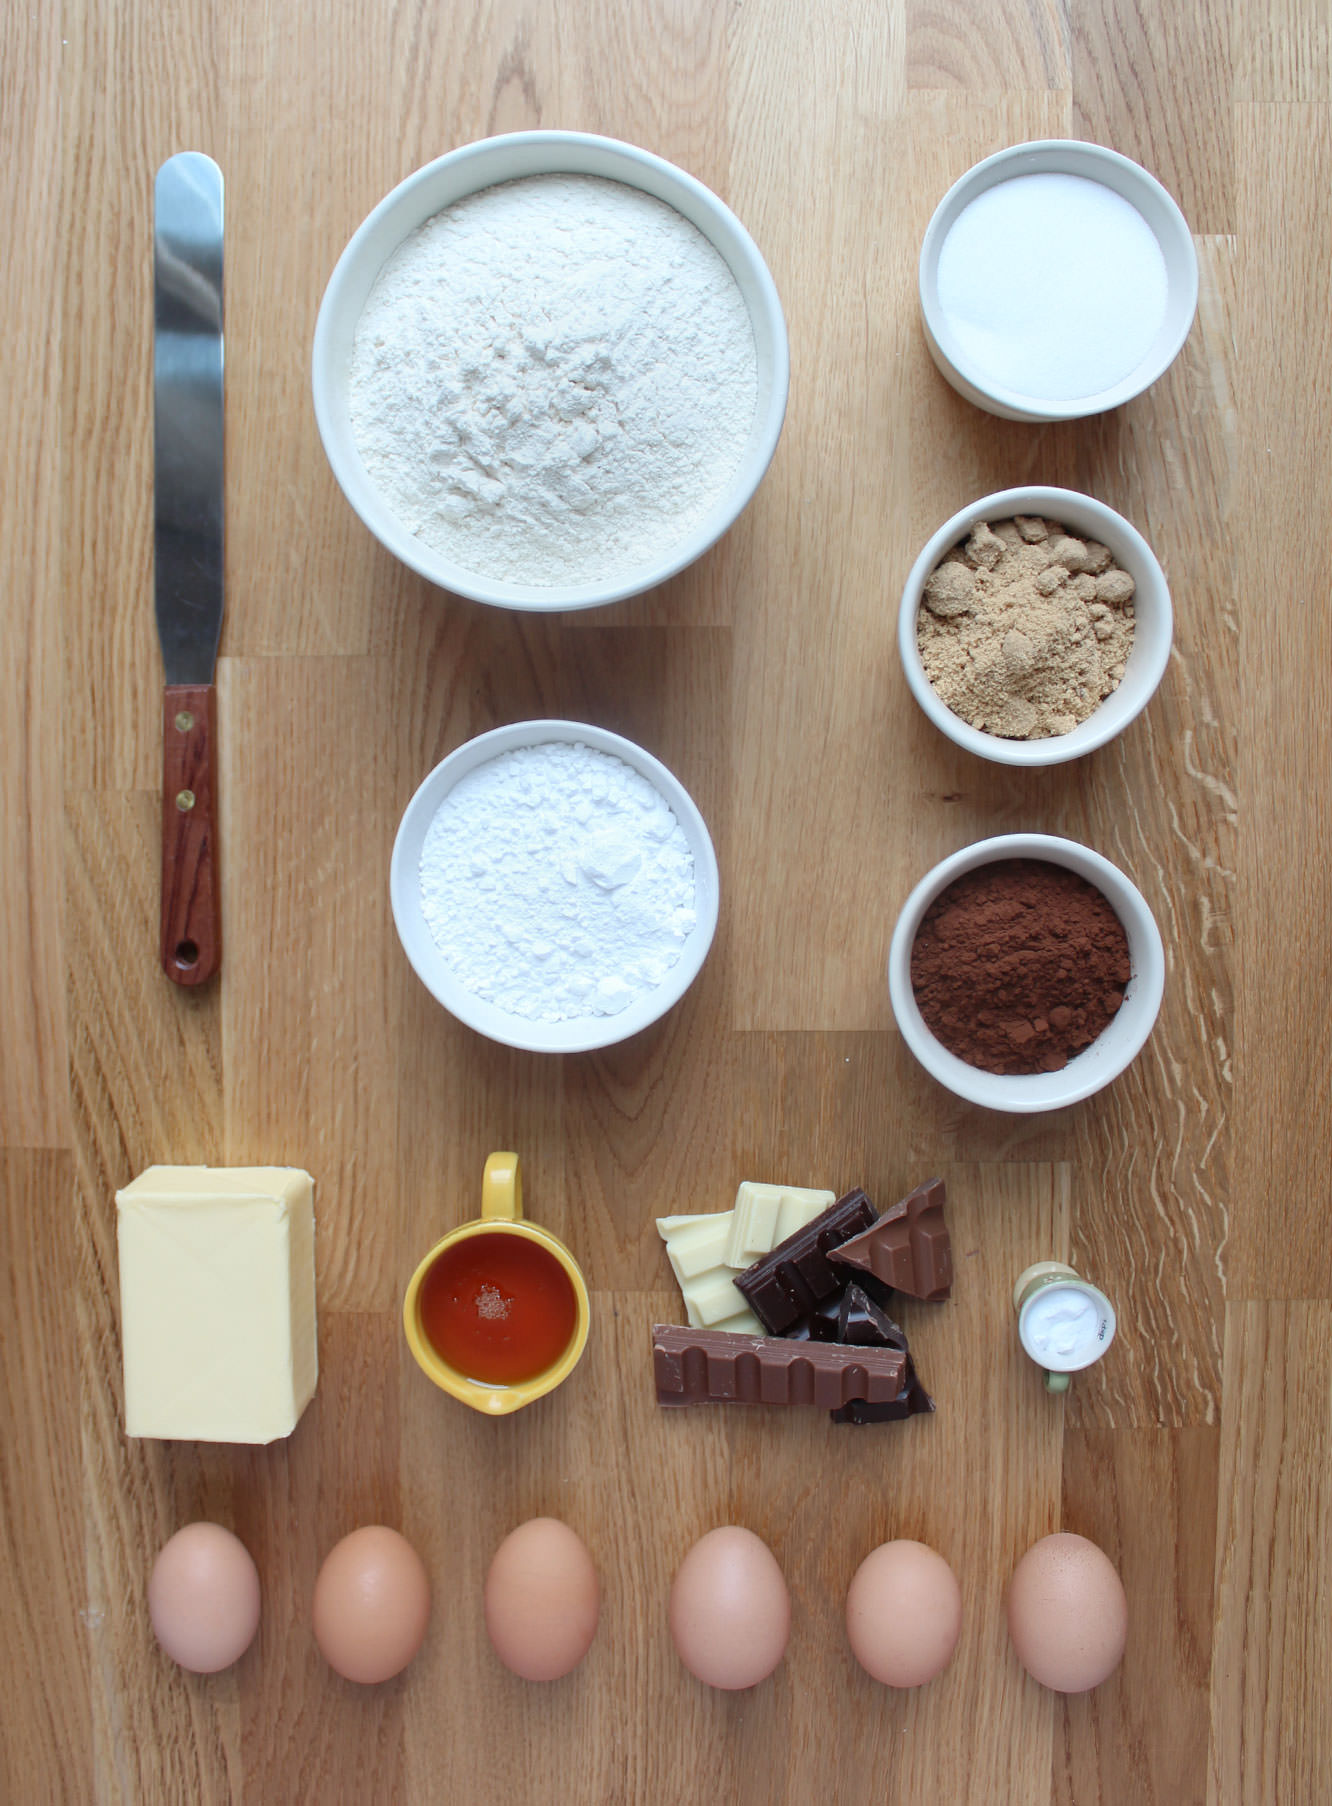
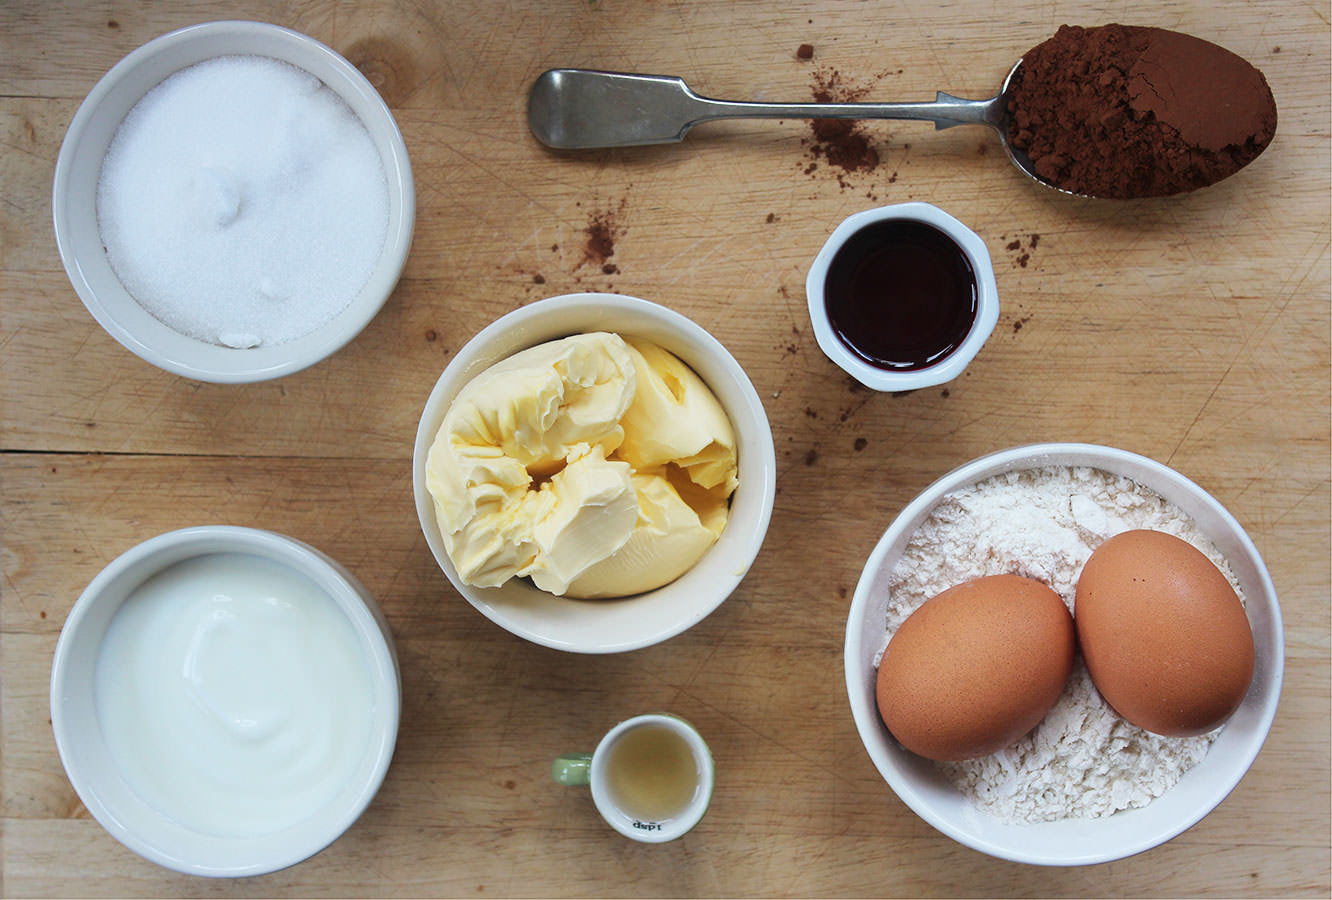
You will need
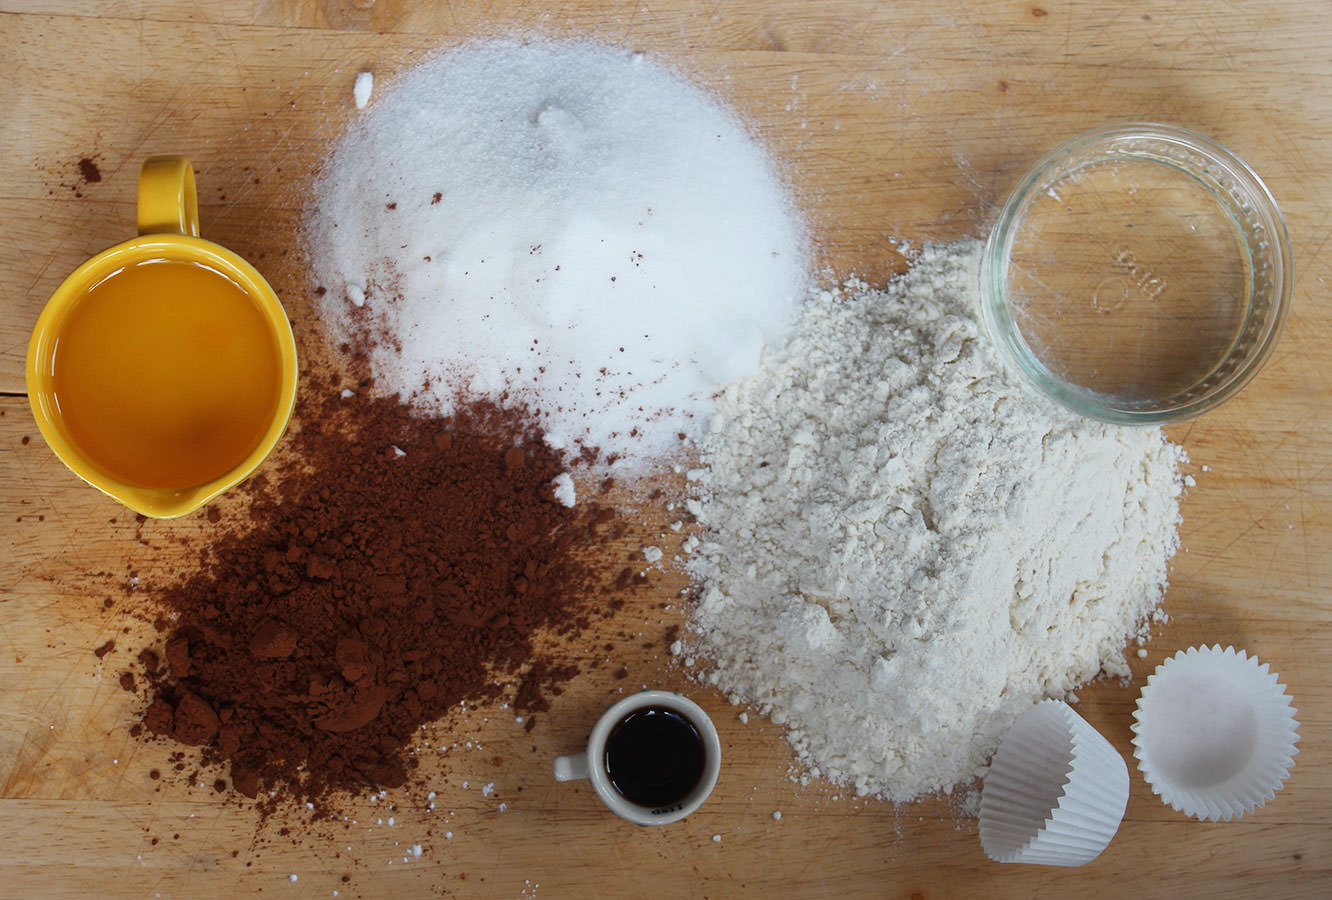
For the cake:
380g/13.5 oz caster sugar
380g/13.5 oz unsalted butter or margarine (I use stork)
325g/11.5 oz self raising flour
6 eggs
55g/2 oz cocoa powder
1 1/2 tsp bicarbonate of soda
For the salted caramel buttercream:
400g/14 oz icing sugar
250g/9 oz butter
80g/3 oz soft brown sugar
100ml/3.5 fl oz double cream
2 tbsp golden syrup
2 tsp salt
For the chocolate fudge icing:
225g/8 oz unsalted butter
200g/7 oz plain chocolate
100g/3.5 oz milk chocolate
2 tbsp golden syrup
200ml/6.5 fl oz double cream
For the decorations:
1 packet strawberries (sorry I didn’t look at weight)
2 packets of raspberries (about 500g)
200g/7 oz plain chocolate
200g/7 oz milk chocolate
100g/3.5 oz white chocolate
(for the chocolate amounts are the best approximates I can make, I bought a LOT of chocolate. I strongly recommend Sainbury’s Belgian cooking chocolate if you are in the UK, definitely do not buy that scot block stuff)
Other:
Cake tin bottom tier – 1 x 7 inch (3.5 inches deep)
Cake tin top tier – 2 x 5 inch (1.5 inches deep)
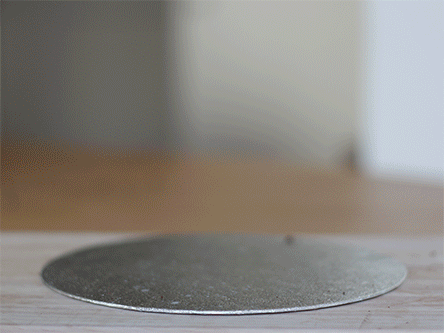
Cake boards – 1 x 8 inch, 1 x 5 inch
Sticks/straws for support. I used cake pop sticks, but wooden dowling or special cake making supports would be fine. Make sure they are at least 4 inches so you can cut them to size.
Palette knife
Sugar thermometer (not 100% essential but I recommend tempering the chocolate)
Cellophane
Piping bags
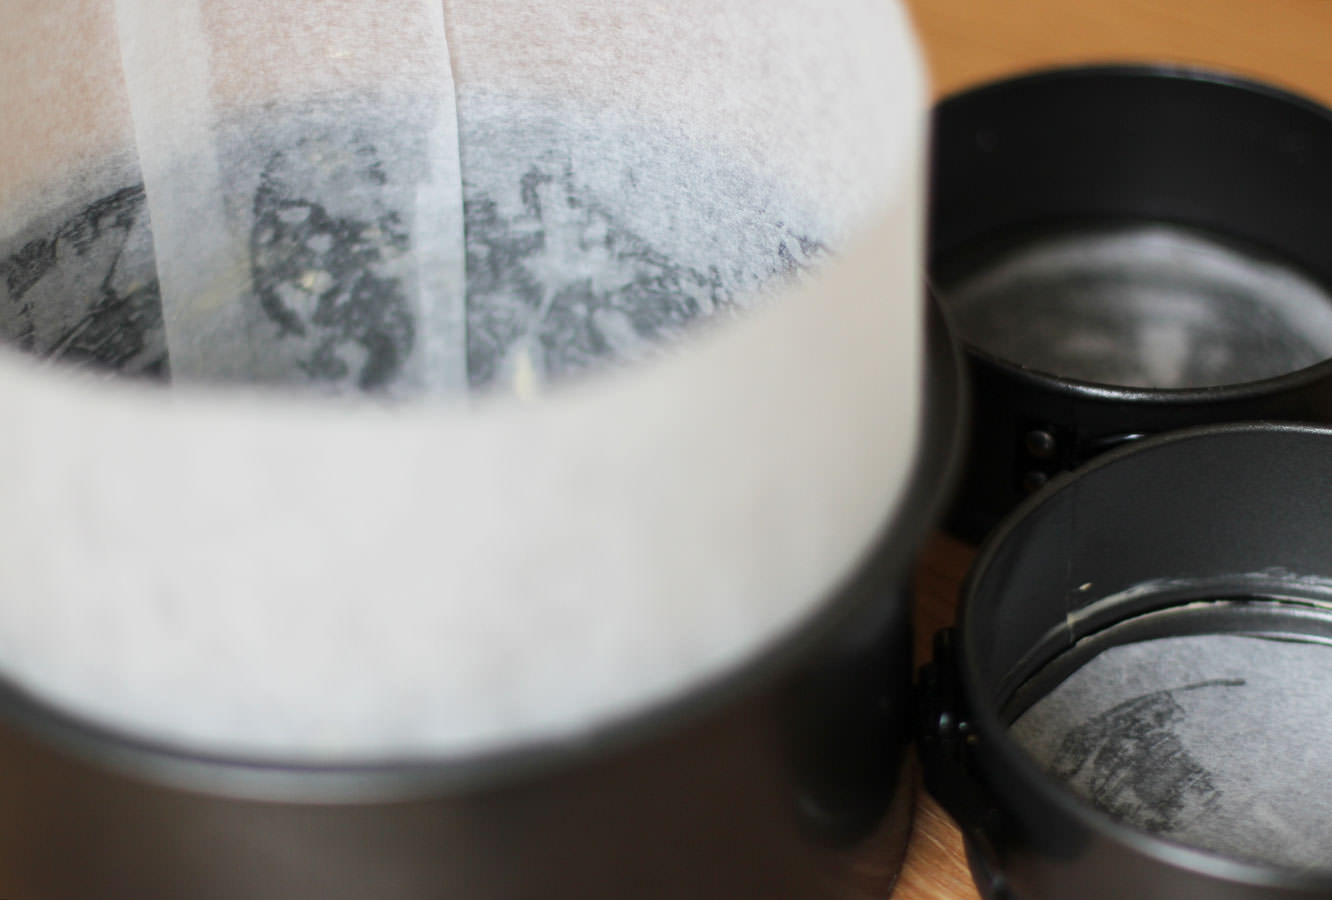
Step one
Grease and line the tins.
Note how I created a bit of a collar on the larger tin from greaseproof. This is to help stop the sides of the cake catching while the inside bakes as it’s essentially double the thickness.
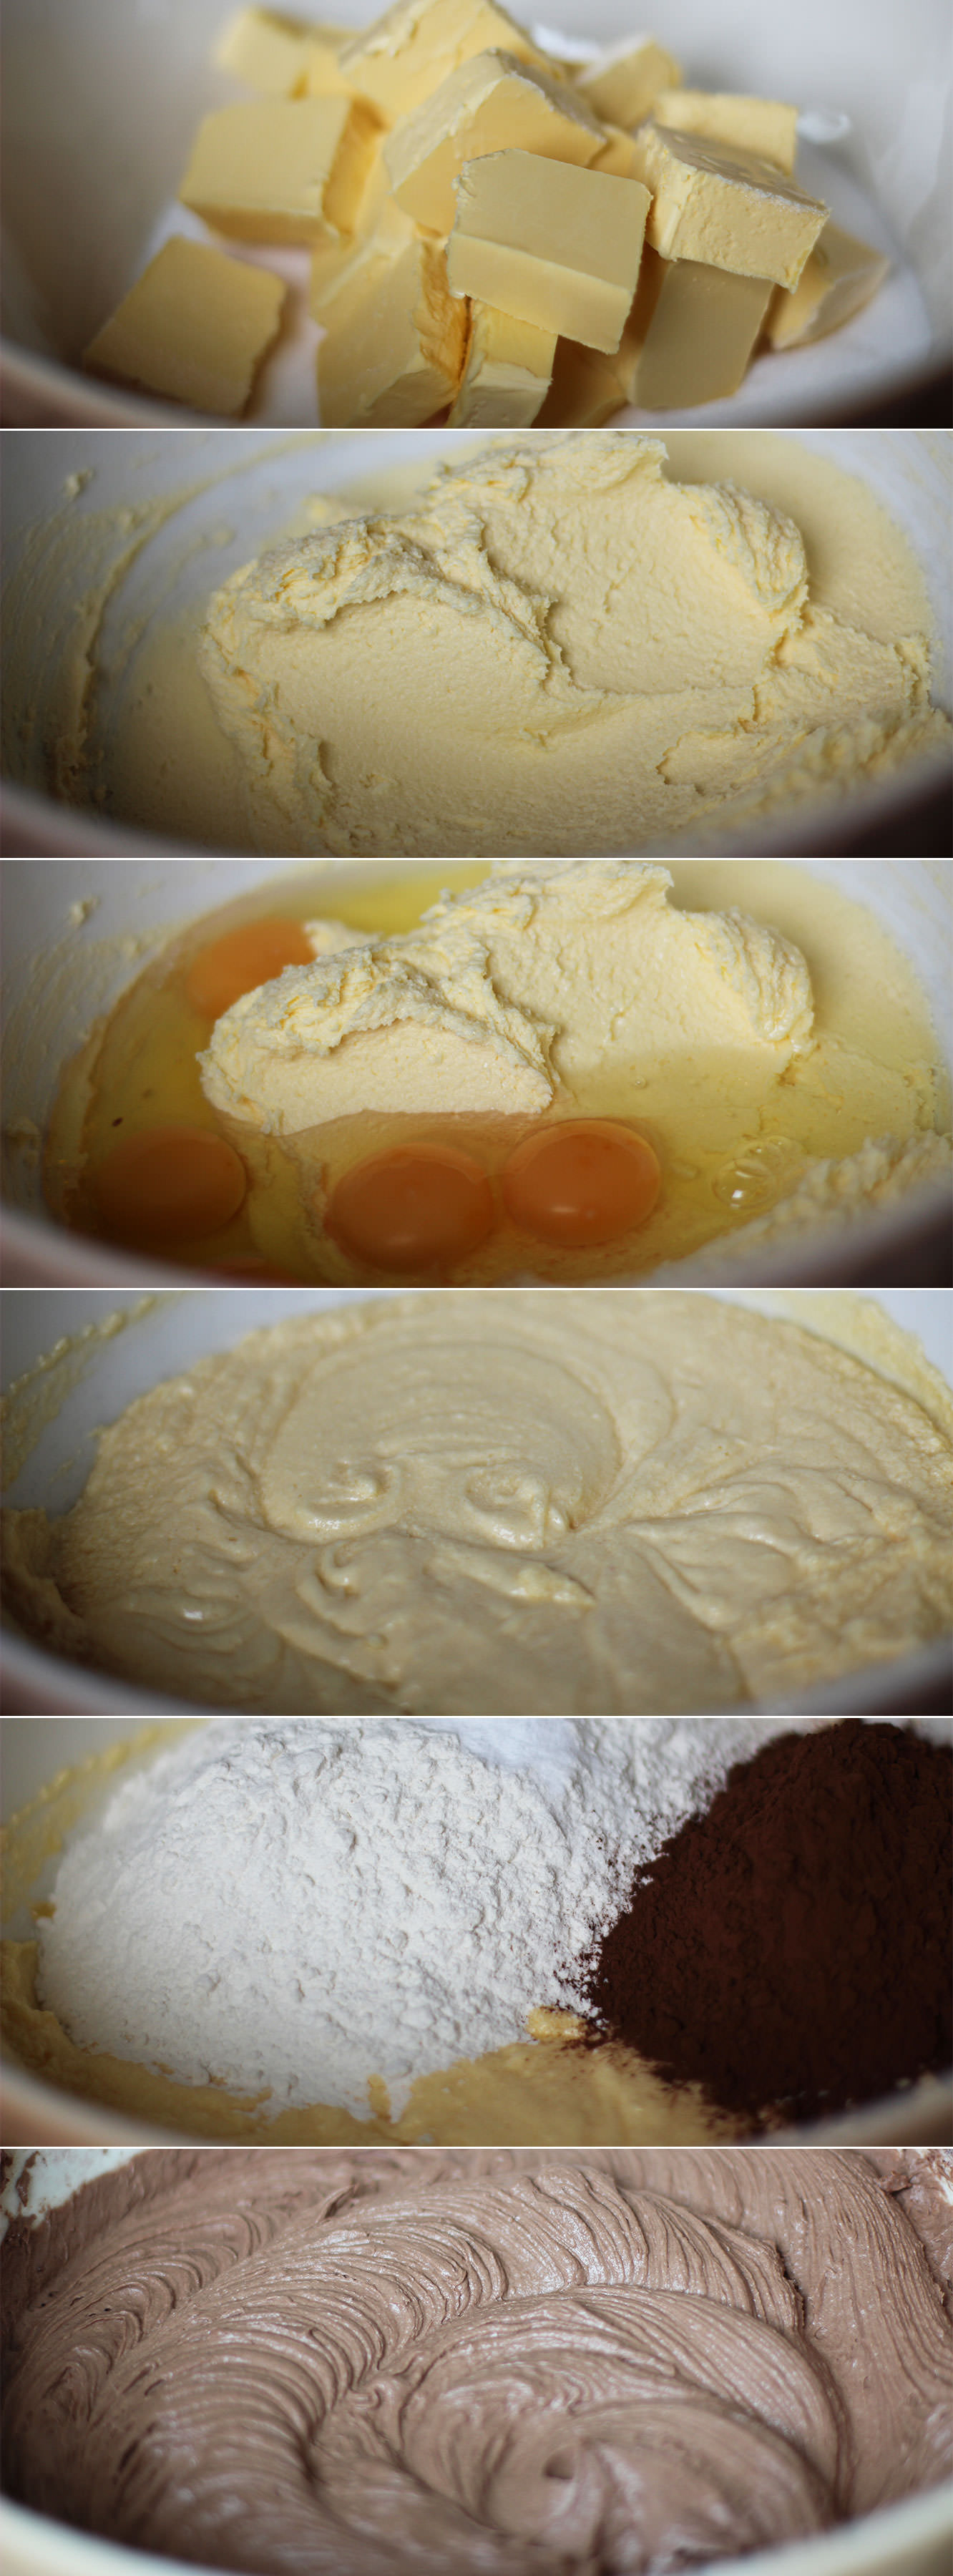
Step two
Whisk together the butter and sugar with an electric whisk, or a wooden spoon and some elbow grease, until smooth.
I used a block of stork for this, but I prefer the softer version you can get in a tub, you don’t have to wait for it to come to room temperature first that way. Margarine works just fine for cakes, I think it makes them fluffier.
You might want to use a tea towel over the bowl to avoid everything getting covered in sugar and butter.
Step three
Add all the eggs and whisk until combined.
Step four
In go the flour, bicarbonate of soda and cocoa powder.
Stir gently to start mixing the dry ingredients in first before turning the whisk on, you don’t want to choke on flour, that’s not a good way to go. It also means you will never get to eat this cake.
Step five
Divide into the tins.
Bake in the oven on 180C/350F/gas mark 4. This is where it’s a little tricky as the little cakes need a lot less time but you don’t want to open the oven much or your big cake will sink.
I say give the big cake about 30 minutes on its own, and then opening the door as little as possible add the smaller ones for the next 20 minutes. You will then need to test the cakes by sticking a sharp knife, or a cake tester if you have one. If this comes out clean (or with the odd crumb) you’re all good. If not give them another 5-10 minutes.
Step six
While the cakes are in the oven make the icing as both, but particularly the chocolate, need time to cool.
Place a heatproof bowl over a pan of barely simmering water. Add the butter (real butter this time), chocolate and golden syrup. Melt until smooth.
Remove from heat and stir in the cream quickly. Take the bowl off the pan and place somewhere cool and dry.
I don’t really suggest the fridge because you might forget it (like I did) and then you have to wait for it to warm up enough to spread. But that being said, the fridge is a viable option, just keep an eye on it.
Step seven
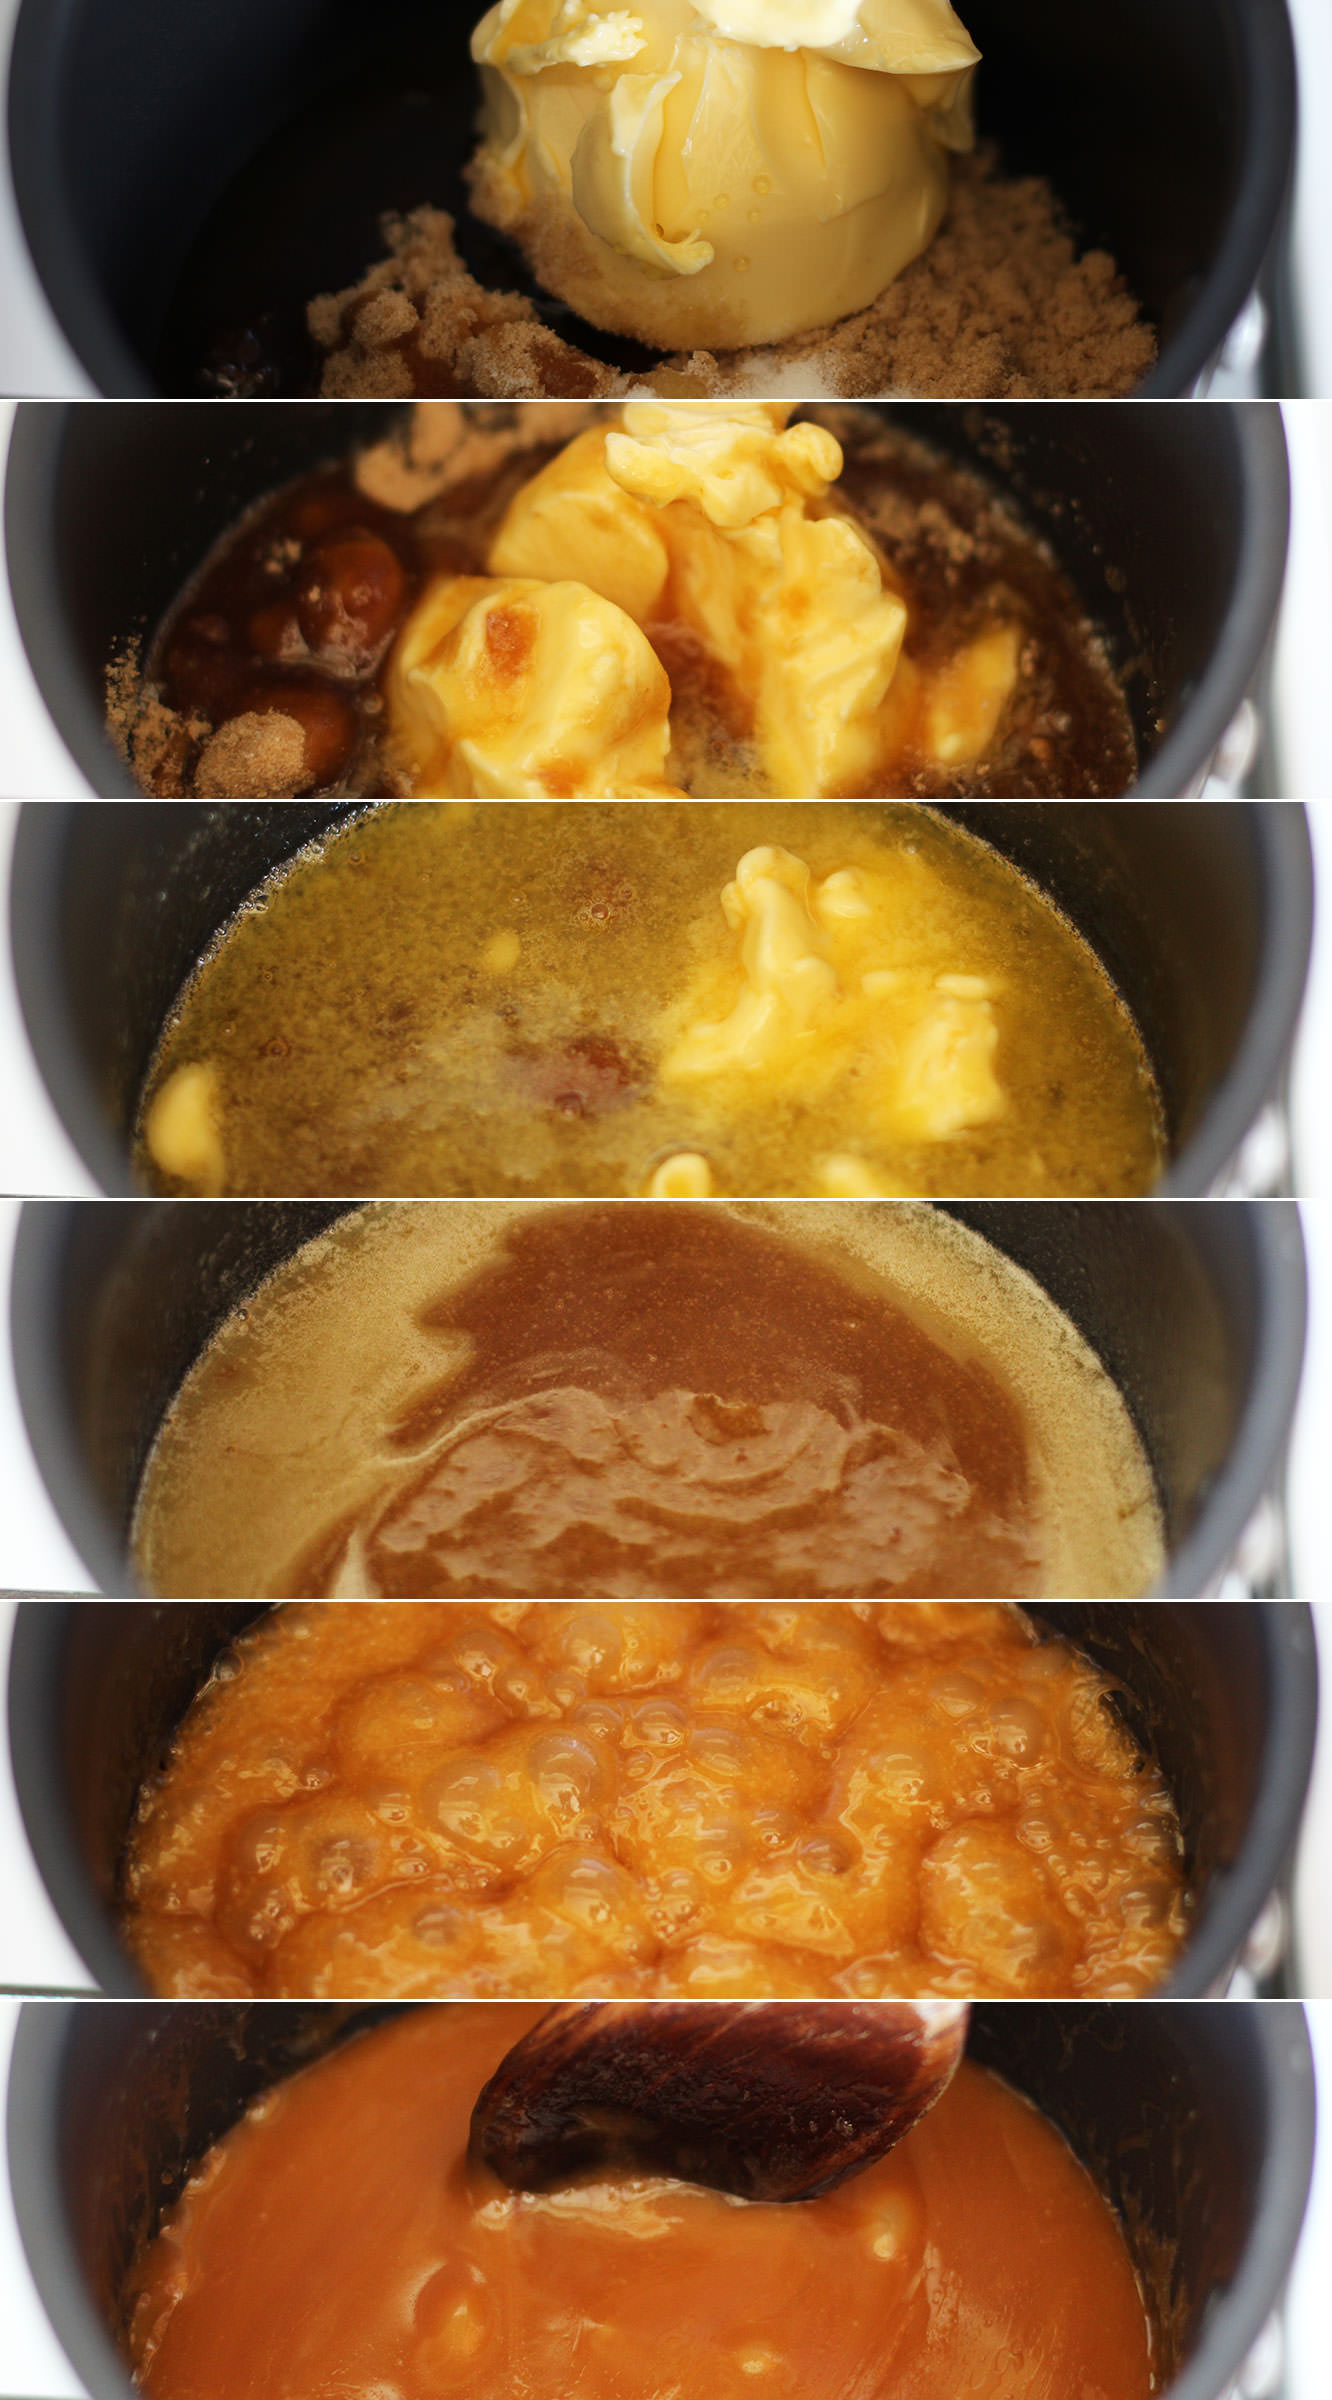
For the salted caramel buttercream melt together 100g of the butter, the brown sugar, golden syrup and salt. Do this slowly and then bring the heat up to a simmer.
Simmer for 10 minutes. Stir regularly so that it doesn’t catch and burn. Leave to cool down for about half an hour or so.
Step eight
Stir in the 100ml cream and leave to cool further.
Step nine
Whisk the icing sugar and 150g of butter together with the salt. Definitely cover the bowl with the tea towel this time. I find if my butter is not quite soft enough it helps to rub it in a bit with clean hands first. There is NOwhere icing sugar won’t go when you use an electric whisk.
Step ten
Add the caramel and whisk again until smooth. Don’t worry if the caramel is still a little warm, just leave your buttercream to cool in the fridge for a bit. But again, don’t forget about it or it won’t be spreadable.
Step eleven
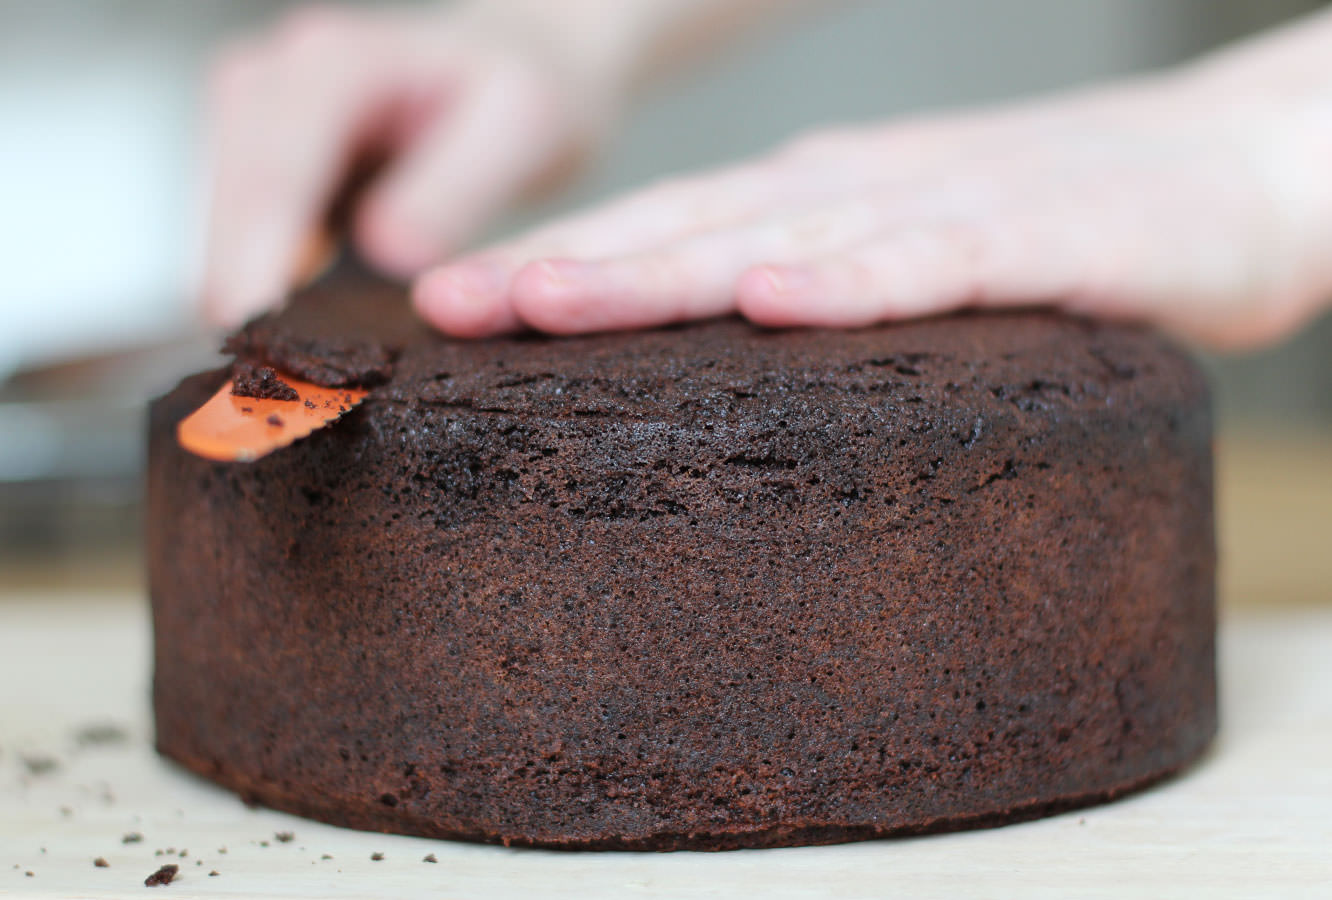
When your cakes have completely cooled prepare them for icing. You need to lop the top off the large one until it’s as flat as possible on top. So much of this cake is covered in decoration that you can get away with a little bit of wonky though so don’t panic if it’s not prefect. Having said that the flatter the better so the top tier sits straight. NO PRESSURE.
Step twelve
Cut the cake in the middle. Try to do this evenly by scoring it the whole way round first. Just keep going round in circles, getting further in each time until you’re all the way through.
Step thirteen
Level out the tops of the small cakes. I would be lying if I said I didn’t spread some icing on the offcuts and eat them.
Step fourteen
Using a palette knife ice the cakes.
First place a bit of buttercream on the cake base to stick the cake to it. Start with the caramel buttercream and ice the middle and the top. Don’t worry if bits splurge out the sides.
Smooth these out around the sides with the palette knife, gradually adding buttercream here and there to create the sharpest sides you can. Some parts will have a thicker coating than others, this layer is made to contain all the crumbs (hence the name crumb layer) and to even out the shape a bit. It’s not going to be pretty.
Place in the fridge for about an hour before starting the chocolate.
Ice the chocolate on in the same way, neatening as you go. For the most part it will be covered up, so it really doesn’t need to be too smooth.
Step fifteen
Cover the small cake in the same way.
Place both in the fridge while you prepare the decorations.
Step sixteen
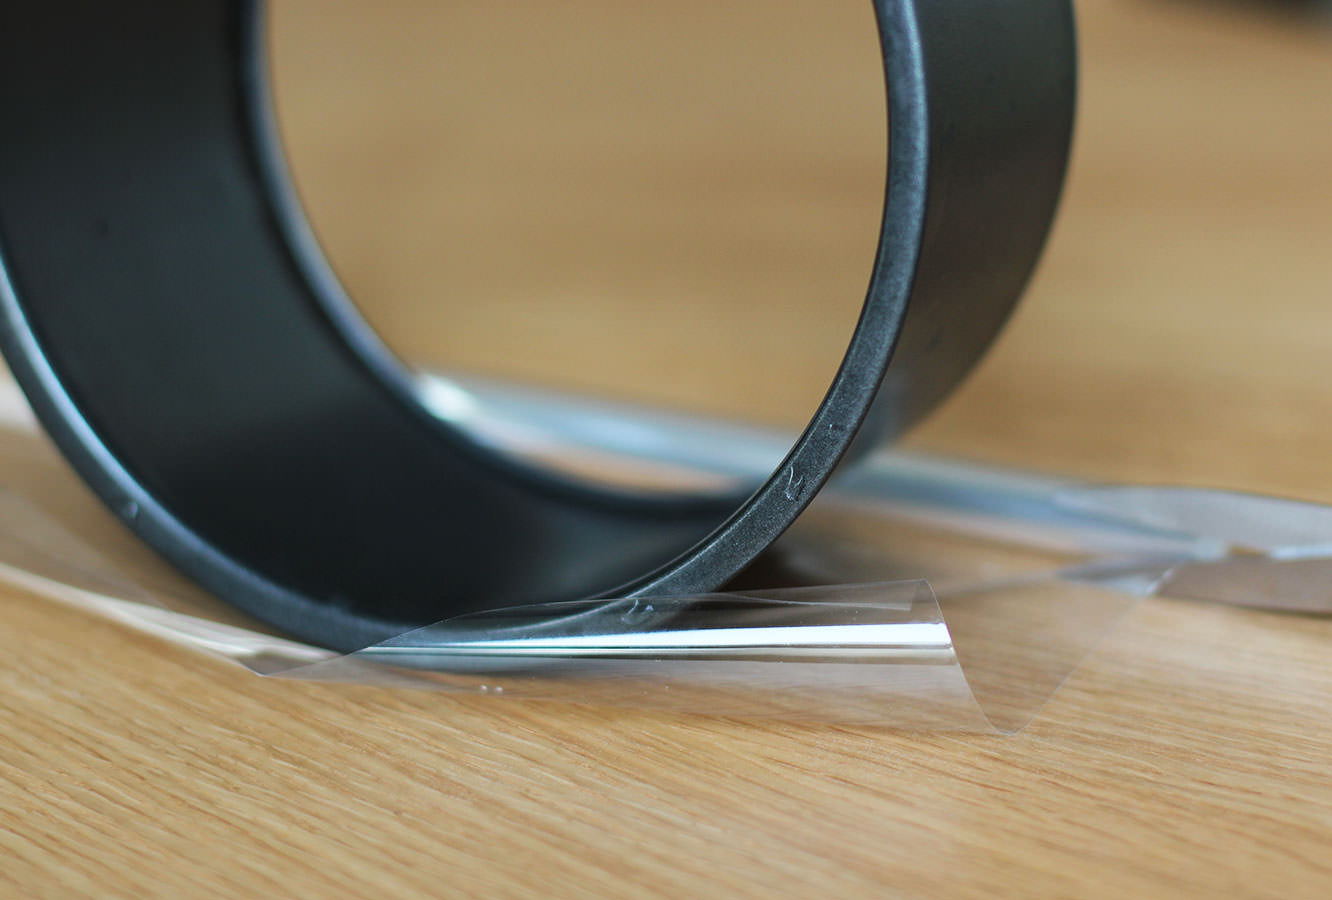
Using the tins as a guide cut a strip of the cellophane for both the top and bottom layer. You want these to be quite close to the size of the chocolate collar, so tall enough that you will have about 5cm/two inches taller than the cake, and wide enough to match the circumference. You can quickly check this against the cake to ensure it will fit.
Don’t forget to cut one for the top tier and one for the bottom, bearing in mind your top tier cake is twice as tall as the tin.
Step seventeen
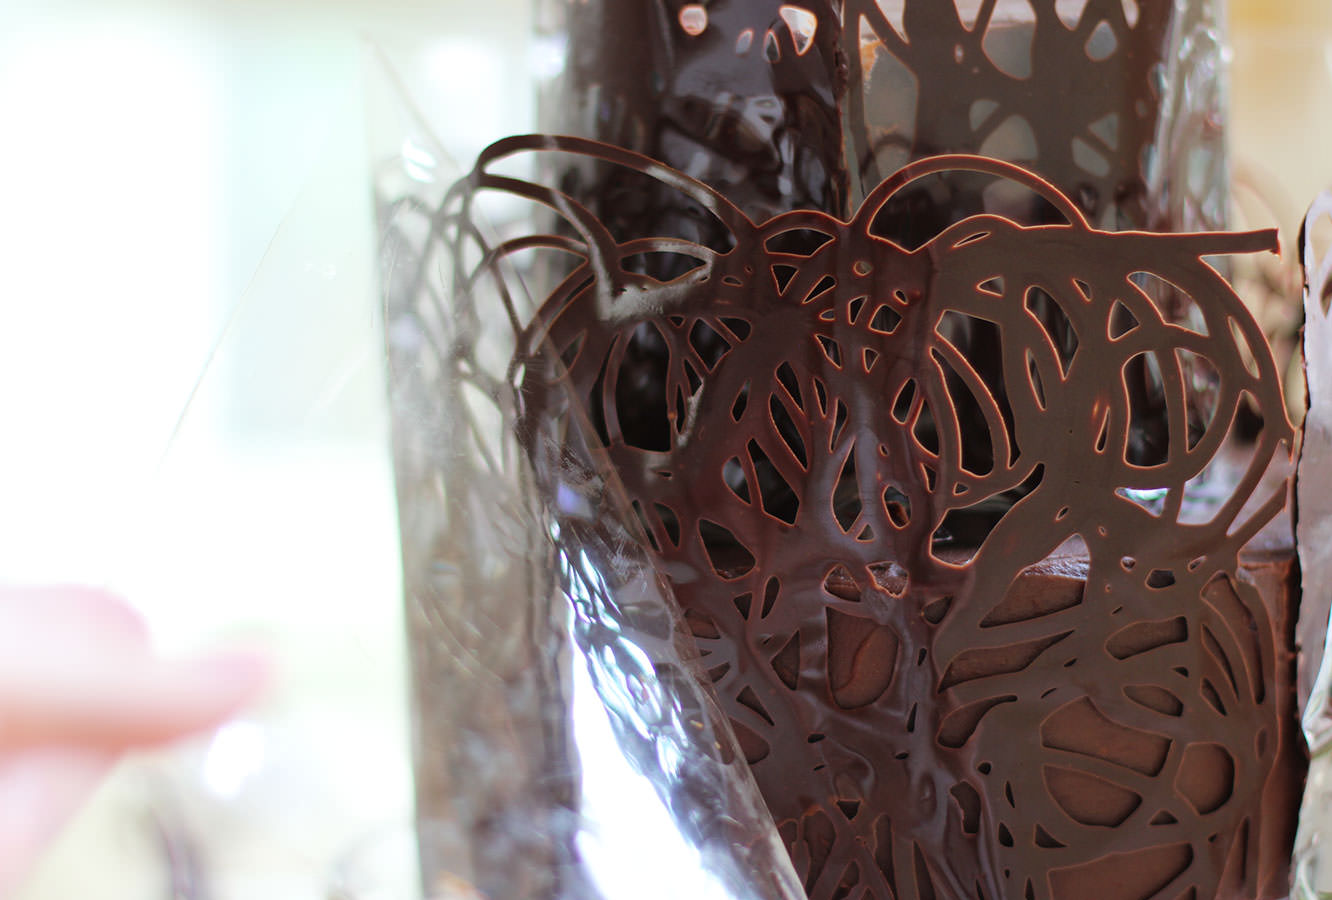
Temper 200g dark chocolate. Don’t look at me like that…you are really going to want to do this so you have shiny chocolate on the collar.
First melt 125g of the chocolate in a heatproof bowl over a pan of simmering water. Let it get to 55C/131F before removing from the heat.
Chop the remaining chocolate and stir into the melted mix to aid the cool down process. Stir continually until it cools to 28C/82F. I found a good way to speed this up a bit. Put cold water in a large saucepan and the bowl on top. You’re welcome.
Place the bowl back on the heat and bring it to 31C/88F. Your chocolate is tempered.
Be warned – if you’re doing a different type of chocolate the temperatures are different:
Milk – 45C/113F original melt, 27C/81F cool down, 29C/84F
White – 45C/113F original melt, 26C/79F cool down, 28C/82F
Step eighteen
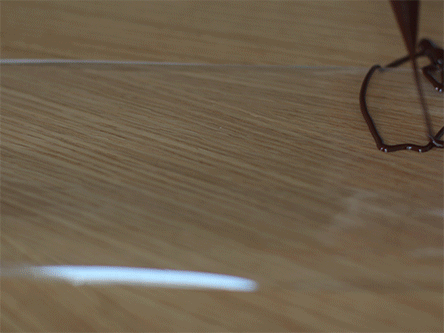
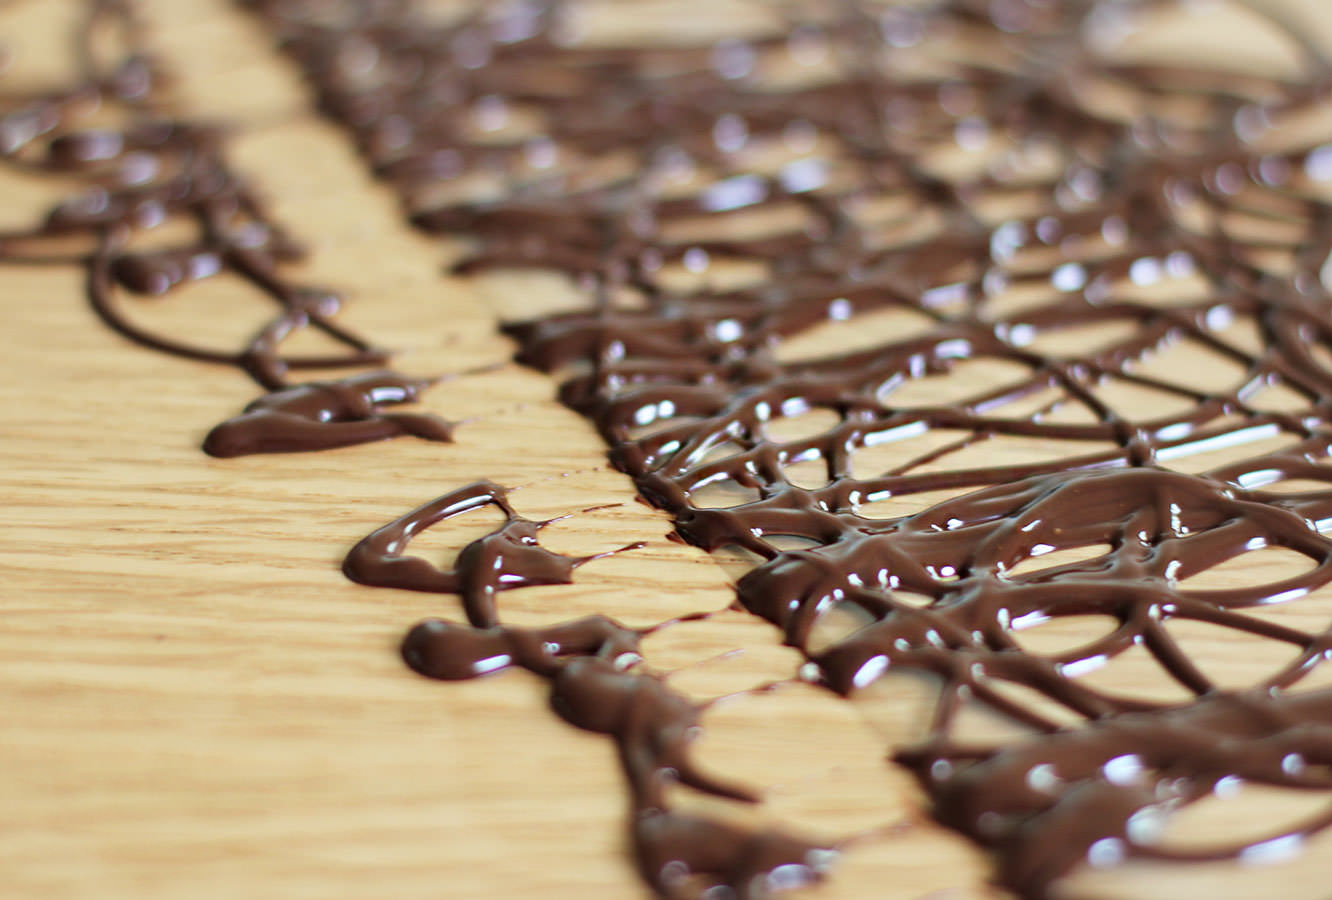
Place chocolate in a piping bag and using circular motions cover the cellophane with swirls. Go over the bottom edge onto the work surface but ensure the top stays on the cellophane so it’s ‘whirly’.
Step nineteen
When it has started to dry pull the cellophane away so the bottom is clear of the extra overlap bits.
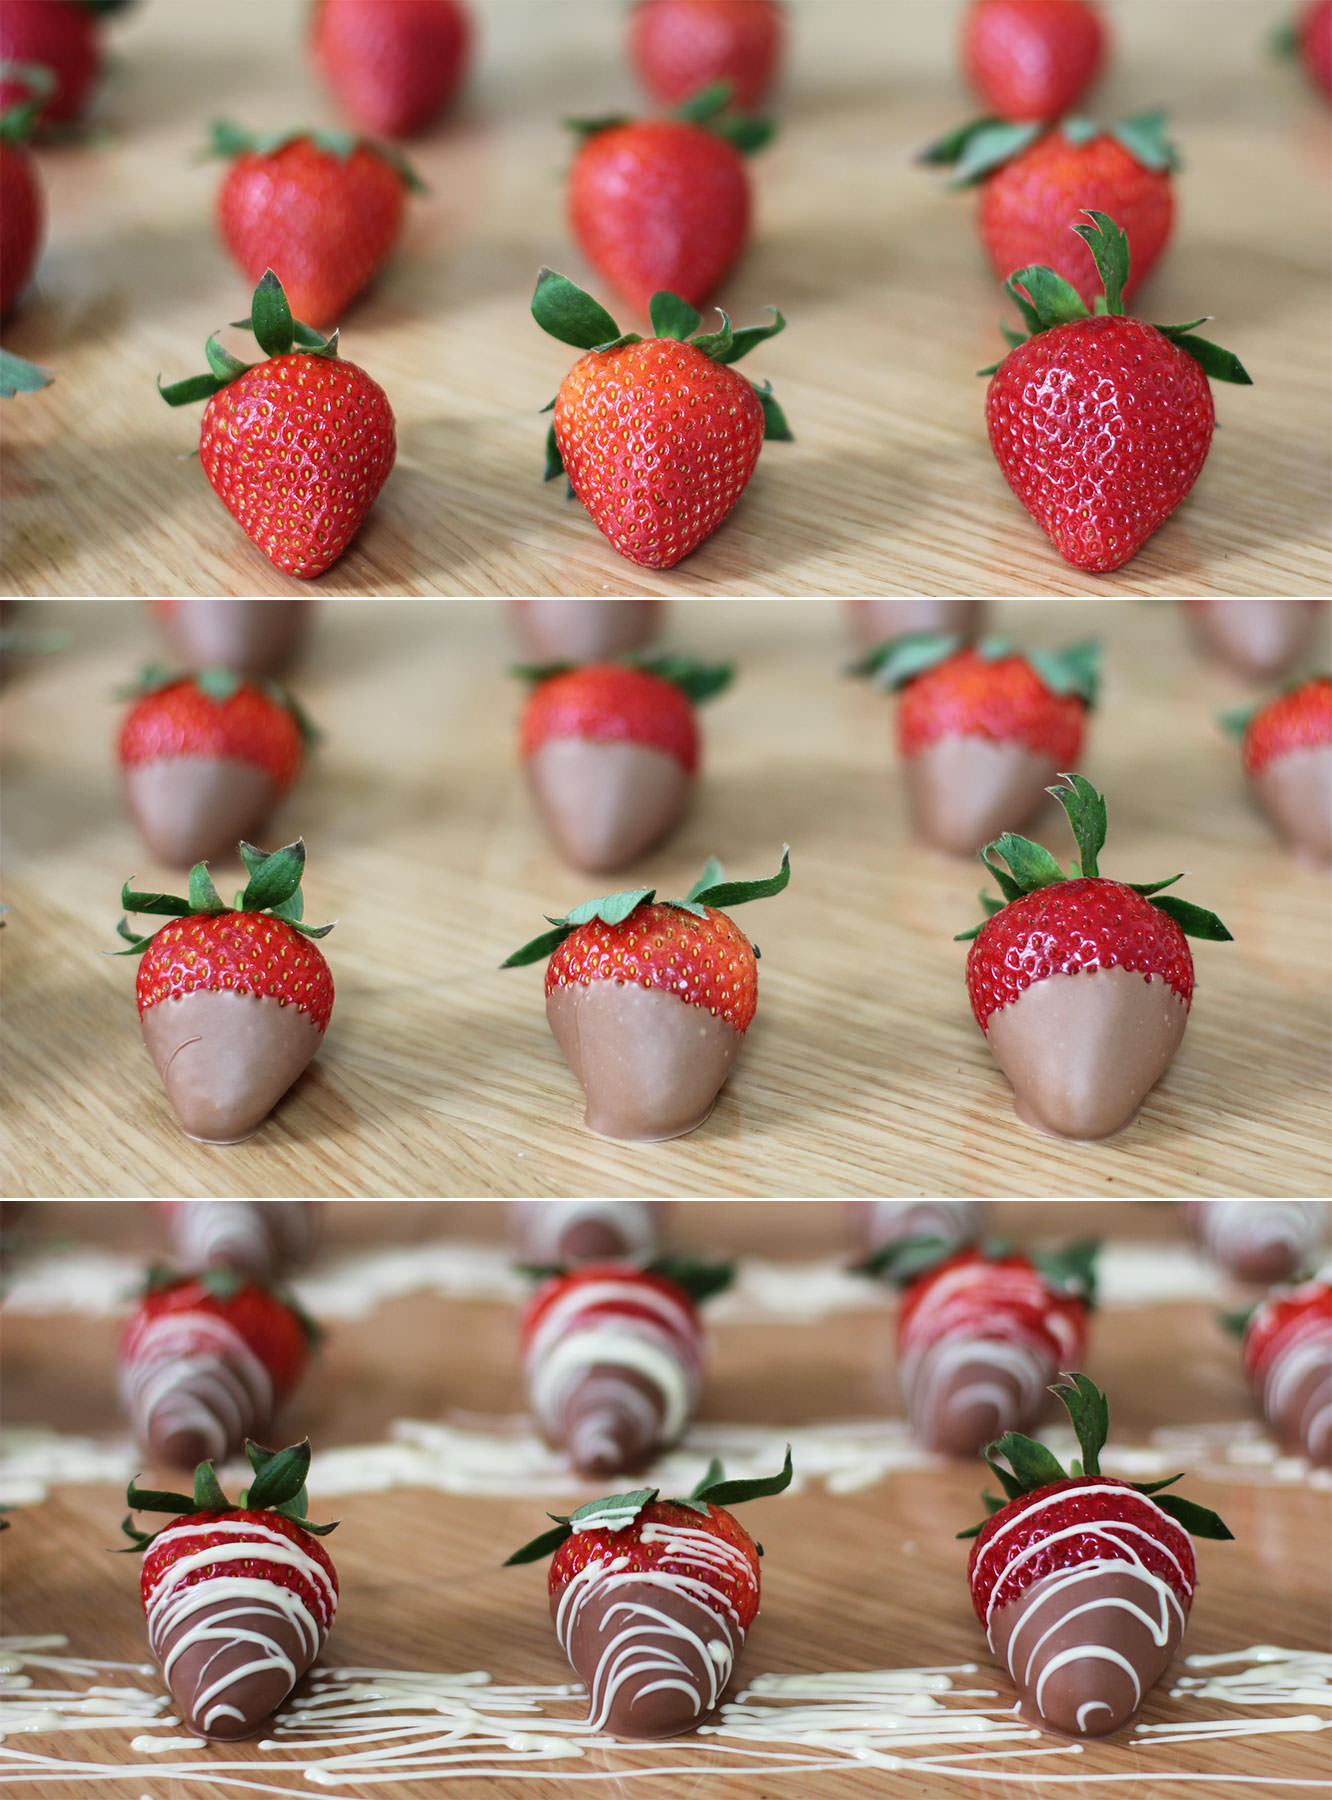
Step twenty
Melt (preferably temper) the milk chocolate. Dip the strawberries in half way and leave to set on some more cellophane.
Melt the white chocolate (no real need to temper this) and place in a piping bag. swing the bag back and forth to drizzle the white chocolate over the top.
Step twenty one
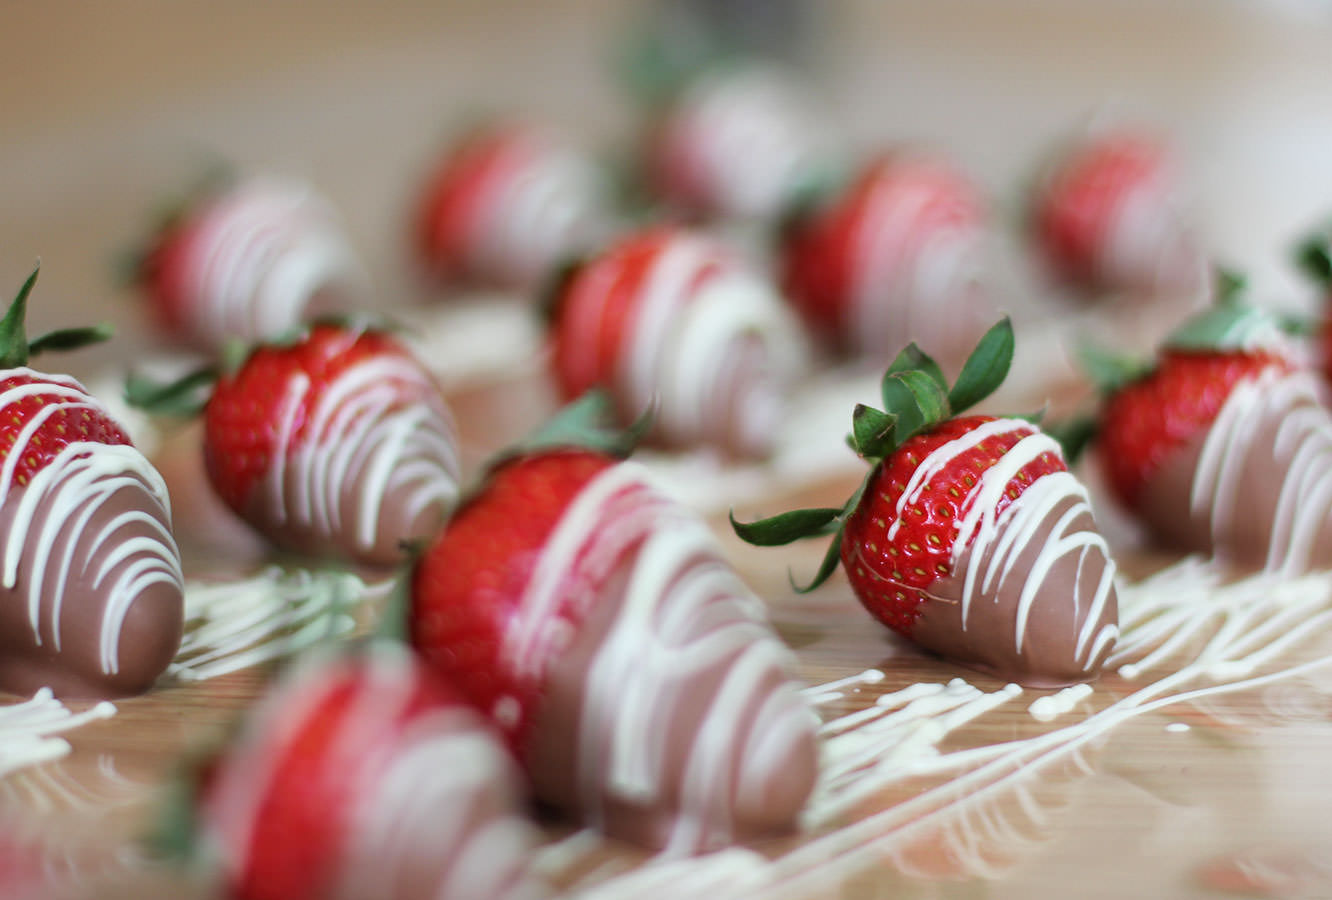
Drizzle the raspberries with white and milk chocolate. You can dip them if you want to, but, really? I know this is taking a while, but do you have that kind of time??
Step twenty two
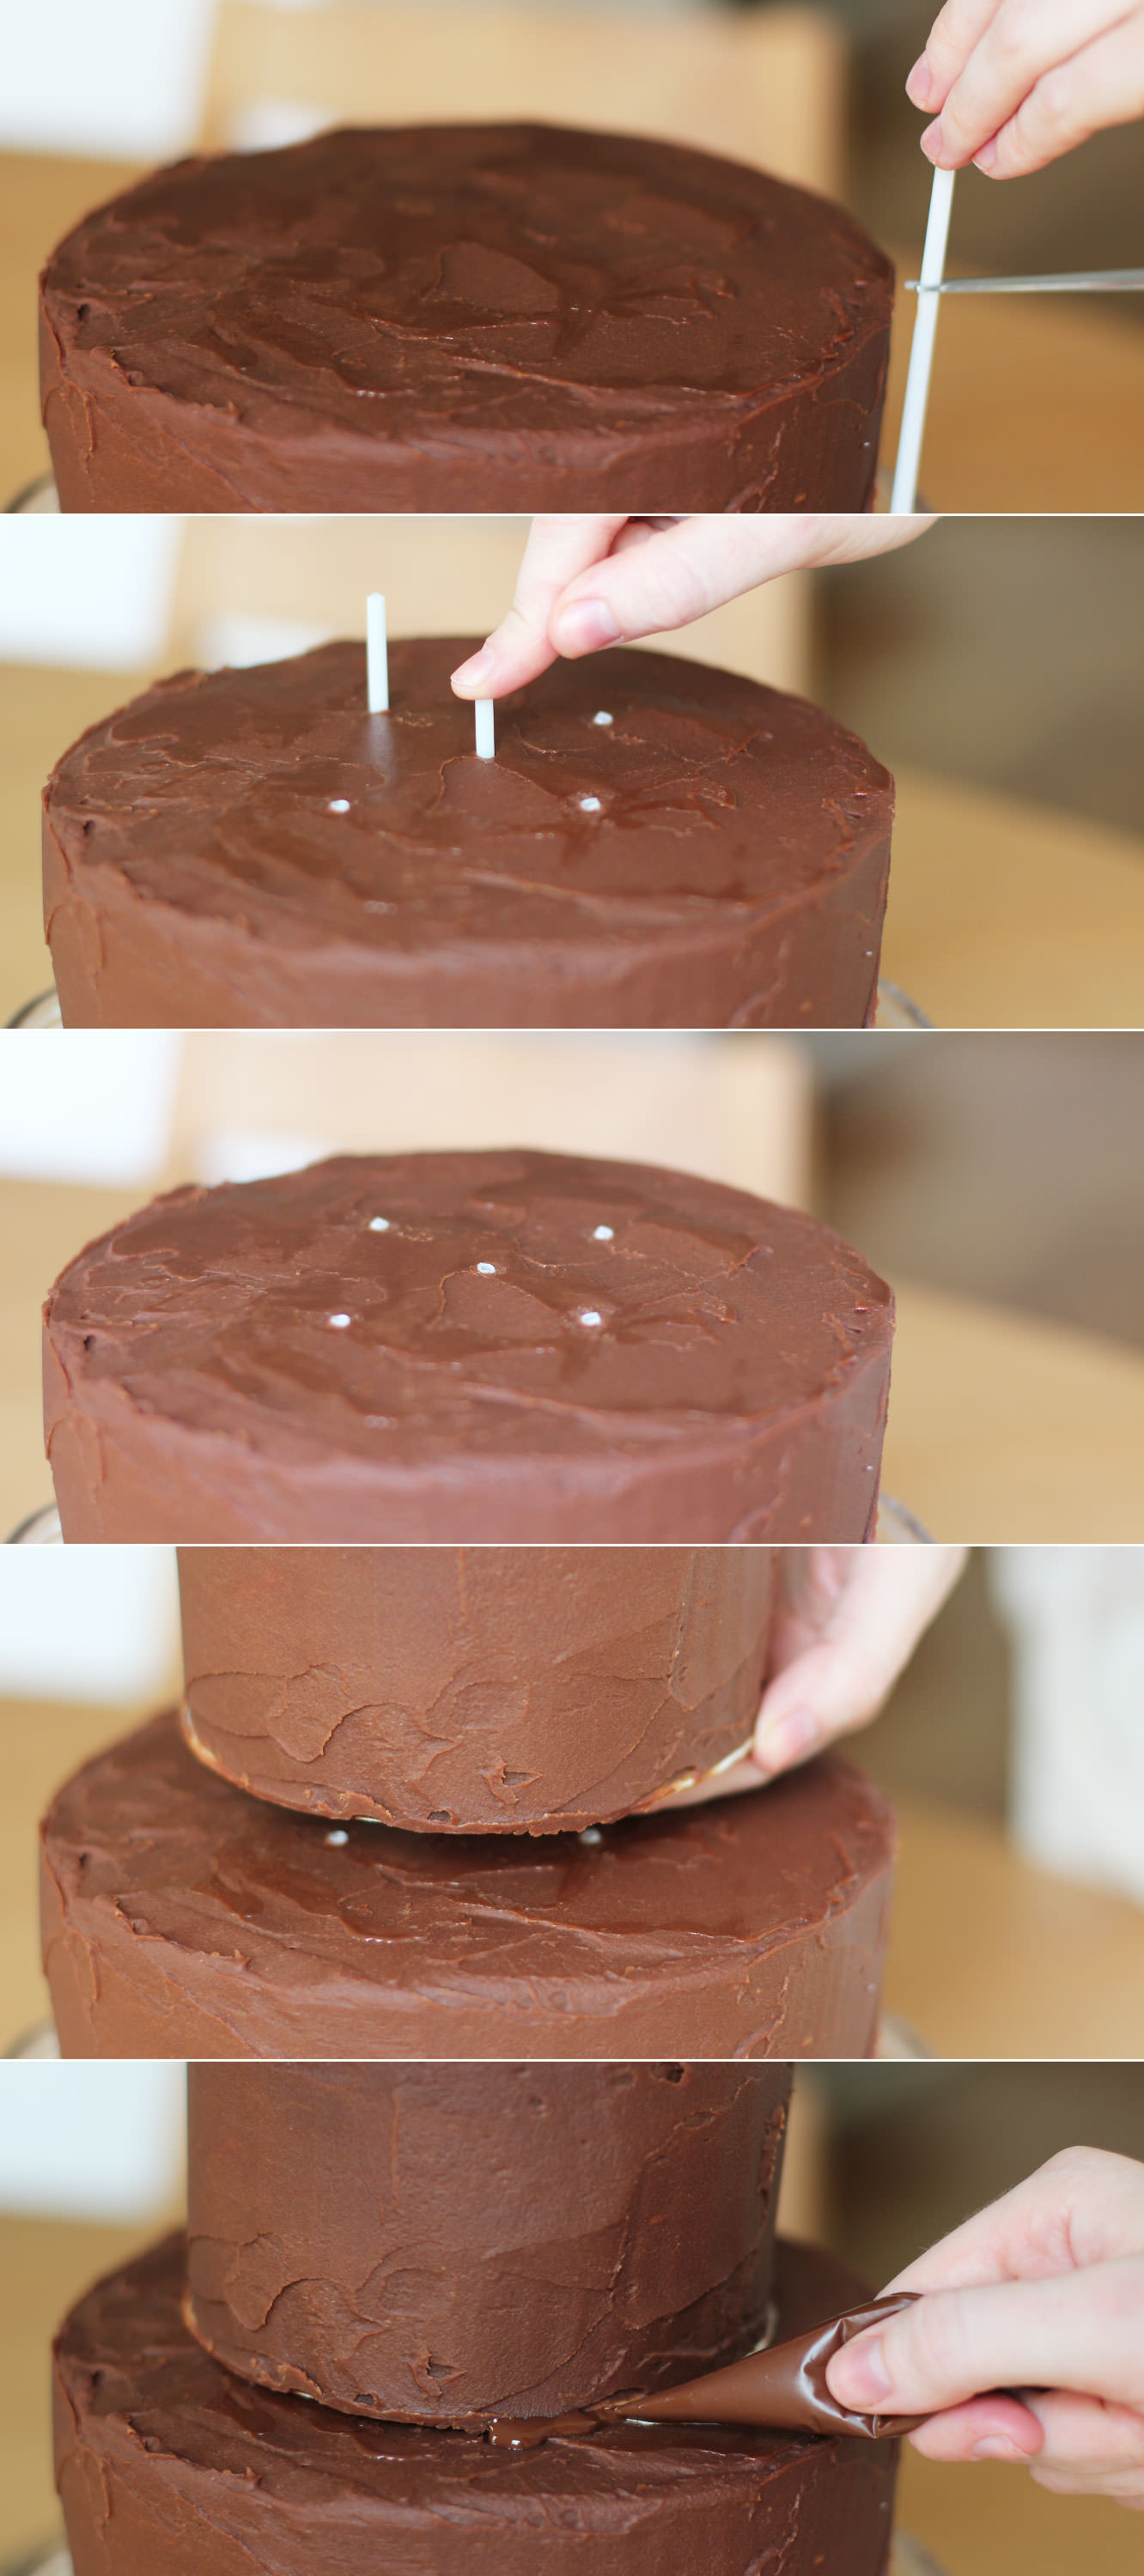
Get the cakes out of the fridge to assemble.
Cut the sticks to size and push through the bottom layer where the top tier will sit.
Place it on top.
I then secured this a bit further with the remaining dark chocolate I had. It will be covered up so no big deal if it’s messy.
Step twenty three
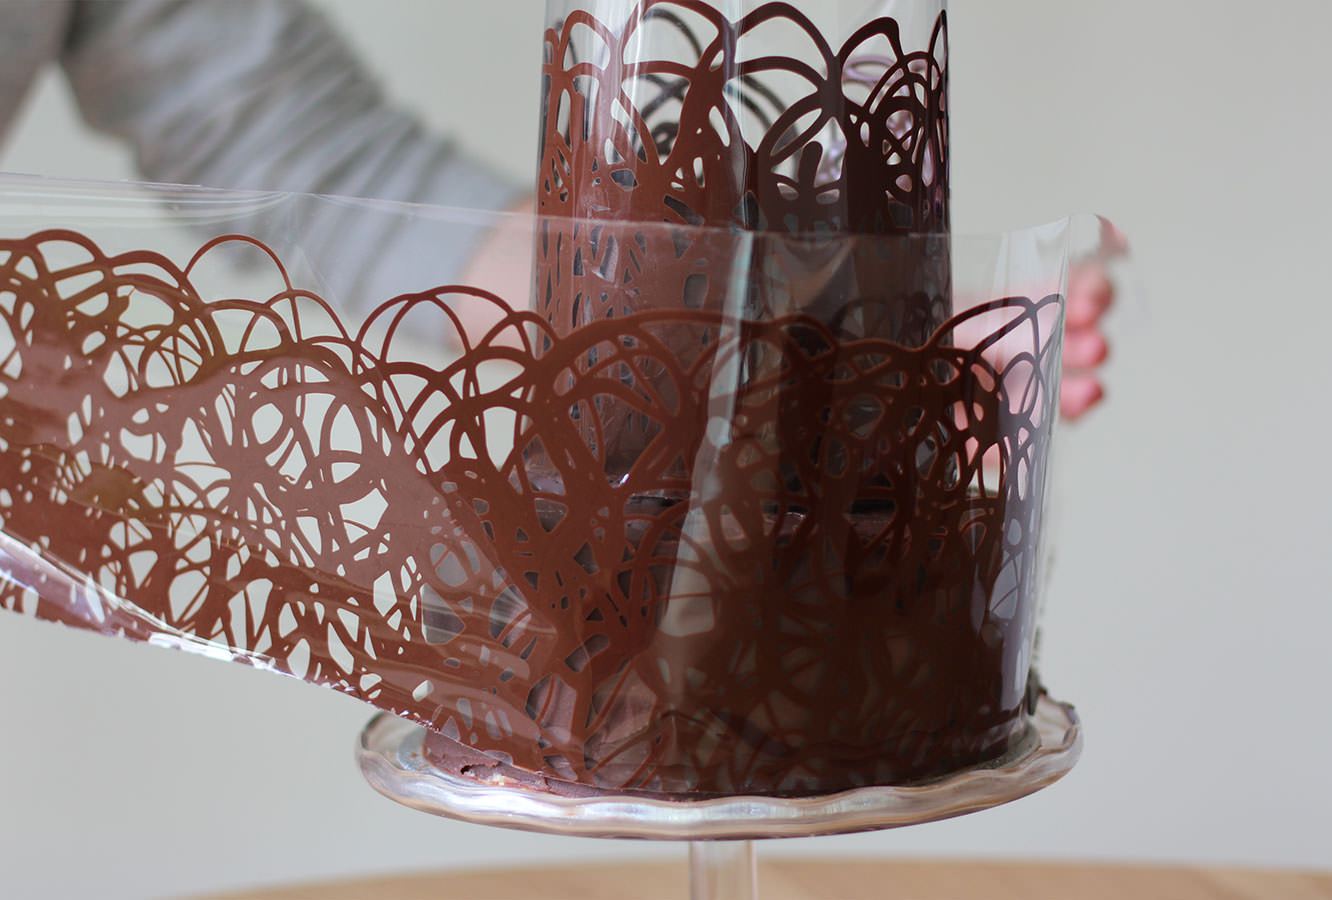
When the collars become touch dry, (meaning if you gently touch the surface you shouldn’t get chocolate on your finger, but what’s underneath is still not set) wrap them around the cake.
LEAVE THE CELLOPHANE ON. Sorry for shouting. But please. Walk away and don’t touch it for a while. Maybe leave a window open if it’s a cool day to help the process along.
Step twenty four
When you’re feeling brave slowly peel off the cellophane to reveal your beautiful shiny chocolate collar. I was pretty excited at this point I must confess.
Step twenty five
Fill with the fruit and make someone’s occasion that bit happier.
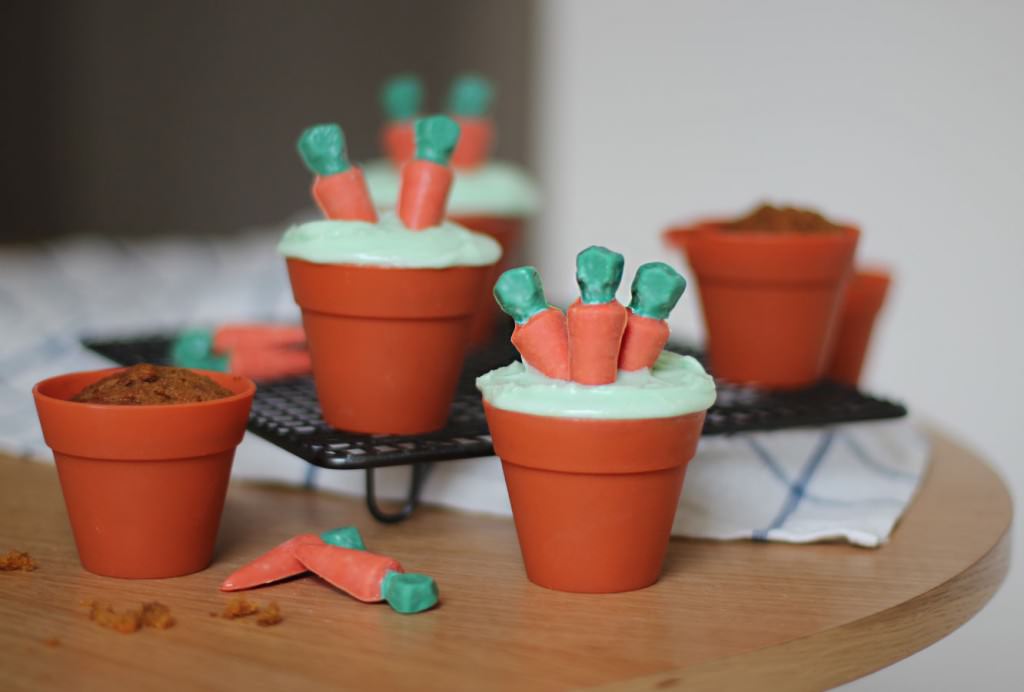
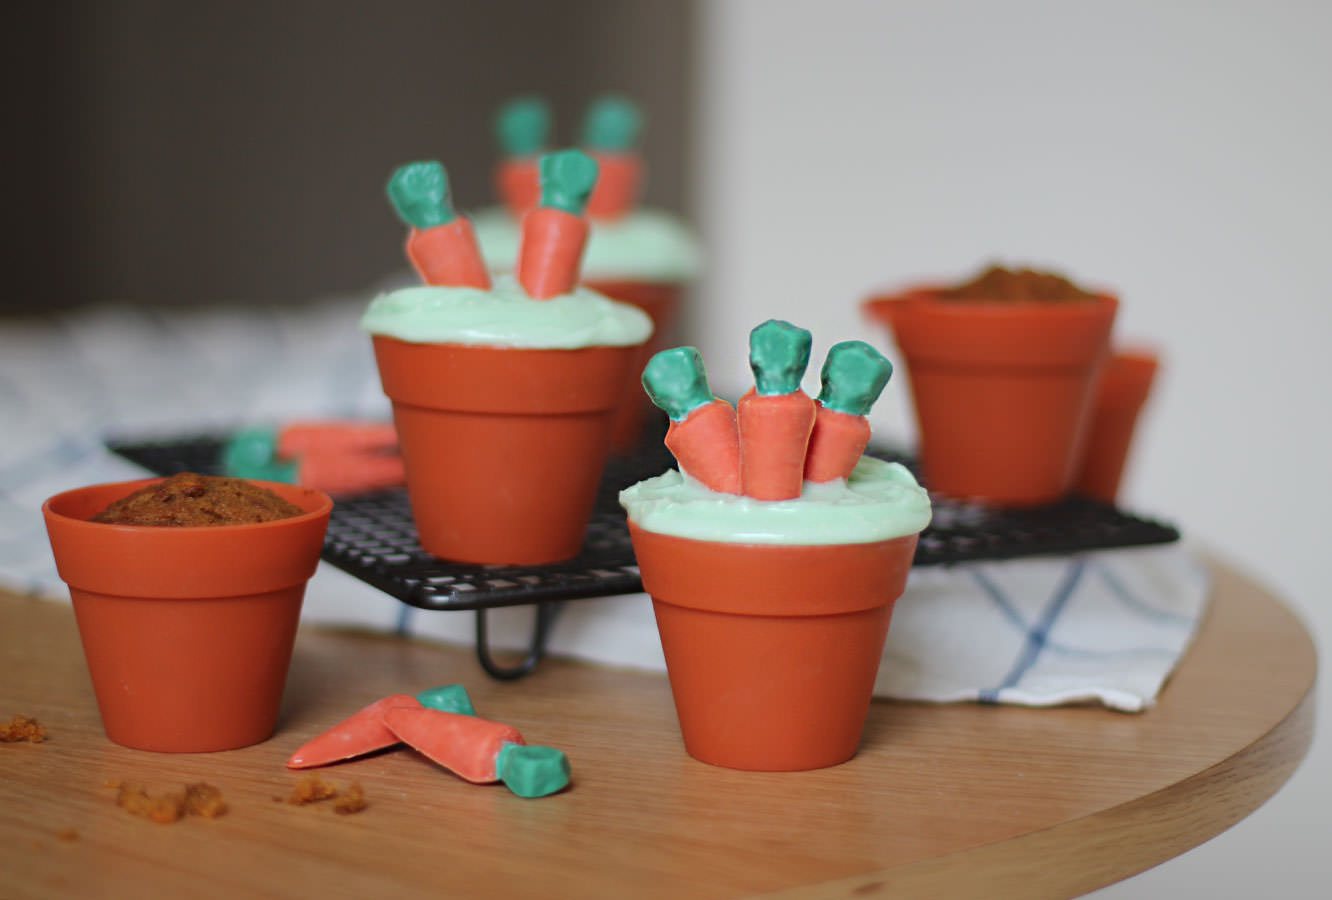
Hullo again, with Easter well and truly around the corner, here’s another cute bunny-themed bake for you.
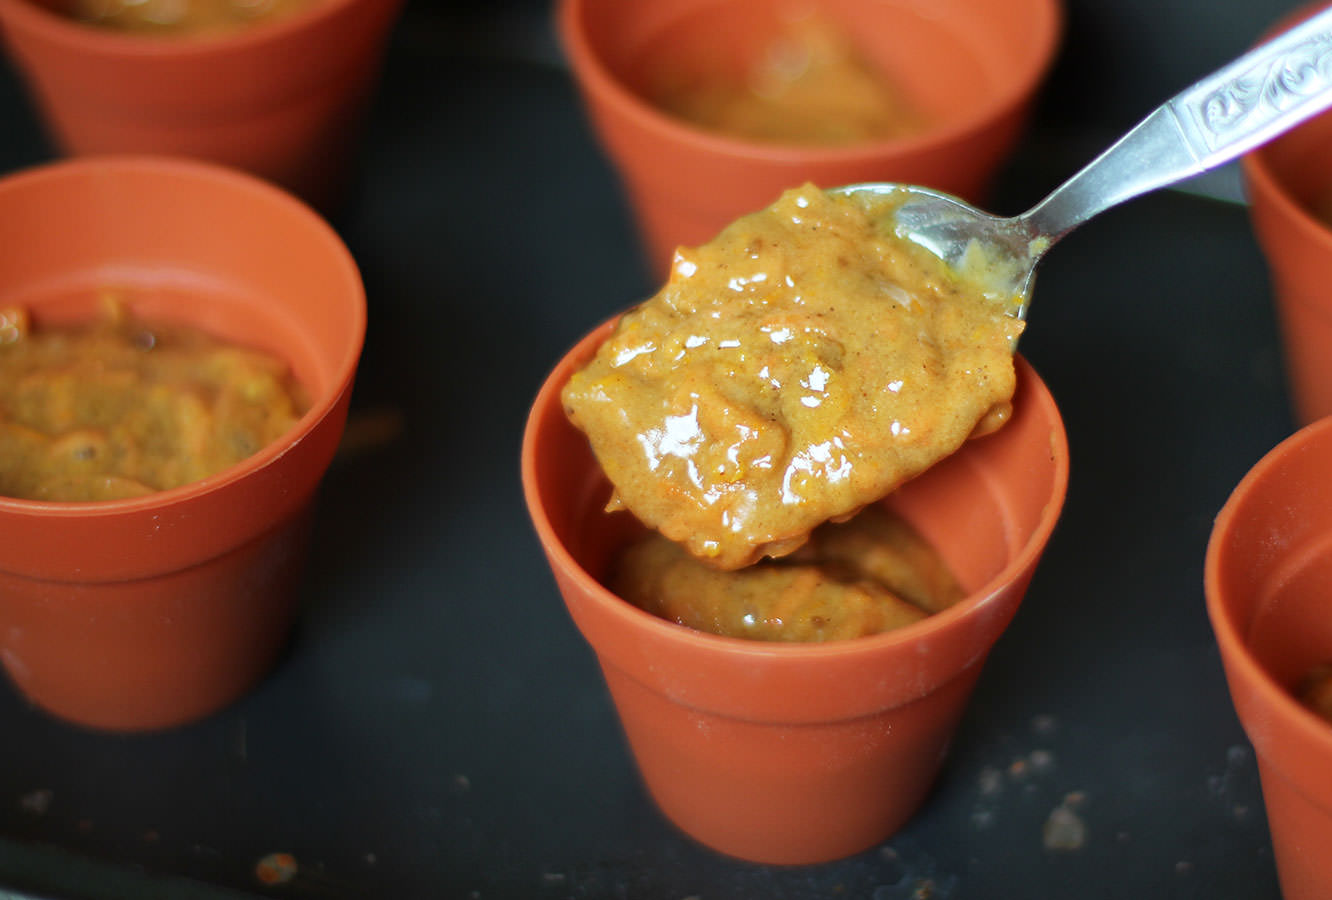
I found an adorable mould for tiny carrots online when browsing for chocolate moulds, as you do on payday…right? I couldn’t resist pairing them with the gorgeous little flowerpot shaped cupcake cases my lovely pal Taylor bought me for my birthday a couple of years back.
Anyhoo, there was an obvious flavour choice for these and I pried myself away from my usual chocolate bakes to bring you carrot muffins/cupcakes with cream cheese frosting.
This makes 6 cupcakes, so you will want to double it for more or for a single cake.
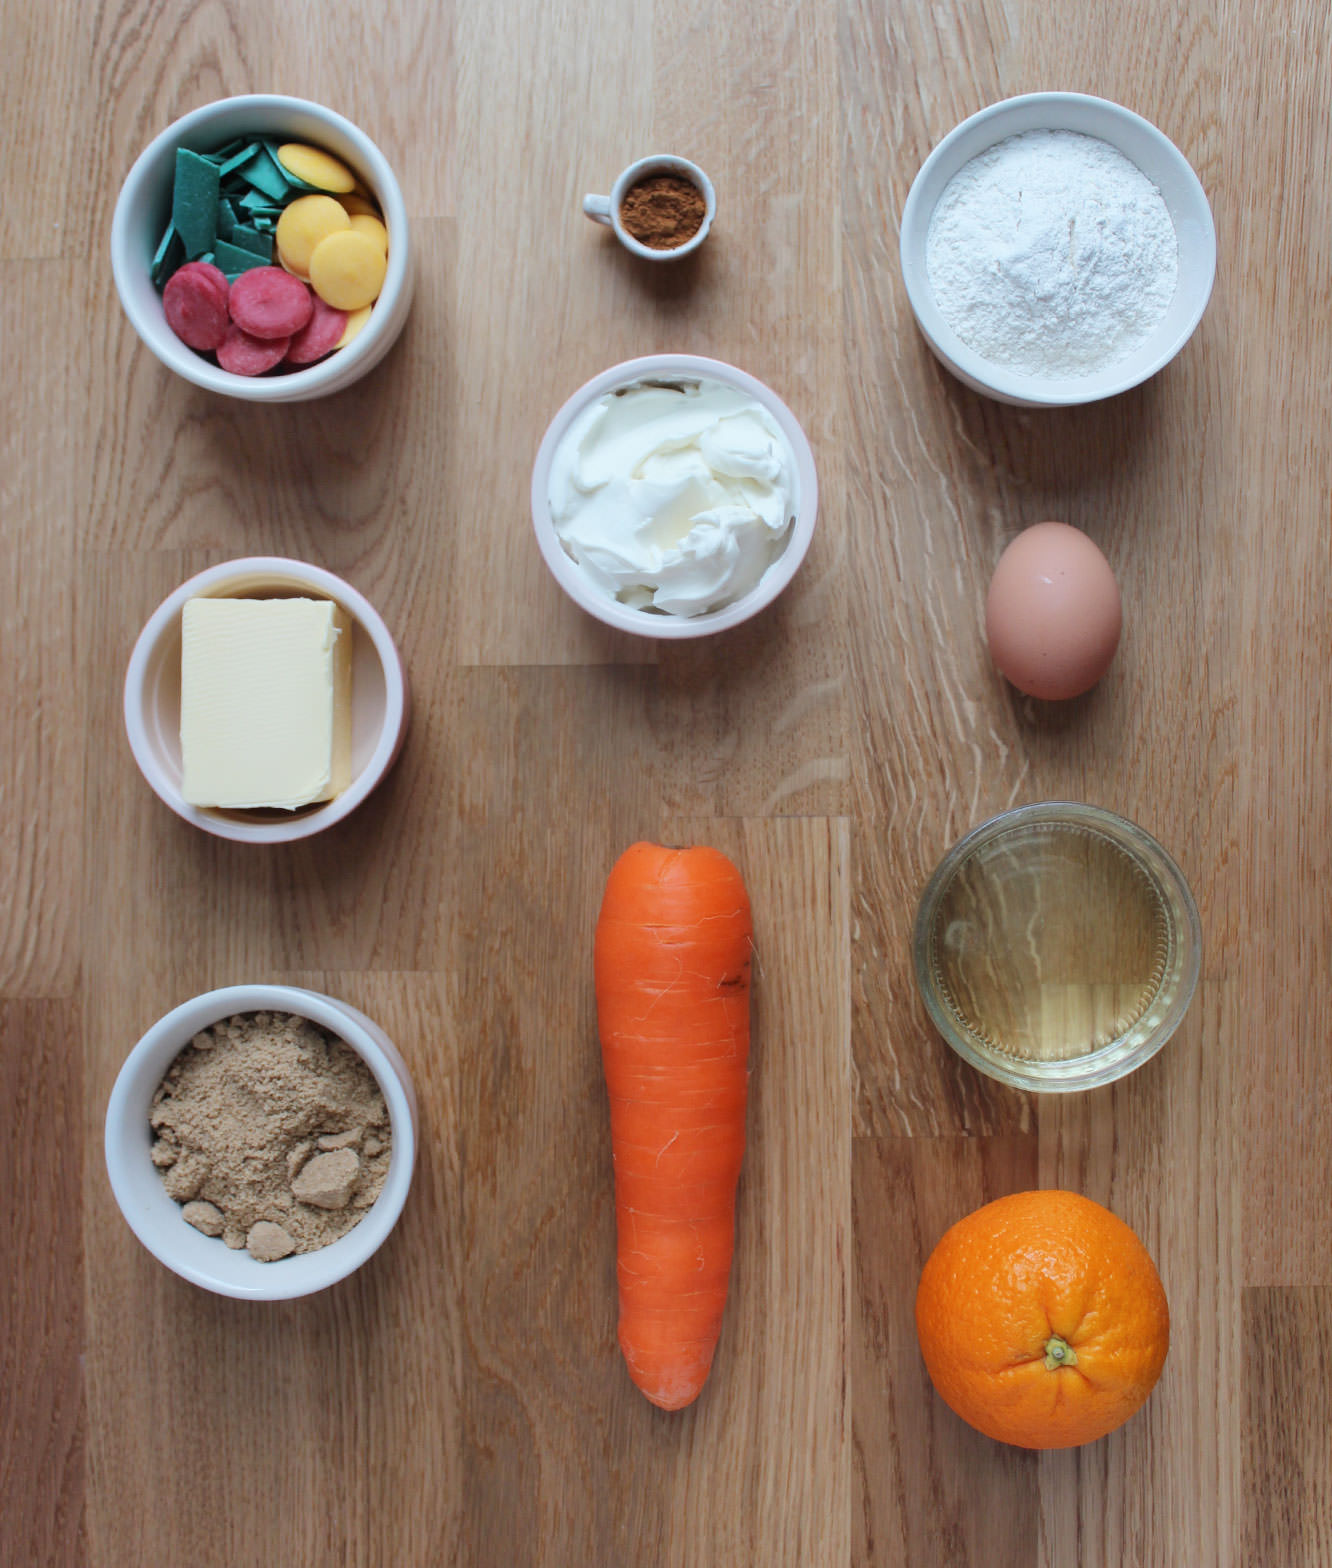
You will need
100g/3.5 oz self-raising flour
100g/3.5 oz carrot
80g/2.5 oz soft light brown sugar
75ml/2.5 fl oz sunflower/vegetable oil
1 egg
1/2 tsp bicarbonate of soda
1 tsp ground cinnamon
1/2 tsp ground nutmeg
Zest of an orange
For the icing:
75g/2.5 oz soft cream cheese (full fat)
25g/1 oz unsalted butter
100g/3.5 oz icing sugar
1 tsp vanilla extract
Green food colouring
Other:
Candy coating chips in orange (or yellow and red like me) and green
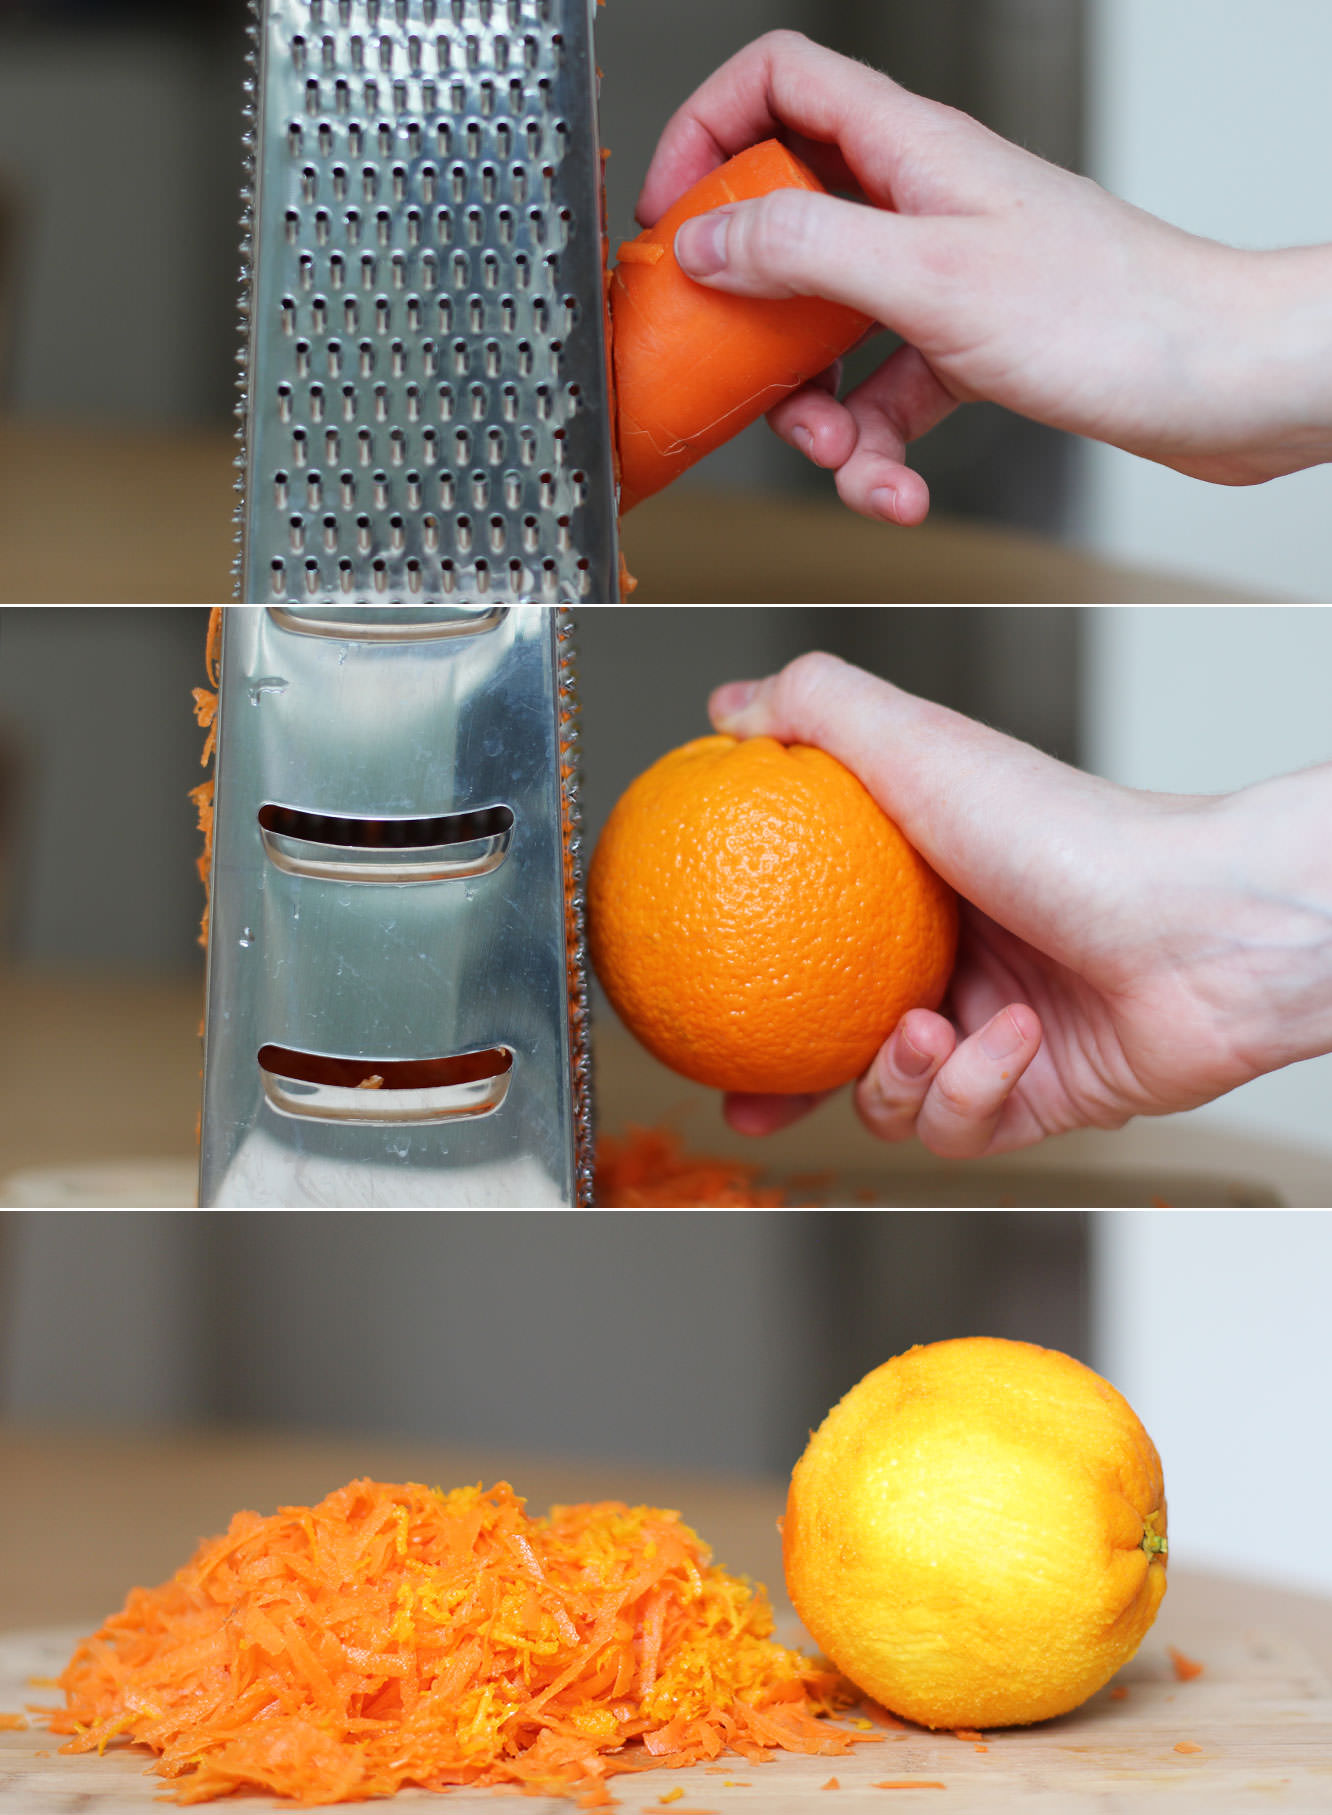
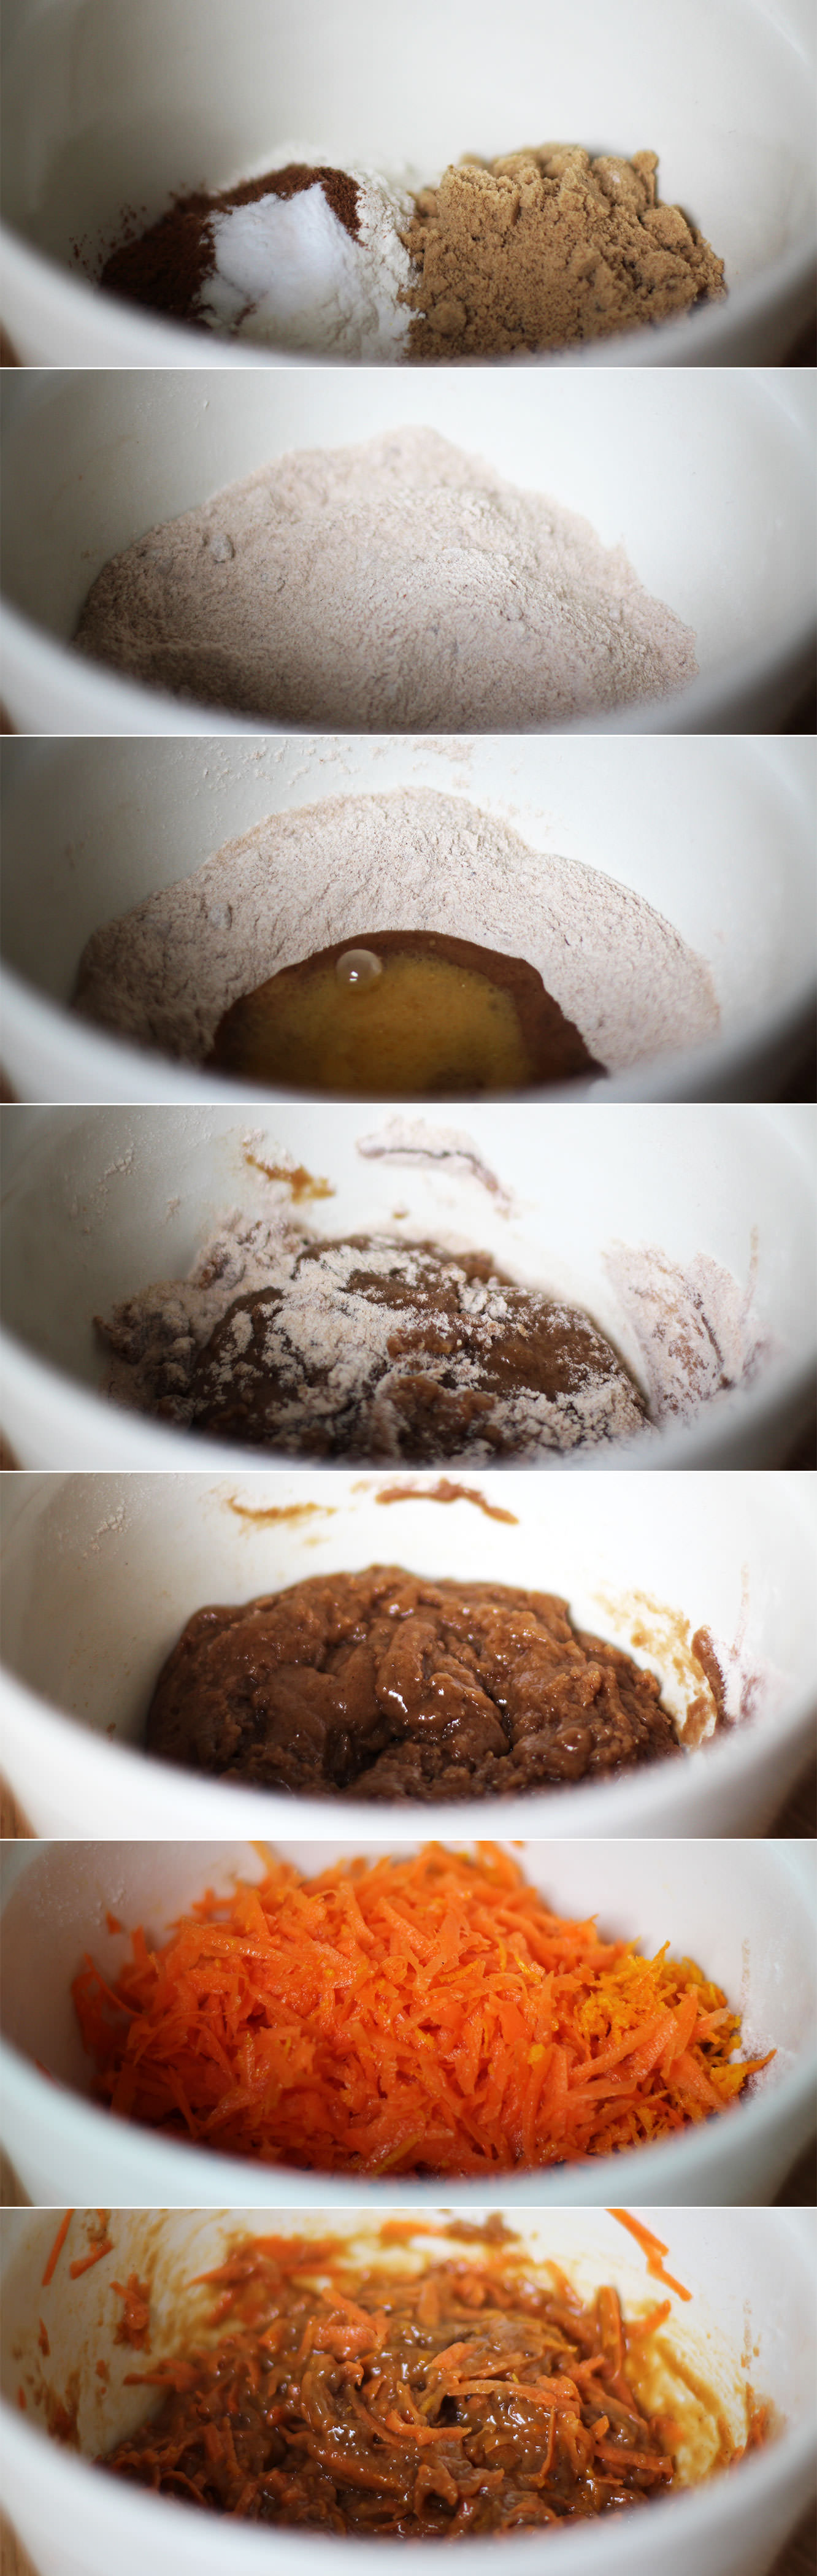
Grate the carrot on the largest setting and the skin of the orange on the smallest setting on your grater.
Step two
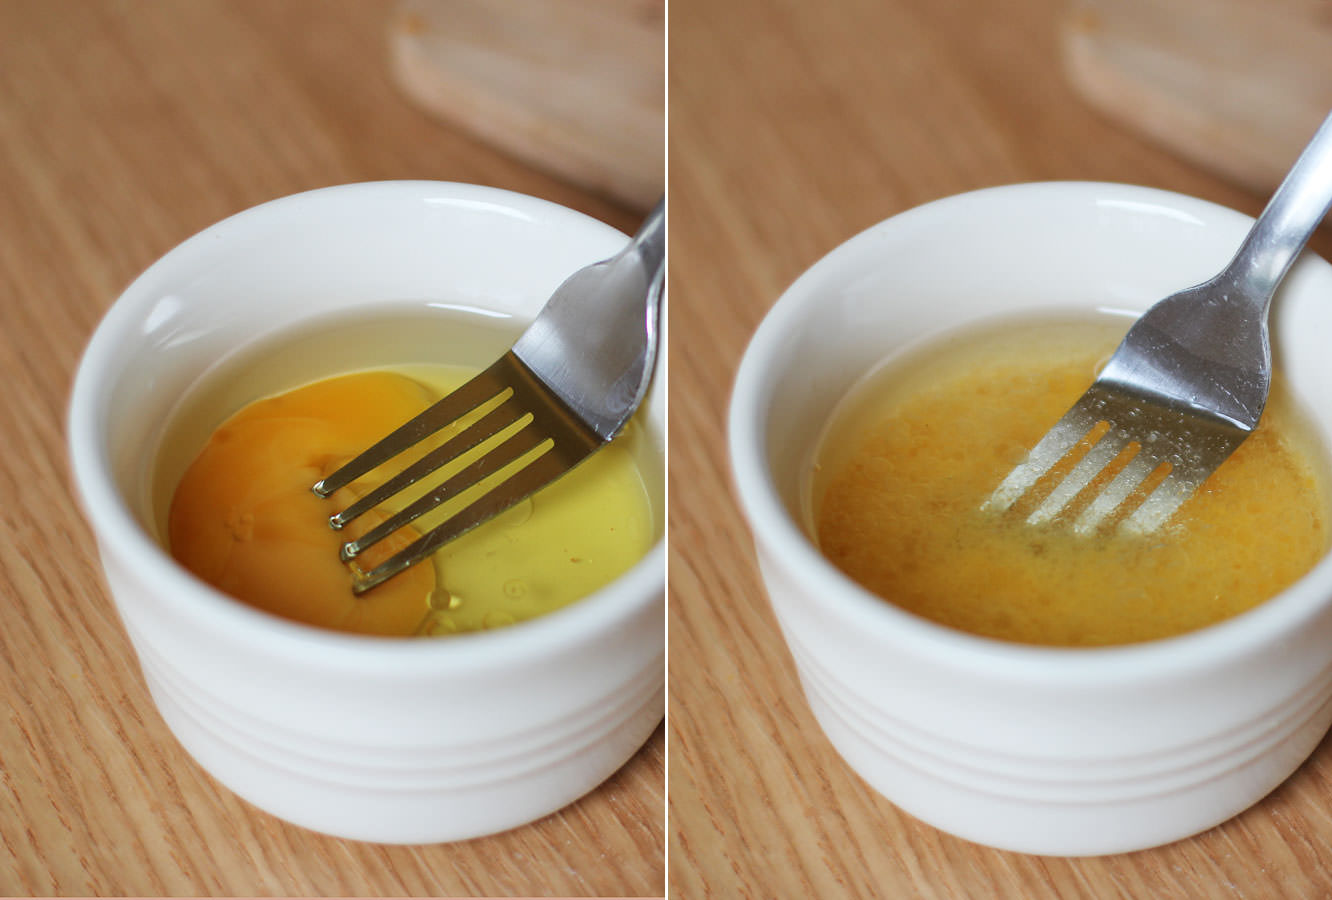
Using a fork combine the oil and the egg in a small dish.
Step three
Combine the flour, sugar, spices and bicarb in a mixing bowl. Make a well in the middle and stir in the egg and oil mix. Do this in small circles to avoid lumps.
Add the carrot and orange zest (some raisins wouldn’t go amiss if you have some).
Let’s be honest. Not the most appetising looking mixture.
Step four
Distribute the mixture evenly between the pots.
Bake on gas mark 4/180C/350F for 20-25 minutes.
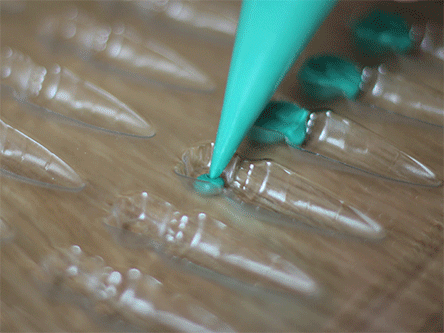
Step five
While the cakes are in the oven melt your candy chips in the microwave and fill the moulds using a piping bag. Make sure to look underneath your mould to check there’s no bubbles.
If mixing the orange from red and yellow like me I advise you to start with yellow and gradually add red to get the colour you want rather than the other way round.
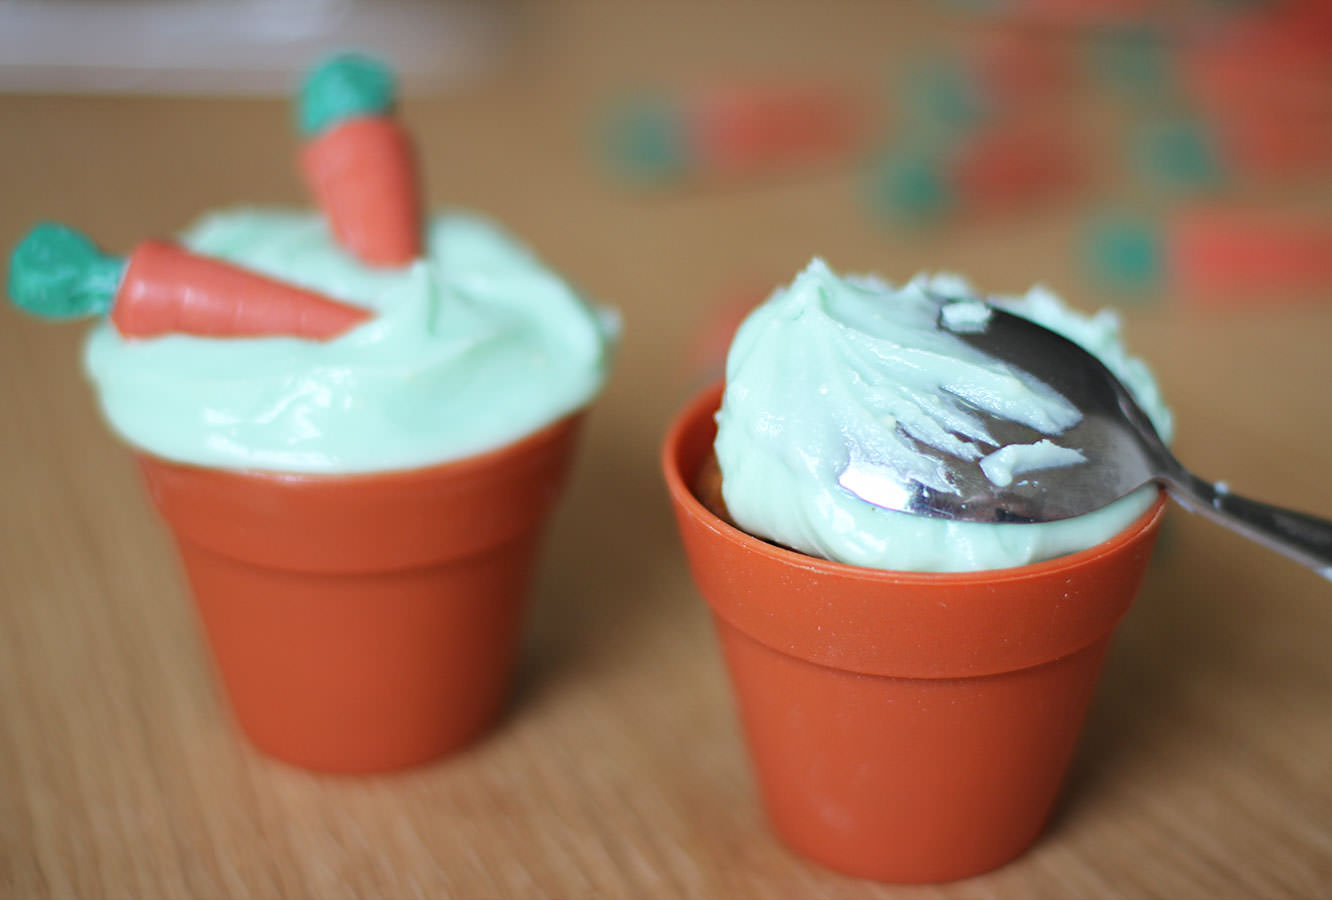
Step six
Make the icing by combining the cream cheese, icing sugar, butter and food colouring. Now, I won’t lie, you may need to add a little more icing sugar to the recipe, I’ve adjusted the quantities based on a slightly runny mix that I had, but they might not be totally perfect. My apologies chaps.
Add food colouring until you have a colour you like, I didn’t want to overdo it and overshadow the carrots.
Step seven
When the cakes are completely cool ice them just using a spoon. You can get more fancy if you want but personally I didn’t see the need to faff about.
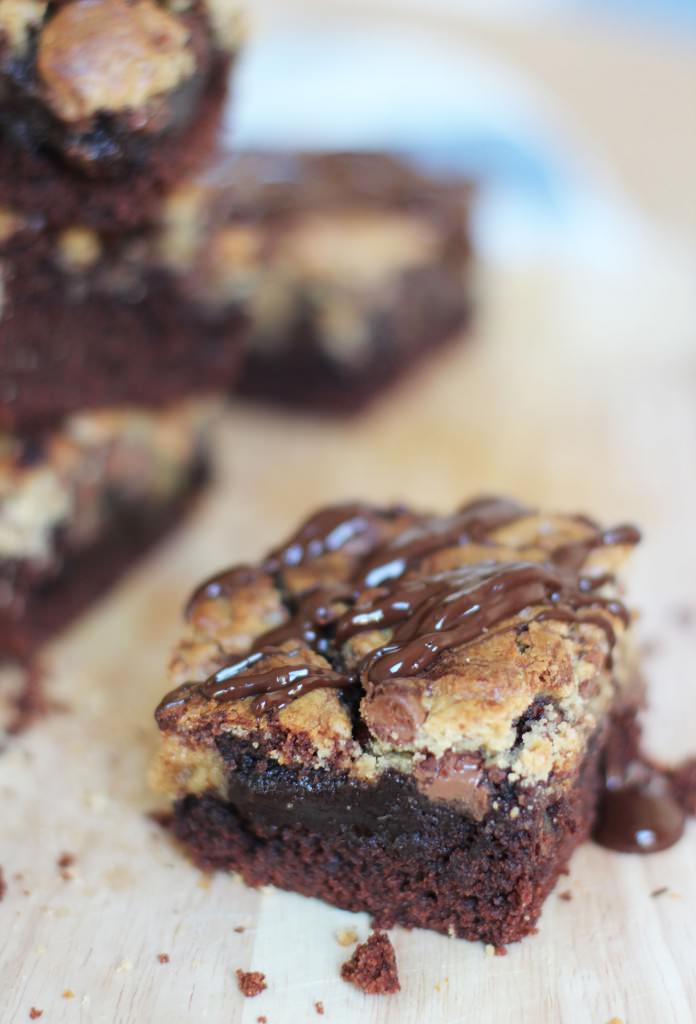
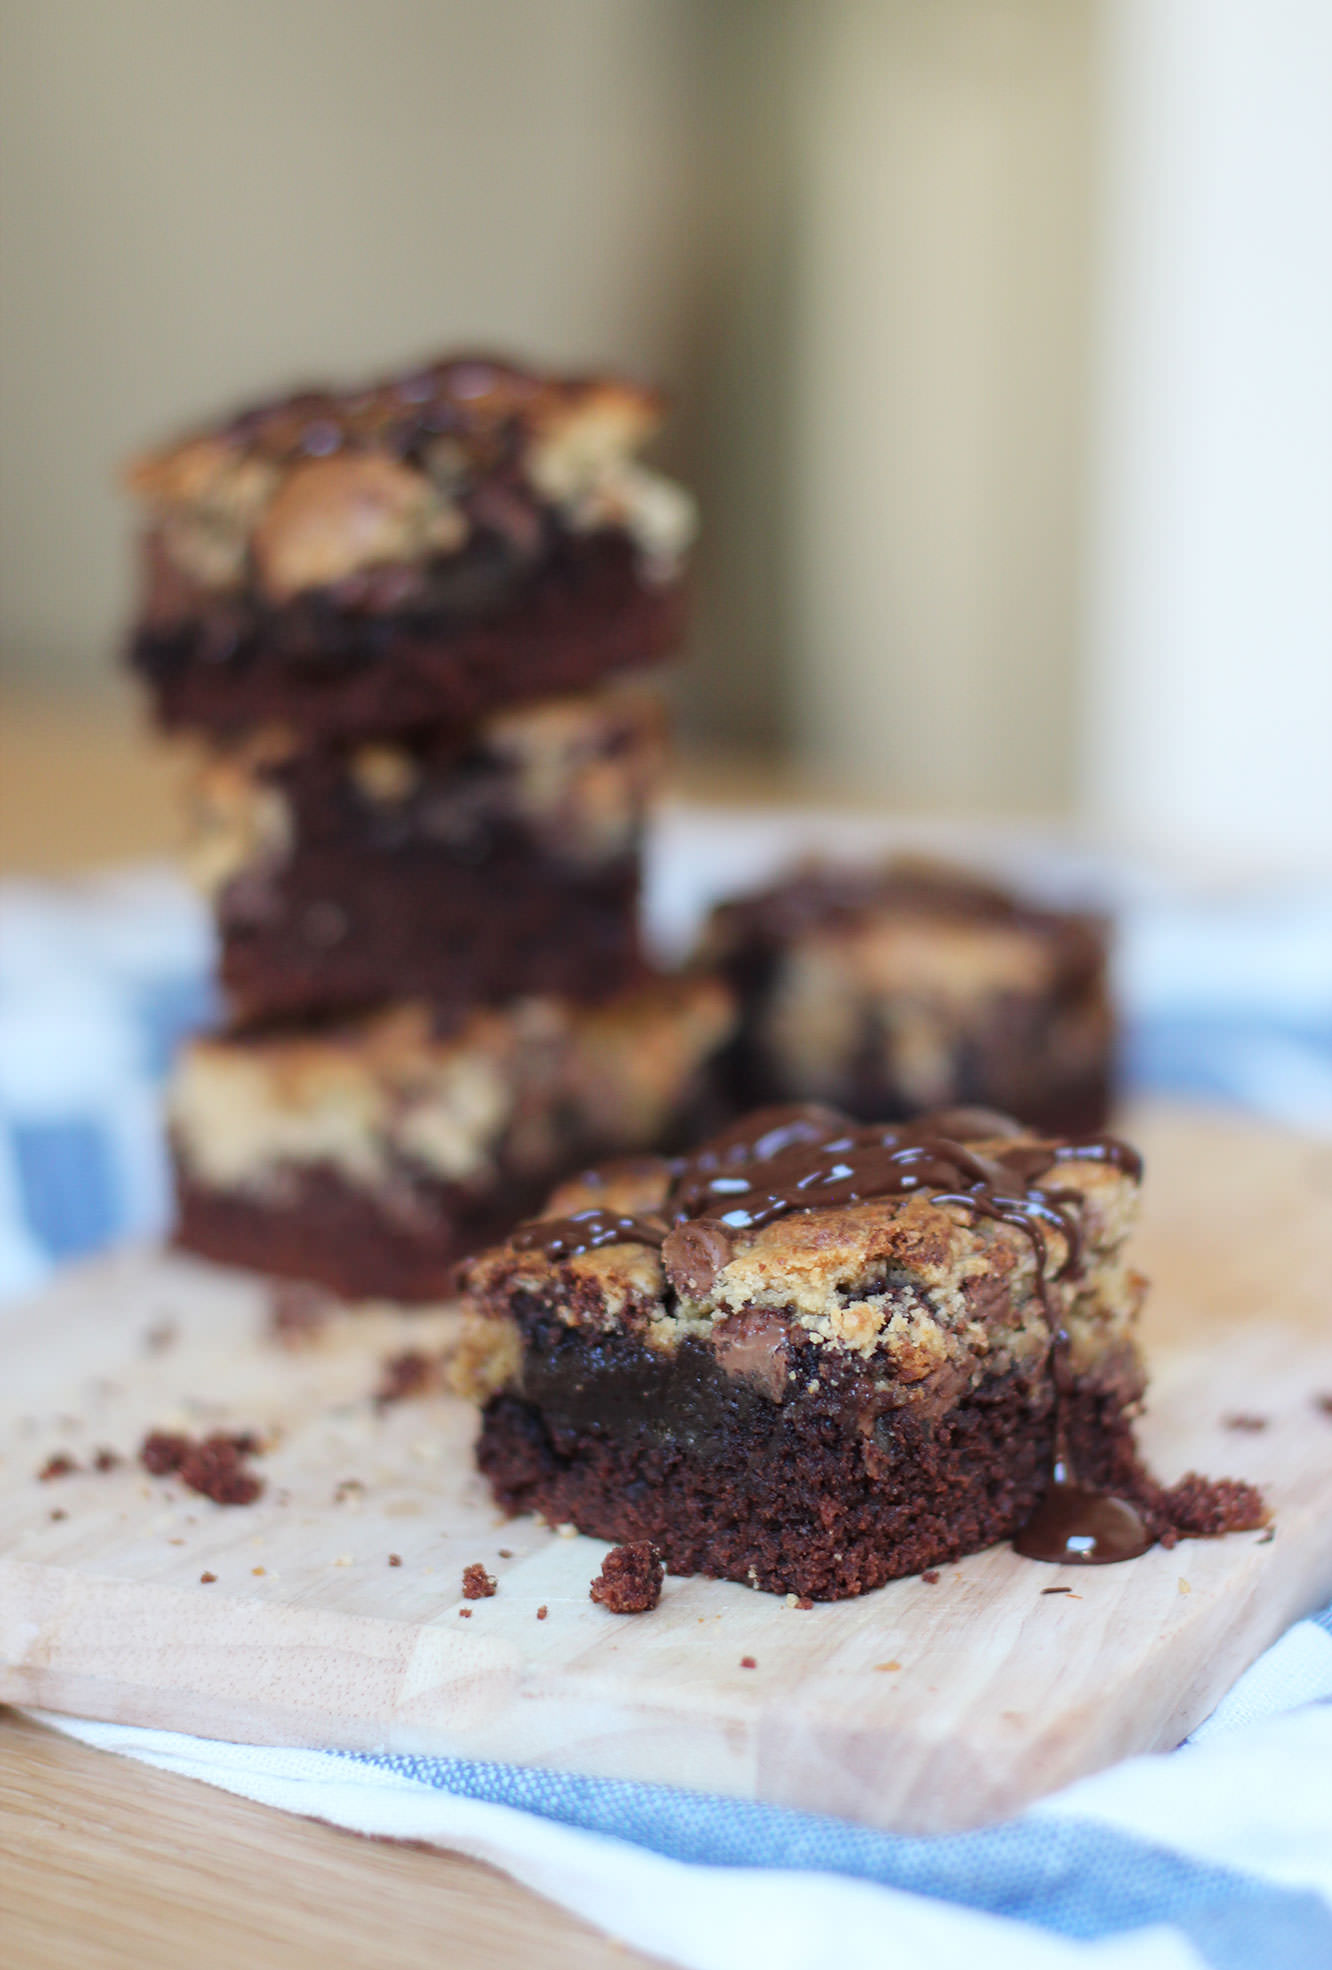
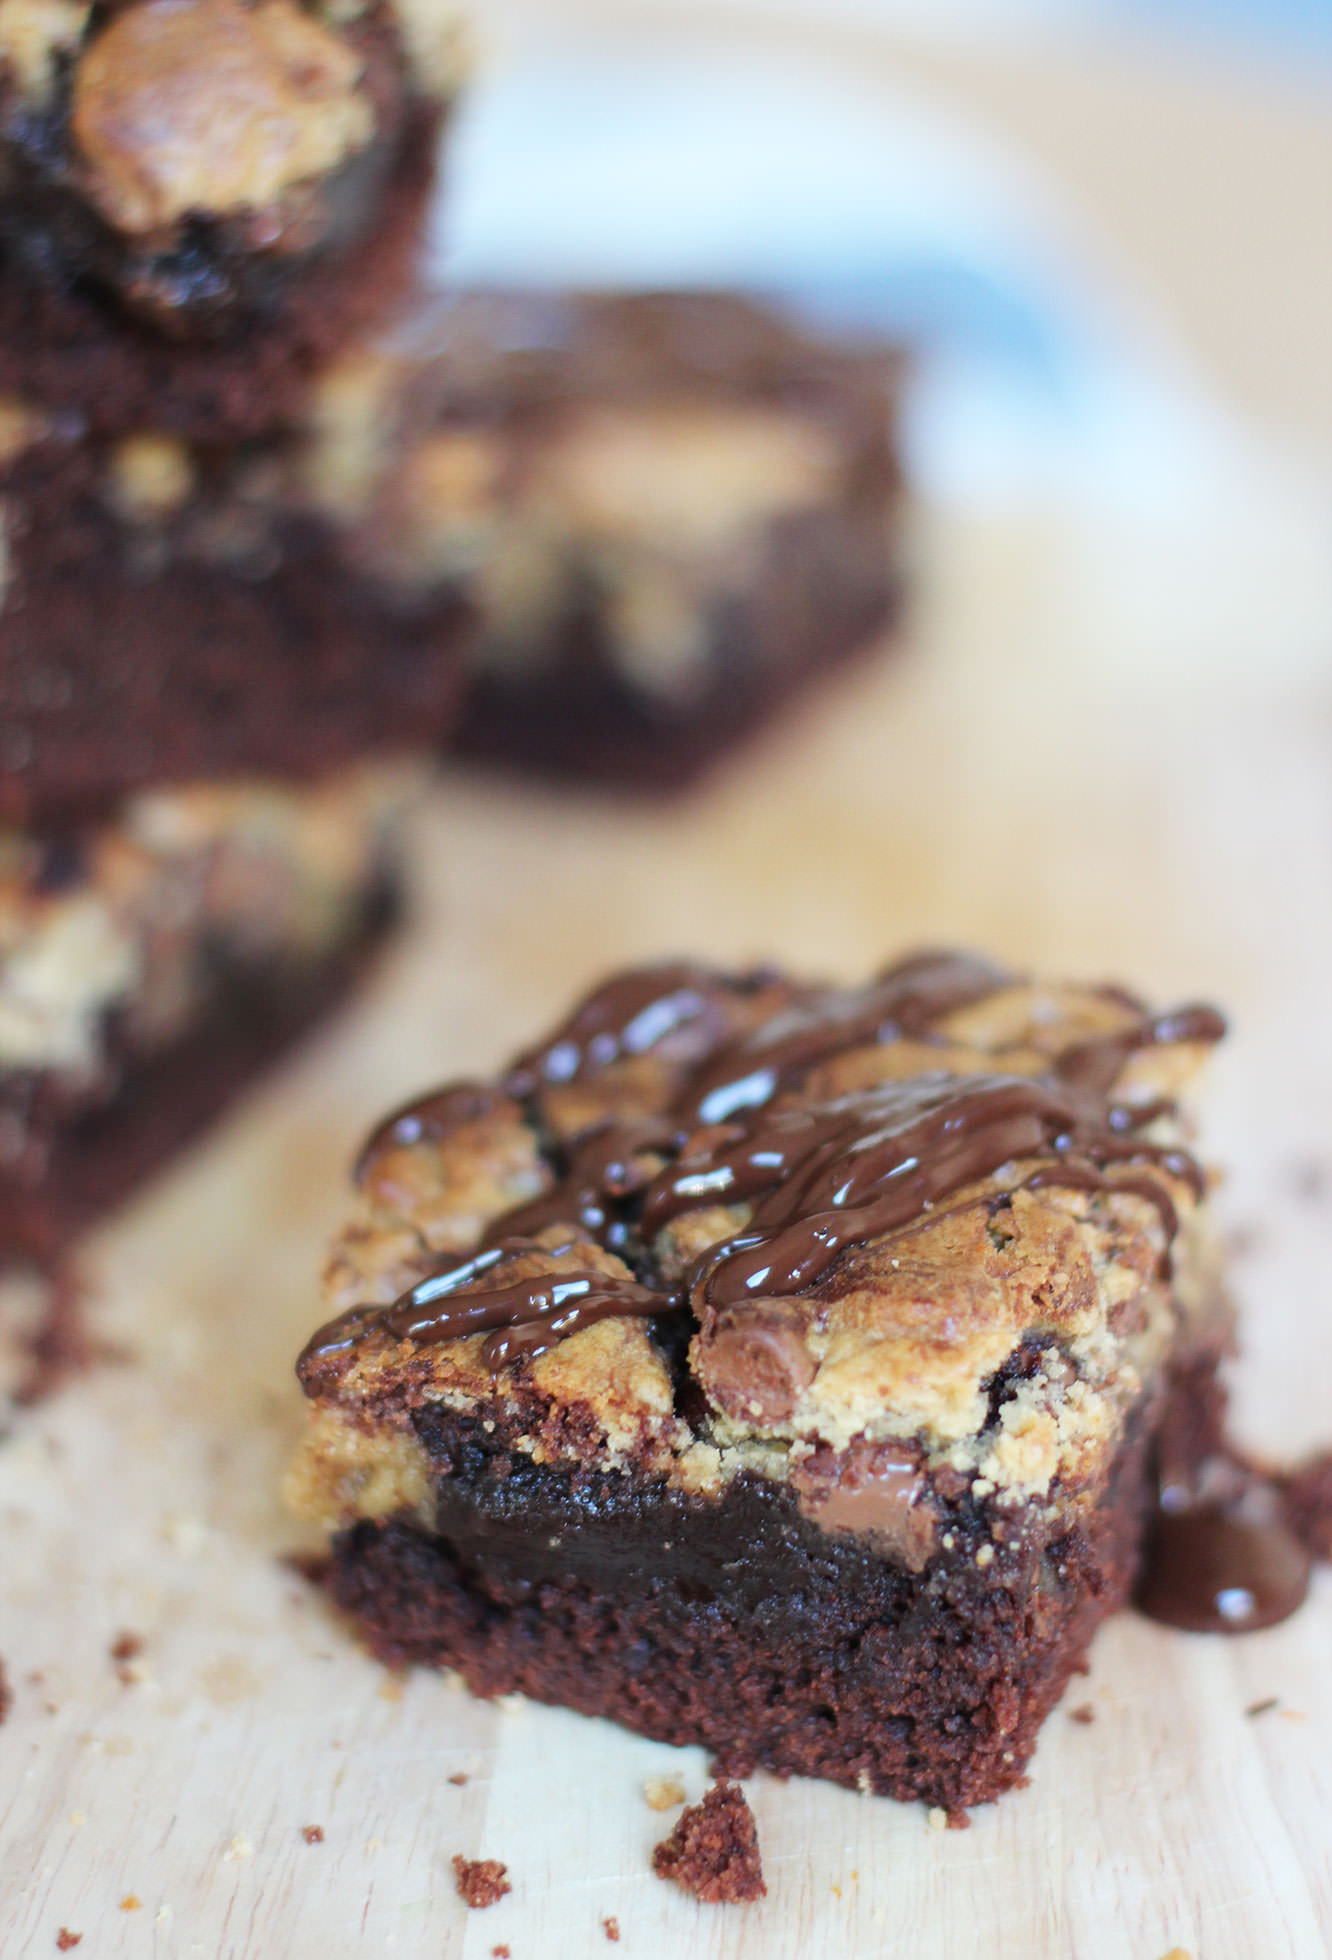
I used to make a cheat’s version of this recipe with two packet mixes, and recently I just thought to myself, ‘I wonder if this would taste better if I made the batters from scratch’. Oh boy does it.
You just have to find an excuse to make this and eat it warm from the oven with some ice cream. It’s very easy and quite a bit more impressive than regular brownies.
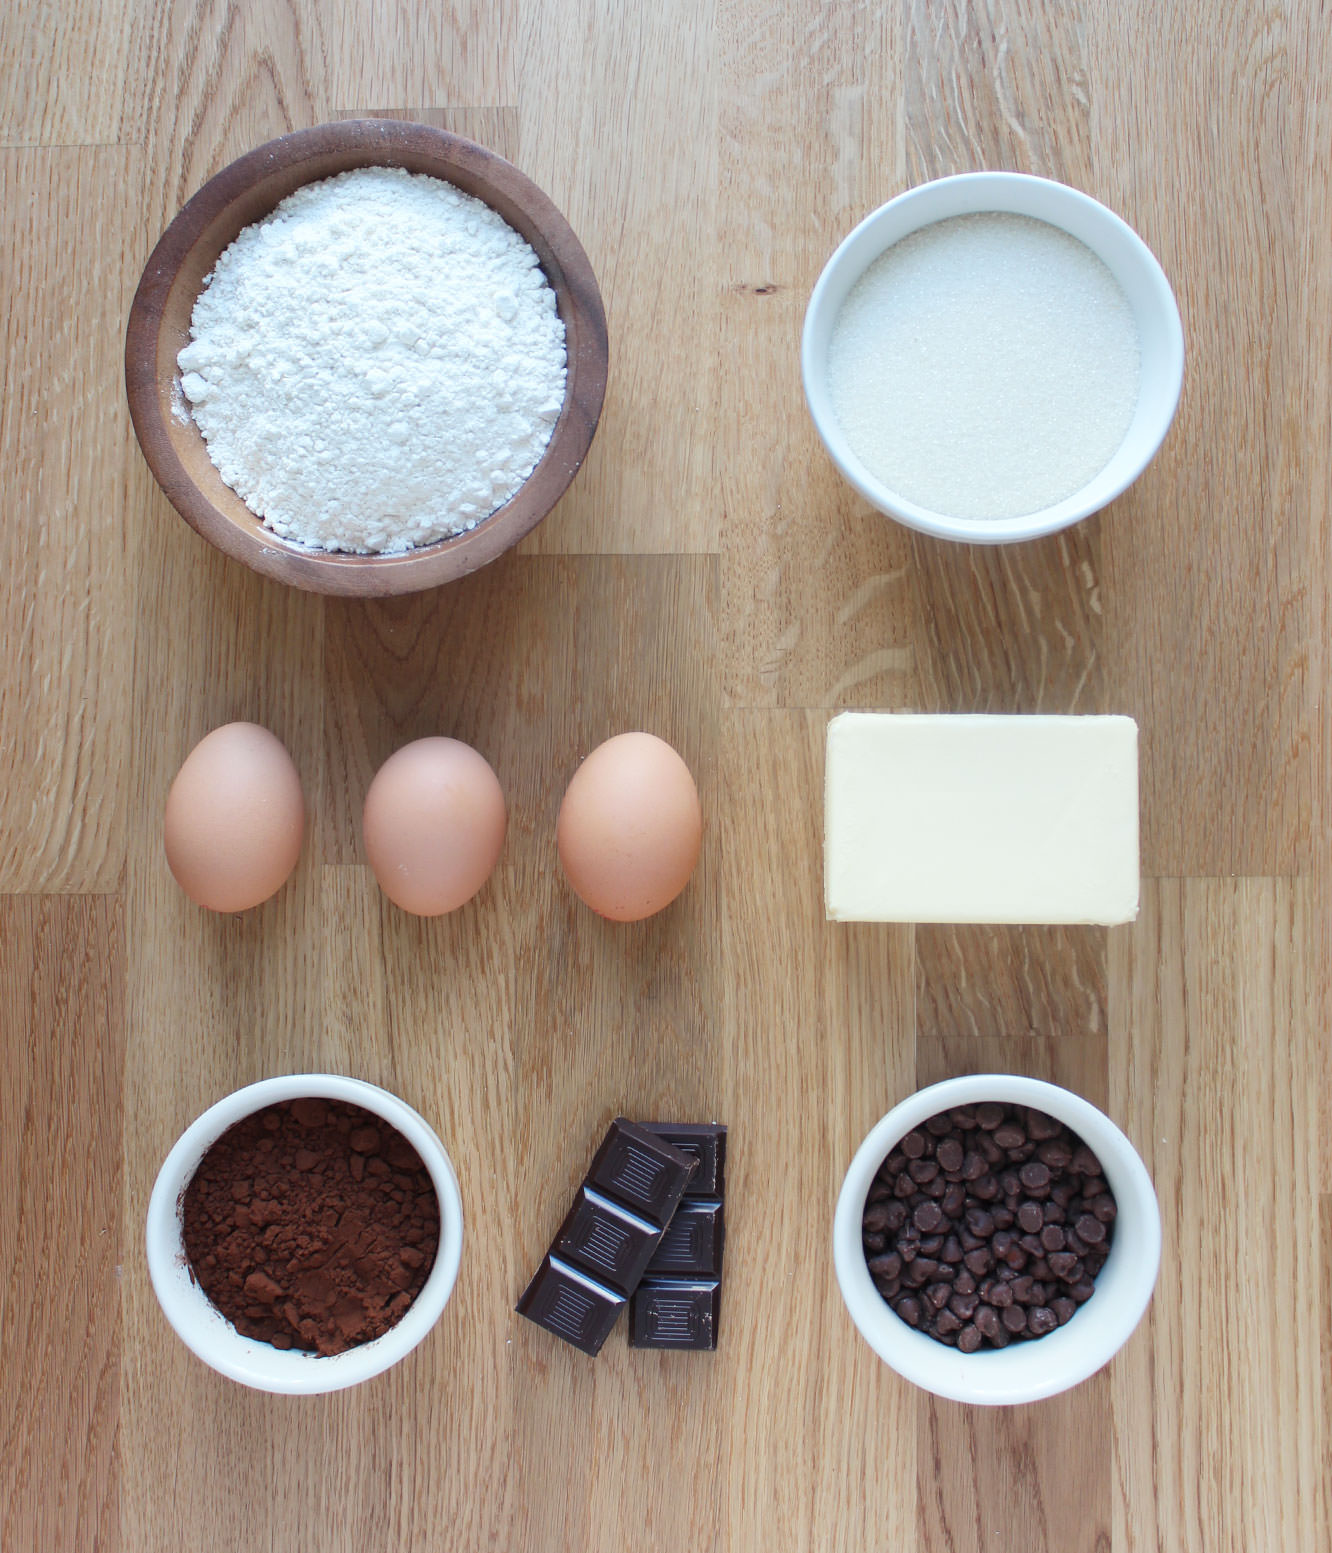
You will need
For the brownie batter:
300g/10.5 oz Caster sugar (golden if you have it)
170g/6 oz Unsalted butter
170g/6 oz Plain flour
45g/1.5 oz Cocoa powder
3 Eggs
1/2 tsp Baking powder
For the cookie dough:
170g/6 oz Plain flour
100g/3.5 oz Soft light brown sugar
100g/3.5 oz Milk chocolate chips
60g/2 oz Unsalted butter
1 Egg
1 tbsp Golden syrup
1/2 tsp Baking powder
Extra
45g/1.5 oz Dark chocolate
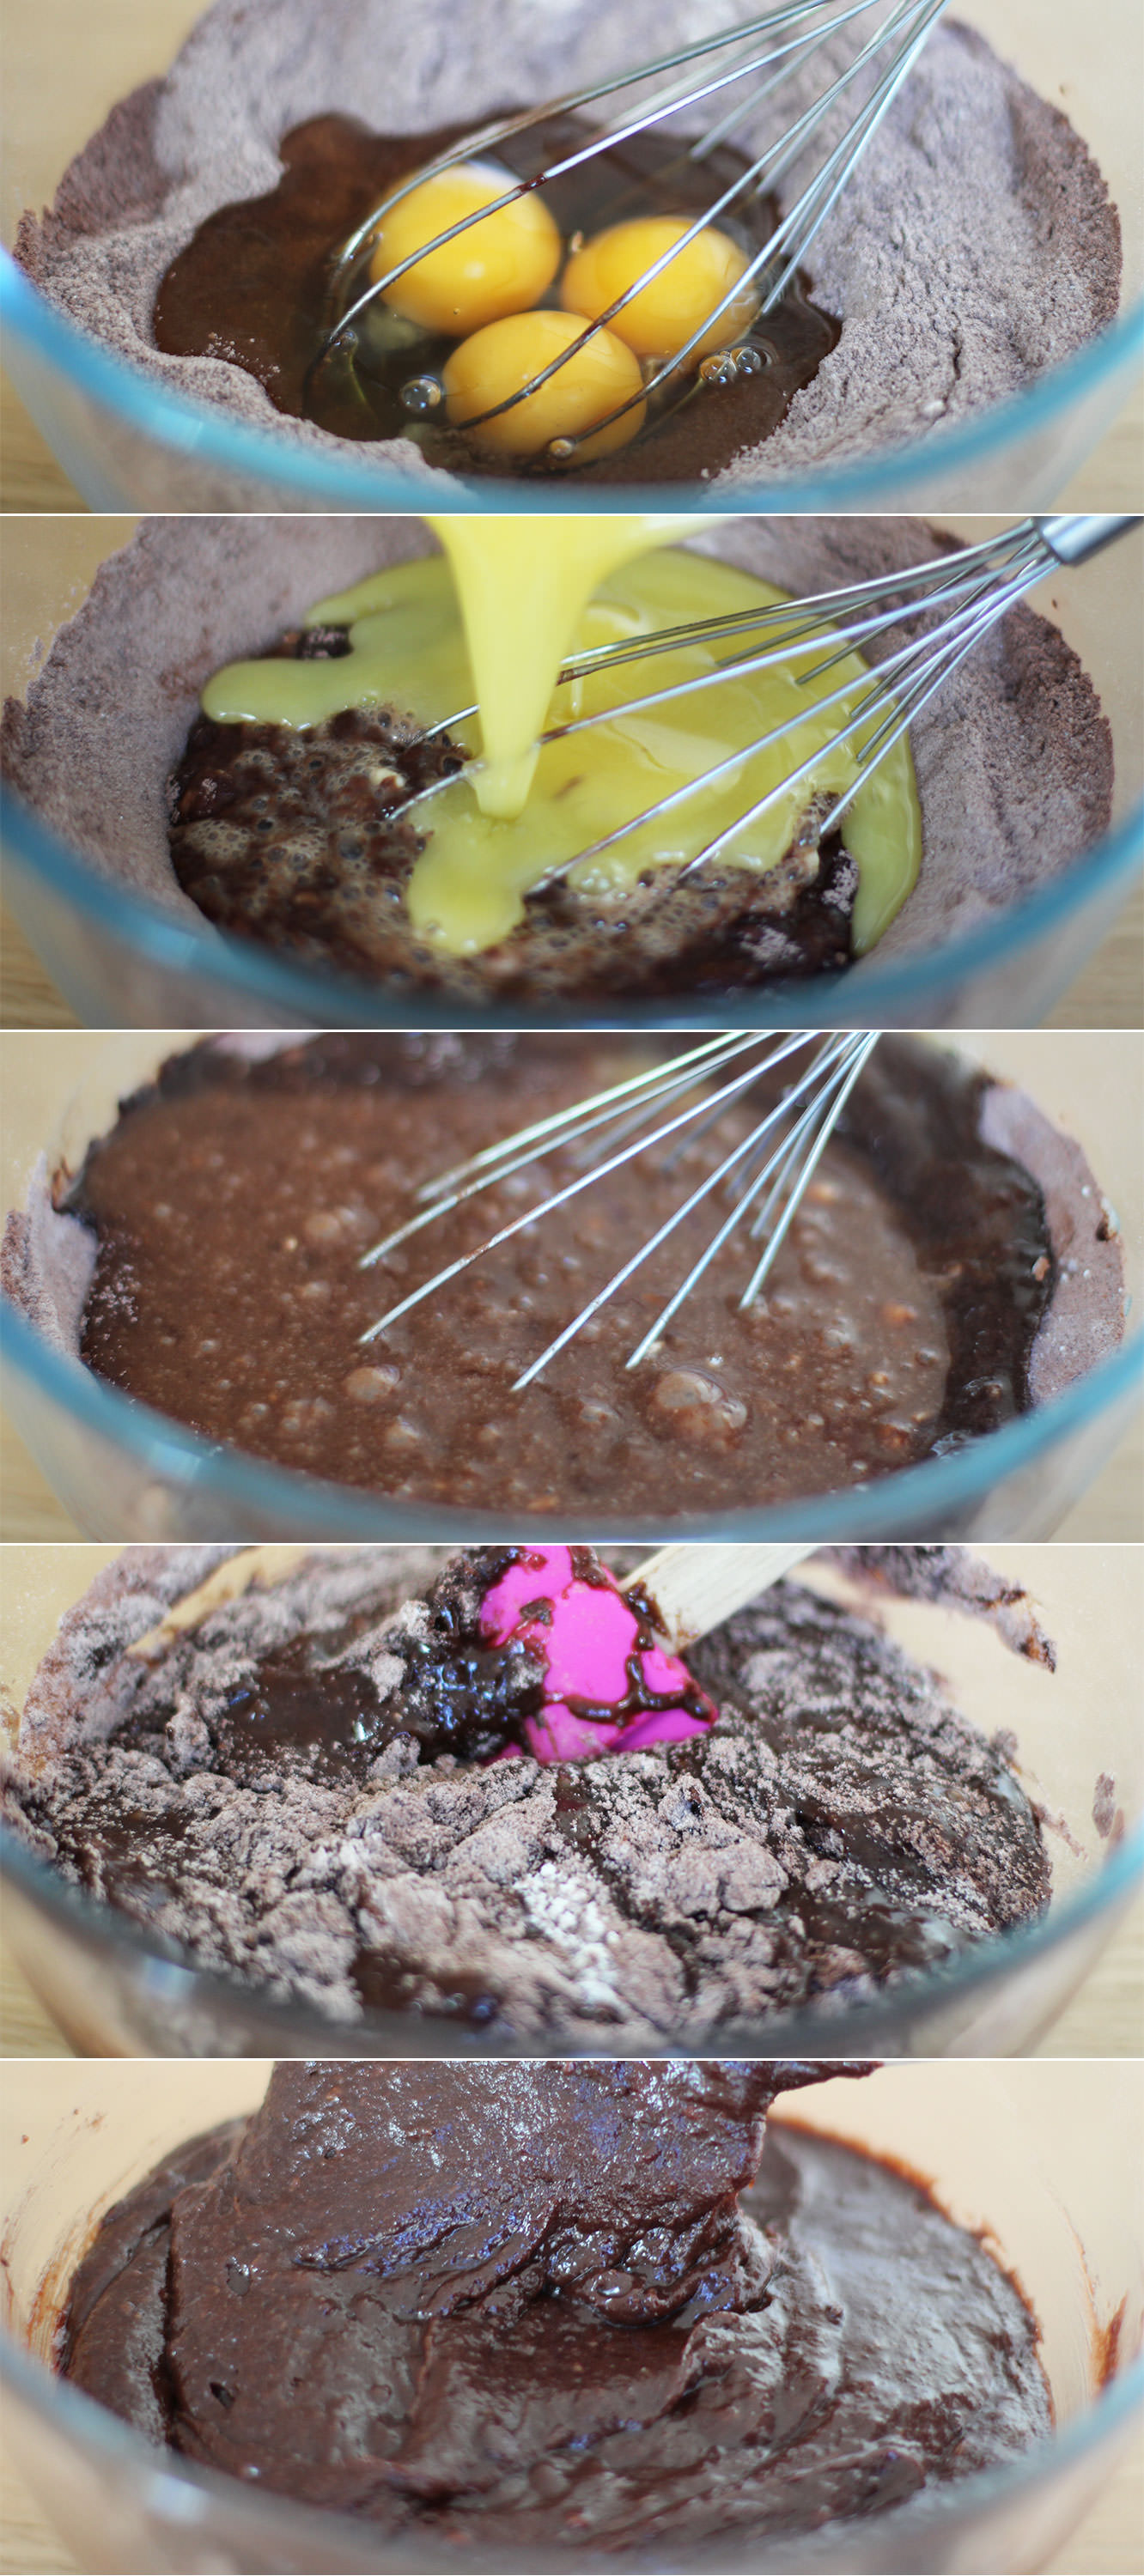
Step one
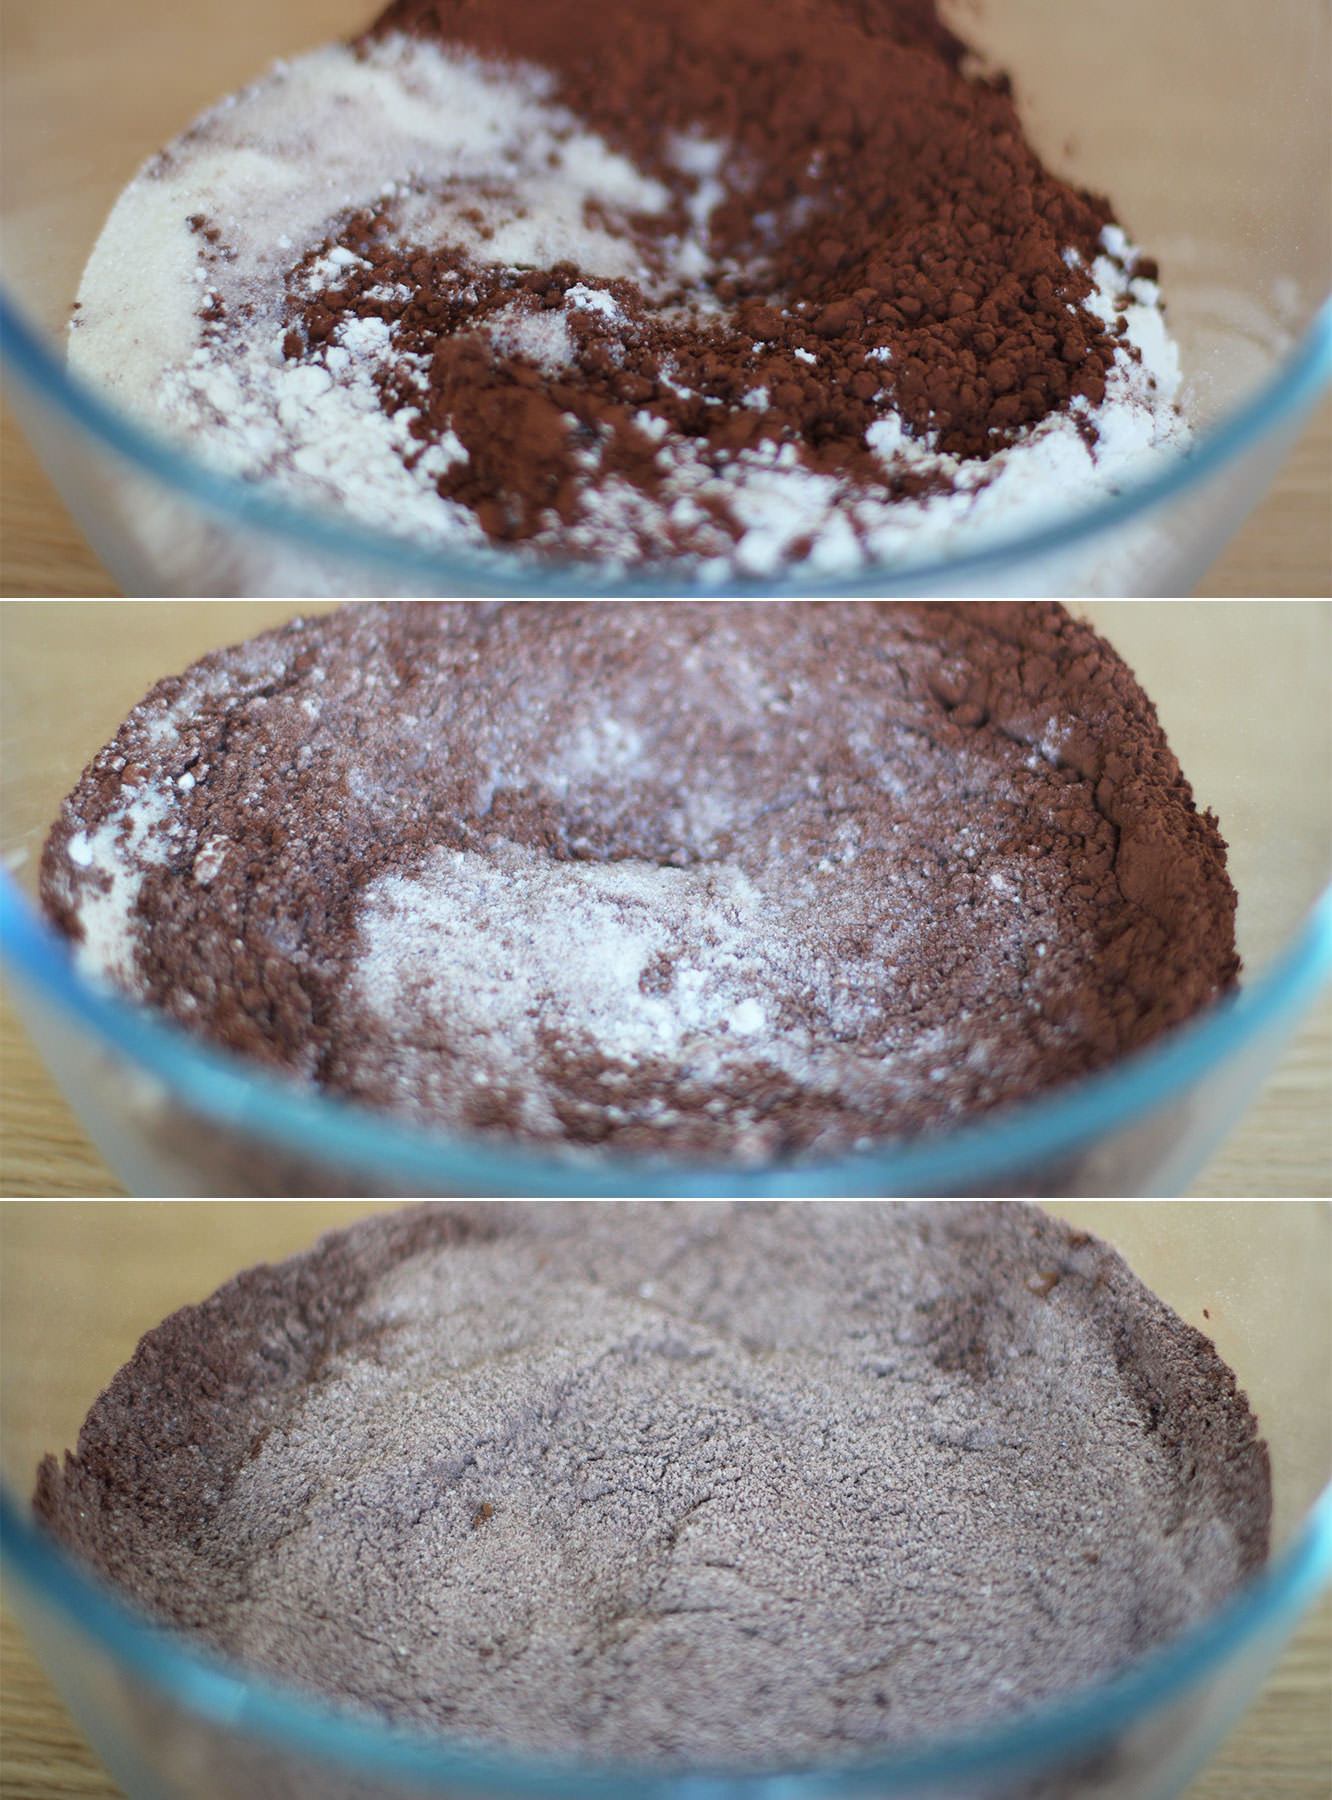
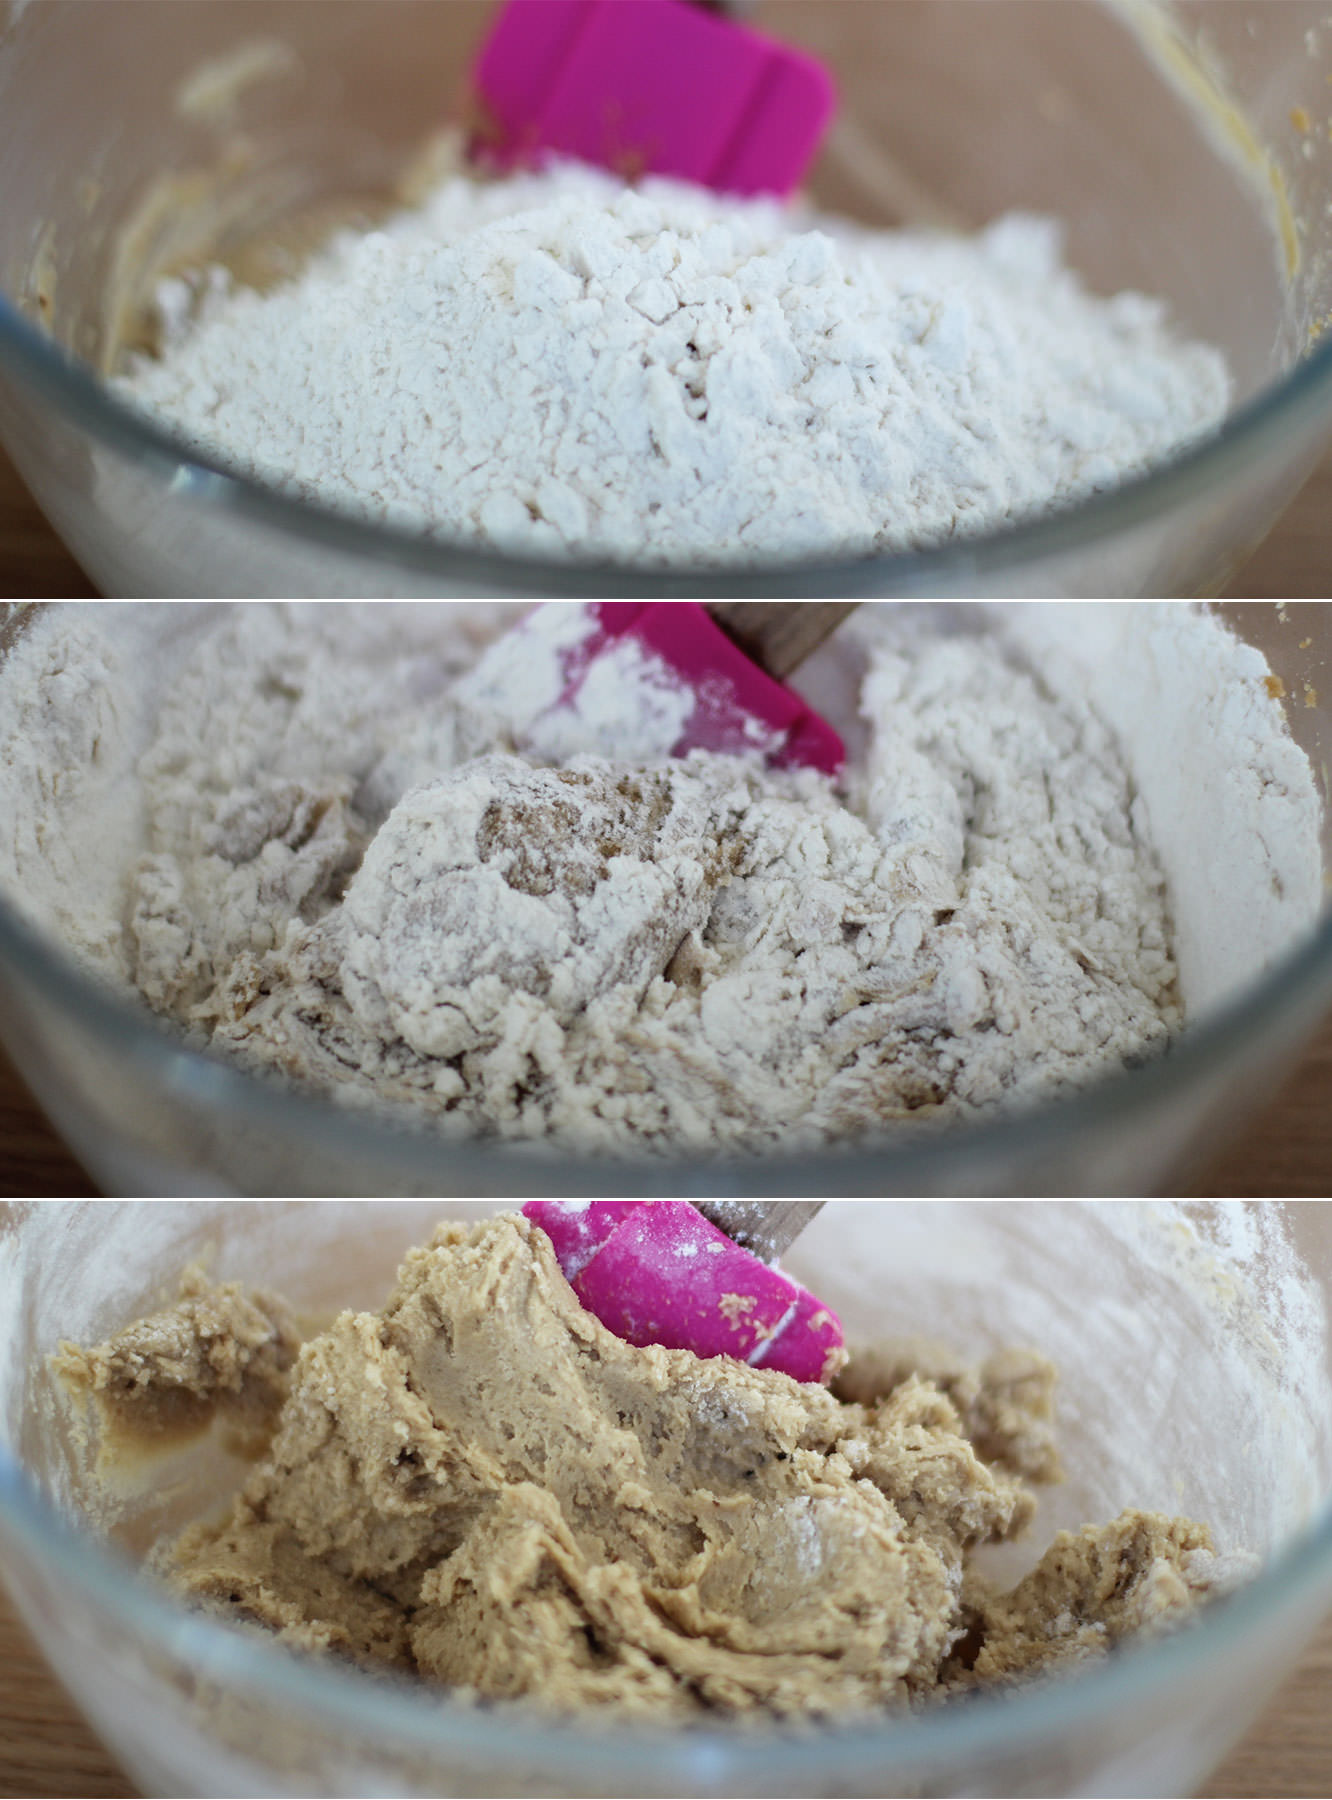
Starting with the brownie batter, mix together the baking powder, sugar, flour and cocoa powder.
Step two
Make a well in the middle of your dry ingredients and add the eggs. Using a hand whisk, combine gradually using small circles in the centre of the batter.
Step three
Melt the butter in the microwave. Only until it has just about dissolved mind, or it will cook the eggs and this is not intended to be a recipe for scrambled egg brownie.
Step four
Add the butter into the mixture and continue with your little circles until most of the flour is combined, then use a spatula or wooden spoon to fold in the rest.
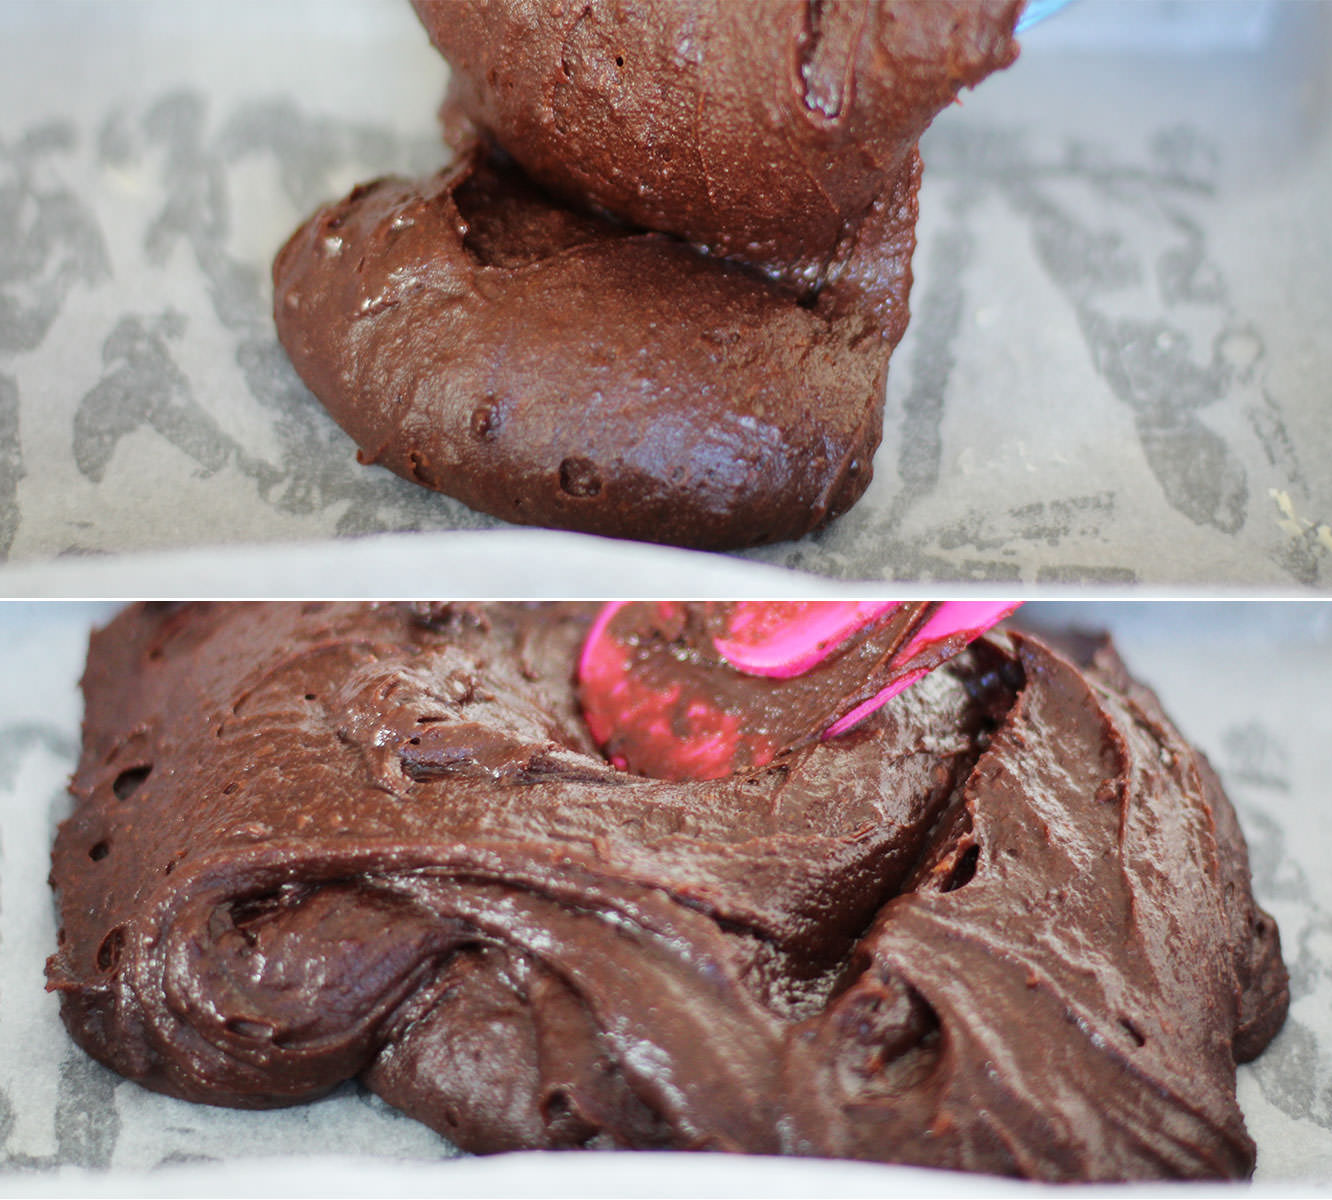
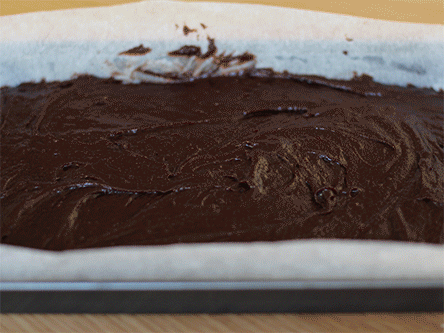
Step five
Pour into a greased and lined brownie tray and gently spread into the corners.
Get a teaspoon and eat a bit. You know you want to.
Moving on to the cookie dough…
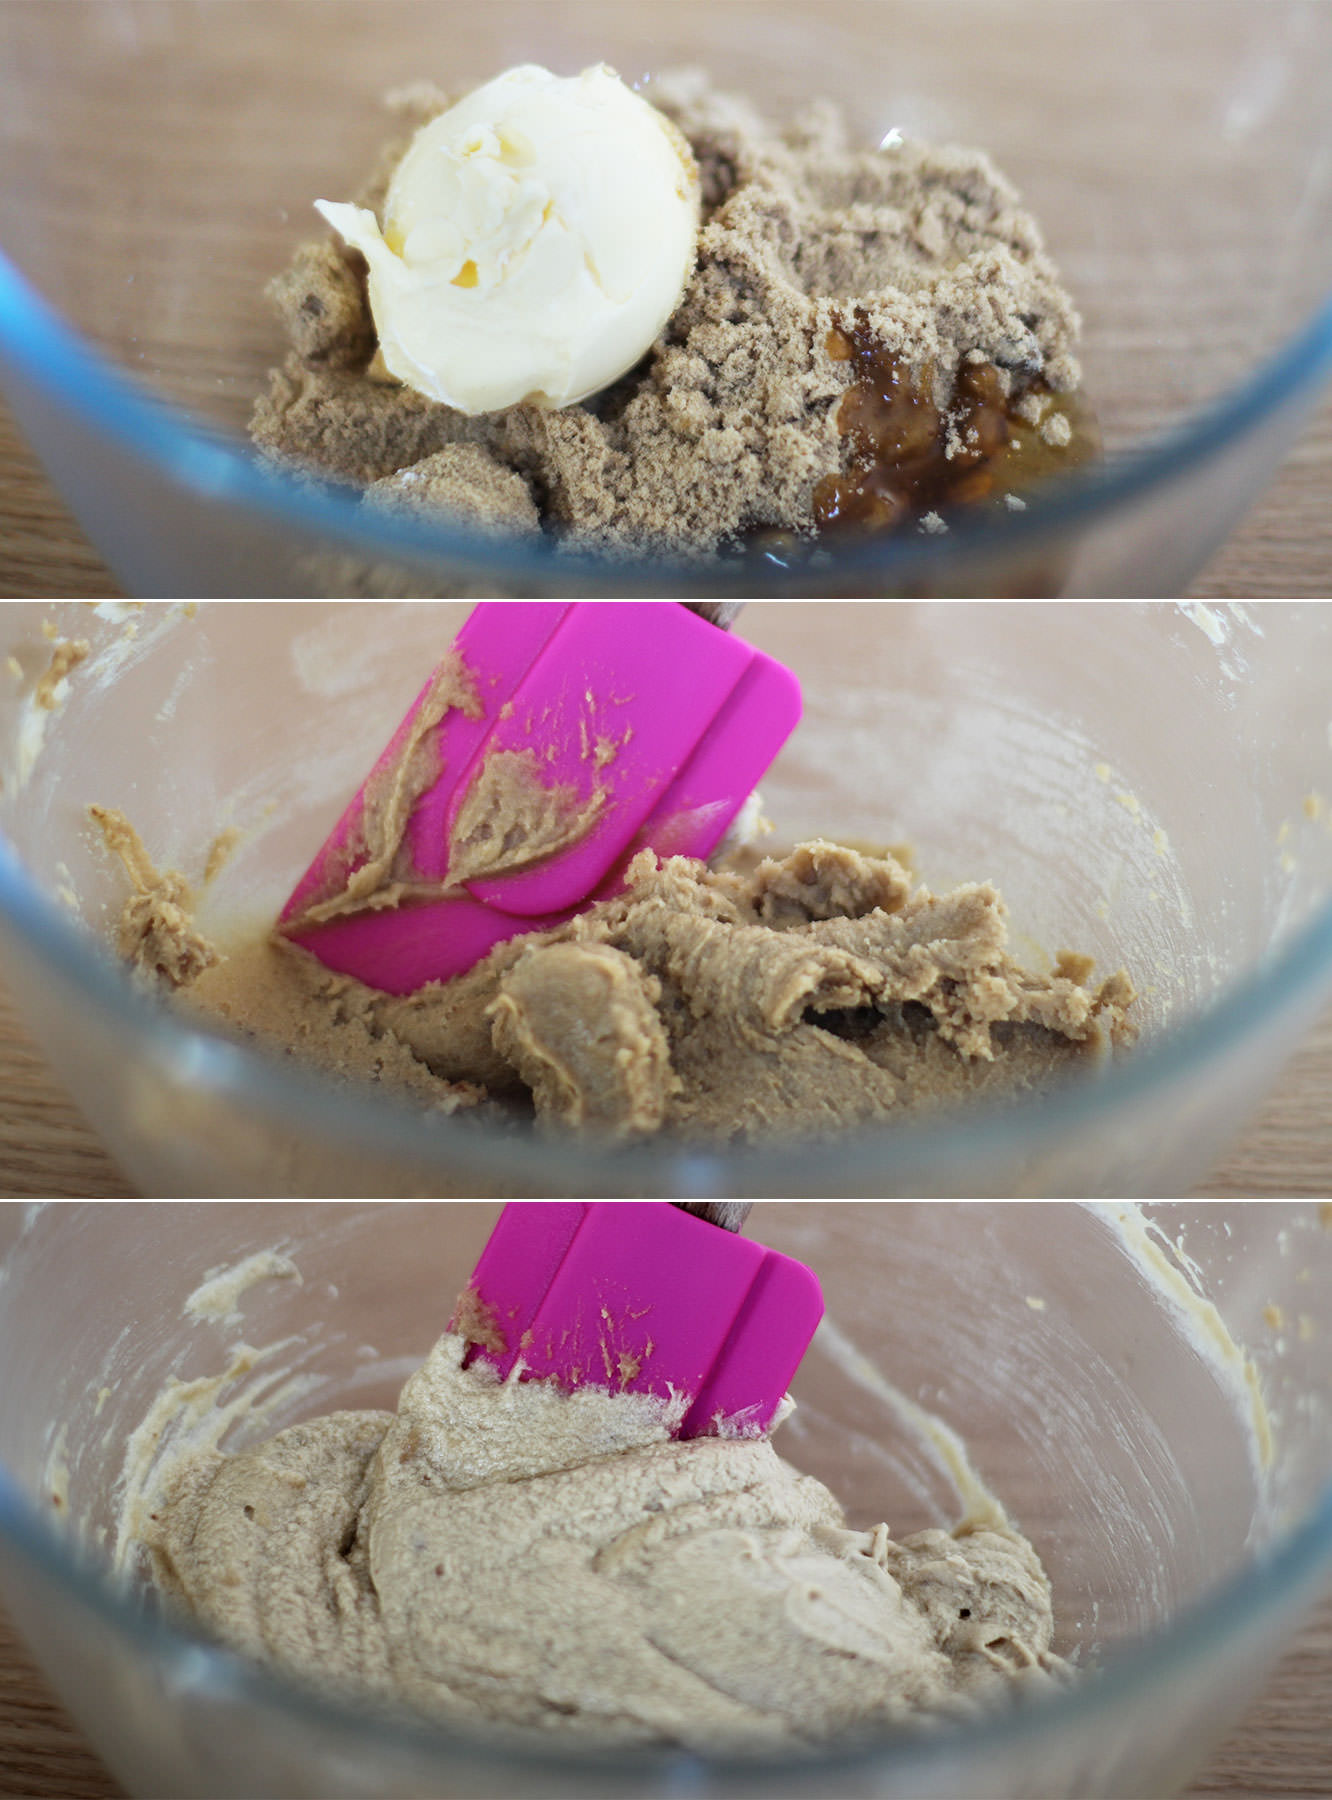
Step six
Beat together the butter, soft brown sugar and golden syrup. You might find it easier/quicker to use an electric whisk.
Step seven
Beat in the egg until pale, light and fluffy.
Step eight
Fold in the flour and baking powder until you have a smooth dough.
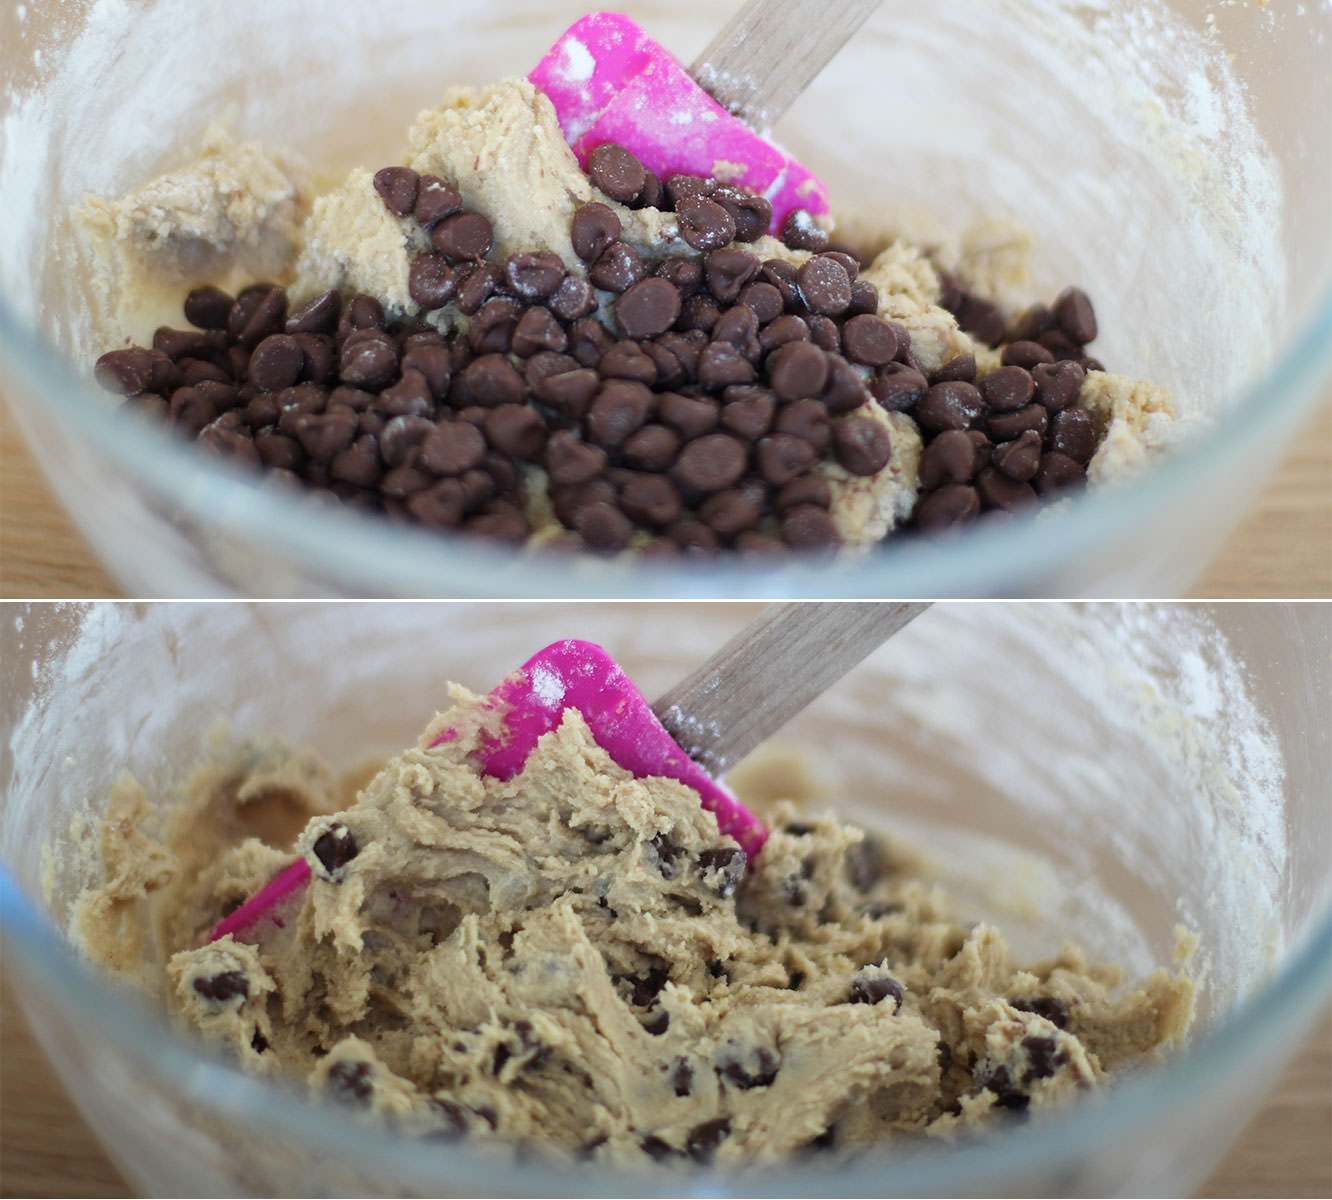
Step nine
Add the chocolate chips.
Time for another little taste.
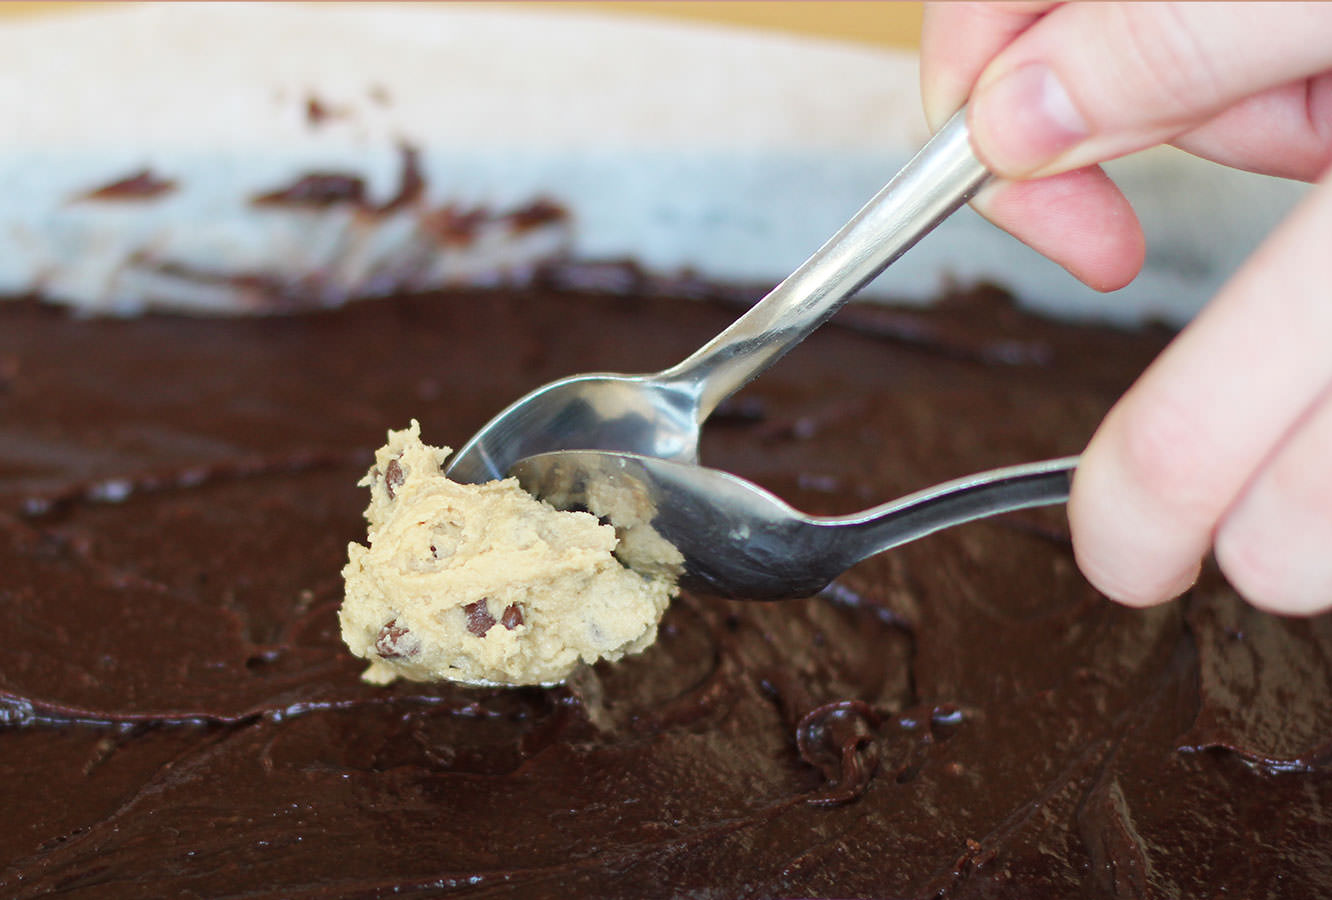
Step ten
Using a pair of teaspoons drop blobs of the batter onto the surface of the brownie mixture.
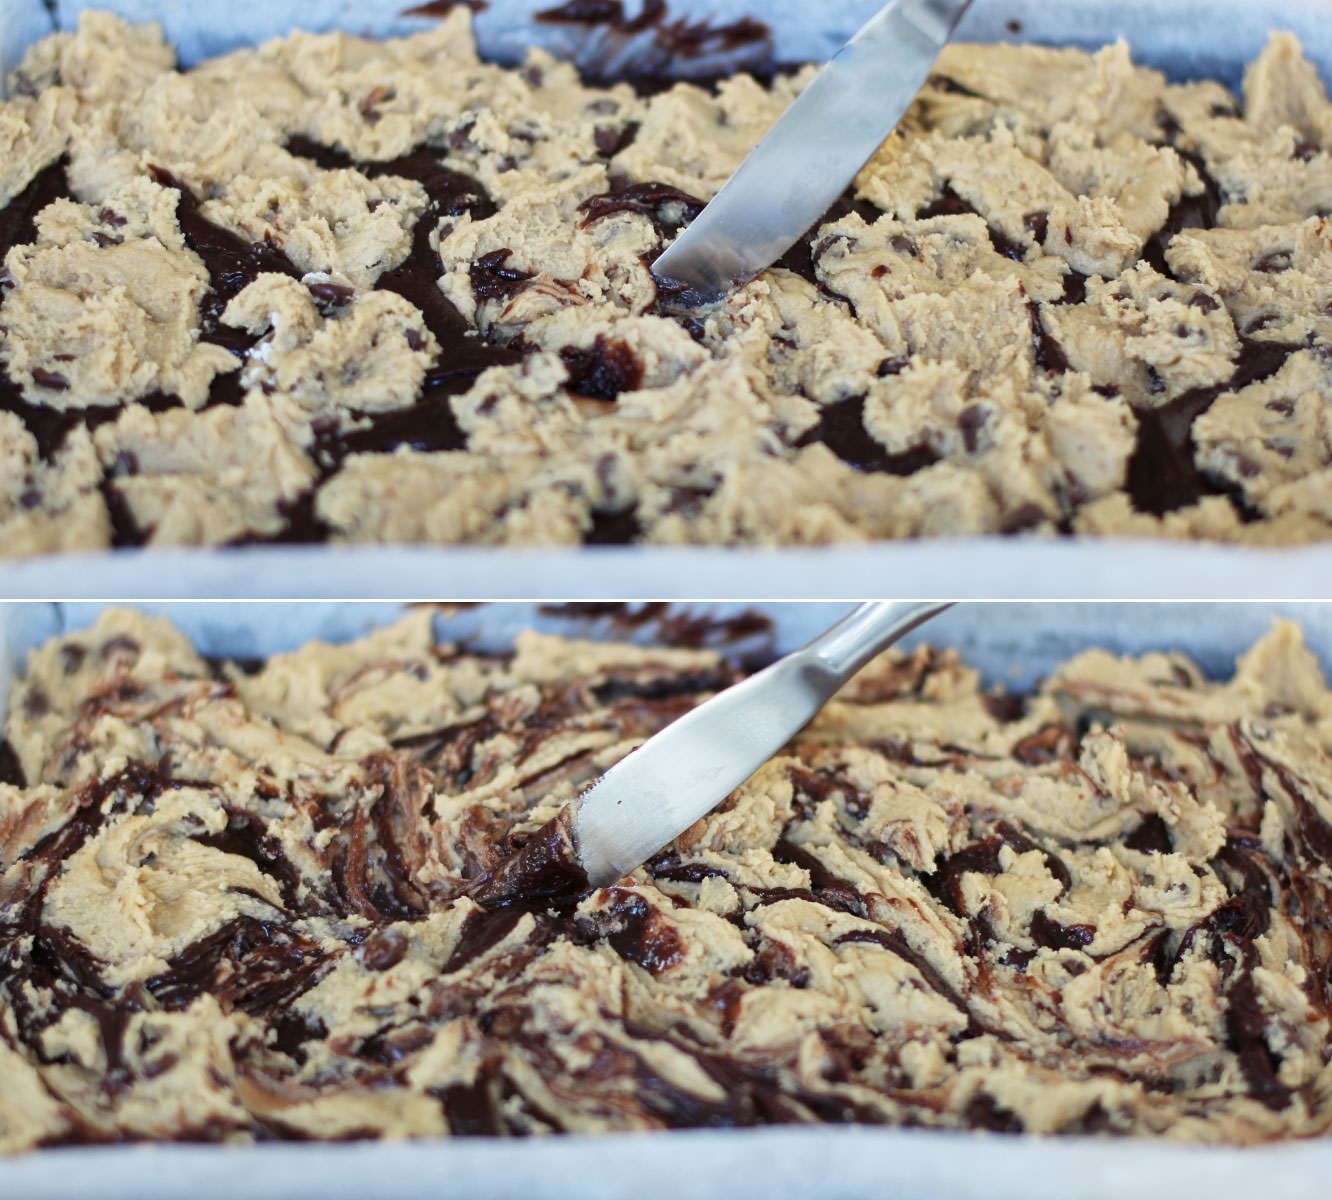
Step eleven
Push the cookie dough blobs down a bit with the back of a spoon and use a butter knife to make a marbled effect on top.
Step twelve
Bake in the oven for 30-35 minutes on 180C/350F/gas mark 4. You want there to still be a bit of fudgey chocolate between the brownie and cookie so be careful not to over do it.
Step thirteen
Melt the dark chocolate in the microwave and drizzle over with a spoon.
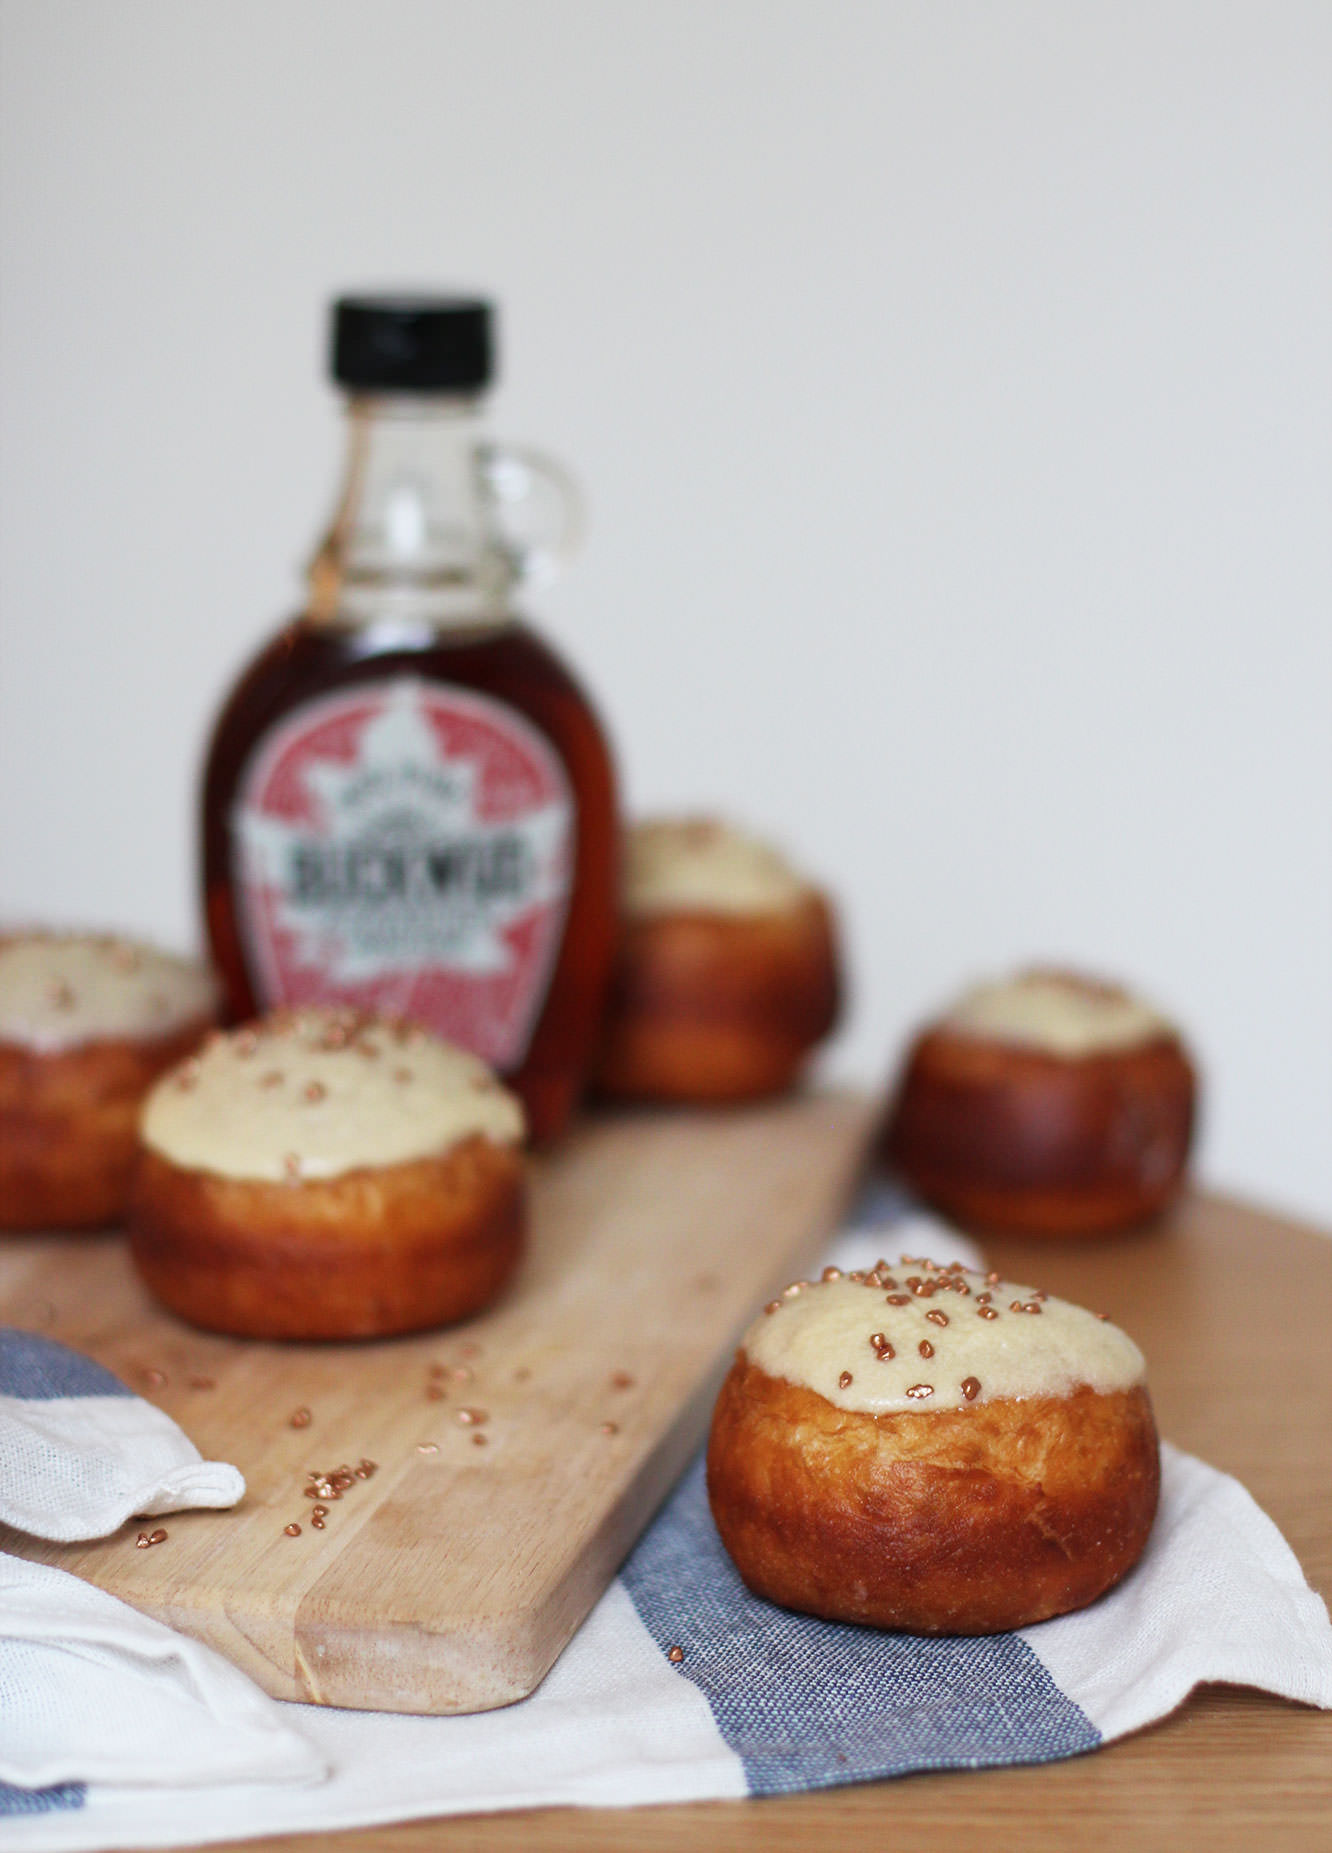
I’m going to call it before you do. I am a tiny bit cheating in this post. Back in November my housemate Vicky and I made Bonfire Night doughnuts. It was an epic feat of baking, one I vowed not to repeat for a very long time. That is, until my teacher at college had a birthday last week and I took to the kitchen again to make a maple themed bun in honour of his Canadian homeland.
So I confess. Given that doughnuts are a touch on the complex side, I’ve repeated many of the photos from November. It’s a lot easier to get snap happy when there’s a spare set of eyes to watch the pan of hot oil, so don’t judge me too harshly friends.
I urge you to give doughnuts a try some day.
You will need
For the doughnuts:
350ml/12 fl oz Warm full fat milk
700g/1lb 8 oz Strong white bread flour
2 Eggs
70g/2.5 oz Unsalted butter
100g/3.5 oz Caster sugar
1 tsp Salt
14g/0.5 oz Dried yeast
50ml Warm water
For the filling:
300g/10.5 oz Icing sugar
125g/4.5 oz Unsalted butter
175ml/6 fl oz Maple syrup (as good as you can afford)
1 tsp Maple extract (don’t panic if you don’t have this or can’t find it, I lumped for a caramel extract in the end, and you could leave it out altogether)
For the glaze:
100ml/3 fl oz Maple syrup
100g/3.5 oz Icing sugar
25g/1 oz Unsalted butter
Extras
1.5 litres/50 fl oz Vegetable oil for frying
Sprinkles (these bronze ones are from Waitrose)
A flavour injector or piping bag with long thin nozzle
(Makes 25-30)
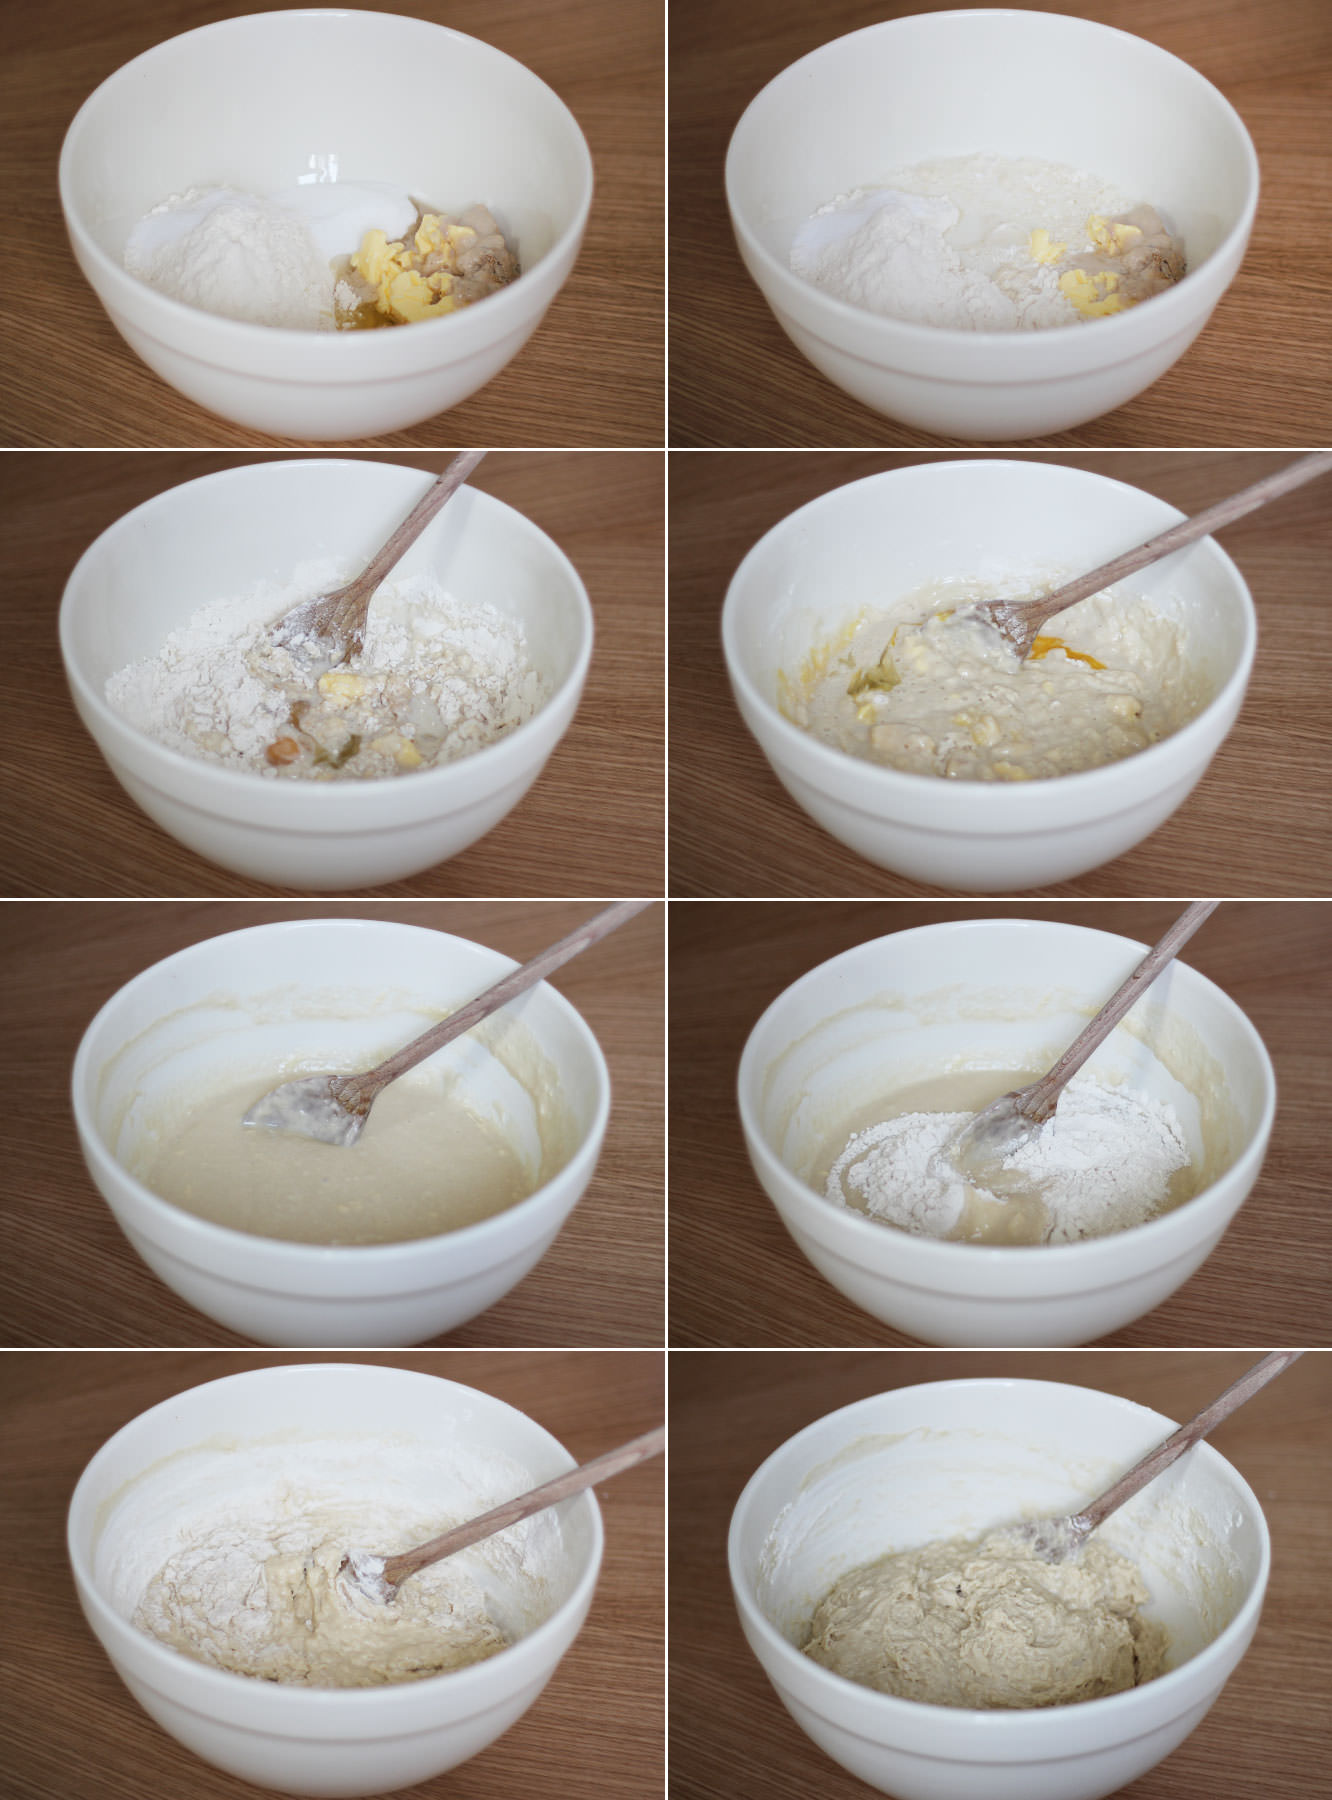
Step one
Put the yeast in the warm water and wait until frothy.
Step two
Combine half the flour with the rest of the dough ingredients (including the yeast froth).
Put the yeast and the salt on opposite sides of the bowl so the salt doesn’t prevent the yeast from doing its thang.
Step three
When the batter is smooth, gradually add the rest of the flour and stir.
The dough will be sticky but not impossible to work with. Having said that I still gave the work top a significant dusting of flour.
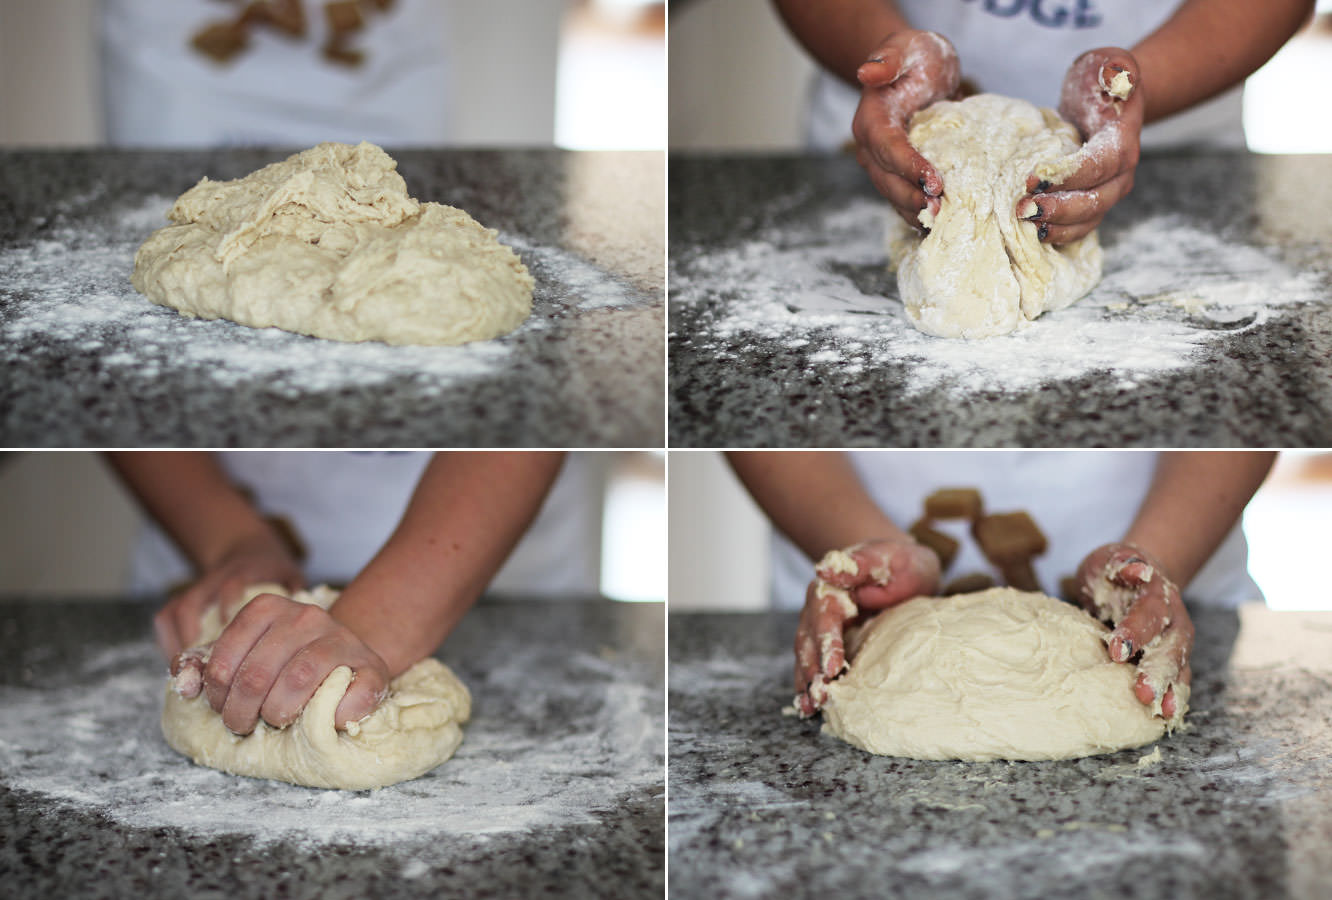
Step four
Turn the dough out onto a floured surface.
Knead for about 10 minutes, don’t worry if you have to add more flour to stop it sticking but don’t add loads and loads.
Step five
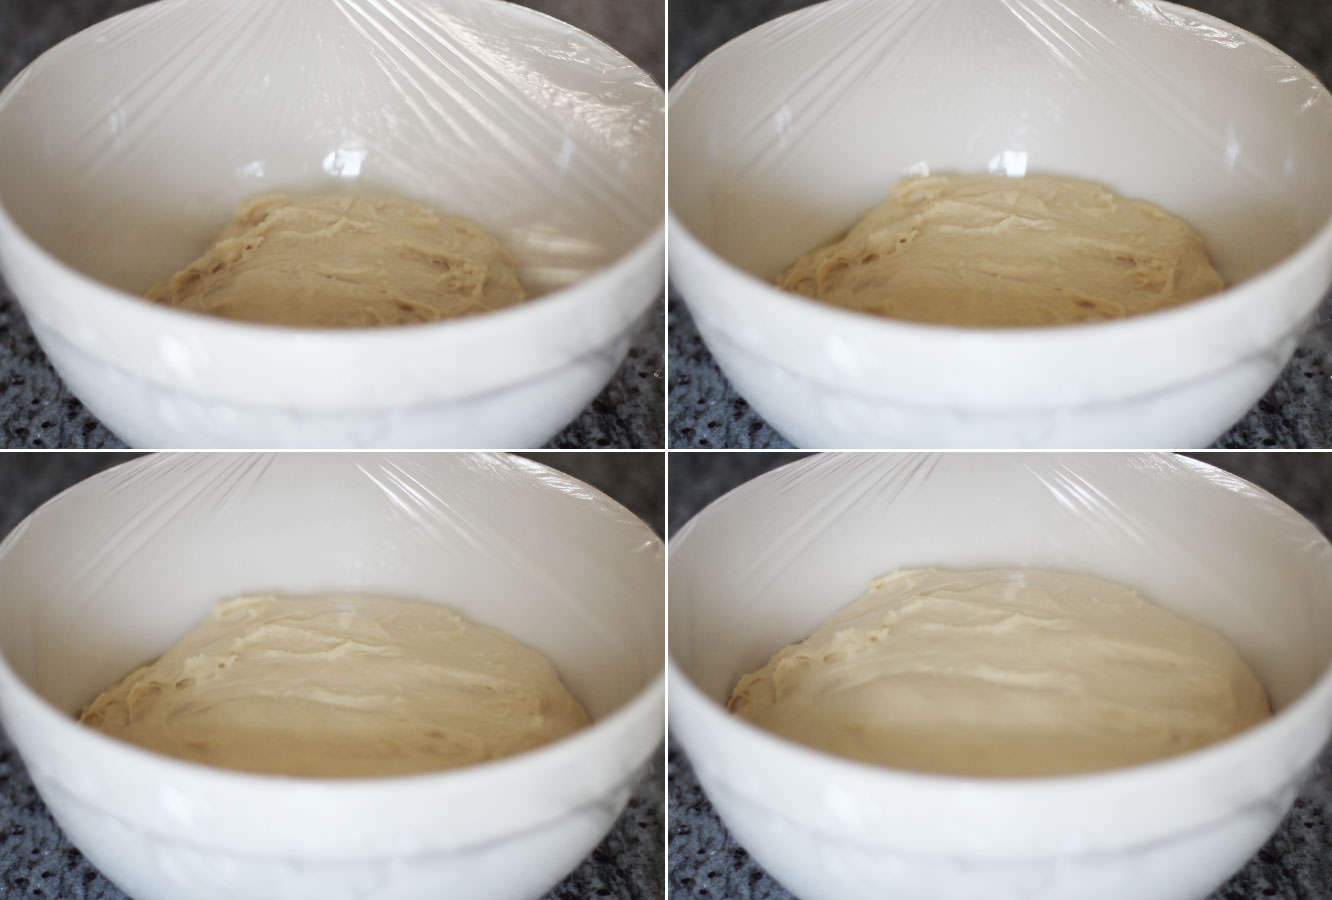
Pop it back in the bowl and cover with clingfilm. Leave in a warm dry place for 60-90 minutes or until doubled in size.
Step six
Once the dough has finished rising turn it back out of the bowl and roll out into two long strips. Cut into 30 equal pieces.
Step seven
Roll the pieces into balls and leave on a lightly dusted (with flour just in case that wasn’t obvious) surface or tray to prove.
Step eight
You’ve probably got time here to make the filling and the glaze.
Essentially for both you just need to whisk all the ingredients together in a bowl. I can’t even make that sound remotely more complicated.
Step nine
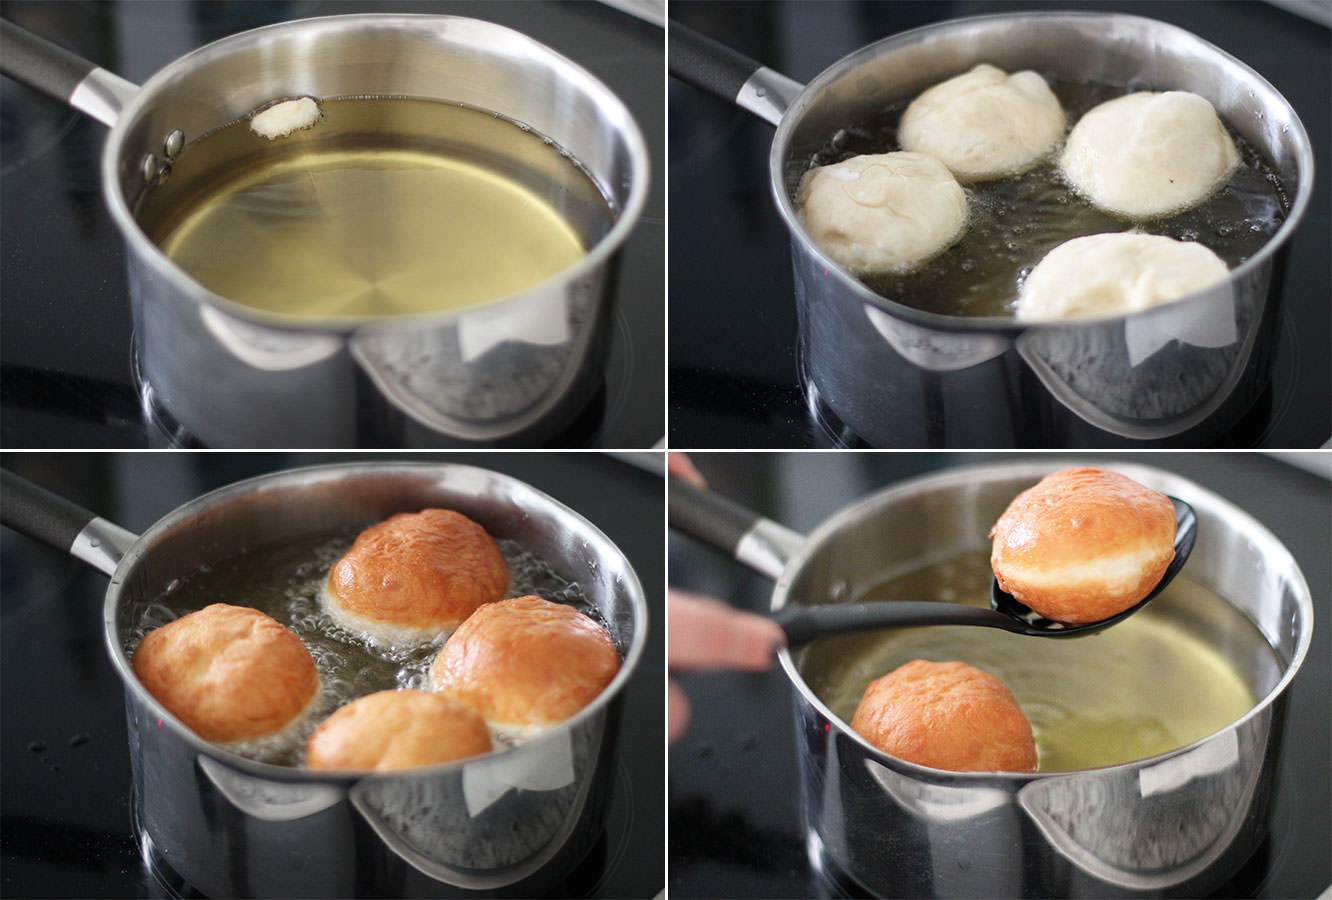
About 20 minutes after the proving has started put the oil in the pan on a low-medium heat. Definitely don’t rush this stage, it will take a long time for the oil to come to the right temperature but patience is key.
Test your oil heat with little pieces of a dough. When this tester floats and bubbles straight away you’re good to go.
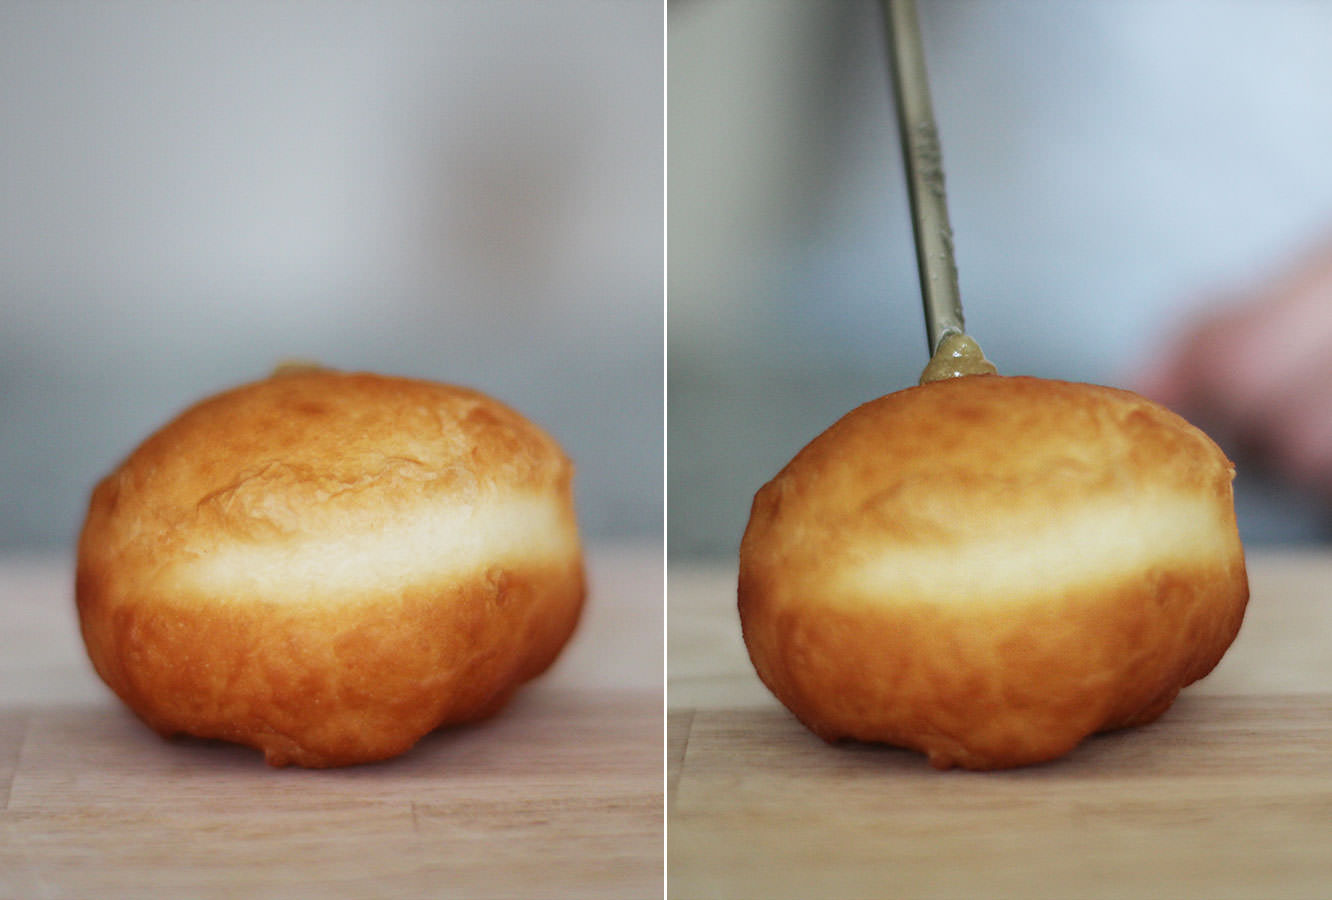
Step ten
Cook your doughnuts. I did this by eye, but I reckon it only takes about 30 seconds to a minute on each side.
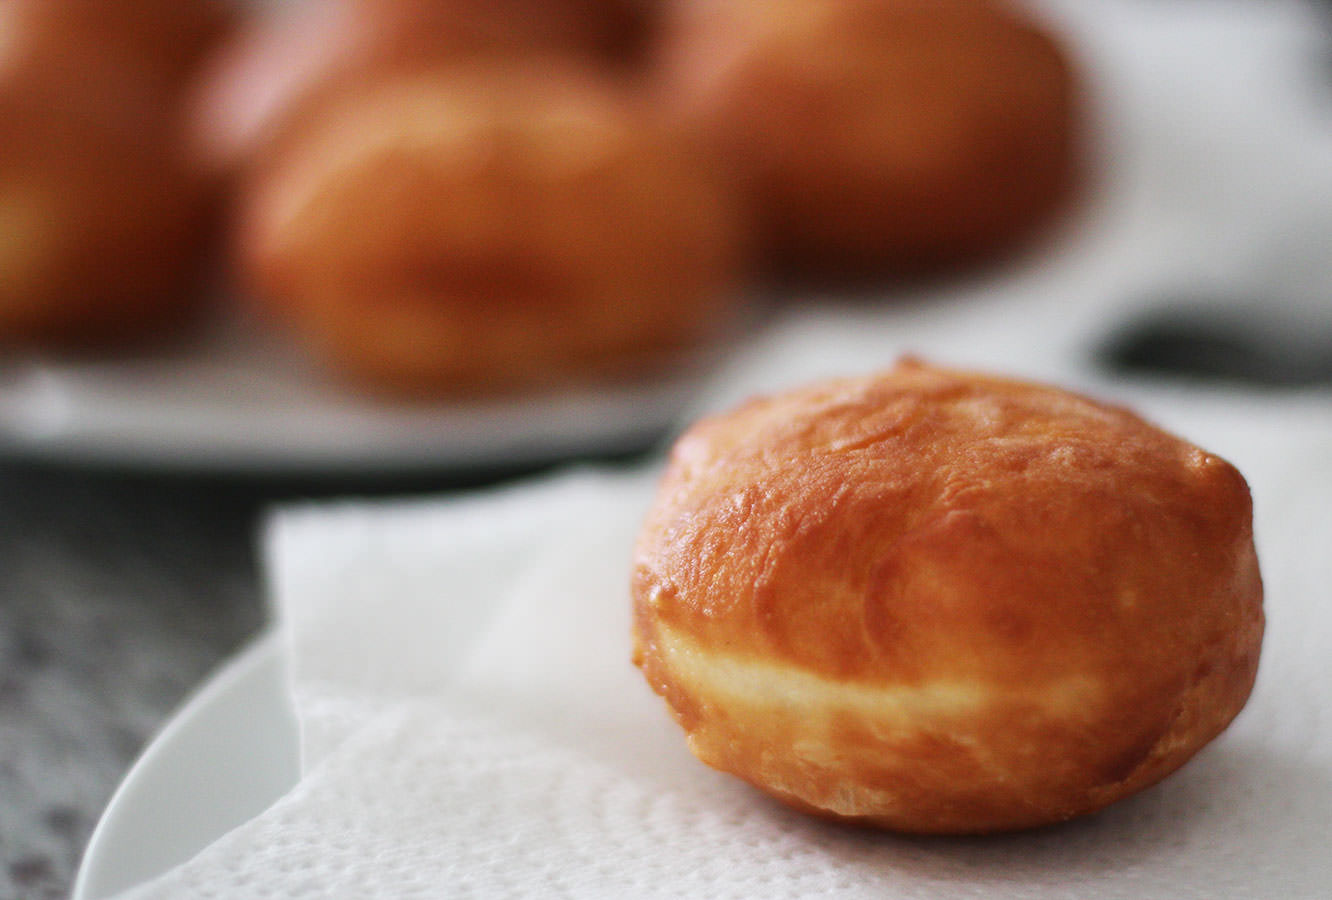
Leave your doughnuts to rest on a few sheets of kitchen roll which will soak up any excess oil.
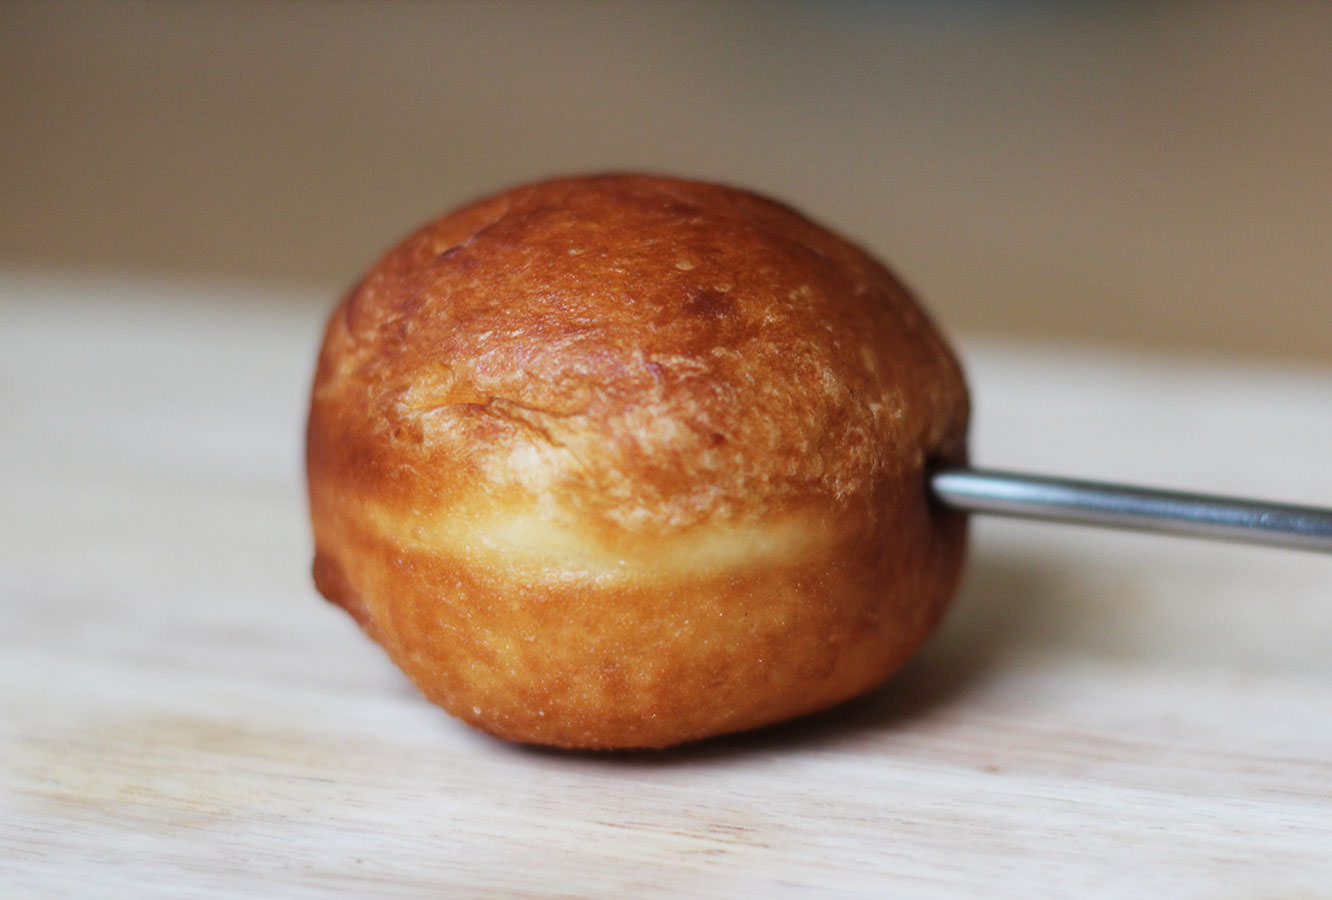
Step eleven
Once the doughnuts are completely cool, fill them with the maple buttercream.
My flavour injector has measurements on the side, so I went for about 10 ml in each. If you don’t have that luxury, practice piping an adequate amount of filling out so you know how much pressure to add and for how long to fill them properly.
Step twelve
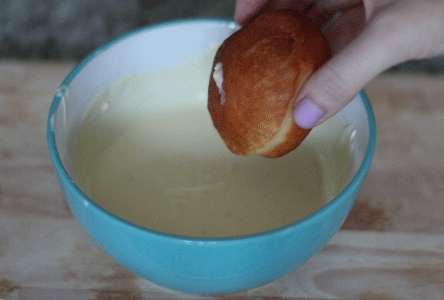
Place the glaze in a deep cereal bowl.
Turn the doughnuts upside down and dip them in the mixture. Sprinkle some, well, sprinkles, on top.
Step thirteen
Stand back and survey. You just made doughnuts my friend.
You might notice there’s a different pair of disembodied hands in the post this week. That’s because my lovely housemate was on half term, and ever since we watched this year’s GBBO we have wanted to make our own doughnuts (I’ve been informed donut is the wrong way to spell it). Thanks for your help Vicky and for very patiently allowing me to photograph the occasion.
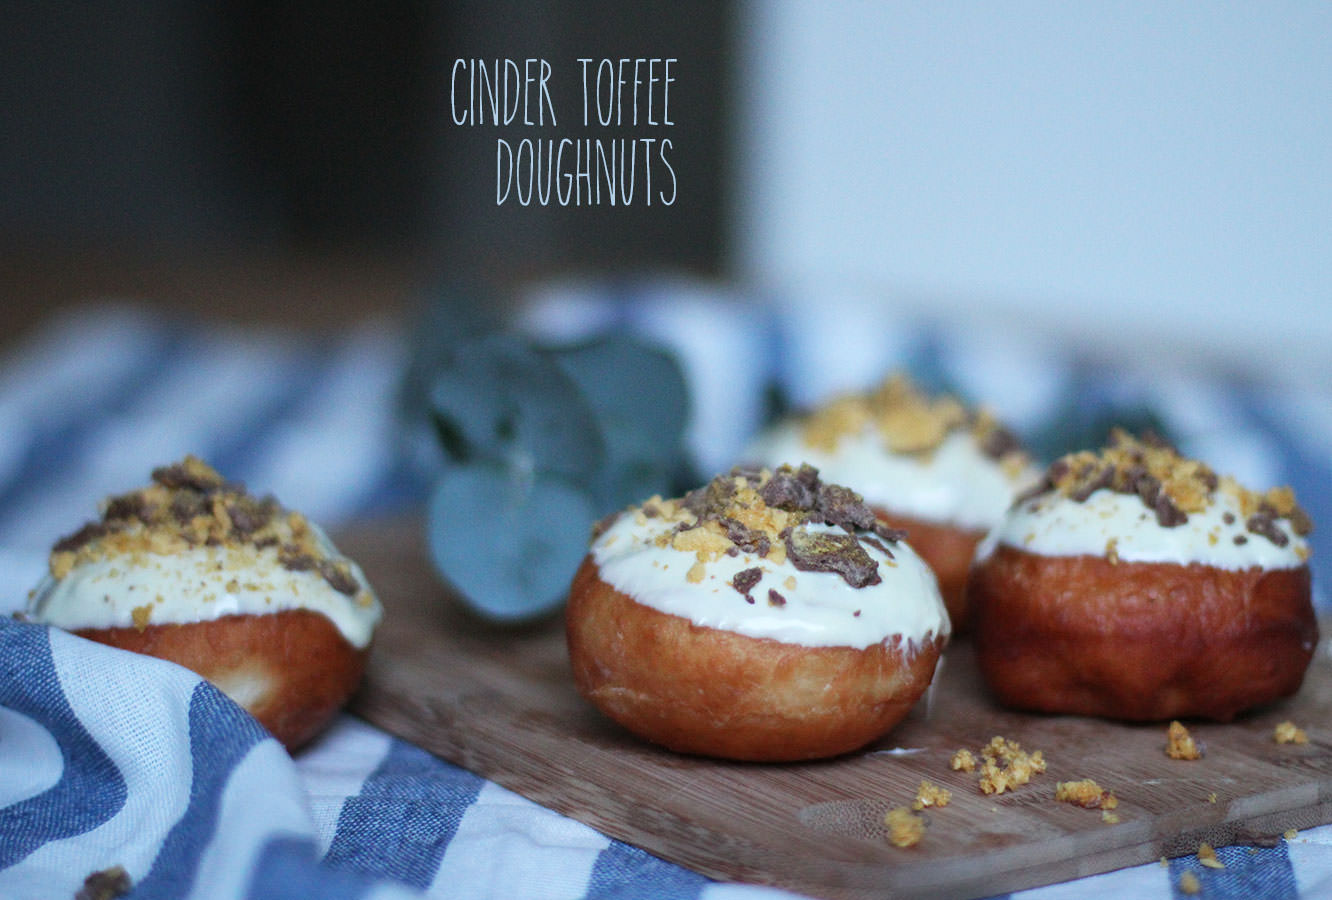
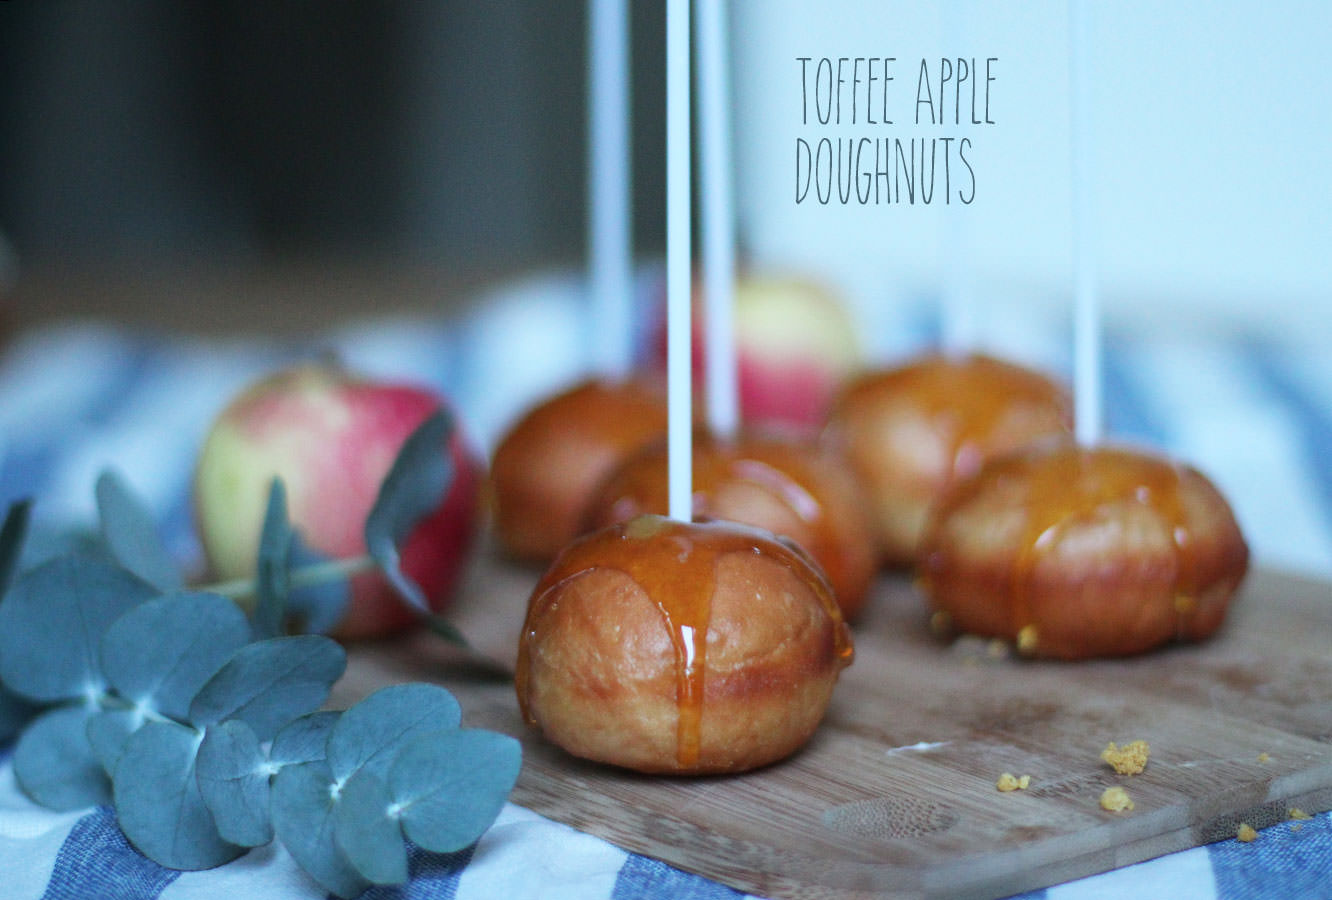
We’re having a little get together for bonfire/fireworks night on Wednesday and we thought we would make some appropriately themed treats. We bring to you a doughnut double whammy, flavoured with toffee apple and cinder toffee.
Disclaimer – these aren’t quick to make, but they are IN-credible, I was very sad to put them into the freezer, and I hope they emerge as delicious as they went in.
You will need
Please note: doughnut recipe makes 30, so the extra flavourings recipes are for 15 of each. If you want to make just one of the versions you will need to double the quantities of the fillings and toppings or halve the doughnut mix.
For the doughnuts:
350ml/12 fl oz Warm full fat milk
700g/1lb 8 oz Strong white bread flour
2 Eggs
70g/2.5 oz Unsalted butter
100g/3.5 oz Caster sugar
1 tsp Salt
14g/0.5 oz Dried yeast
50ml Warm water
For the toffee apple version:
2 Bramley (cooking) apples
3 tbsp Soft light brown sugar
1 tbsp Water
300g/10.5 oz Granulated sugar
6 tbsp Water
For the cinder toffee version:
200g/7 oz White chocolate
2 Crunchie bars/some cinder toffee
1.5-2 tbsp Golden syrup
1.5-2 tbsp Full fat milk
150g/5.5 oz Icing sugar
50g/3.5 oz Unsalted butter
1 tsp Vanilla extract
Extras:
1.5 litres/50 fl oz Vegetable oil for frying
15 Cake pop sticks for the ‘toffee apples’
Flavour injector (if you don’t have one of these, a long thin piping nozzle should also work)
Step one
Put the yeast in the warm water and wait until frothy.
Step two
Combine half the flour with the rest of the dough ingredients (including the yeast froth). Remember to put the yeast and the salt on opposite sides of the bowl, they don’t get on.
Step three
When the batter is smooth, gradually add the rest of the flour and stir. The dough should be sticky but not impossible to work with. Vicky and I found we had to add a lot of flour in kneading so I’ve adjusted the recipe for y’all.
Step four
Turn the dough out onto a floured surface and knead for 5-10 minutes. It’ll still be quite sticky, don’t sweat it.
Step five
Place in a lightly oiled bowl and leave to rise for an hour or until doubled in size. While that’s going on you can prepare your toppings and fillings.
Step six
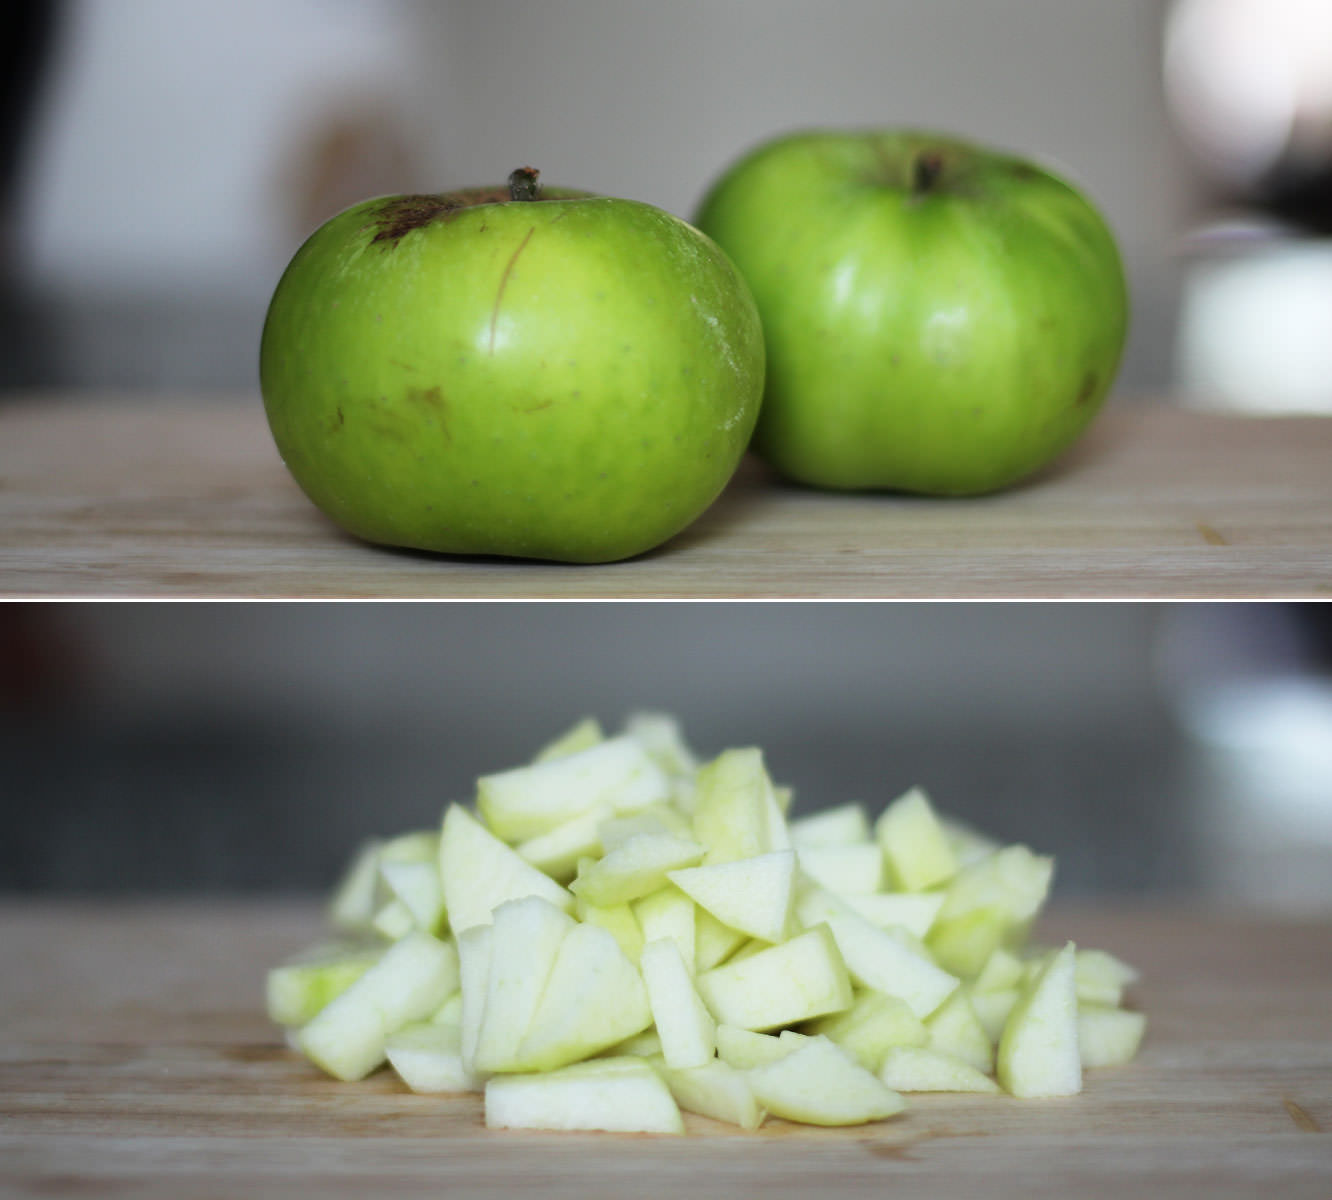
For the puree which will fill the toffee apple doughnuts, peel and chop the apples into small chunks.
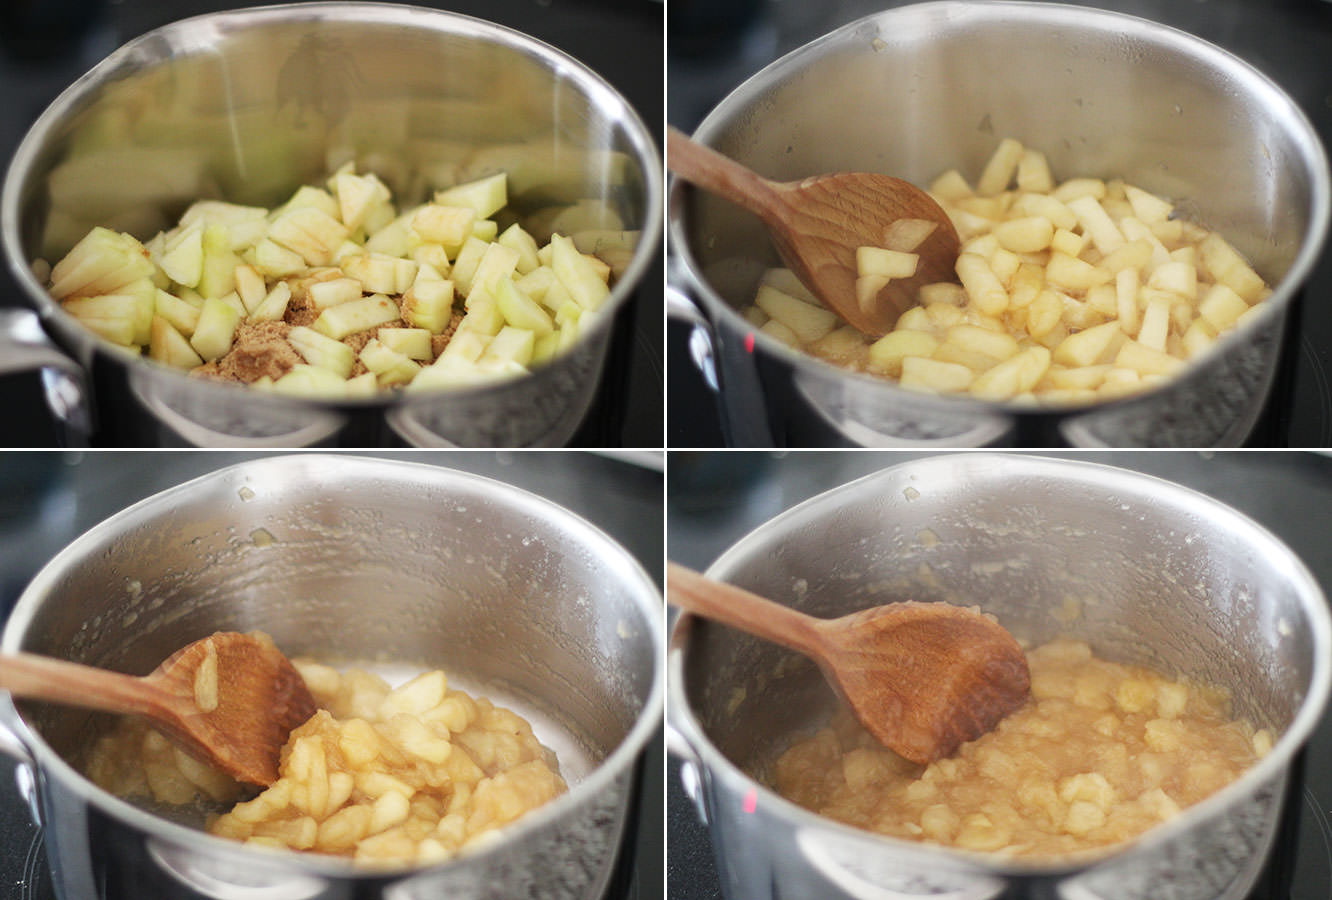
Step seven
Place the apples in a saucepan with the 3 tablespoons of soft brown sugar and 1 tablespoon of water. Heat on medium until the apples have reduced.
Step eight
If you have one, use a food processor to liquidise the apple mixture. If you don’t, do what we did and use a potato masher and then pass the mix through a sieve.
Step nine
To make the filling for the cinder toffee donuts combine the butter, icing sugar, milk, golden syrup and vanilla extract. Whisk until smooth and set aside.
Step ten
Tip the risen dough onto a floured work surface. Squeeze into a long sausage shape and chop into 30 pieces.
Step eleven
Roll into balls and leave on a tray to prove for another hour. Make sure you leave plenty of space. The picture above was before these rose, and they almost filled the tray after.
Step twelve
About 20 minutes before the doughnuts have finished their second rise, begin to heat the oil.
It’s beyond important that you heat the oil really slowly on a low heat to avoid risking a pan fire. There’s no reason to worry as long as you heat this gradually.
Test your oil heat with little pieces of a doughnut. When the sample floats and bubbles straight away you’re good to go.
Step thirteen
Fry the doughnuts in batches, you will get a good idea when to turn them pretty quickly, it only takes a few minutes for them to get golden.
Leave your doughnuts to rest on a few sheets of kitchen roll which will soak up any excess oil.
Step fourteen
When the doughnuts are completely cooled inject 15 of them with the apple puree and 15 with the cinder toffee filling.
We went in at the top because we knew we were going to cover the holes, otherwise you would use the side. For those of you with a flavour injector (and of course that will be most of you…) we did 10 ml per doughnut.
Step fifteen
For the cinder toffee doughnuts you need to crush up the crunchie bars (easily done when they’re in their wrappers) and melt the white chocolate. Do this slowly in the microwave to avoid burning it.
Dip the doughnuts in the chocolate to coat the upside down top, and sprinkle with crunchie pieces. Leave to one side for the chocolate to set.
Step fifteen
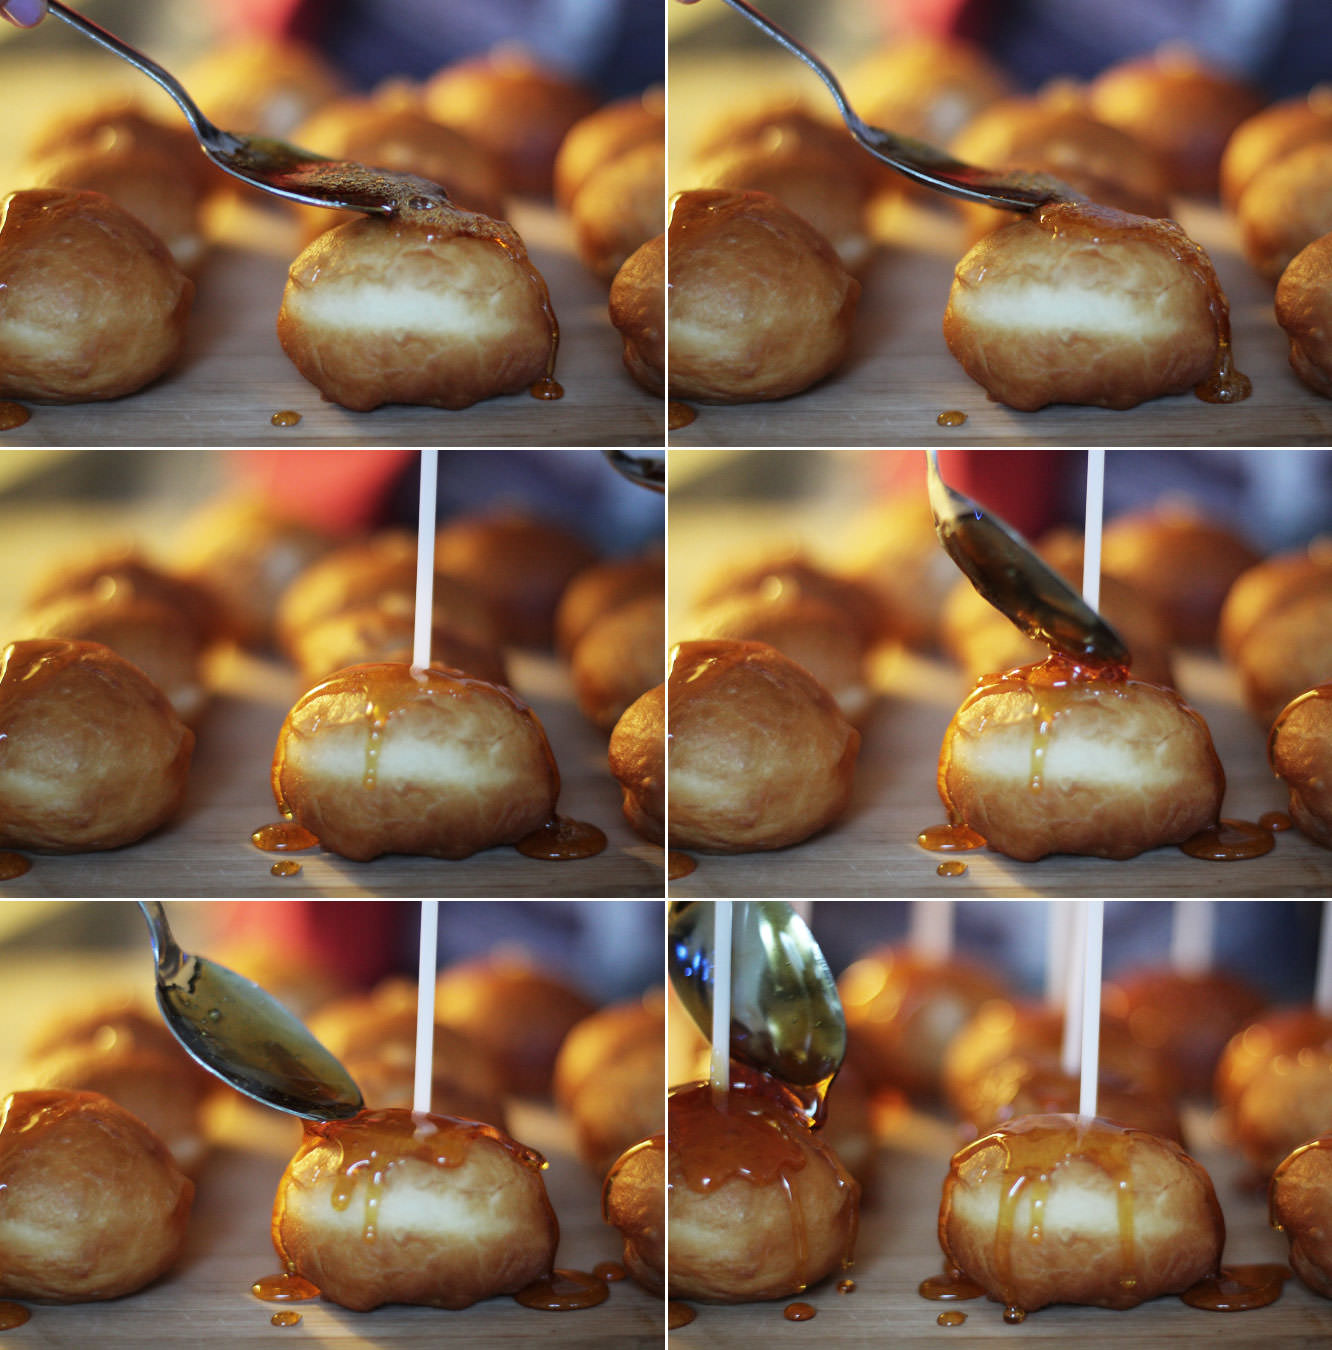
Make a hard caramel by combining the 300g of granulated sugar and 6 tbsp water in a saucepan.
Heat on a low-medium heat until the mixture takes on a dark honey colour. Do not stir it as the sugar will crystallise. I’m afraid I did this by eye so I don’t have a temperature, but use the pictures above for a reference point for the colour and you’ll be fine, it’s not an exact science.
Remove from heat and cool by dipping the bottom of the saucepan in a mixing bowl full of cold water.
Spoon over the top of the doughnuts. I did one layer on each and popped the sticks in, then went back once the caramel got a little thicker (this happens as it cools) to do another and to secure the sticks in place.
Hullo chums. Just a little heads up that this is my last post for a couple of weeks as I’m heading off on holiday and didn’t quite have the organisational skill to do enough to tide you over until I’m back. Something my new design guru seanwes would not be impressed with.
But anyway. This is a real good’un I’m leaving you with, there’s not much point making any of the rest of the afternoon tea series after you’ve done these. Your guests won’t look back. Partly because they will be bouncing around the room on a sugar high.
You will need
For the cakes:
200g/7 oz Plain flour
200g/7 oz Caster sugar
30g/1 oz Cocoa powder
250ml/8.5 fl oz Water
5 tbsp Vegetable oil
1 tsp Bicarbonate of soda
1 tsp Cider vinegar
1 tsp Vanilla extract
For the ganache filling:
100g/3.5 oz Dark chocolate
100g/3.5 oz Milk chocolate
200ml/6.5 fl oz Double cream
For the salted caramel frosting:
300g/10.5 oz Icing sugar
250g/9 oz Butter
80g/3 oz Soft brown sugar
100ml/3.5 fl oz Double cream
2 tbsp Golden syrup
2 tsp Salt
(Makes 48)
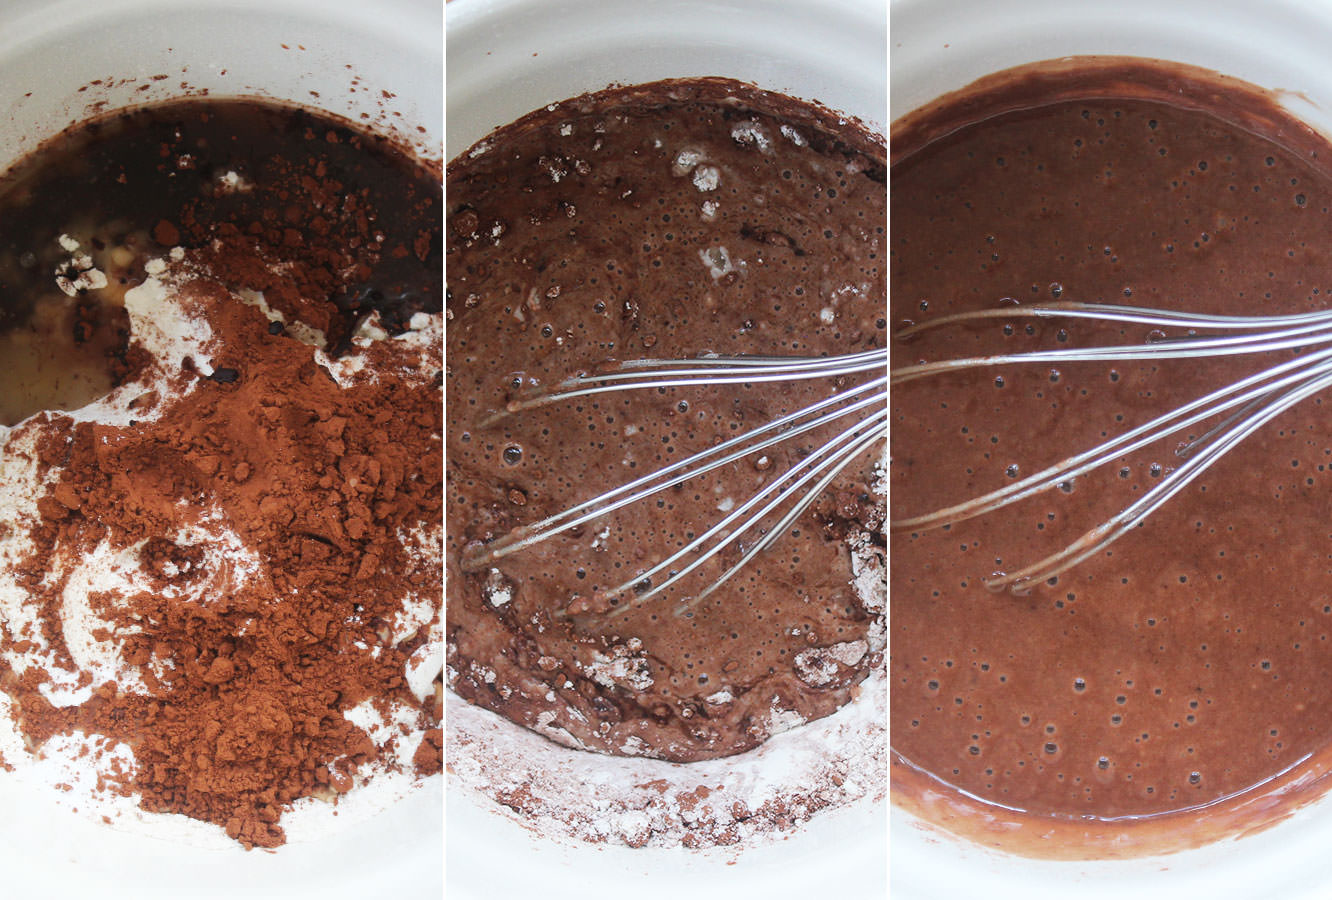
Step one
Combine all the cake ingredients into one bowl and whisk until there are no lumps. This makes quite a thin batter that you will find a bit disturbing if you are used to putting egg and butter in cakes.
This recipe is great for vegans (as long as you don’t add the icing or filling – use substitutes instead perhaps). It’s my favourite recipe for chocolate cupcakes now, I originally found it when baking for a lactose intolerant friend.
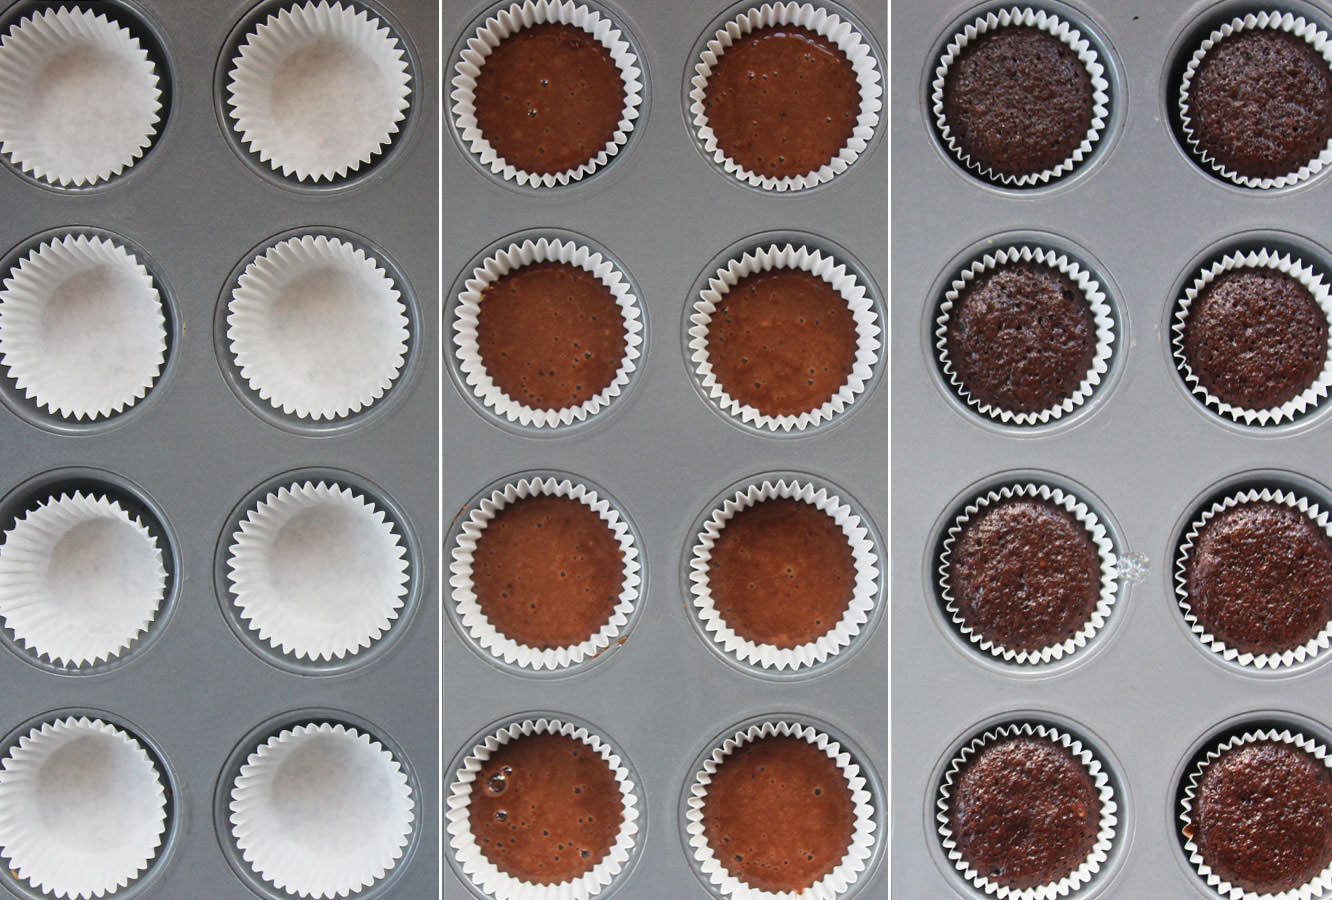
Step two
Spoon into mini cupcake/muffin cases. I filled mine about halfway and could have gone to two thirds. There’s not a huge amount of rise in this mixture, perfect for cupcakes because they are nice and flat for icing onto.
Step three
Bake in the oven at gas mark 4/180C/350F for around 40 minutes or until springy to the touch.
Step three
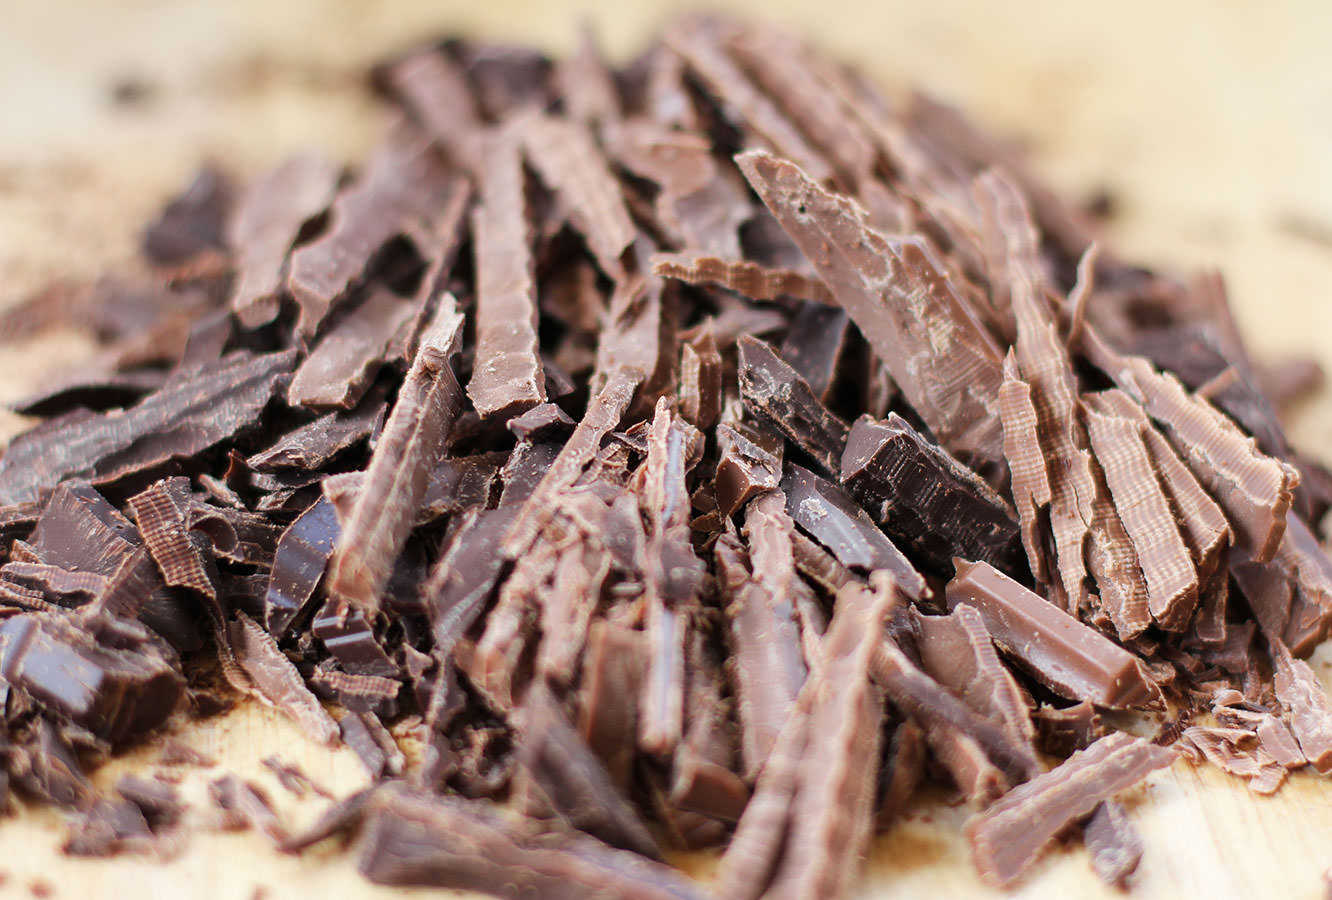
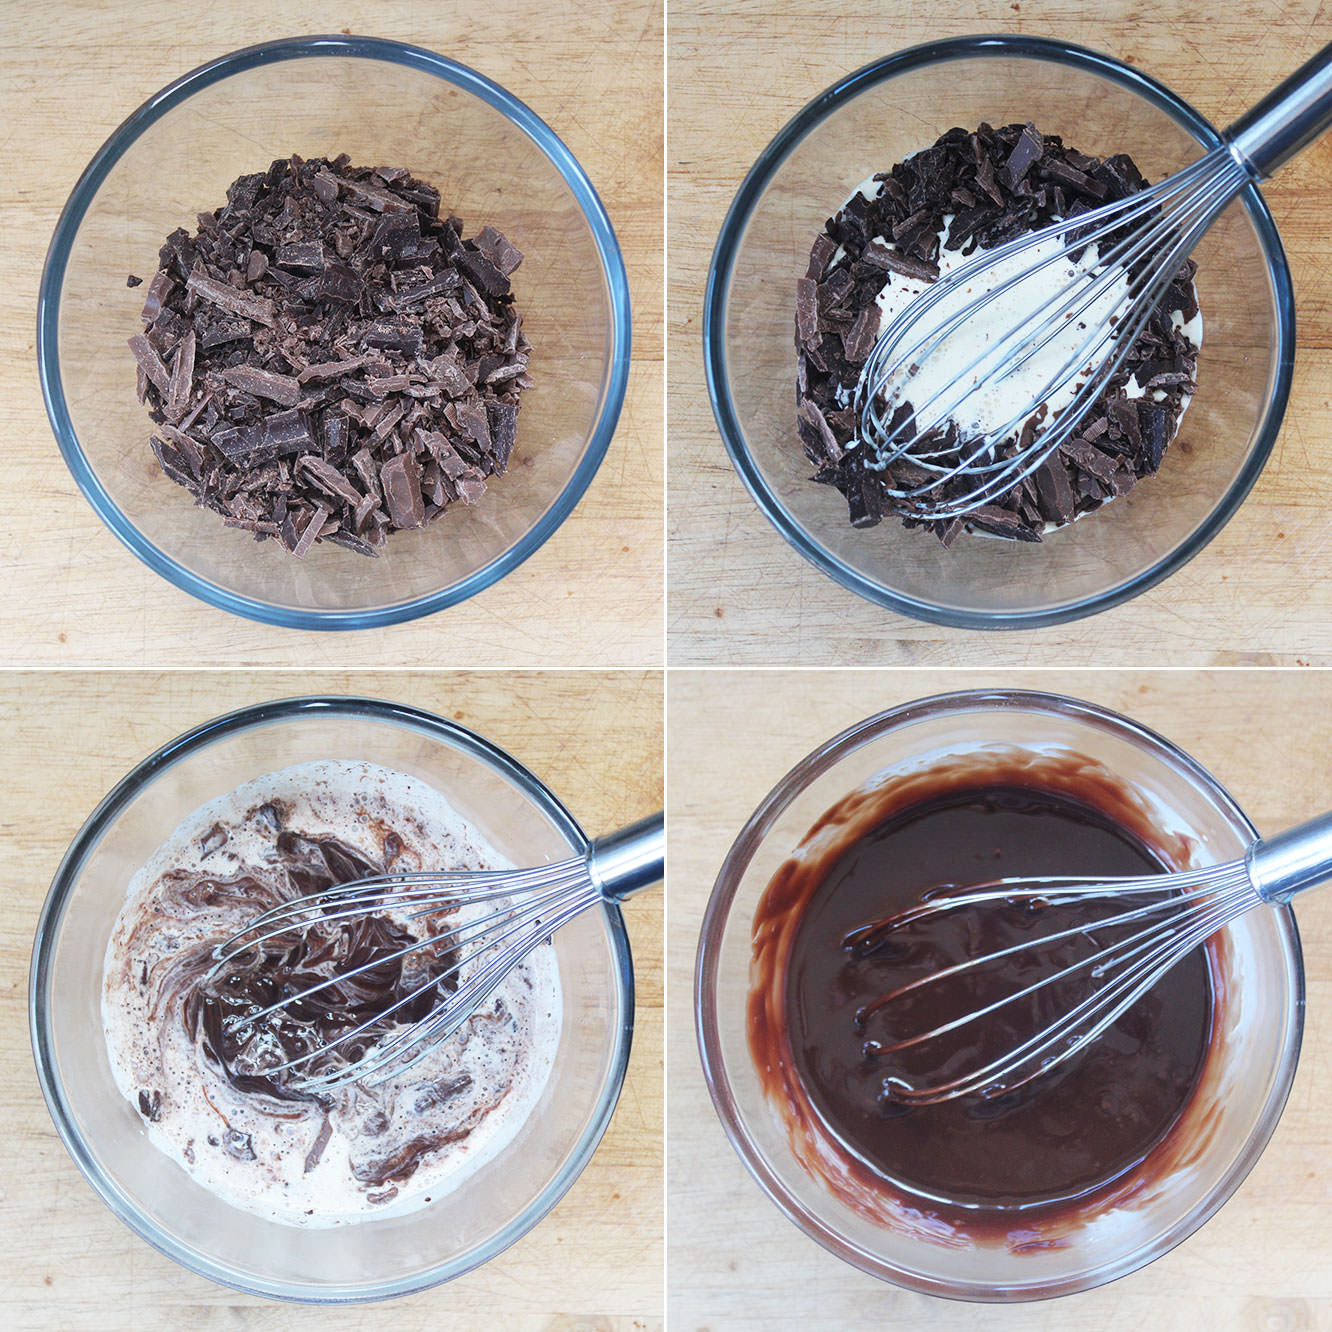
Whilst the cakes are in the oven, make the ganache. Chop the chocolate finely; I always use a bread knife for this and recommend you do too, you’ll never go back.
Place chocolate pieces in a small mixing bowl.
Step five
Gently heat 200ml double cream in a small saucepan. Let it get to the point where there is steam sort of dancing across the top and it’s beginning to simmer/bubble at the edges. You don’t need to wait longer than this, it doesn’t need to be piping hot – as Mary Berry always says in her wonderfully whimsical way – chocolate can melt in a child’s pocket.
Pour the cream over the chocolate and whisk until smooth. Set to one side.
Step six
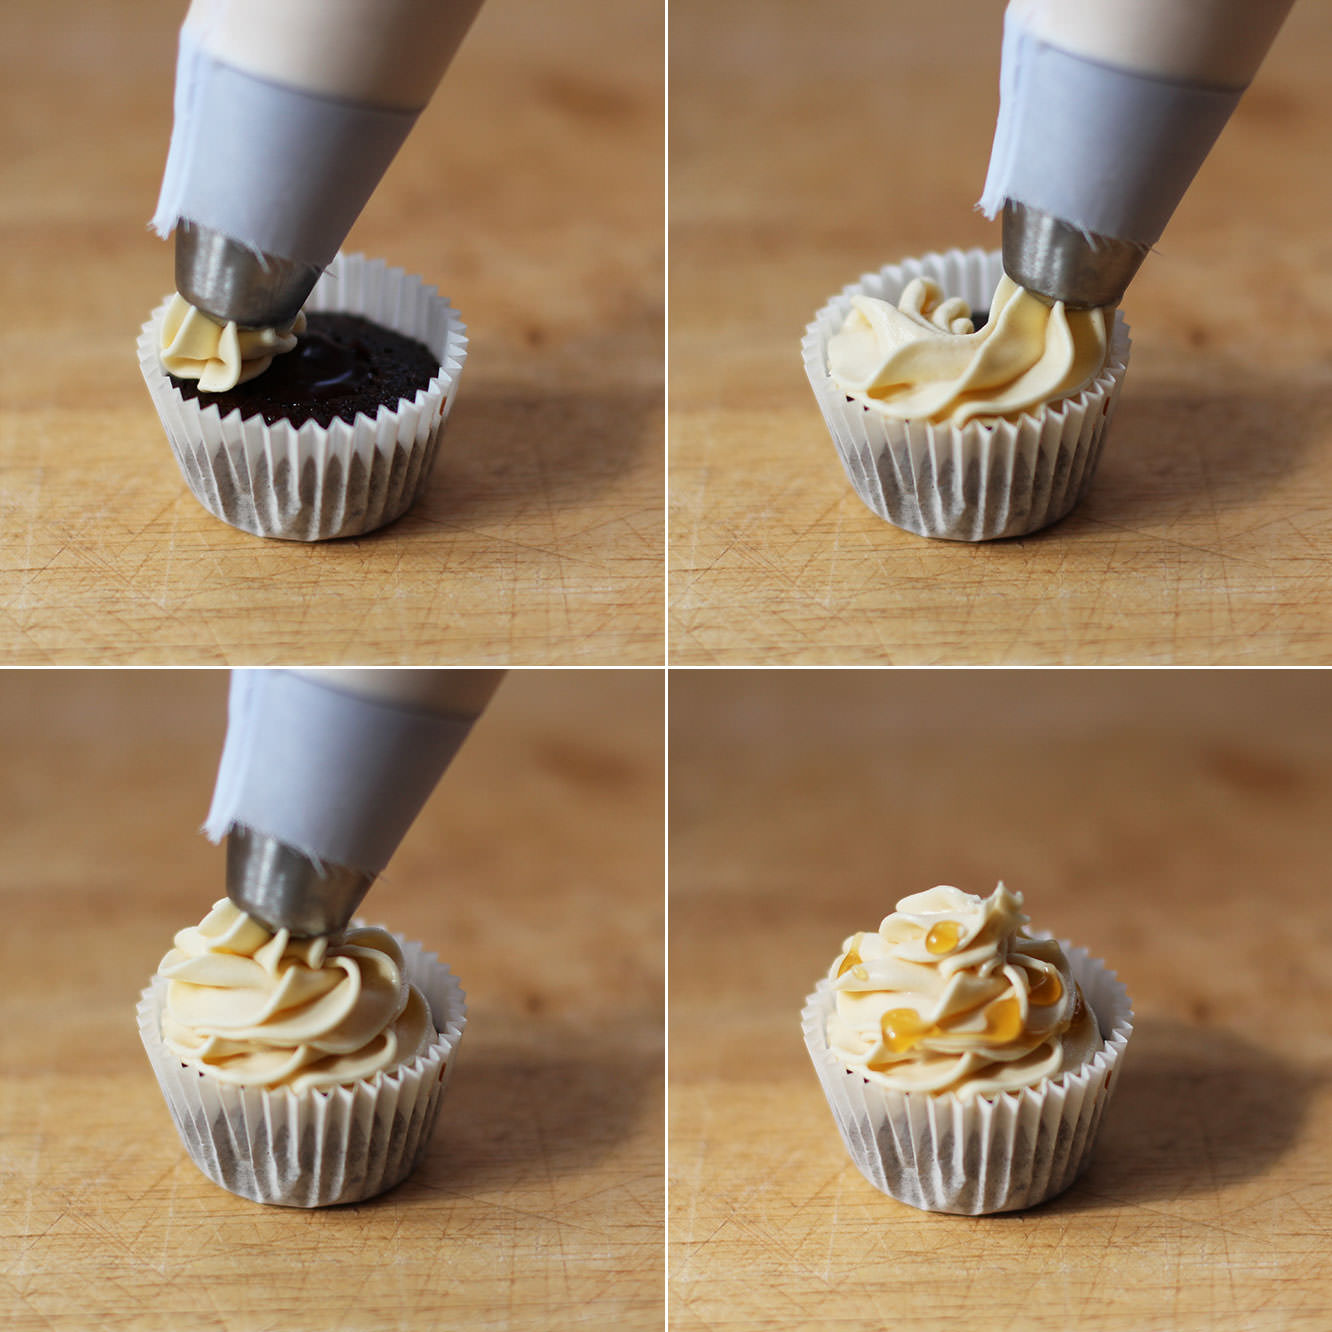
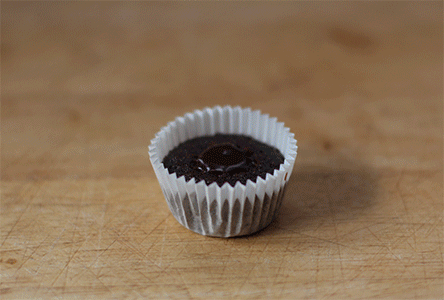
Once the cakes have completely cooled use a small vegetable knife to cut a hole in the centre. Yes you can eat the bit that pops out.
I found it was easiest to put the ganache into a piping bag as the cakes are quite small. Fill the gap entirely until the ganache is level with the top of the cake.
Step seven
Just keep filling, filling, filling, what do we do? We fill.
Leave them to set.
Step eight
Melt together 100g of the butter, the brown sugar, golden syrup and salt. Do this slowly and then bring the heat up to a simmer.
Simmer for 10 minutes. Stir regularly so that it doesn’t catch and burn. Leave to cool down for about half an hour or so.
Step nine
Once the caramel has cooled down a bit, stir in the 100ml of cream. This will bizarrely make the caramel darker. Maybe a scientist can tell me why? Answers on a postcard please.
It will also get much runnier, I understand that bit.
Allow to cool to room temperature.
Step ten
With an electric whisk beat together the rest of the butter and the icing sugar. Cover with a tea towel to begin with so you don’t choke on the clouds of icing sugar…
Once the mixture is well combined gradually mix in the caramel you made earlier. Set a bit of this aside (about 50-100ml or so) to decorate later on.
Step eleven
Pop the frosting into a piping bag and top off your little cakes with a drizzle of caramel once iced. I used a different nozzle than I usually do just because. Forgive me that some of them look a little wonky.
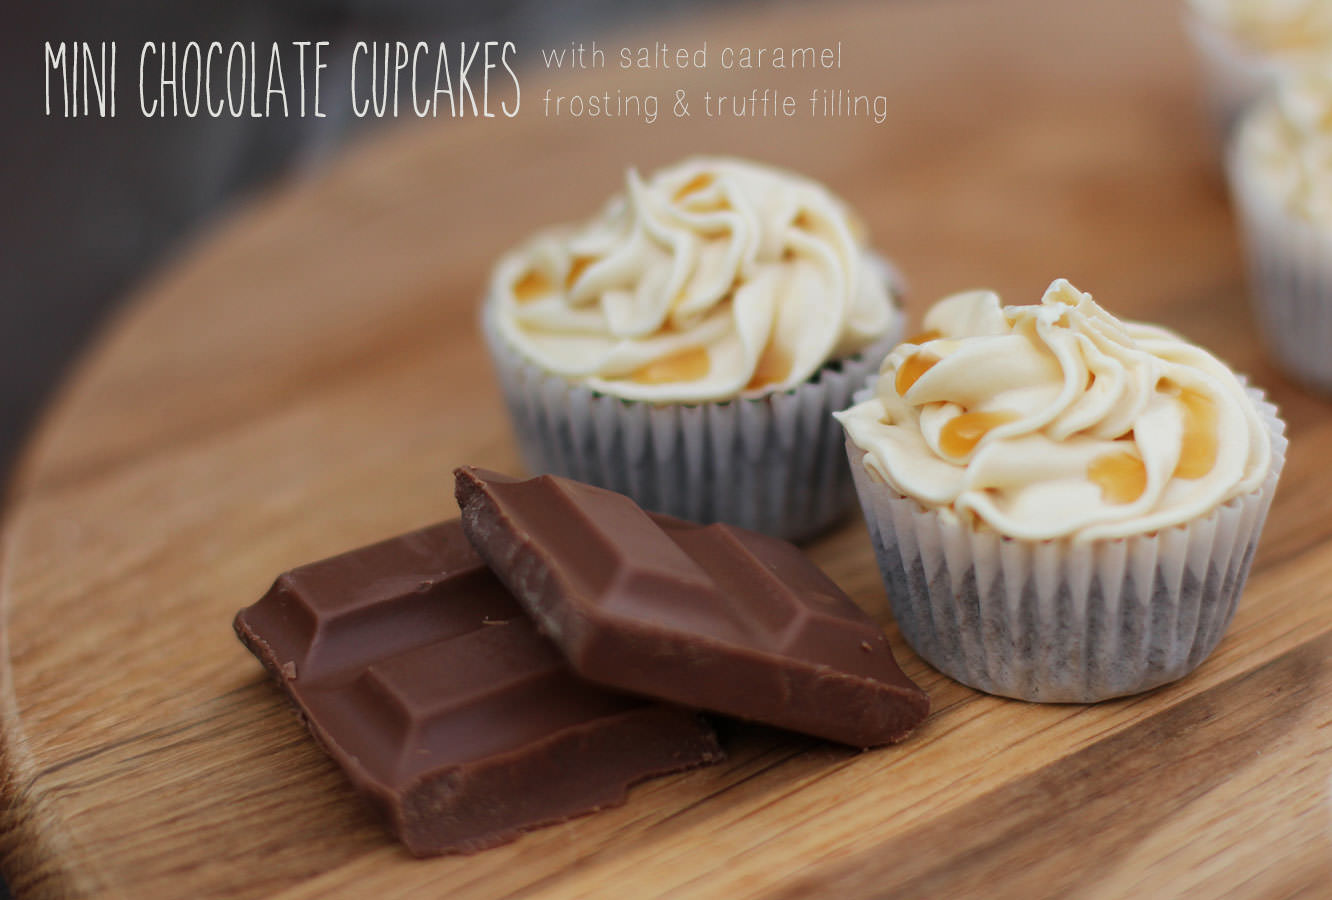
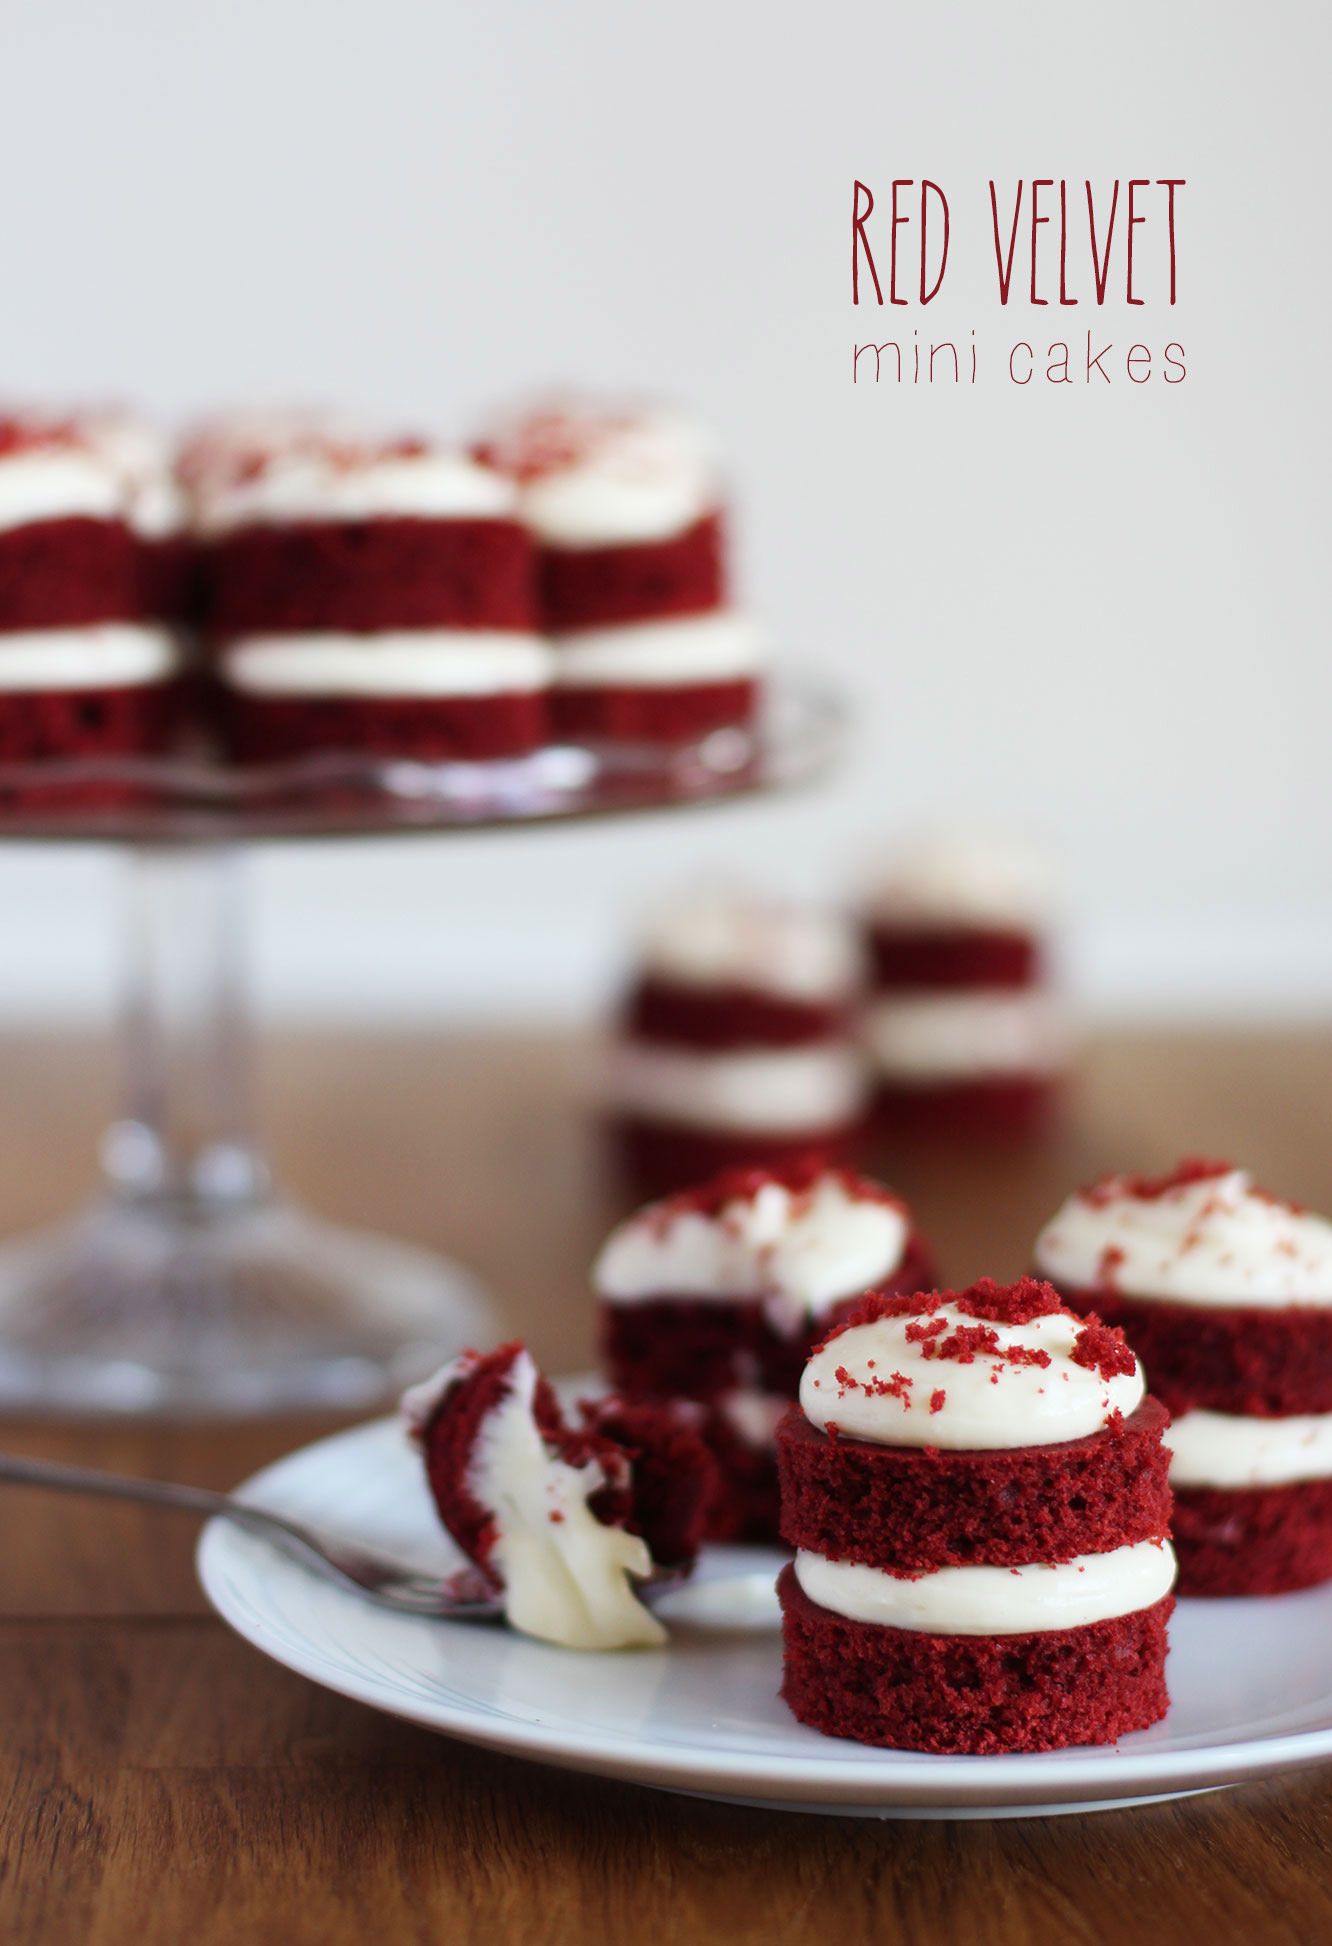
Right. I need to precursor this post with the fact I did not copy the Great British Bake Off, I promise! It just so happened that the mini cakes I had planned for my little afternoon tea series fell on the same week as the Bake Off did them. If anything, the BBC stole my idea.
Regardless of whether or not you believe me you should definitely try your hand at these little guys. We have a lot to thank North America for when it comes to the invention of red velvet. That is, provided you look the other way when adding the food colouring. There’s a whole lot of that…
You will need
For the cake:
150g/5 oz Butter (I use Stork margarine, and I don’t even feel guilty)
230g/8 oz Plain flour
230g/8 oz Caster sugar
170ml/5.5 fl oz Buttermilk
2 eggs
25g/1 oz Cocoa powder
1 bottle (38ml) Red food colouring (yup. that’s right. all of it)
1/2 tbsp Cider vinegar
1 tsp Bicarbonate of soda
For the icing:
100g/3.5 oz Butter (at room temperature)
150g/5.5 oz Cream cheese
200g/7 oz Icing sugar
1 or 2 tsp Vanilla extract
(Makes 15)
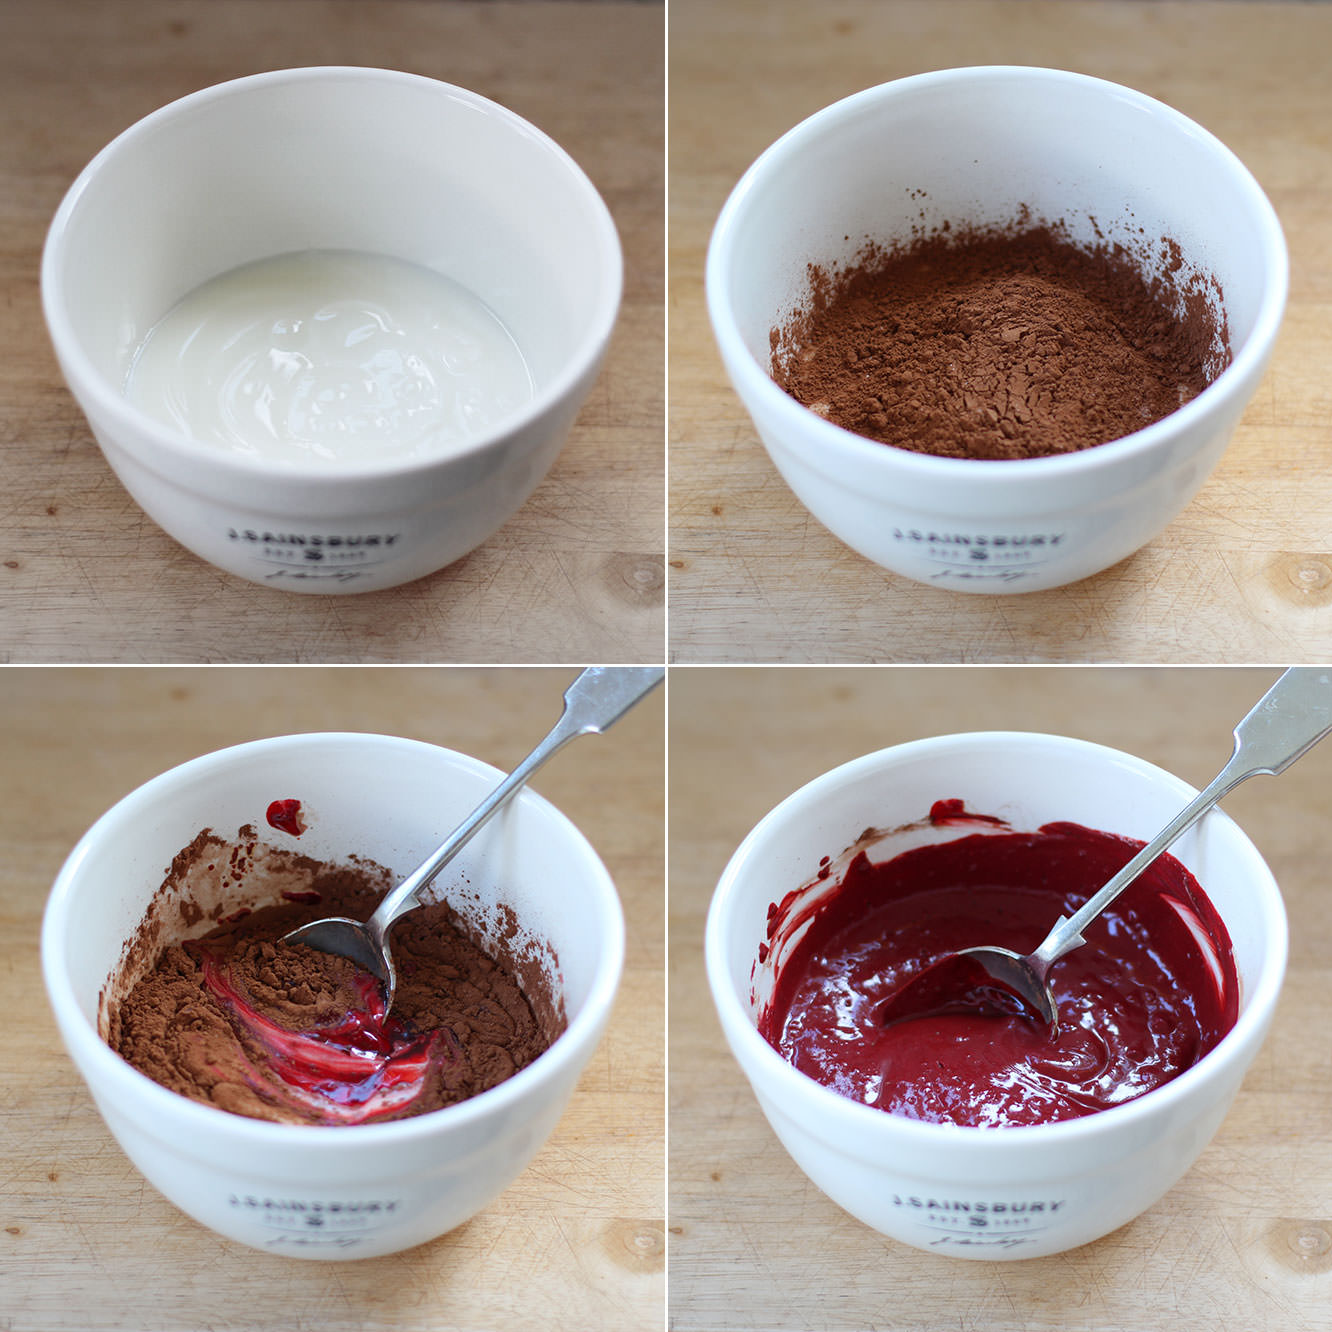
Step one
Combine the buttermilk, cocoa powder and the bottle *covers eyes* of red colouring in a bowl and set to one side.
Step two
Beat together the butter and sugar. As I said in the ingredients list, and probably will say countless more times, I use Stork marge in all my cakes. As well as being cheaper, you don’t have to wait for it to come to room temperature, and it’s easy to use straight from the fridge. I’m convinced it makes fluffier lovelier cakes too!
Step two
Add the eggs, vinegar and bicarbonate of soda and beat again until well combined. I always advise an electric whisk for this, as it keeps the air in the cake.
Step three
Add the buttermilk mixture and the flour in stages (halves or thirds) until you have a bowl full of red batter.
Step four
Preheat the oven to gas mark 3/170C/325F.
Spread mixture evenly into two greased and lined tray bake tins.
Place on the middle shelf of the oven and cook for 30-40 minutes. The mixture should spring back a bit when touched.
Step five
Whisk together the icing sugar, butter, cream cheese and vanilla extract. You’d do well to cover the bowl with a tea towel if using an electric whisk…otherwise prepare for a cloud of sweet dust and a coughing fit. Not hygenic.
Step six
Once the cake has cooled completely use a round cutter to cut as many circles as you can. I used a 1 and 3/4″ cutter and made 30 discs, so those of you with a basic maths ability will know that’s 15 mini cakes.
Although the buttercream keeps these cakes nice and moist, it’s still best not to cut them out days in advance, and be sure to keep them in an airtight tub.
Step six
Using a piping bag and a round nozzle fill and ice the little cakes. Point the bag straight down and squeeze, the icing will spread out from the middle. I used left over crumbs to decorate as I just love the ‘redness’ of it all, but feel free to use your imagination!
I made a GIF!
Except you have to click on it to make it work. I don’t know why. I’m too proud of myself to find out.
Step seven
Add proudly to your afternoon tea repertoire.
p.s. why not turn your off cuts and any left over icing into cake pops? I know. I’m a genius.
(This one is for you Bonny, in your pursuit of the reddest velvets).


 Step one
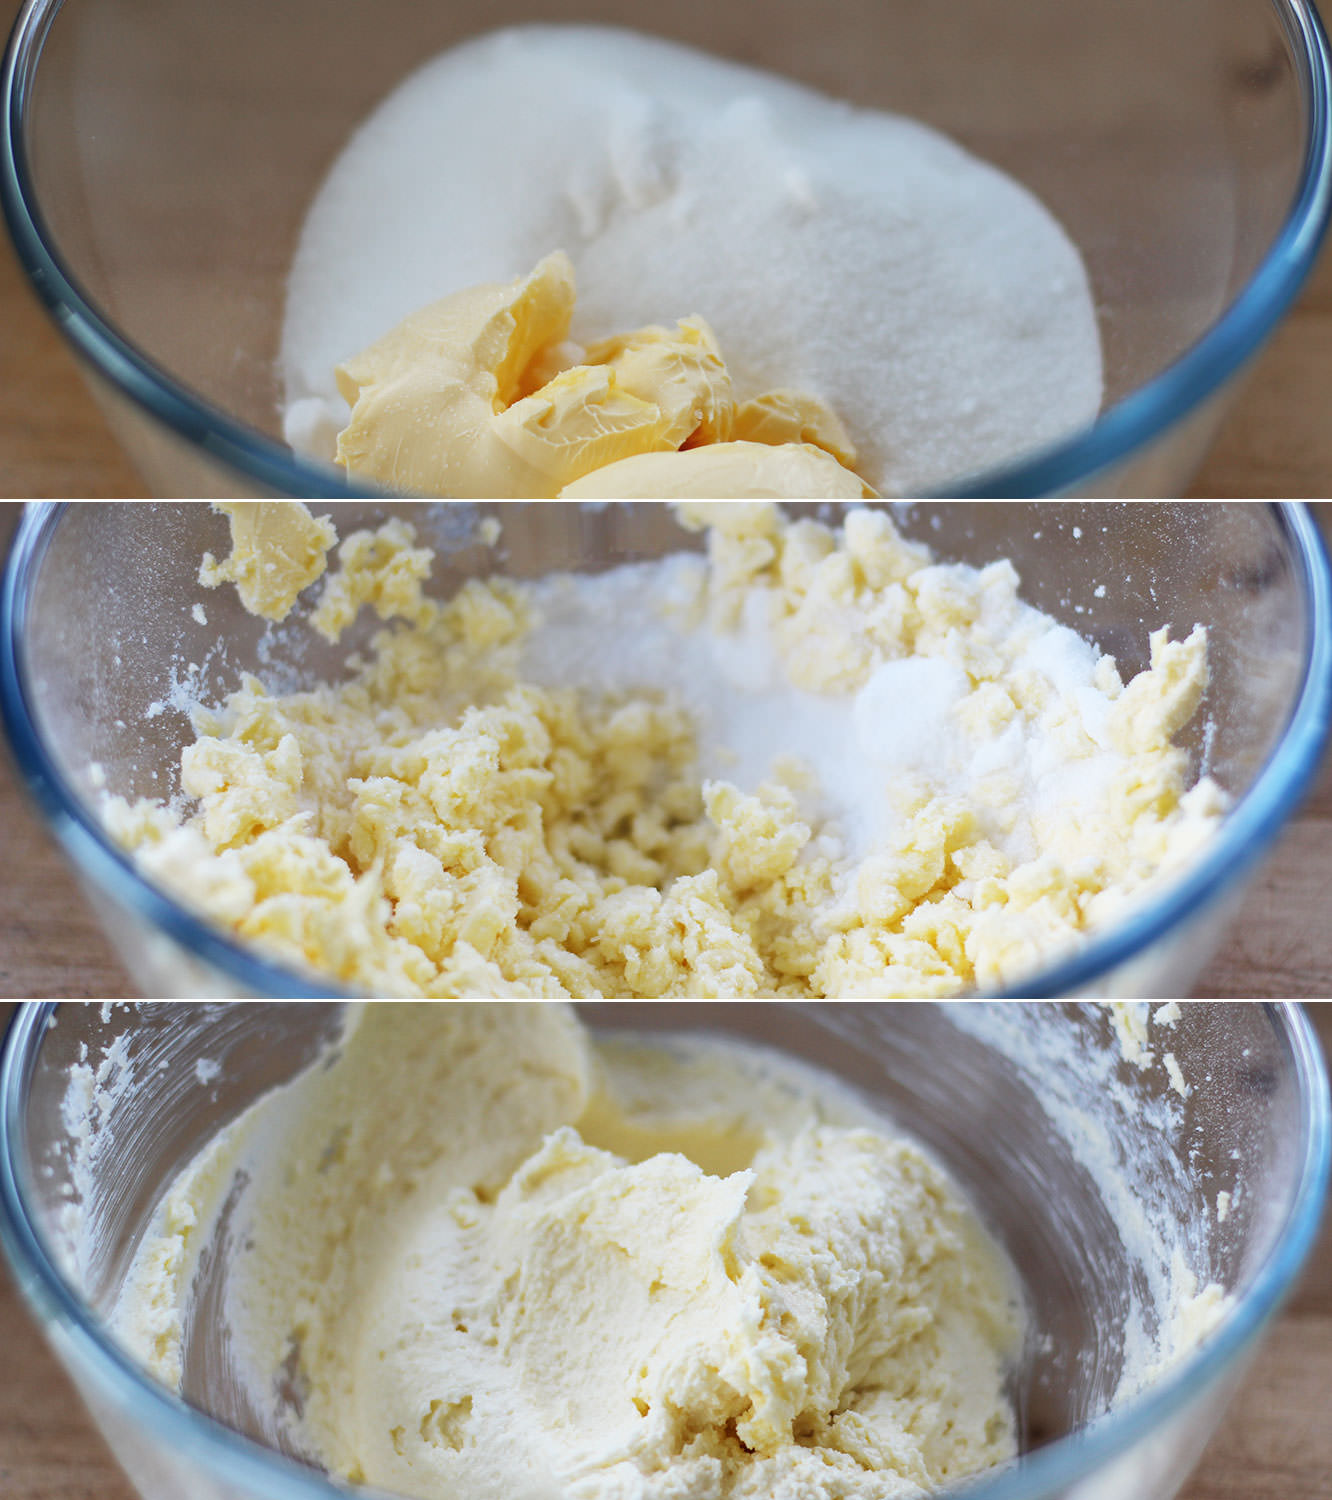 Step two
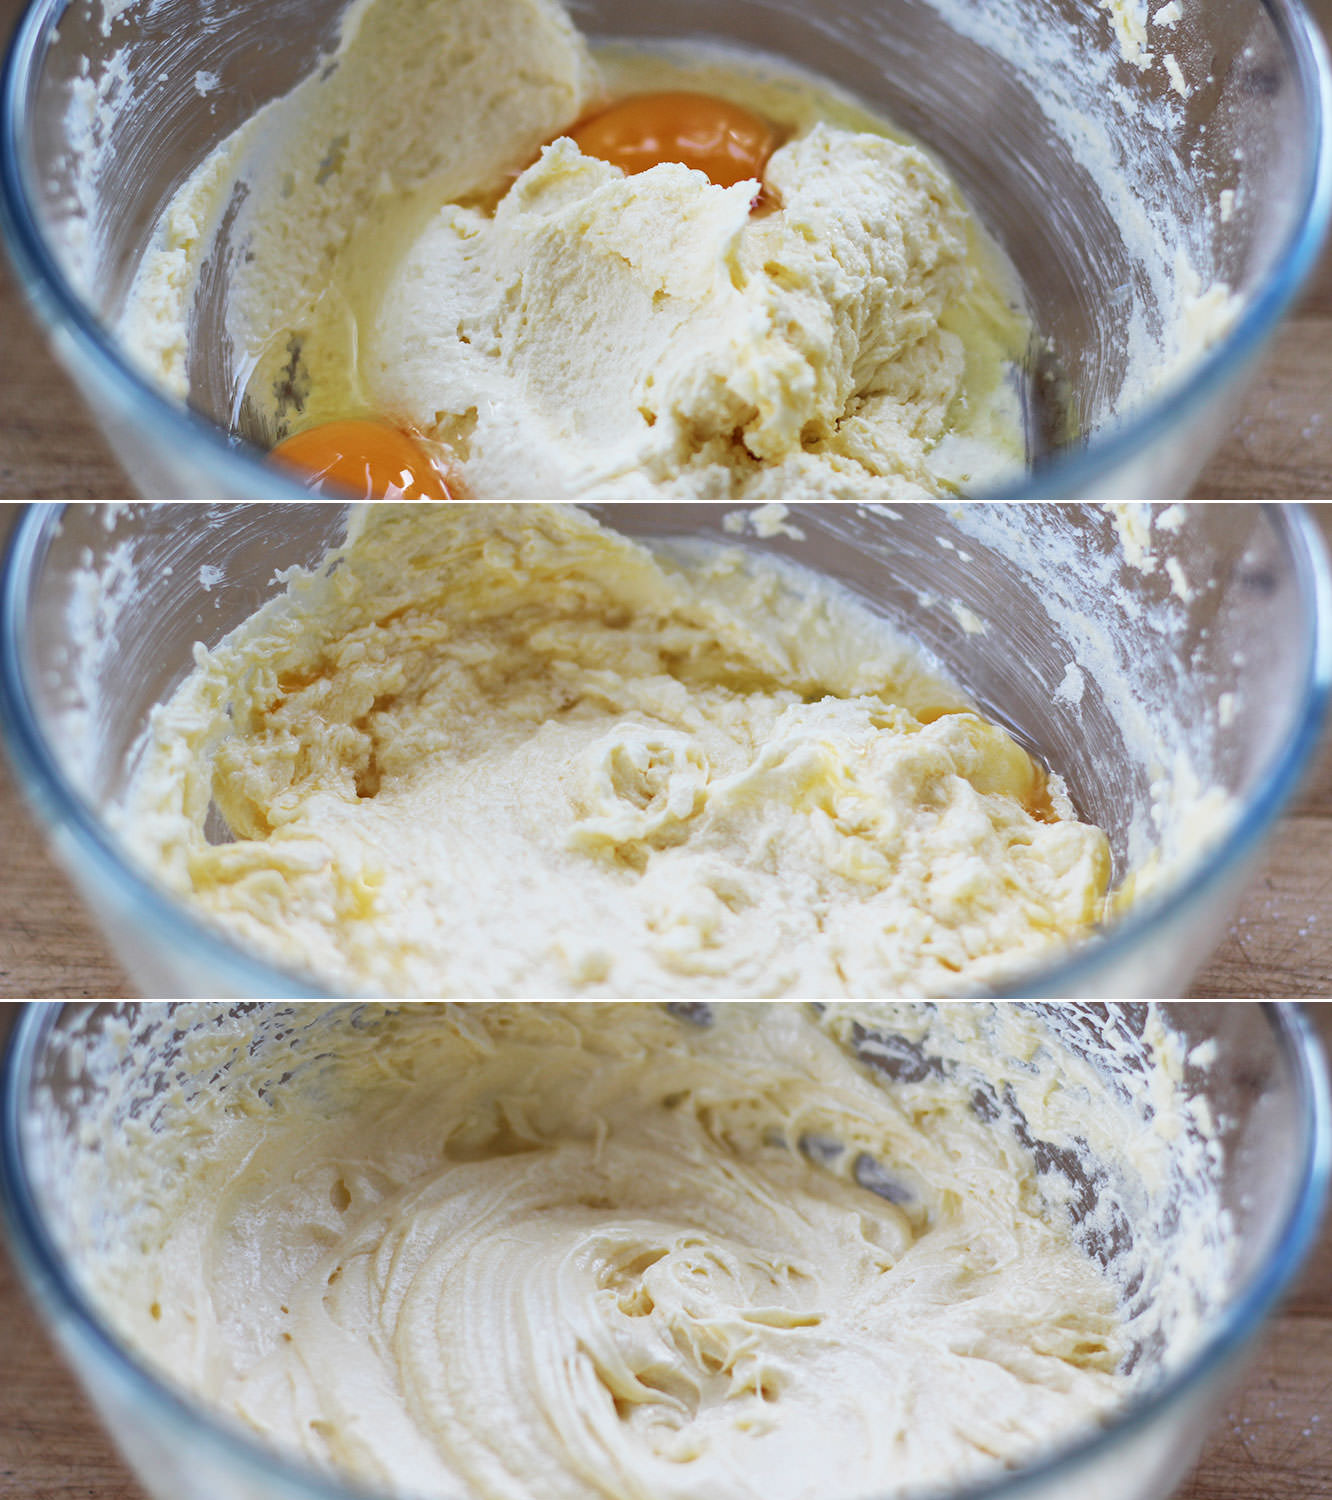 Step two
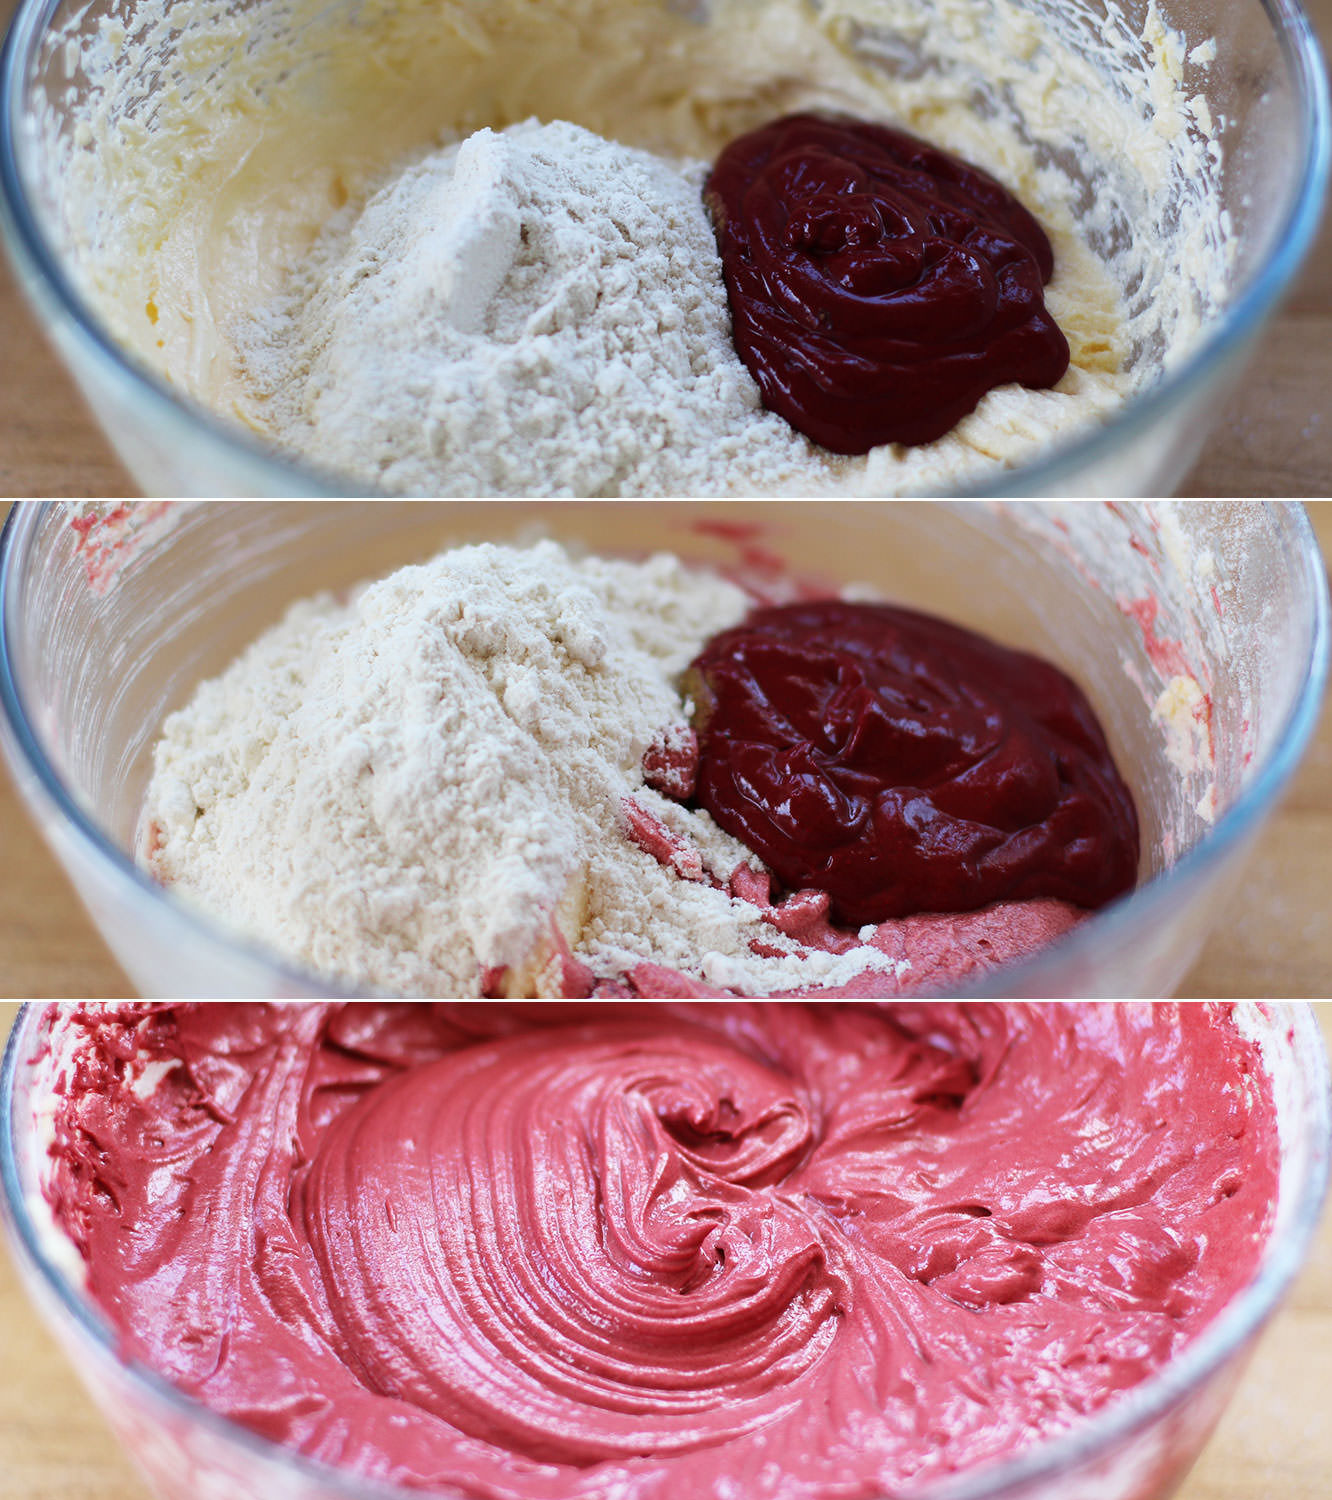 Step three
 Step four
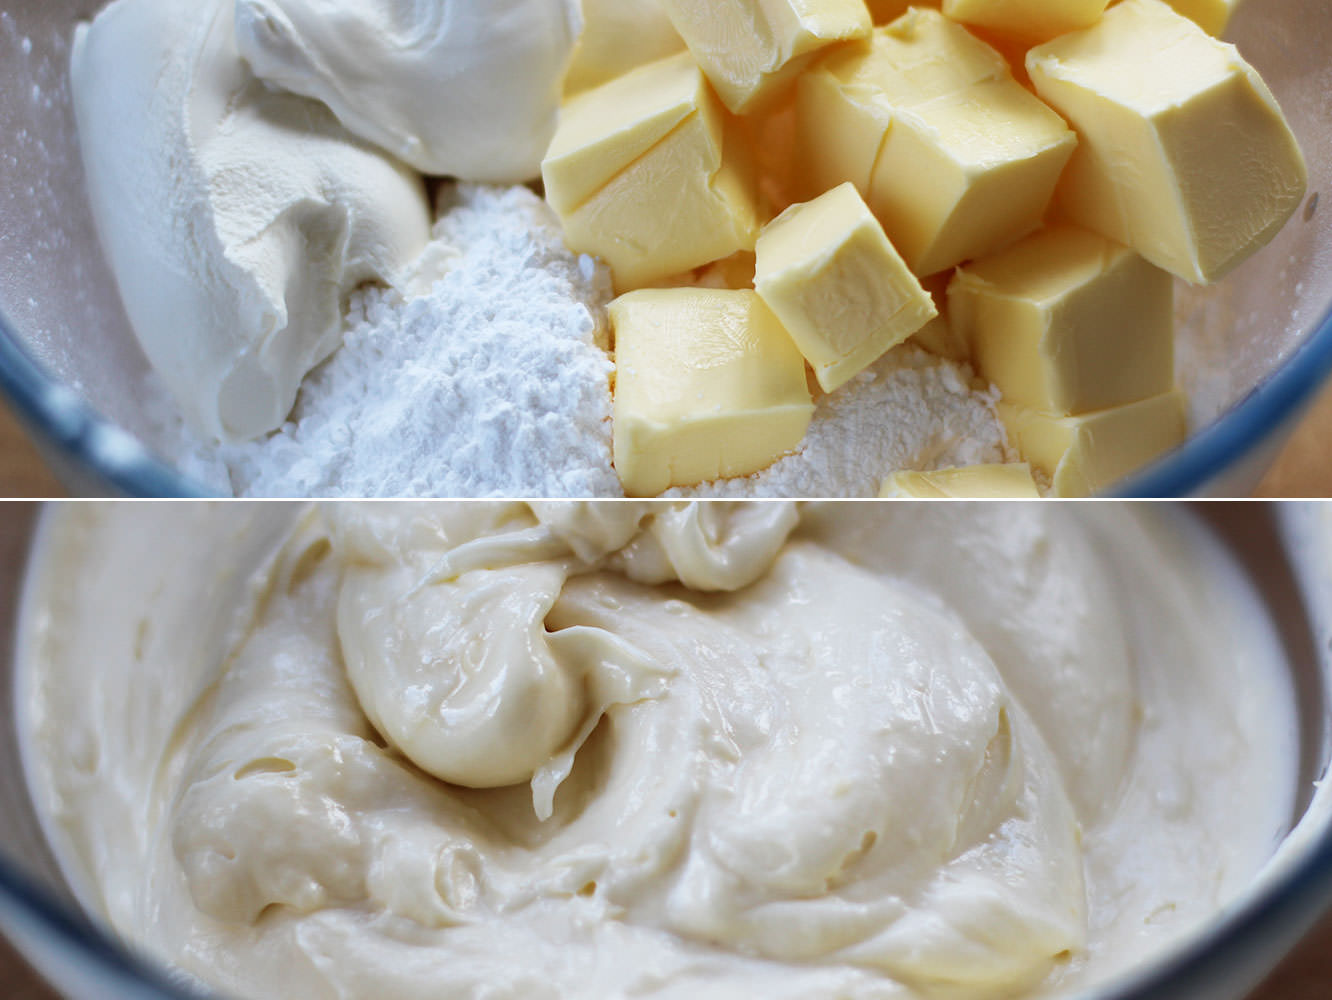 Step five
 Step six
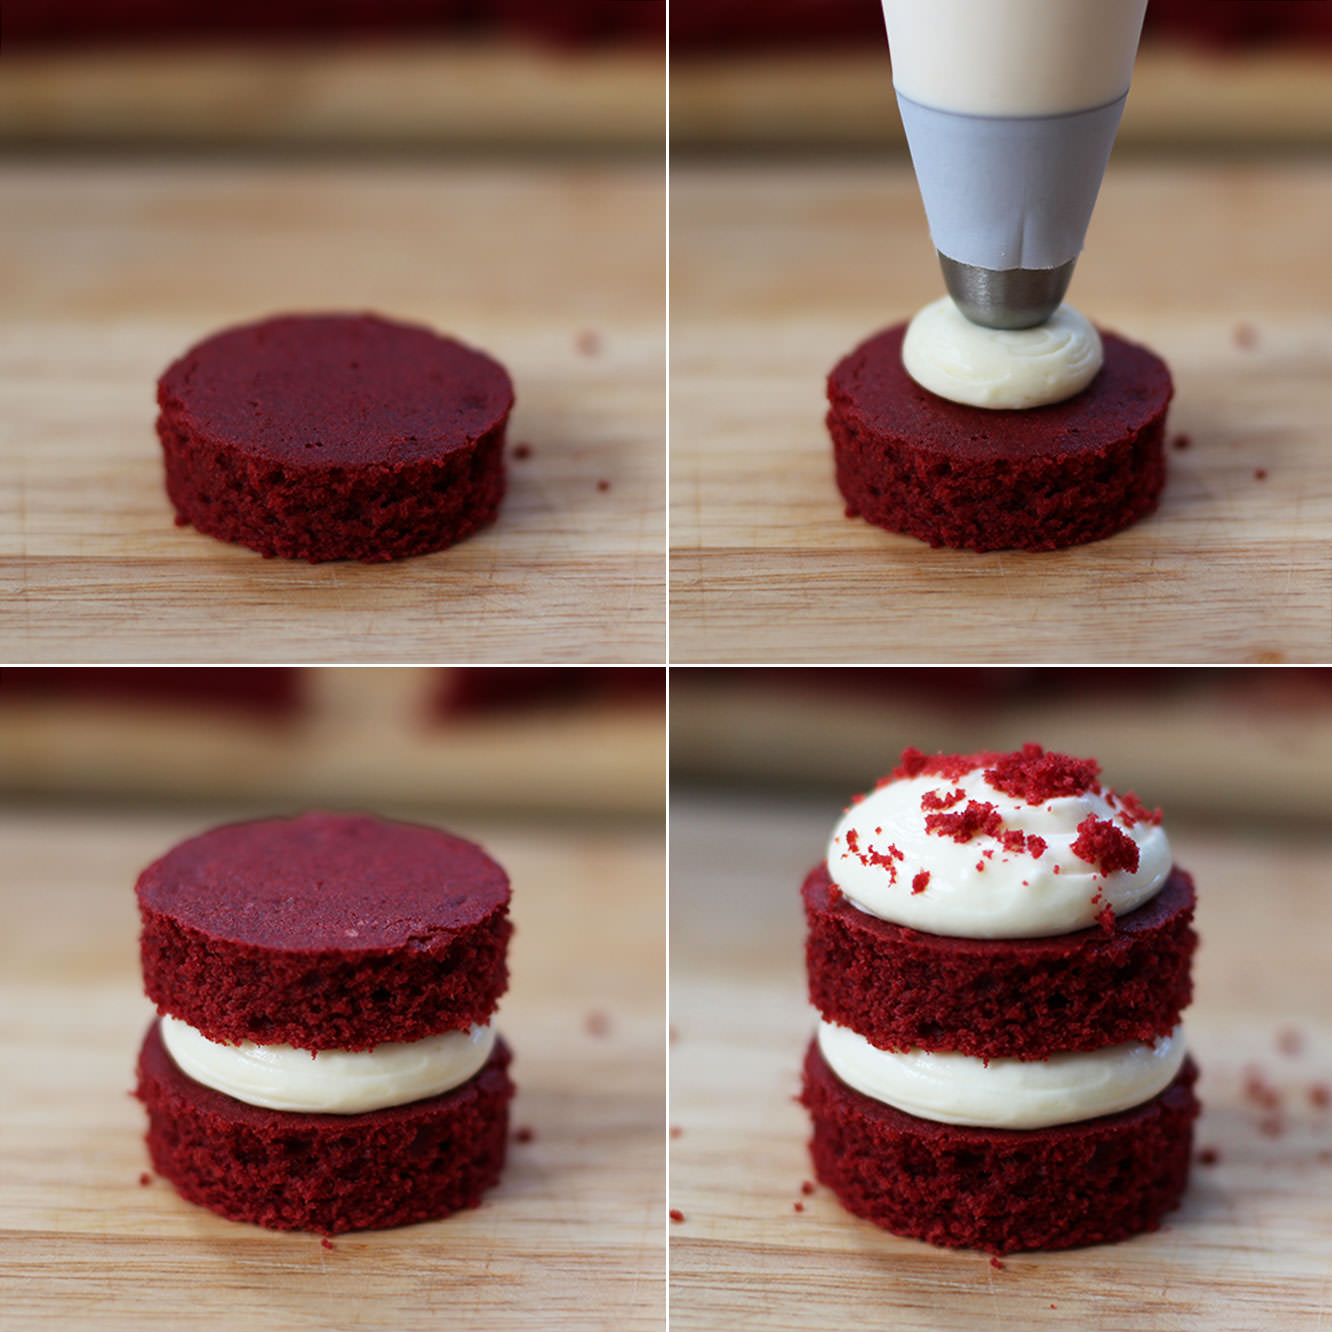 Step six
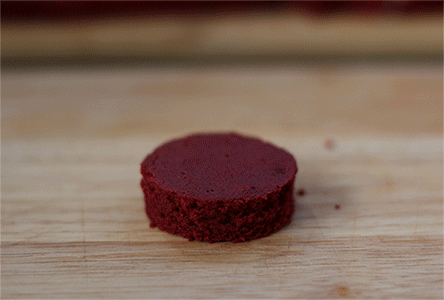
 Step seven