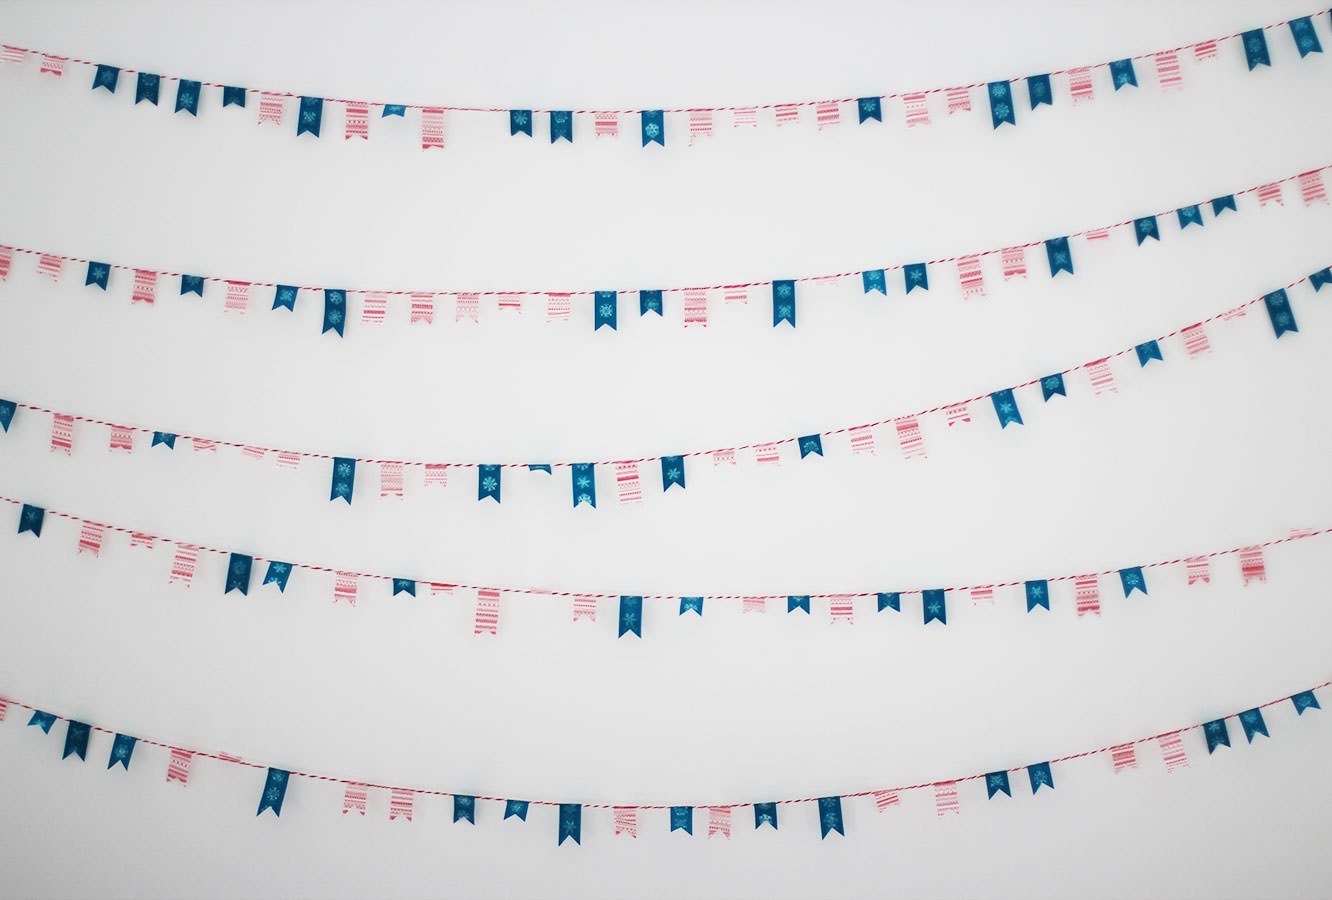
Hi all, massive sorrys this week as I’m afraid I went away for the weekend. Working full time again and running out of my little stash of ready posts has meant that I’m empty handed so far as new ideas go this week.
BUT, fear not, for I have now been blogging for two whooooole years. I also quite like Christmas. Here are a few ideas from the last couple of years to keep you ticking over until next week.
Two years of fabrefaction.co.uk friends. Yup. THAT HAPPENED. Thank you for the support and the loving, please keep sharing, commenting and messaging me; I love hearing from you and seeing what you’ve made.
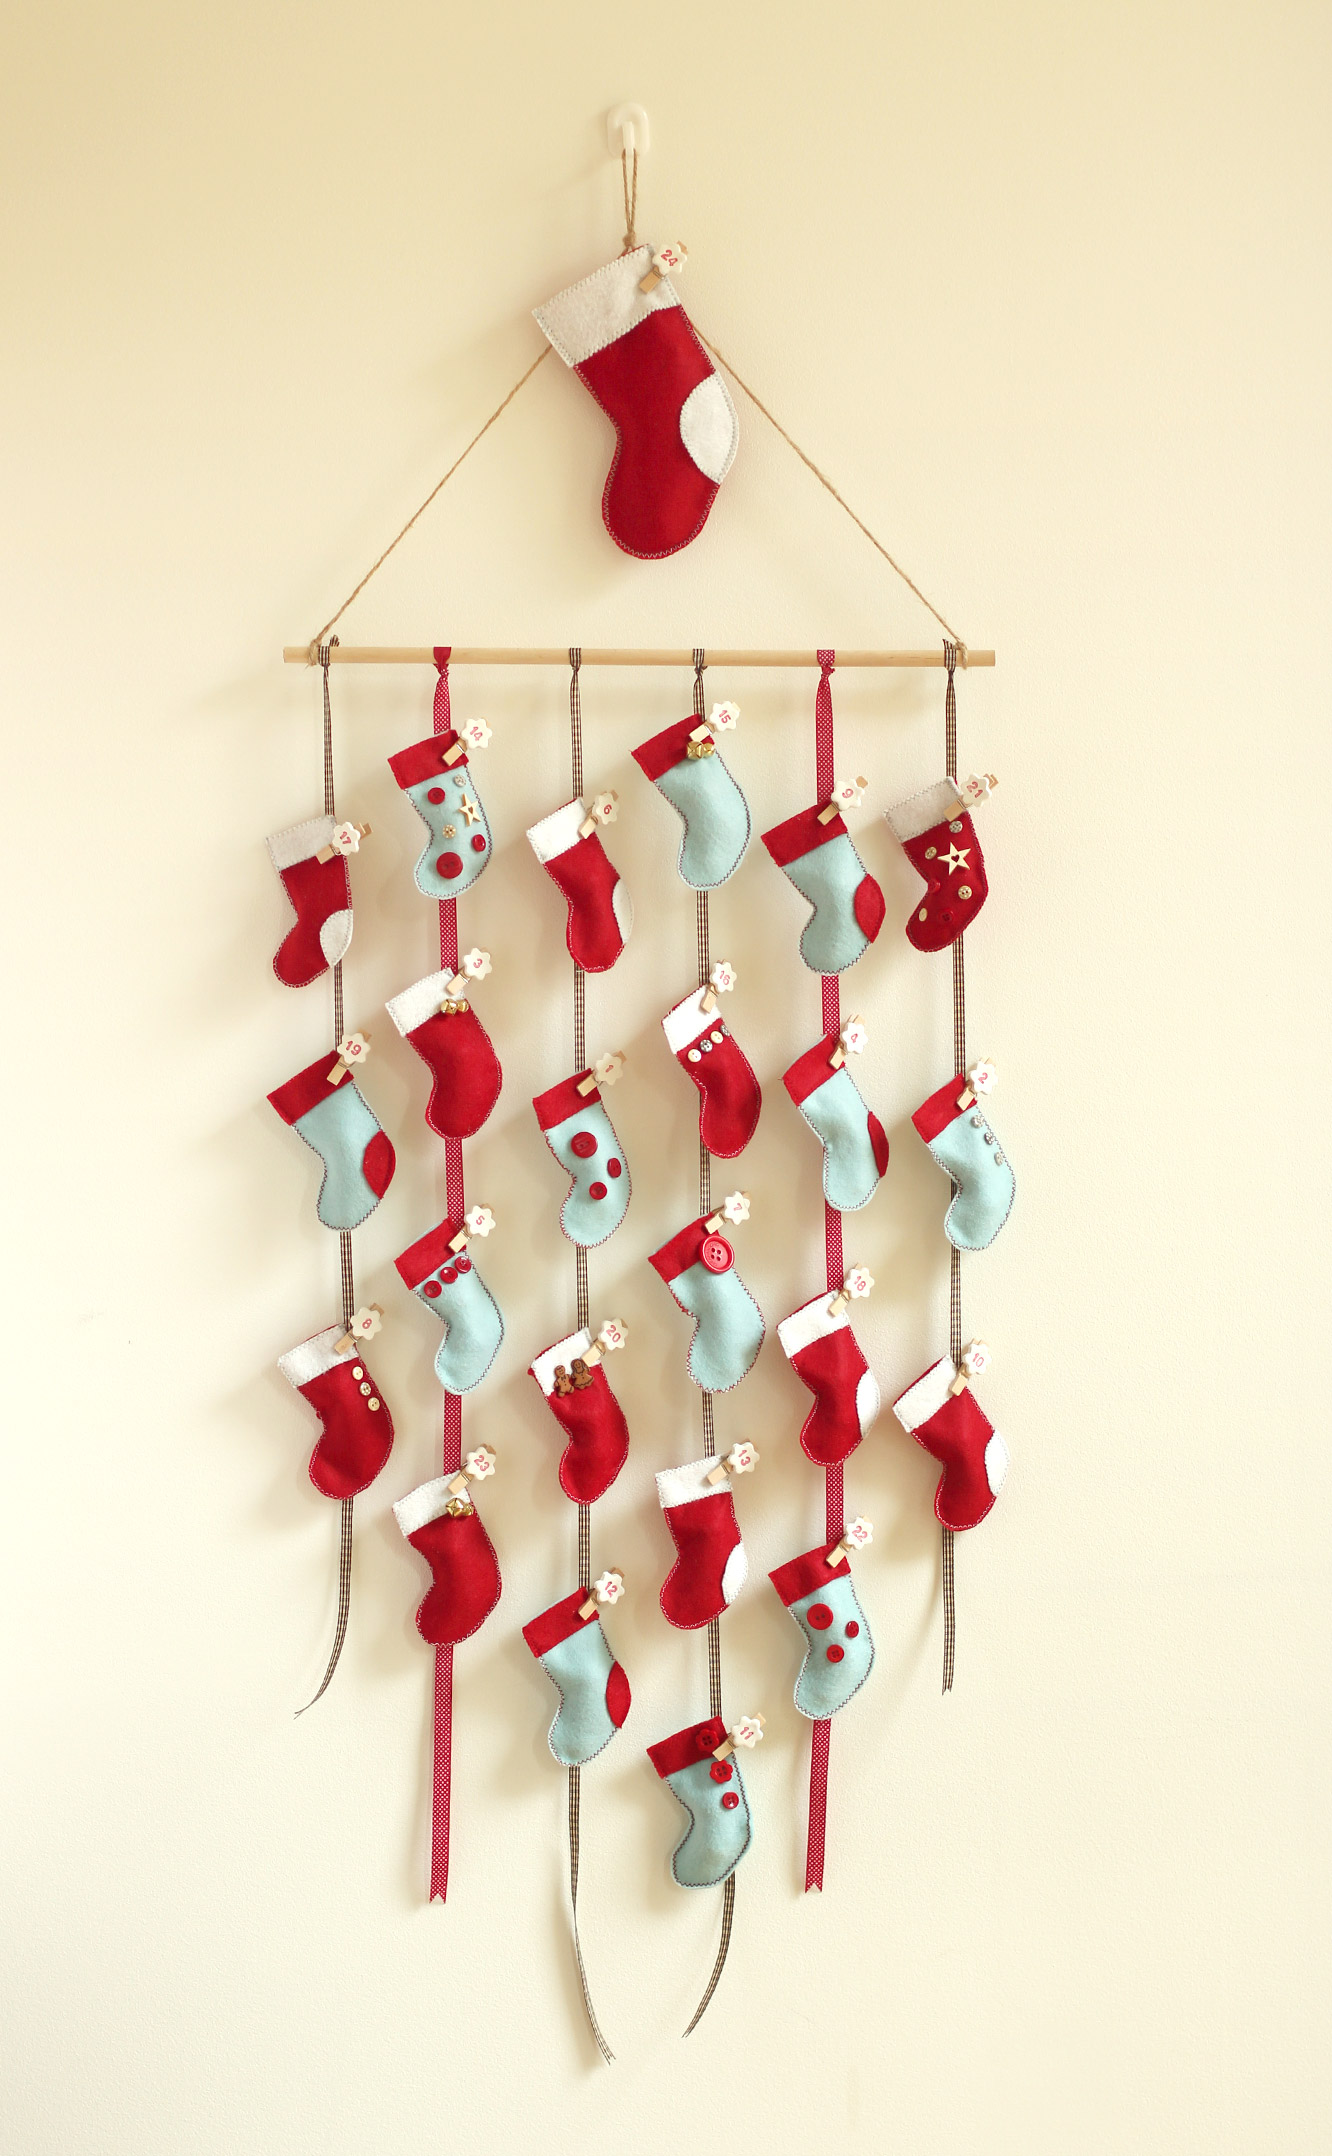
In keeping with my first post ever, and the one year anniversary post of this little blog, here’s another lovely advent calendar for you to make.
“Oh but advent starts next week, I don’t have time!” Yes, yes you do. I made this in a day. Less than really when you consider I went out for breakfast and dinner. You could even take the easy way out and glue instead of sew.
This particular calendar is a labour of love for my very hardworking and wonderful sister. Poor duck got jealous of mine once, and this year I thought it was about time she had something a little more permanent so she never forgets again. Thanks for your love and support sib.
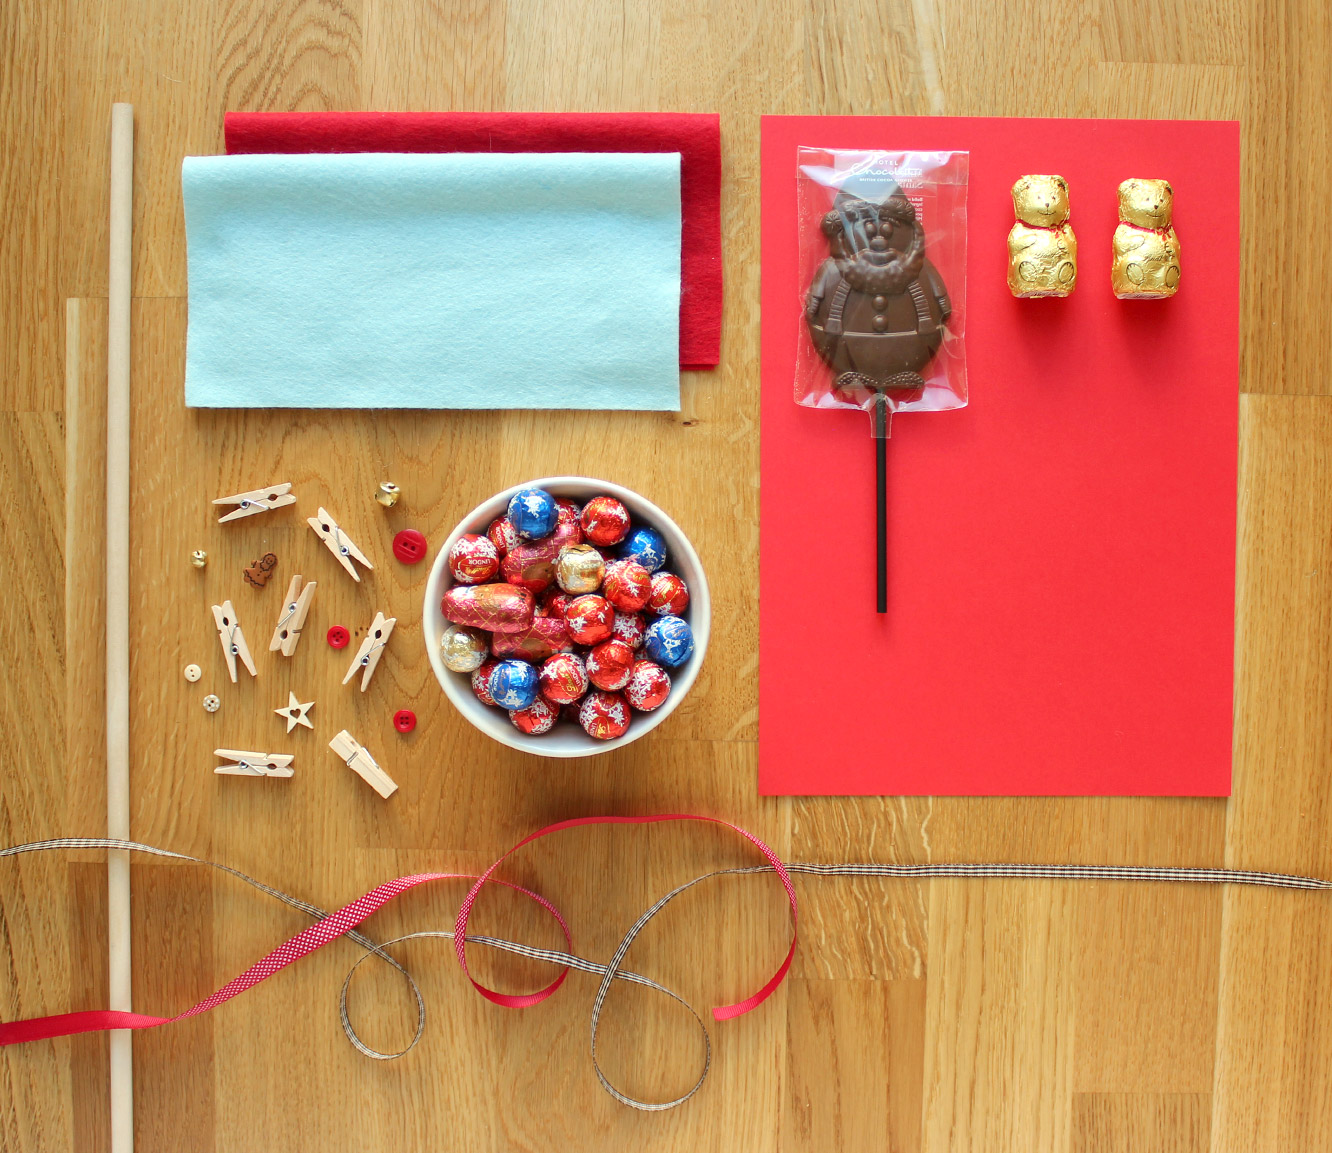
You will need
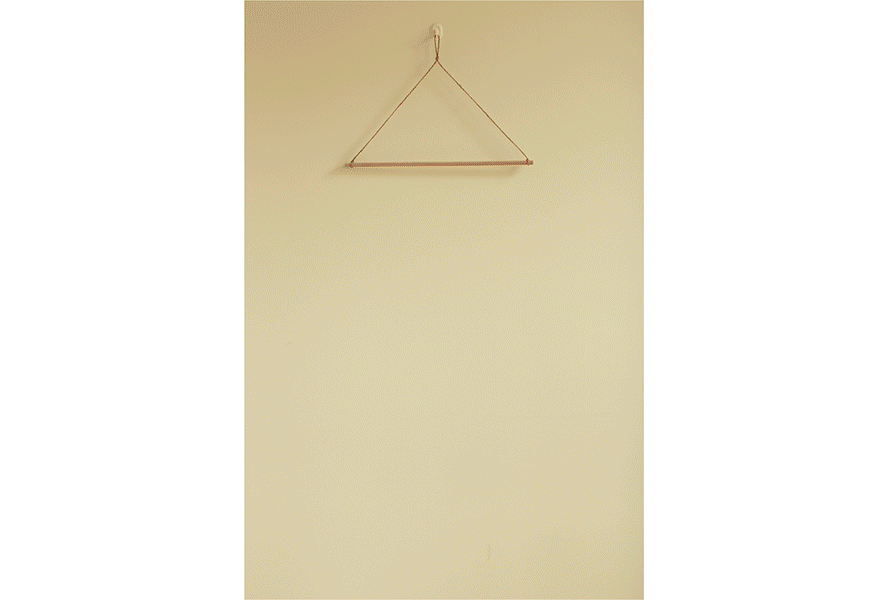
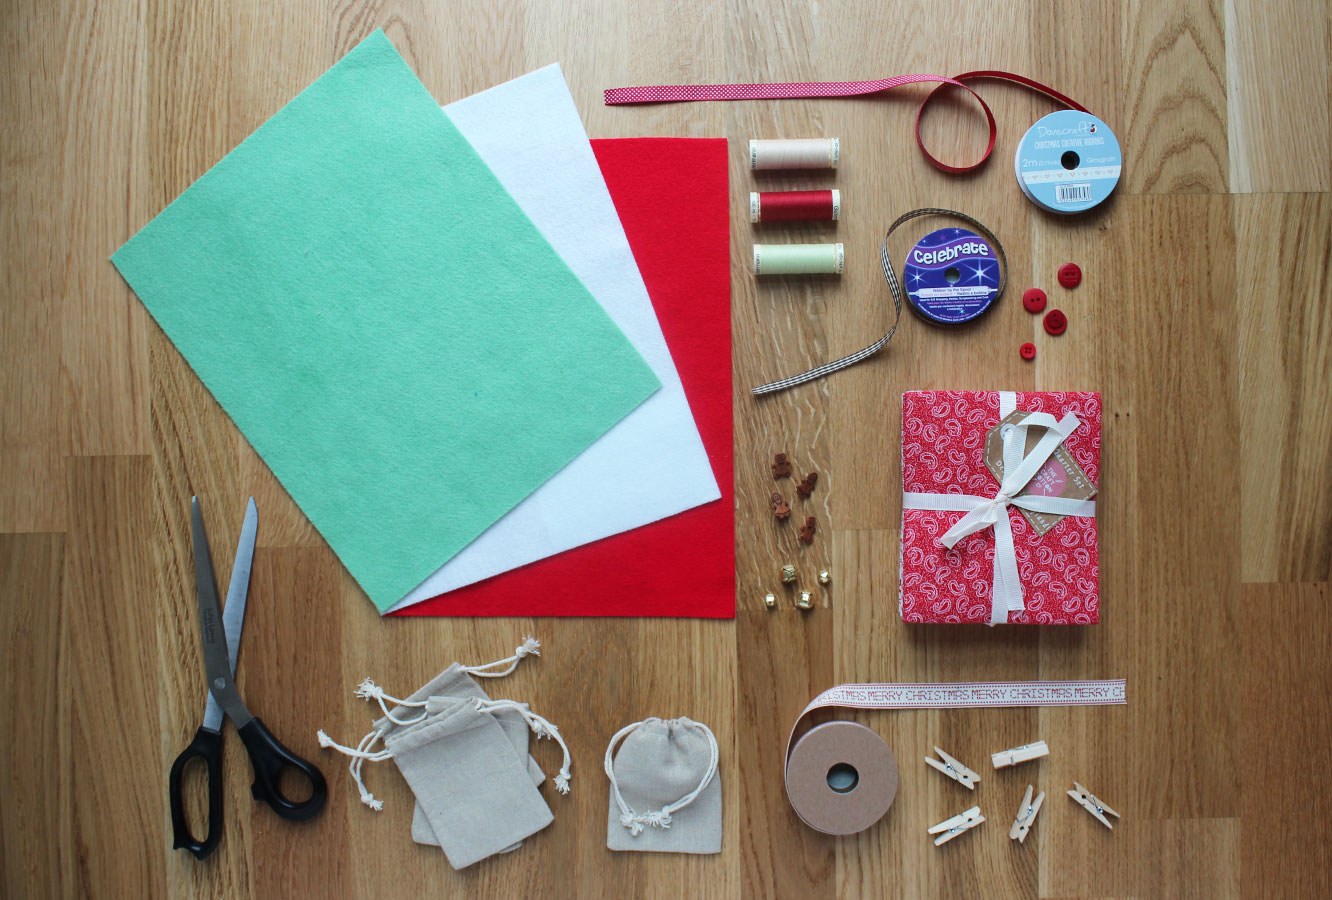
A dowel rod (40cm) (or a wire coat hanger)
Festive looking string or ribbon
Felt (I bought two packs of 5 felt squares from John Lewis, you’d probably need 6 or so A4 sheets)
24-48 chocolates (I used mini Lindor truffles (there are 22 in a bag) and some woodland friends from Waitrose)
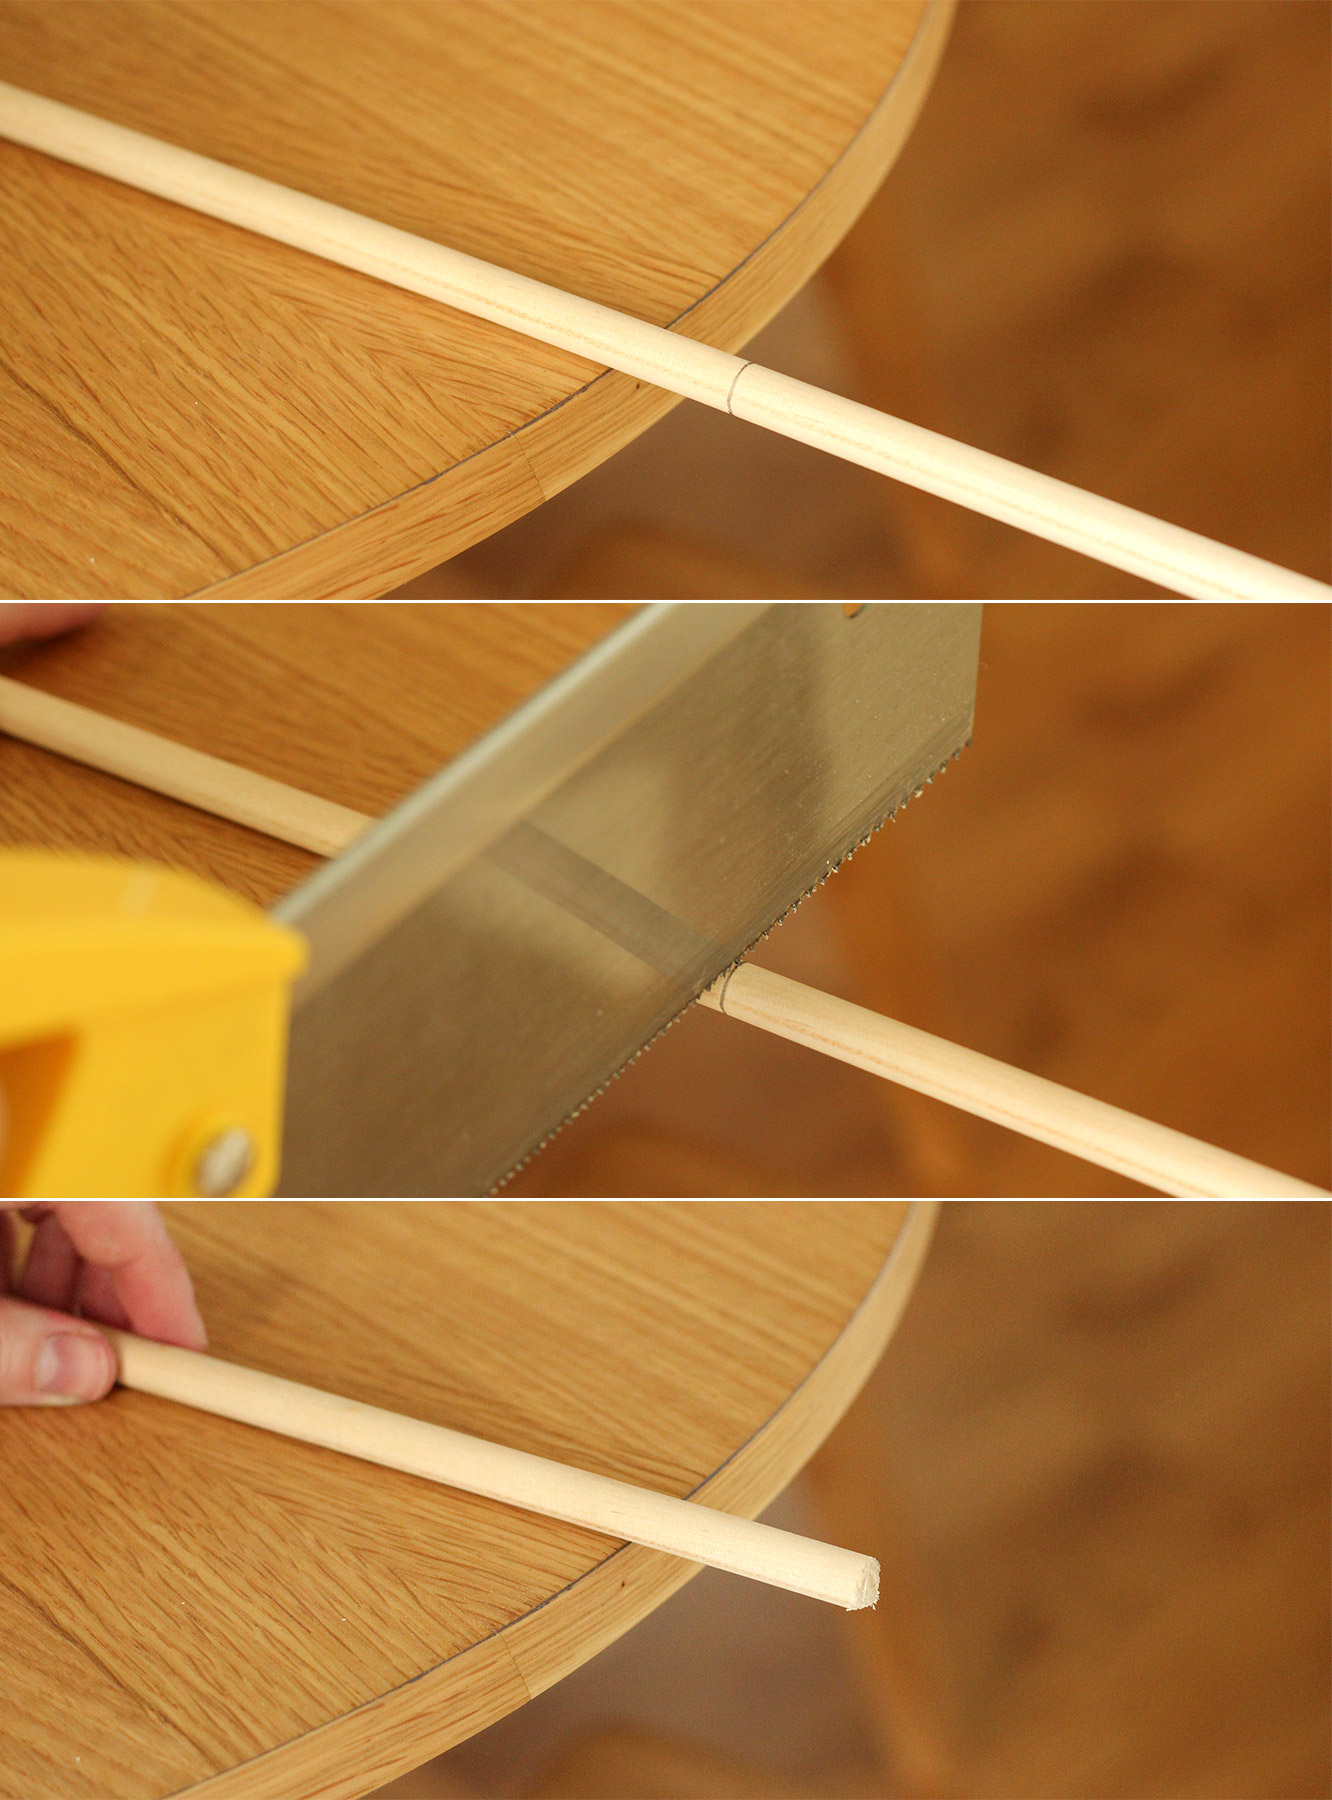
Depending on the length of your dowel you might need to cut it down. Mark the cut point at 40cm.
Step two
Cut the end of the dowel off. Those of you into wood work (of which I am sure there are plenty) don’t judge me for my saw, I’m relatively confident after using it that it wasn’t the right choice.
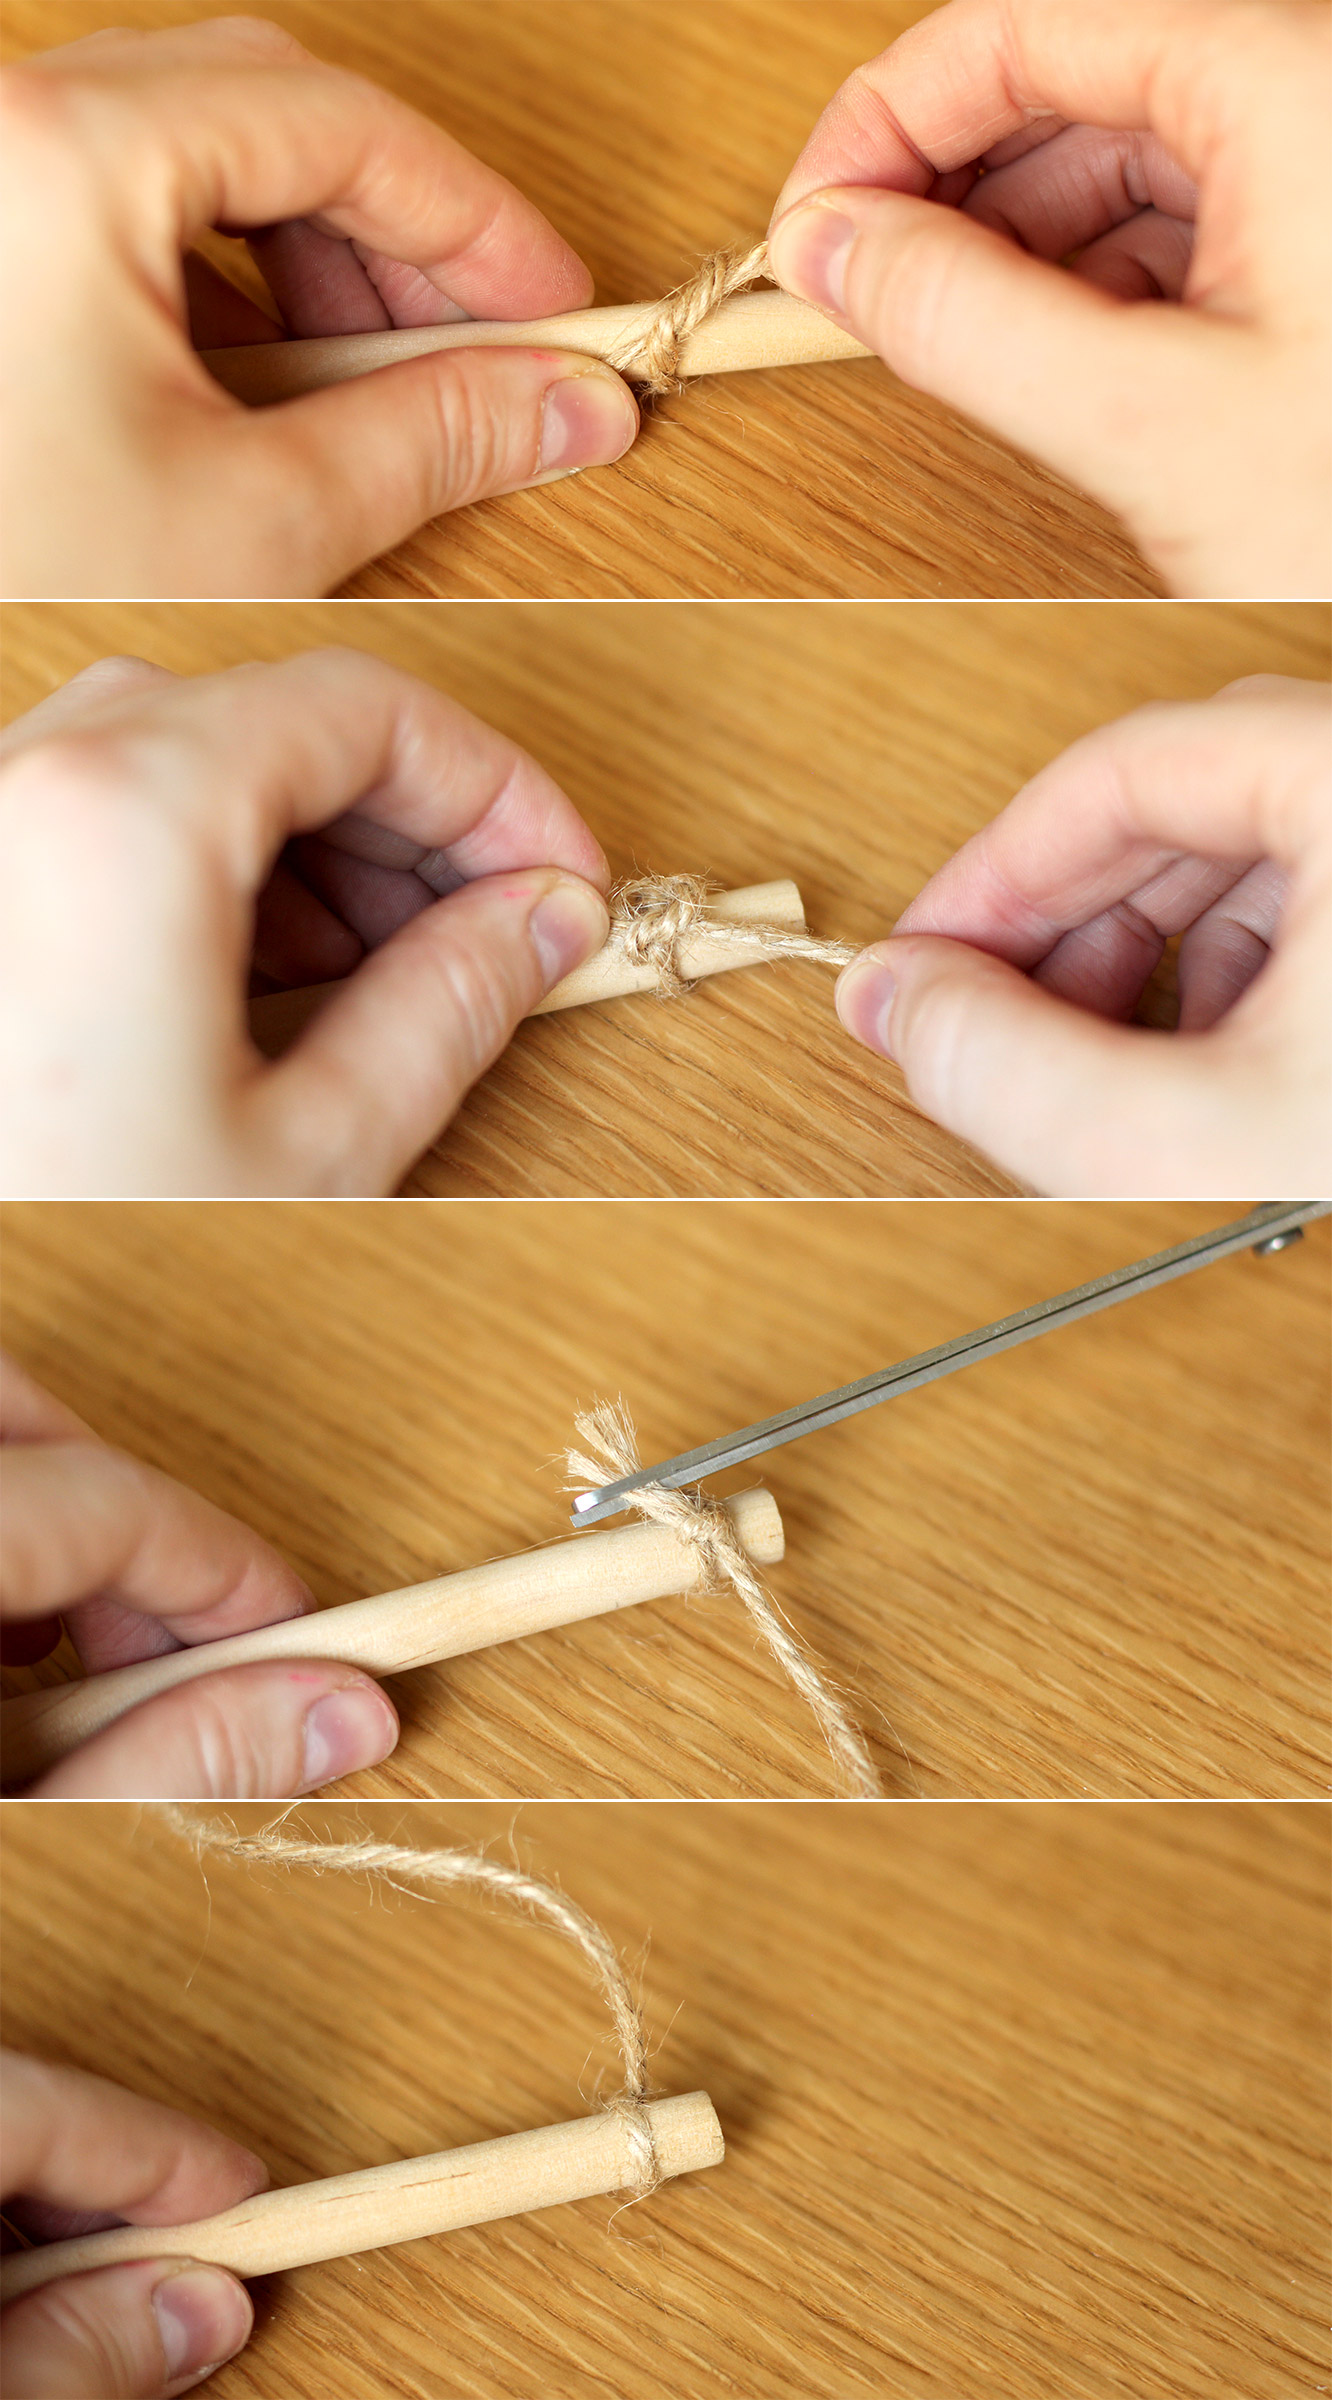
Step three
measure a length of twine/string/ribbon about twice the length of the wood and double knot tie it onto either end. You might want to add a little glue to secure it. Make sure to turn it so the knot is at the back.
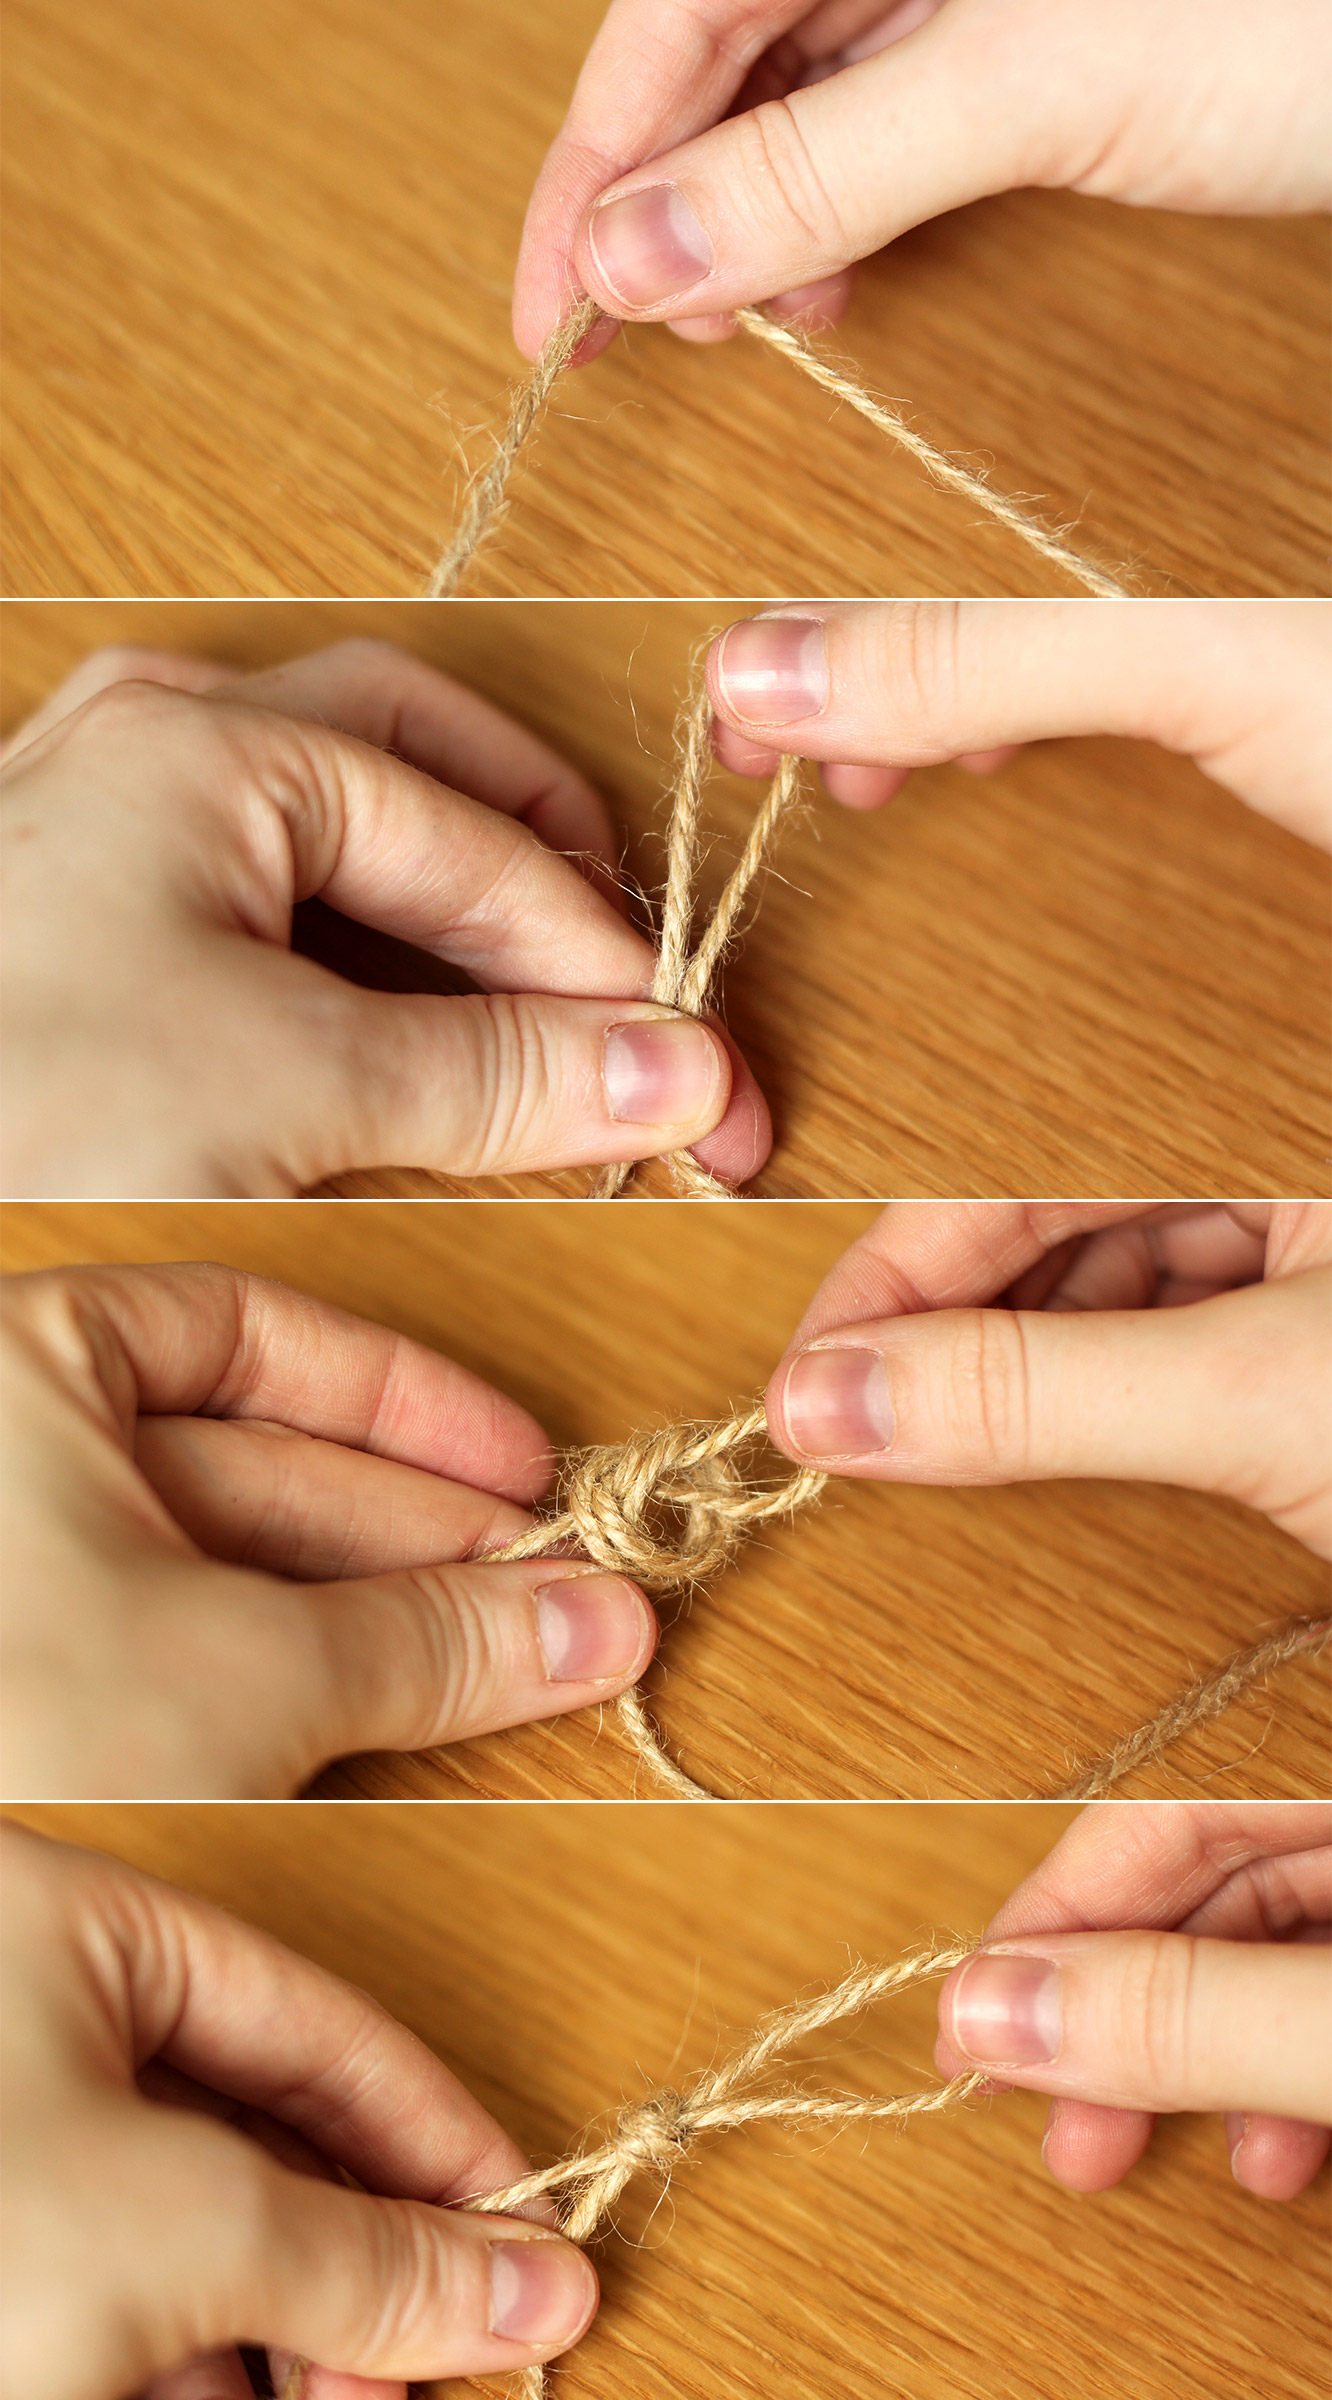
Step four
Hold the centre point of the twine and allow the rod to hang off the side of the table. Make sure it’s level and tie a knot in the middle so that you have a loop to use for hanging.
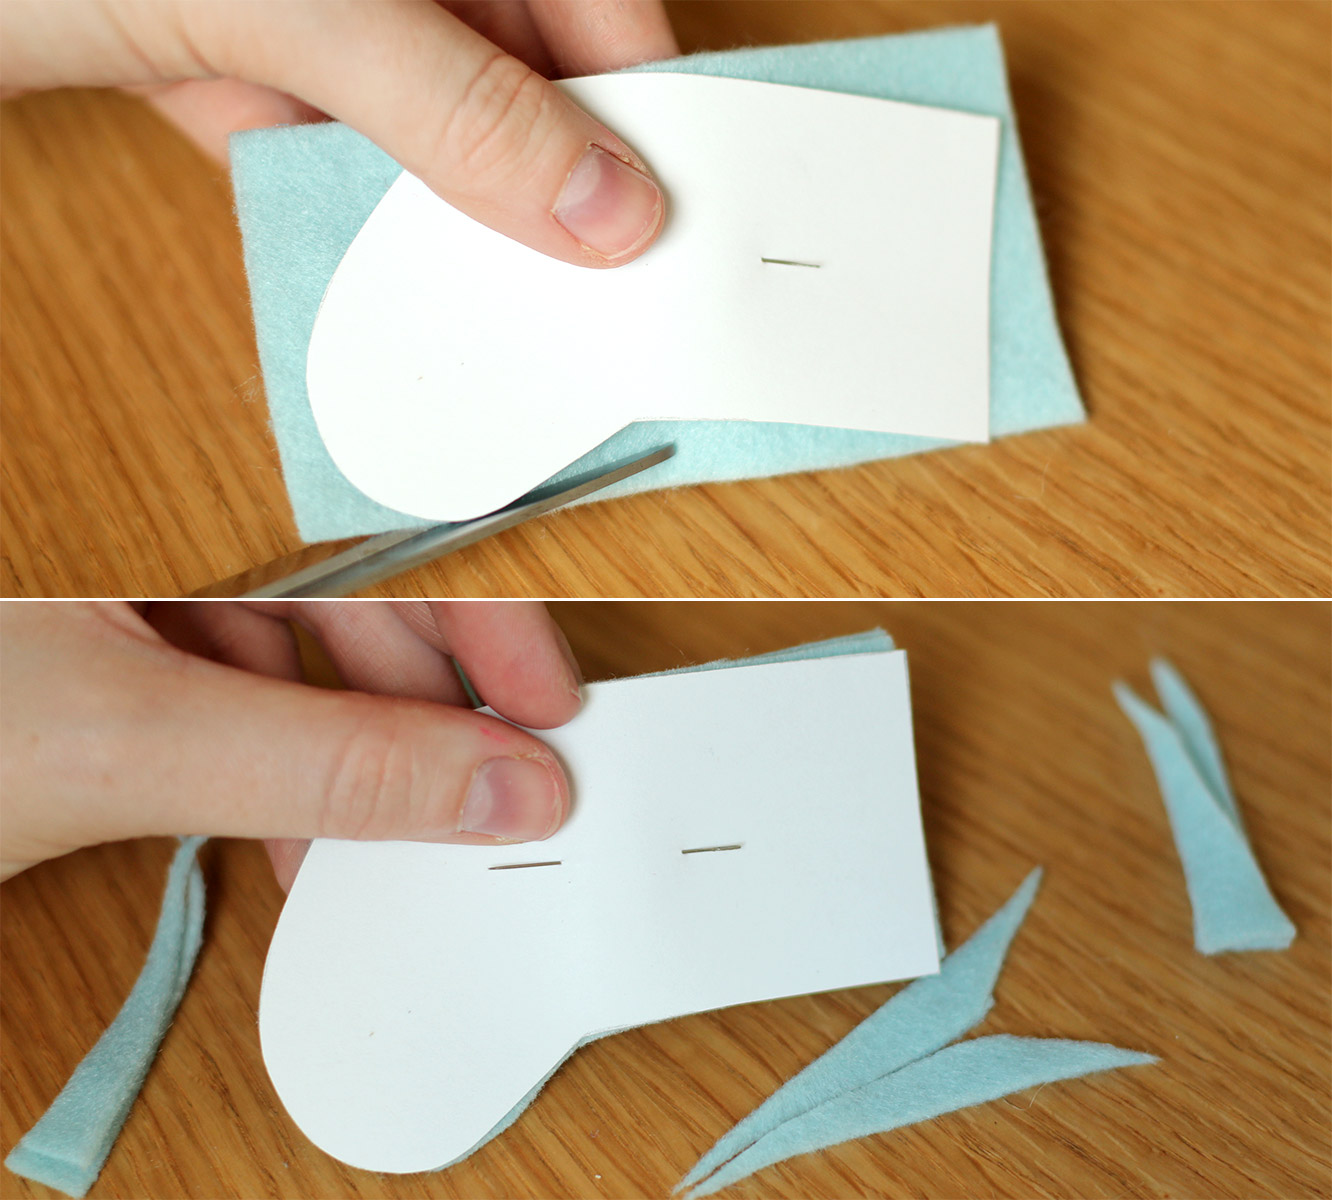
Step five
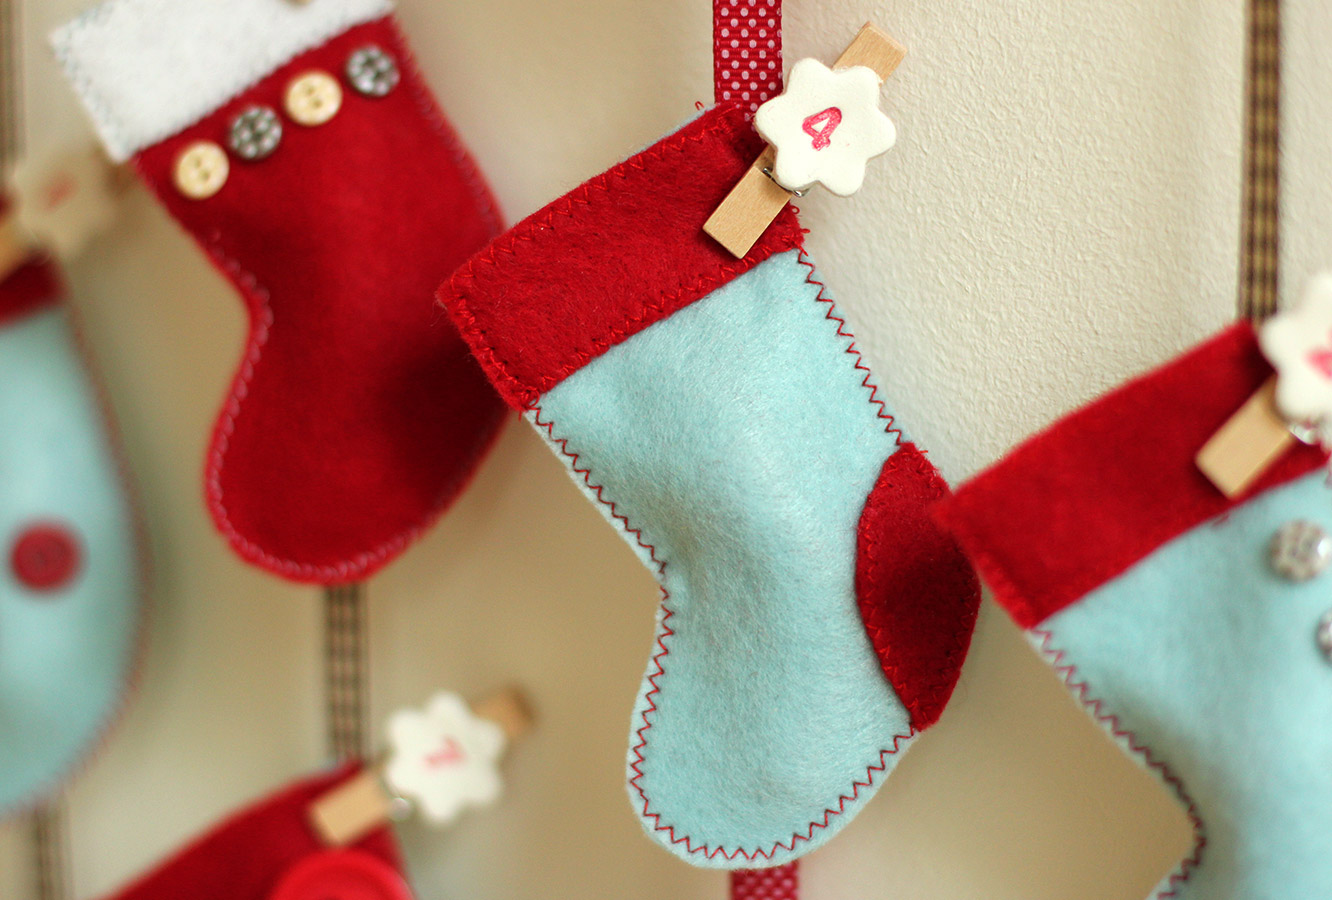
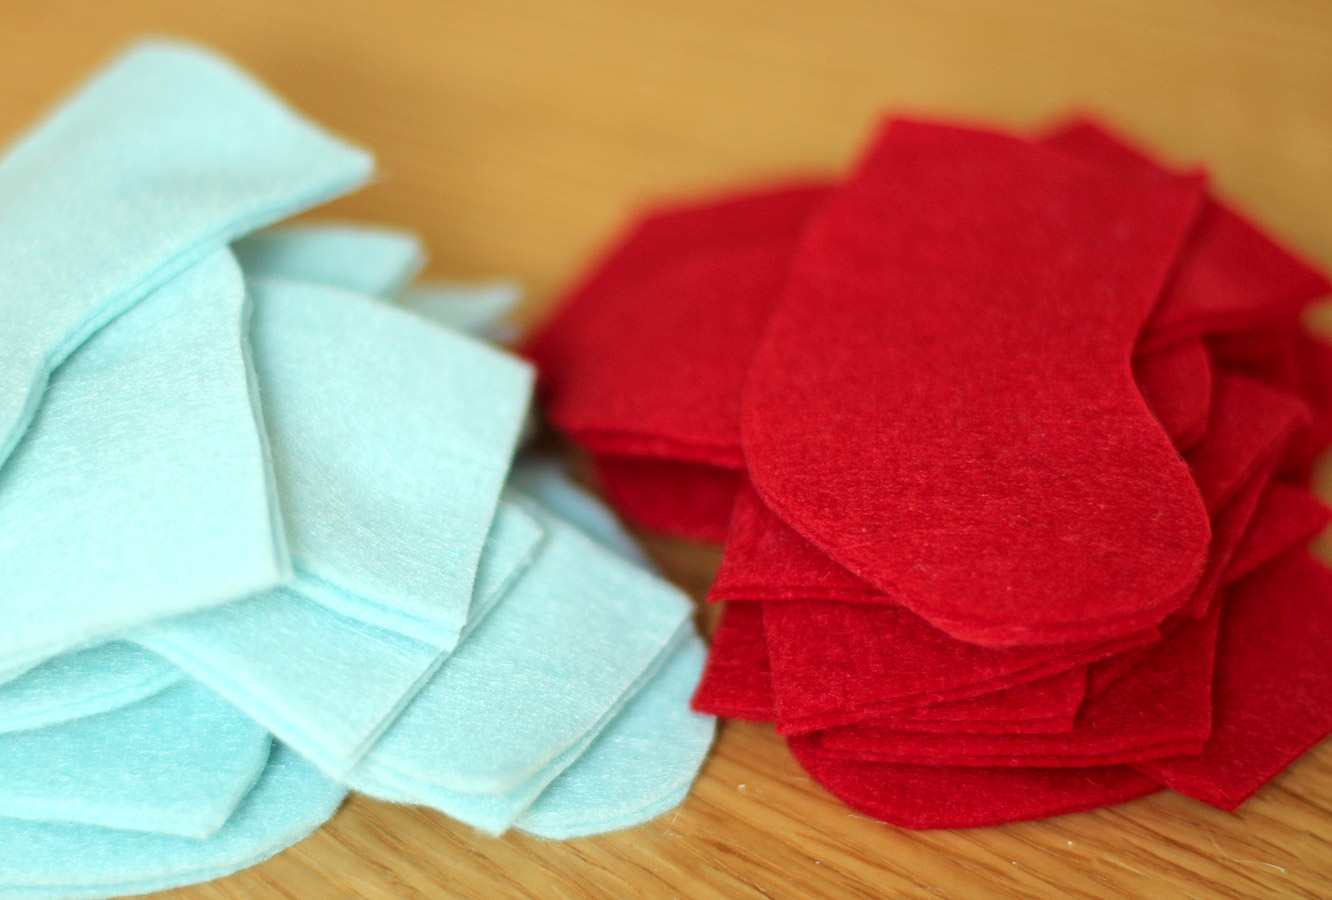
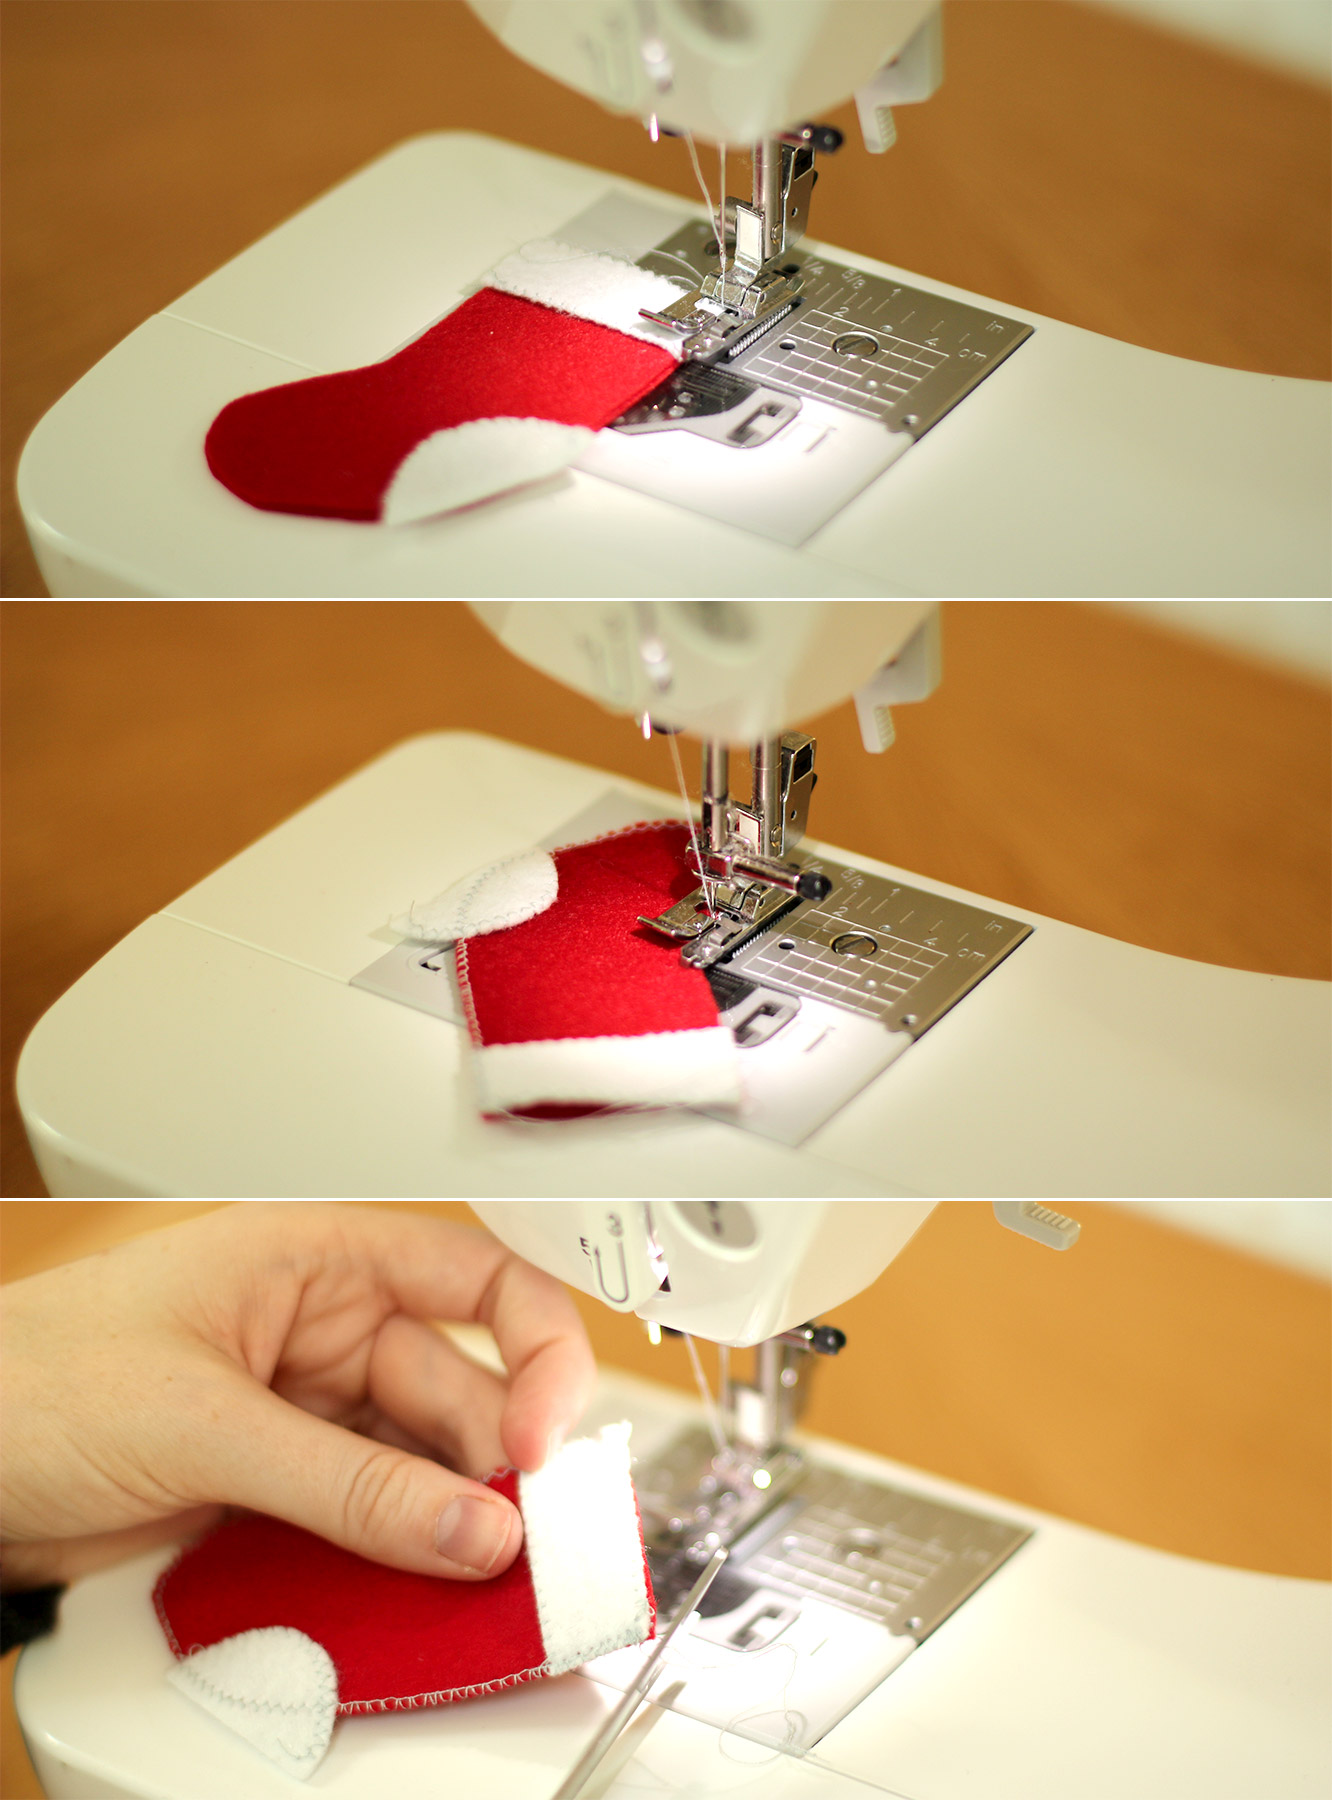
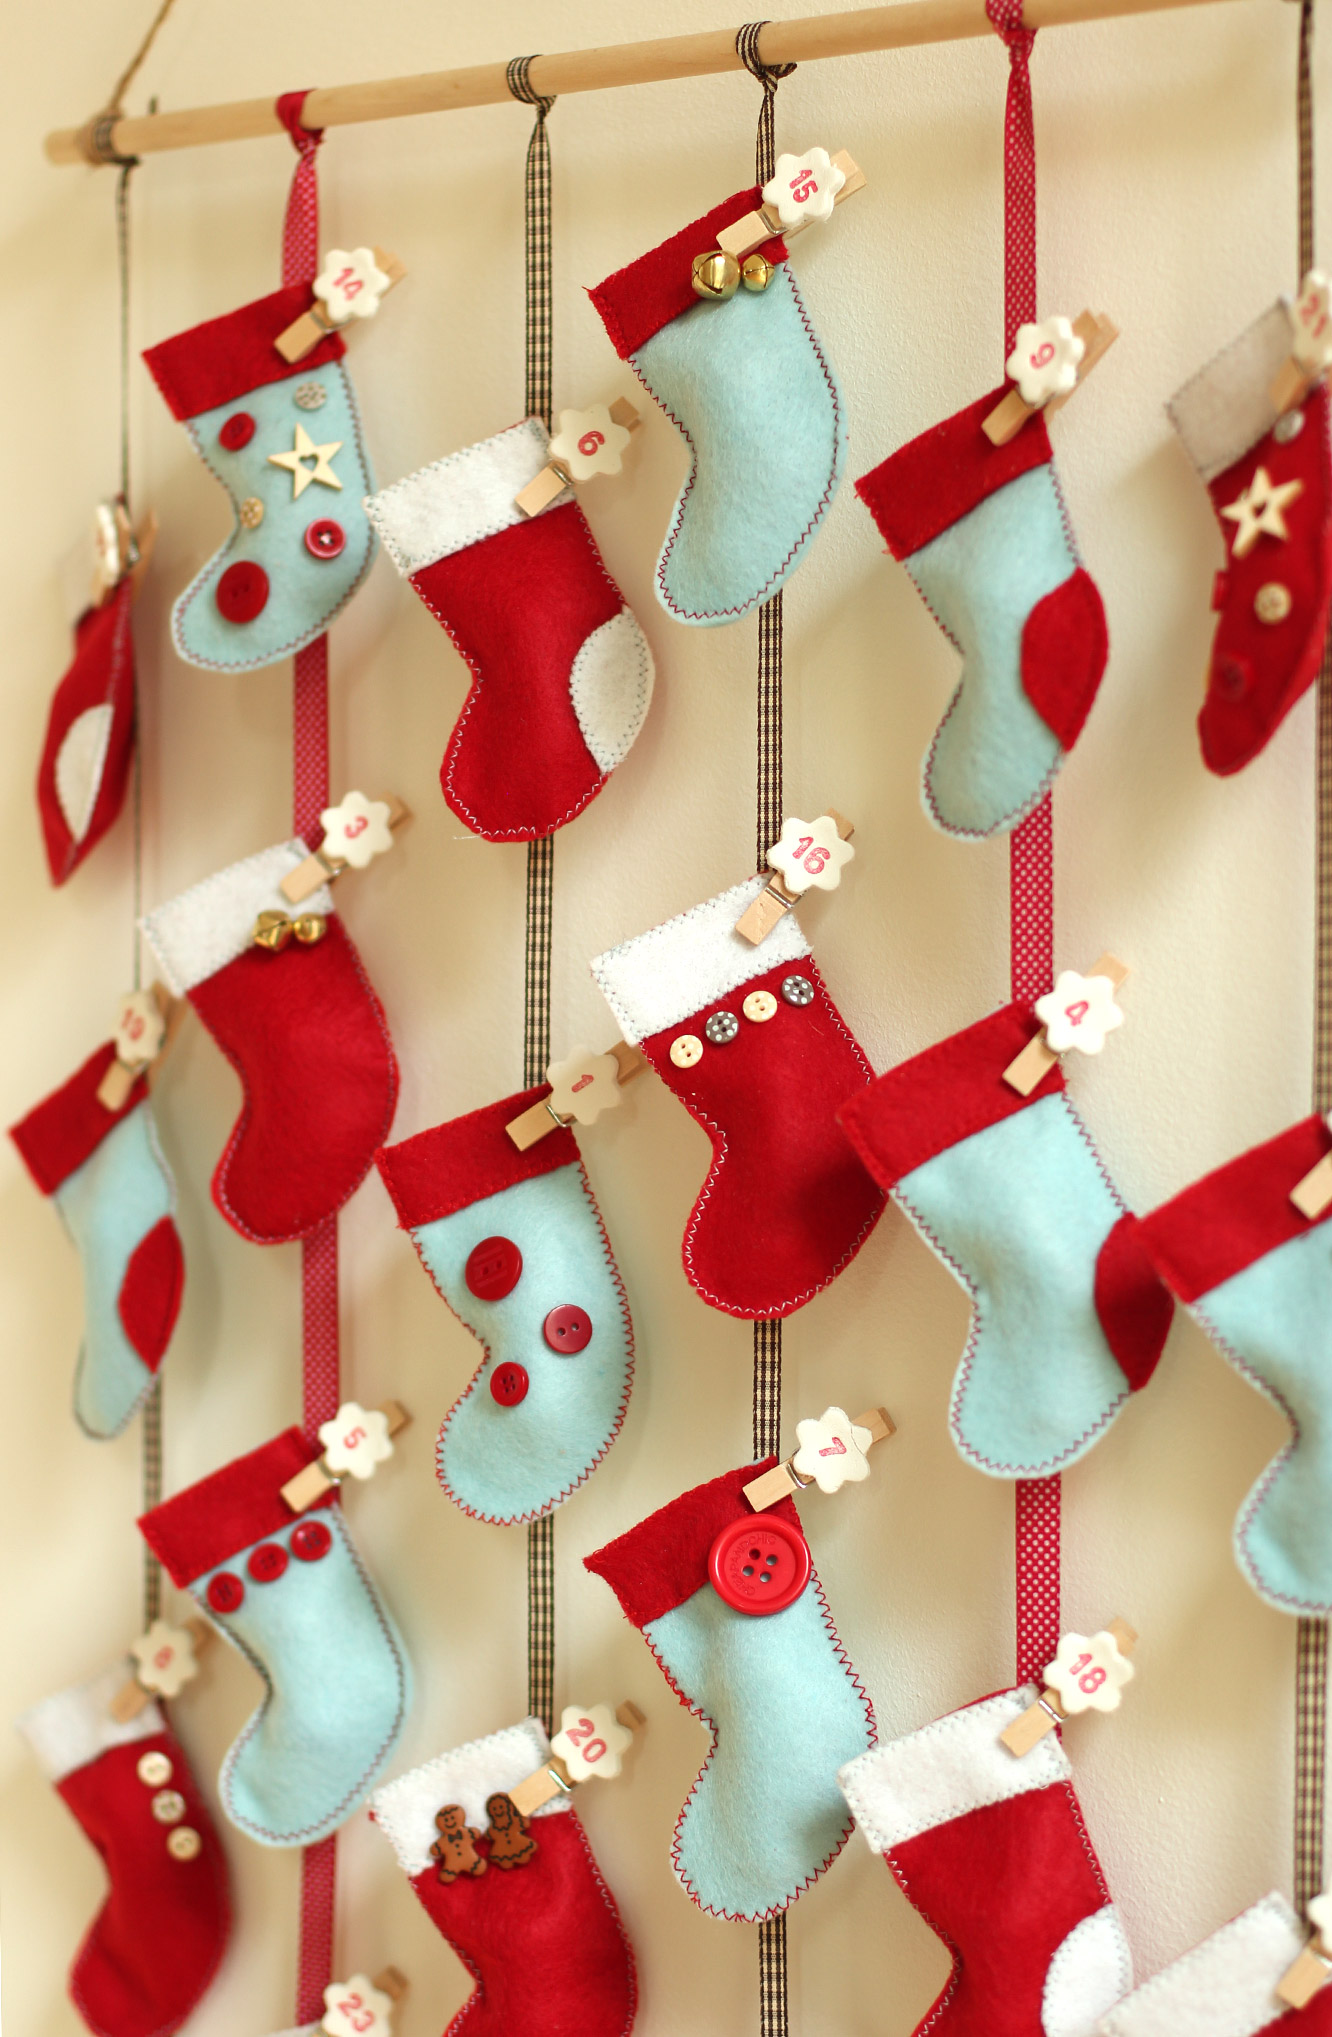
Using the template cut out 23 mini stockings (2 pieces of felt for each). I cut through two layers at a time, and squeezed 8 cut outs from each square of felt. If you bought A4 sheets I imagine you’ll get 10-12.
Step six
Keep cutting.
Step seven
Sew the stockings together using an overlocking or zig zag stitch. I edged the white bits separately before attaching them and left the heel hanging over the edge.
If you are making this for next Christmas, feel free to hand sew. I cover how to blanket stitch here. If you want this ready in time for this advent I recommend borrowing a sewing machine or using glue.
Step eight
Cut the excess off the heel of the stocking and any loose threads.
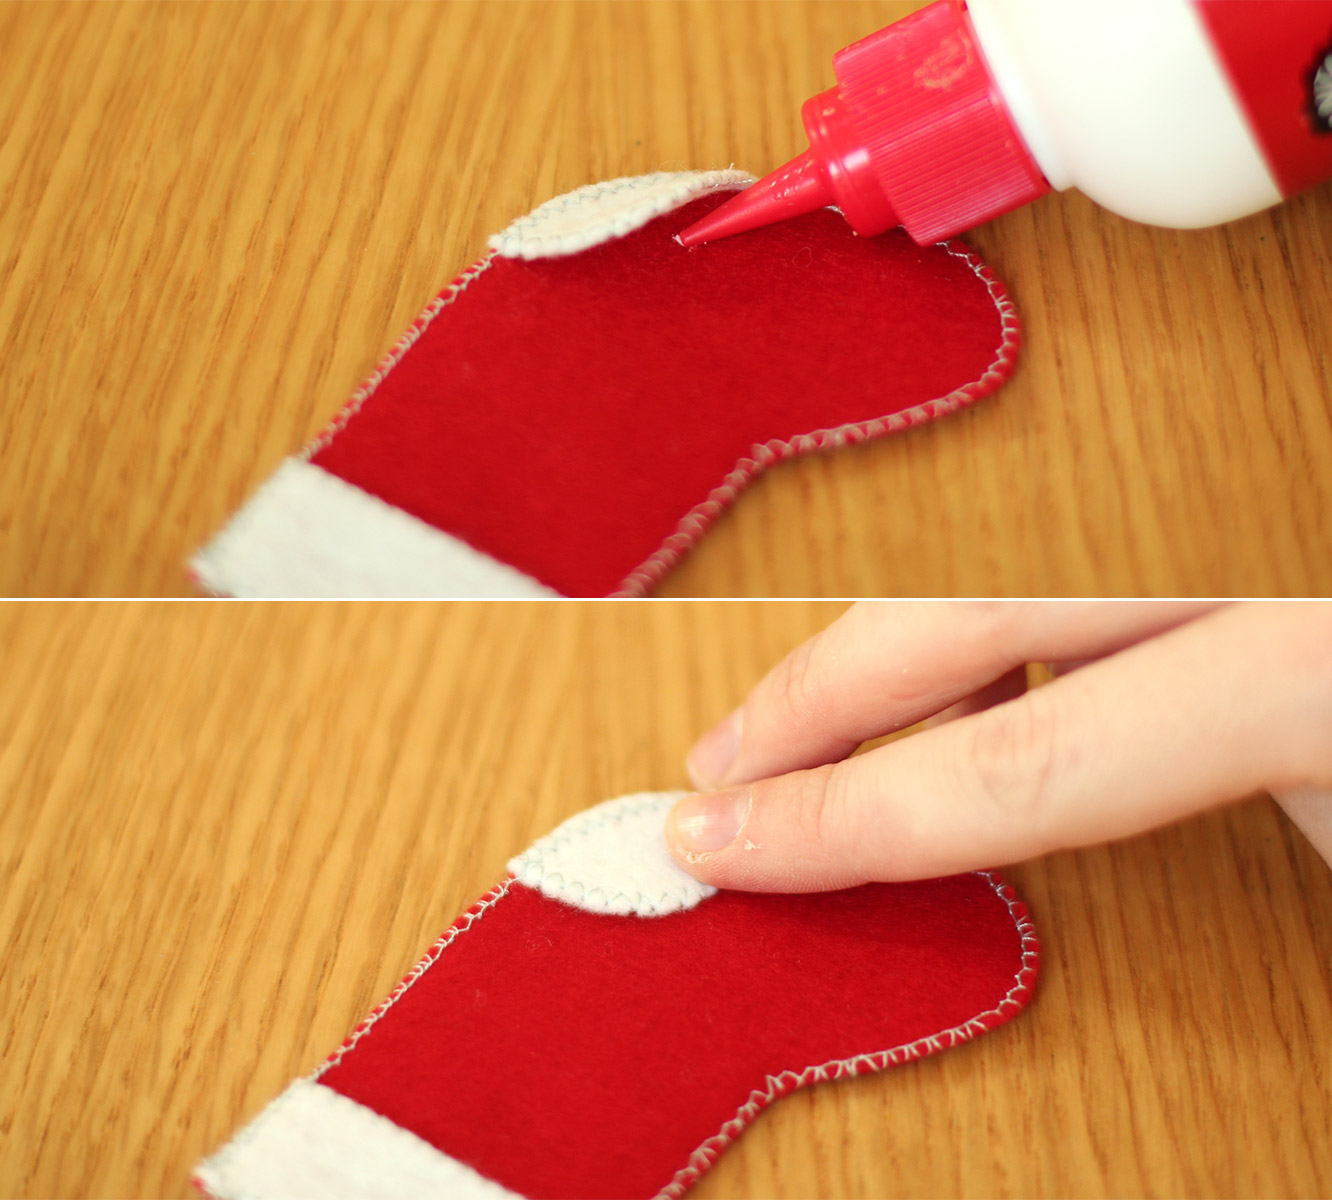
Step eight and a half
(Totally missed this step on the original post)
Secure the heel with a little dab of glue, but make sure it doesn’t soak through and stick the stocking together.
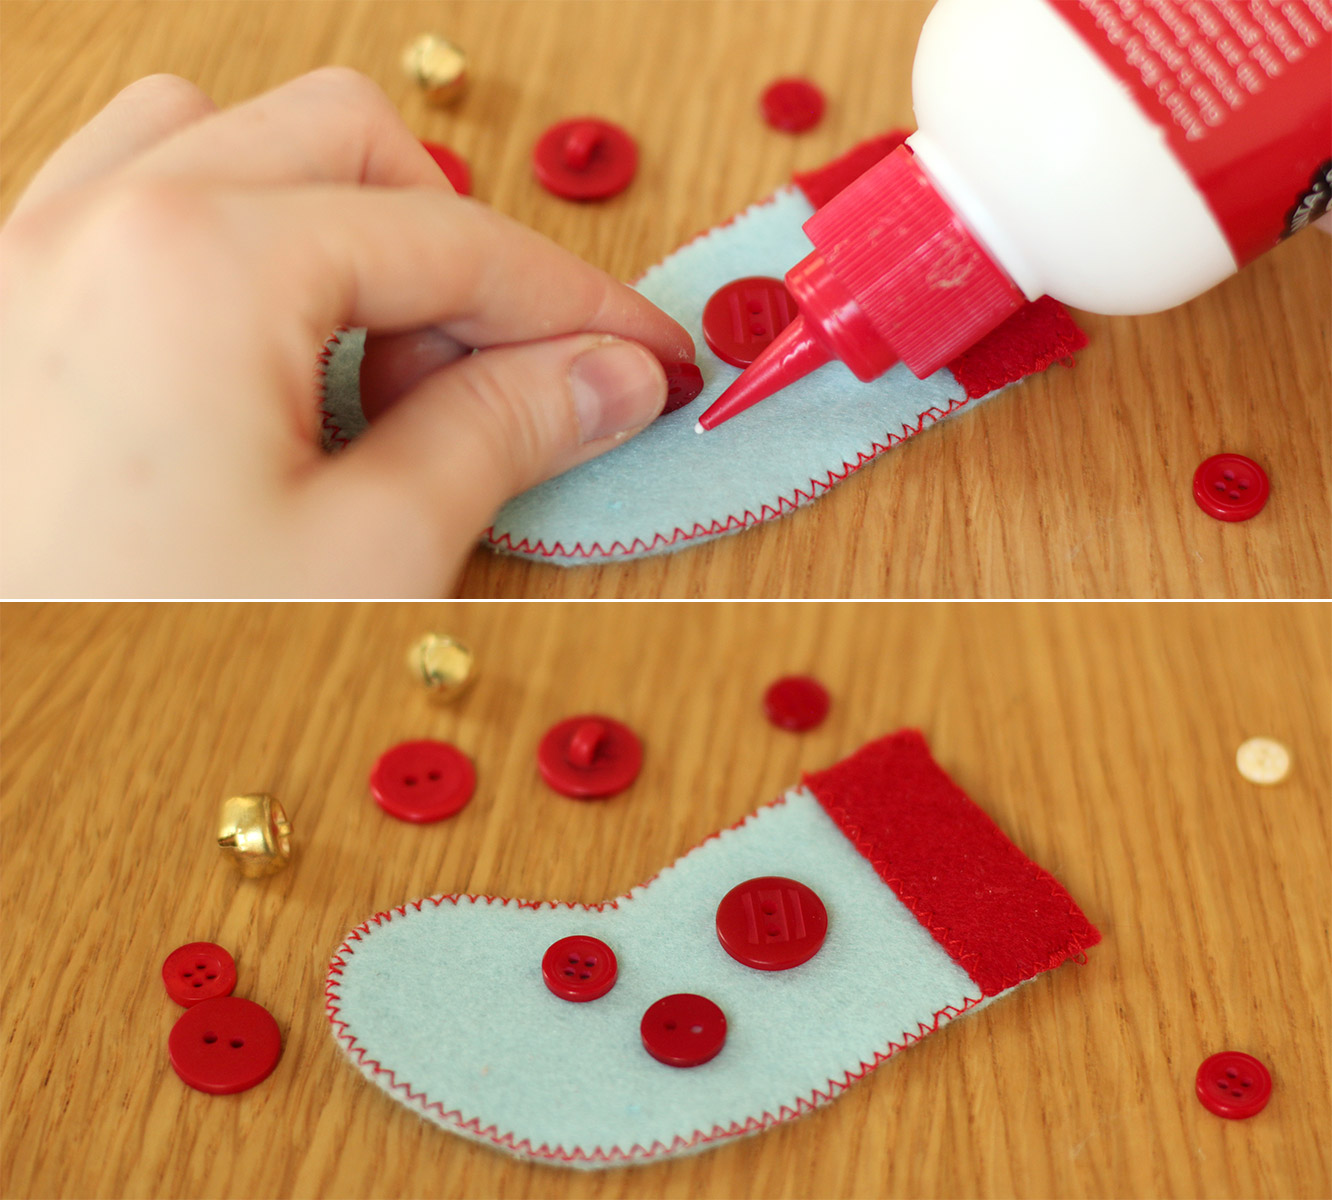
Step nine
I decided not to sew heels on all of them as I wanted a bit of variation. So I used some of the embellishments from last year’s advent calendar to decorate. Glue is acceptable here I reckon, otherwise you really need to sew them on before sewing them together.
Repeat until you have 23 little stockings and one big one.
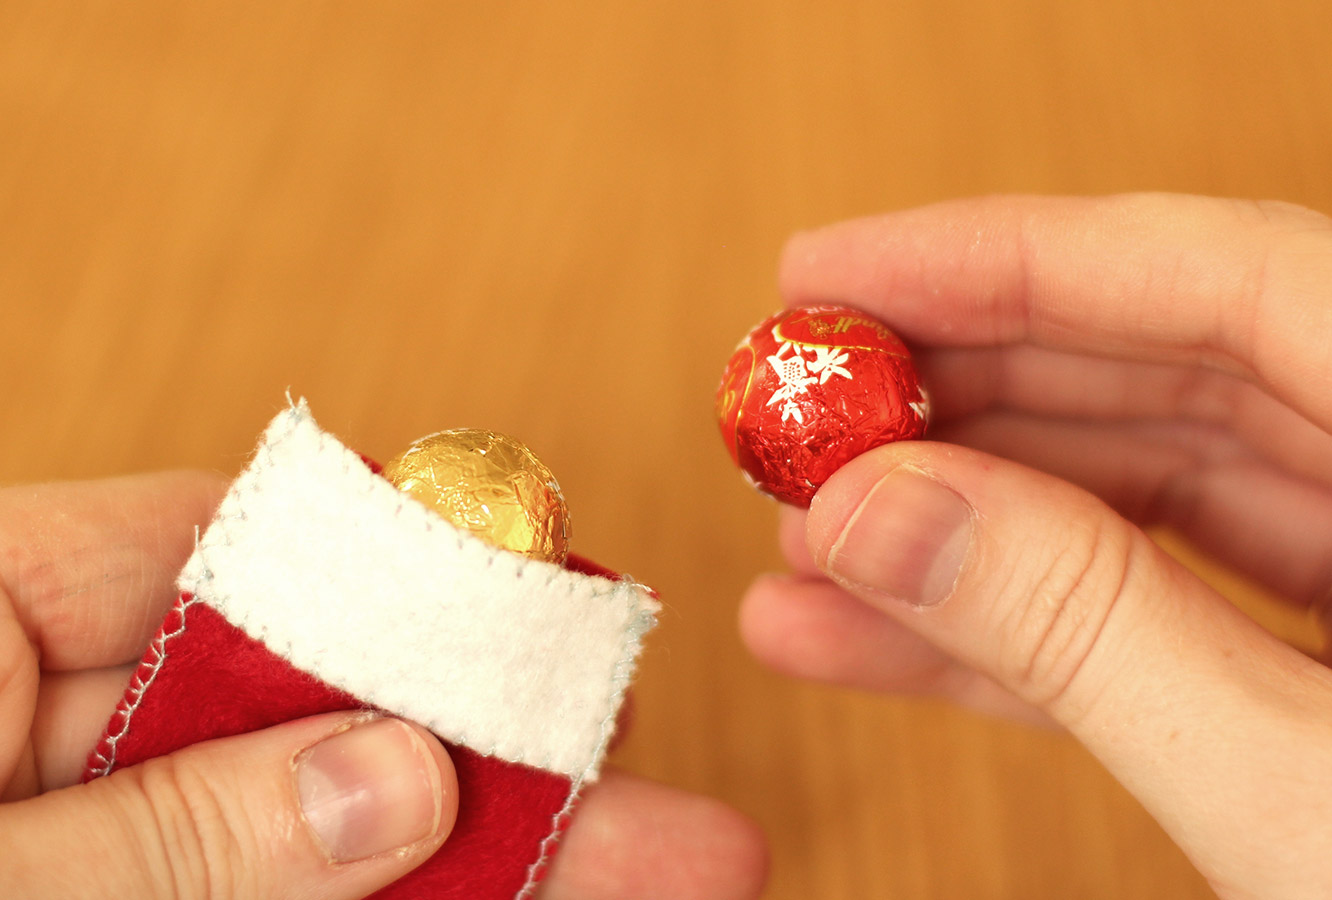
Step ten
Fill your little stockings as you go, they look very cute as they stack up.
Step eleven
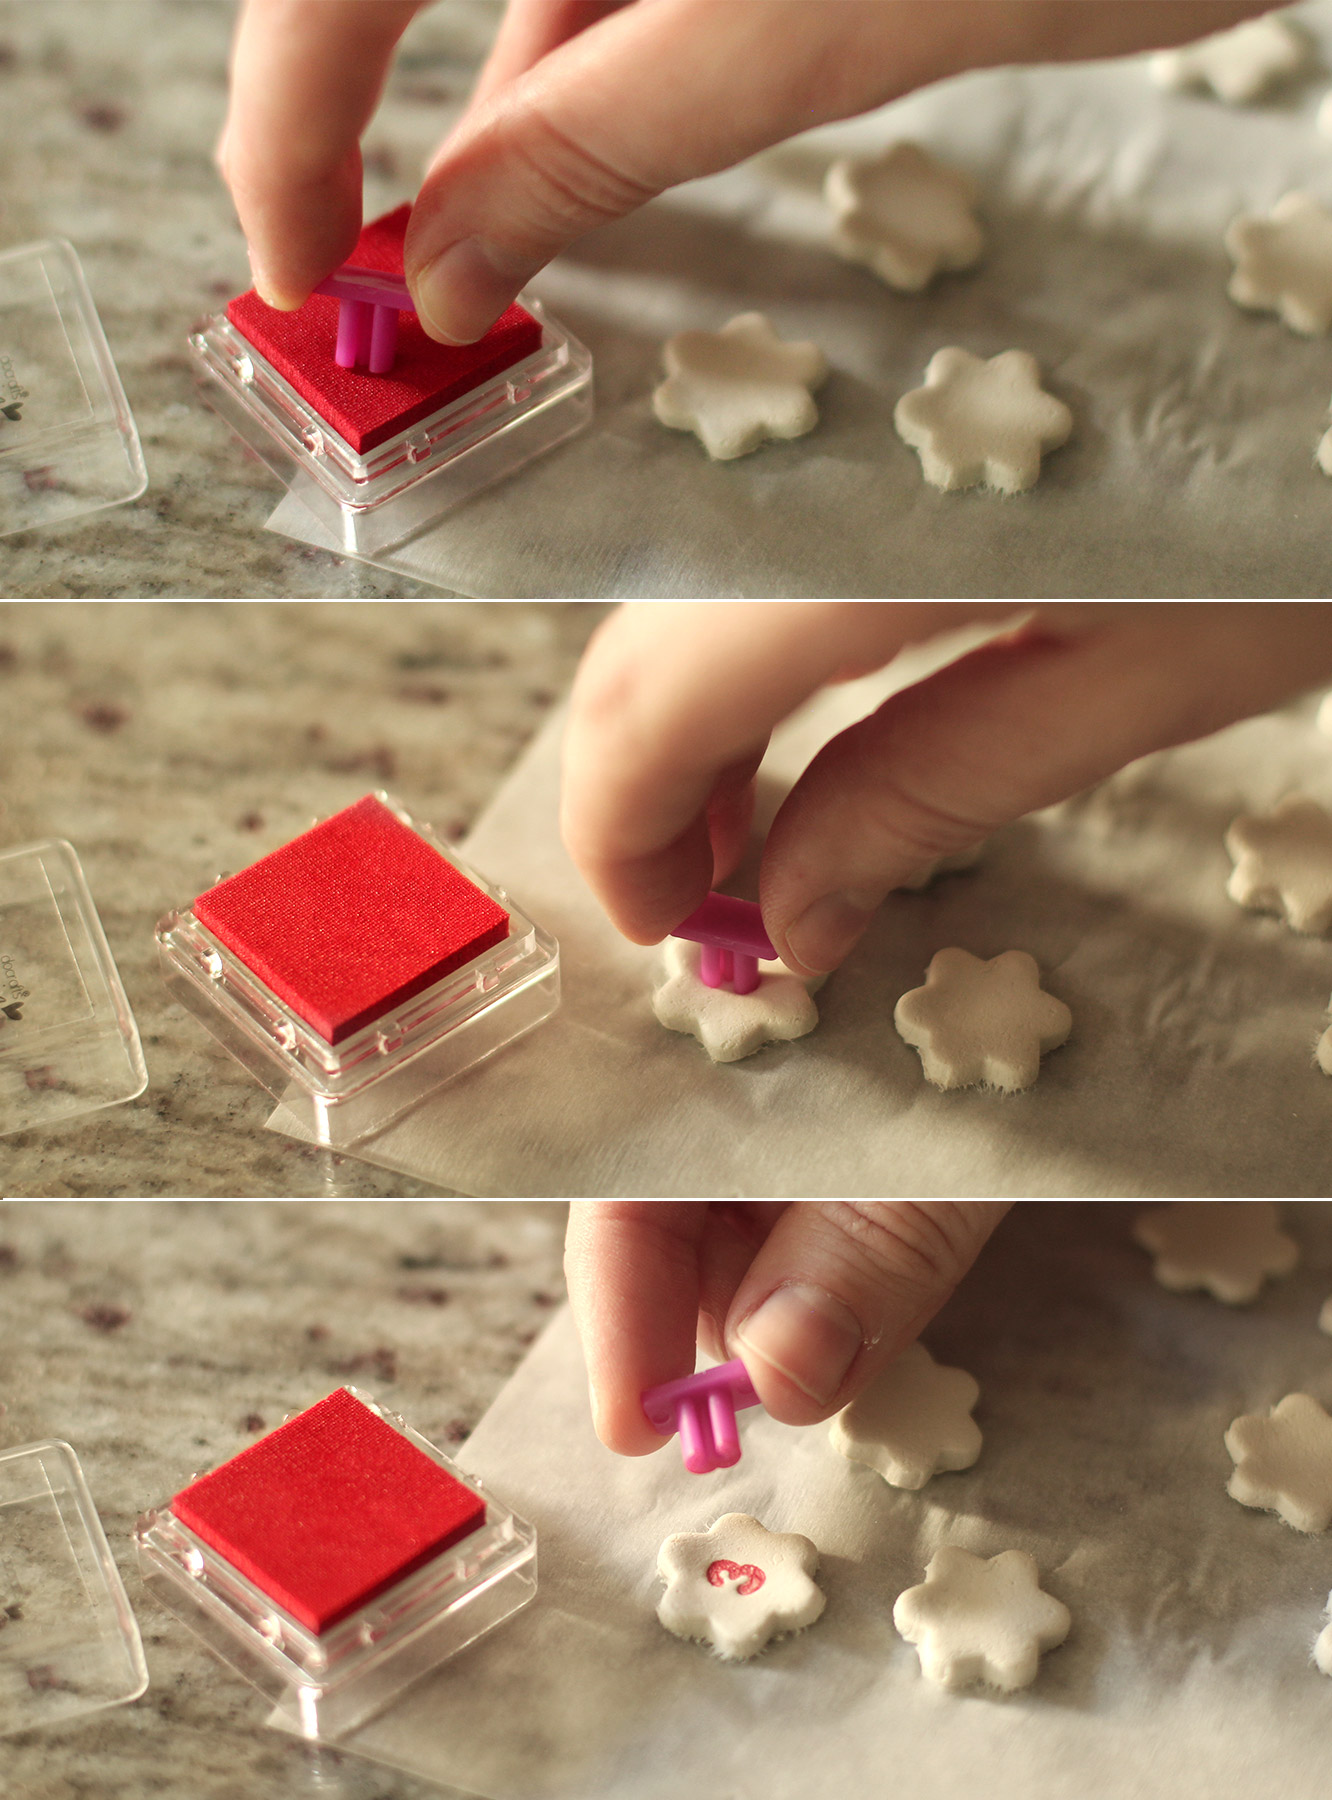
After a few learning lessons from last week, I made the number markers with air dry clay. I found it easier to work with than FIMO. It also worked really well to ink the stamps before pressing them into the shapes.
This is entirely optional, you could write the numbers on the pegs, stamp them, make circles of card instead etc etc.
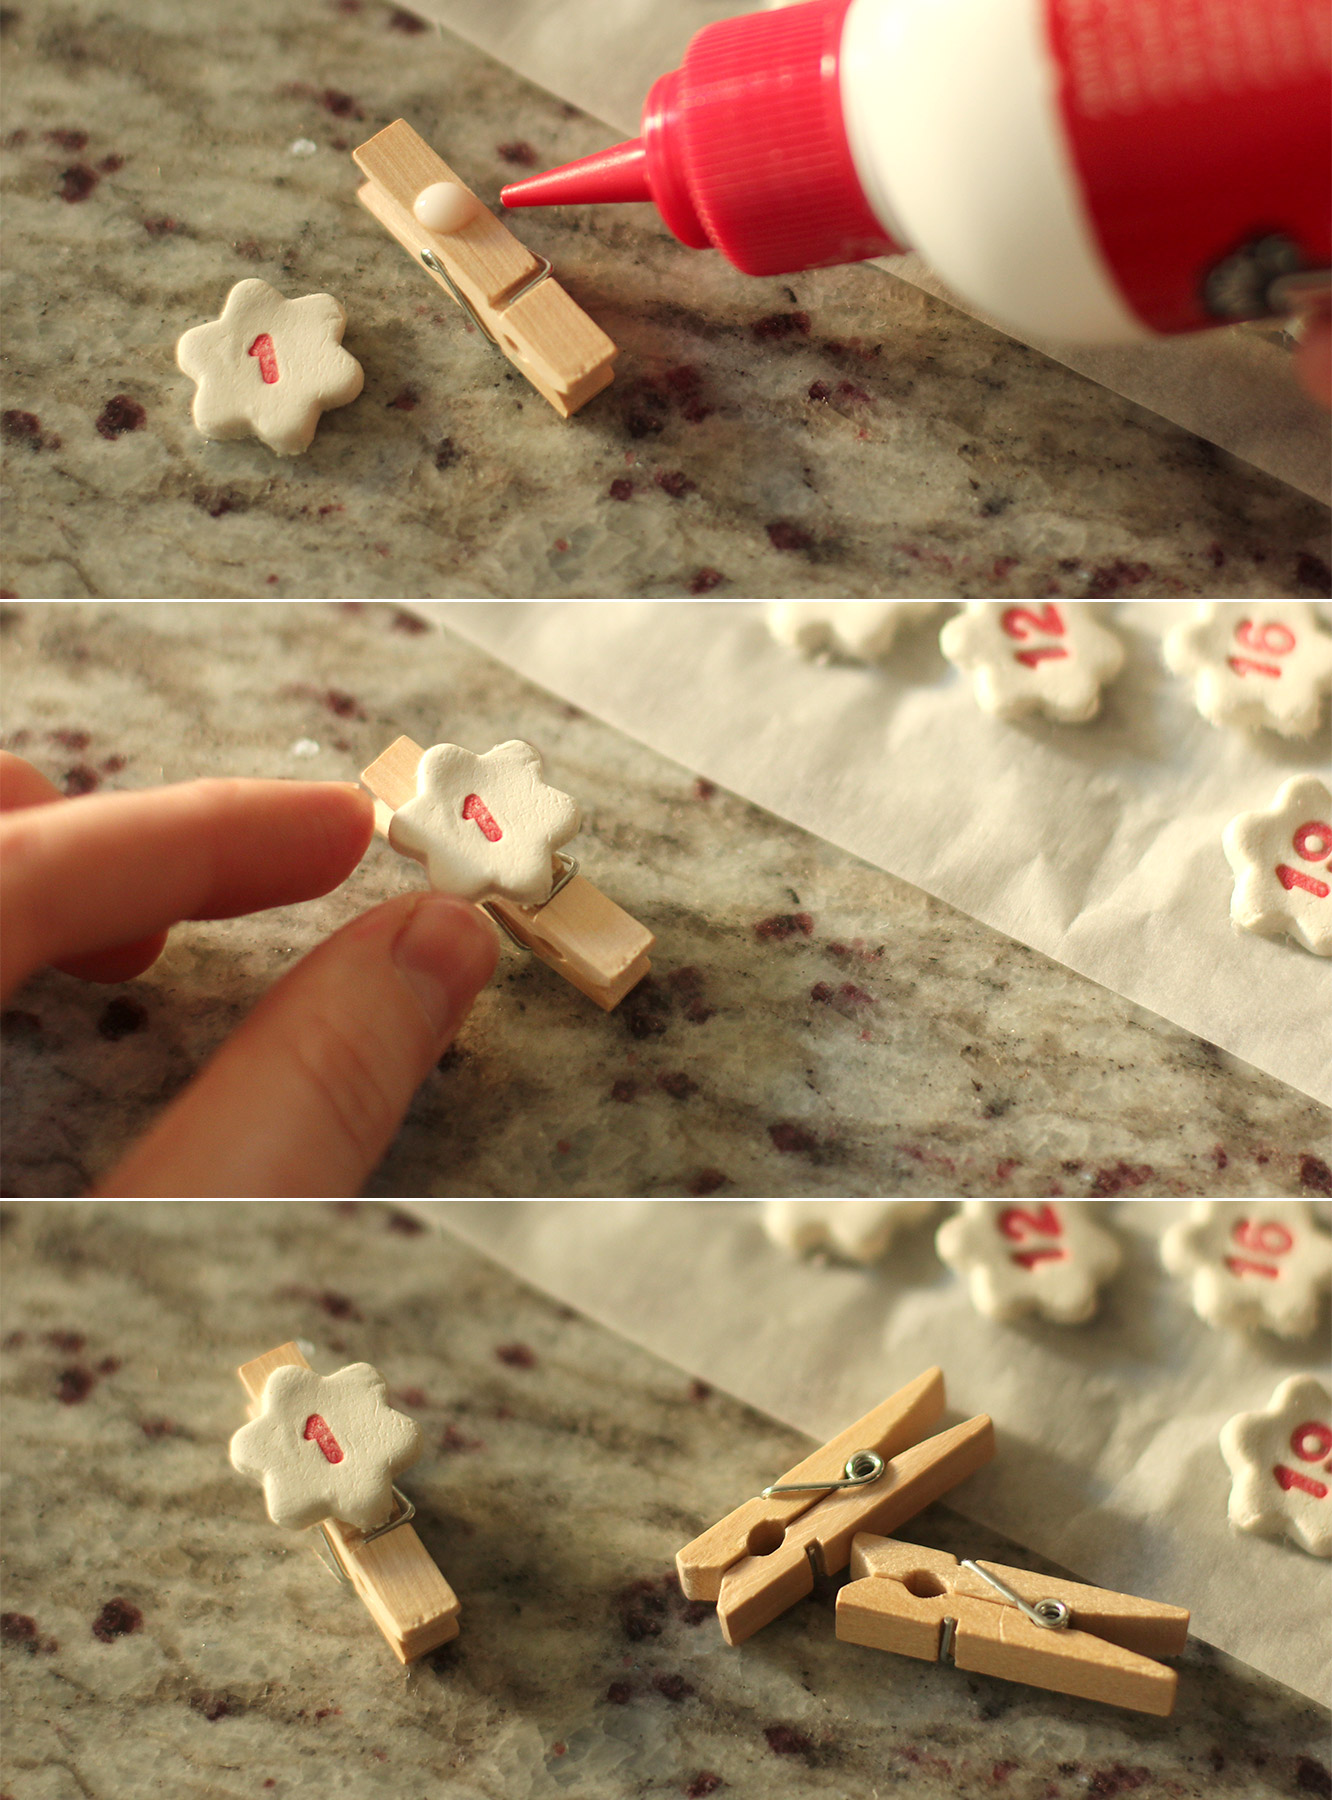
Step twelve
Once the shapes have dried out (no cooking required with this clay), stick them to the pegs with enough space at the top to open and shut the peg without squashing them.
Step thirteen
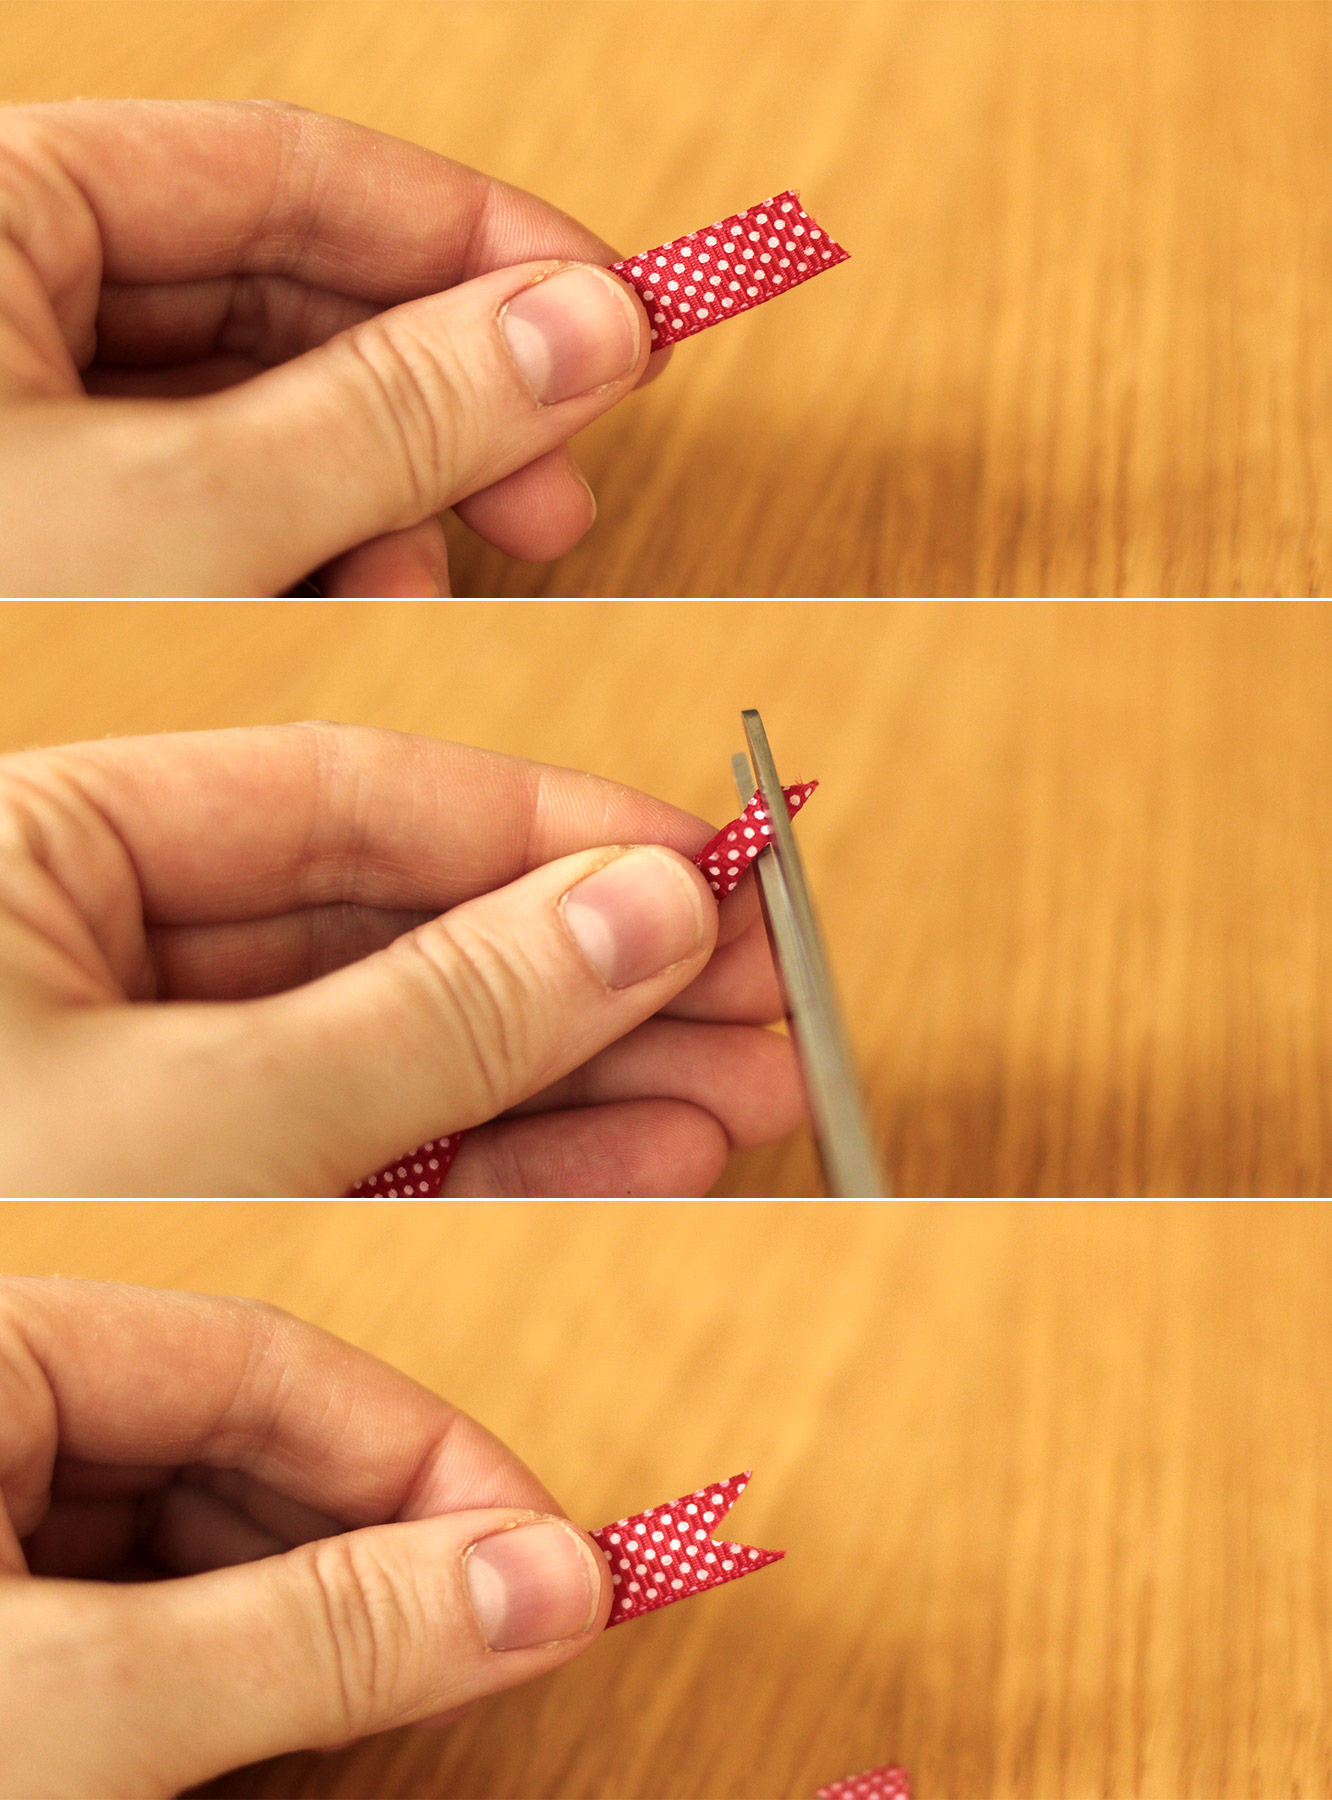
Cut 6 lengths of ribbon. I decided to taper mine at different lengths, as you can see in the final photos. To shape the ends nicely, fold the ribbon in half and cut diagonally on the fold to create a v-shaped cut.
Step fourteen
Tie the ribbons onto the rod and peg the stockings on.
A classic case of things not turning out quite how they were meant to this week. I’m not sure exactly what I was expecting, but my housemates managed to cajole me into embracing the rustic charm of these makes nonetheless. By the end I managed to accept them as ‘not too bad after all’ and the lack of precision means that they would be a great little craft for kiddies as the winter creeps in.
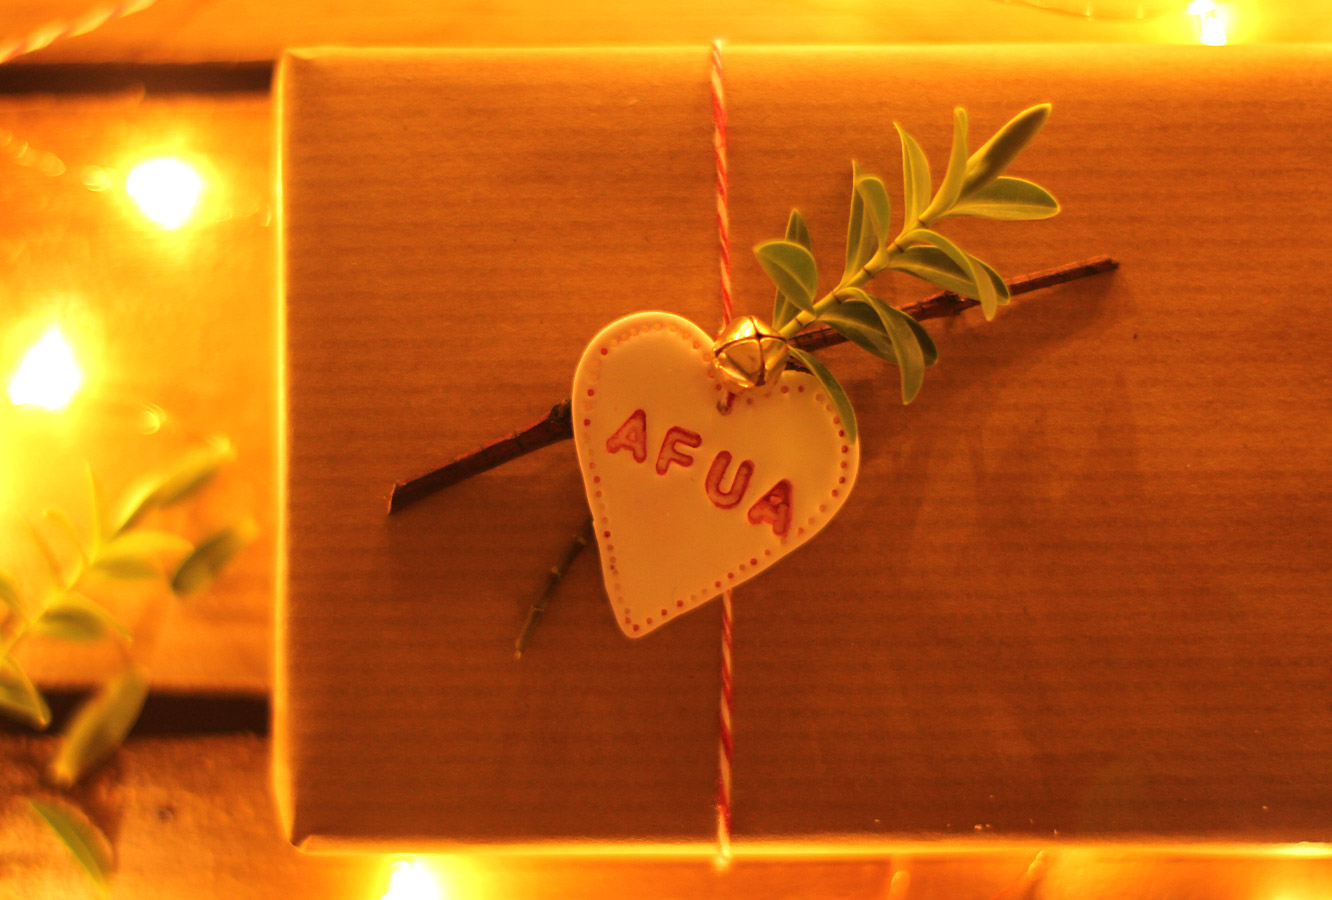
With Christmas decorating just around the corner these guys are a great finishing touch as tree decorations, tags on presents and for card making. They are cheap to make and are cute little token gifts for the people you love, or at least those you like enough to want to give them something, but not enough to actually apply yourself to Christmas shopping.
You will need
A block of FIMO modelling clay
Shape cutters
Festive string or ribbon
Acrylic paint and a small paint brush
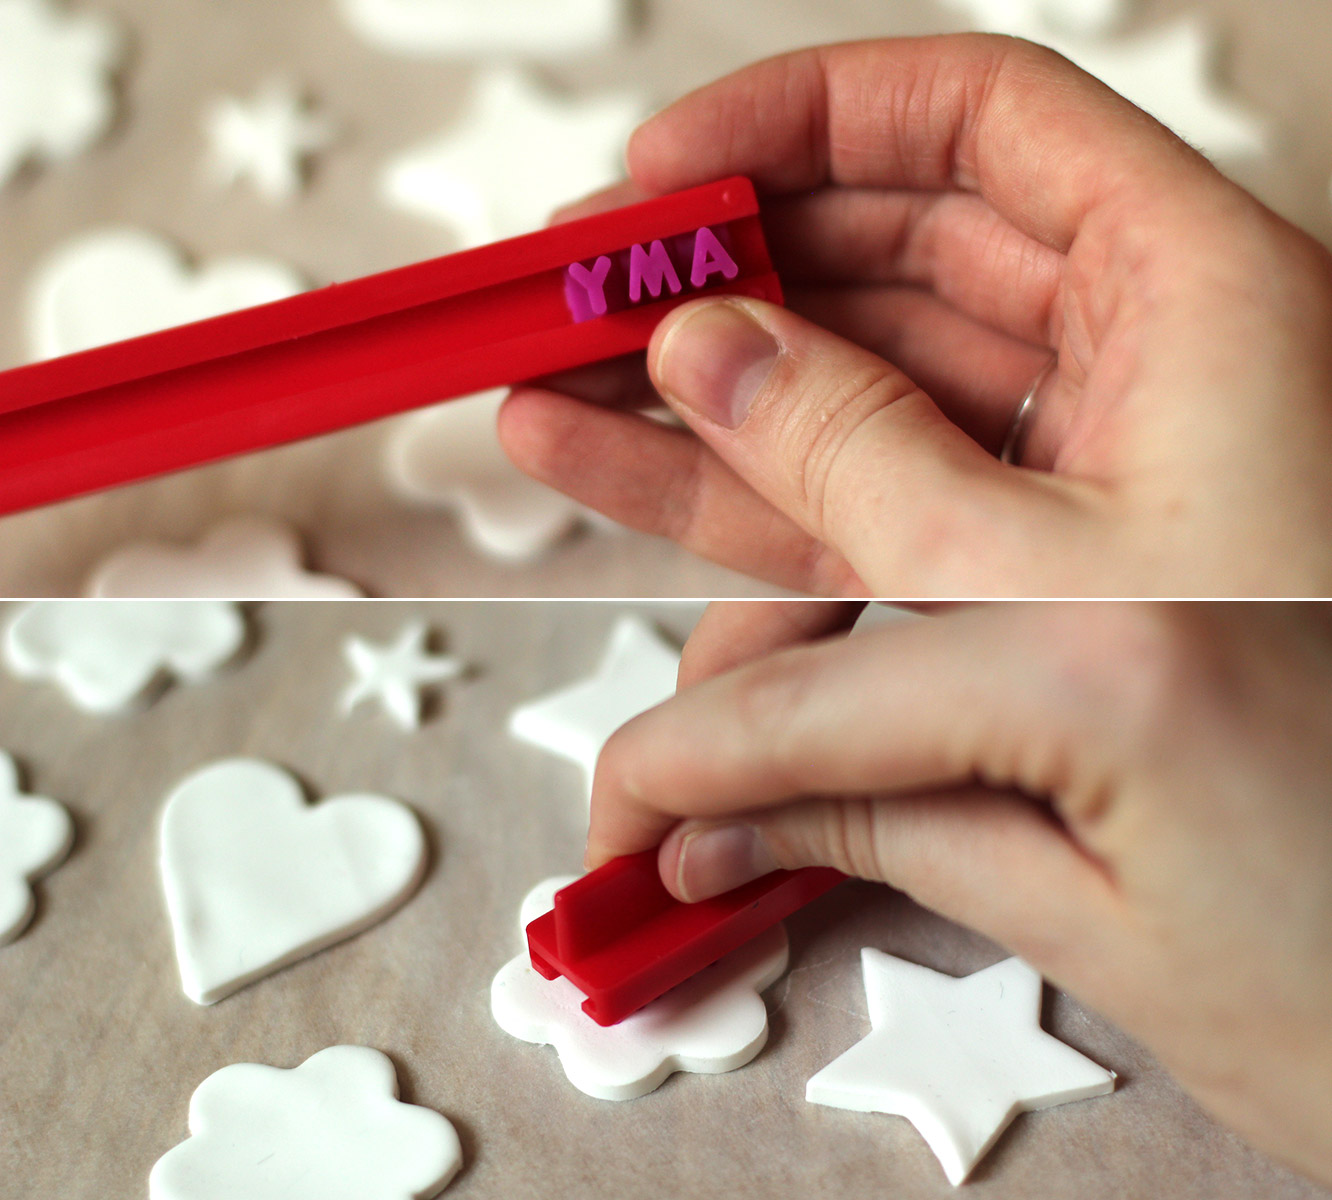
Alphabet cookie stamp, I go this from Tiger recently (or regular stamps might work)
A paperclip
Step one
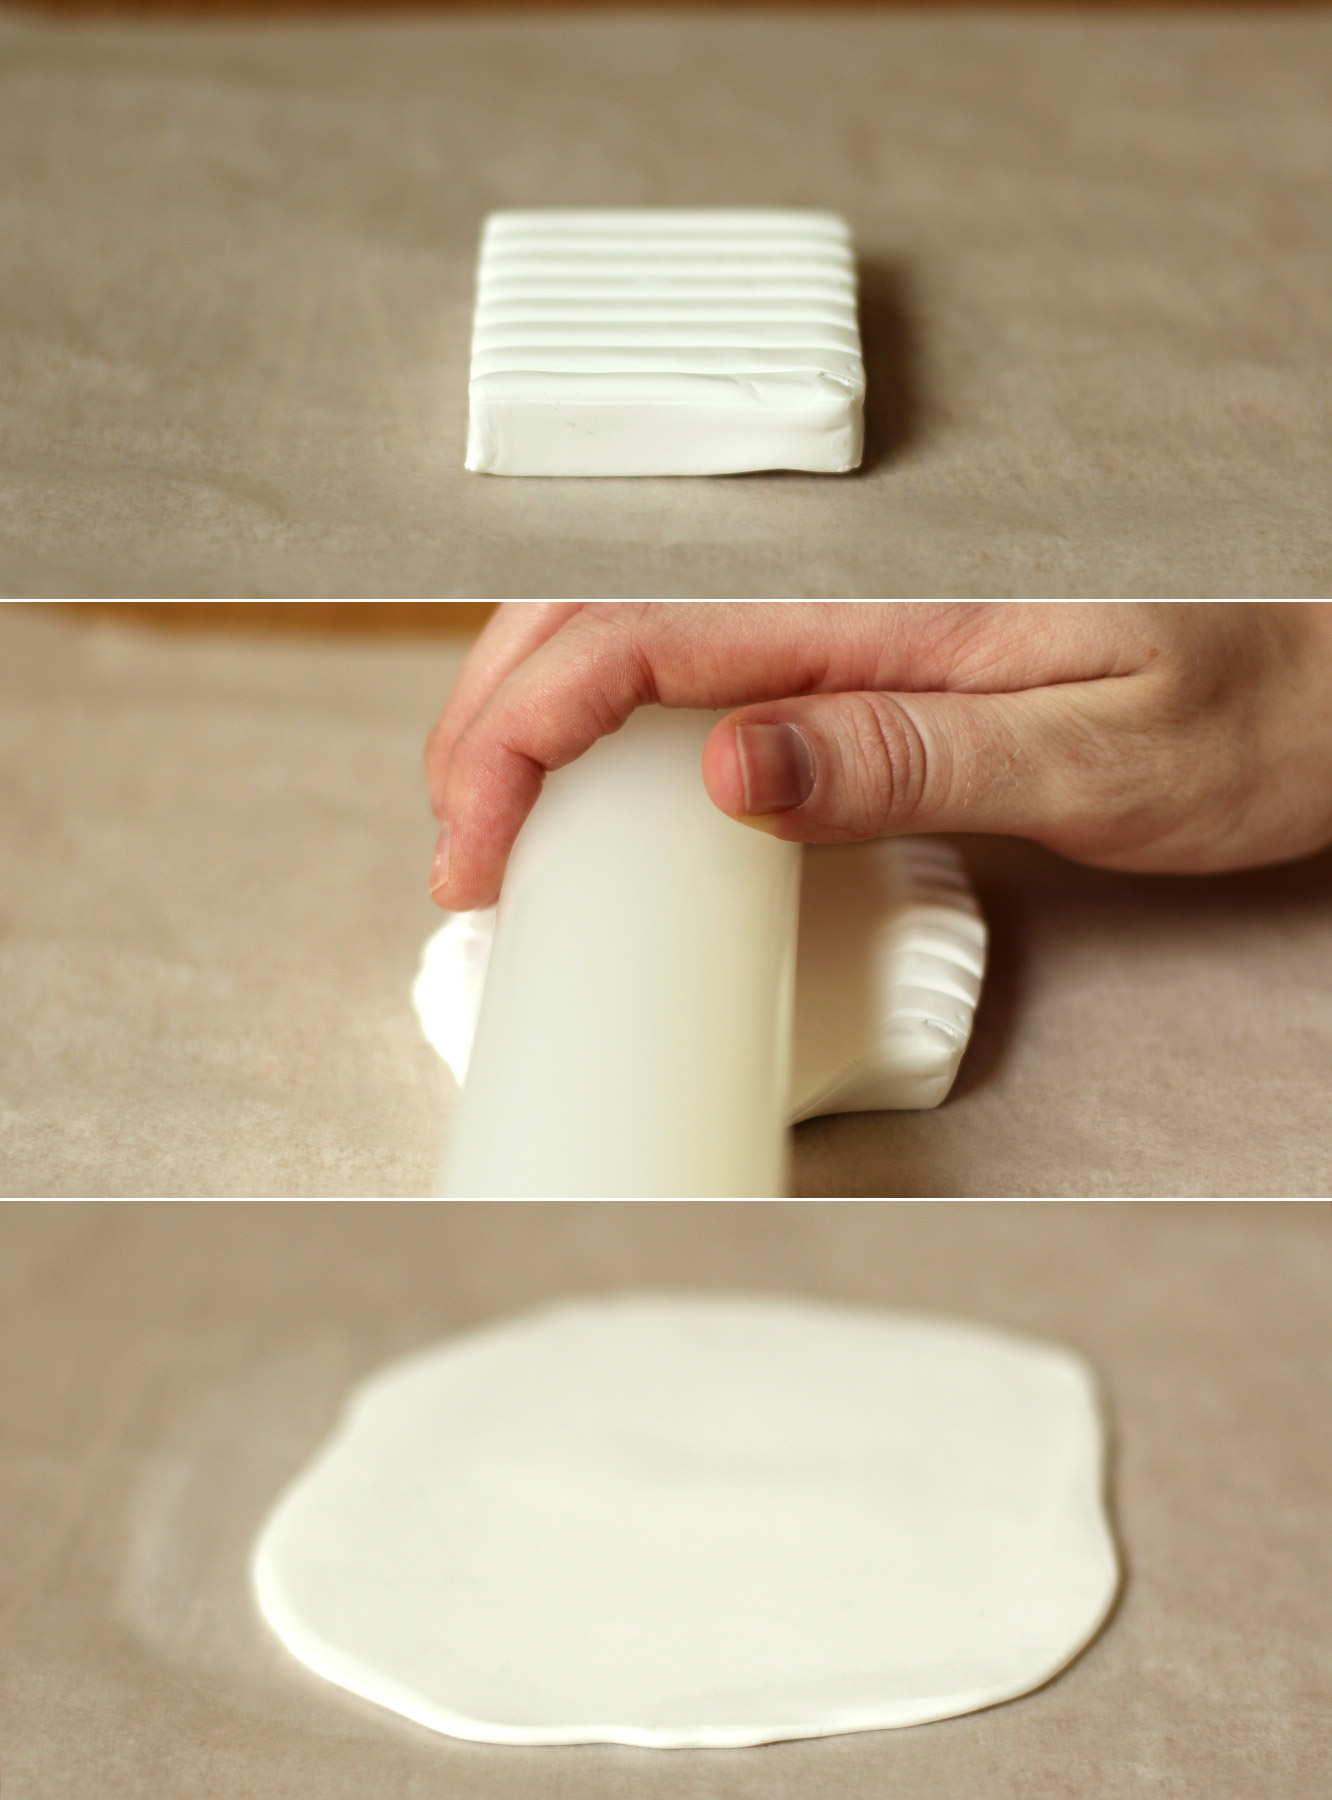
Roll the FIMO out into a thin sheet, about 2-3mm thick.
I learned a few things here. Greaseproof paper is not the easiest thing to roll this out onto, a clean surface would be better. Roll the FIMO into a ball with your hands first to warm it up a bit as it will be easier than just rolling straight onto the block. Dust will get into the FIMO so easily, it picks up EVERYTHING, so make sure you wipe your rolling pin and surface carefully.
Step two
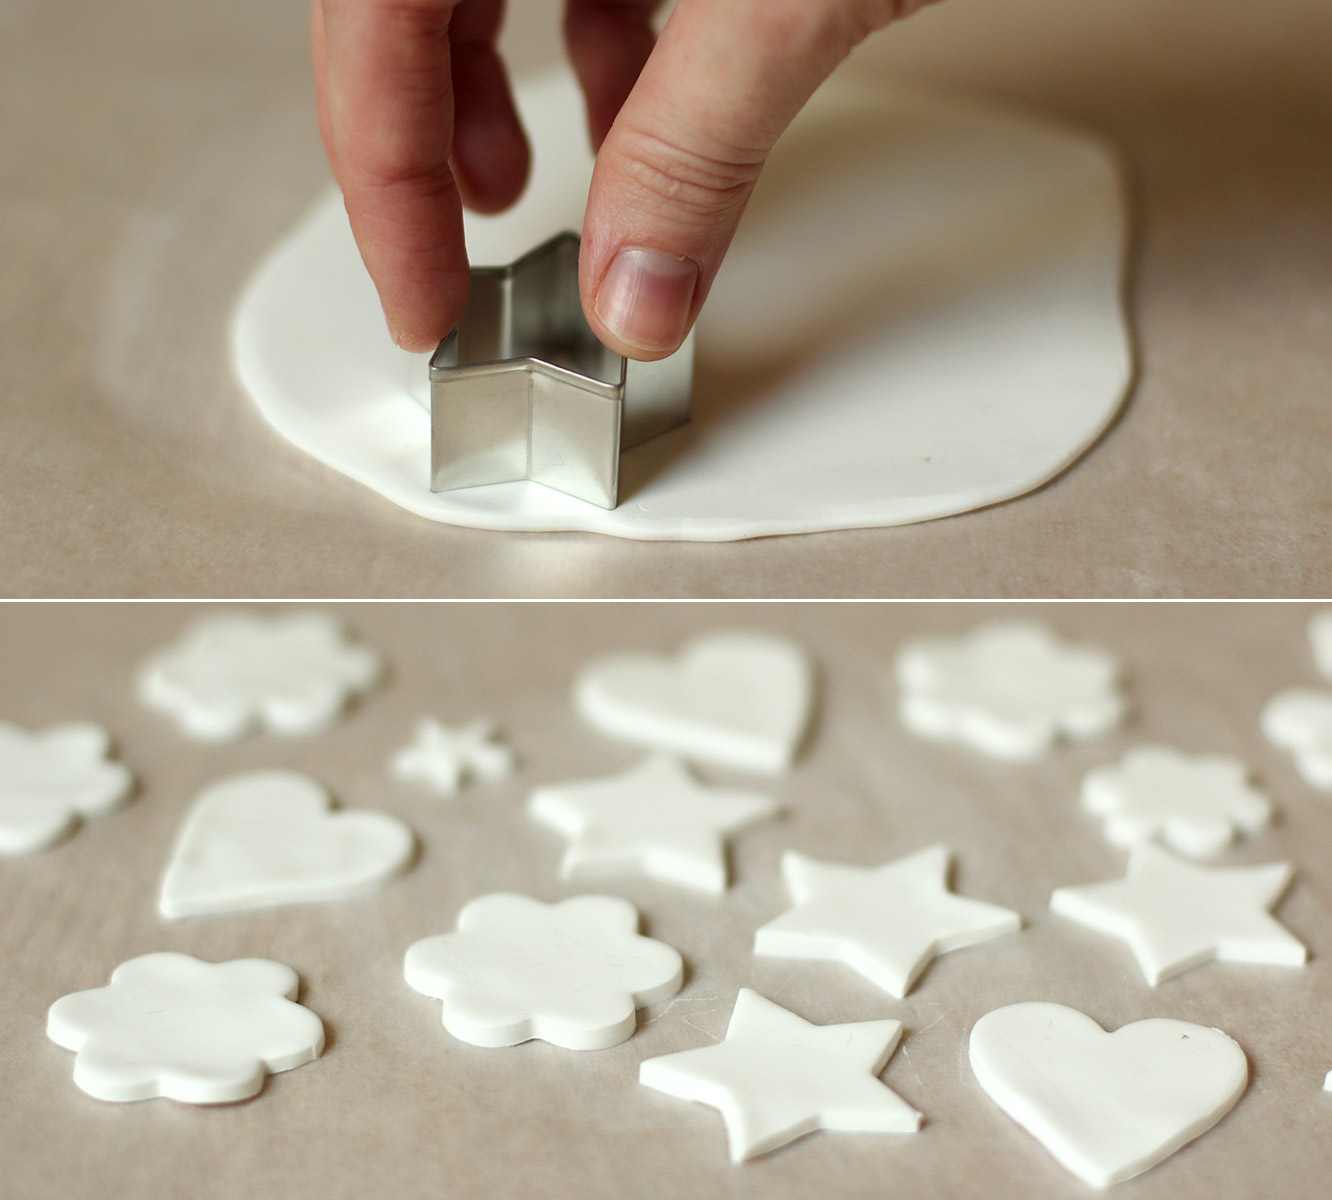
Cut out a variety of shapes. Re-roll and keep cutting until you have used all the FIMO. It’s surprising how many you get in the end out of such a small block.
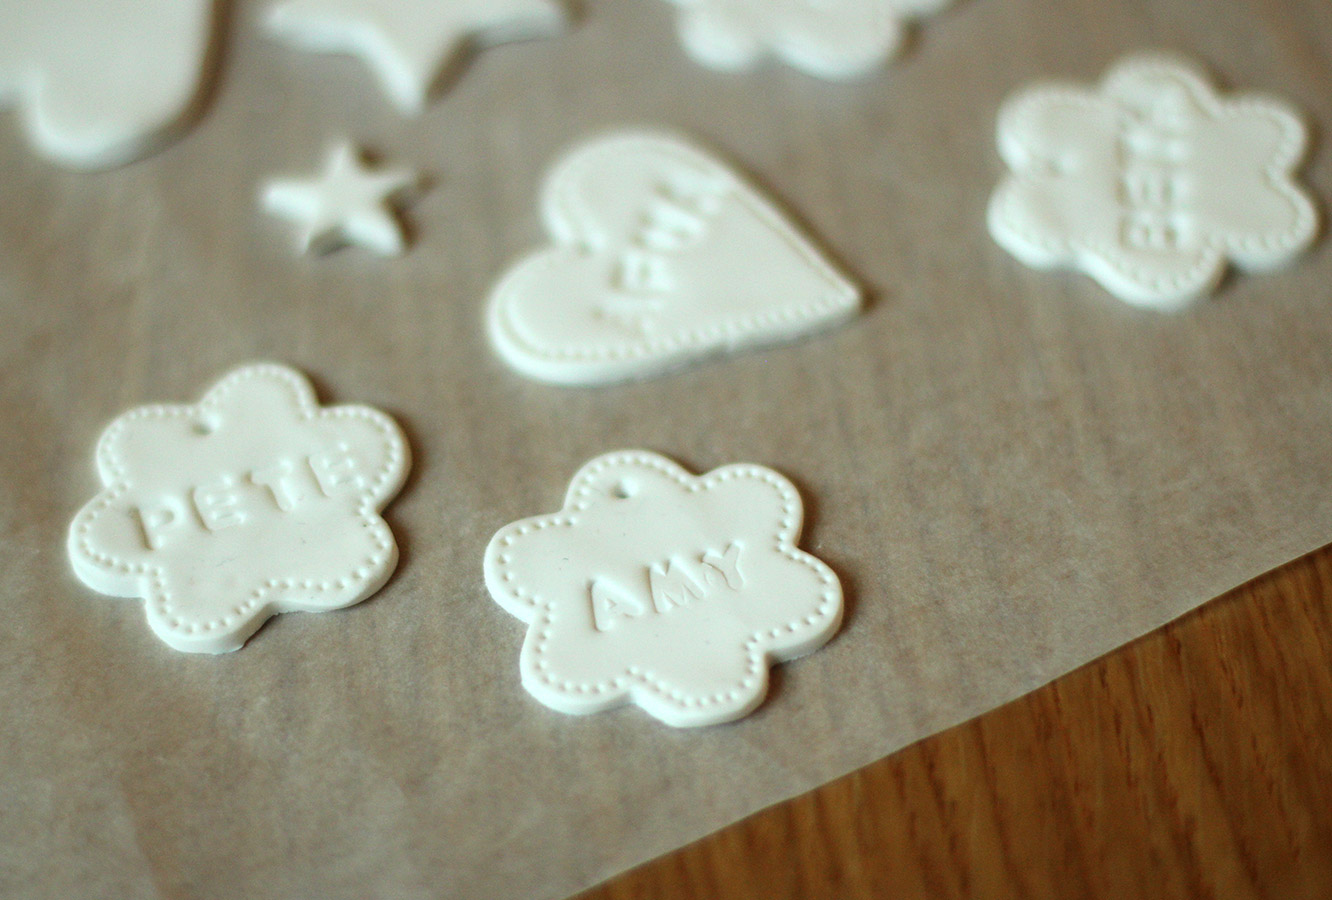
Step three
Stamp the names of your nearest and dearest into the shapes. I found that words longer than four letters were problematic. I employed some creative shortenings, although my housie Marianne was not impressed with Matz as her new nickname. It will depend on the sizes of your cutters, but you might want to do initials or words like ‘love’, ‘joy’ and ‘noel’ if there’re some long names knocking about.
Step four
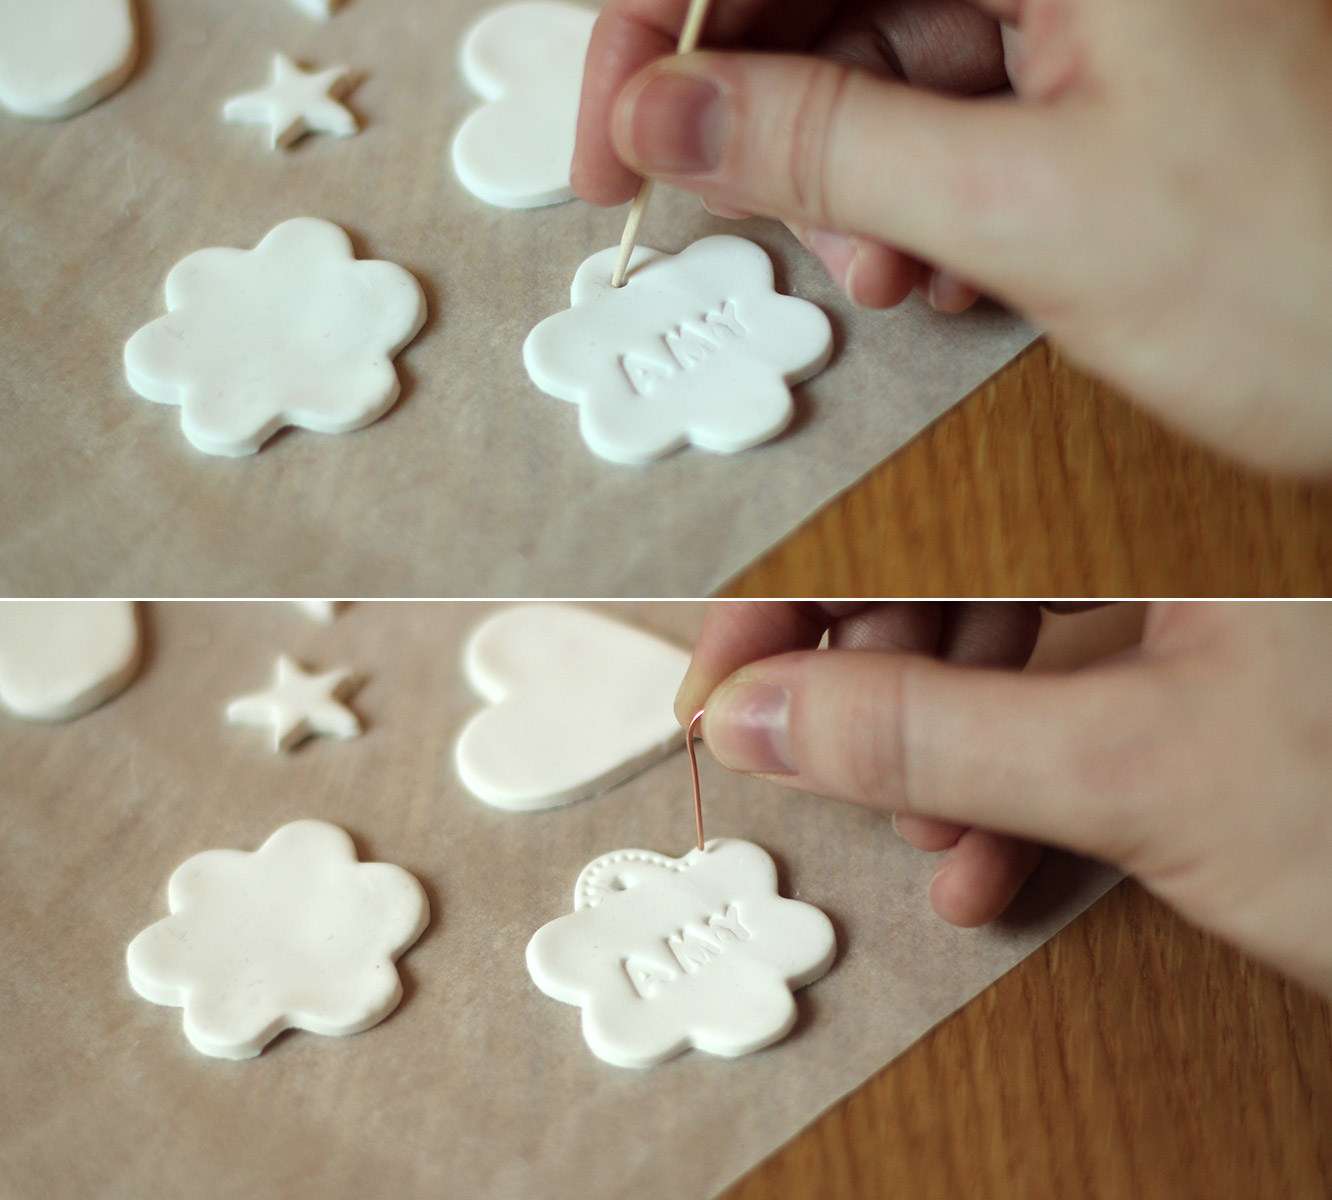
Using a cocktail stick or bent out paperclip make a hole at the top for the hanging. Wiggle the stick about in a circular motion to make sure the opening is big enough for your string or ribbon.
I then made dots all around as an edging with a paperclip.
Step five
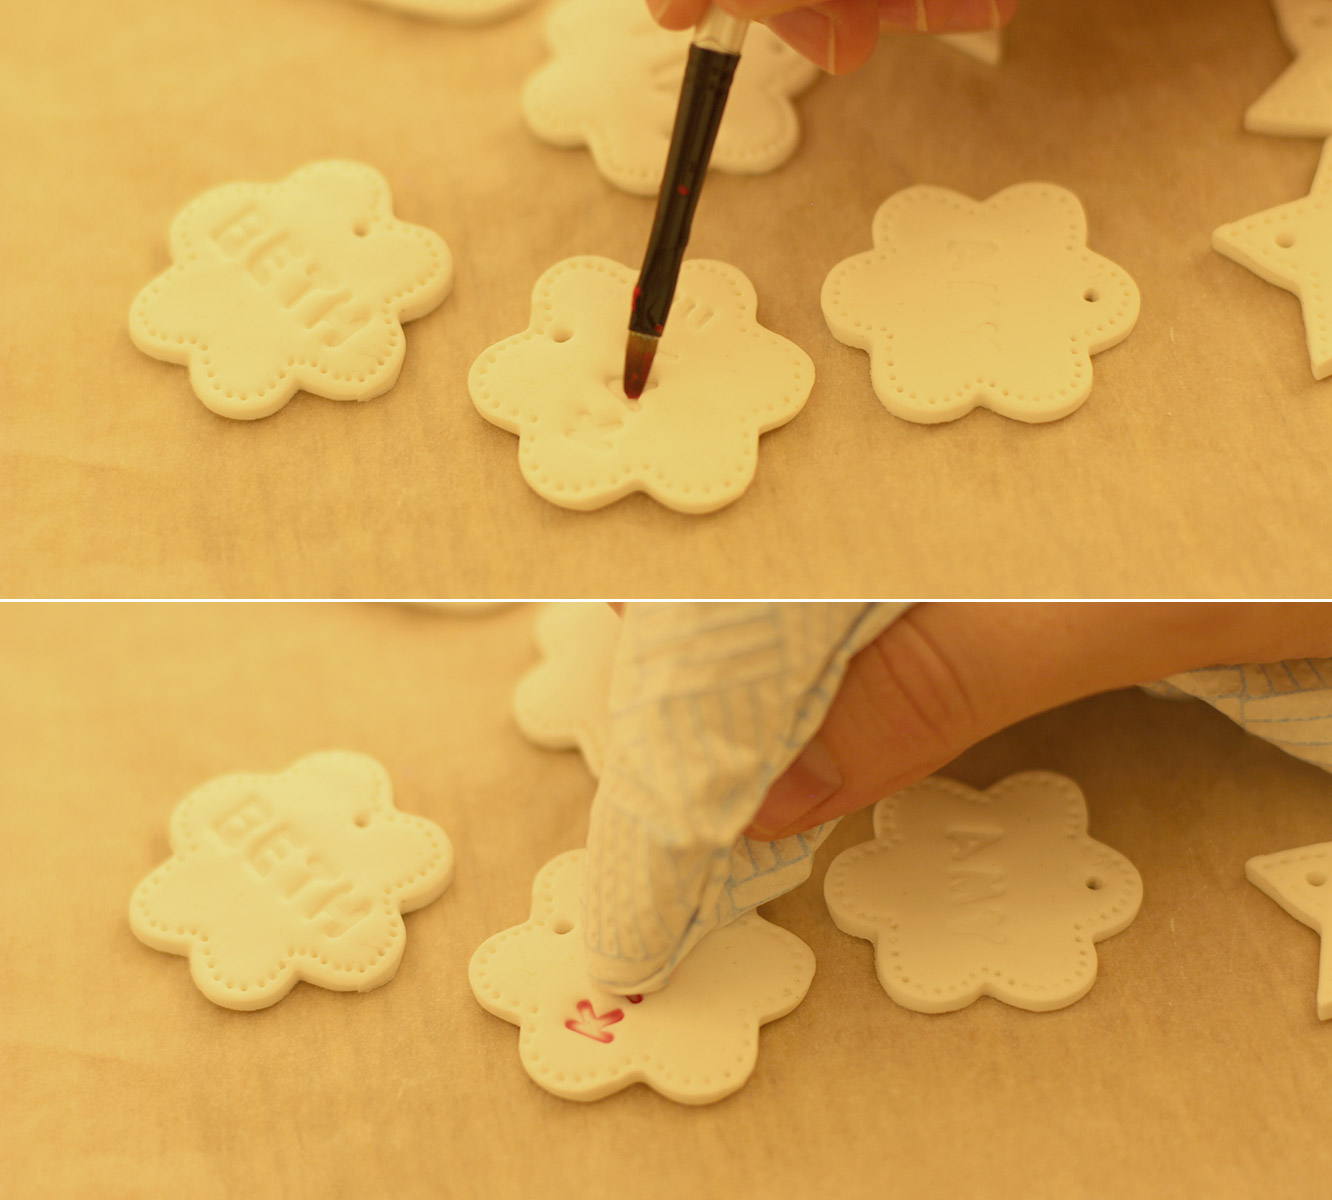
Place on greaseproof paper and onto a tray. Bake in the oven on 100C/200F/gas mark 1 for about 30 minutes. I guessed because the packet provides zero instructions, other than to not heat it above 130C. You can tell by picking them up as they start to feel less soft and a bit lighter as they cook.
Step six
Using very watery acrylic paint, brush over the letters and the edging. Quickly dab away the excess with some clingfilm to create a rustic look.
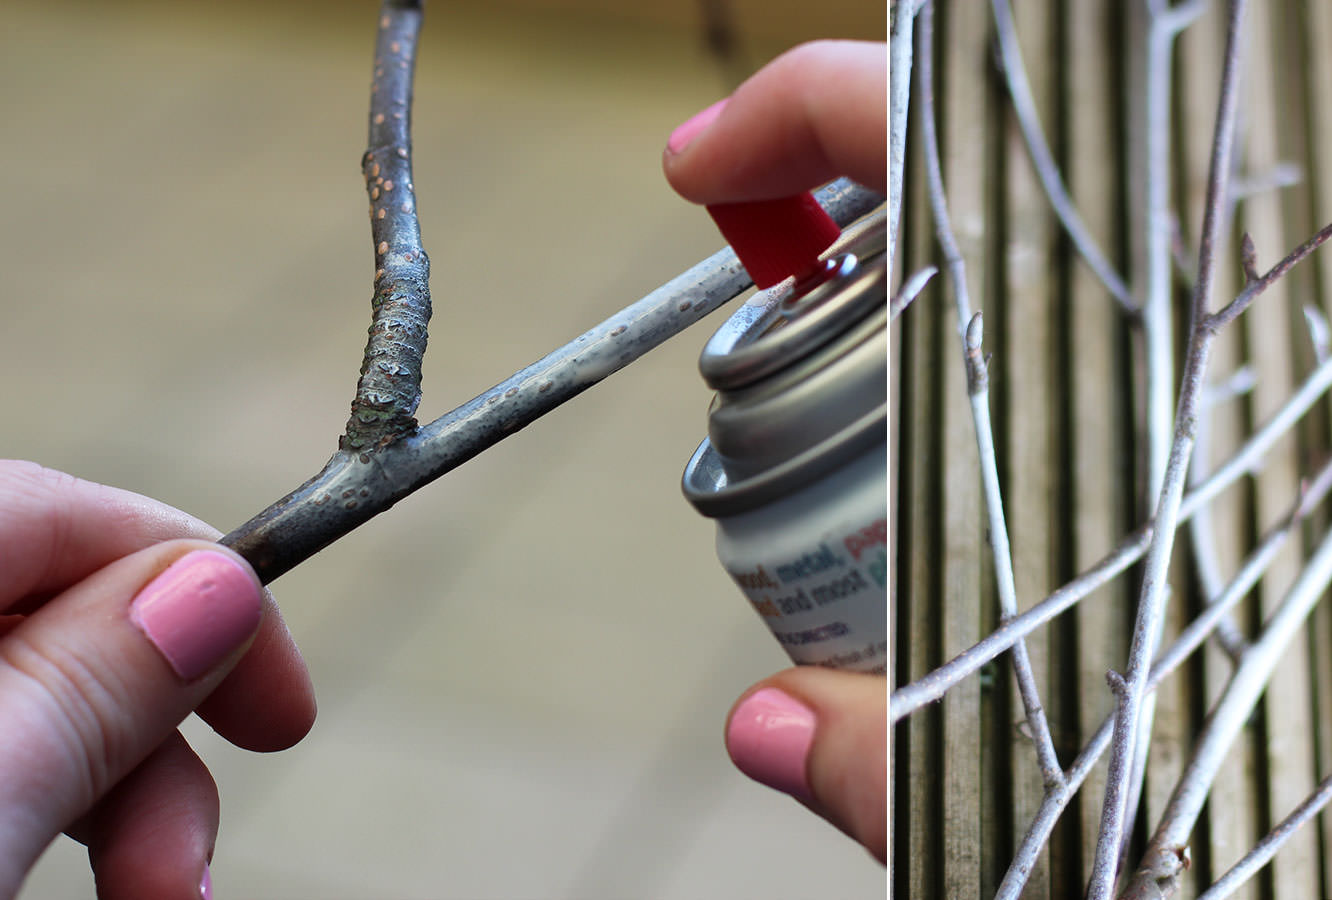
Use one: Tie up with a couple of trimmings from the garden, maybe a button/pom pom/little bell like mine. Tie with the string around a gift wrapped in brown paper.
Use two: String up and hang from a jug of twigs or your Chrimbo tree.
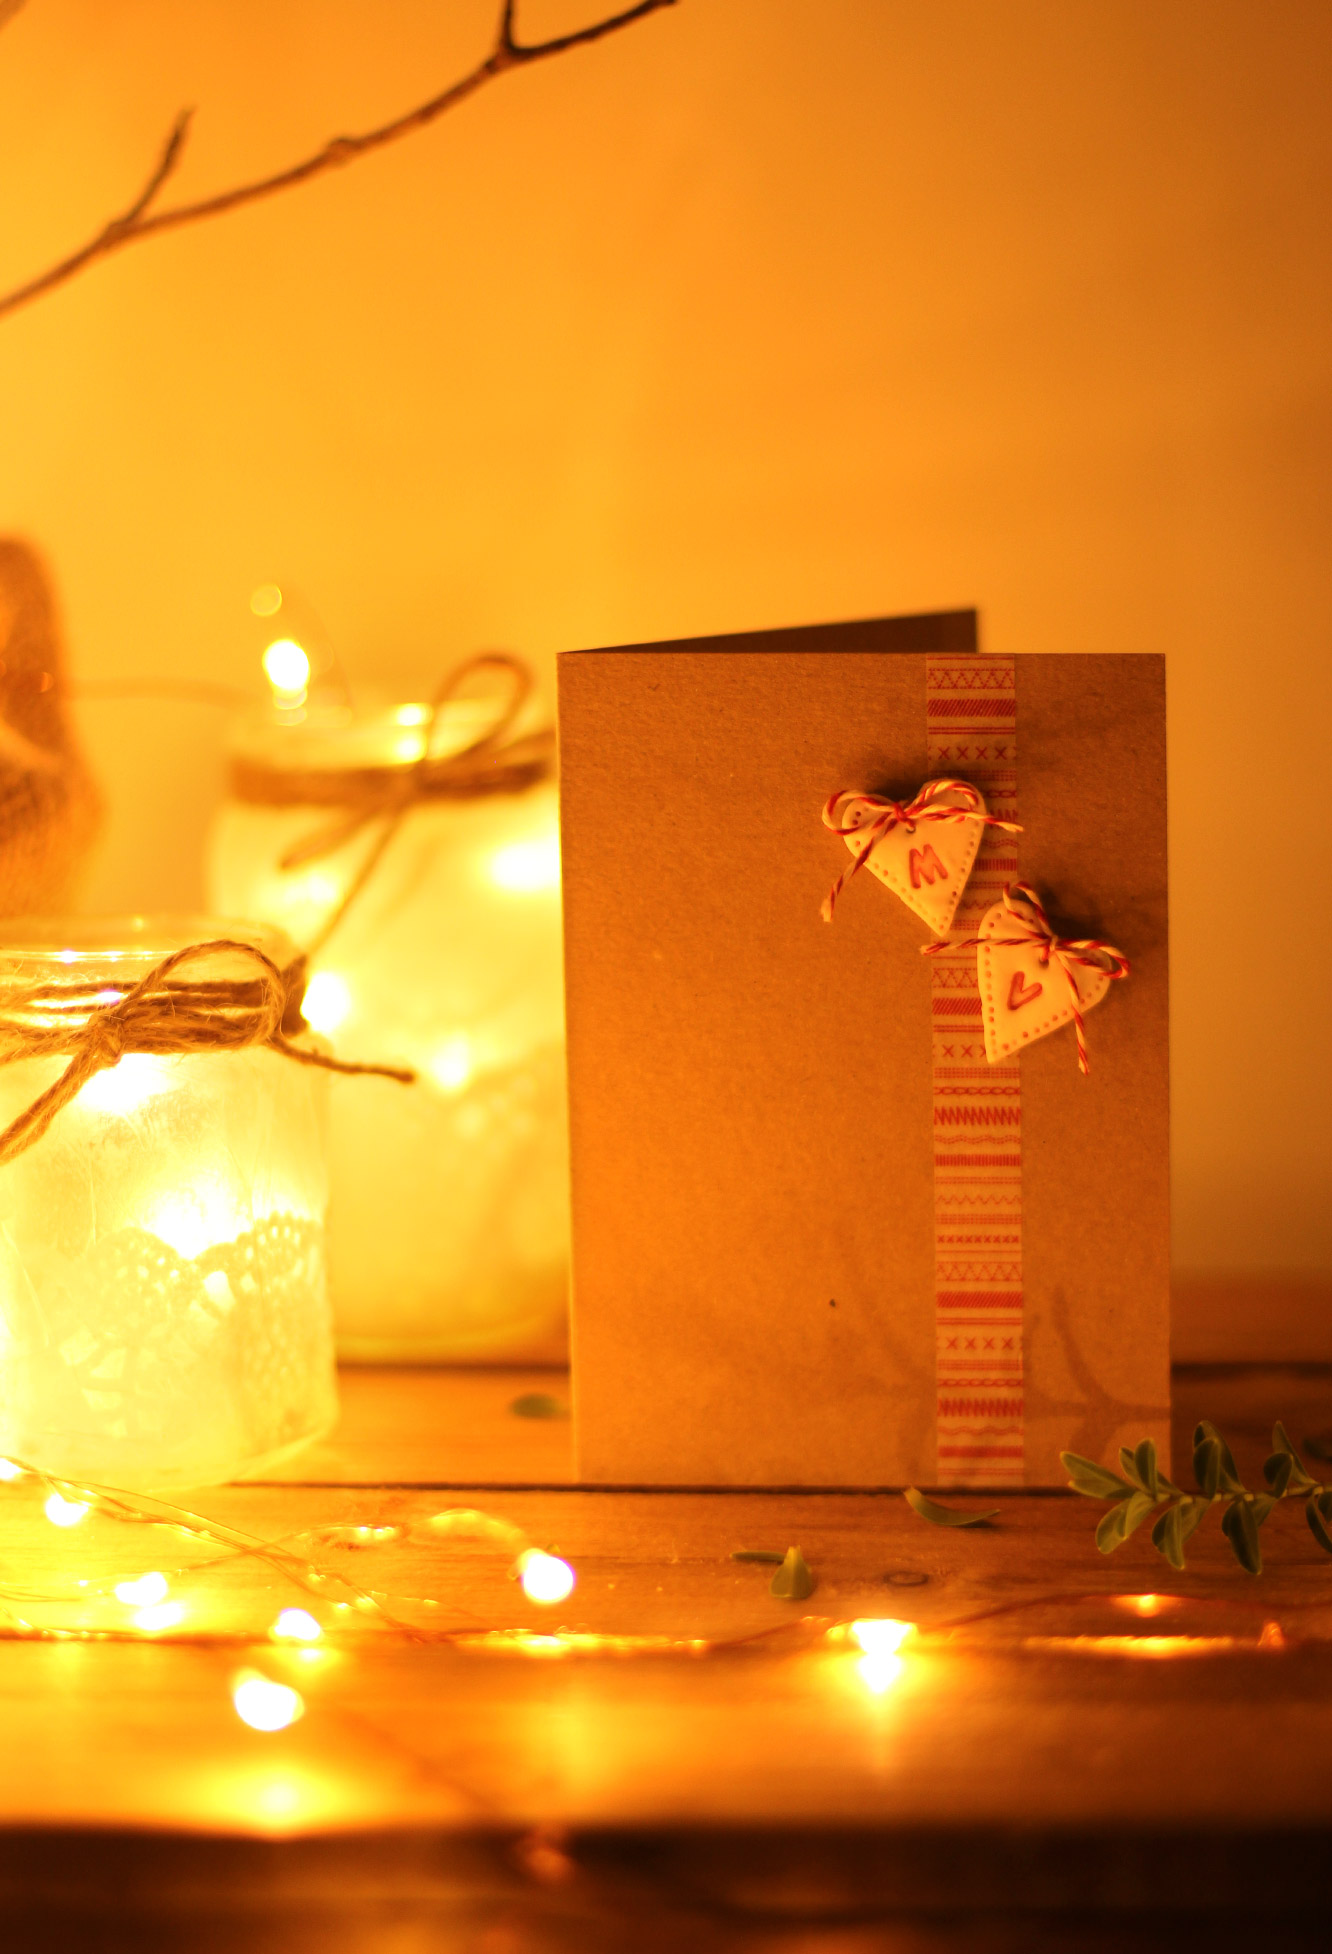
Use three: Make mini ones with initials and create a simple Christmas card with a piece of wash tape and brown card.
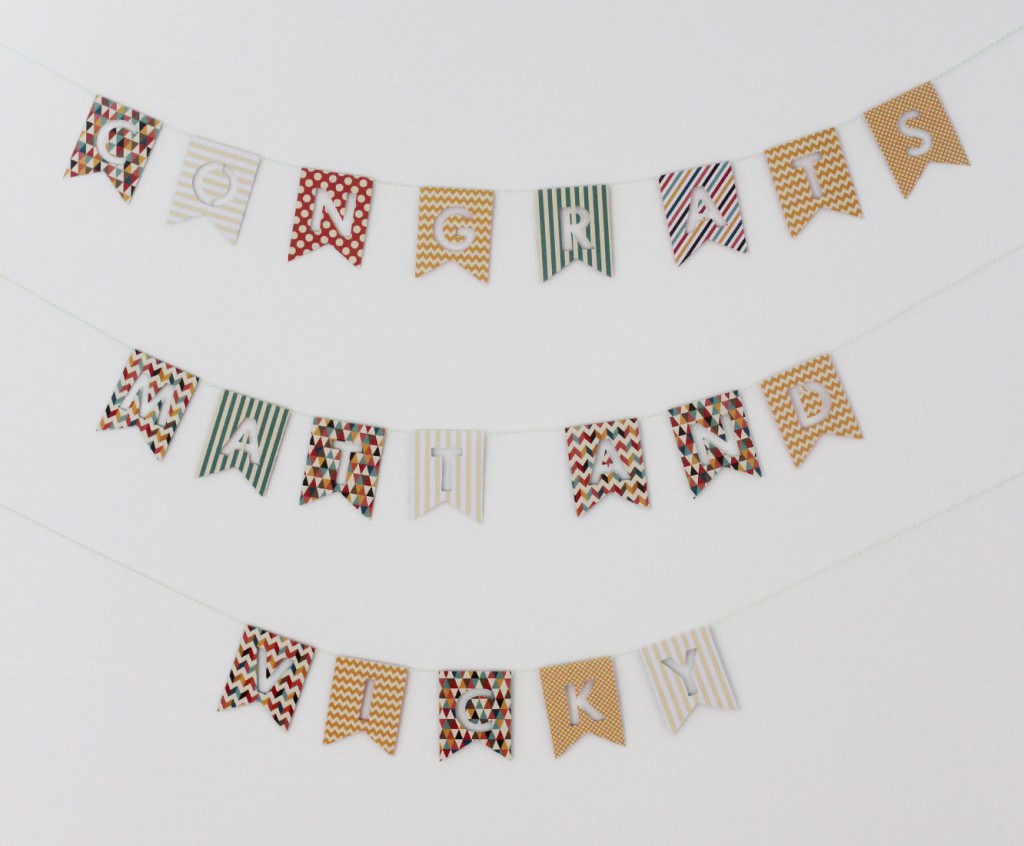
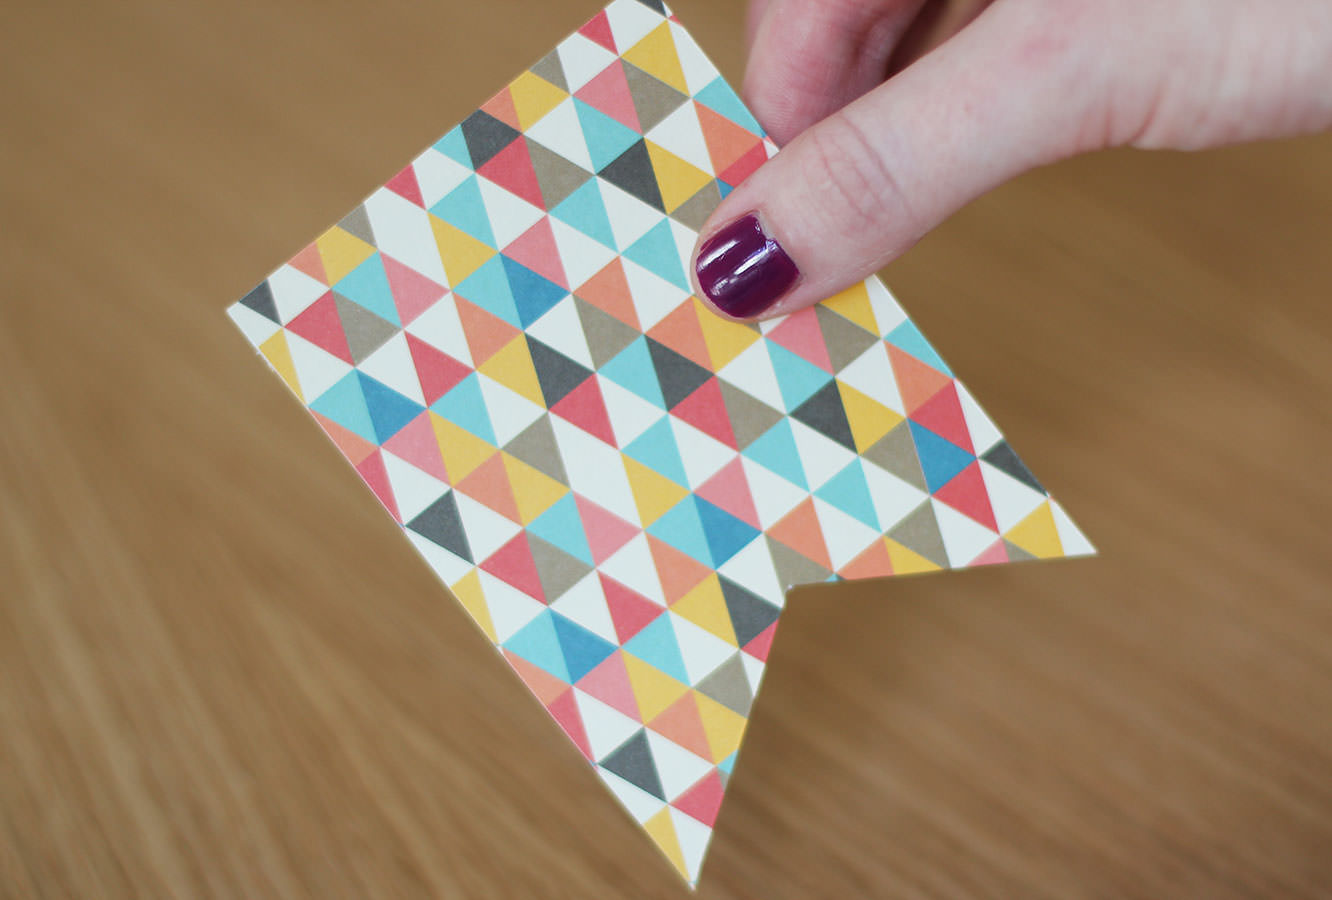
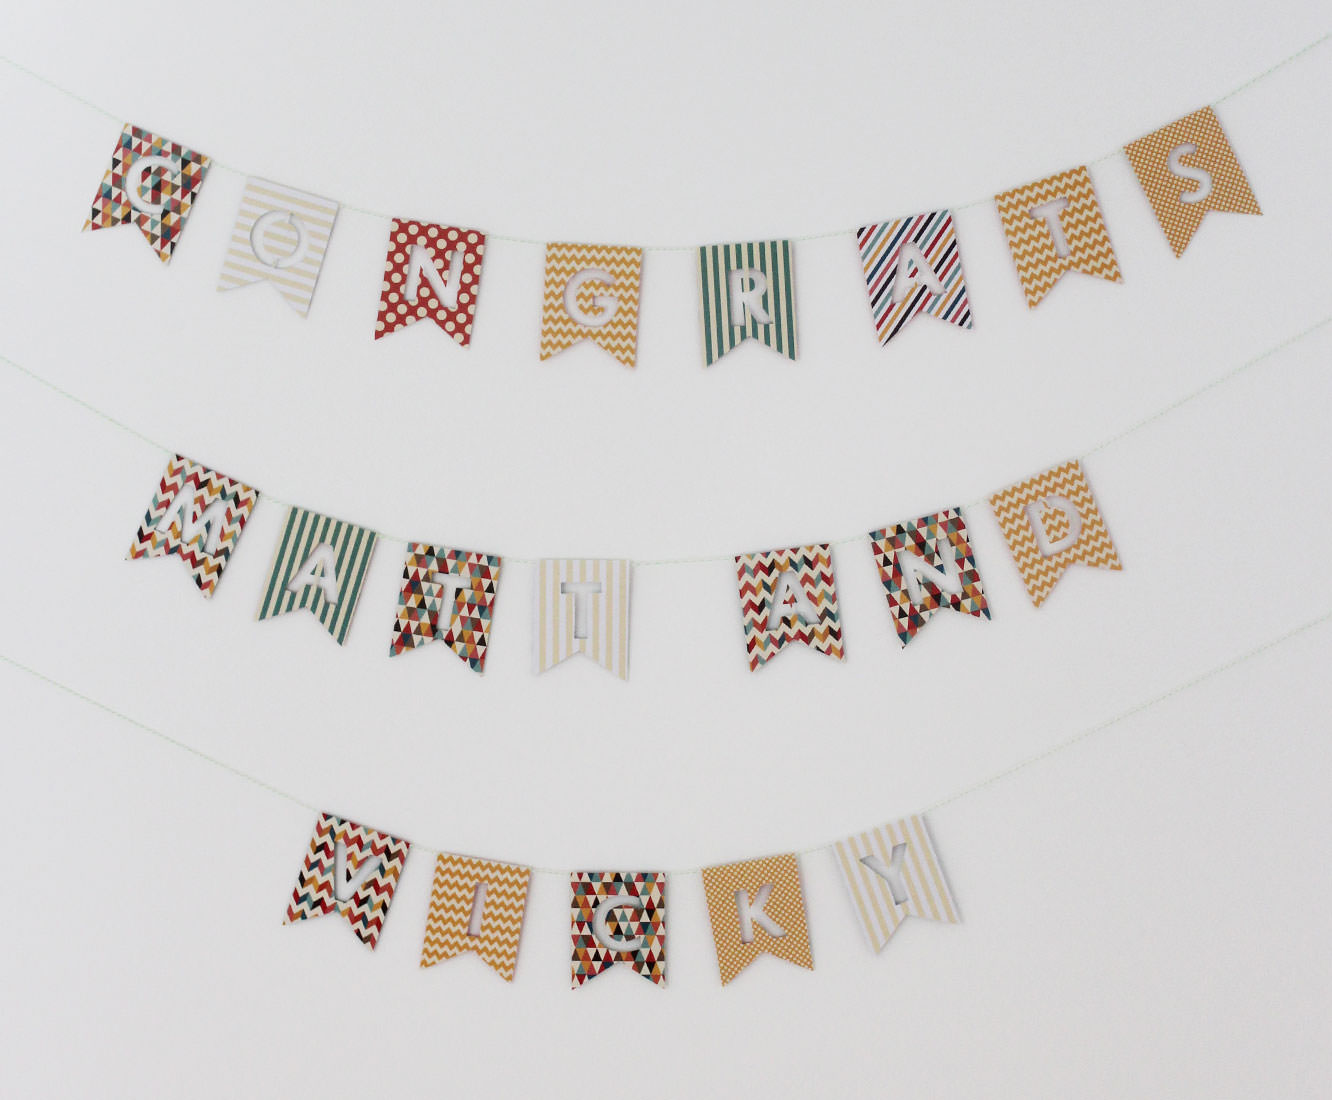
I’m finally going to wrap up my little series of posts from Matt and Vicky’s engagement party this week. I know, you didn’t think there could possibly be more right? Well, no party is complete without a banner.
Just in case their guests forgot, I made a little congratulations banner. A congrats banner, let’s be honest, congratulations is a long word.
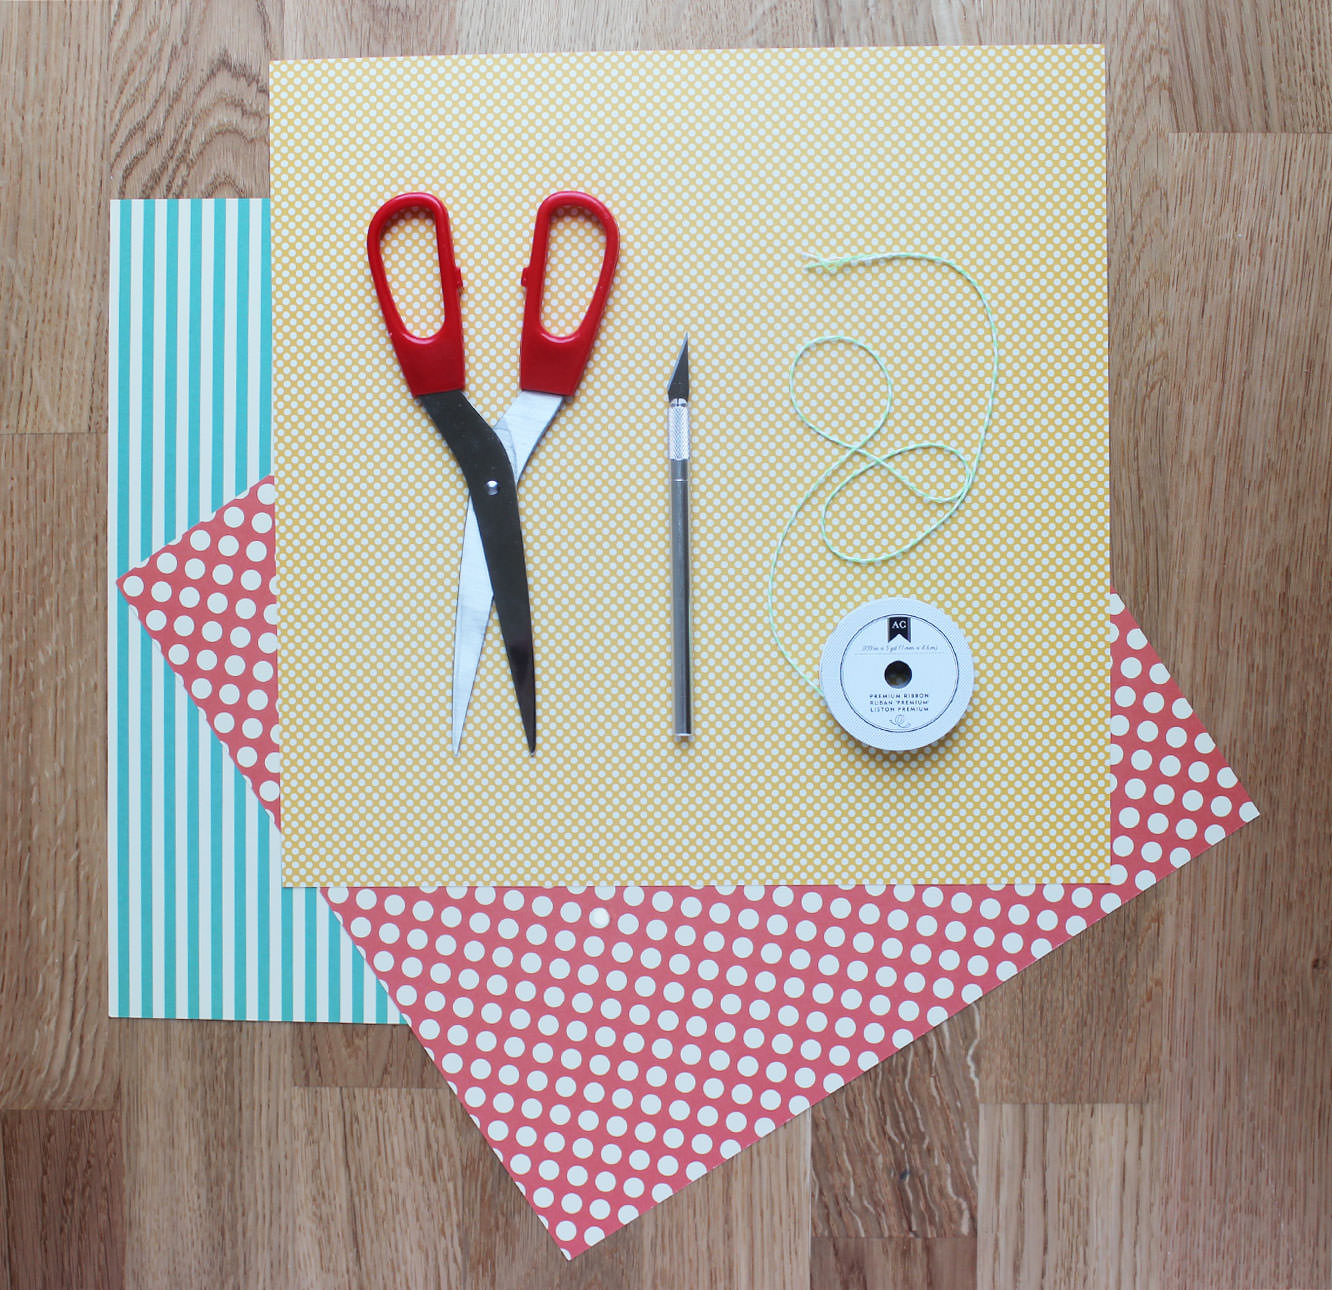
You will need
Some pretty paper or card
A craft knife and a cutting mat (or chopping board)
Double-sided tape
String
Step one
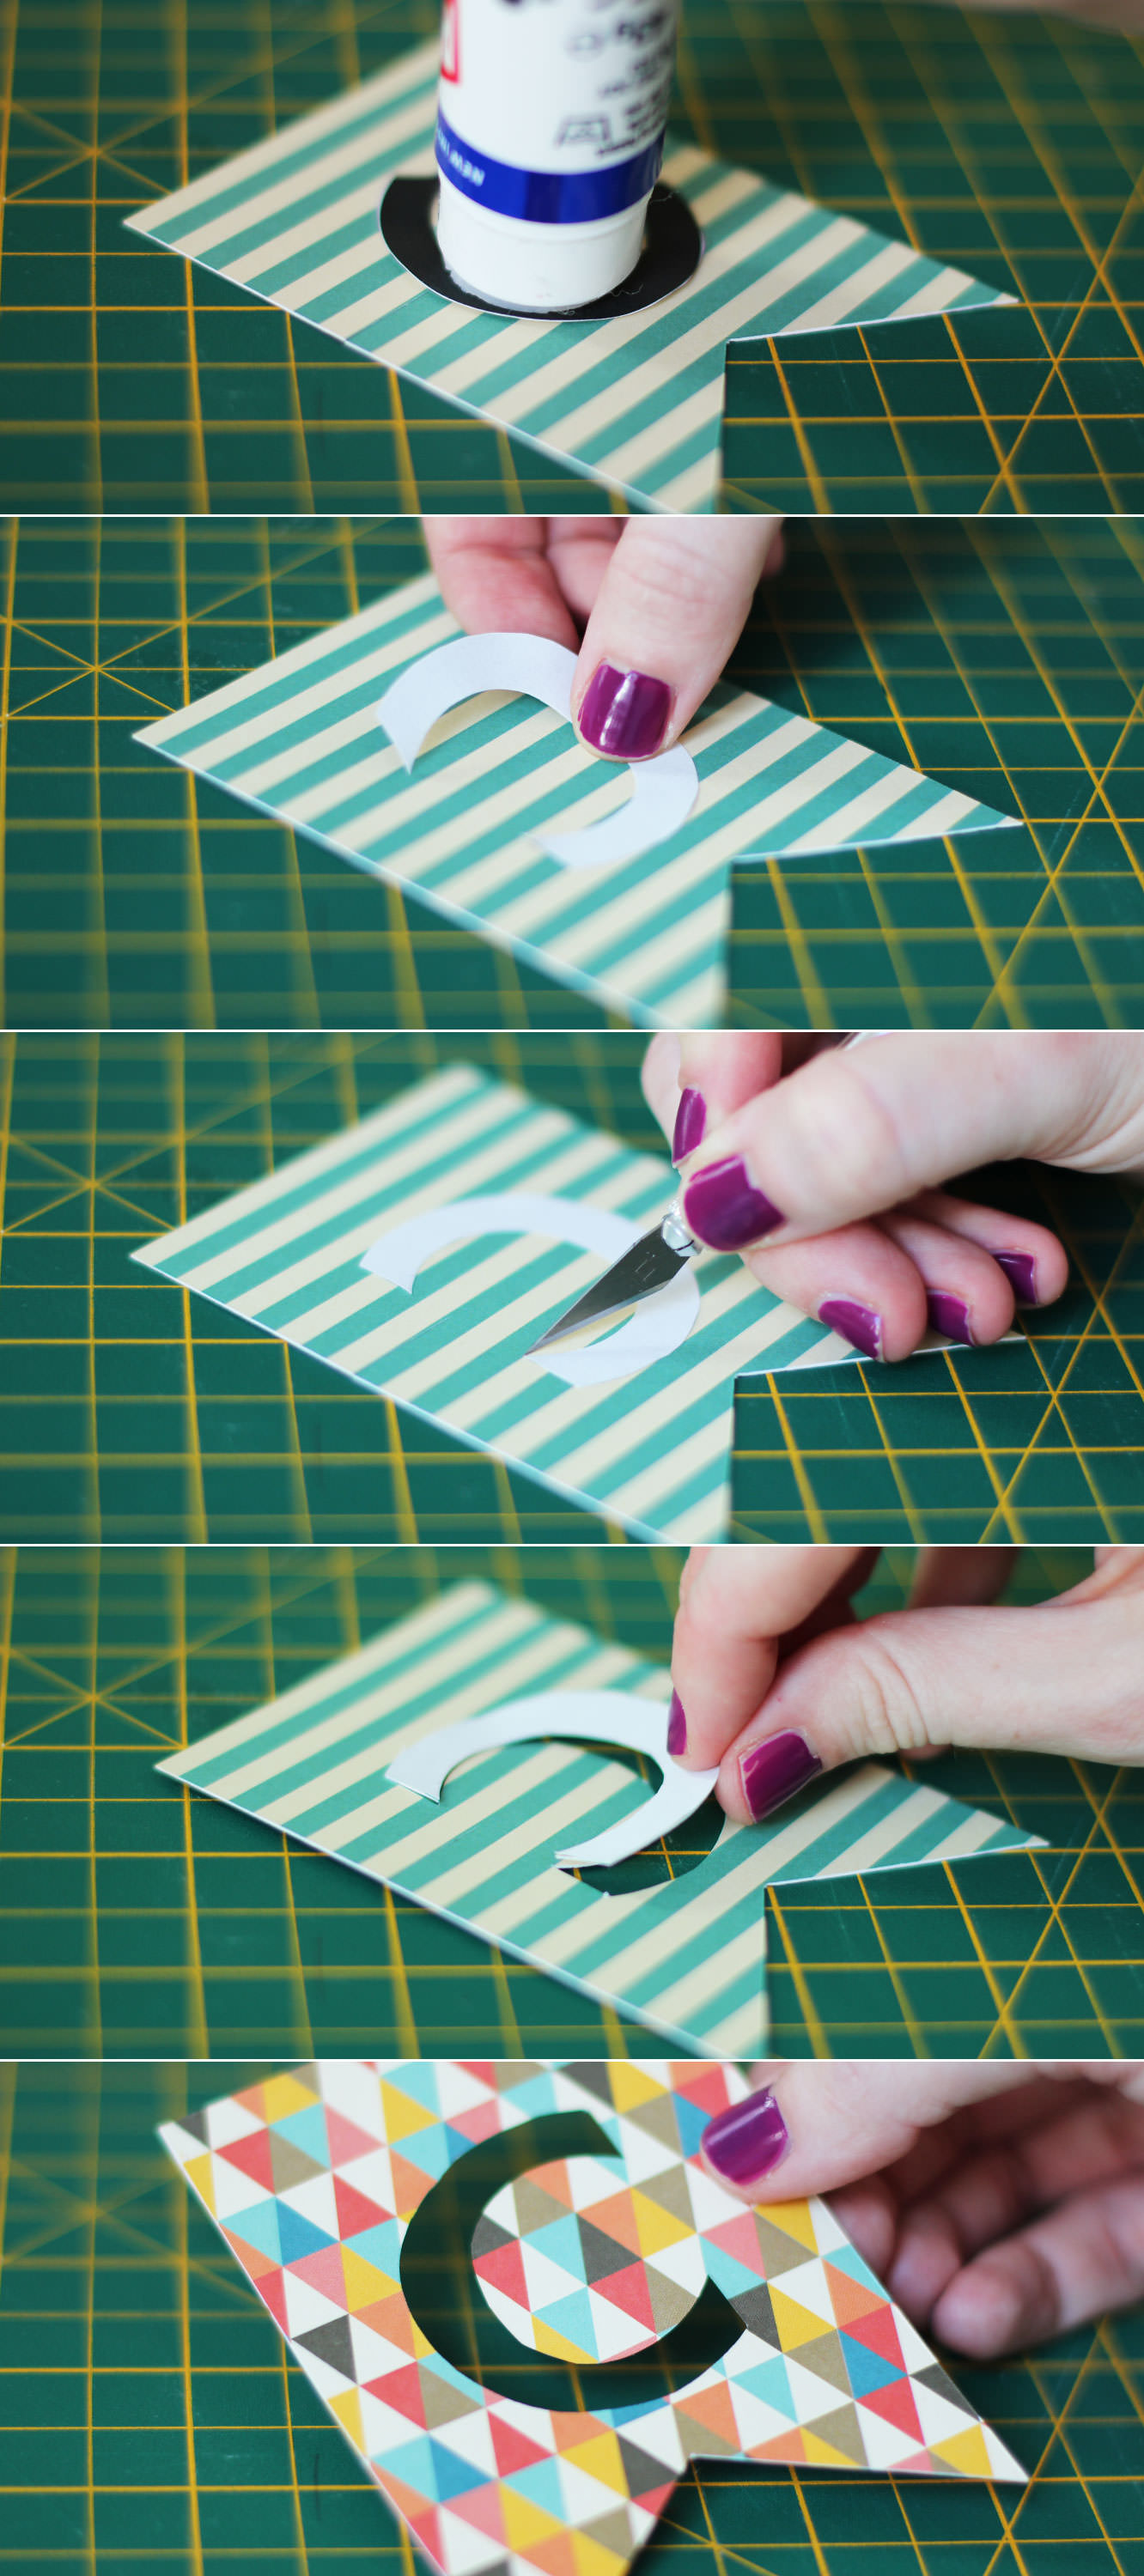
Using a chunky font, type out the message for your banner. I think this was Futura in case you want to copy exactly (but then you would also need to find a Matt and a Vicky to congratulate).
Step two
Cut out little flag shapes big enough to house your letters, remember to leave at least half a centimetre at the top to fold over.
These are super simple to get even, just draw a rectangle with a line down the centre and then draw two diagonals from the corner to the same point on the central line. Use the first one as a template.
Step three
Glue the front of the letters and stick them face down on the back of each flag.
Use a craft knife to cut around the edge of the letter. The child in me was bizarrely satisfied by punching these out.
When cutting out letters like A and O which have a counter in them remember to keep a small stem so you don’t totally hollow them out.
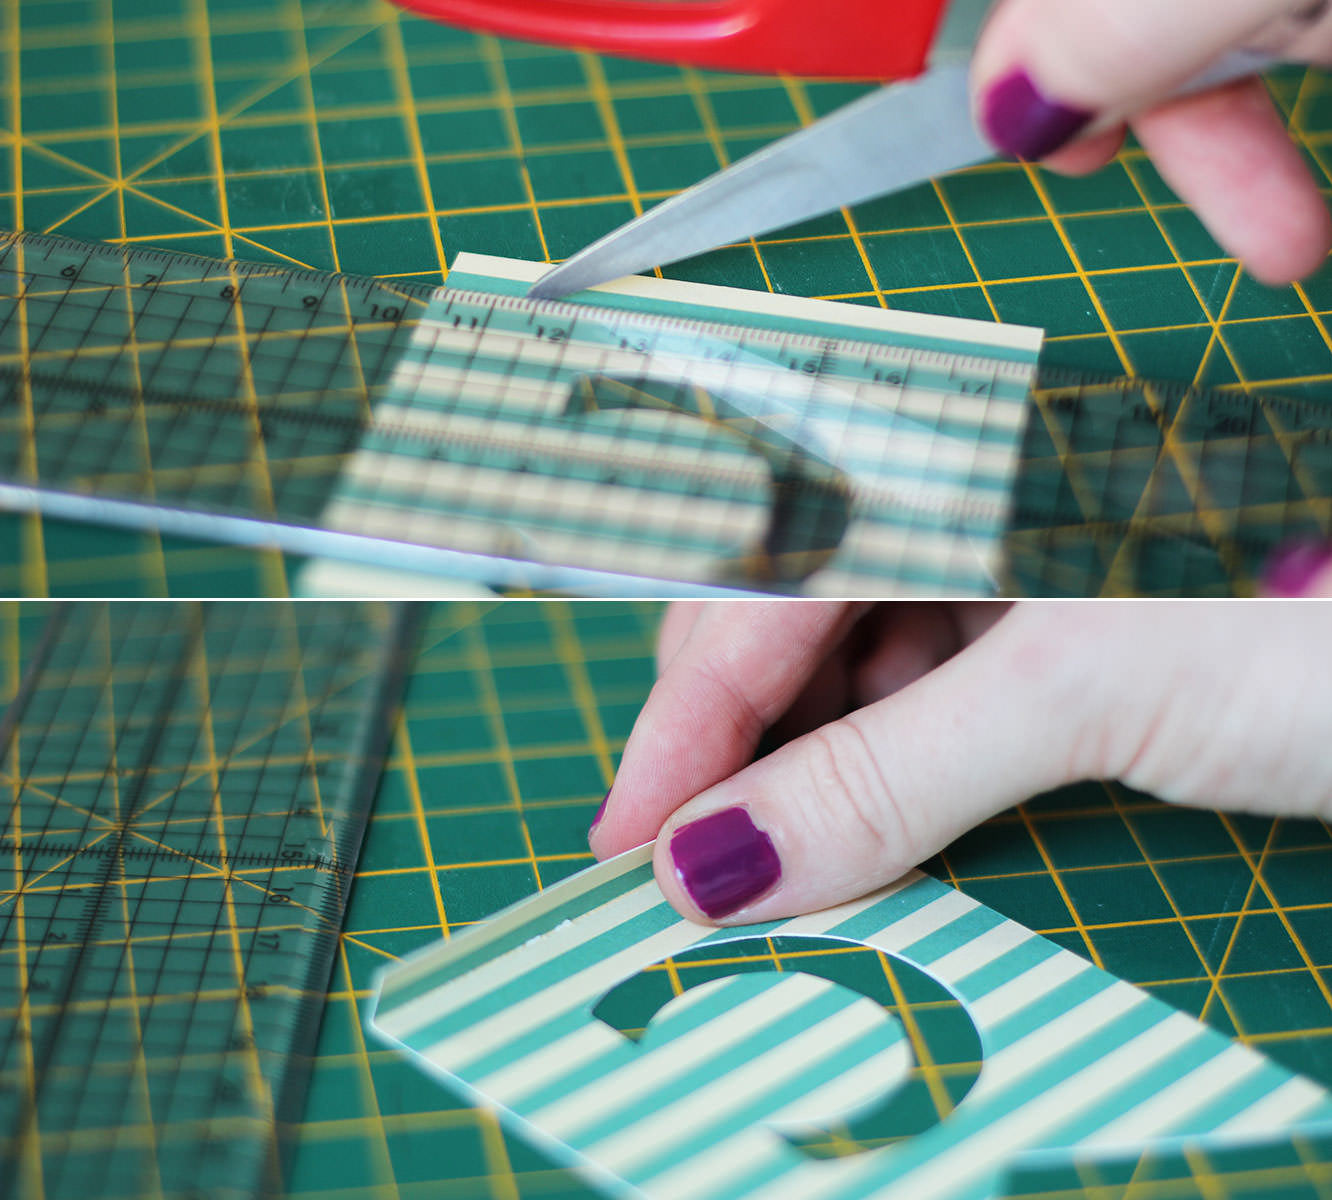
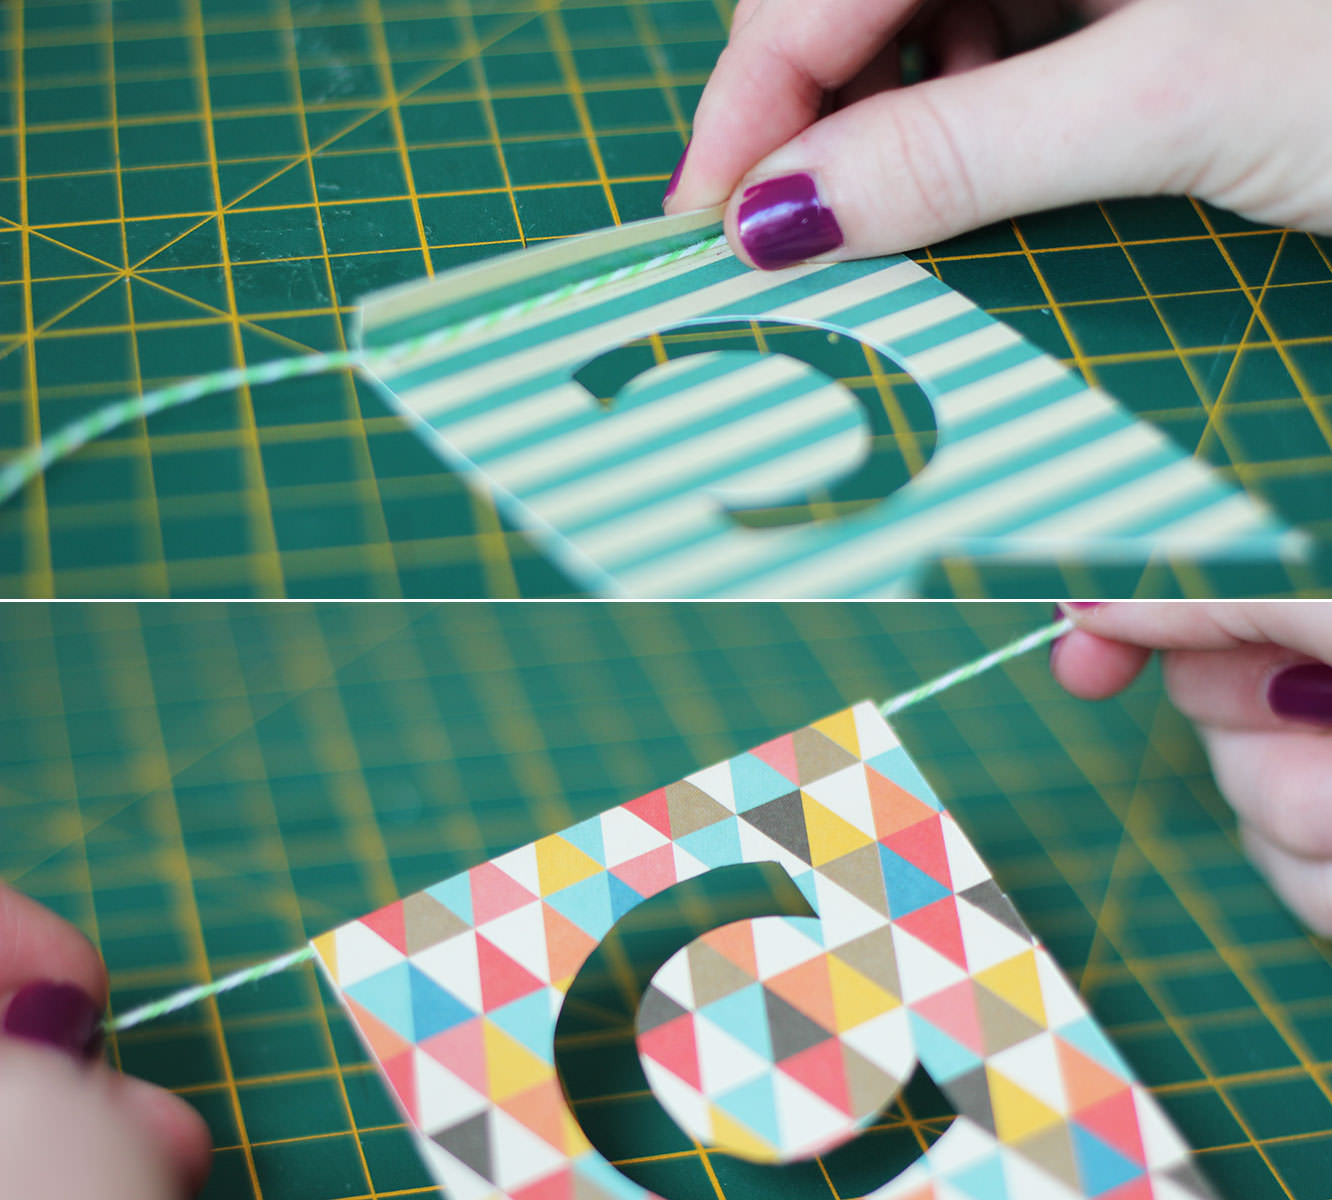
Step four
Using open scissors score the top of the flag (on the back) to create a fold.
Step five
Stick double sided tape inside the fold, making sure it’s right to the top edge. Place the string in the fold and stick down.
Some years (every year) I have grand plans for home made gifts and decorations at Christmas. Rarely does this materialise in the lovely relaxed and whimsical way it looks in my head. Generally I end up covered in the contents of my baking cupboard feeling totally harassed by the number of hampers I’ve decided to make.
If you’re anything like me, or if you’re completely handmade/craft-phobic in the first place, this one is for you. Three super quick festive crafts to brighten up the house and fill up stockings at the last minute. You don’t need an ounce of artistic/baking ability for any of these. So no excuses.
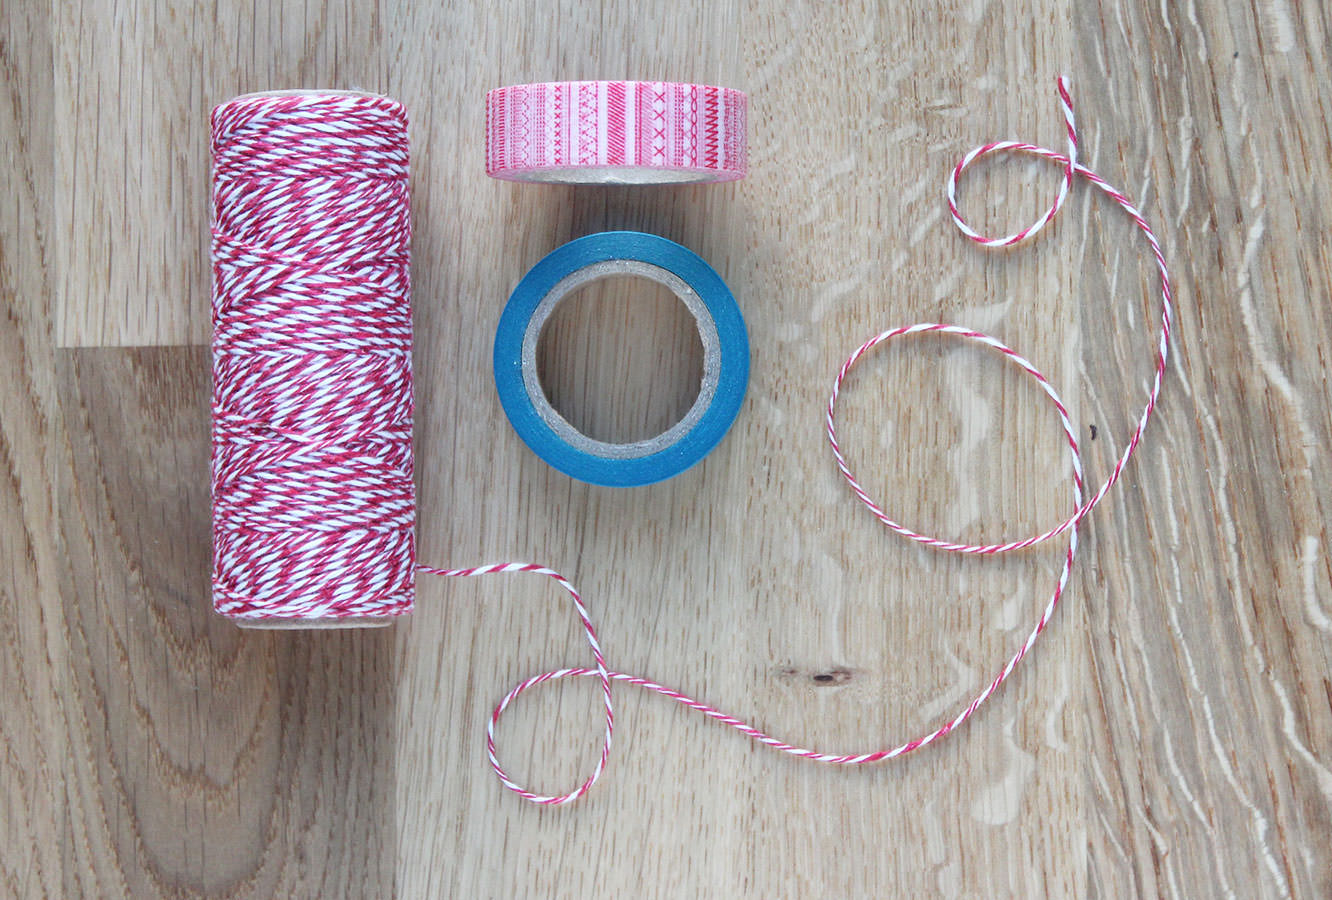
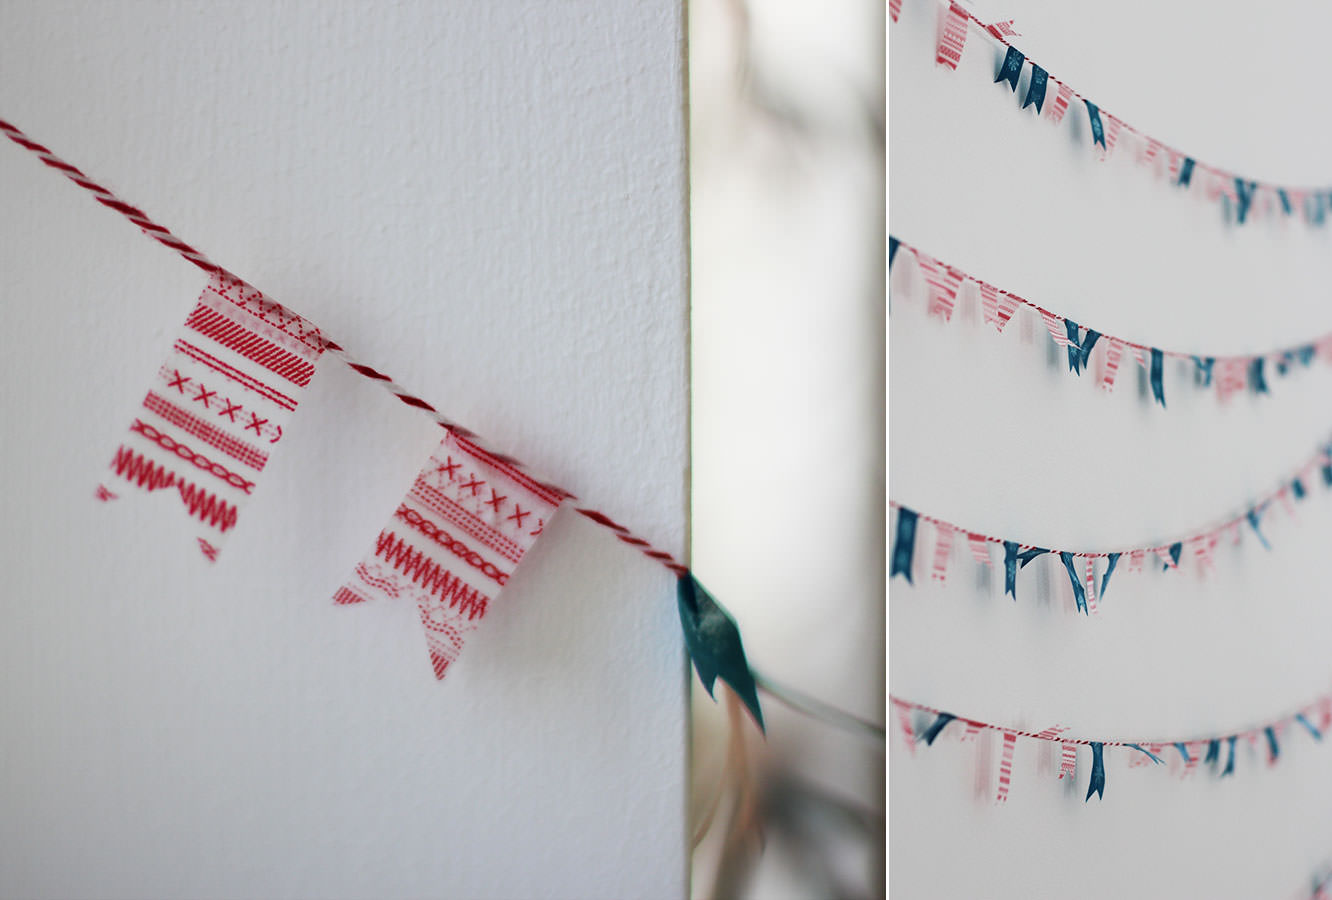
#1: Cute Christmas bunting
You will need
String (I got this two colour spool from Tiger for £1)
Christmassy washi-tape
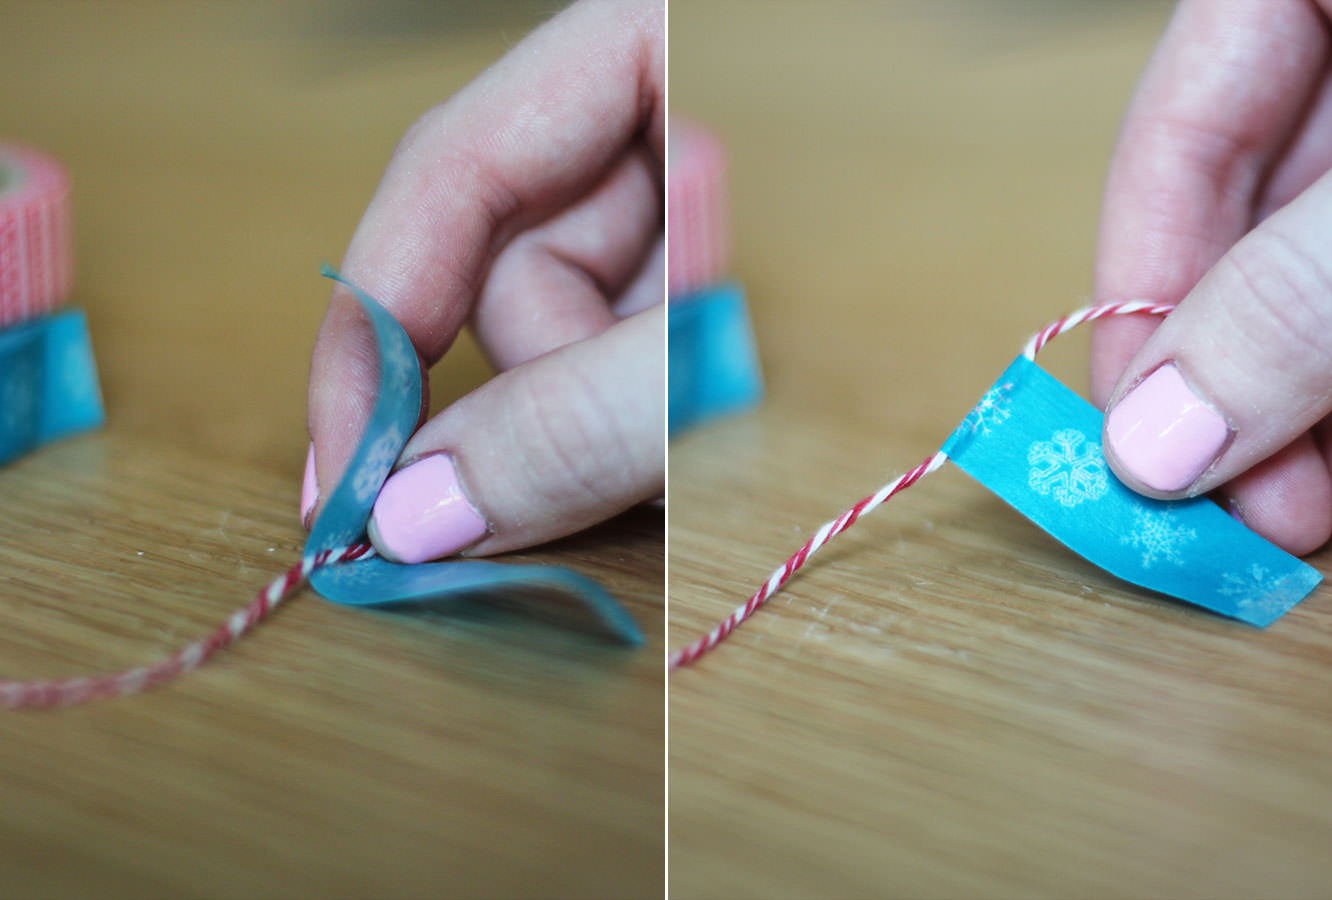
Step one
Cut a random length of tape and place the string in the middle. If you really want to punish yourself you can try and make them all the same length, but I really like them random and it’s much easier that way too.
For this step I cut loads and stuck them on the edge of the table so I had them ready and did them in batches so I wasn’t constantly cutting one then sticking it etc etc.
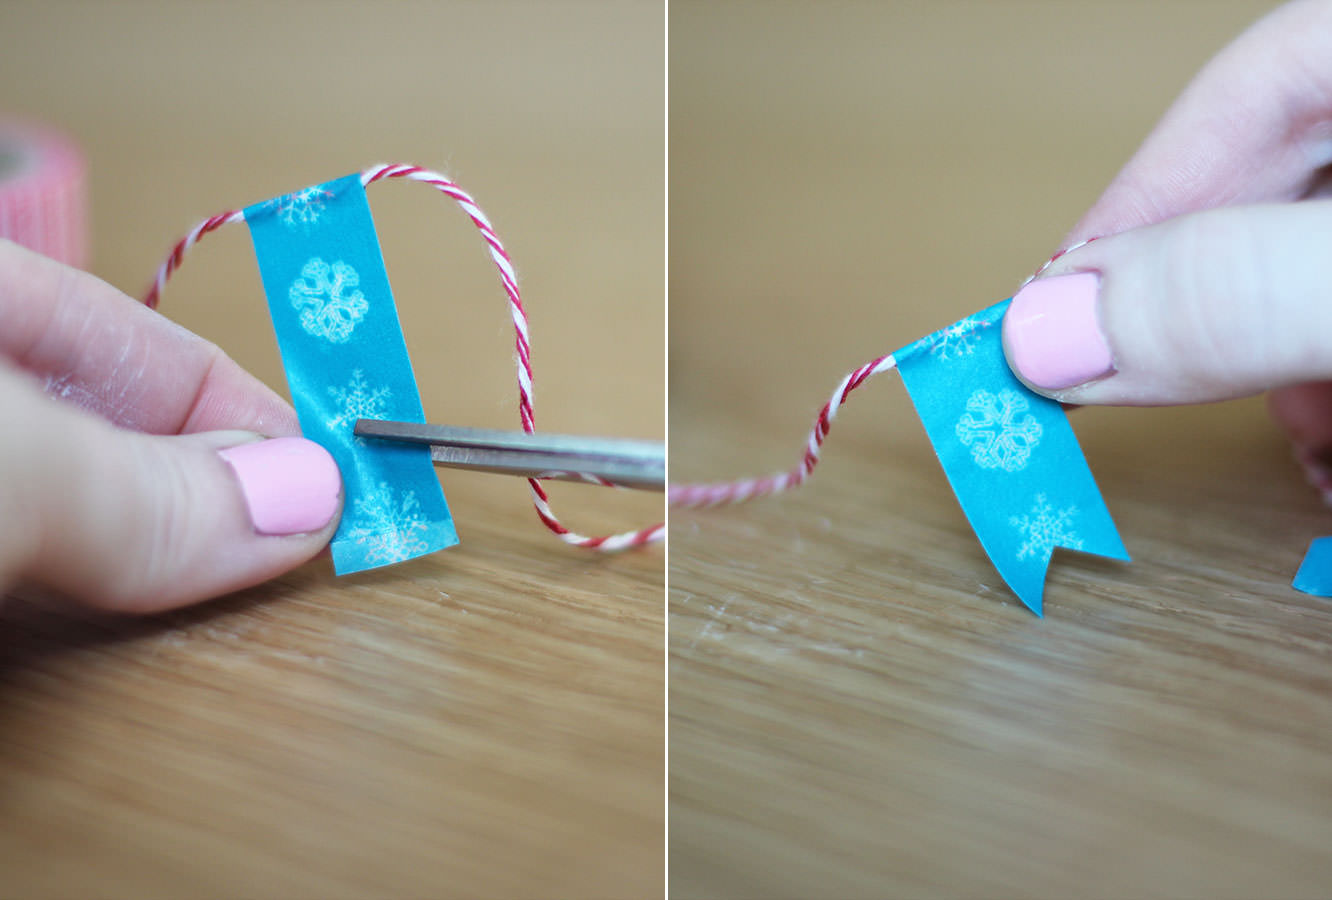
Step two
Fold over the wash tape and stick together. Again, I found it easier to do this step in bulk and then snip them in one go (see below).
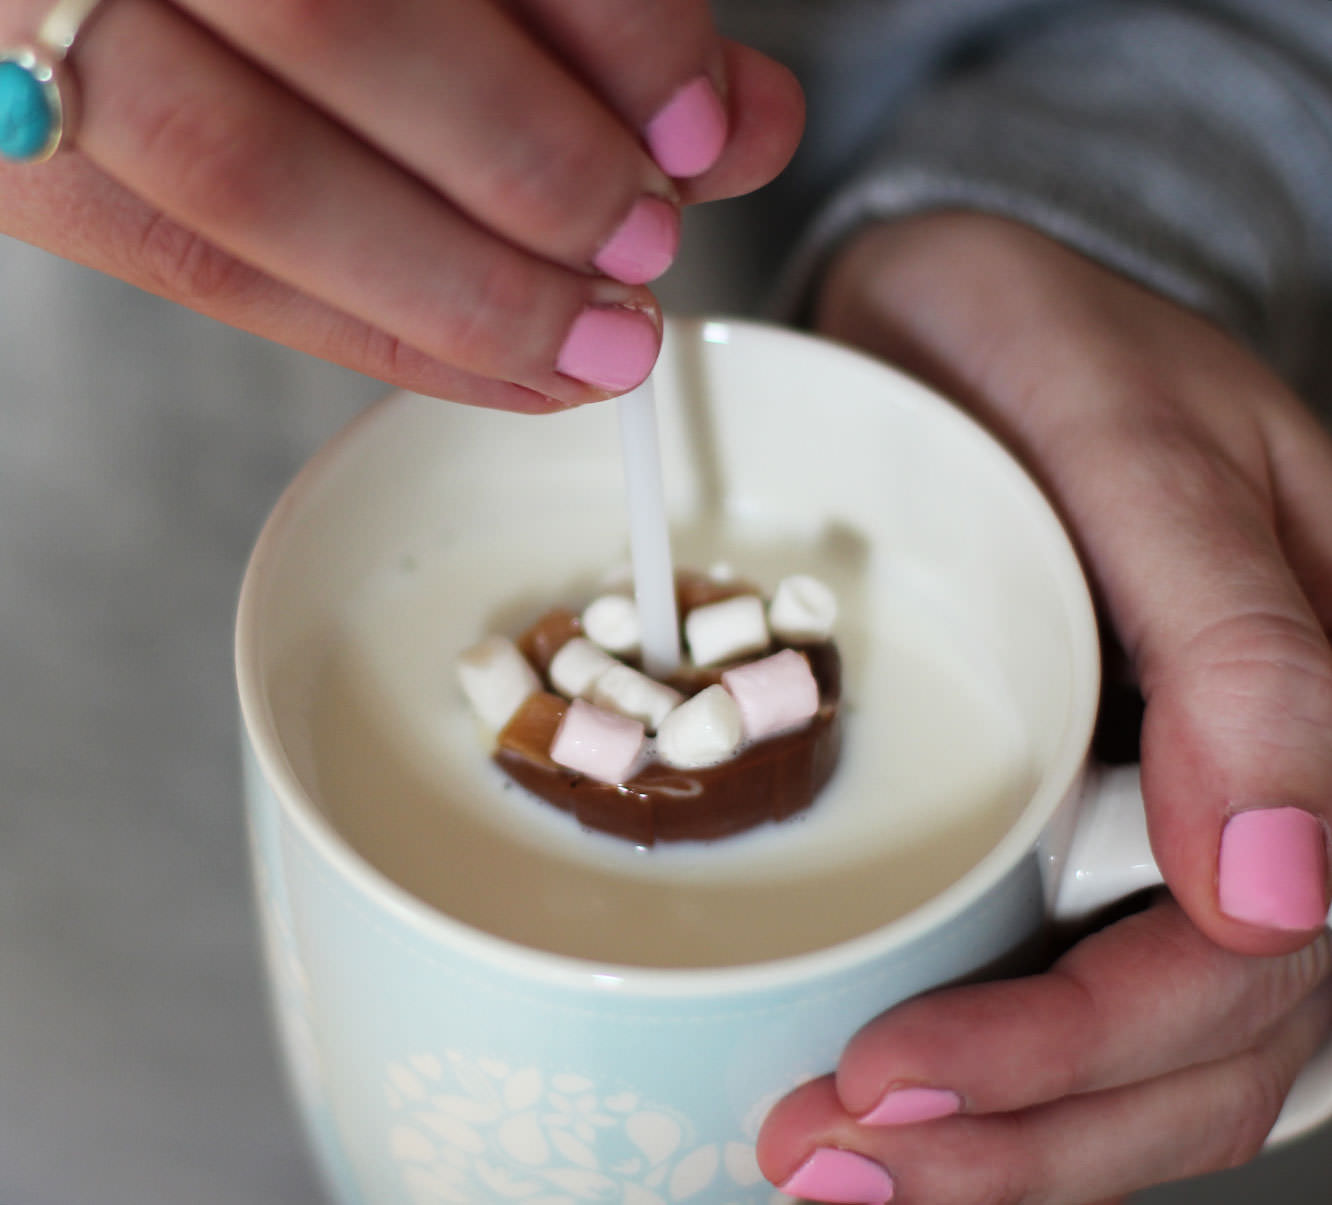
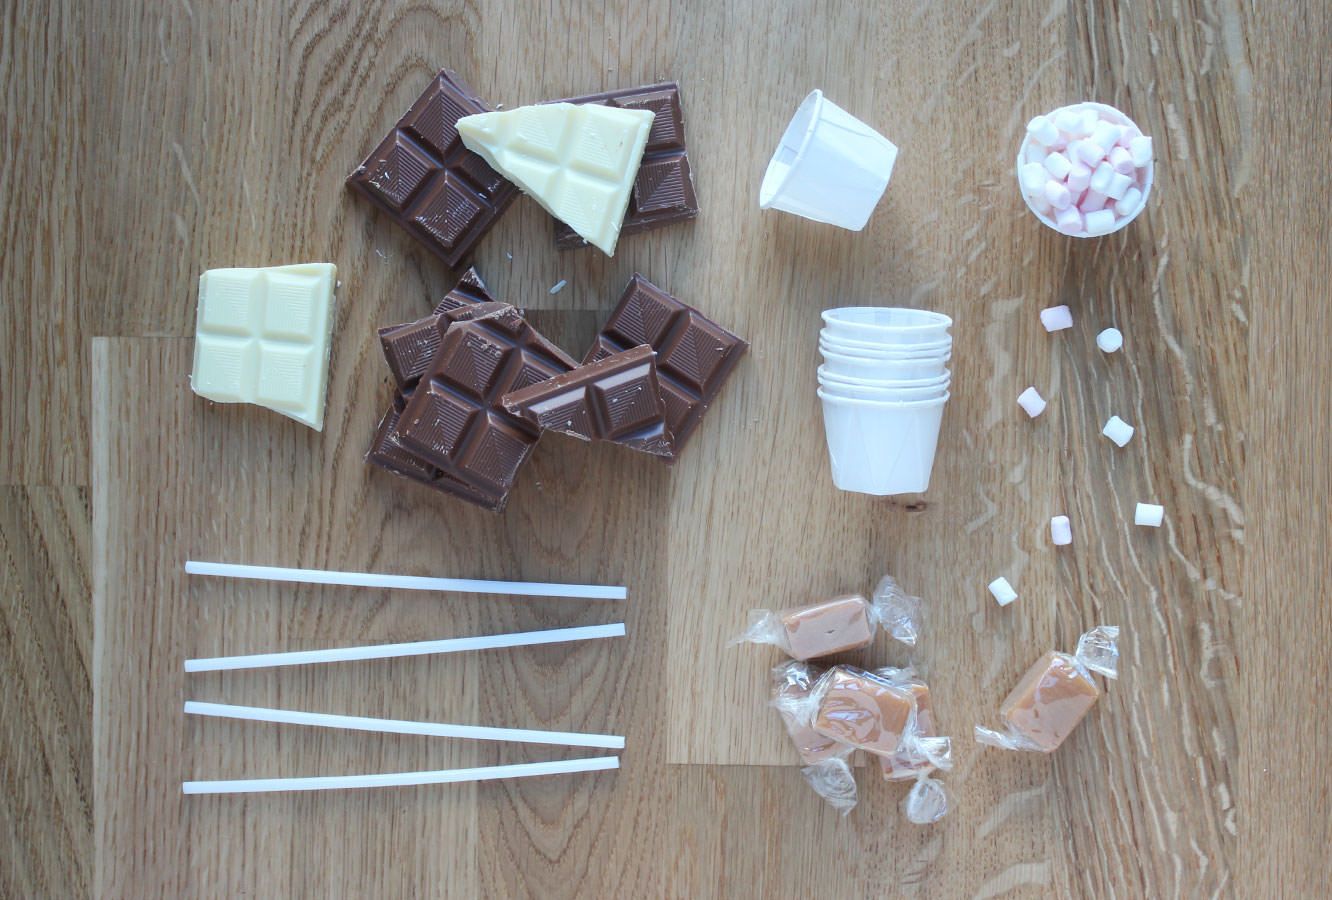
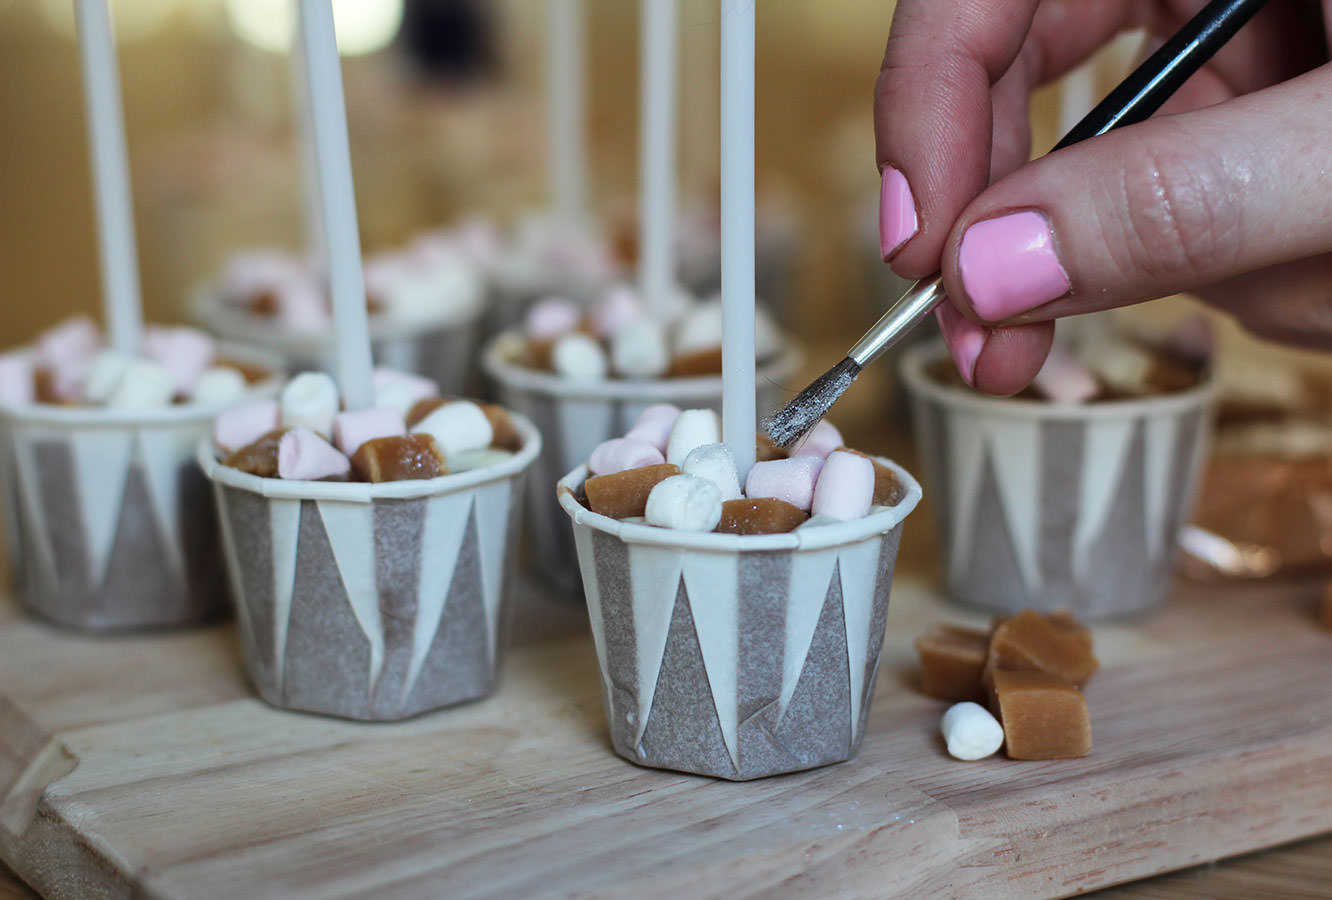
I saw one of these at the shops today, it was £3! These make a great little stocking filler, present topper-upper or gifts for the neighbours. Just swirl into hot milk for a luxury hot chocolate.
You will need
400g/ 14oz Milk chocolate
50g/ 1.5oz White chocolate
Condiment cups (if the closest McDonalds doesn’t have these you can buy them online, or use mini-muffin cases)
Mini mini marshmallows (these tiny fellows are from Waitrose)
Fudge pieces
Cake pop sticks
Edible glitter (optional)
(Makes 10-12. You need roughly 35g chocolate per cup so adjust the above to suit the number of hot chocolates you want to make).
For wrapping
Cellophane roll (available online or from craft shops)
Chrismassy ribbon or string
Step one
Chop the fudge into little chunks so that they’re roughly in proportion with the marshmallows.
Step two
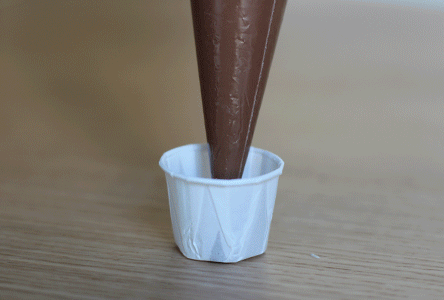
Melt the chocolate slowly in the microwave and put into piping bags. You can temper it if you want, but given that you won’t see much of it, it might not be worthwhile. I go into a bit more detail as to how to temper chocolate here.
Step three
Fill cup to near the brim with milk chocolate. Add a little white and swirl in with a cocktail stick.
Place stick in and surround with fudge and marshmallows.
Leave to set.
Step four
Dust on a little glitter.
Step five
Wrap up. Cut a square of cellophane wrap and place cup in the centre, bring corners up to the middle and secure. I used a loom band to do this, you could use a small elastic band or go straight in with the ribbon/string.
Trim off the corners and ‘foof’.
Go on. There must be one spare you can treat yourself to?
There’s lots of things happening right now. The first one to mention is that fabrefaction TURNS 1 TODAY! I know, crazy right? I will leave any sentimental ramblings to my new year post, but it seems mad to me that my first little blog about an advent calendar made from egg boxes was only a year ago.
The other major thing that’s happening is that MEGAN IS GETTING MARRIED. In 12 days no less. Gawsh.
In honour of this we had a hen party last weekend in beautiful Bath. For part of the afternoon we had time to kill and every activity we looked up was crazy expensive or not available etc etc. After some deliberation it was suggested that I conjure up something to do.
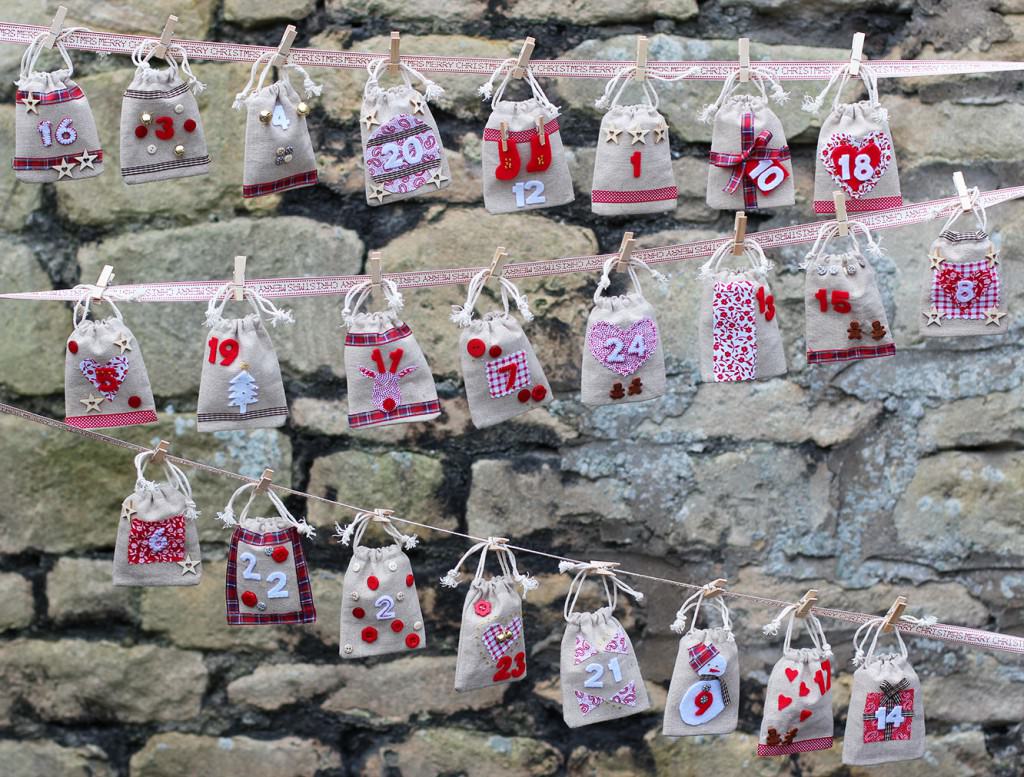
So in honour of Meg’s wedding, fabrefaction’s birthday, and being as close as we are to December, it seemed like the perfect opportunity to use our make shift craft workshop to make an heirloom for Meg and Olly to obligingly hang at Christmas…at least as long as we’re friends…which will be forever, so…
DISCLAIMER: This post isn’t so much the usual step-by-step, more a little inspiration and a few tips along the way.
24 little pegs (I got mine from Tiger, they’ve got numbered ones at the moment too)
3m ribbon to hang the pegs off
A whole plethora of Christmas themed haberdashery (The Range and Hobbycraft furnished us nicely)
A team of Santa’s little helpers
Now it depends how crazy you are, I rate as ‘very’ on the scale when it comes to craft. Cool kid I know.
Well, I didn’t quite fancy the thought of the hens free styling the numbers because I think a little bit of consistency helps the overall look of this kind of thing. Yes, I did tell them that as an introduction, and yes, I do have problems.
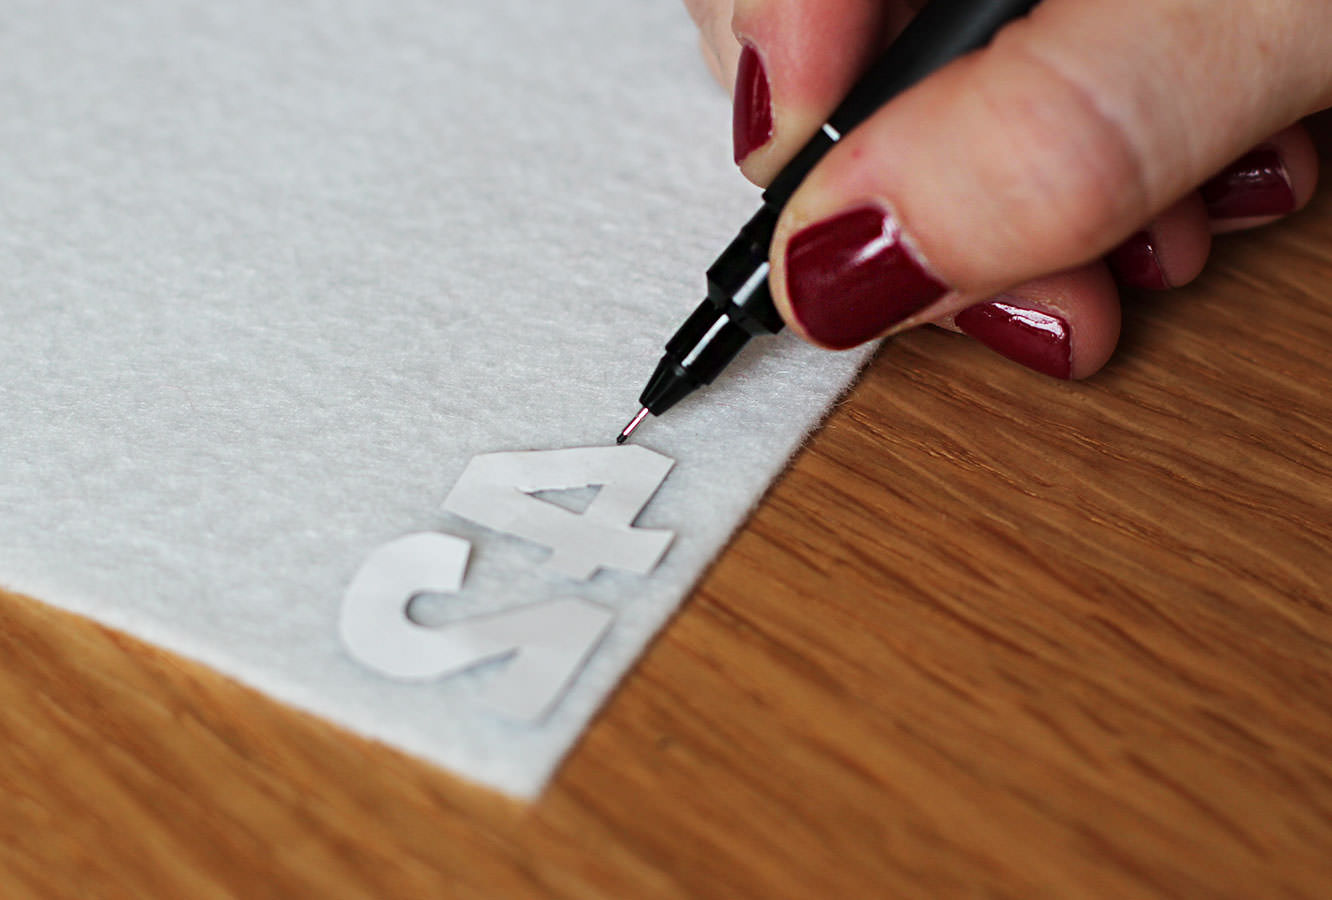
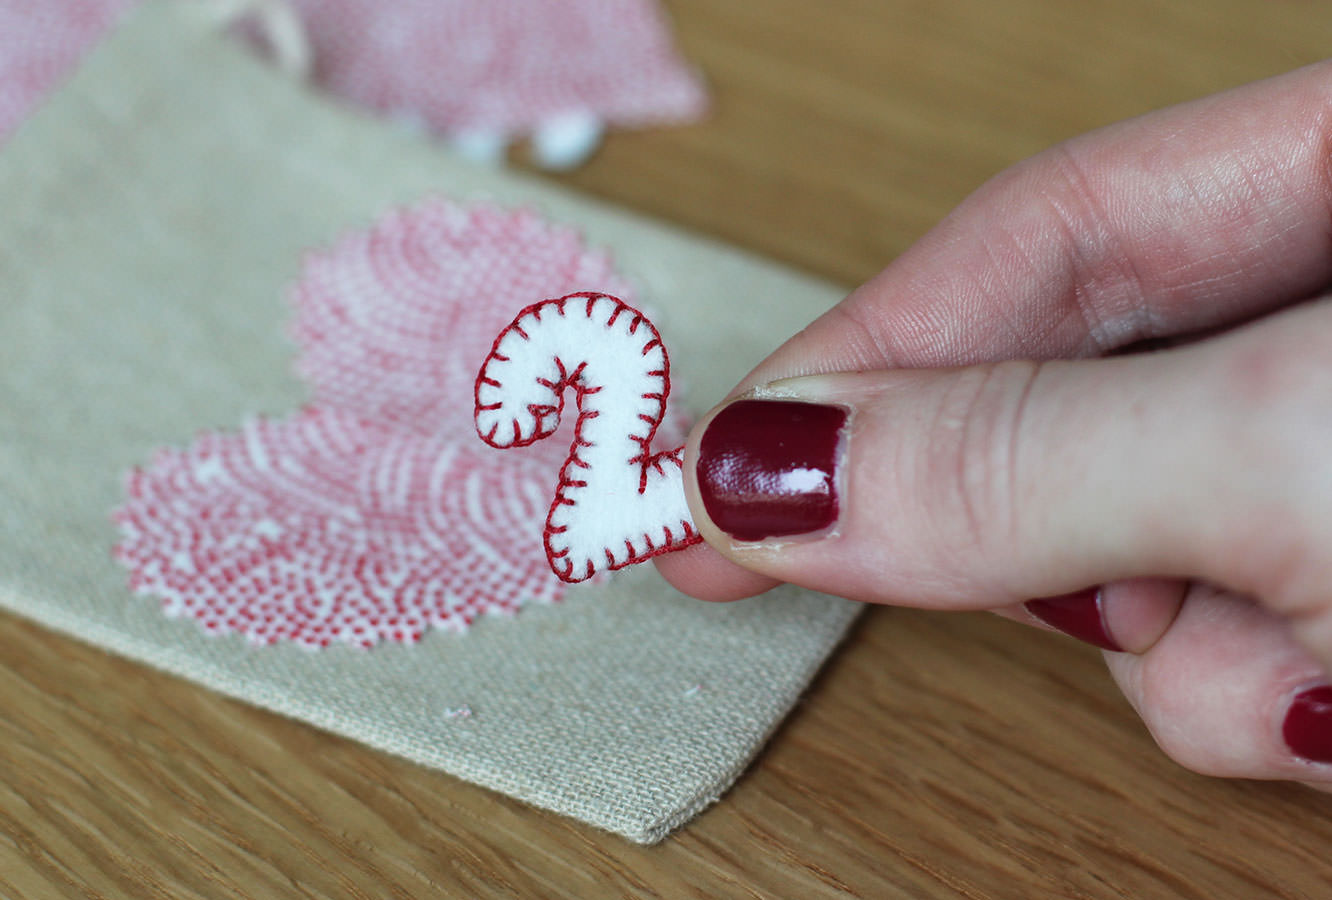
I printed the numbers in a chubby font to begin with using them as a template on felt.
If you don’t trust yourself to hold and cut at the same time turn the numbers upside down and draw round them very lightly. Then you won’t have pen marks when you turn them over. I was a bit heavy handed with the pen at first, so be warned.
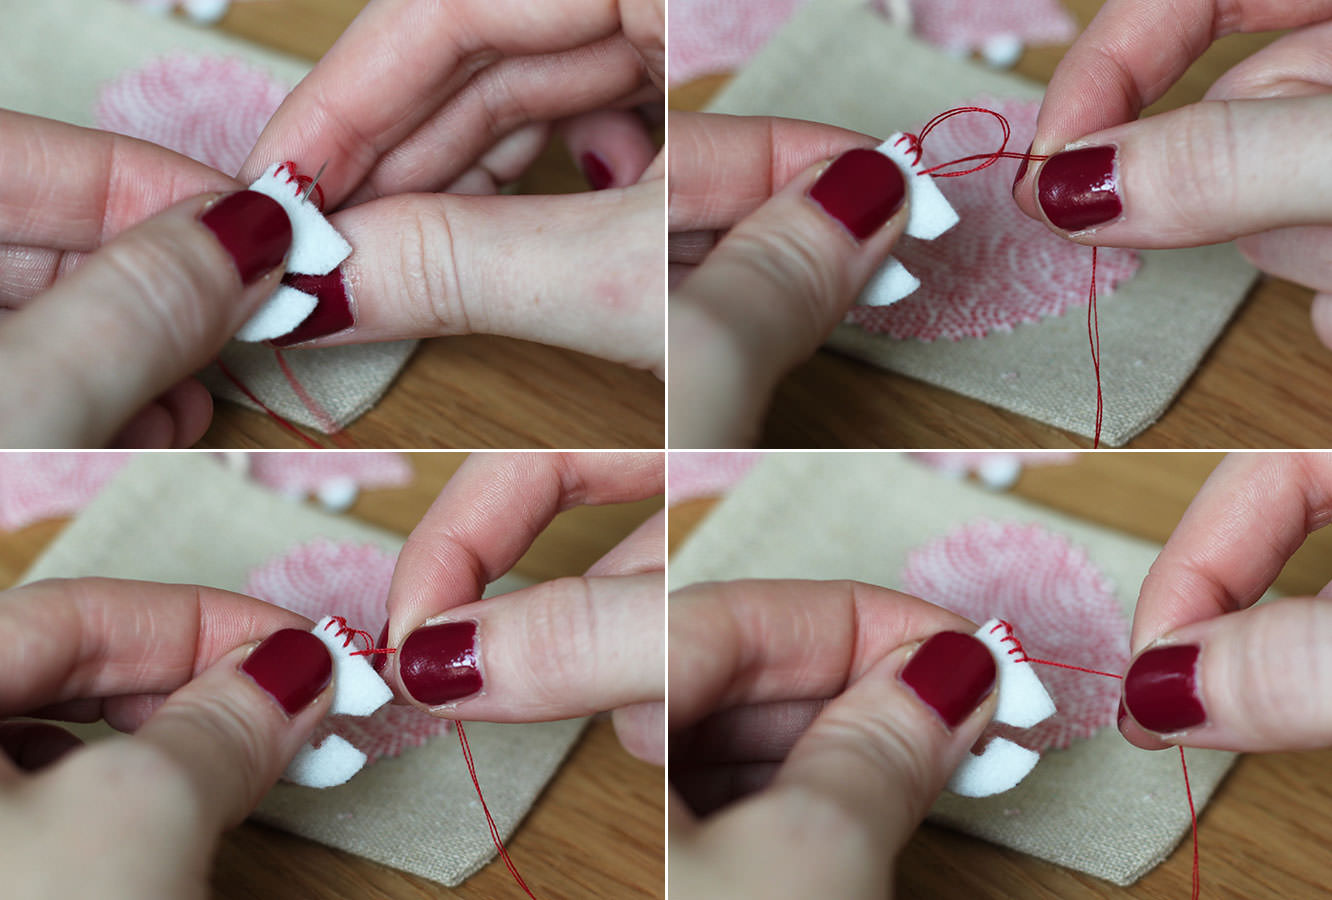
I love a little blanket stitch on Christmassy craft. You basically need to put the needle through the felt at the height you want your stitching, and as you pull the thread through catch the loop so that it is held at the top.
Voila. Not fiddly at all. Nope.
If you are cutting regular fabric use pinking shears (the zig zag ones) so it doesn’t fray. Otherwise you may have to hem it all. The alternative if you don’t own pinking shears and don’t want to sew is to use felt, or just chance it with the fraying (but then we can’t be friends).
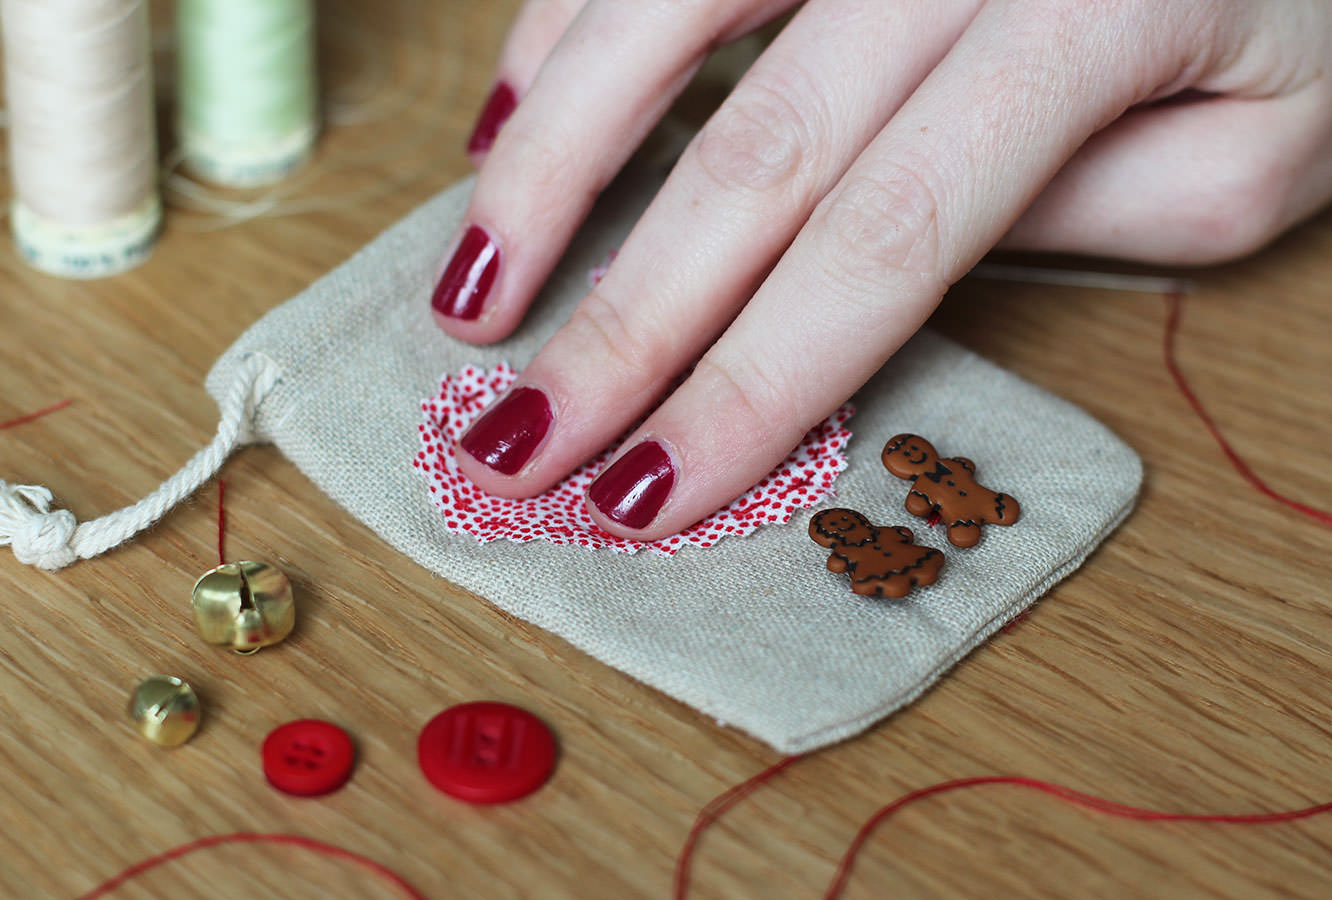
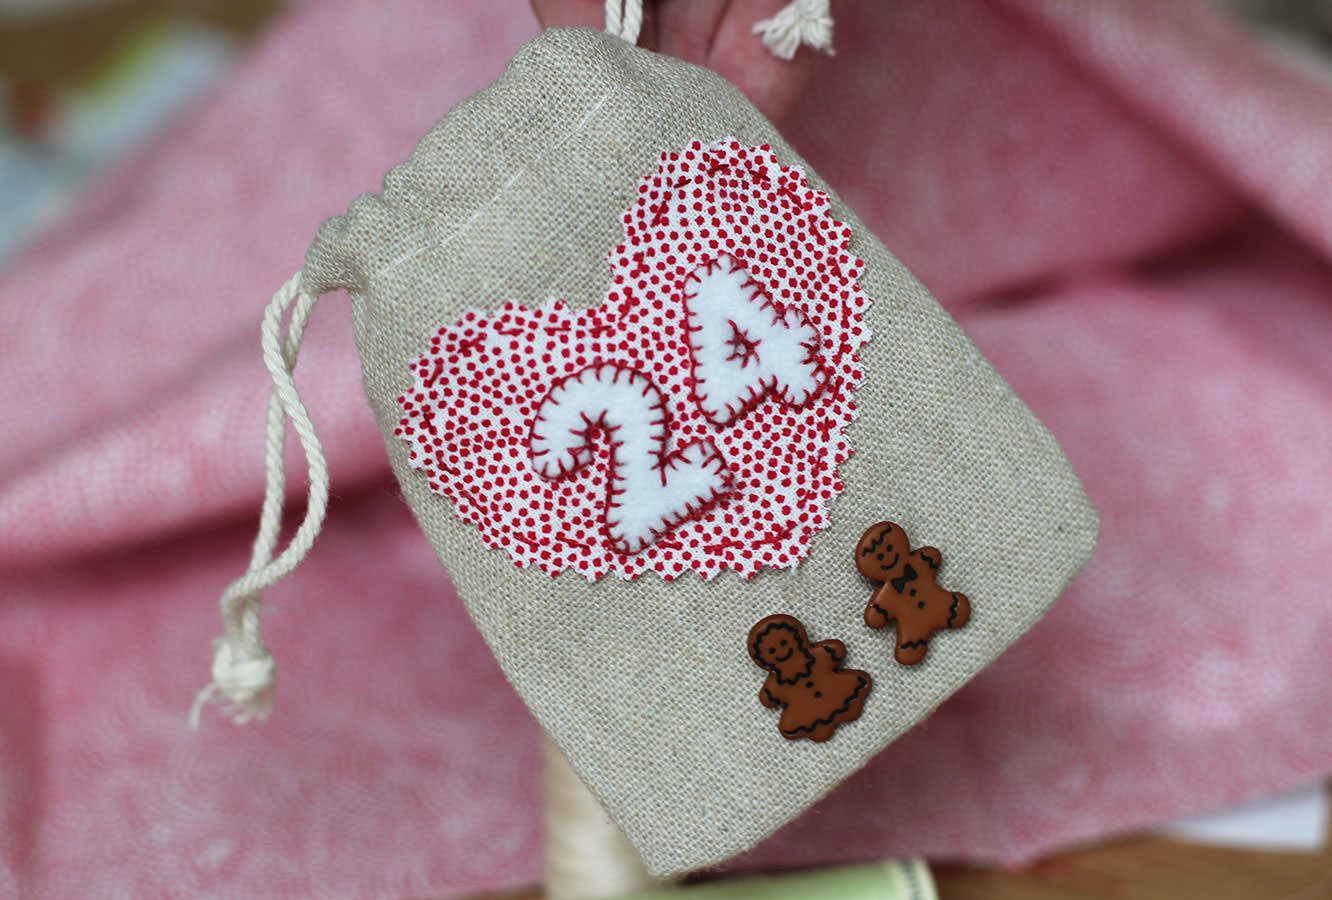
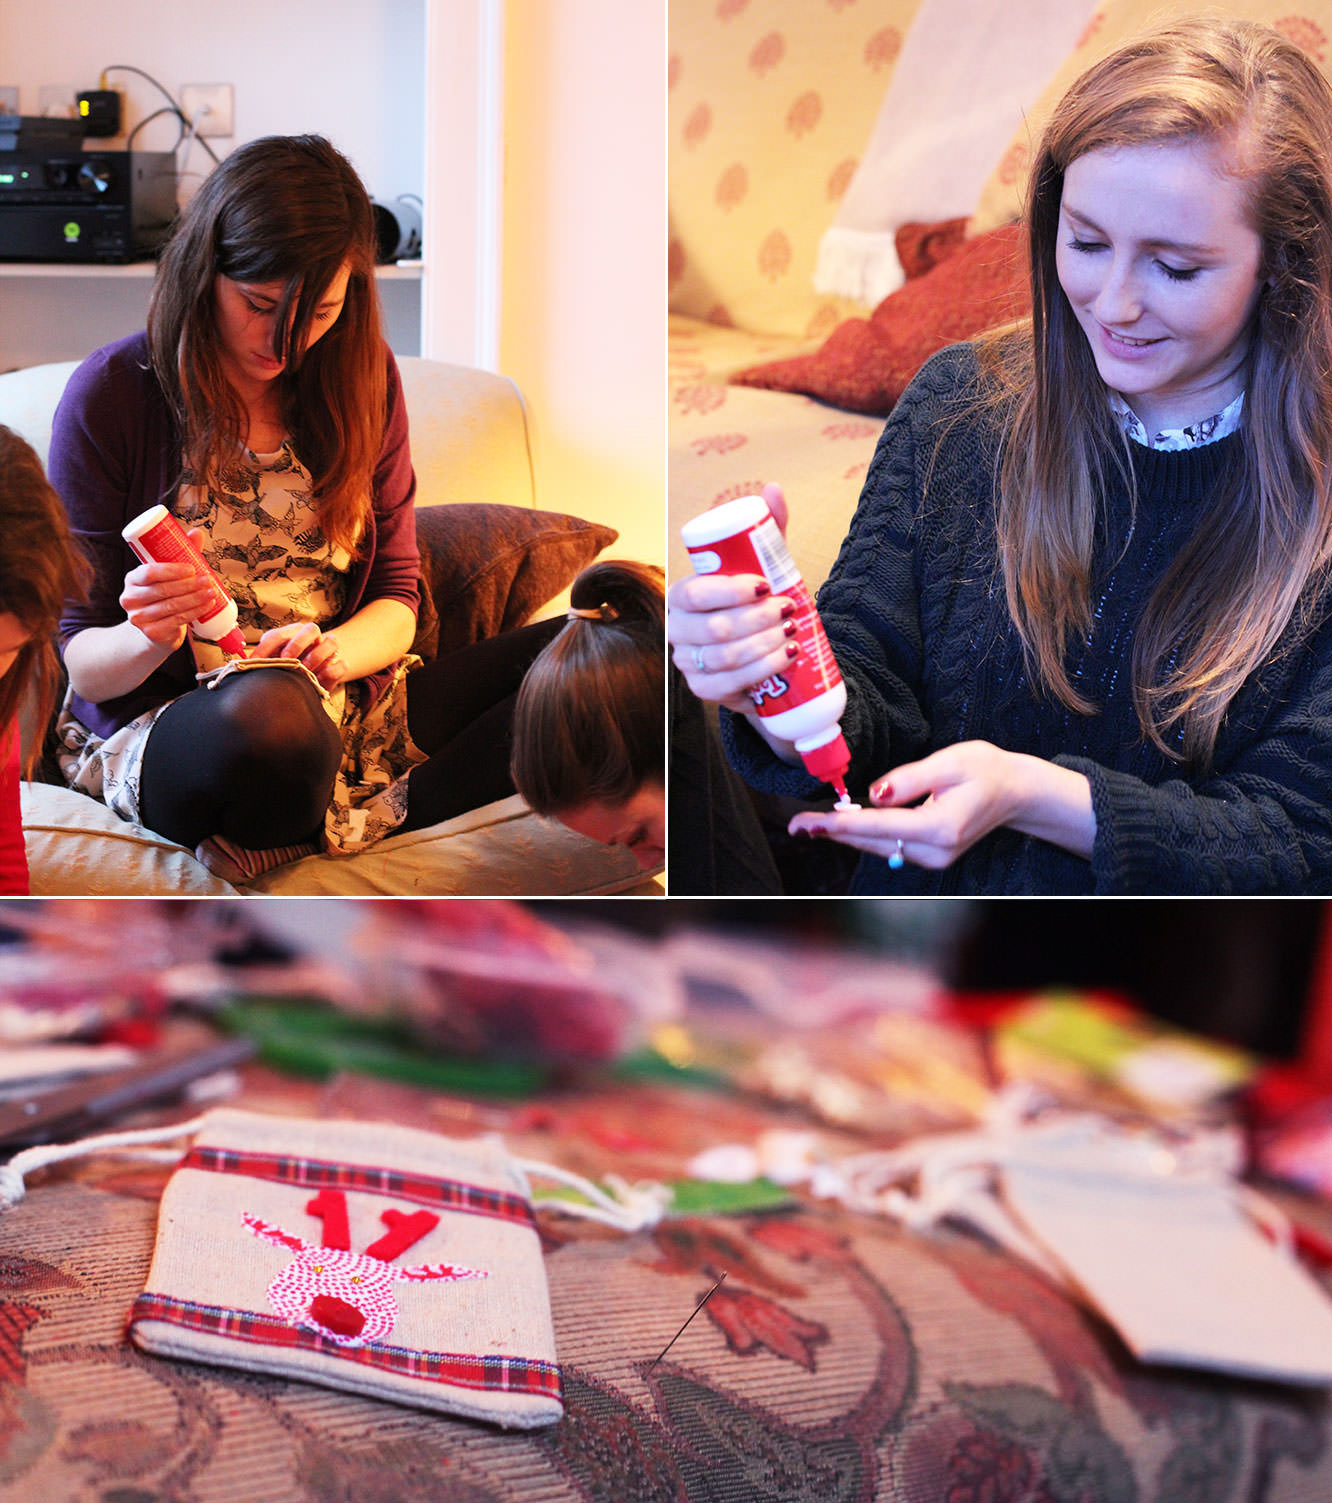
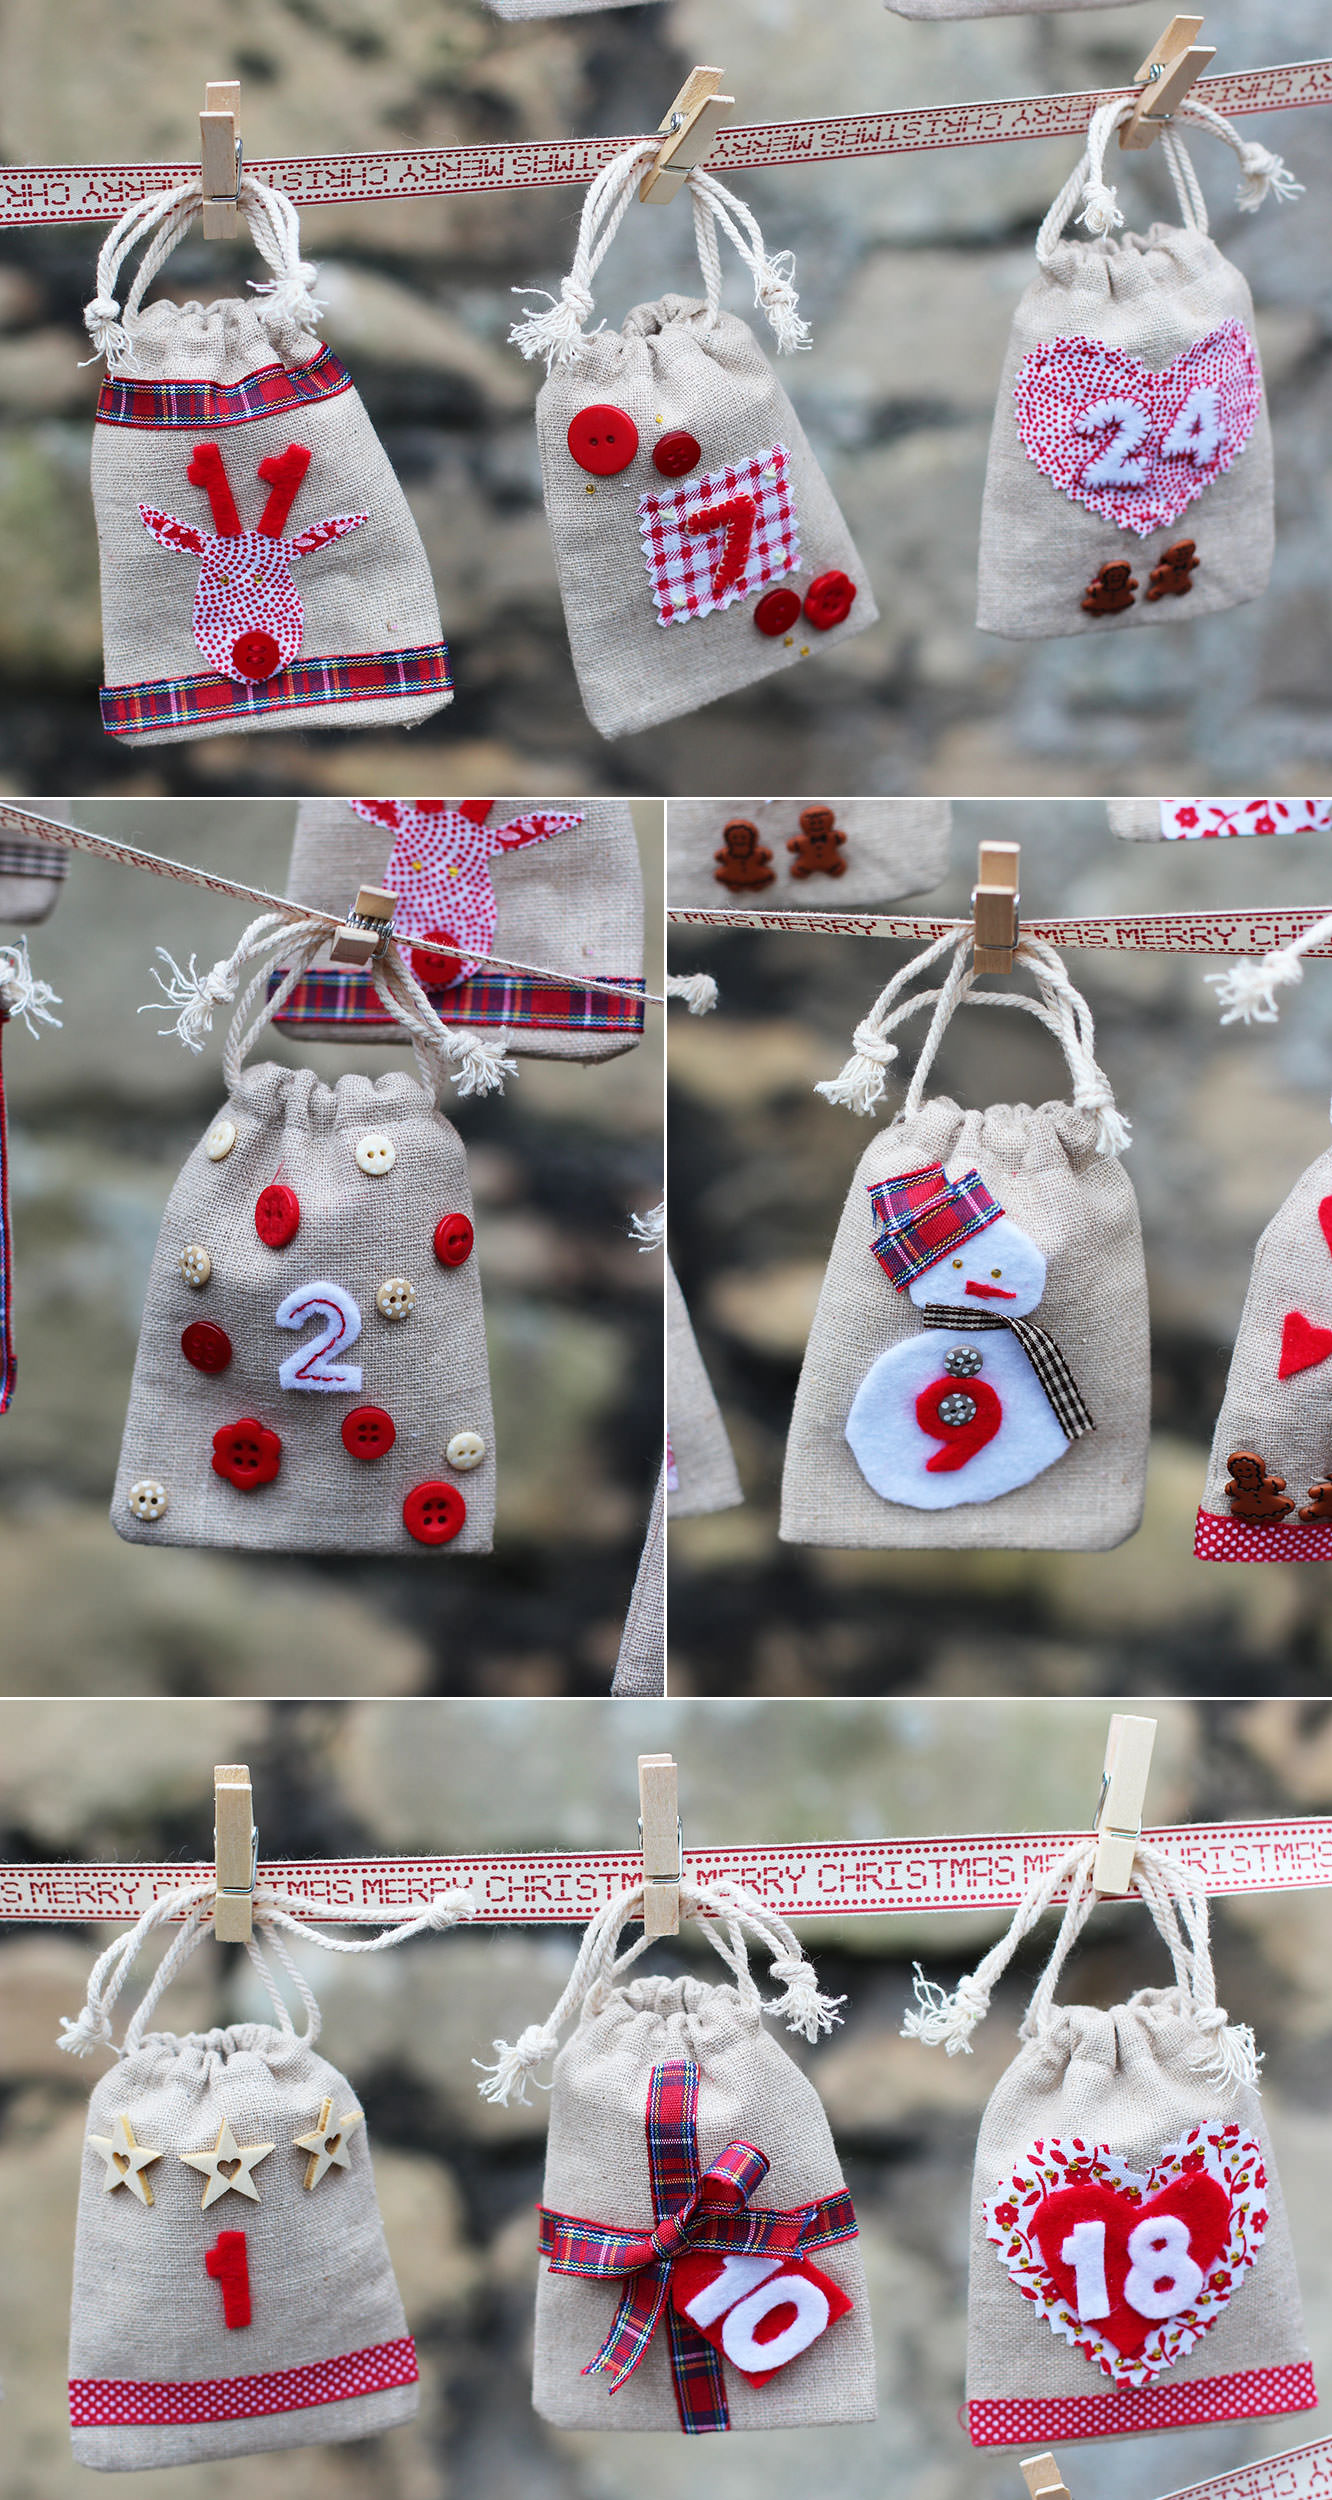
How cute are those little gingerbread buttons?! It helped to hold them down where I wanted them and half turn the bag inside out to sew.
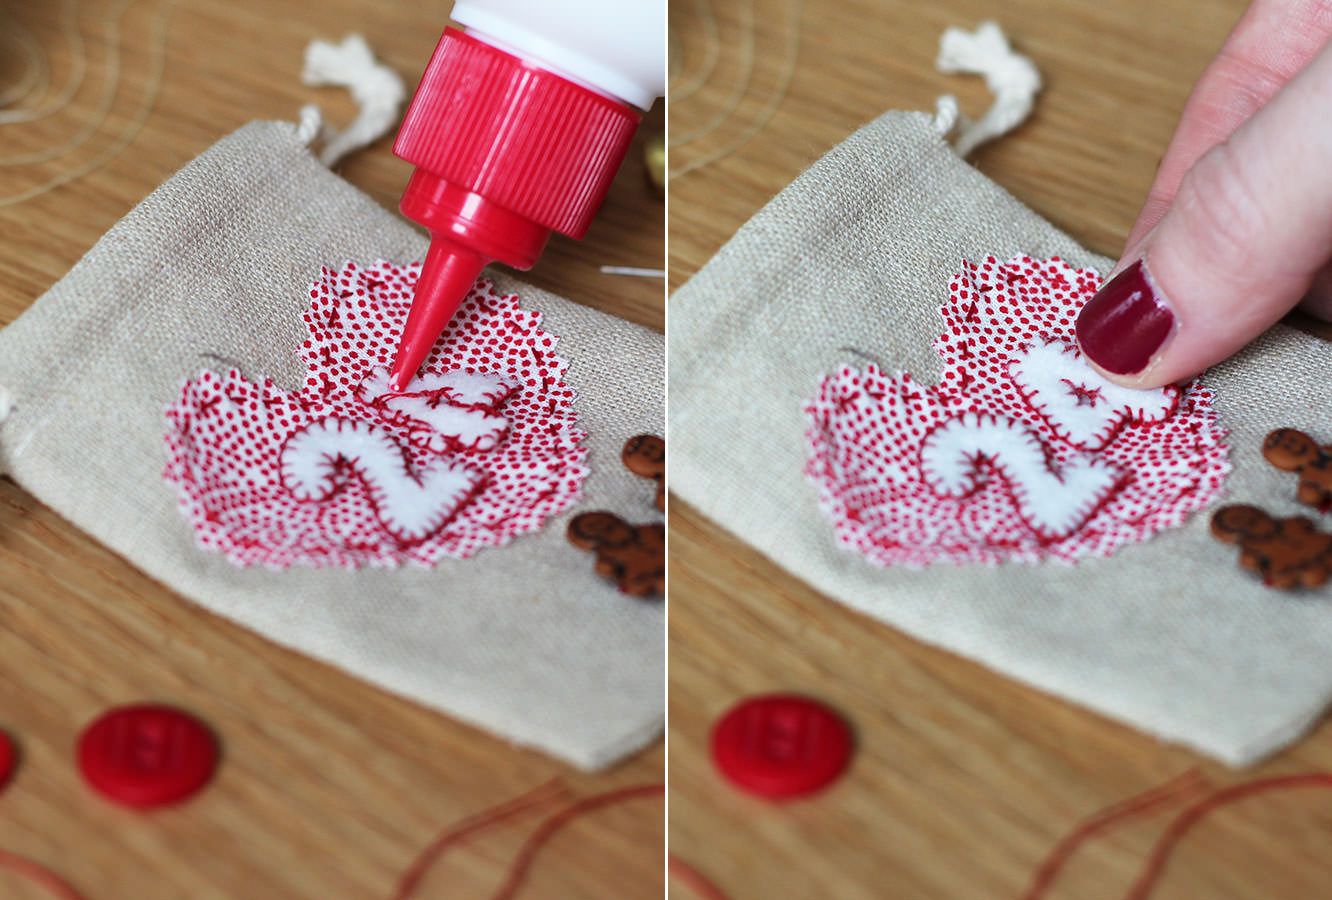
I found it best to sew any details onto the individual items and then glue them down using a few dabs of PVA. You can be a lot more precise that way.
One down. Twenty three to go. Time to rope in some helpers…
Everyone got involved with the gluing action so don’t be ashamed. I loved little Rudolph with his number 11 antlers.
A few more.
The whole shebang! I love the way this turned out, and now Meg has a keepsake from some of her favourite people.
Thank you for visiting my little space of internets. It’s kept me going all year, here’s to another.
This half term holiday I had promised two little friends of mine a day in my London pad. They were very excited and had all kinds of crafty plans and ideas to keep us busy.
When thinking about what we could do on a budget, I remembered learning how to sew when not much older than them.
I was pretty impressed with these two; by the end they were using the sewing machine unaided (although for their parents’ benefit – heavily supervised!)
This is a great little project for beginners of any age, but for the reference of anyone planning to do this with children, these two are 7 and 8 and handled it very well. It would certainly be doable if you don’t have a machine too.
You will need
Cute fabric
Elasticated hair bands
Needle and thread (or a sewing machine)
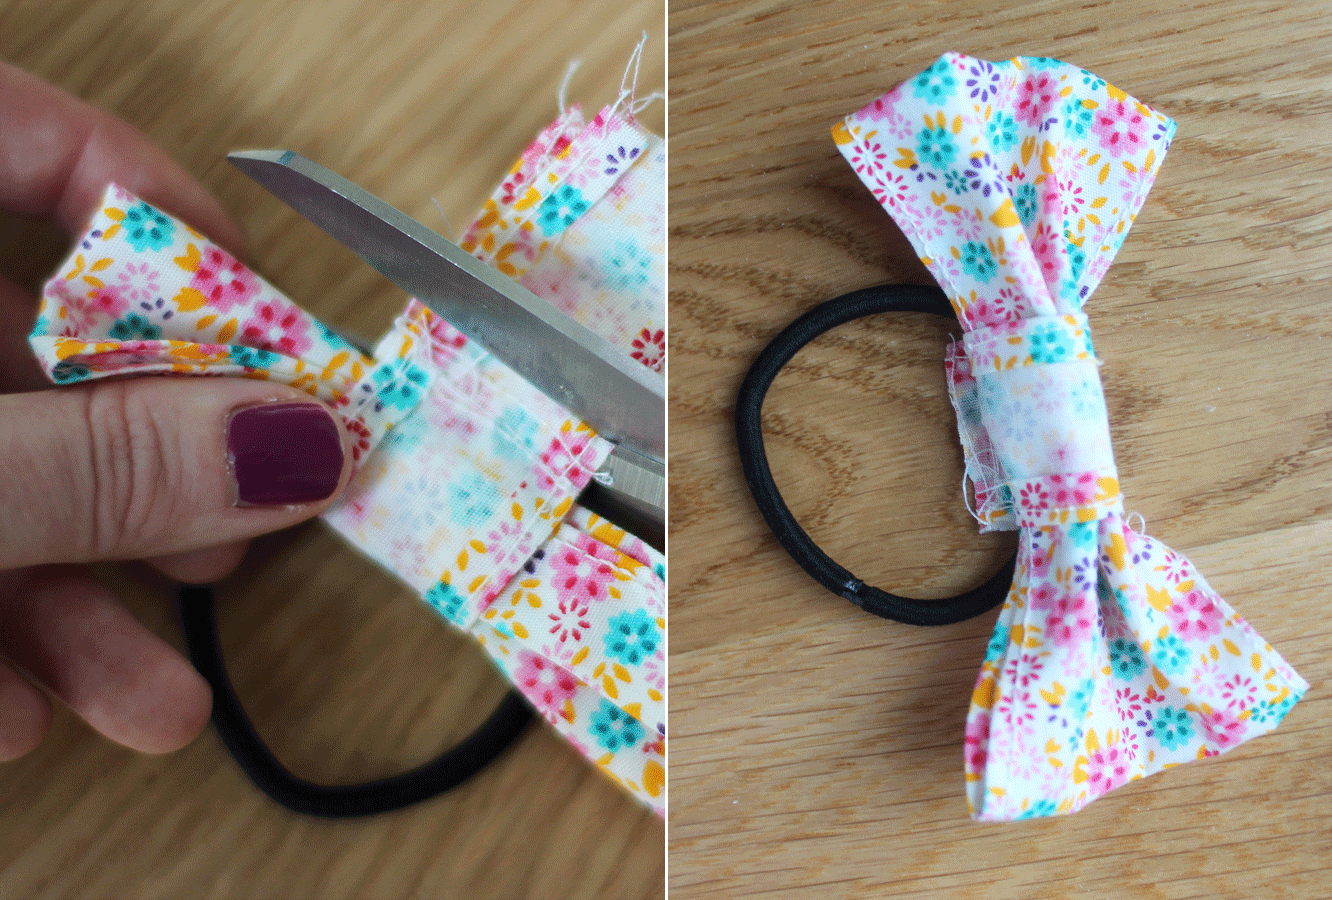
Step one
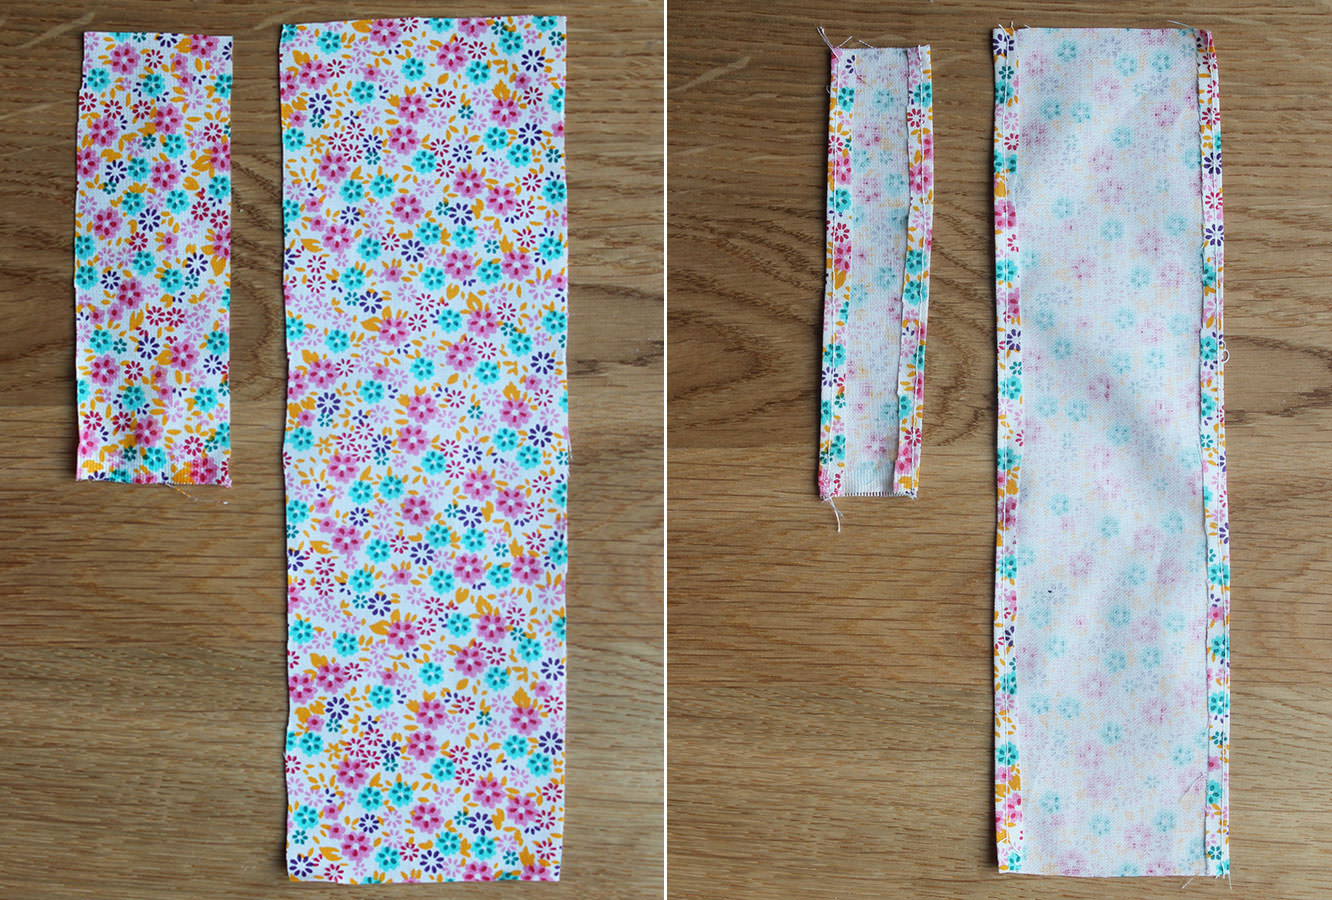
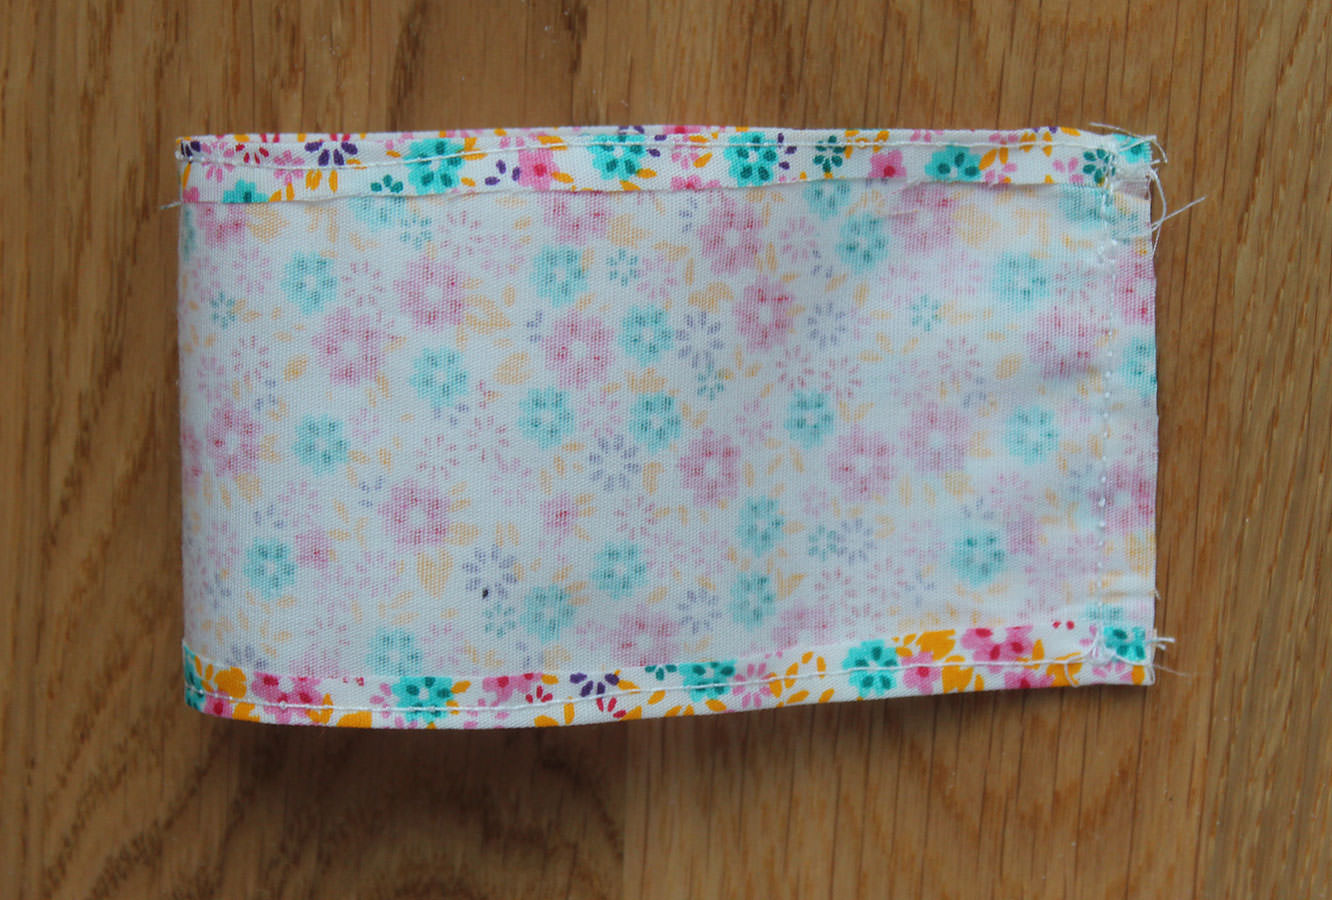
Cut two lengths of fabric, one 7cm x 22cm and the other 3.5 cm x 12 cm.
Step two
Sew a small hem along the long edges as shown above.
When doing this with the girls they used the foot while I guided it through at first, then I took a turn with the foot so they could guide, then they took the helm altogether.
Step three
Join the larger piece with right sides facing. Turn it through so the right sides are showing.
Step four
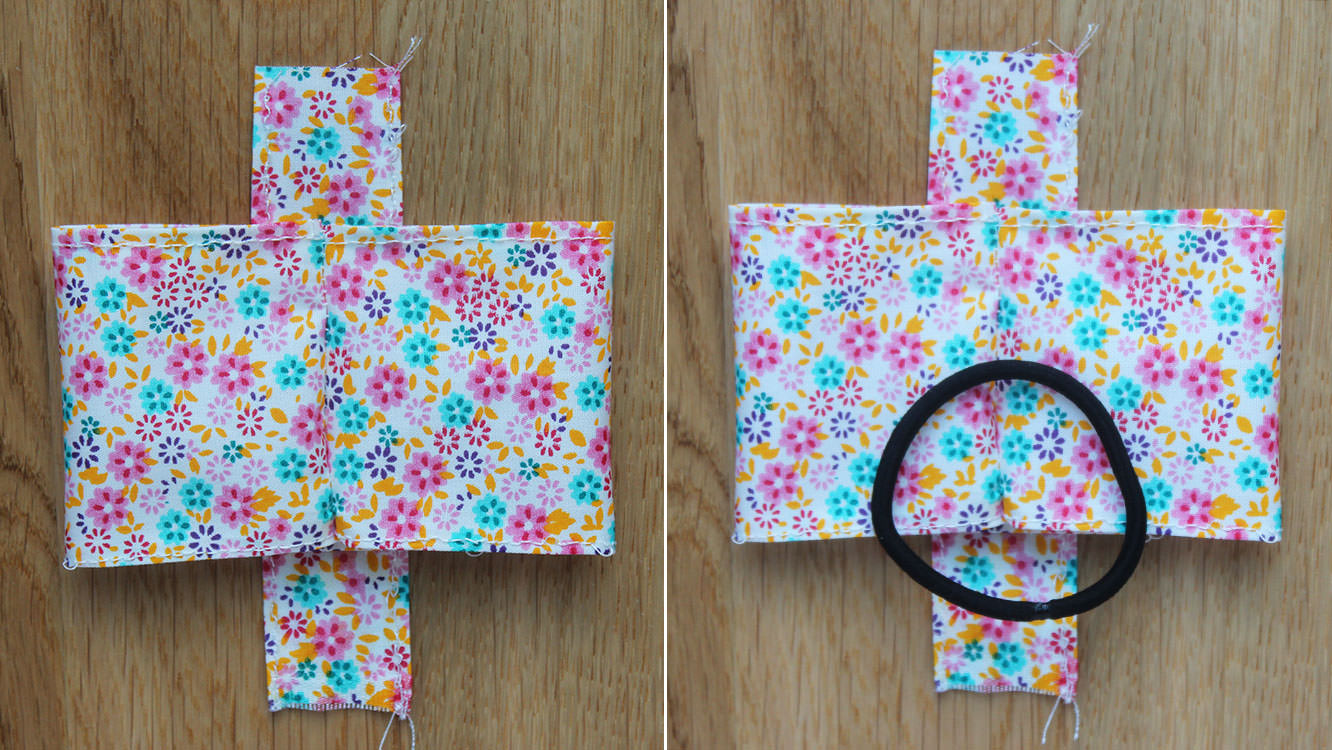
Lie the smaller strip down, right side facing upwards. Place the larger piece on top with the seam running down the centre.
Pop the hairband on top.
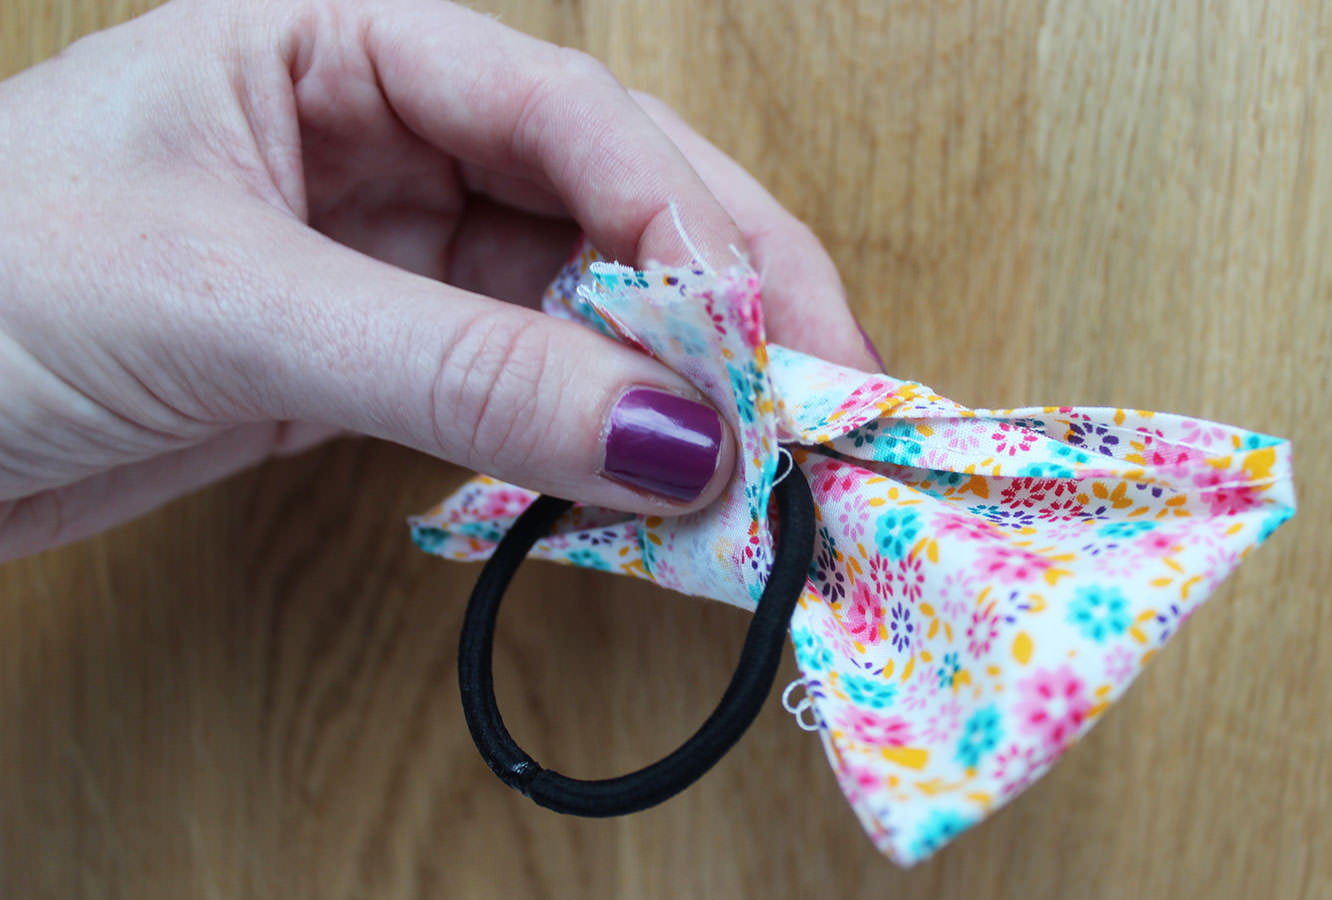
Step five
Loop the smaller strip of fabric through the hair band and squeeze it all together. Don’t worry too much about the shape of the bow for now, plenty of time to sort that out later.
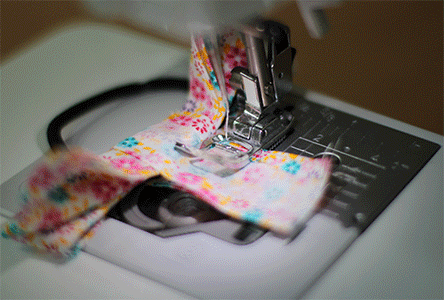
Step six
Sew across the smaller piece of fabric as close to main body of the bow as your machine will allow. That being said, if you are hand sewing (and therefore have a bit more control) do leave a little wiggle room.
Step seven
Chop off the excess fabric.
Step eight
Turn the loop the right way round and attach it to some hair.
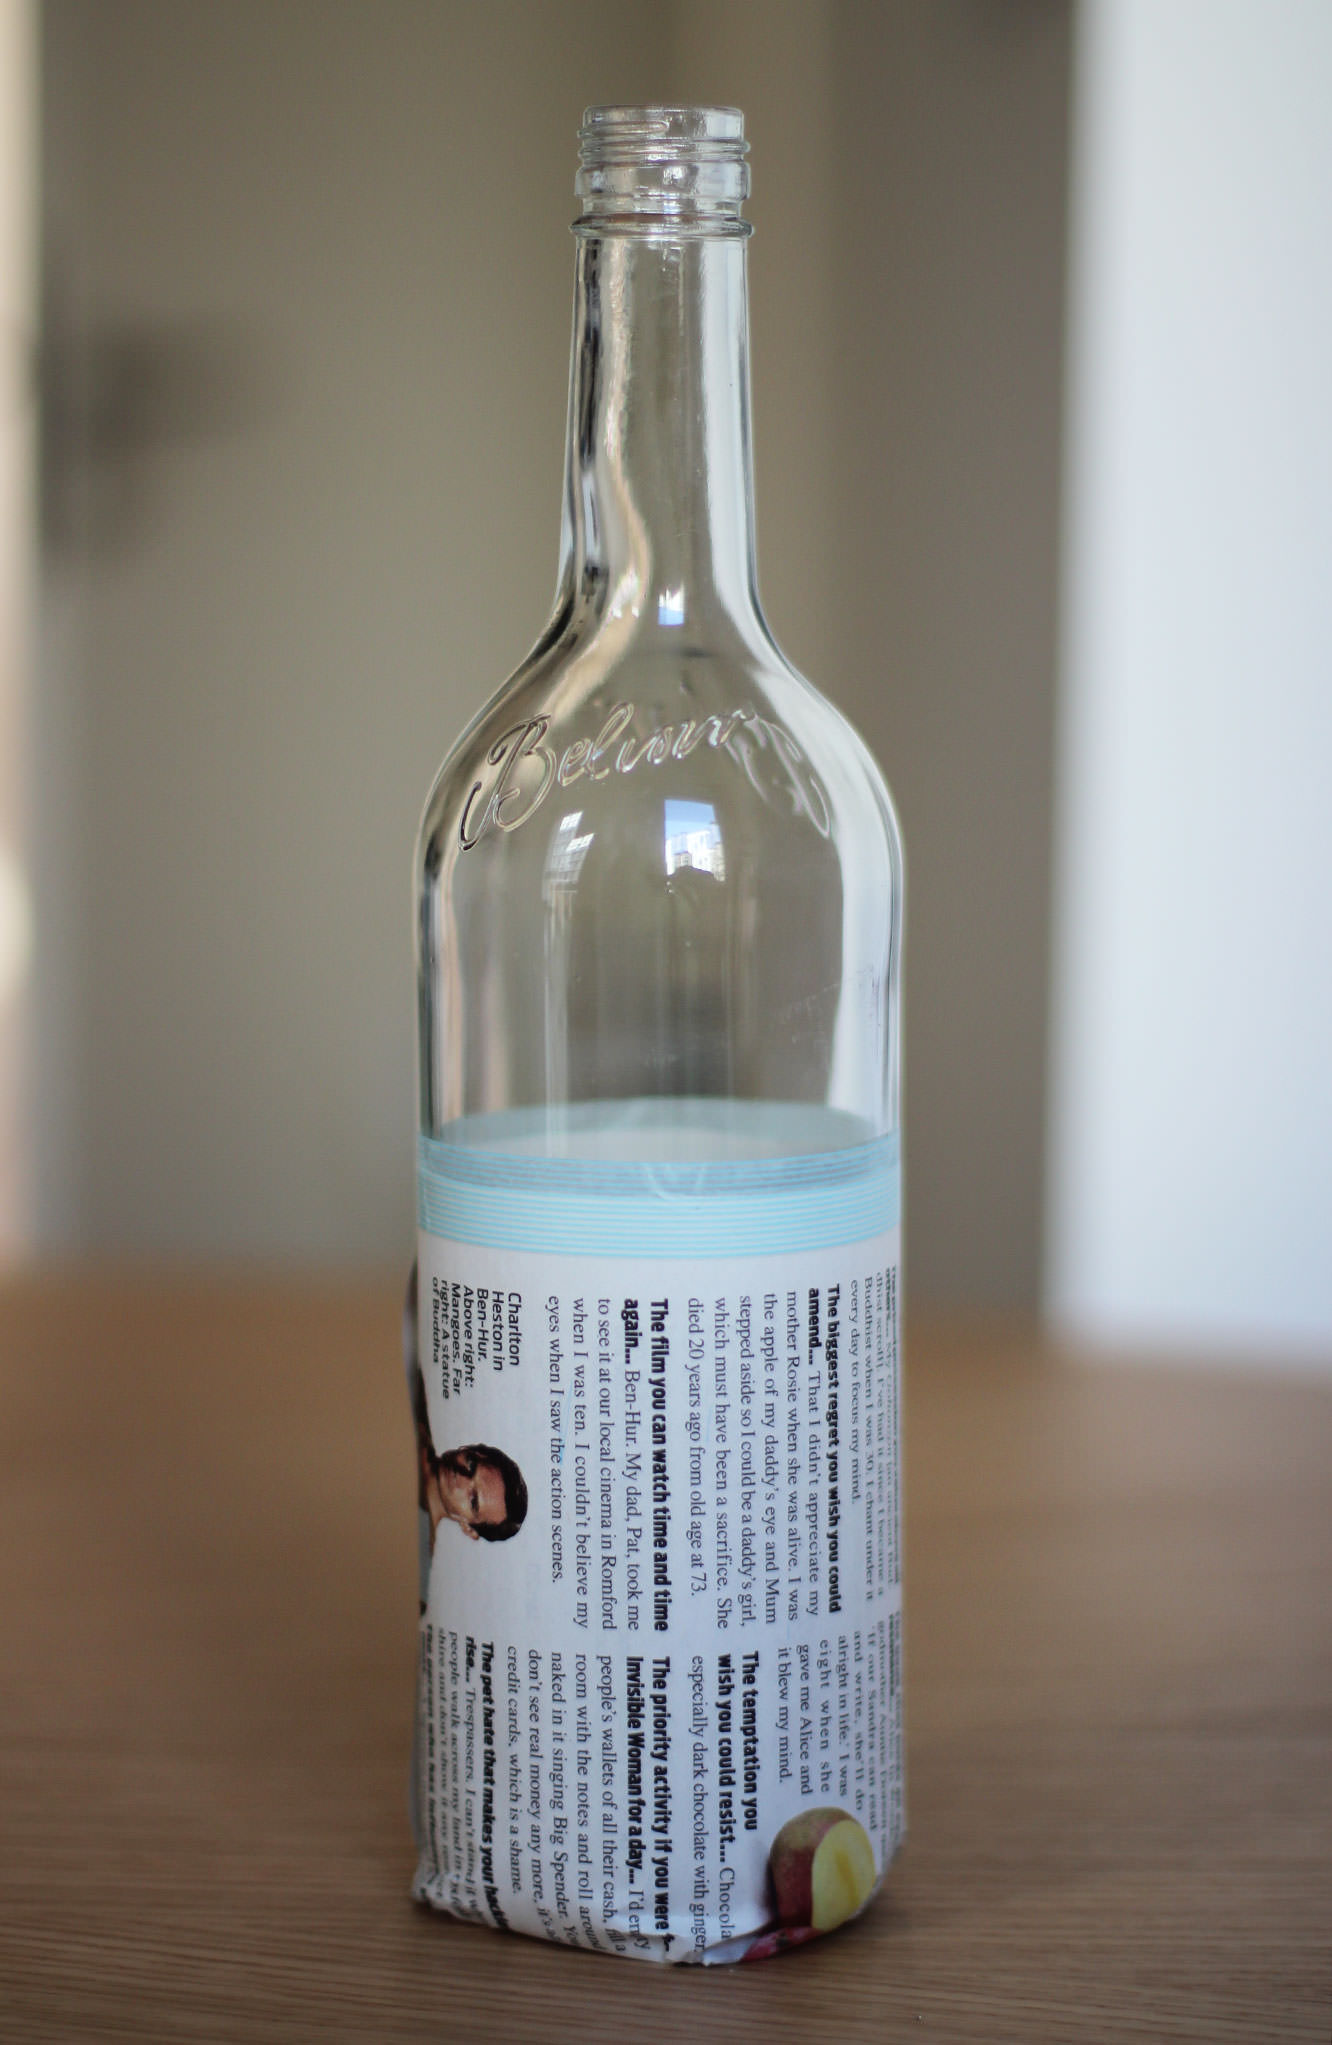
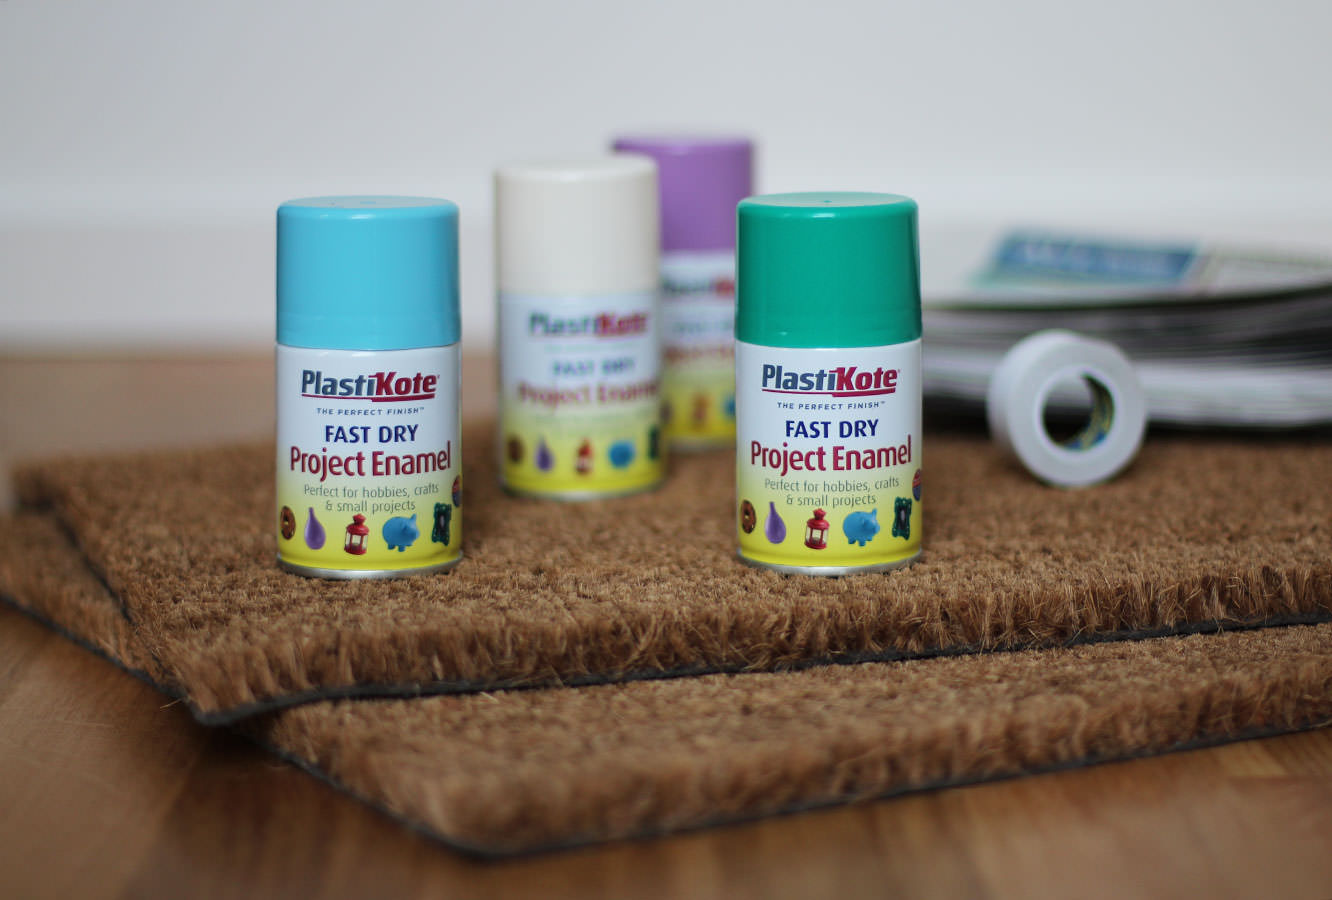
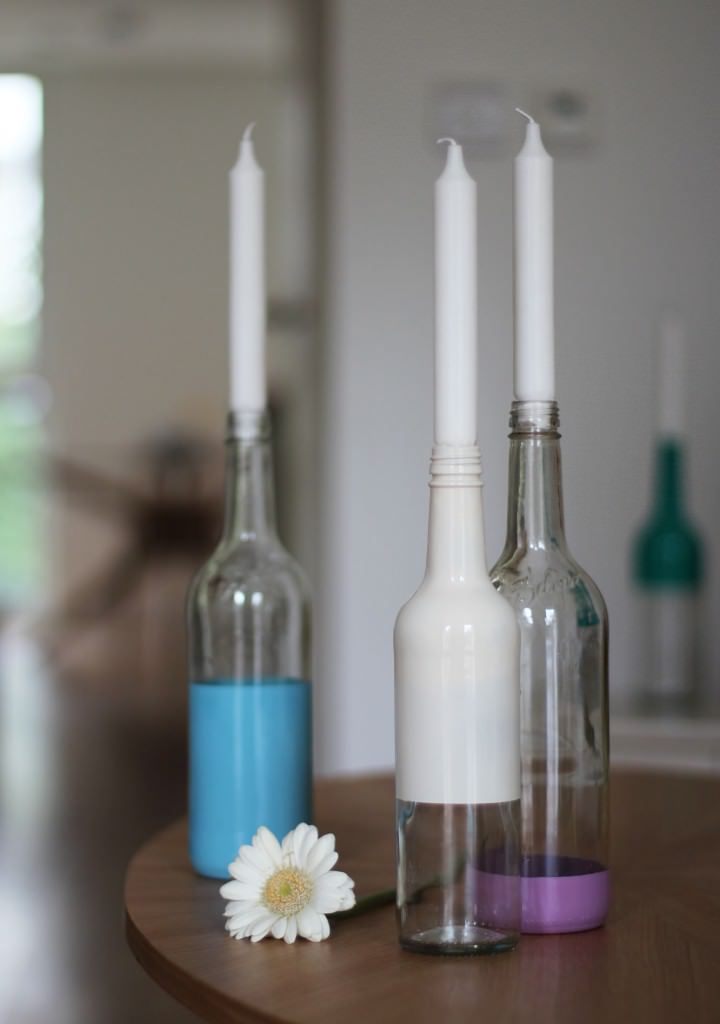
Winter is fast approaching and it’s time to get cosy. Cosy equals candles. At least it does this week, because I had left over spray paint from my mat making, and I really like spray painting things. Like really like it. In an unhealthy way.
This is a pretty easy quick make, and is satisfyingly effective. I recommend it for adding a bit of pizazz at a dinner party or even for sticking a couple of flower stems in rather than candles.
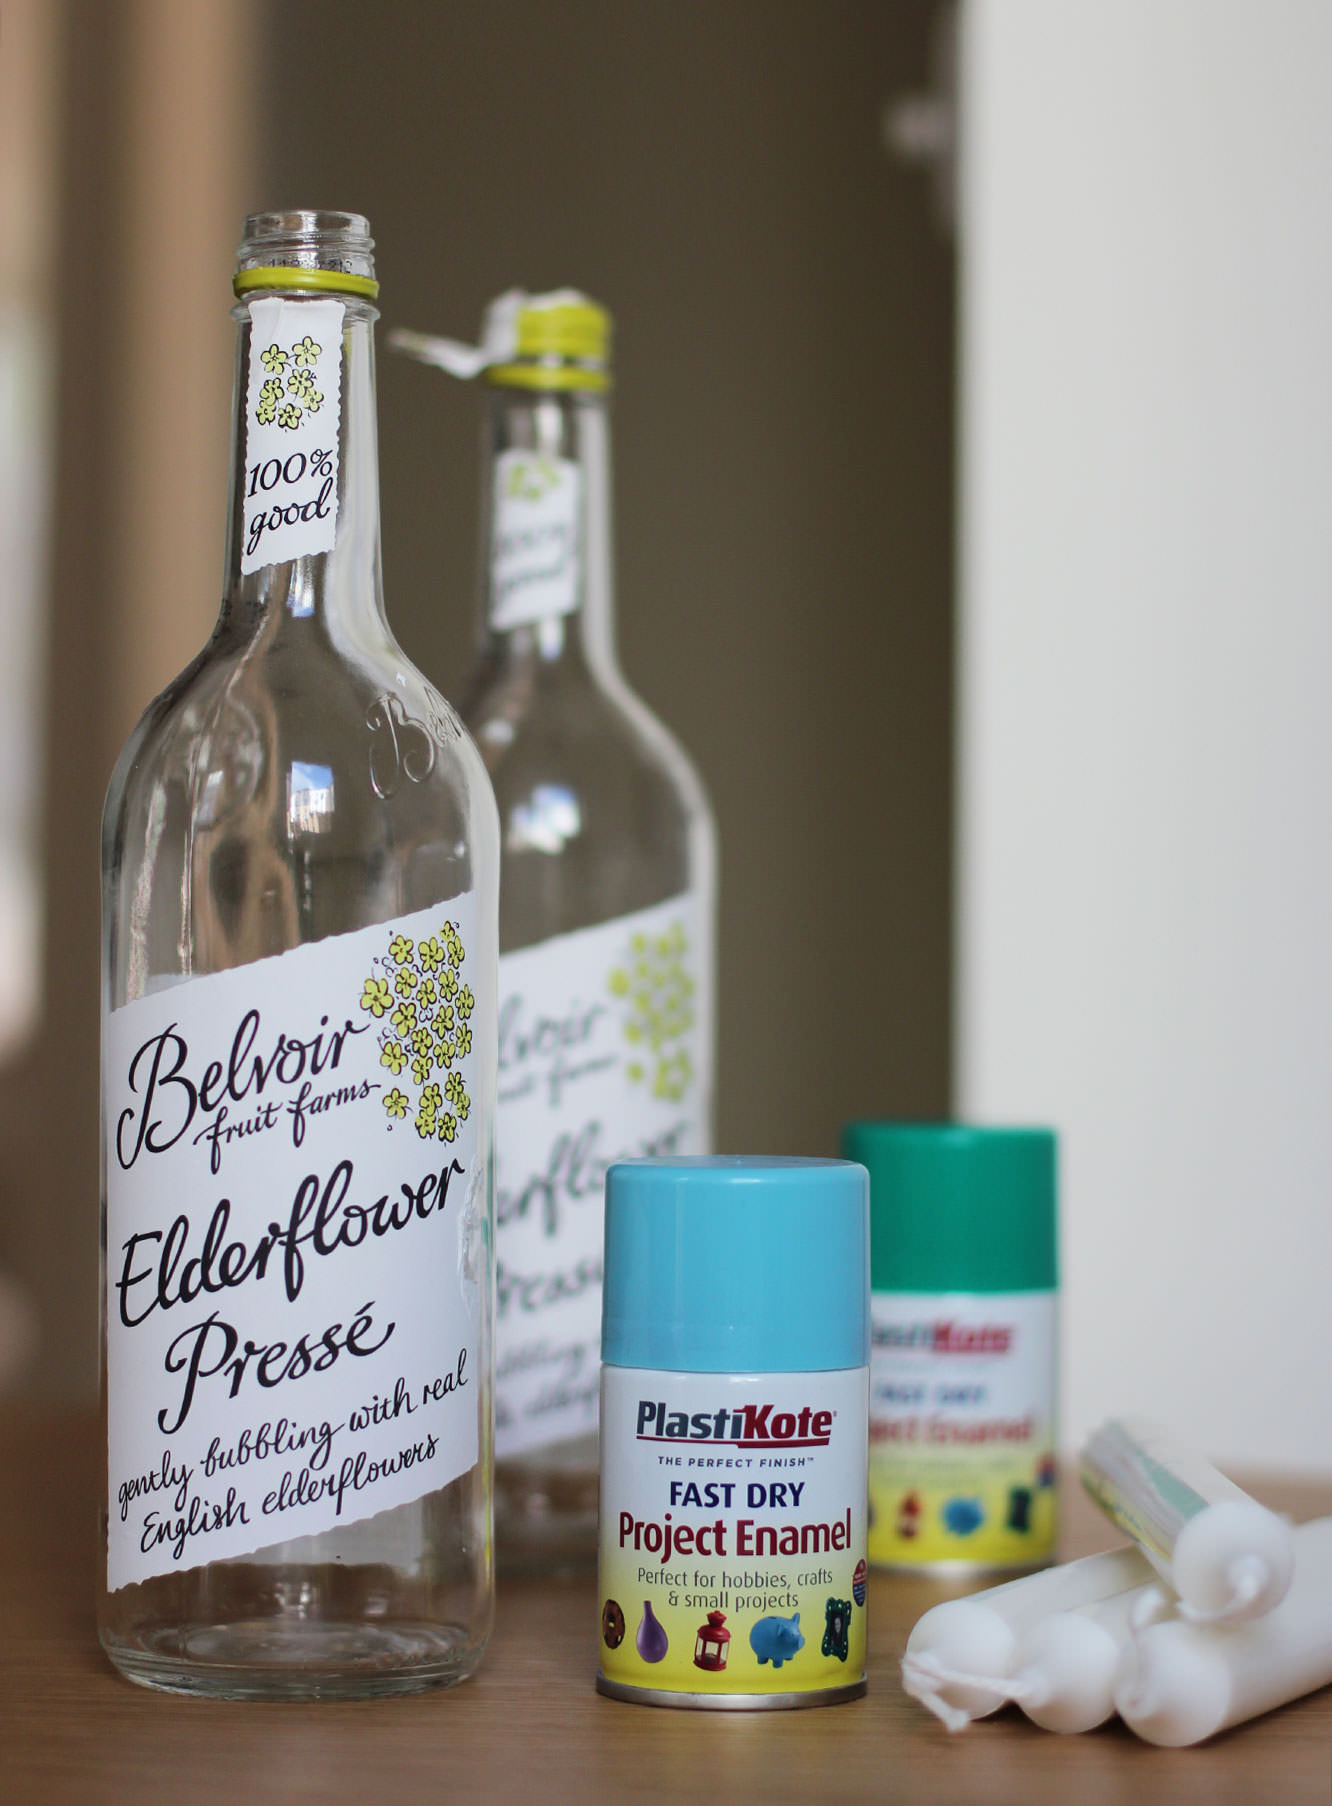
You will need
Clear glass bottles
White or cream dinner candles
Spray paint of your desired colour(s)
Newspaper and masking/washi tape
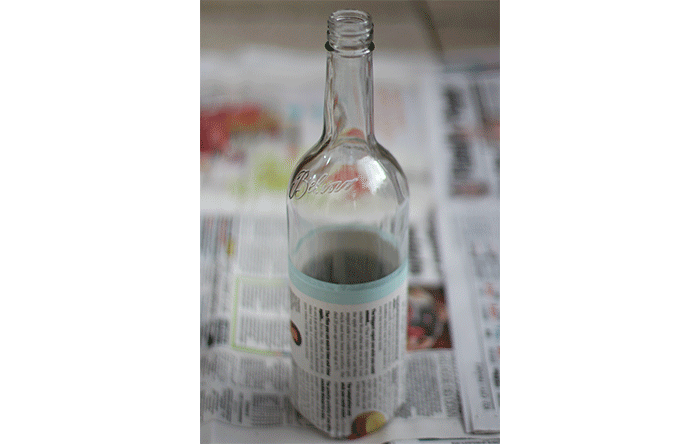
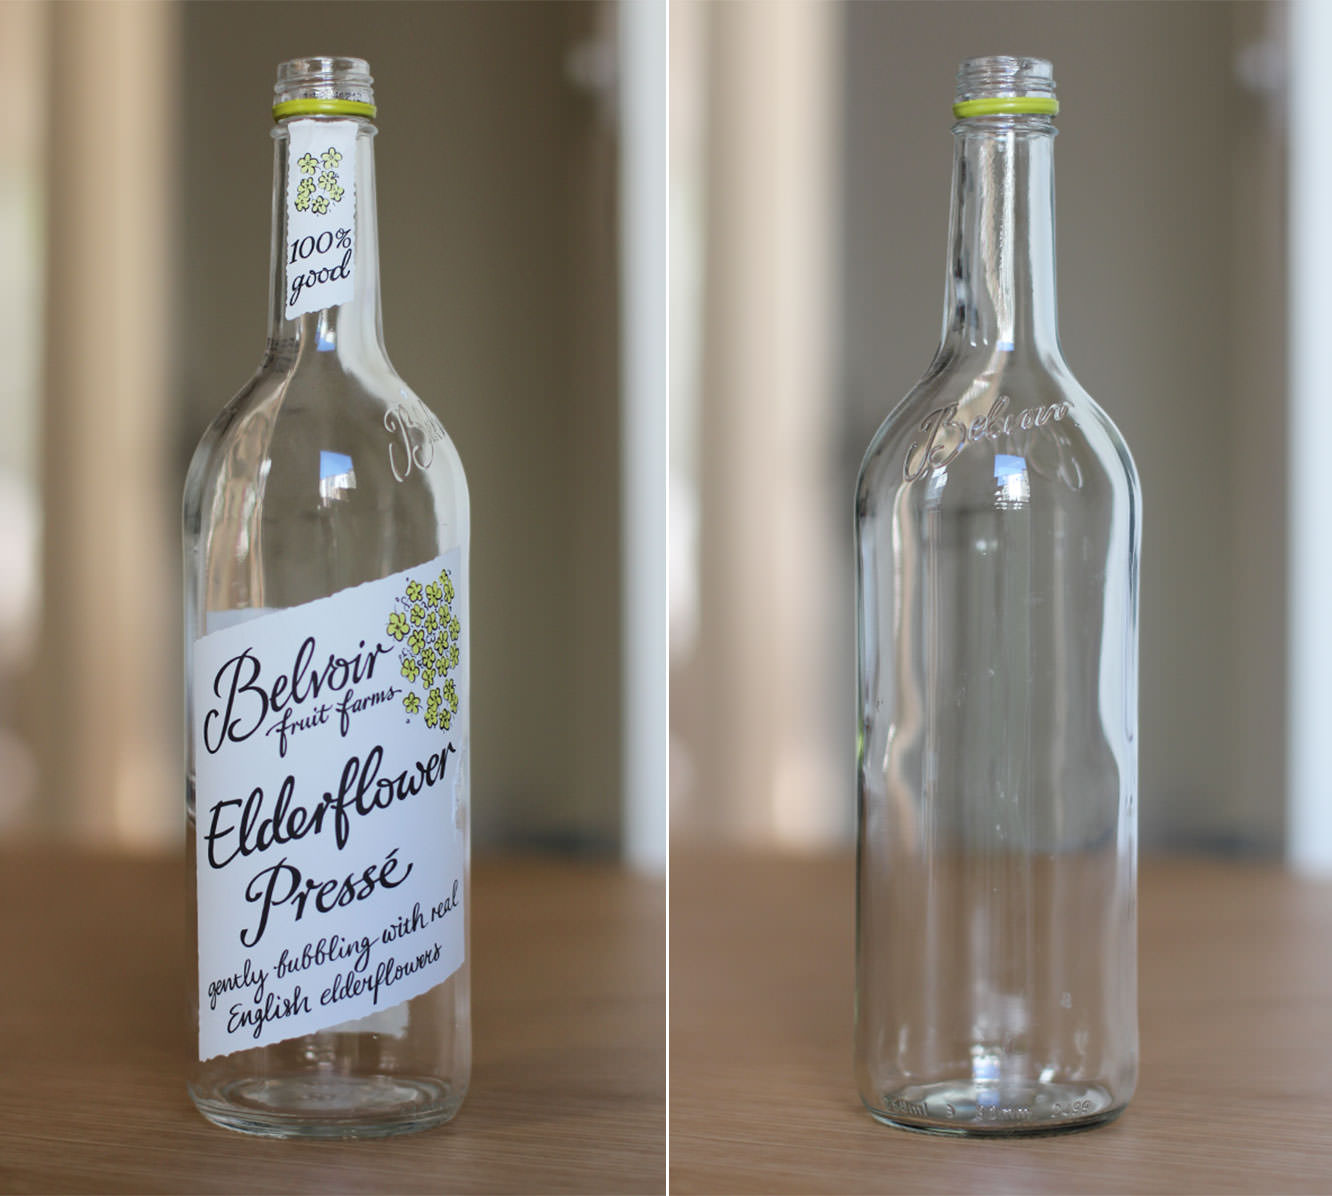
Step one
If your bottles have labels like mine did then you need to pour boiling water over them to soak alla that off.
They drink a lot of posh juice at work so I got these bad boys for free. You could also buy some from the home brew section of a Lakeland/Wilko’s; if that’s you, advance to step three and collect £200 as you pass Go.
Step two
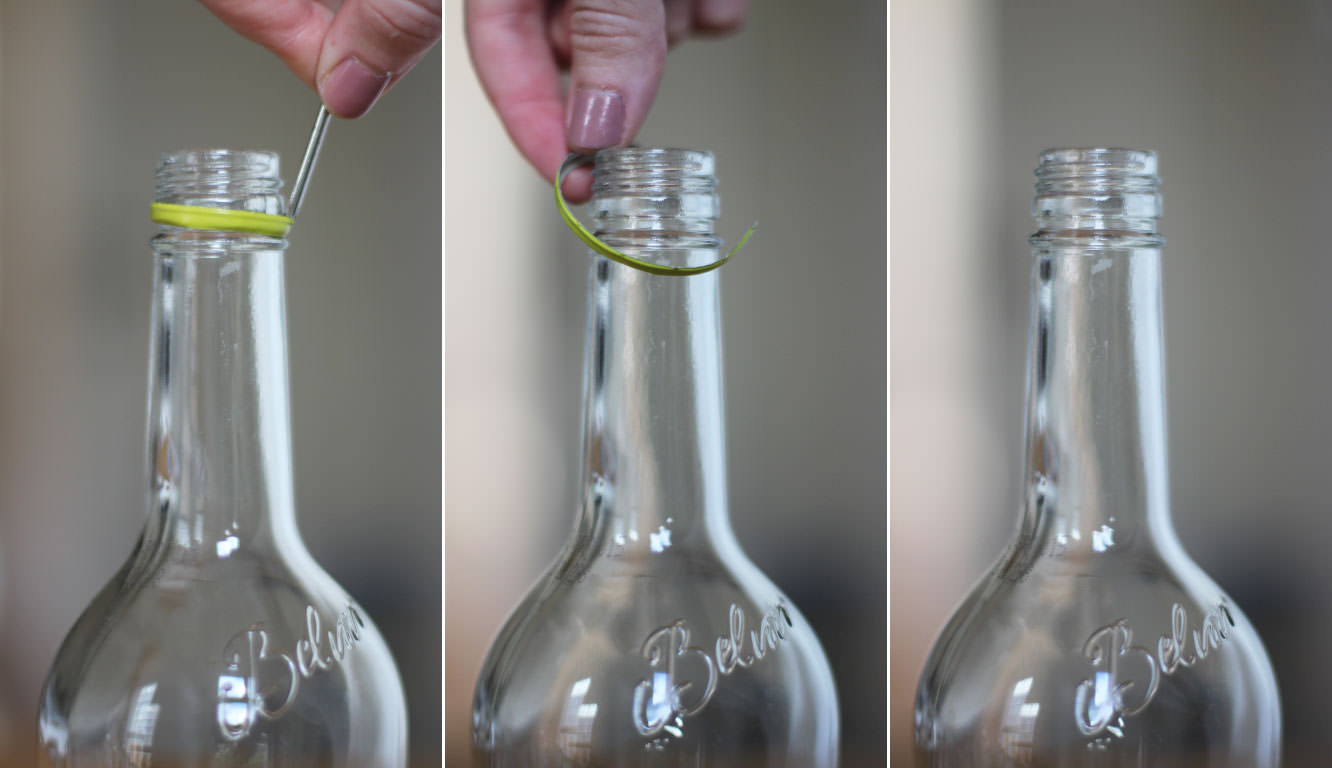
If you’re using recycled juice/wine bottles then stick a little screwdriver or a knife in the metal bit and prise it off. It’s worth not being lazy and skipping this step.
Step three
Wrap the tops or bottoms of your bottles in newspaper, securing it with wash tape or masking tape which would be a lot cheaper if you have it to hand. As you can see, I didn’t.
The more care you take over this the better as you want the lines to be as straight as possible. Otherwise your OCD friends won’t enjoy your company at your dinner party; they will be too distracted by your wonky candle holders. They will be totally justified in this.
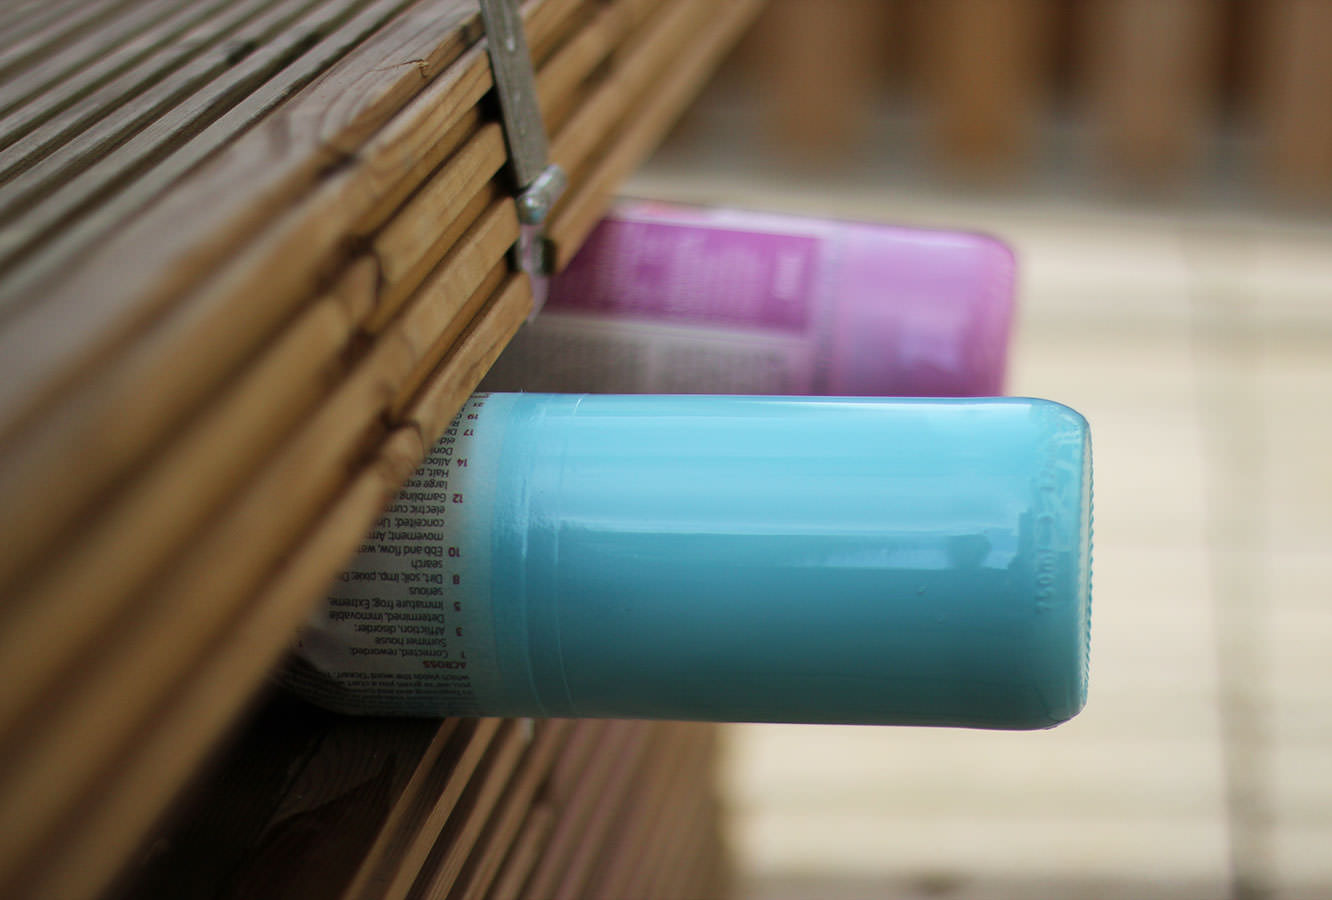
Step four
Go outside and put down some newspaper. Obviously the best time to do this is on a dry day, but let’s just see how well the British weather co-operates with you…
Shake the can of spray paint and hold about 20cm/8 inches away. Spray thoroughly until the bottle has an even, opaque colour.
Leave to dry.
Step four – bonus tip
If you’ve wrapped the top of the bottle rather than the bottom, I found the easiest way was to hold the neck in my hand and spray while holding it.
In order to dry it you need to find something to wedge between so it’s sides/the bottom won’t touch anything else. You could just hold it as they don’t take long to dry at all, but I found this storage chest/bench in the garden was just the ticket.
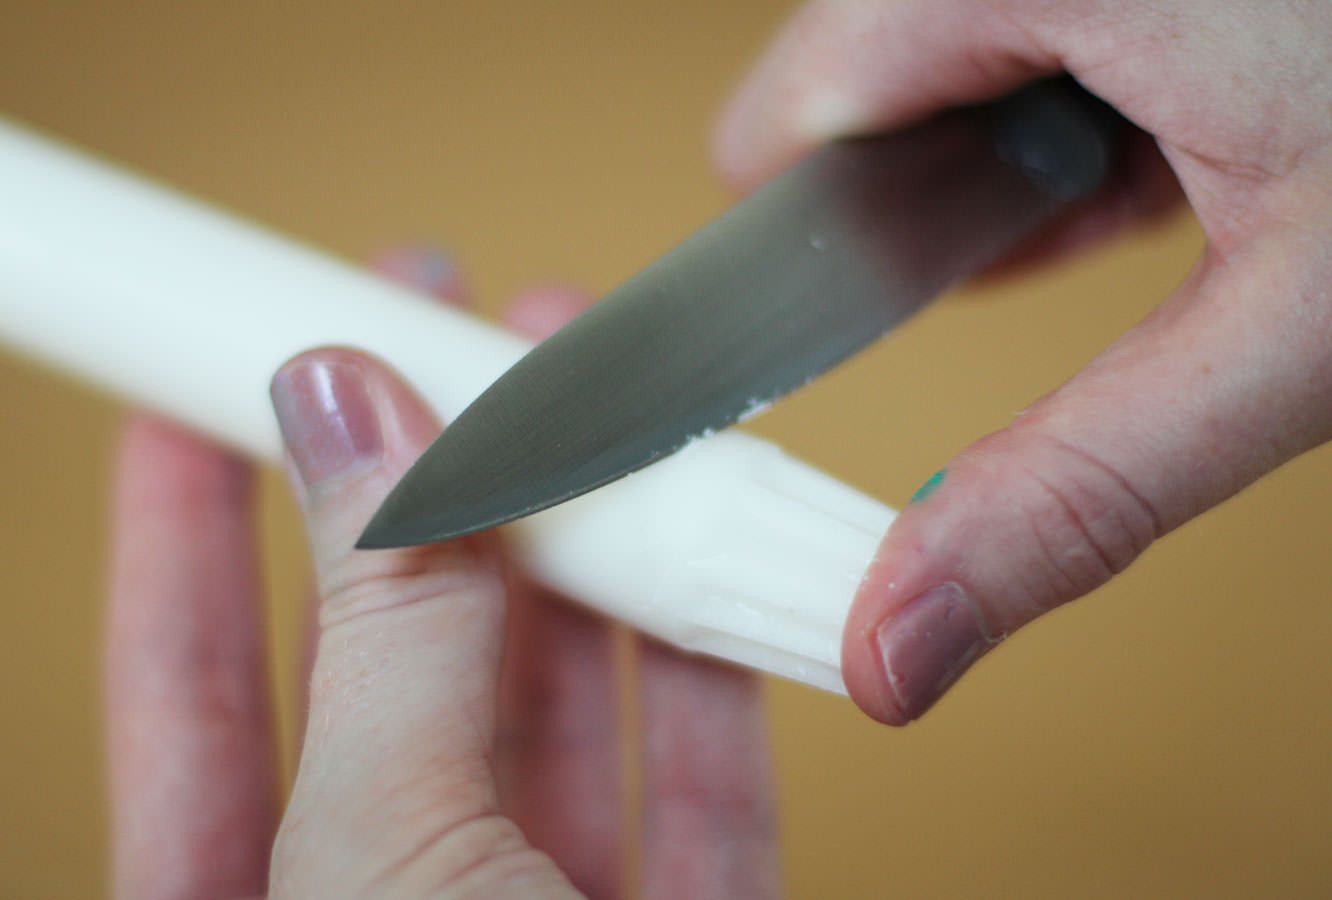
Step five
Whilst your bottles are drying you might need to do a little candle whittling. Mine had really handy grooves in them already but unfortunately were still a little on the large side, so I had to trim them down.
Just for the sake of everyone who knows how clumsy I am and would reel in horror at this picture, I still have all ten digits.
Having been ticked off by one of my nearest and dearest for producing too much food and not enough craft on the blog lately I thought it was about time I sorted that out. Plus, I’m a little bit scared of her.
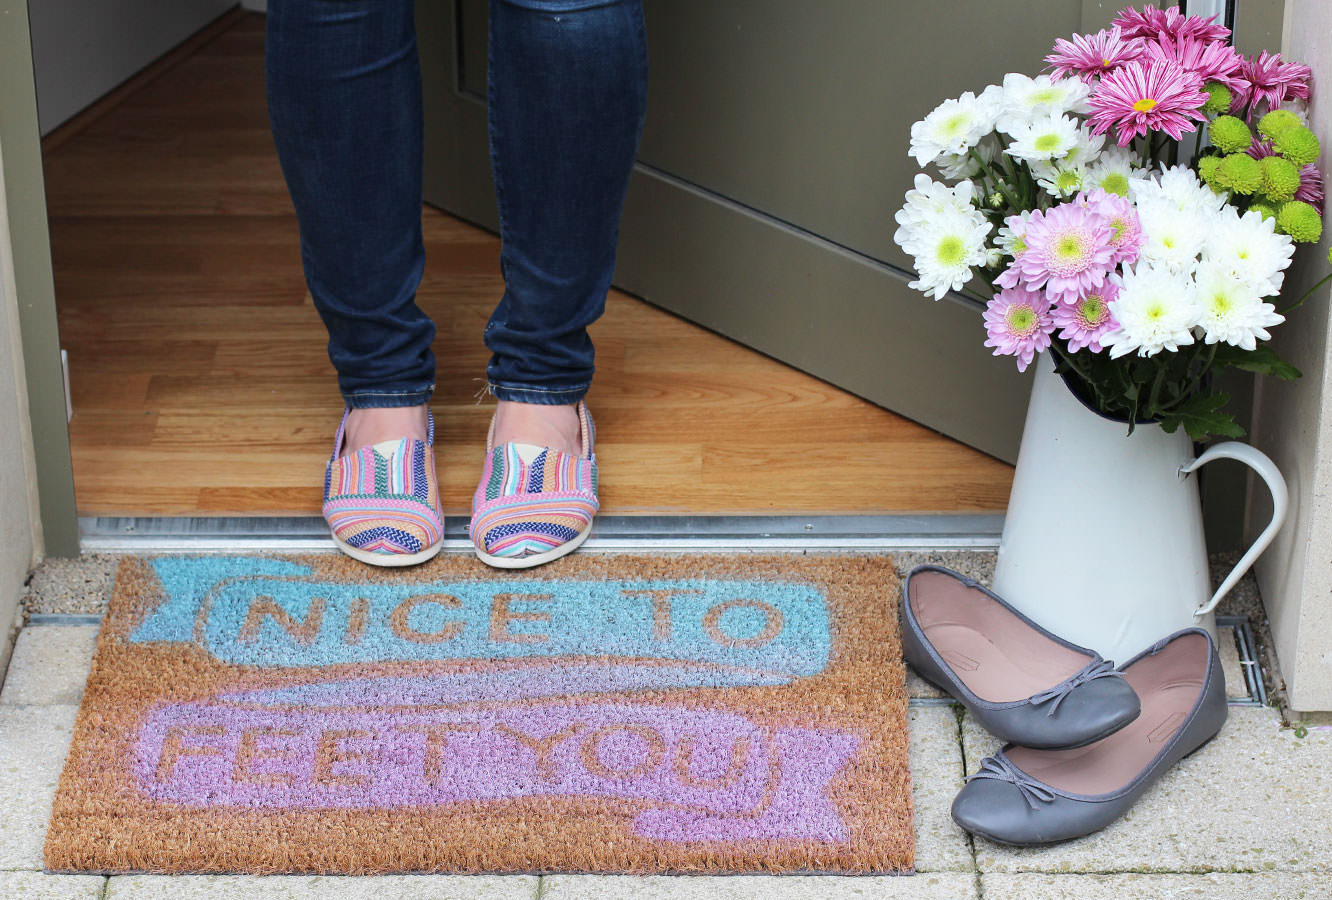
Having noticed the doormats along the street were pretty much all exactly the same, and needing to acquire one, I thought of this little make.
My housemate provided the rather excellent pun for ours, I can’t take the credit for that.
This could double as a housewarming gift or wedding present too if you’re a bit strapped for cash and want to give something unique and homemade.
Things you need
Plain doormat (check if it’s indoor or outdoor depending where you want it. Wilkinson’s have both for about £4)
Spray paint (again, mine came from Wilko’s)
Newspaper
Double sided tape
A sheet of paper or newspaper as big as the mat.
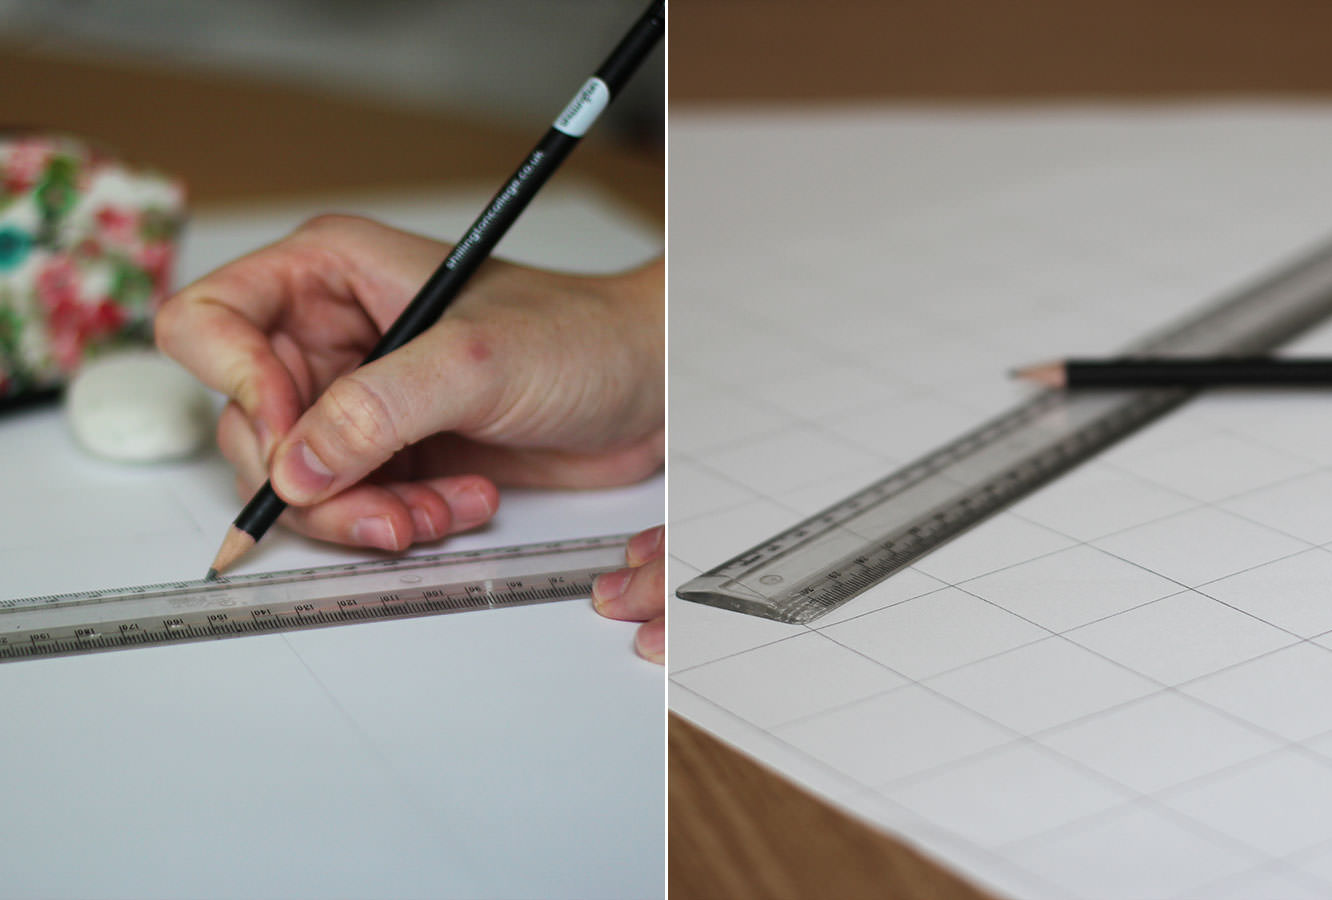
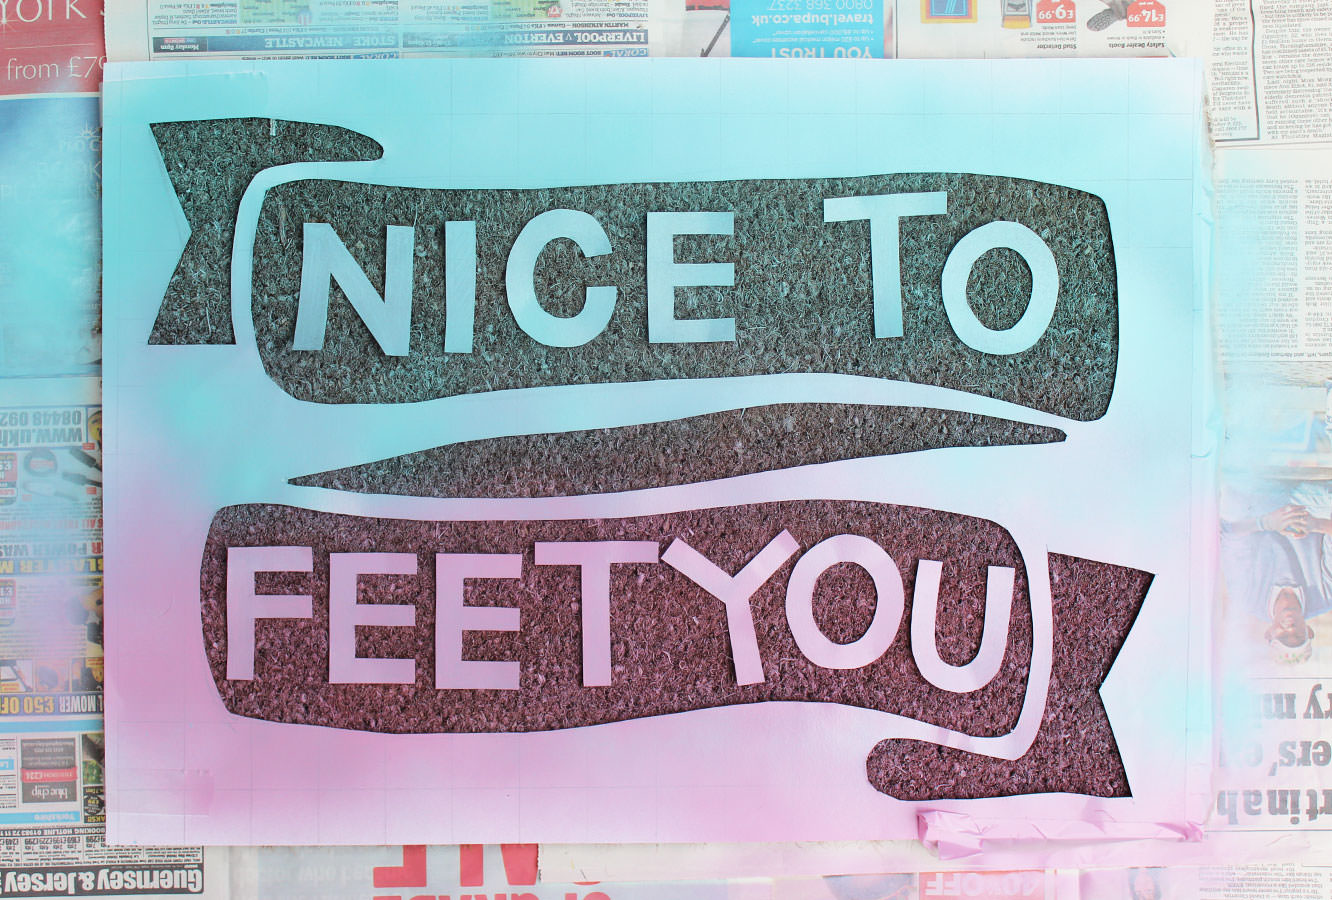
Step one
Draw a grid on your big sheet of paper. You are going to use this paper as the stencil; the grid will help you centre your design evenly and space everything out well. You don’t absolutely have to do this, but I recommend it. I just used the width of the ruler.
Step two
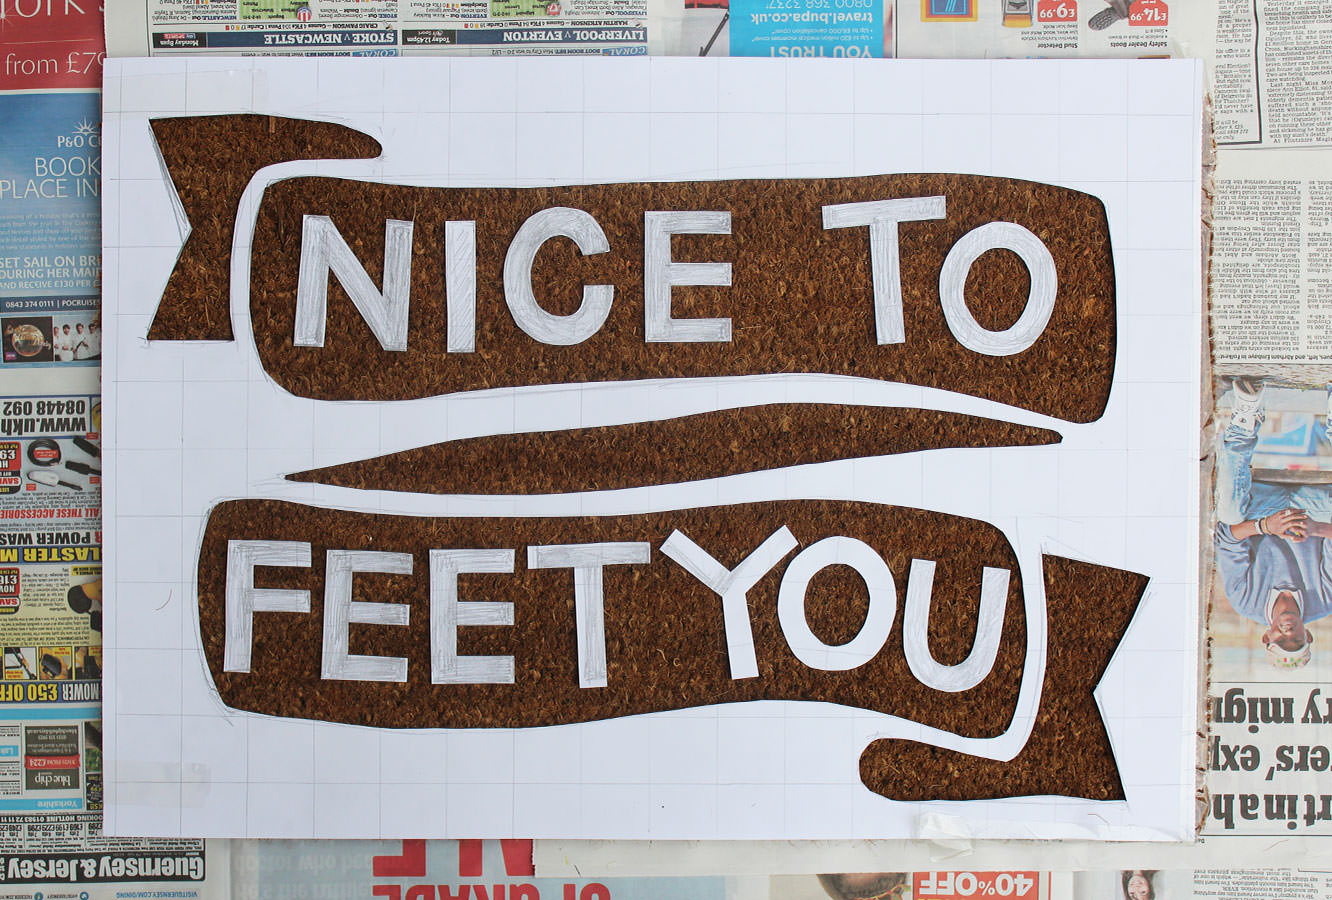
Sketch out your design.
Have a think about what you want to be sprayed and what will be mat coloured. If, like me, you are spraying the background and leaving the letters the colour of the mat make sure you keep them fairly bold and chunky. The spry has a nasty habit of creeping underneath.
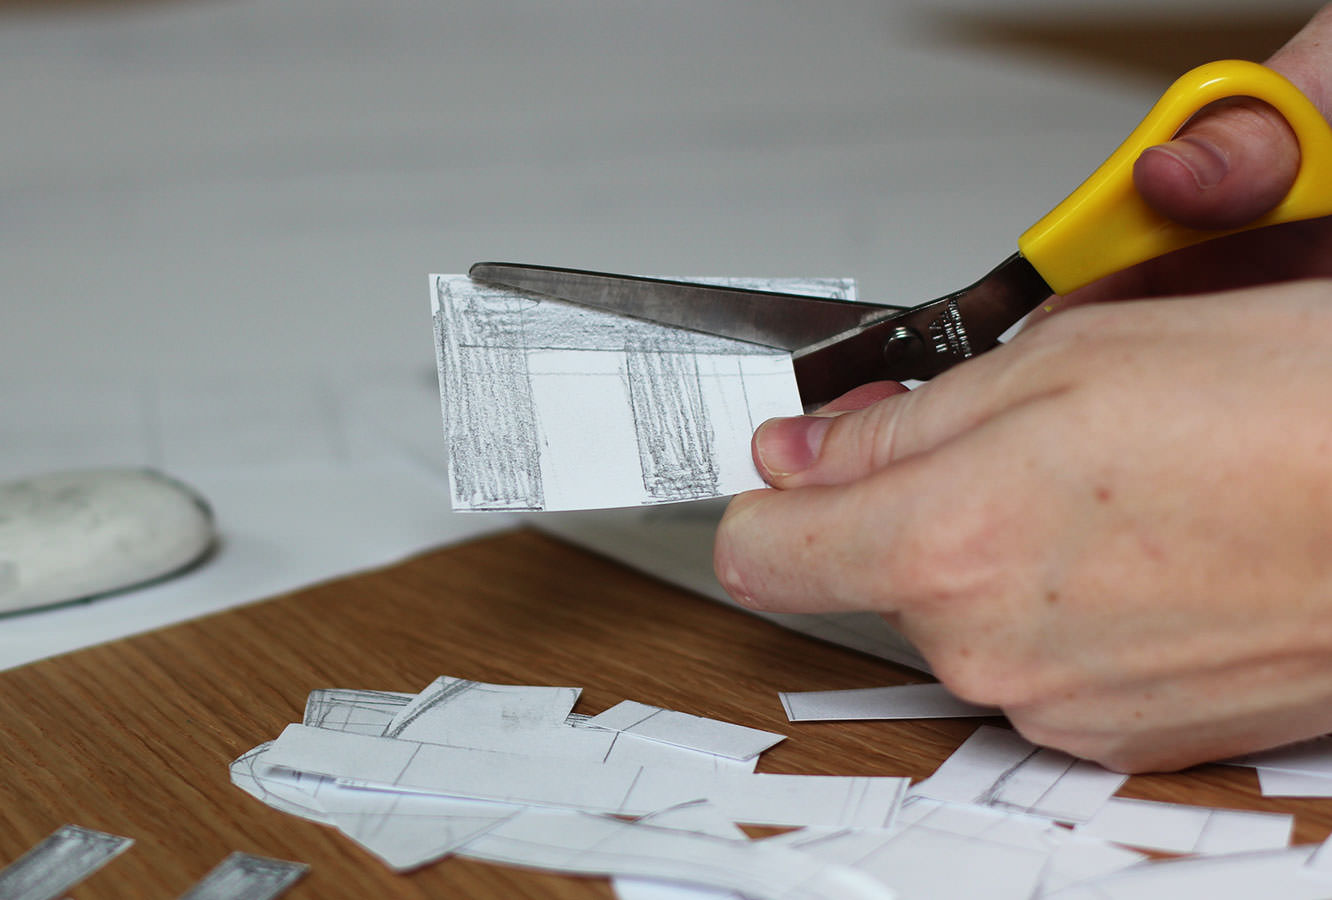
Step three
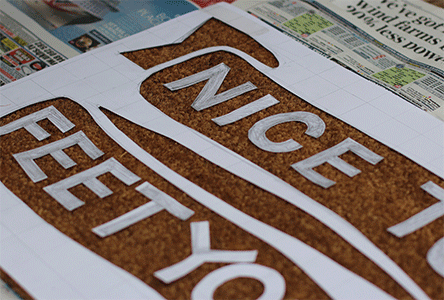
Cut out your design, leaving everything that’s meant to be mat coloured in tact and leaving gaps where the spray will go.
Step four
Go outside and lay out newspaper on an even surface. Place the mat on top and arrange your stencil.
I used double sided tape to secure the letters. I won’t lie, this didn’t work perfectly as they did still curl up a little, but I couldn’t think of a better solution – blu tac would have stayed in the bristles of the mat.
Step four
Spray away. Keep the can about 20cm away from the surface. I used two colours and sort of merged them in the middle.
Here’s a tiny gif (I apologise, it’s not my best, I was too distracted by all the spray paint flying in my face to concentrate on the photography) but I got complaints last week for not including one…
Step five
Leave to dry and add another layer or two until the colour is quite pronounced. As you are most likely spraying onto a brown mat it’s unlikely you will get it totally opaque. Try to choose colours that are light and bright or really dark. The lilac colour didn’t work quite so well, so I sprayed some white on top to brighten it up a bit. The blue was good, and I think yellow might work well too.
Step six
Bring a smile or a roll of the eyes to your post man’s face.
Oh hi. Thanks for stopping by. This week I’ve been putting together a little DIY project for all you people getting married this summer. Or basically anyone who likes candles. I can’t tell you just how ridiculously easy this is and it takes no time at all, so no excuses, unless you are scared of fire.
You will need
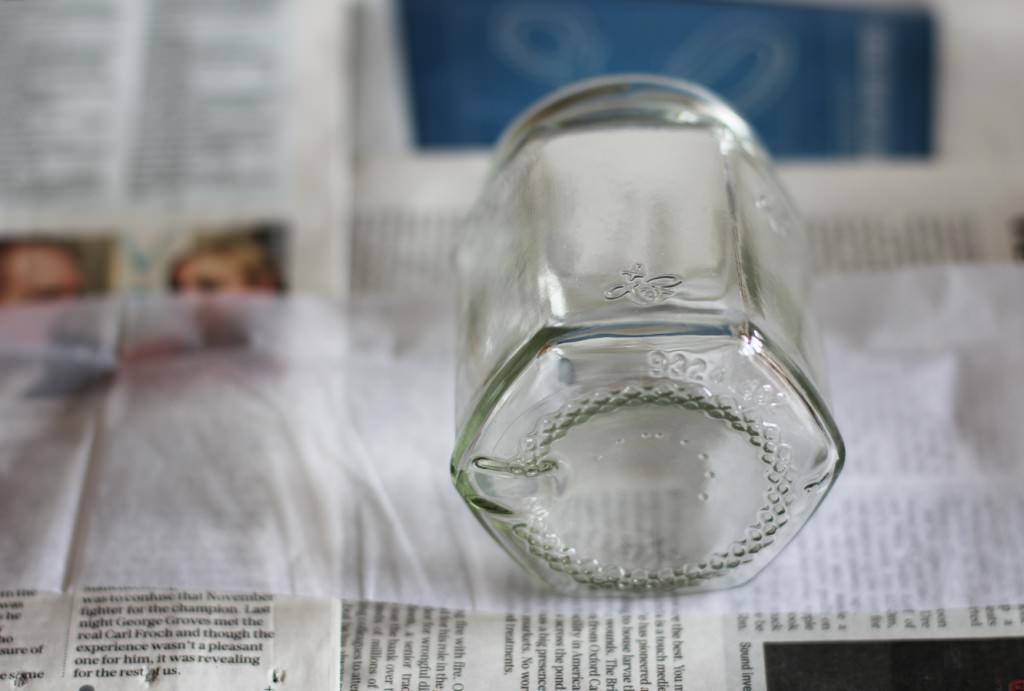
All the jam jars and glass pots you can find (a great excuse to go to France and gorge on those chocolate puddings, and a perfectly reasonable level of dedication to your craft)
Tea lights/small candles
White tissue paper
Paper doilies
Some kind of nice rustic string or ribbon (mine was from hobby craft)
PVA glue
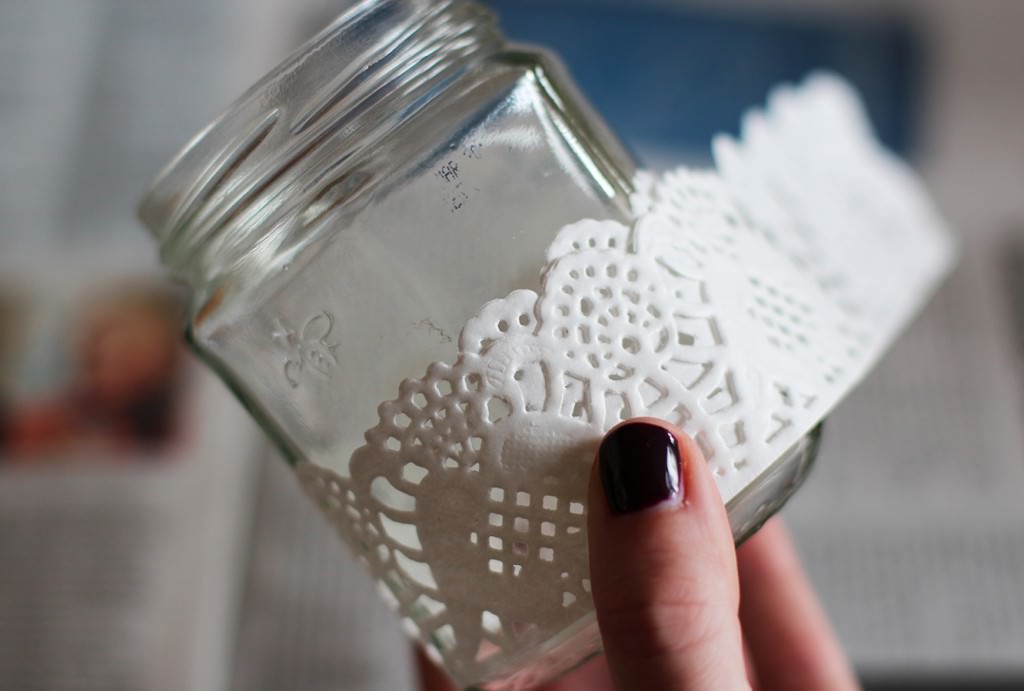
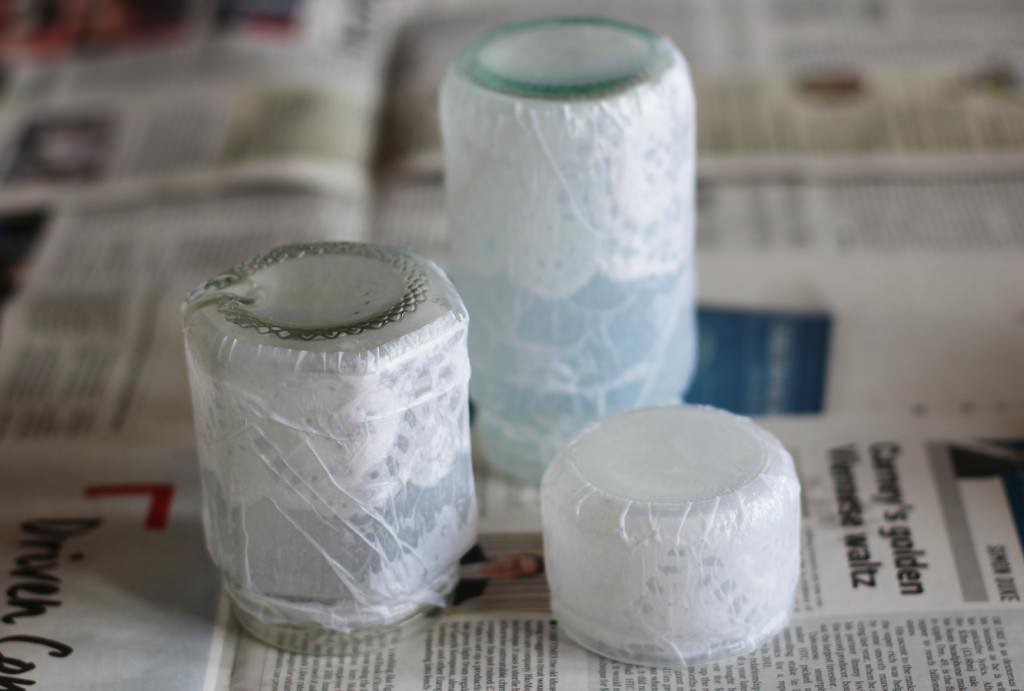
Step one
Cut the lacy bit of the doily off so you have a long strip. I found these rectangular ones in a bits and bobs shop which are ideal for wrapping round in a straight line.
Step two
Measure the circumference of your jam jar and cut the doily strip to size. Pro tip: when you cut it go with the natural curve of the pattern, rather than a straight line, as even if you have some overlap the join will be far less obvious.
Step three
Use the jar as a measure to cut a strip of tissue paper (one sheet thick) to match the height and circumference. You don’t need to be too exact as the tissue molds easily with the glue.
Step four
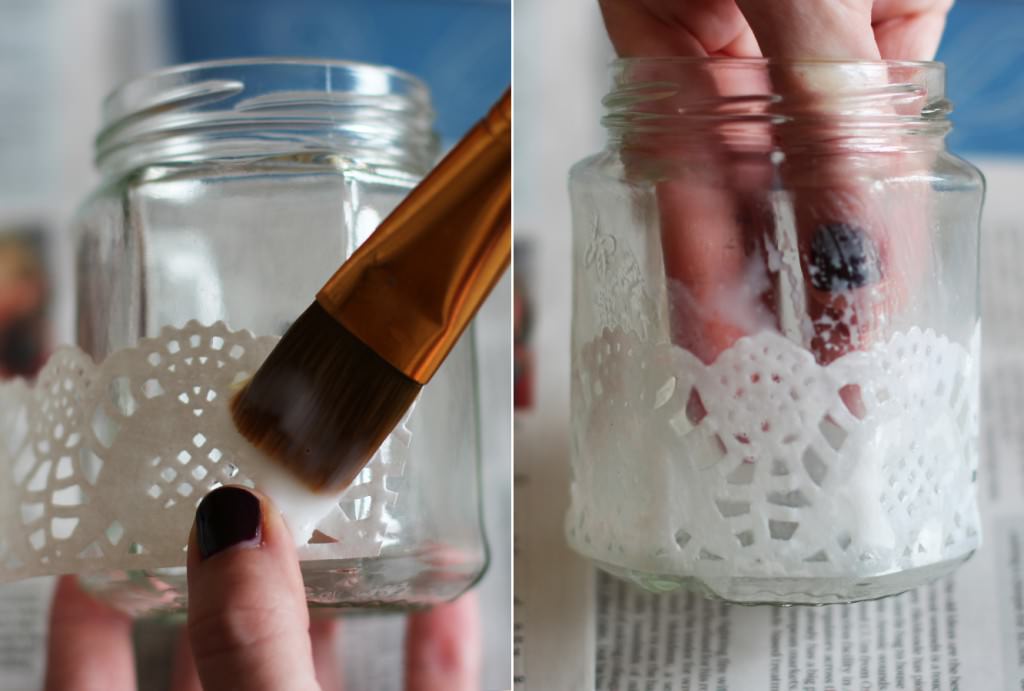
Using a mixture of PVA glue and water (about two thirds PVA to one third water) stick the doily around the bottom of the jar as shown. I put the doily onto the jar dry and then just painted over the top which worked perfectly. Pro tip #2: I know, I know, I’m spoiling you today…once you’re about half way round the doily will hold to the jar by itself so you can put your non paintbrushing hand inside it to hold steady and avoid getting glue all over yourself.
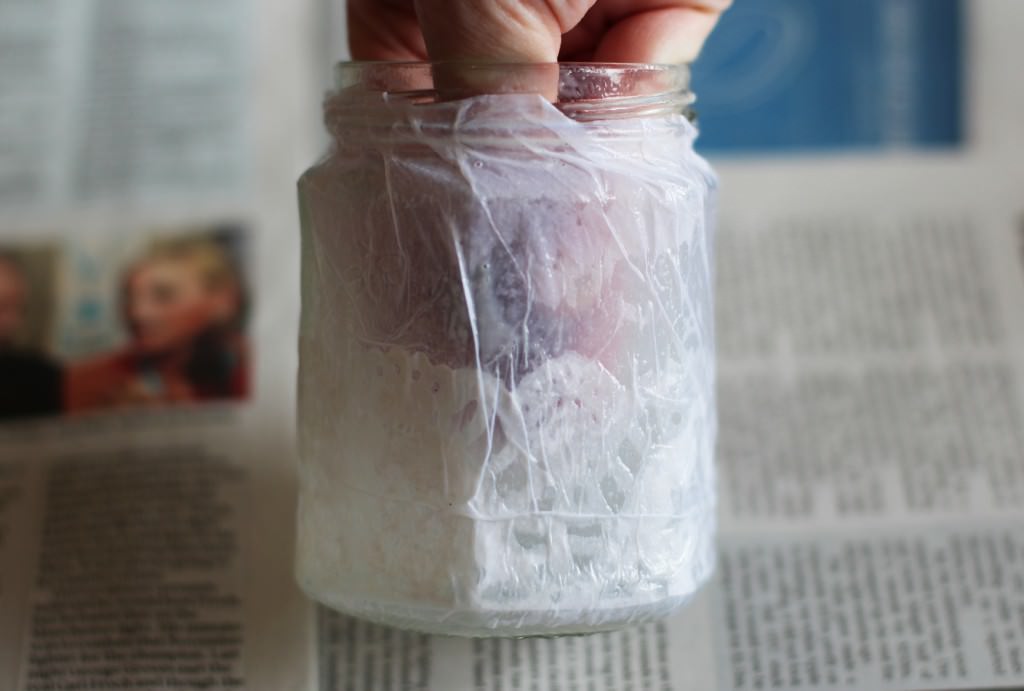
Step five
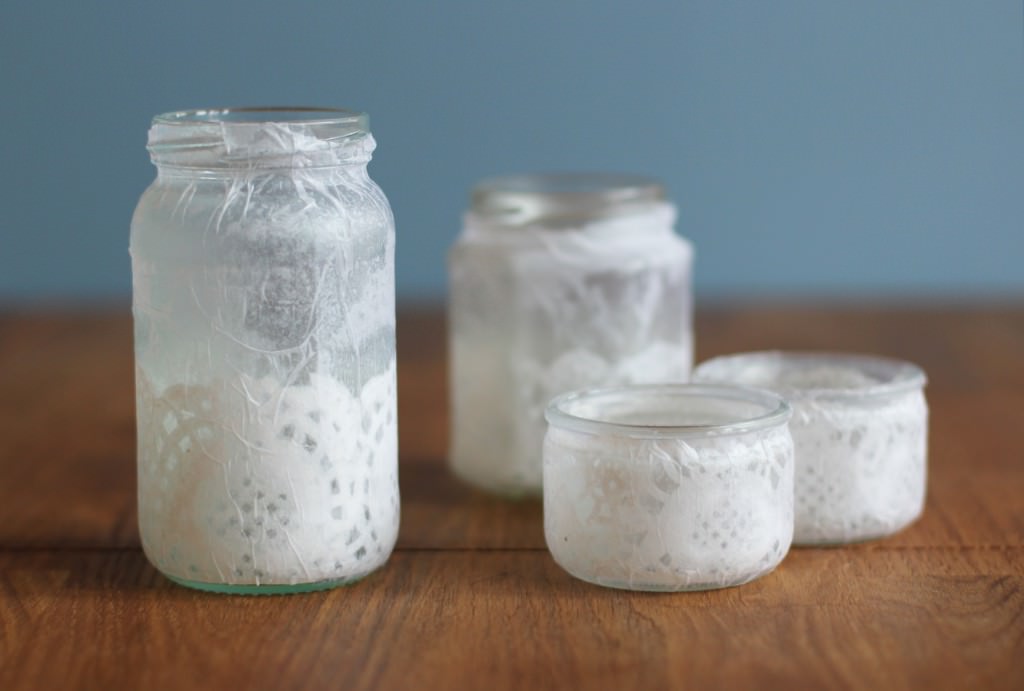
Repeat with the tissue paper, pushing it into the contours of the jar as you go. Don’t worry if it looks really scruffy at this point; it will be alright on the night.
Step six
Leave upside down to dry (or on whichever is the least gluey end!)
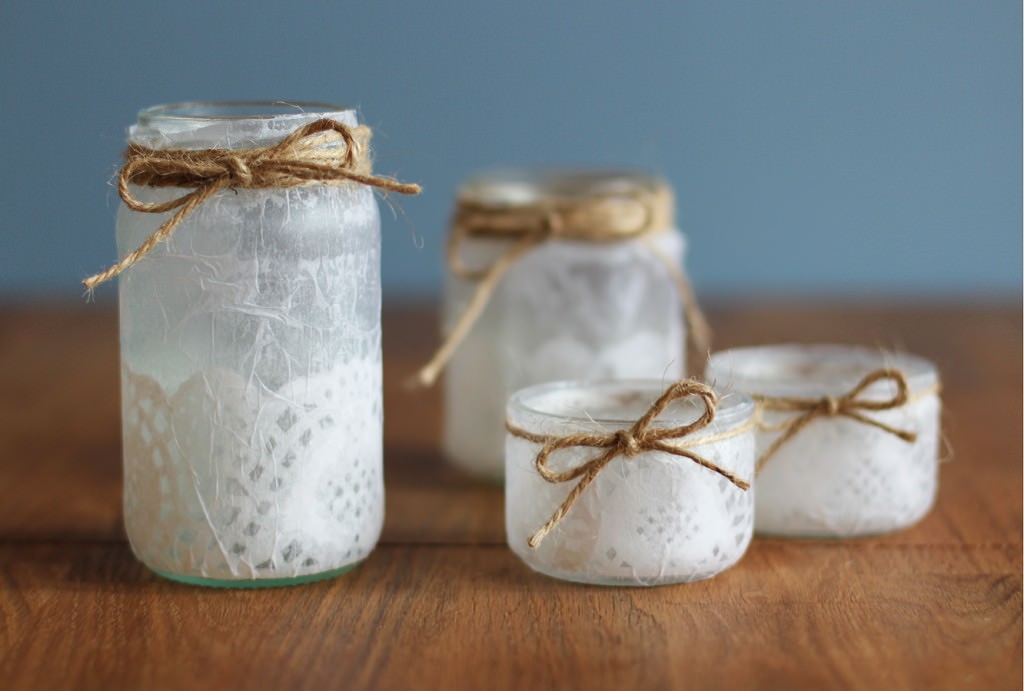
Step seven
Once dry, tie some lovely little bows around the necks of your candle holders. If you made a mess of the necks in the gluing phase you can use this opportunity to wrap the string around several times and pretend it’s all part of the design.


 Step two