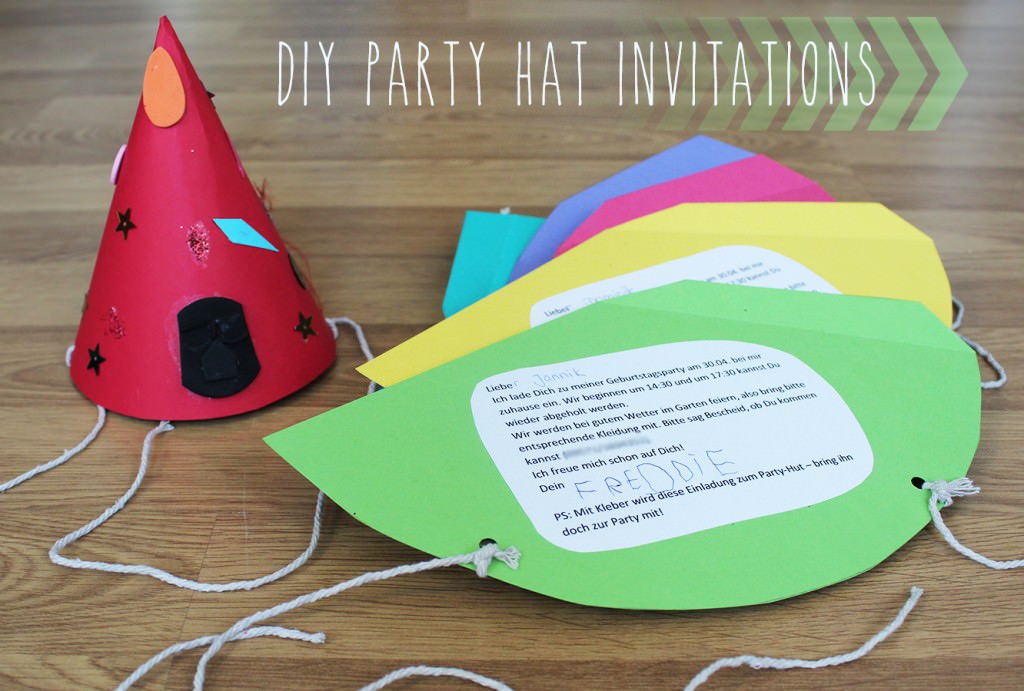
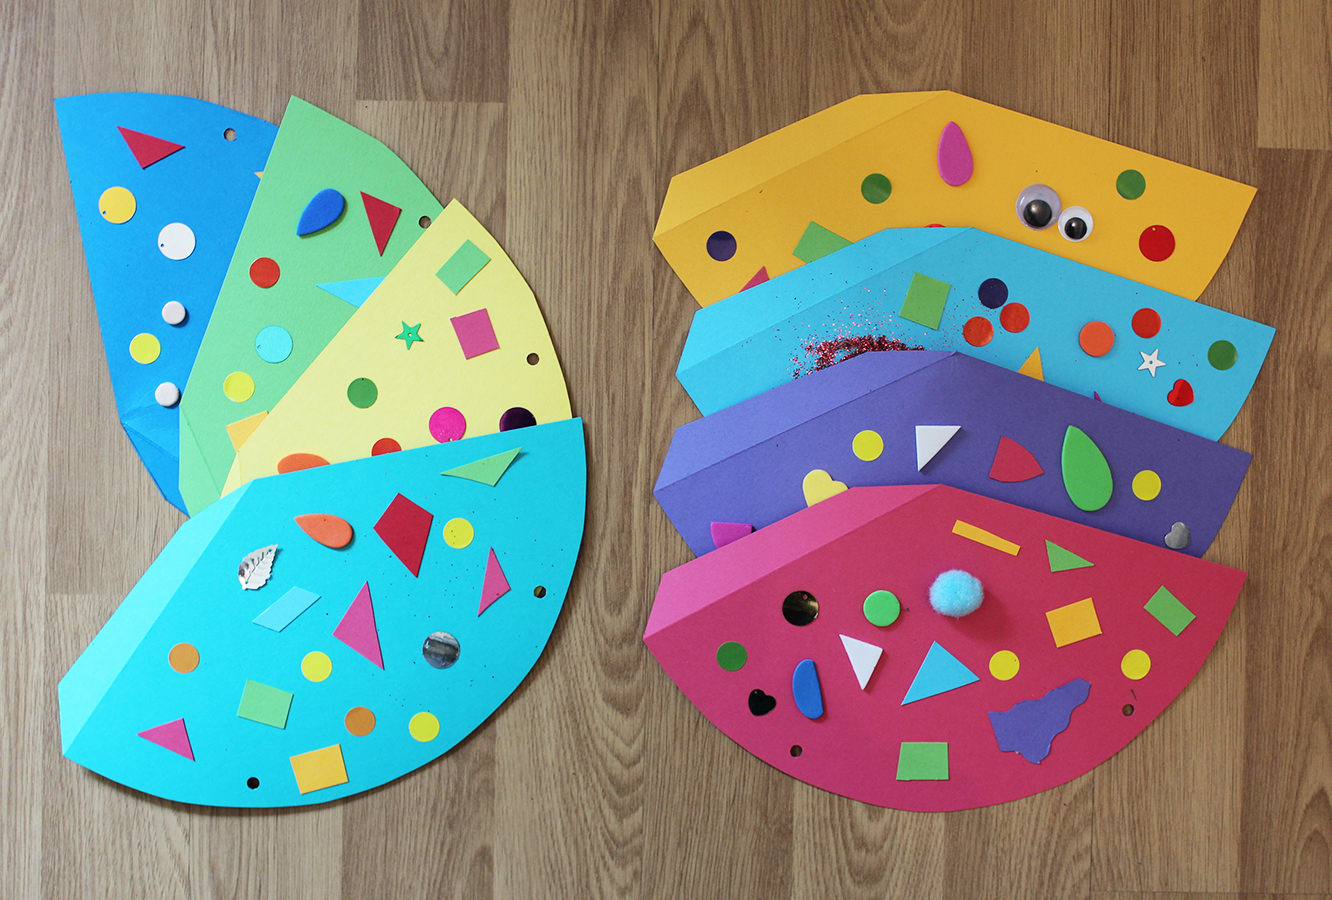
You might remember my mentioning I went on a little trip to Germany recently? I went a-visiting a wonderful little family who I miss very much. Capitalising on their crafty house guest there were some birthday preparations to be done. So aside from baking over 70 cupcakes (very popular little chap) there was the small matter of inviting other little people to come and eat them.
They were throwing a garden party with lots of traditional German party games, I really wish I’d have stuck around a bit longer to join in! So Mr Freddie and I crafted some invites that were fun and festive and will adapt to any theme or themeless party you’ve got going on.
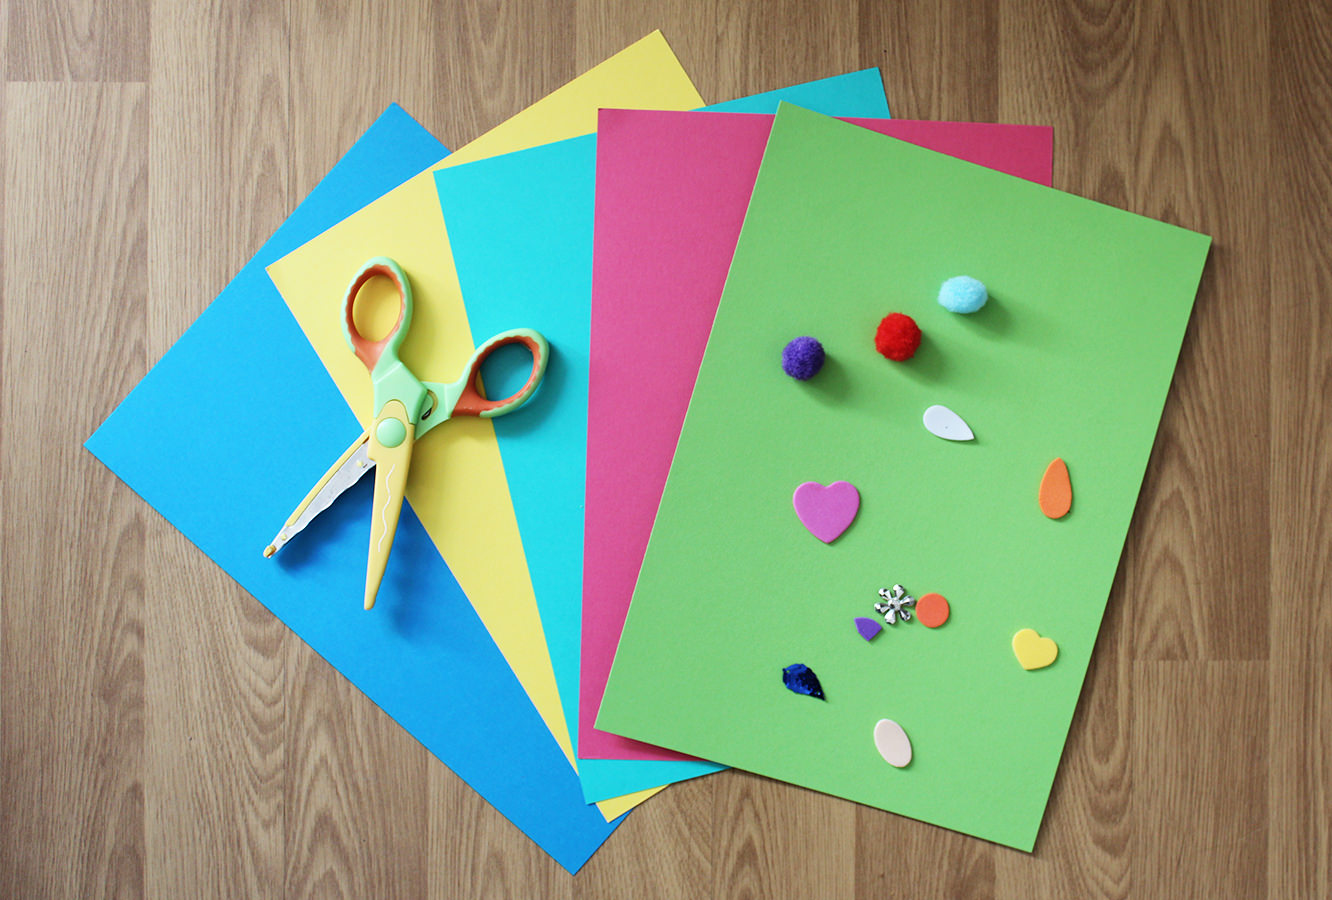
You will need
A4 Card/thick paper (one per guest and an extra for the birthday boy/girl)
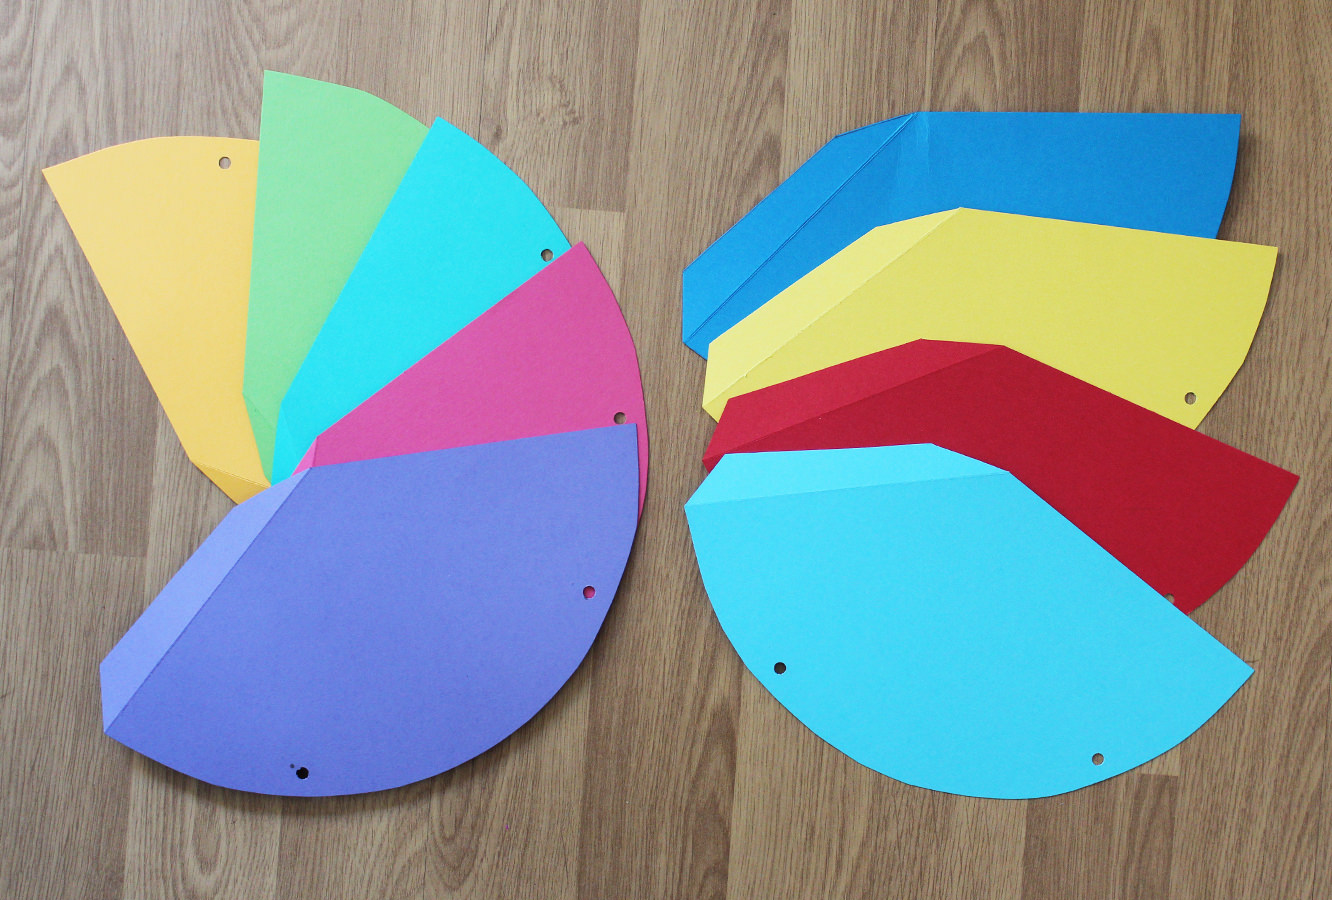
Draw round the template onto each piece of card and cut out a hat for each guest, not forgetting one for the birthday boy or girl.
Step two
Use a hole punch or something sharp poke holes in each hat (as marked on the template).
Step three
Using an open pair of scissors and a ruler score along the dotted line to create a flap.
Step four
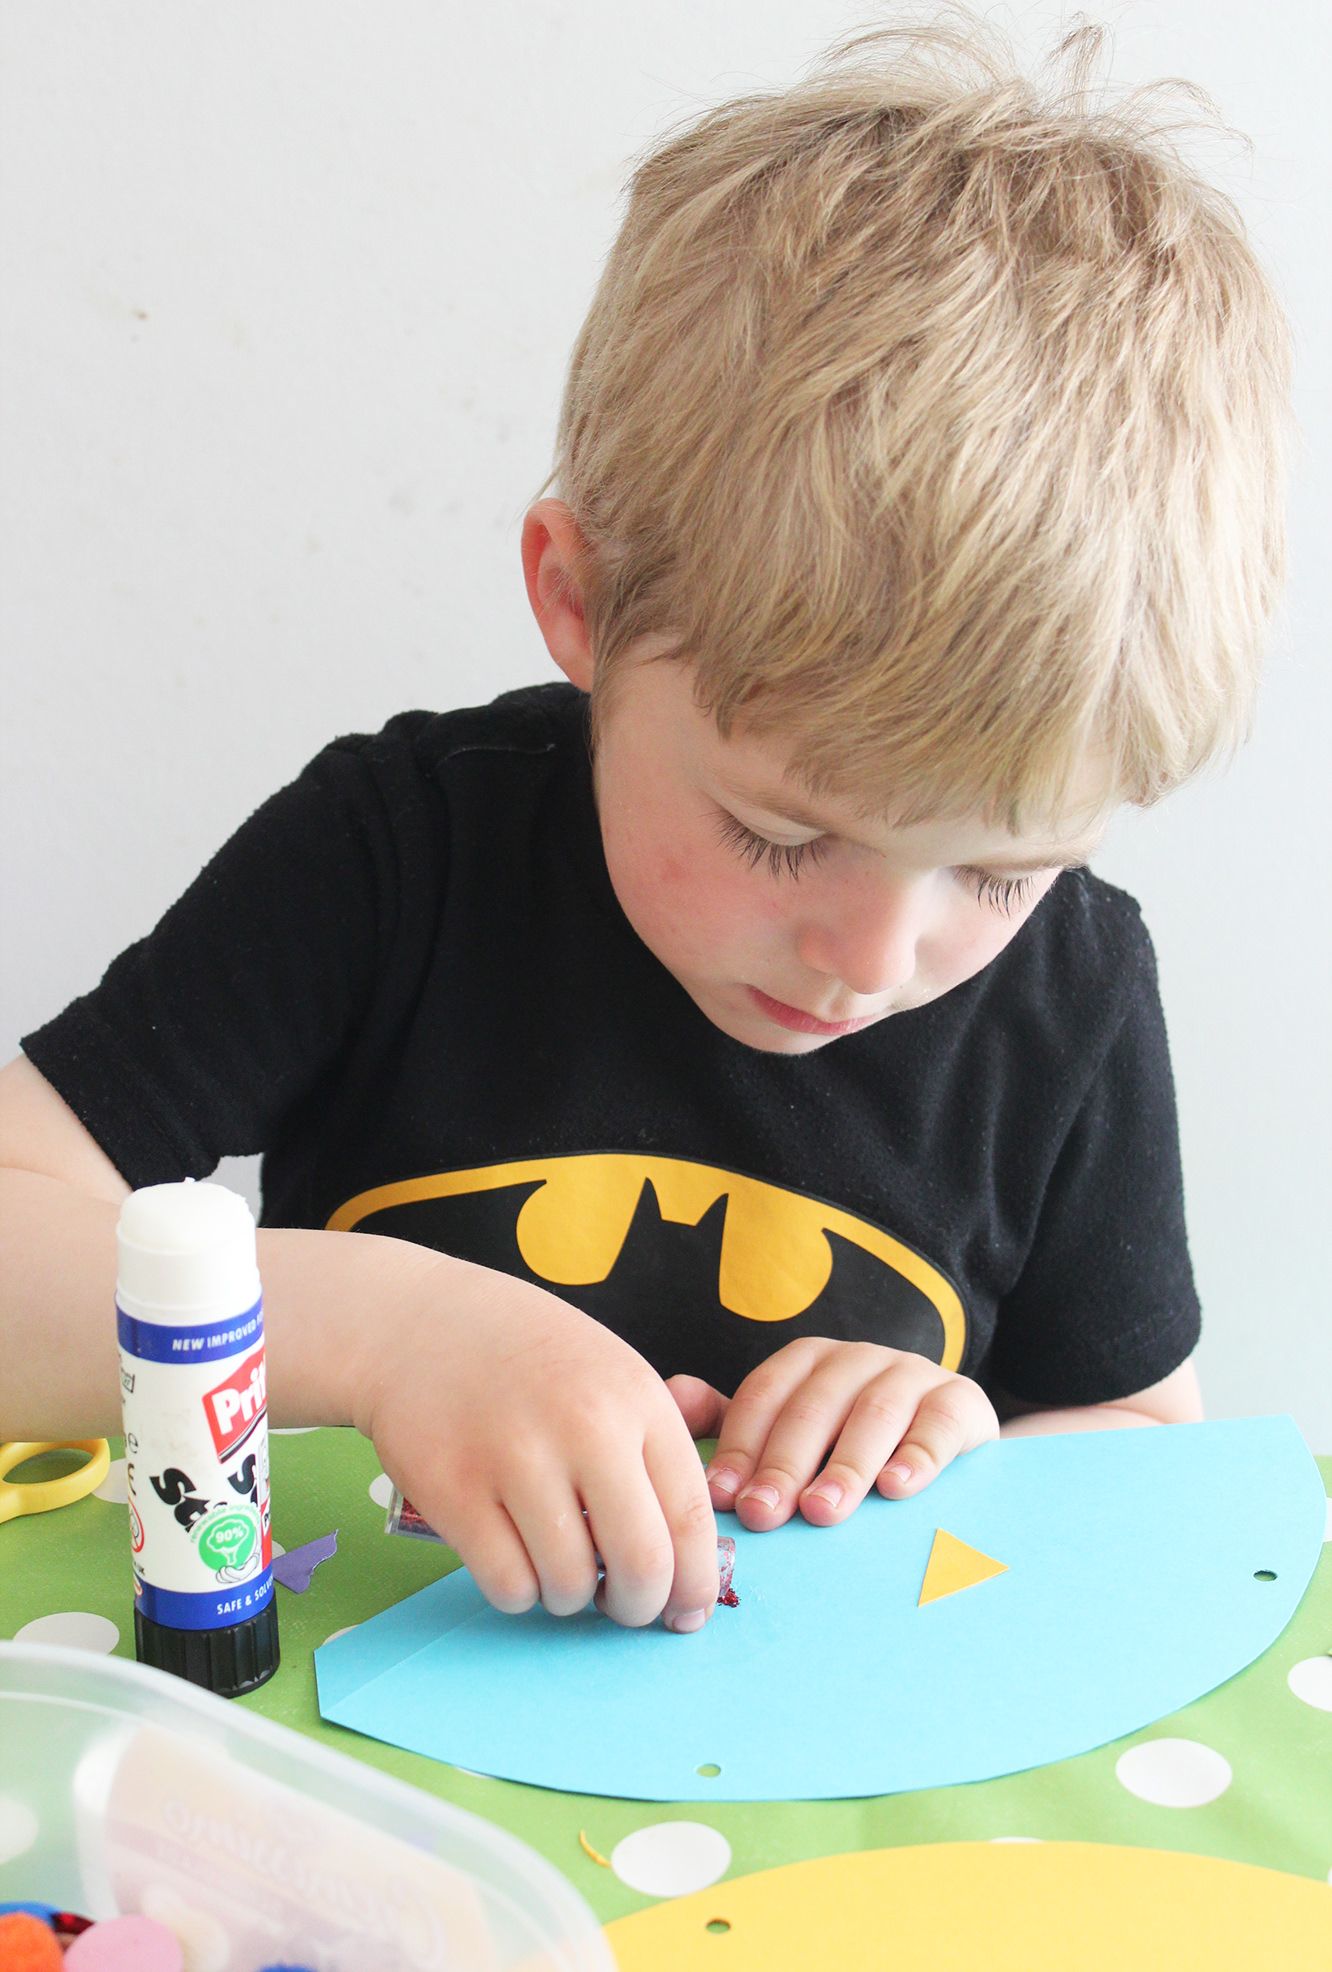
Decorate! Use your (or your child’s) imagination, Freds and I used foam shapes, stickers and glitter that mummy already had in stock. We also cut some shapes out from the left over card so as not to waste anything.
You can use whatever you can get your hands on, cut outs from old magazines/buttons/feathers/draw pictures or each child’s name. Your only limit is the attention span of the child in question!
(don’t decorate the flap)
Step five
Cut two lengths of string for each hat. Use the child you already have in stock to get an idea of length, you need to be able to tie a bow under their chins. Doing it this way rather than one loop means they are adjustable for each guest.
Step six
Add the party details on the other side and voila! Your hats are ready to give out. Each guest is in charge of assembling their hat and bringing it with them to the party (worth having one or two spare just in case!)
To stick together just glue the flap (with the hat right side up) and stick underneath the opposite edge.
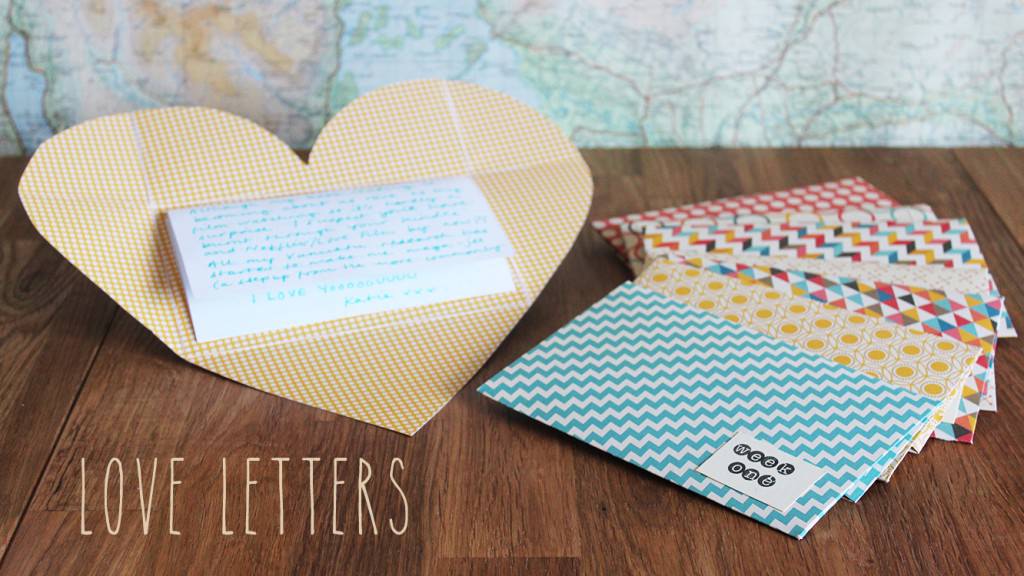
Yo. Another Monday, another blog from me. It’s sort of a cheat really, as it’s a spin off from this present I made for my friend Beth a few months ago. I made one for each week she was away travelling, I hope she’s having as much fun reading them as I had writing them. I MISS her.
I’ve been reflecting a whole lot lately on what wonderful friends I have. Beth is truly one of life’s diamonds (I promise I’m not usually this cheesy).
So if you have a special someone in your life, take a moment to make them a little love letter and let them know how much they are valued.
You will need
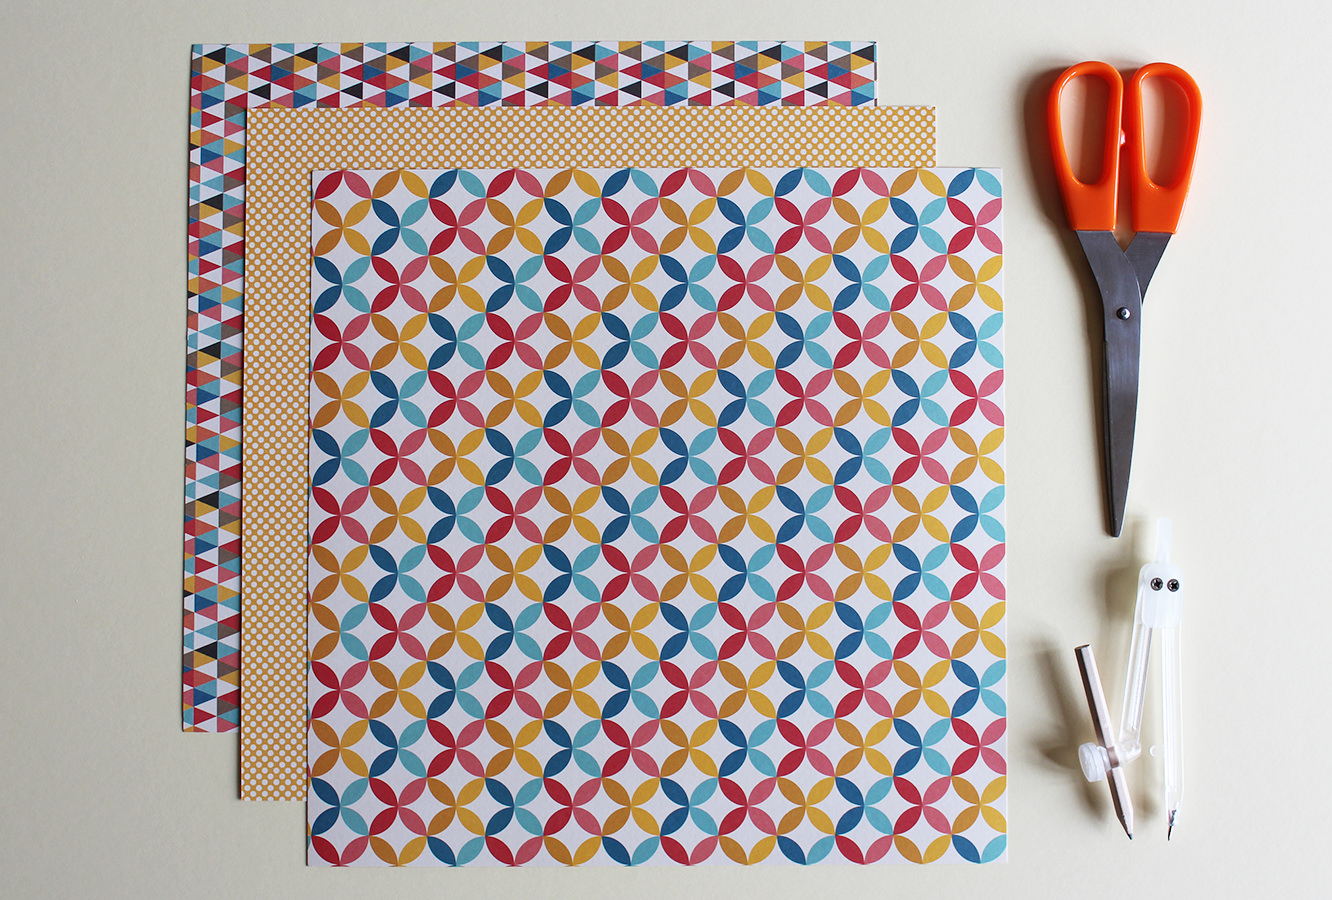
Large pieces of pretty card/paper (mine are scrapbook sheets 12″x 12″)
Something round/set of compasses
Scissors
The outpourings of your heart
Step one
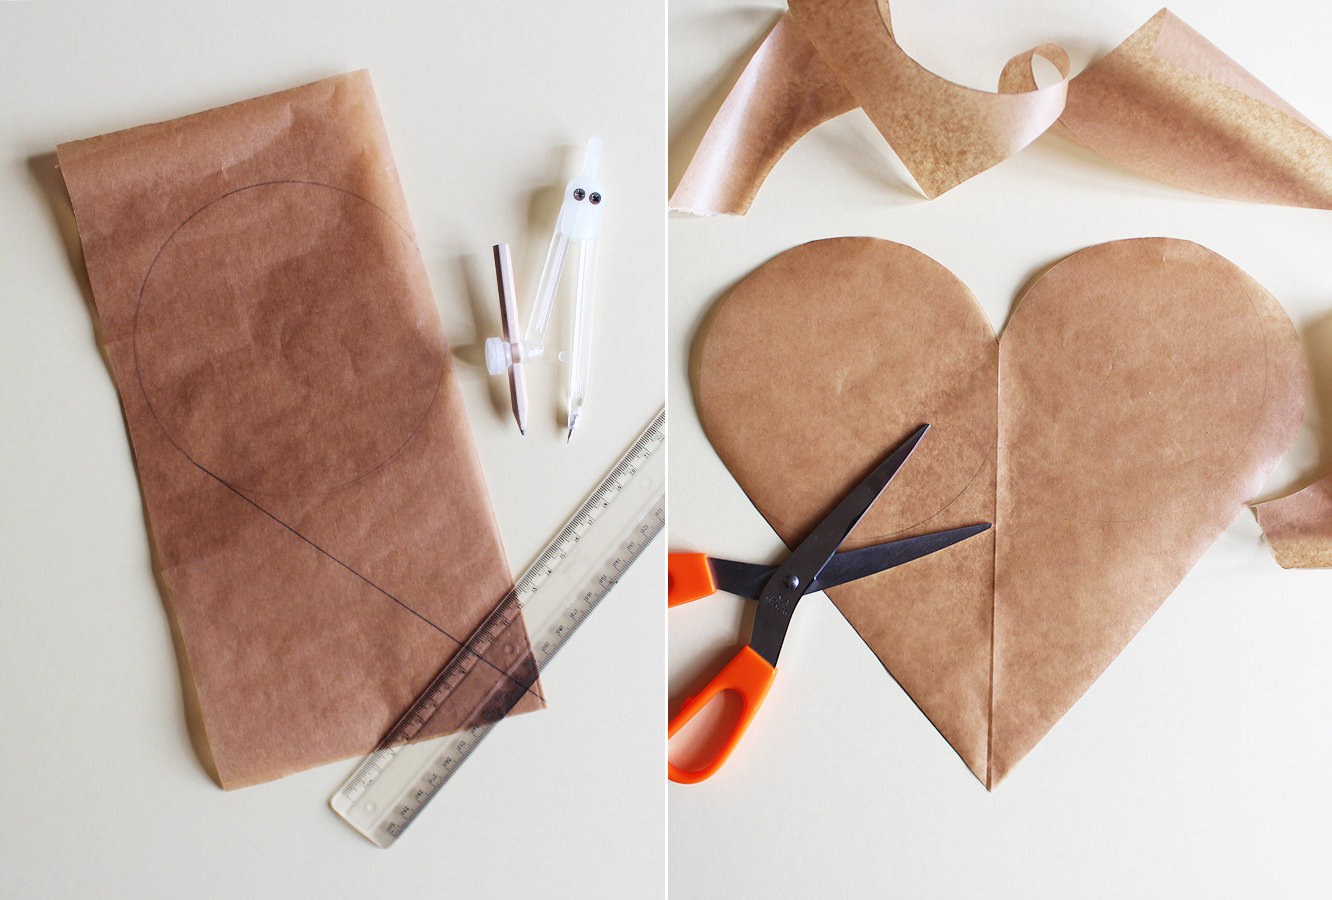
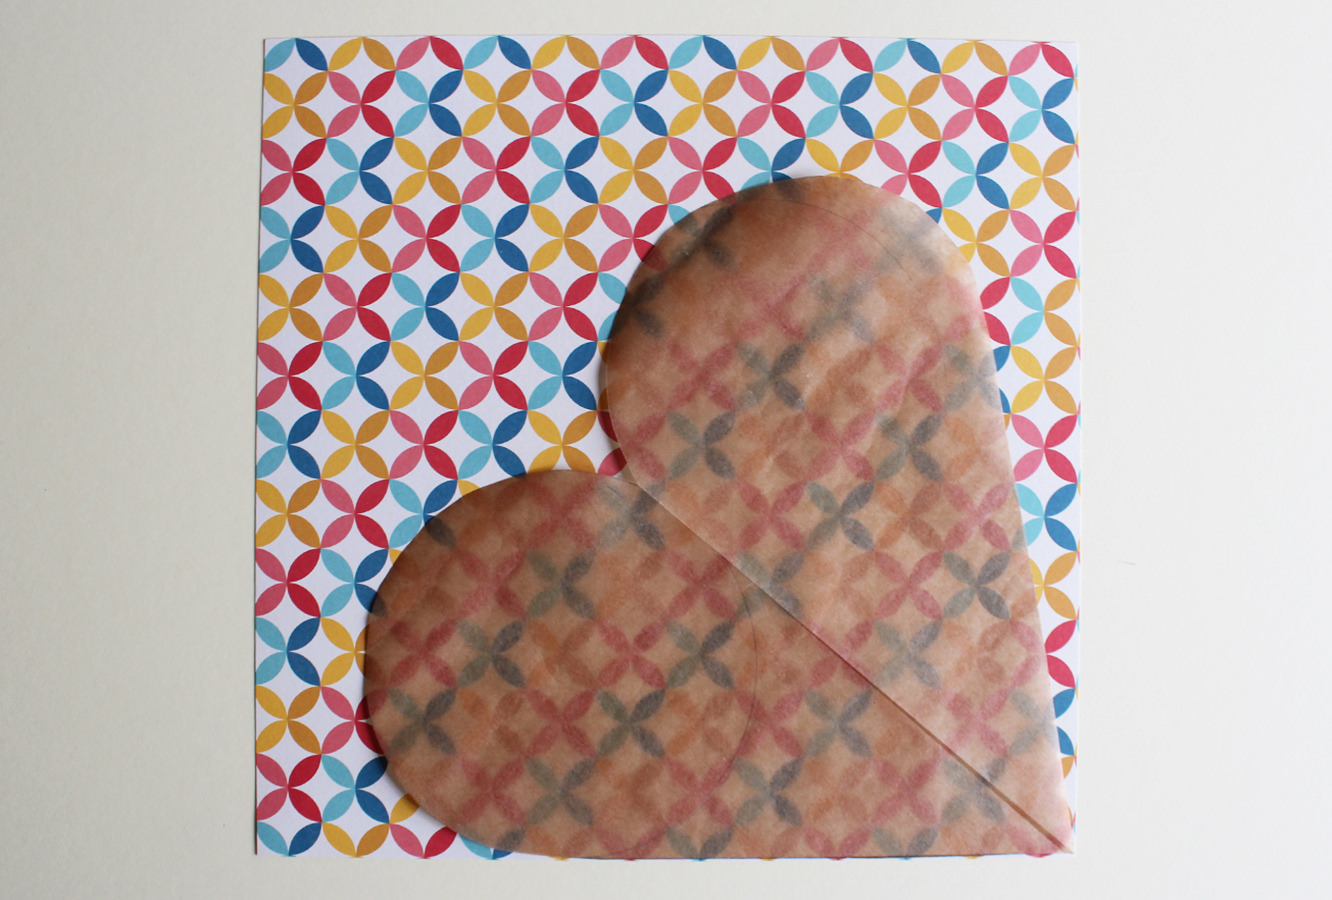
Using a piece of plain paper/newspaper/greaseproof the same size as your proper paper, make a heart template.
I did this by folding the template paper in half and drawing a circle to almost full width. Then use a ruler and draw a line from the edge of the circle towards the fold to make a point.
Cut out and unfold. Voila.
Step two
Draw round the template on your nice paper/card. Don’t be a peasant – use pencil.
Step three
Cut out as many as you need. I appreciate for you guys this might just be one, not everyone fancies their friends as much as I do.
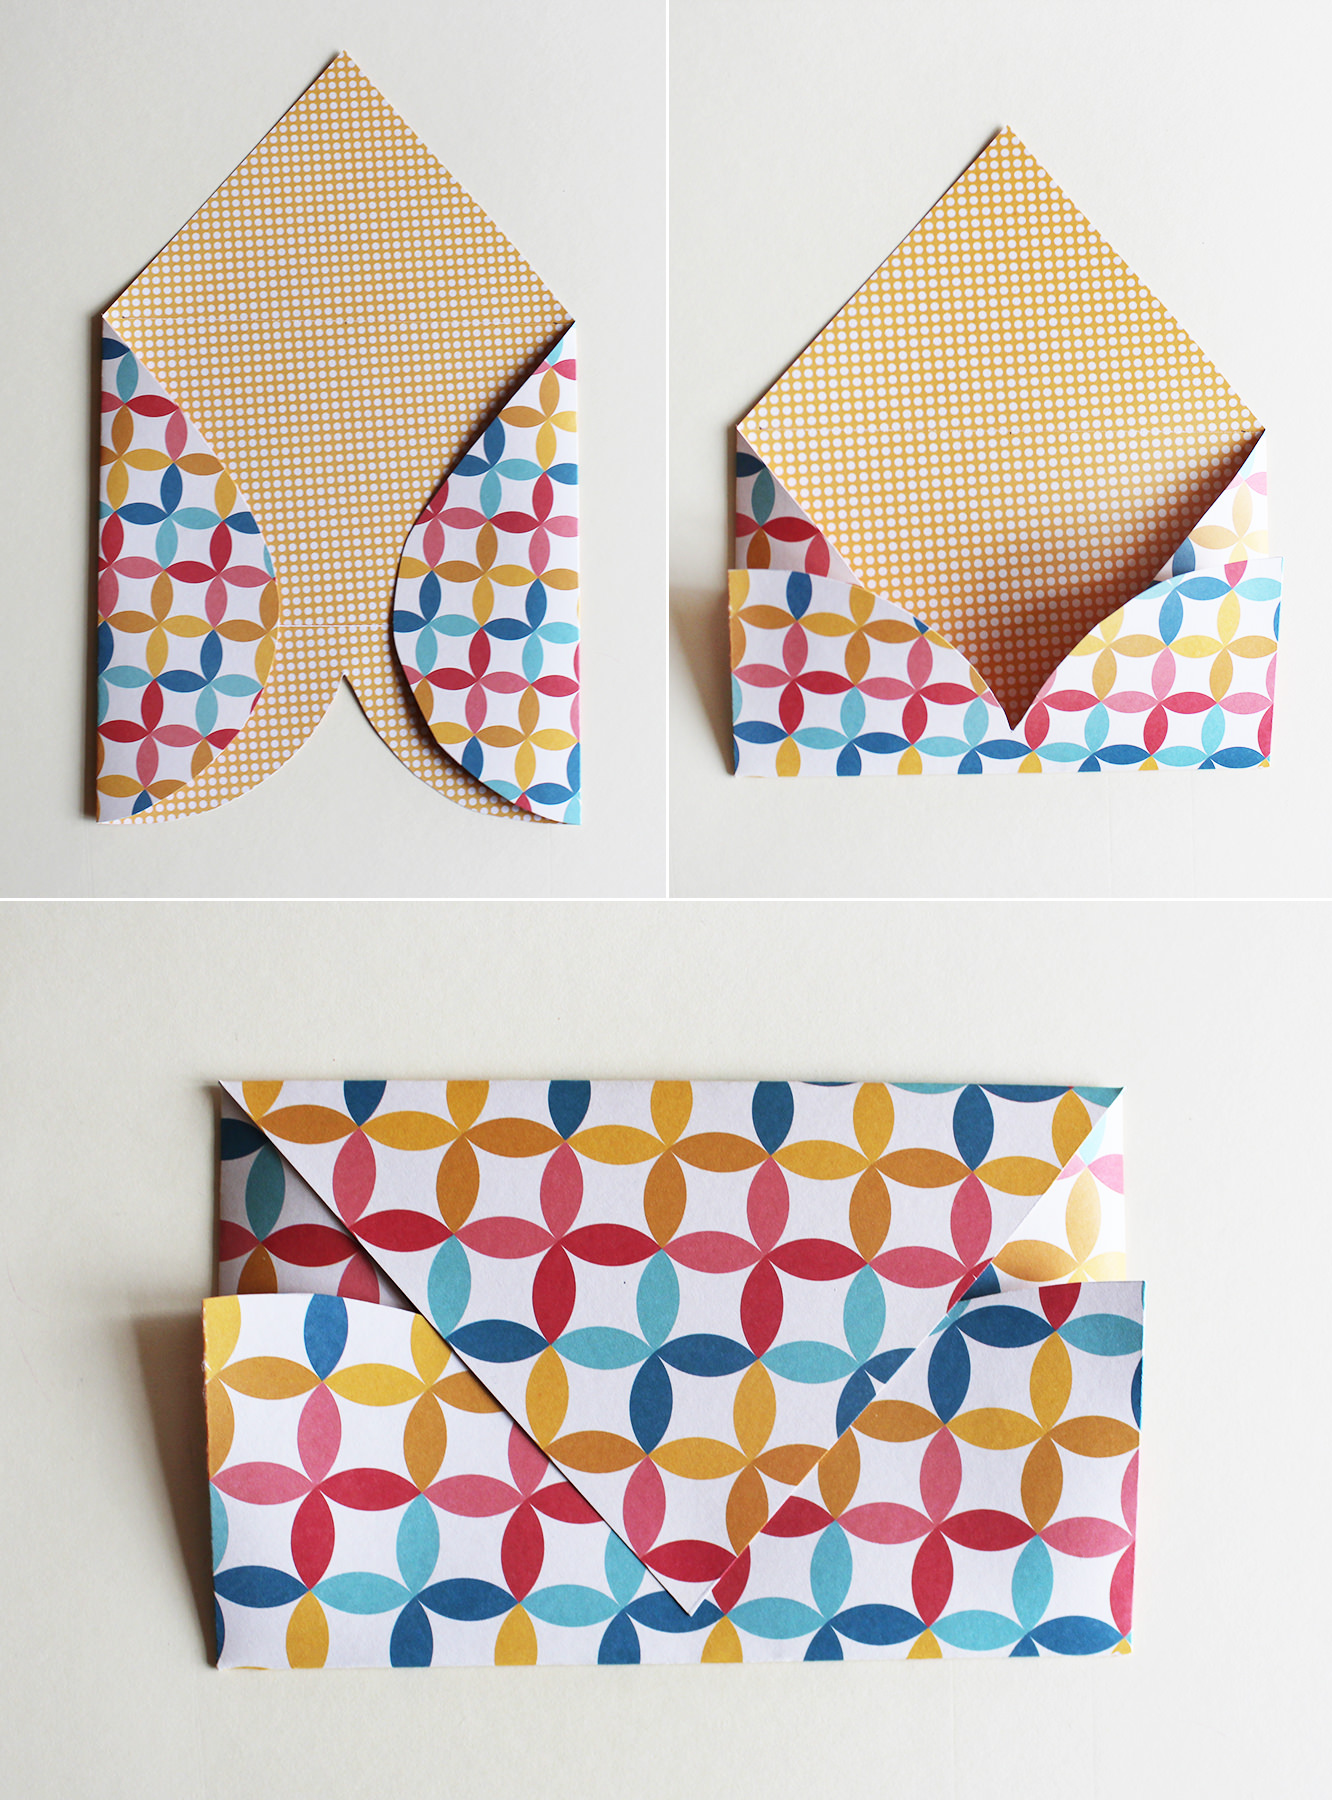
Step four
Turn the heart around so the point is facing away from you, and fold the sides in. You might want to use the scissor blades to score the lines first if you are using thicker stock.
Fold the domed bits up to make the bottom of the envelope. Finally, fold the point down to make the flap.
A disclaimer for this step is to practice on the template version first so you have the right dimensions, to make sure your envelope doesn’t have any gaps. You’ll see what I mean.
Step six
Write away.
I folded strips of A4 and stuck one section to the back of the heart so it kind of pulls out. You might prefer to write straight onto the it if your paper doesn’t have such busy patterns.
I stuck a button on each of mine to close them.
Enjoy telling people the people you love that they are great!
Well hi. Apologies for being MIA, sometimes the blog falls victim to life’s unpredictability, but I’m back, and thanks for sticking with it.
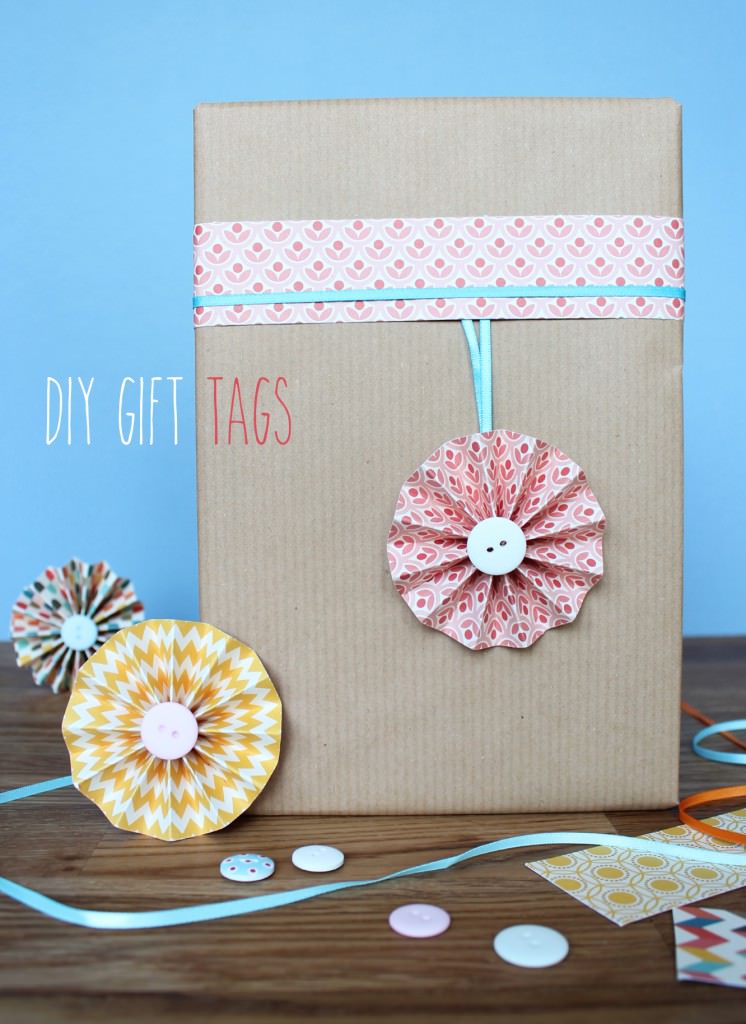
I had a birthday recently, so in honour of my stepping over the early-mid twenties boundary *weeps silently* I have devised an excellent little make to help your gifts stand out from the crowd. You can make a load of these up in one go so that you have a good stock of supplies to whip out at a moment’s notice.
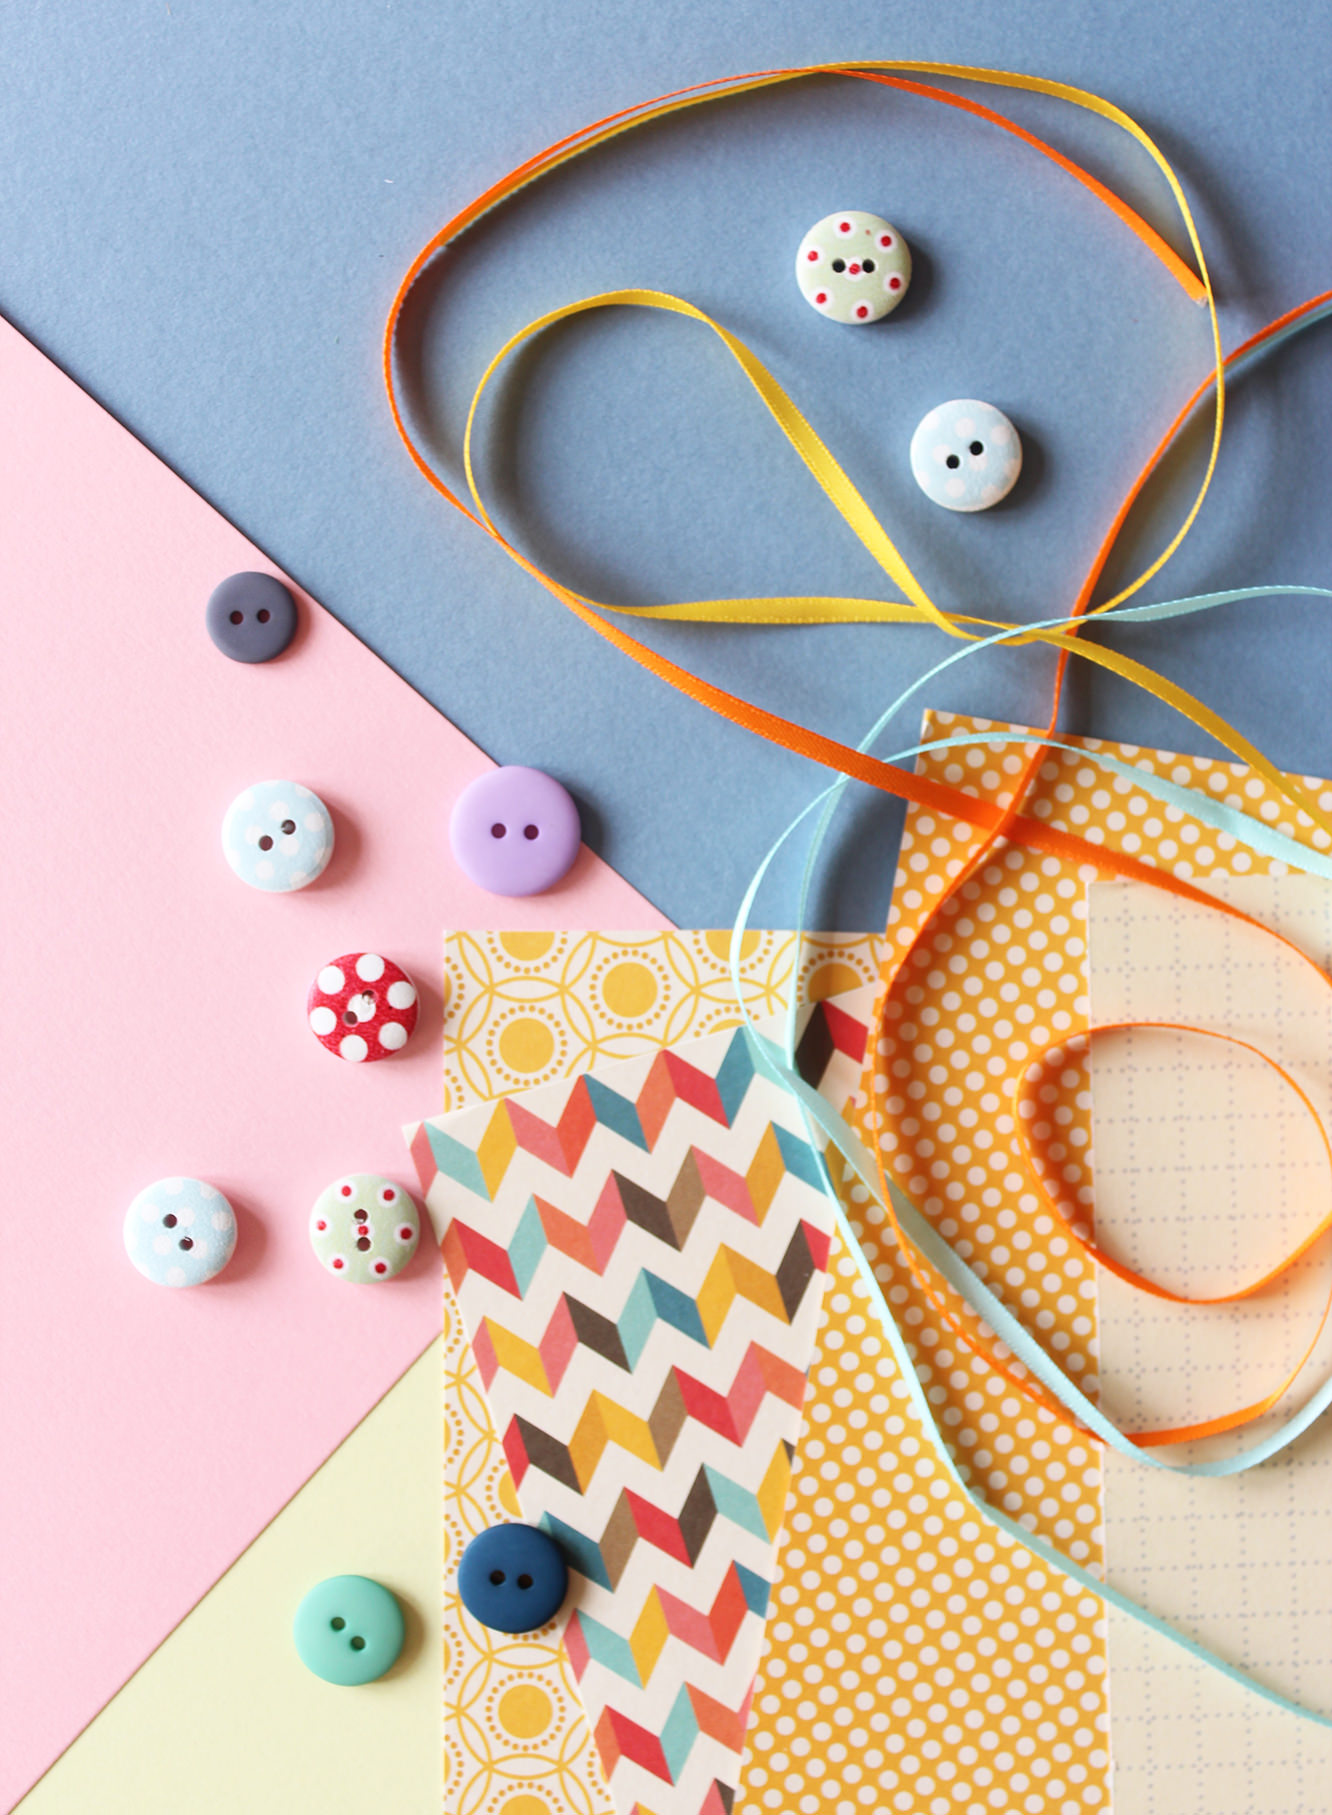
You will need
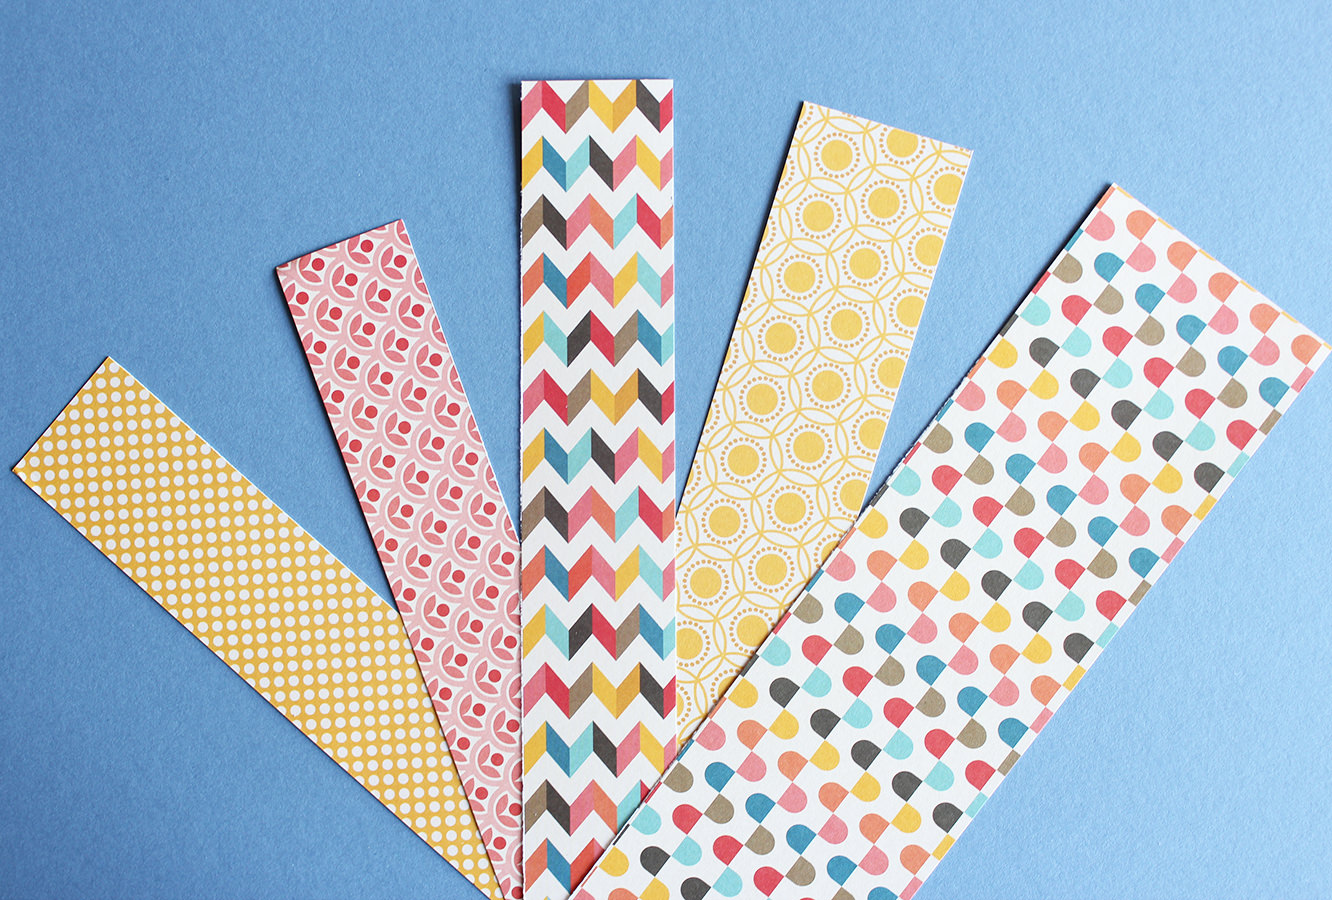
Cheerful patterned paper
Some plain card or paper
Buttons
Ribbon
Strong quick drying glue
Step one
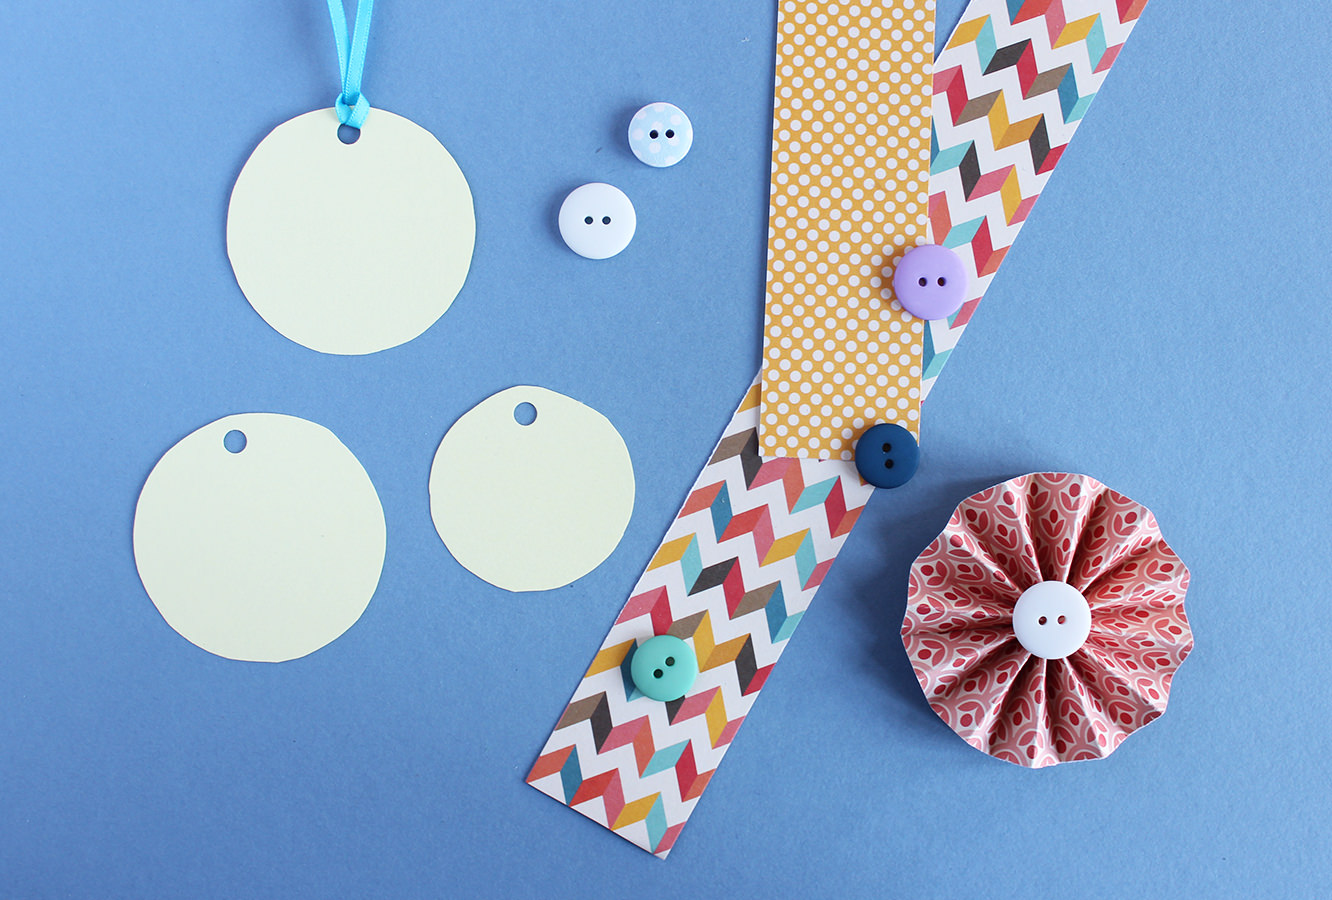
Cut your paper into long strips.
The width is up to you, but bear in mind it will be the radius of your tag. I found the thicker the strip, the longer it needs to be to work (I didn’t deserve my Maths GCSE for not knowing that instinctually) so you may need to tape two strips together if you want big tags.
All will become clear.
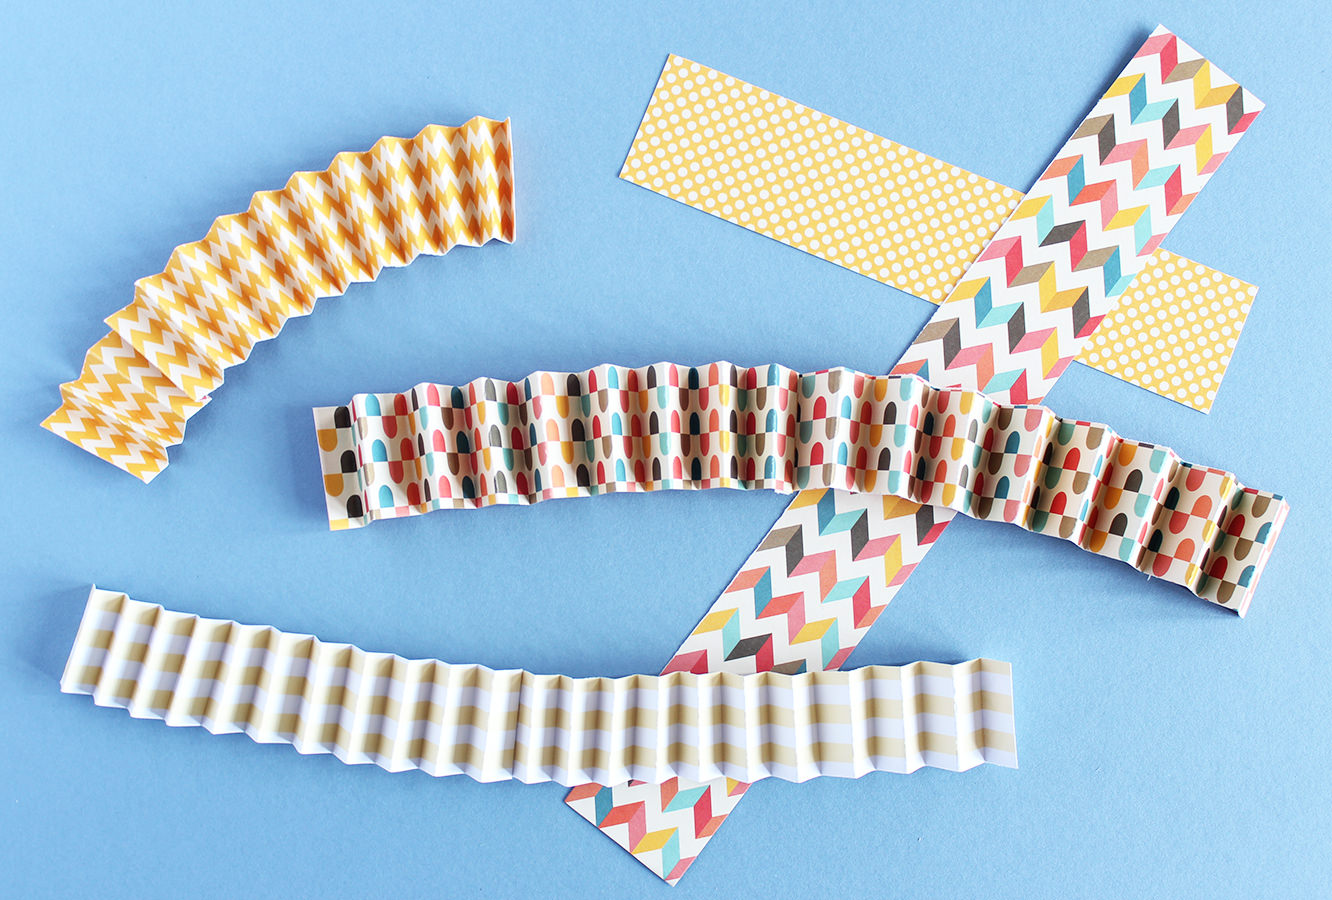
Step two
Fold the strips into a concertina (one bit forward, one back, just like in primary school when you made paper fans).
Step three
Stick together the two ends of each strip so that you have the star shape type things above.
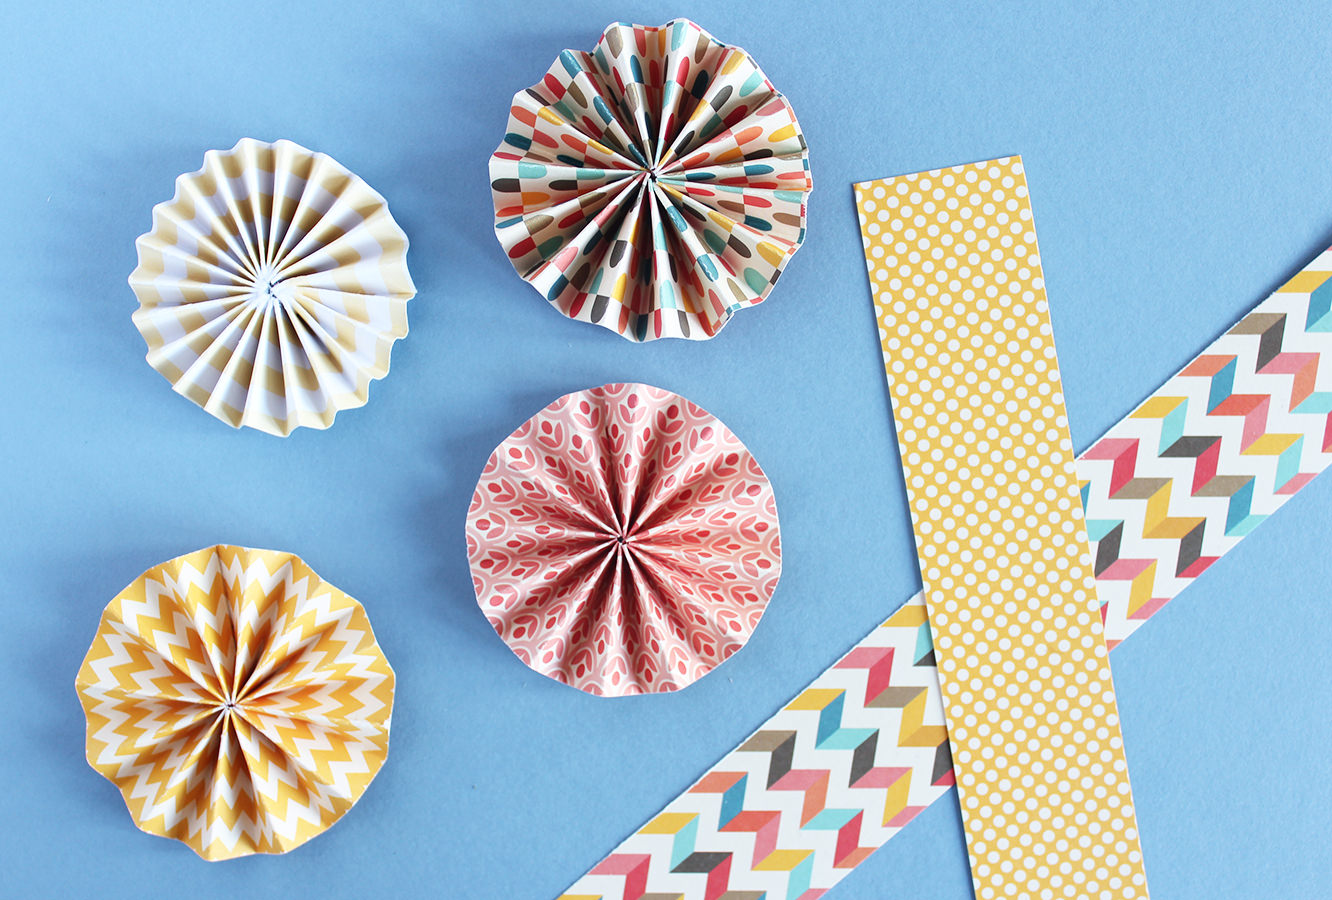
Step four
Pick up your stars and push the top edges into the middle to make these circular flowery fan things.
Put a small dab of strong glue on the centre and hold until stuck (I mean super glue really, I have zero patience for anything else, and glue burns to prove it). On that note, be careful it doesn’t drip all the way through the middle while you’re holding it – unless you want a charming new finger accessory.
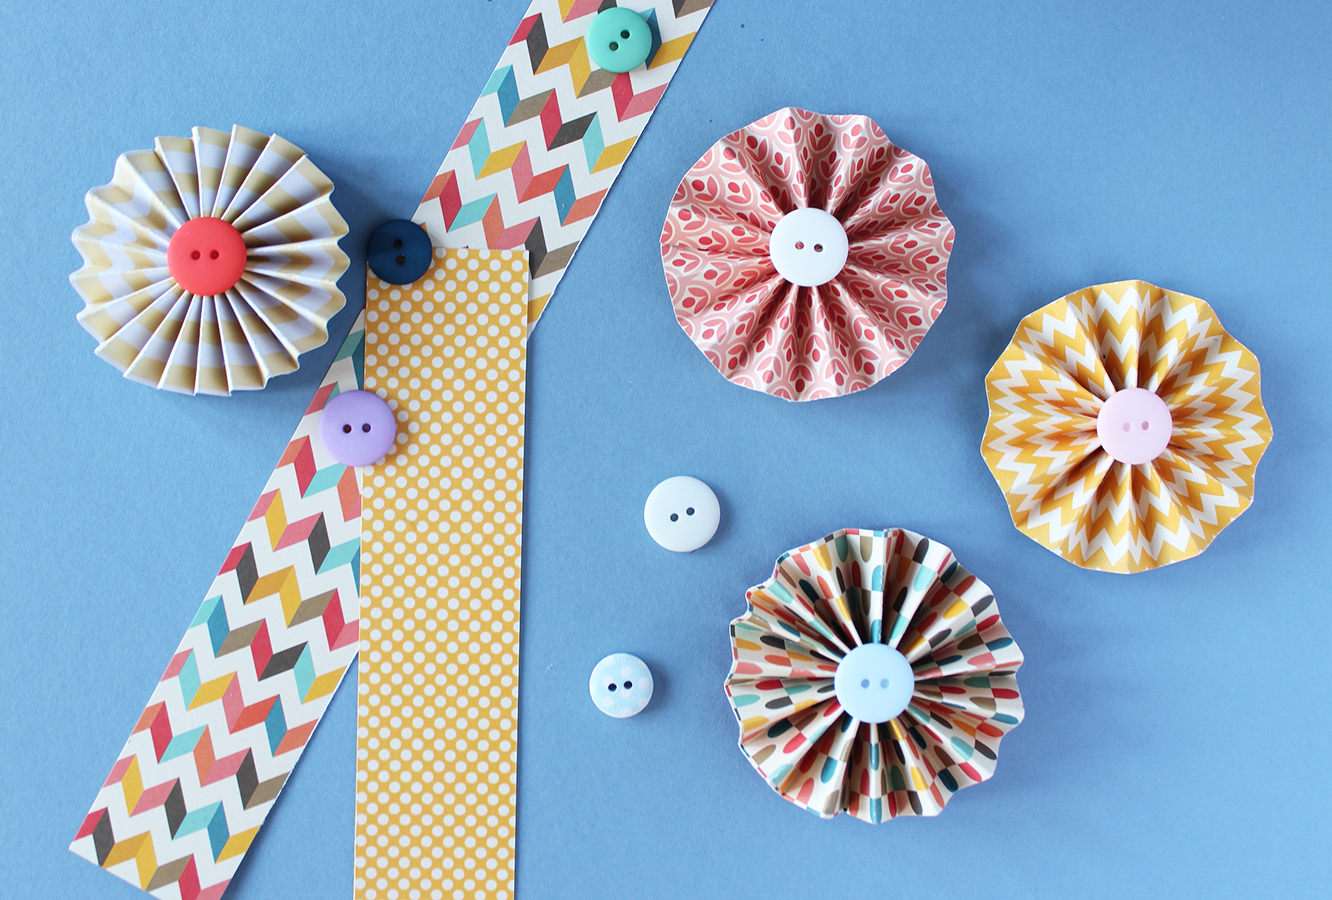
Step five
Stick a button over the join in the middle.
Step six
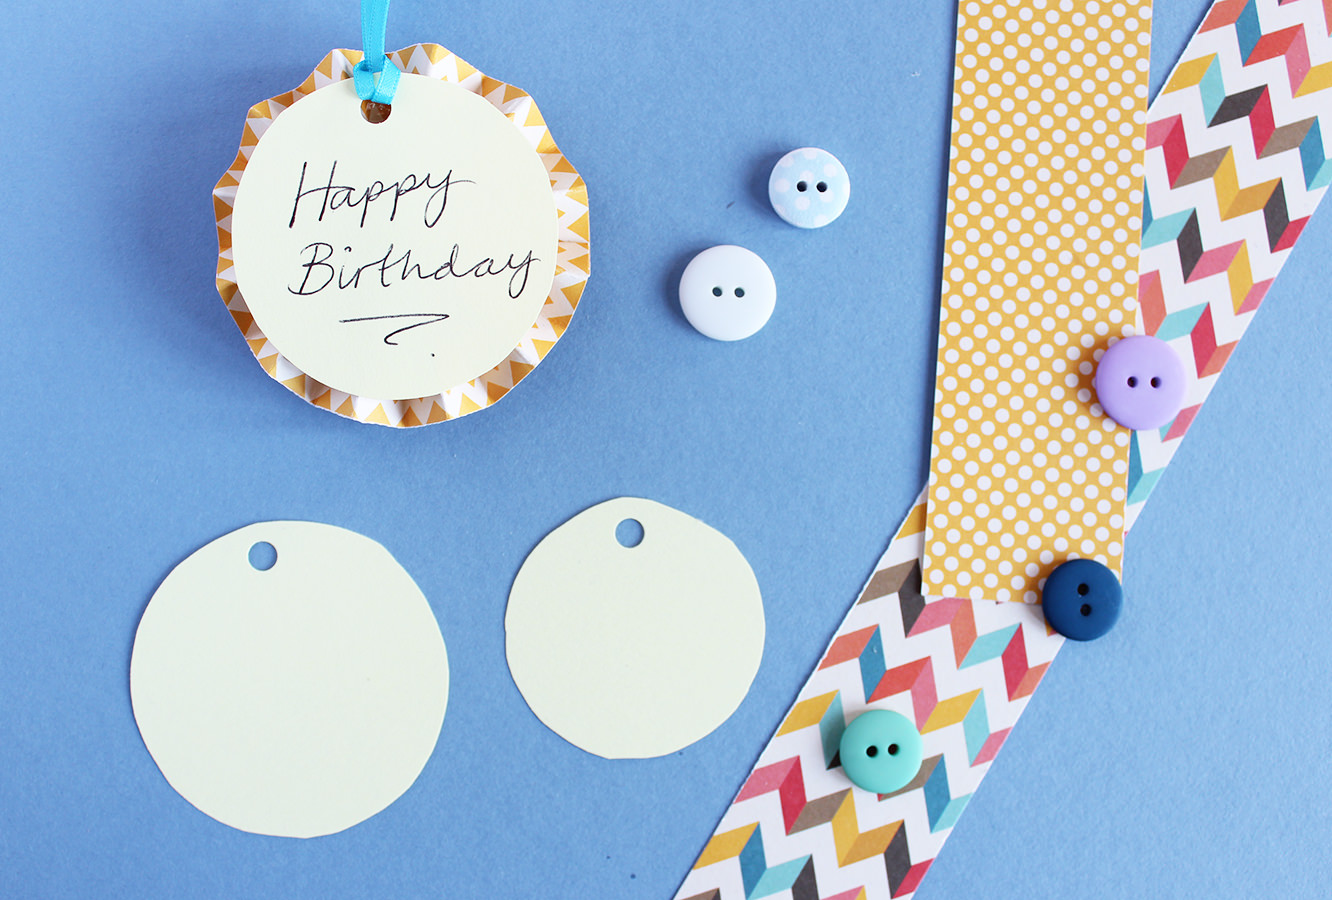
Find something circular that matches the size of your tags (or use a set of compasses). You want the circle to be a bit smaller than the tag itself.
Cut said circles out from plain coloured card and use a hole punch to make, well, a hole.
Loop a short length of ribbon through the hole.
Step seven
Stick the card disks to the backs of the tags using double sided tape or glue.
Write your meaningful and heartfelt congratulations that the birthday person is still alive on the reverse.
Affix to gift.
Step eight
Smugly produce your beautifully tagged gift at the appropriate moment.
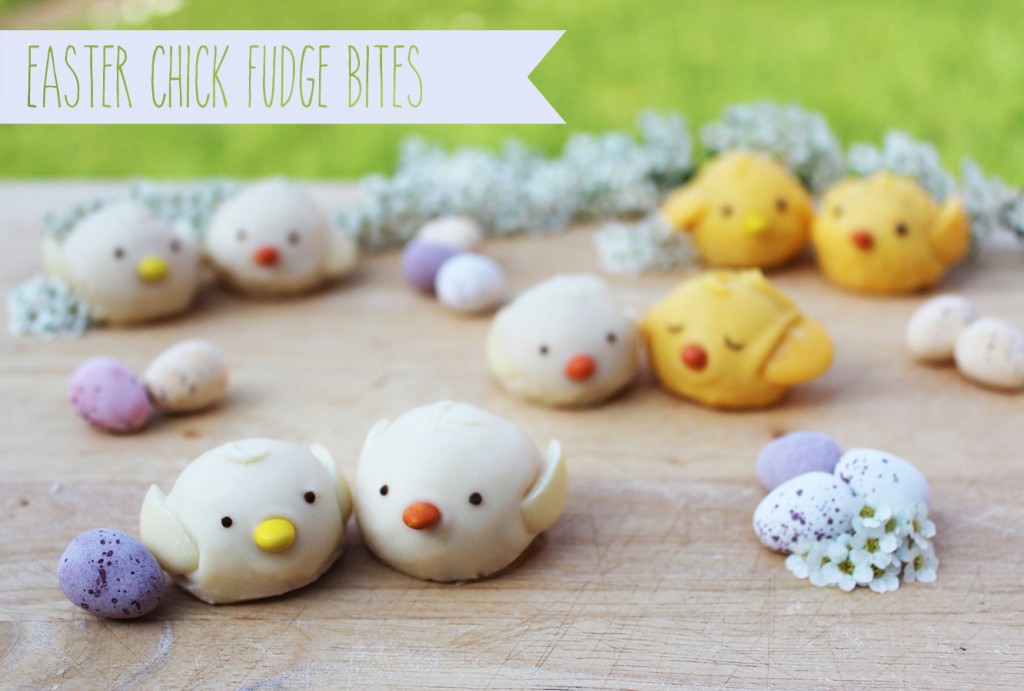
Last Monday night I found myself in Sainsbury’s lending a hand with the food shopping. Whilst queuing behind five of the most ridiculous locals in the bakery line, I happened to spot a something in the display case. Now, I don’t know whether I was more amused or horrified to see these little things. There was no way to describe them, so I bought some to show you. See below.
Now, I wouldn’t blame you for wondering what on earth they are. That, my dear friends is one of the ways Sainsbury’s is ringing in the Easter season this year. They’re chicks! I know right? Wow.
So in my slightly obsessive way I hit the chocolate aisle with plans to improve on Sainsbury’s rather bizarre little contribution to Spring.
You will need
A half batch of the fudge from last week’s post. See step one for more info.
(You may prefer to use a favourite truffle or cake pop recipe instead, I just really like fudge)
300g White chocolate
White chocolate buttons
200-300g Candy coating
(optional – substitute with more white chocolate if you prefer/don’t want to buy)
A tub of chocolate beans
(mine were from Dr Oetker)
A couple of squares of dark chocolate
Step one
Make up the fudge as seen in last week’s post. You don’t want to heat it to quite the same temperature though, or you won’t be able to roll it. Go with around 112 degrees C. The white stuff you can see on the board is icing sugar – the fudge was a touch sticky.
Apologies both for skipping the ‘making of’ in this post, and for using the same recipe twice in two weeks. This is just a suggestion, you can use any kind of filling as long as you can roll it into balls.
Step two
Cut buttons into halves for the little wings, and sort your beans out so you’ve just got the yellow and orange ones for their little beaks.
Step three
Now, this stage was all a bit too much to try and document all on my own, even with the help of self timer, so excuse the jump in photos.
You want to melt the candy coating and white chocolate in the microwave in heat-proof bowls (do one colour in full first then the other).
After my first and bad experience with candy coating I wasn’t thrilled with the idea of take two, but I really wanted yellow chicks and had plenty left over. So I did a little google, only to discover that Wilton’s Candy Coating (the one I have) is pretty much universally hated by all home bakers. Wish I’d known before I forked out £3…still, never mind.
The forum mums and bloggers informed me that this cement mix can be thinned out with some melted shortening (Trex is the best UK substitute), or oil. I didn’t want a whole tub of Trex with no other plans for it on the horizon, so I just used veg oil. It worked fairly well, and at least made the candy dipp-able. I will probably try to source an alternative next time though.
Anyway, you should check out my dipping technique, documented in this post if you’re not sure where to start. You need to dip your fudge, place on greaseproof paper, and straight away stick on the little beak and wings. Feel free to experiment with different positions for the wings and beak so that all your tiny chickens are unique.
Leave to dry.
NB: I also added little swirls and lines for hair with a cocktail stick to give my chicks a bit of extra character, not that they needed any…they’re a little bit bumpy and odd as it is but it all adds to the charm eh?!
Step four
Use a small sharp knife to trim off any chocolate that has pooled to form a base on the greaseproof around the bottom of your chicks. I wish I’d been a little more careful about this, so take your time. If you do it while the chocolate is still a little soft you will get a cleaner cut.
Step five
Melt a couple of squares of dark chocolate and use a cocktail stick to dot on eyes. I made a number of mine sleep with little semi circles and the wonkiest looking one was given glasses…mainly for my sister’s benefit as I knew she would find him endearing.
Step six
Put them on a plate and serve them up to your Easter guests!
They are a bit too cute to eat though. Even if they aren’t quite the polished product I had in mind when I turned my nose up at the Sainsbury’s ones, I hope they bring a little smile to your face.
Hello there, apologies for the short blogging hiatus; life happens sometimes, but I appreciate you sticking with me.
This weekend I went to stay with my friend Beth before she goes on her trip. Being as Mother’s Day is so near (this Sunday for those of you in the UK), B and I thought we would make some fudge for our mummys.
Whether or not you have Mother’s Day coming up, I urge you to have a go with making fudge. It’s a bit of a rascal but there’s lots to feel good about when you get it right, I’ve made quite a lot in my life time and so hopefully some of the below will help you avoid some of the fudging pitfalls.
Just a heads up, the batch below is fairly large, so unless you’re making it with a friend or for your Grandma too, you may want to cut the quantities in half.
You will need
1kg/2lb Granulated sugar
280g/10 floz Evaporated milk
120g/4 oz Clear honey
120g/4oz Salted butter
250g/9oz Dried apricots
1tsp of Liquid glucose (if you have it – not essential – but great)
Tray bake tin lined with greaseproof paper
Sugar thermometer (essential)
Step one
Combine all the ingredients (minus the apricots) into a large heavy bottomed pan.
At home I use the pressure cooker, and at Beth’s we discovered this casserole dish worked pretty well. The pan should be quite large as the mixture will bubble up, and the sturdier it is the less likely your fudge is to scorch.
Step two
Melt ingredients on a reeeaaallly low heat.
Seriously. As low as your cooker goes. Impatience will not help you here.
This ensures all the sugar is dissolved before it boils, and should help to prevent sugar crystals forming.
You should stir gently to stop the mixture burning on the bottom of the pan. Pop your thermometer in at this point too.
This was the first outing of my rather swish thermospatula, above, so I could stir and measure the temperature at the same time. I know, I need to get out more.
Step two and a half
Keep the fudge on a low heat, stirring gently.
It will begin to boil as above. Resist the urge to put your face in it, as good as it smells, that won’t end well for you.
This is where the thicker your pan the better, as this boiling stage should take around 10-15 minutes ideally. You want your fudge to reach soft ball stage on the thermometer or 115 degrees. Patience is the key here. You should the fudge thicken up and get darker evenly.
Step three (optional)
Once your fudge has reached 115 degrees pour immediately into an empty saucepan. Some fudge people will disagree with me here, as faffing about with fudge can cause crystallisation in the sugar. However, I’ve found that if I leave it in the original pan it carries on cooking and can become brittle. The trick is to do it straight away and don’t scrape the pan out or stir it once transferred.
Now, DO NOT TOUCH. Don’t allow pets, children or interfering family members near the fudge mix for at least half an hour. Preferably you want to wait until the thermometer hits about 50 degrees, but when I did this for a craft fair a few years ago I didn’t have the time to hang around, and found that half an hour was generally enough.
Step four
While you wait, use scissors to chop the apricots into tiny pieces. These are an optional addition and can be substituted depending on your mum’s tastes. You may want to add a different dried fruit, some chopped nuts, or chocolate instead.
Step five
Get a wooden spoon, summons all your arm power, and beat the mixture. If you have a stand mixer, you’re laughing at this stage, because it can take up to 15 mins sometimes…
About 5-7 minutes into your beating add the apricots (warning, if using chocolate chips you want to add them as late as possible so they don’t melt completely).
Keep going until the fudge becomes very thick, you still need it to be soft enough to spoon into the tin, so try not to take it too far. I didn’t have the chance to photograph this, so you will need to take your best guess. Here’s a clue though, your arm will be hurting you by now.
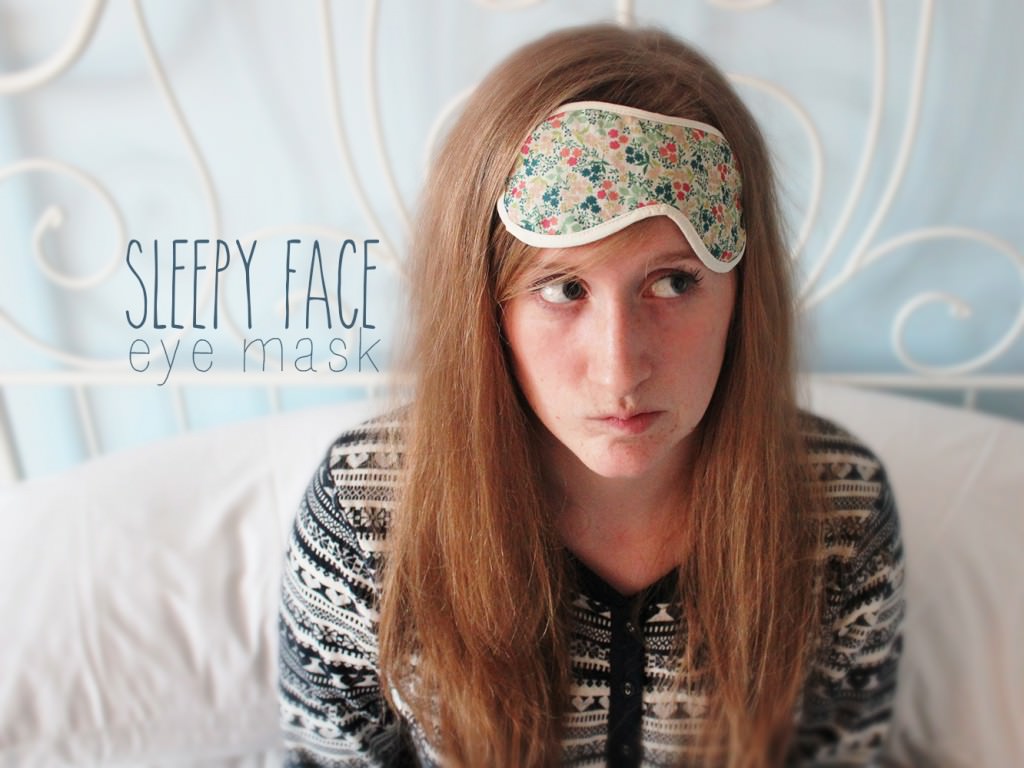
Don’t get me wrong, I’m loving that Spring is having a little flirt with us at the moment. The evenings are getting longer and the sun is playing peek-a-boo. At the same time, sometimes you wake up a little bit earlier than intended at the weekend or you just want to shut it all out for a little Sunday nap. So here’s a really quick and easy make for catching some Zzz or maybe adding to a little pamper package for Mother’s Day? More on that later…
You will need
Some pretty scrap fabric (the darker and thicker the better)
Pin the template to at least two layers of fabric. At this stage you might also want to sandwich a little padding in between, but I didn’t have any to hand so just went without.
I just used some scrap fabric for this make, but I would advise you choose a darker palette than this if you can as it will block out more light.
Cut around the template, leaving a small seam allowance, a couple of mm will do as you aren’t turning inside out.
Step two
Remove template and re-pin your fabric layers together. You will see I used some of the adhesive fabric I used for my bookbinding tutorial. This was an error. The iron isn’t a huge fan of this material and vice versa. You will see later.
ANYWAY. Sew around the edge to bind all the layers together. Make sure that if you are using patterned fabric the right side is facing out.
Step three
So, I never knew how to sew on bias binding properly until a few months ago. It changes your life. Seriously.
You will notice that one of the folds in your bias binding is slightly smaller than the other side. You want to open the shorter side out and pin to the edge of your fabric as shown above.
Note that the pins are facing outwards, this is because I was using a sewing machine and this way it just runs straight over, no need to pull them out as you go. If you’re hand sewing you probably want to pin the opposite way so you still have hands left at the end.
Step four
Sew around the binding, on the outer edge of the fold (see above).
Unpin.
Step five
Turn the bias binding over and use an iron to press it down (mainly for the benefit of people using a sewing machine)
Pin the elastic under the bias on both sides. You want to adjust this to size depending on who you’re making it for, 17″/43cm was a little on the large side for me so perhaps go a bit smaller or measure round the back of your head from temple to temple. Don’t forget to take a bit of length off so it holds by the stretch.
Step six
Sew the top of the bias binding as close to the edge as you can. Use a close zigzag stitch to secure elastic to the front of the mask, this will stop any light seeping through the gaps at the sides.
(you can see that the heat of the iron on the adhesive wrinkled my top fabric layer quite a lot, this shouldn’t happen to you!)
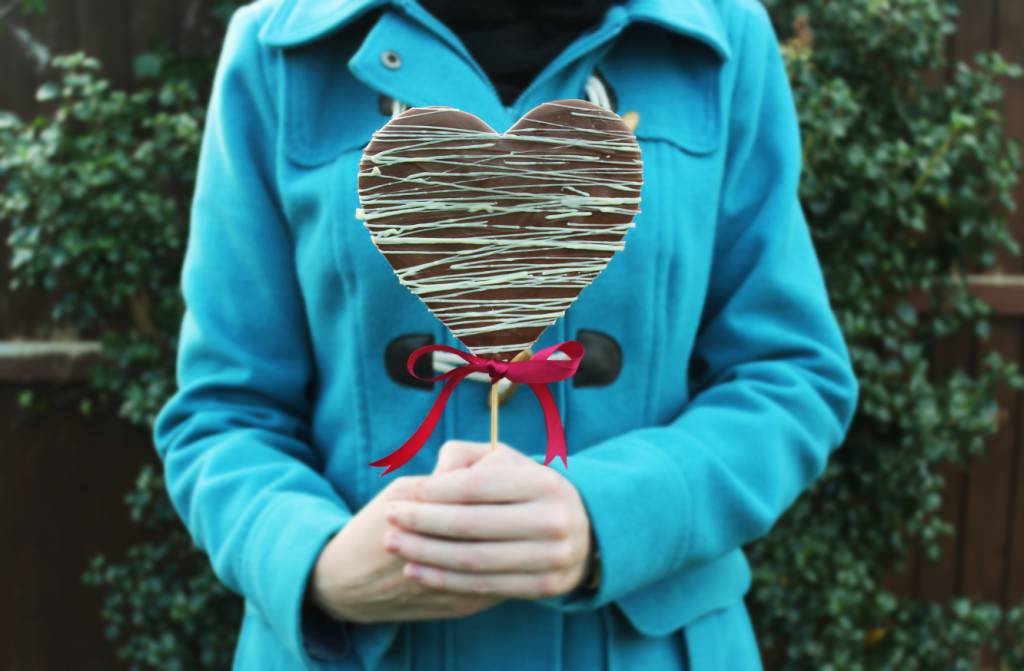
When making themaple truffles I ended up with a decent amount of left over chocolate from the dipping stage. So I decided to create another little Valentine’s treat. There’s still time to dash to the shop and whip one up tomorrow evening for a yummy treat that’s more heartfelt than hallmark.
This is a little bit of a cheat post (hence the mid-weekness of it all). I’m afraid there are no photographs of the stages, just the final product. But all is not lost…I do go through making homemade chocolate lollies here.
To create the heart shape you just need to create two circles next to each other and then sort of pipe down and drag to make the point. More info can be found on the Christmas Lollies post (link above). Once the outside is touch dry you can melt a couple of squares of white chocolate and drizzle over the top. Feel free to experiment with different decorations, types of chocolate, or just chuck a load of sweets on top while it’s still drying. You might even want to try piping a message to your beloved?
Wishing you a wonderful rest of the week, see you on Monday!
So, I missed Monday blog day. Apologies, but there was some urgent badge making to see to, for a very special nearly 8 year old who’s mum was tearing her hair out looking for an 8th birthday pin. Katie and her dusty old badge-it to the rescue.
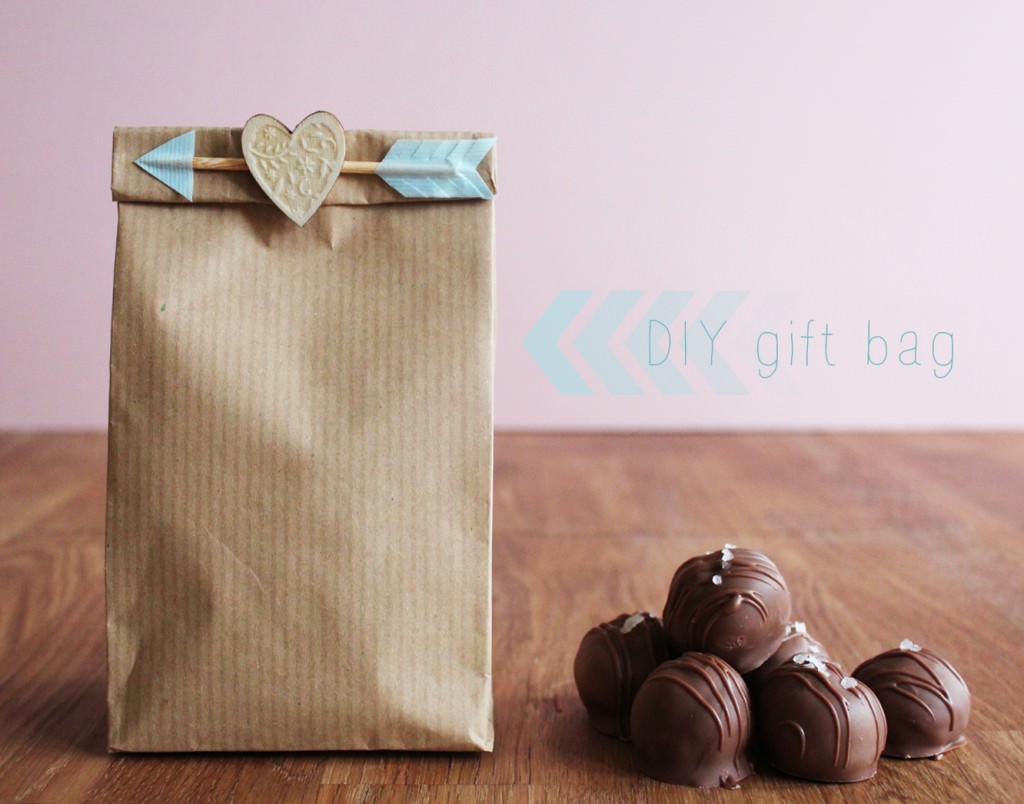
Now to business…I know you spent your weekend making those lovely truffles and need something to gift them in. Here’s how to make a little bag. I warn you, it’s not really the industry approved method (I’ll do a tutorial for that another time) but it does the trick and is super quick and easy.
Step one
Choose your paper, I’m a sucker for a bit of brown parcel paper, but as long as it’s relatively thick you’re good to go with whatever takes your fancy.
Find a box whose dimensions match the rough size and shape you want your bag to be.
Cut paper to size as if you are wrapping a gift, but leave a little extra on the long side so you have some to fold down to close the bag.
Step two
Wrap the long side first. Fold over the edge that will appear on top so that it’s nice and neat and stick down with glue or double sided tape.
Step three
I don’t really want to patronise you and tell you how to wrap a parcel particularly when the above isn’t even the best. But wrap the bottom of the box, but make sure you leave the other end open!
Step four
Pull box out of the wrapping so you have the basic bag shape. You can go ahead and use it now (see I told you it was quick and easy) but I prefer to make it look a bit more authentic.
Pinch the edges to make crisper folds.
Step five
This step was a little difficult to photograph, but basically you want to create a fold in the centre of the long side. Put your index finger in between your two folds and use your thumb and middle finger to sort of pinch it together.
Step six
Fold the bottom under as shown above. This will give you the little triangular type bits, and also means that you can make a few and store them flat until you need them.
(note triangle bit I was talking about above – I’m not mad)
Step nine
For Valentine’s day decoration I used a wooden BBQ skewer. Chop with a pair of garden clippers to about the width of the bag.
Step ten
Use a bit of washi tape to create the feather of cupid’s arrow. Stick a bit on both sides and trim as above.
Step eleven
Fold down the opening of the bag and cut two slits through all layers of paper. Push arrow through to secure.
Step twelve
Use washi tape to make an arrowhead and secure to the end.
Step thirteen
Stick a heart over the centre.
In all honesty I am not a huge fan of this, but I think it’s probably partly because the woods don’t match. You could cut one out of coloured paper or card if you don’t have a little wooden heart in your supplies. Just make sure you don’t do what I did; hold it up first to see if you like the look of it rather than sticking it on and wishing you hadn’t.
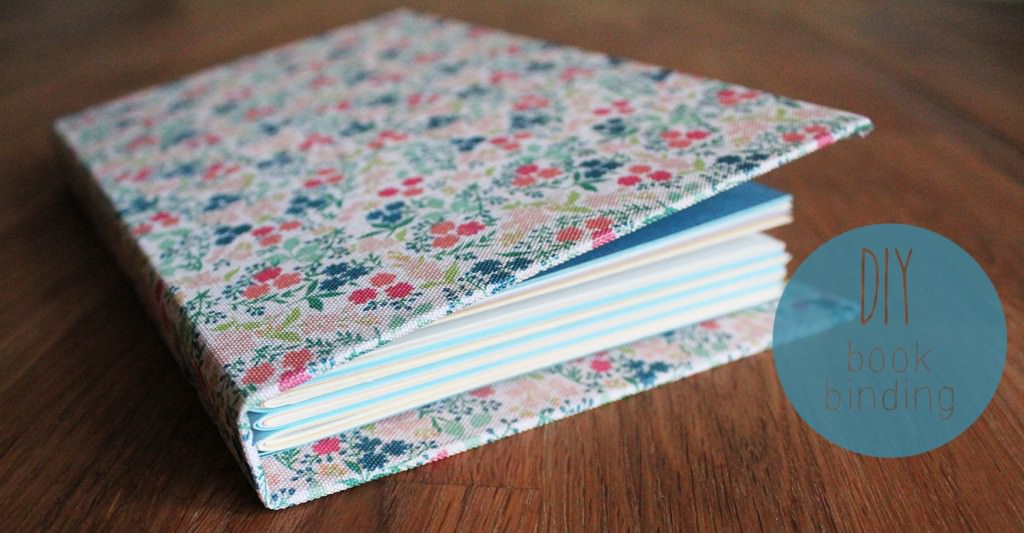
This weekend I decided to make a book. It was pretty satisfying holding the finished product, so I definitely encourage you to have a go, even if you never write in it, just put it on a shelf and admire it, that’s what I’m doing at the moment. It was pretty cheap too and will keep you busy for a while (January budget strikes again – you might even have all the ingredients!)
You will need:
A sheet of thick card (this will be your cover)
Good quality paper/thin card (at least 28 sheets)
PVA glue
Fabric/Adhesive fabric roll
Nice quality paper for inside cover
Craft knife and cutting mat (ideally, but scissors will work too)
Needle and thread
Step one
Depending on the size of your thick piece of card you may need to trim your paper sheets. I bought my card from The Range, and it’s artists’ backing board so it came in standard sizes. I got A4, and then realised once I got home that the inside paper was A4 too. Error. You need to cut a spine from your cardboard, so whatever goes inside needs to be smaller to begin with.
Fortunately I have a paper trimmer left over from my A level Art days. So I cut my inside sheets to 25cm x 19cm.
Then you need to score all your sheets in the middle so you get a clean fold. Don’t use the craft knife for this or chances are you’ll slice straight through. Regular scissors are good.
Stick a bit of music on, you’ll be here a little while.
Step two
Fold fold fold.
Put your folded paper into four or more equal size booklets, you need at least four. The number of sheets of paper you need will depend on the thickness of it and the number of pages you want. I’ll let you figure that out. As you can see, I used different pastel coloured papers; take advantage of it being made from scratch and mix it up a little. You could do each booklet in a different colour or alternate them more regularly like I did.
Step three
Poke at least five holes through the fold of each booklet with a needle. Make sure you do this over a blob of blu-tac in true Blue Peter style.
Sew each booklet together using a double threaded needle. You will need a big knot at the end of your thread to stop it from pulling through on your first stitch. I used backstitch and went over mine twice to make it super strong. (If you aren’t sure how to back stitch then have a little google, don’t shy away now…you can do it)
Step four
You will see that the non-fold edges of your booklet don’t line up because they are tucked inside each other. Now, you can leave it like that and just have a jagged (whatever the word is for the opposite to spine), but mine was fairly bad, as I used really thick paper – it was basically card.
So, top tip for you if you don’t own a guollutine (99% of people in the world)…use a bread knife! I know it sounds silly, but after hacking away for ages at the first one with a craft knife to the point where I just couldn’t get a straight edge for the life of me, I was beginning to wish I hadn’t bothered.
Then, eureka moment! Got myself set up on the chopping board with a ruler as the guide and it all ended happily ever after…well…still not quite perfect, but a heck of a lot better than the first one.
Step five
Once your booklets are all sewn and trimmed, hold together with a bulldog clip at the top and bottom, ensuring the spines are level.
Step six
Use the PVA to glue to a scrap of fabric as shown above. If you don’t have spare fabric (I cut up an old pillow case) then a piece of paper will work too, it just won’t be quite so strong.
I used some double sided tape to hem the edges of the fabric at the top and bottom. Leave enough scrap on either side to secure it to the cover well later. There’s no need to hem the long edges as they will be completely covered.
Set aside to dry thoroughly. Overnight if you can.
Step seven
Time to make the cover!
Measure the width of your booklet spines, mark out a strip of card the same width for the spine of the cover.
Then mark out larger pieces for the front and back covers. These should be a centimetre wider than your booklet width and 2cm longer than the height.
Step eight
Using a craft knife and ruler for best results, carefully trim cover pieces and discard any excess card.
Step nine
Size up the fabric allowing for at least 2-3cm around the edges of the whole height and width when laid out as above. Add a little space either side of your spine as shown above.
Now, a note about the material. I got this roll of adhesive fabric that just made this bit so wonderfully easy. It’s like sticky back plastic without the angst, you just peel off the white bit and it sticks really nicely to the card. It was £4.50 for a roll in HobbyCraft, and will cover two books this size with some left over to cover a set of matching pencils or something.
If you are using regular fabric you just need to give it a generous covering in PVA and be more patient waiting for it to dry before moving on.
Step ten
Trim the corners to avoid excess bulk, use fairly wide angles so that all the corners get properly covered. There’s no need for a huge amount of precision here.
Step eleven
Stick the edges down, being sure to pull tight for a nice sharp finish. If you’re using PVA leave to dry.
Step twelve
Line up the spine of your booklet with the cover spine. Stick the paper or fabric flaps to the cover. DO NOT stick the spine itself down or you won’t be able to open the pages properly.
I used double sided tape for this, and that seems to hold really well and eliminates drying time. Again, PVA will work for this too, so just go with what you’ve got available.
Step thirteen
Cut two pieces of card or heavy paper for the inside covers. If this is nice and thick it will cover a world of sins! Also, it’s worth getting hold of something attractive as it adds that little extra when you open it.
This should basically be the same size as one of your folded pages from earlier, so mine was 25cm x 19cm.
Score and fold (score on the outside of the fold so you won’t see it on the end product).
Step fourteen
Stick the inside covers to the book. Again I used double sided tape, if you use PVA for this be careful not to overdo it as your paper will bubble.
Stick to the booklet first, lining it up perfectly with the outside page. Then lift your cover to a 45 degree angle and attach there as well. Close the book and press down. If using PVA leave cover open to dry.
A little close up of the paper I used.
Step fifteen
Give yourself a pat on the back, you just made a BOOK.
Let me take you on a journey. It all starts back in 2006 when Pa and I first went to the Wildlife Photographer of the Year exhibition at the Natural History Museum. This becomes an annual event.
Fast forward to 2013, and I visit a marvellous German zoo. The Germans sure know how to do a zoo. I walk into a dark room and floor to ceiling there’s all these manatees just gazing back through the glass, floating and grinning. (I’m sure they were grinning). And I just stand there super impressed by how insane they are, so friendly looking that they are both the ugliest and cutest thing in the world. I could have stayed there all day (and not just because it was 36C outside and my skin is almost see-through) That tank of manatees was like a giant lava lamp. I mean, what?
December rolls round and we hit the exhibit, and behold, this glorious photo by Douglas Seifert. By now I’m in love. (officially this is a dugong not a manatee, but I’m no marine biologist, these things are just as wonderful)
Travelling Companions by Douglas Seifert (USA)
And now to the present day. I’ve started a blog and I’m planning projects. I think about potential subjects. I have to say, if any animals are owning the craft scene right now it’s whales and foxes. If you don’t believe me just search Pinterest for DIY whale/fox. They are in VOGUE. But I’m not the only one who watched Black Fish right? And I’m even more sure I’m not the only one with a conspiracy theory about the urban takeover being planned by our furry orange friends.
Manatees would never.
So I present to you Sea Cow Stamps. We’re setting a new trend here folks go with me on this.
Along with the above justifications, it’s no secret January is rough on the financials. So this little postlet is a little something you can do for about £3, or 50p if you already have a pad of ink somewhere in the recesses of your crafting supplies.
You will need:
A sheet of craft foam
An ink pad
Glue
Something to stick your stamp to
Craft knife and cutting mat/Scissors
Step one
Draw your design onto the foam with a pencil, try not to press too hard or you will alter the texture of your stamp.
Just draw it how you want to see it stamped in the end…don’t worry if you have a few tries, just remember which line you want to cut. I modelled mine on this snap I found on google images, I find it sometimes helpsto have a reference point.
If you’re doing this with kids try to encourage them to avoid fiddly lines etc, as you’re going to end up being the guy carving the foam all afternoon not them…
Step two
Cut out your design with a craft knife or scissors. Either is fine.
Step three
Pop your shape out of the foam and flip over. This is your chance to neaten up, I used nail scissors for accuracy. If you’re doing lines and facial features spend a little time on this bit. The pencil free side is the one you will be applying ink to.
I discovered that everything I had cut was a lot more obvious when I stamped, so don’t worry if your lines look a bit thin, you can always take more away, but you can’t put it back. It’s sort of like a haircut in that way…
Step four
Stick your shapes onto something, pencil side down (remember they need to be back to front because you’re going to flip it over).
The more solid a base the better really. I decided to do this a couple of days after bin day and there was only newspaper and toilet roll in the recycling bin. So I pinched the box from my dad’s muesli (you’re welcome dad). Honestly? This was less than ideal. The flatter and firmer your base is, the less ink you will get transferring that isn’t part of your picture, and the better force you will have to stamp with.
If you know someone handy, ask them to chop you some wood pieces. I plan on migrating these chaps over to wood at some point, I just need to get myself a saw, which I’m sure will be music to boyfriend’s ears…I’m not clumsy AT ALL.
Step five
STAMP!
This is fun. My advice – cover the table in newspaper and have a few practice goes before you go for the real thing. You’ll find if your stamps are as big as mine you need to put the stamp on some newspaper, turn the pad over and sort of dab it on, quite liberally.
Use the side of your fist to rub the stamp onto your card. Sometimes they come out better than others, I’m still yet to get exactly what I want, so just enjoy it.
If you want to do lots of different colours start with the lightest first and wipe off any excess ink with a baby wipe between colours.
I made cards with mine, see below, but I also have plans to put the whole scene together on some brown paper for gift wrap at some point, and I’m sure there’s a whole load of other things to decorate too.
I also plan to digitise my little buddies so you can print them and use them for your own. But I need to be waaay better than I am at graphics software before that happens, so I’m afraid it may take a little while.
The best thing about this project is that you can make a full set of your own stationary. Check out the envelope below. I made a speech bubble for the address, and popped the little guy on the back.
If anyone is curious about the text on the cards above, and is UK based, I got the alphabet stamps from The Range. They do loads of little alphabet blocks with different fonts and THEY ARE ONLY 99p EACH. They are my Pokemon. Literally, never go to HobbyCraft again.
Have a wonderful week chaps.
DISCLAIMER: I reserve the right to make fox or whale themed crafts in the future.


