Tag: easy

It’s as easy as one, two, tree

Afternoon folks! Making the most of my lunch break to post this week because we are officially in Christmas party season. You know what else we’re in? CHRISTMAS TREE SEASON.

Yes. That’s right, get yours out of the attic or head down to your local festive pop up, it’s time.

There’s a lovely nostalgia people have with their generations old decorations; almost everyone I’ve talked to about their tree has some kind of heirloom ornament that takes centre stage each year.

I still think it’s nice to freshen it up from time to time though, and with December costing a fortune, here are some quick and easy christmas tree decorations you can make with things lying around the house/garden.

Pine cone ornaments

Pine cones

Picture frame hangers (screw in ones)

Tip-Ex (white out)

Ribbon or string

Quick-easy-christmas-decorations-pine-cone-tree-ornaments

Quick-easy-christmas-decorations-pine-cone-tree-ornaments-1

Screw the picture hangers into the bottom of the pine cones, attach a loop of string/ribbon an paint the ends of the pine thingys with the Tip-Ex. It dries so quickly you don’t even need to put paper down.

Paper circles garland

White card

Contrasting thread

Circle punch

Sewing machine (or you could use glue/double-sided tape if you don’t have one)

Quick-easy-christmas-decorations-tree-garland

Quick-easy-christmas-decorations-tree-garland-1

Punch a load of circles out of the card. Put them through a sewing machine. Yup. THAT easy.

Christmas tree star

Five reasonably straight twigs

Some twine

Quick-easy-christmas-decorations-tree-star

Quick-easy-christmas-decorations-tree-star-1

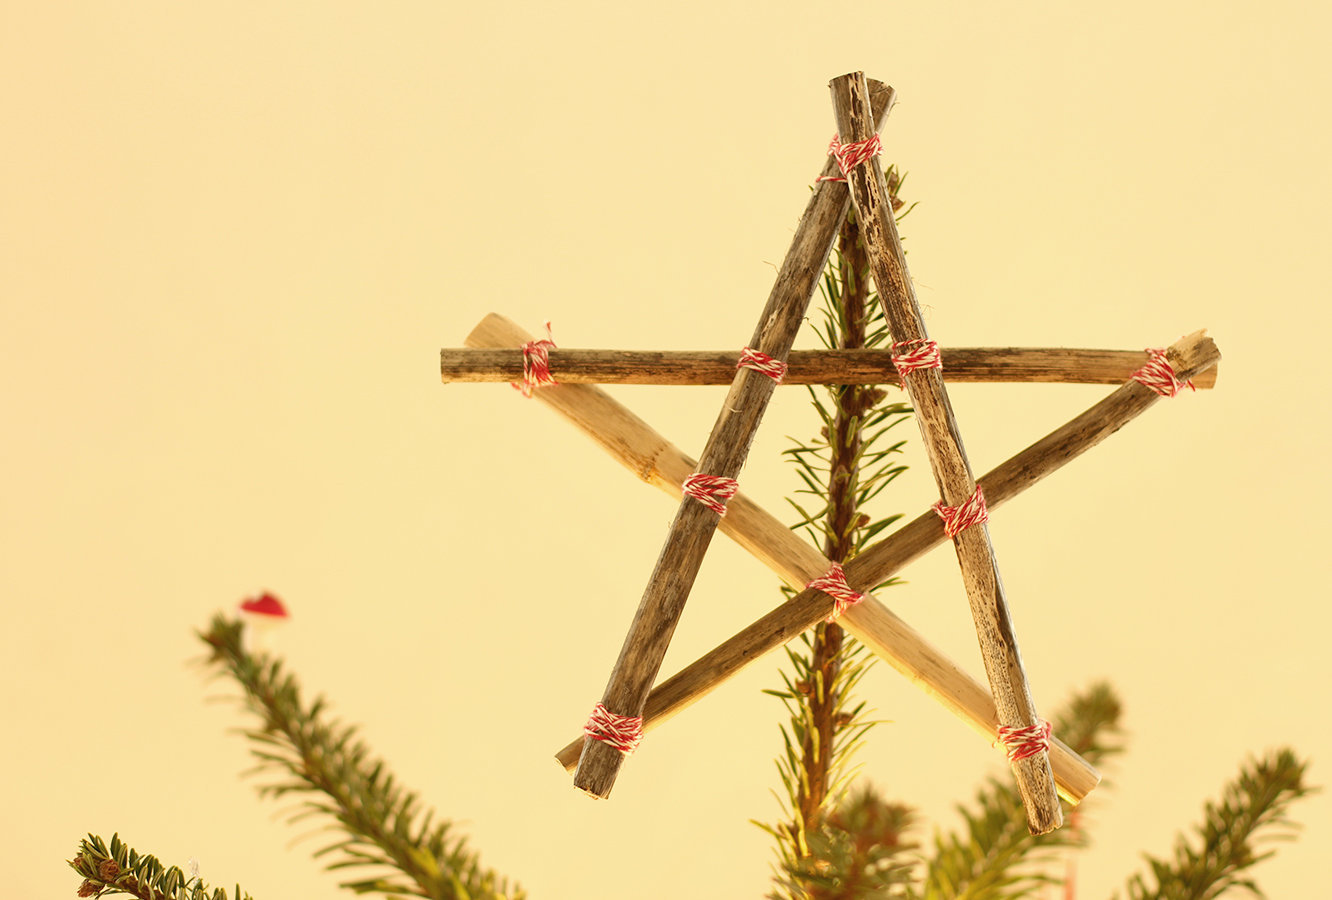
Cut the twigs to the same length using secateurs or scissors. Tie the ends together at 45 degree angles or less. Make sure that when a twig is on top of another at one end that it goes under the next one at the other end. The only exception is the twig you started with, which when you tie it to complete the star, will probably be under both those it’s attached to. Add more twine to secure the cross overs in the middle too.


Stick it, hang it, tag it

A classic case of things not turning out quite how they were meant to this week. I’m not sure exactly what I was expecting, but my housemates managed to cajole me into embracing the rustic charm of these makes nonetheless. By the end I managed to accept them as ‘not too bad after all’ and the lack of precision means that they would be a great little craft for kiddies as the winter creeps in.

With Christmas decorating just around the corner these guys are a great finishing touch as tree decorations, tags on presents and for card making. They are cheap to make and are cute little token gifts for the people you love, or at least those you like enough to want to give them something, but not enough to actually apply yourself to Christmas shopping.

homemade-fimo-christmas-decoration-tag-01

You will need

A block of FIMO modelling clay

Shape cutters

Festive string or ribbon

Acrylic paint and a small paint brush

Alphabet cookie stamp, I go this from Tiger recently (or regular stamps might work)

A paperclip

homemade-fimo-christmas-decoration-tag-02

Step one

Roll the FIMO out into a thin sheet, about 2-3mm thick.

I learned a few things here. Greaseproof paper is not the easiest thing to roll this out onto, a clean surface would be better. Roll the FIMO into a ball with your hands first to warm it up a bit as it will be easier than just rolling straight onto the block. Dust will get into the FIMO so easily, it picks up EVERYTHING, so make sure you wipe your rolling pin and surface carefully.

homemade-fimo-christmas-decoration-tag-03

Step two

Cut out a variety of shapes. Re-roll and keep cutting until you have used all the FIMO. It’s surprising how many you get in the end out of such a small block.

homemade-fimo-christmas-decoration-tag-04

Step three

Stamp the names of your nearest and dearest into the shapes. I found that words longer than four letters were problematic. I employed some creative shortenings, although my housie Marianne was not impressed with Matz as her new nickname. It will depend on the sizes of your cutters, but you might want to do initials or words like ‘love’, ‘joy’ and ‘noel’ if there’re some long names knocking about.

homemade-fimo-christmas-decoration-tag-05

Step four

Using a cocktail stick or bent out paperclip make a hole at the top for the hanging. Wiggle the stick about in a circular motion to make sure the opening is big enough for your string or ribbon.

I then made dots all around as an edging with a paperclip.

homemade-fimo-christmas-decoration-tag-06

Step five

Place on greaseproof paper and onto a tray. Bake in the oven on 100C/200F/gas mark 1 for about 30 minutes. I guessed because the packet provides zero instructions, other than to not heat it above 130C. You can tell by picking them up as they start to feel less soft and a bit lighter as they cook.

homemade-fimo-christmas-decoration-tag-07

Step six

Using very watery acrylic paint, brush over the letters and the edging. Quickly dab away the excess with some clingfilm to create a rustic look.

homemade-fimo-christmas-decoration-tag-09

homemade-fimo-christmas-decoration-tag-10

Use one: Tie up with a couple of trimmings from the garden, maybe a button/pom pom/little bell like mine. Tie with the string around a gift wrapped in brown paper.

homemade-fimo-christmas-decoration-tag-11

Use two: String up and hang from a jug of twigs or your Chrimbo tree.

homemade-fimo-christmas-decoration-tag-08

Use three: Make mini ones with initials and create a simple Christmas card with a piece of wash tape and brown card.


Food innovation at its finest

Apologies for the day late post friends. I had a miniature pie melt down at the weekend (#myblogginglife) and as a result didn’t fancy posting yesterday. Instead I took an evening of sitting on the kitchen counters with the housemates eating pumpkin pie.

Speaking of the housemates. A while ago one of mine professed herself to be a food innovator. Bold claim? Yes. I thought so. When I asked for proof of this theory, she was ready with it. “Well,” she said calmly, and with an air of smugness, “I’ve had an excellent idea for mince pie truffles”. Lover of mince pies I am. Did I think this idea was a good one, worthy of the self proclaimed food innovator title? No, reader, I did not.

About a week of scorning later (I cannot put words together to explain how disgusting I thought the idea was and how aggressively I communicated that to her) she returned home with a box of mince pies to prove her idea, totally unfazed, a quality all struggling food innovators must no doubt possess. I’m sure Heston could empathise.

Anyway. Turns out, I like mince pie truffles. You’ll have to trust me on this one. Best eaten from the fridge, sound and look entirely unappetising, ladies and gentlemen, I bring you the recipe for the humble (but great) mince pie truffle.

This post is dedicated to one Ms Afua Addai-Diawuo, food innovator.

mince-pie-truffles-01

You will need

6 mince pies

300g/10.5 oz dark chocolate

Some sprinkles if you have them

mince-pie-truffles-02

Step one

Using a food processor blitz the mince pies until they are a dough like consistency. It will be very sticky so you will probably need to put the mixture into the freezer for about 30mins to an hour.

mince-pie-truffles-03

Step two

Roll the dough into evenly sized balls.

Put them back into the freezer for a while longer, until solidified.

mince-pie-truffles-gif

Step three

Melt the dark chocolate and dip the truffle centres to coat them and leave them on some cellophane or greaseproof paper to dry.

If you want to see how to dip them, I cover it a little more thoroughly in this post from two weeks ago.

mince-pie-truffles-04

mince-pie-truffles-05

And there we go, early festive treats in three easy steps.

Save it for a drizzly day

This is a recipe for a cake you might have spotted in my wrap up post for Vicky’s hen party. I made some vague comment about getting round to it at some point. So here it is.

Lemon drizzle is one of my go-to bakes when I’m in a rush or don’t have the energy to figure out something new. It’s super handy because often you will have the ingredients and just need to grab a lemon. It’s always a crowd pleaser and really quick and easy to make and transport. I prefer to make it in a brownie tin as a tray bake, I’m of the opinion that it bakes quicker and serves more people this way. Plus I often find loaf cakes get a bit of a dry crust while you’re waiting for the inside to cook. No such problem here.

I present to you the lemon drizzle tray bake.

Disclaimer: I usually use ounces to weigh this one out because I was brought up on ounces and gas marks (thanks mum), I’m still getting my head round grams and celsius since flying the nest. The UK will forever be trapped between the imperial and metric systems…

easy-lemon-drizzle-cake-recipe-01

You will need

For the cake:

6 oz/170g self raising flour

6 oz/170g softened butter or margarine (I use stork)

6 oz/170g caster sugar (golden if you have it)

3 eggs

1 tsp vanilla extract

1 lemon zest

For the drizzle:

3 oz/85g caster sugar

The juice of your zested lemon

(Makes 15)

easy-lemon-drizzle-cake-recipe-04

Step one

I like to sort my lemon out first and get it out of the way.

Grate the lemon on a fine setting on your grater. Place in the microwave for 10-15 seconds and roll around on the surface to release the juices. Cut in half and use a fork or a juicing thingy to squeeze as much juice as you can out of each bit.

Set the zest and juice aside.

easy-lemon-drizzle-cake-recipe-02

Step two

Beat together the margarine and sugar. I like to use an electric hand whisk for most cakes to keep them light and fluffy, but you can do this with a wooden spoon too.

Add the vanilla and eggs and beat again until combined. Don’t worry if the mix looks a bit split/curdled, the flour will bring it back together.

easy-lemon-drizzle-cake-recipe-03

Step three

Add the flour and lemon zest and stir with your whisk (leaving the power off). Once the flour is about half combined you can turn your whisk back on to finish it. If you turn the whisk on to start with you will be wearing more flour than is in the bowl.

easy-lemon-drizzle-cake-recipe-05

Step four

Grease and line a brownie tray. Drop the mixture into the tin and spread out gently with a wooden spoon or silicon spatula until even.

Place in a pre heated oven on gas mark 4/350F/180C for 30-35 minutes. It will go a light golden brown on top and a sharp knife poked into the middle will remove clean when it is cooked.

easy-lemon-drizzle-cake-recipe-06

Step five

About 5 minutes before your cake is cooked, mix the 3oz/85g caster sugar with the lemon juice you squeezed earlier. You will probably need to give it another quick little stir before you pour it.

easy-lemon-drizzle-cake-recipe-07

Step six

As soon as you take the cake out of the oven pour the drizzle evenly over the surface of the cake. Sometimes I take a spoon to the corners to collect the bits that have run down and redistribute them elsewhere.

easy-lemon-drizzle-cake-recipe-08

easy-lemon-drizzle-cake-recipe-09

Allow to cool and cut into squares.

Choco-mania

It has been too long without a post featuring chocolate, hasn’t it? That question was rhetorical.

In case you hadn’t noticed from perusing this blog, I’m a pretty big fan of the stuff. If you bake these then you will be too, or a bigger fan at the end of it. They are gooey, rich and wonderful even if I do say so myself.

Welcome, friend, to death by chocolate brownie meringue cupcakes.

chocolate-meringue-brownie-cupcake-recipe-1

You will need

For the brownie:

250g/9 oz unsalted butter

250g/9 oz soft brown sugar (either light or dark is fine)

200g/7 oz dark chocolate

150g/5.5 oz milk chocolate

85g/3 oz plain flour

3 eggs

1 tsp baking powder

For the meringue

300g/10.5 oz golden caster sugar

100g/3.5 oz cocoa powder

6 egg whites

1-2 tsp cornflour

(makes 16-18)

chocolate-meringue-brownie-cupcake-recipe-2

Step one

Place a heatproof bowl over a pan of simmering water and add the dark and milk chocolate along with the butter. Remove from the heat once fully melted.

chocolate-meringue-brownie-cupcake-recipe-3

Step two

Whisk the eggs with an electric whisk, adding the sugar as you go in thirds. Keep whisking until the mix starts to thicken and goes glossy. Thin ribbons of the mixture should remain visible on the surface when you remove the beaters.

chocolate-meringue-brownie-cupcake-recipe-4

Step three

Pour the melted chocolate mixture into the eggs and stir gently with a metal spoon or a spatula until well combined.

chocolate-meringue-brownie-cupcake-recipe-5

Step three and a half

A careful reader spotted I missed out this step, thanks Gill!

Gently fold in the flour and baking powder.

chocolate-meringue-brownie-cupcake-recipe-6

Step four

Using a jug, fill the cupcake cases between two-thirds and three quarters full.

Bake in a preheated oven on 180C/gas mark 4/350F for 25 minutes.

chocolate-meringue-brownie-cupcake-recipe-7

Step five

With about 5 minutes to go on the baking of the brownies, make the meringues.

Add a third of the golden caster sugar to the egg whites and start to whisk them until they are stiff. Basically, when you can turn the bowl upside down without anything falling out you’re good to go.

chocolate-meringue-brownie-cupcake-recipe-8

Step six

Beat in the rest of the sugar for another minute or two.

Step seven

Fold in the cocoa and cornflour. Do this as if you are stirring a bowl of kittens. Try not to hurt your meringue.

chocolate-meringue-brownie-cupcake-recipe-9

Step eight

Remove the brownies from the oven. Don’t worry, they sink, one day I might bother to adjust the recipe accordingly to stop that happening but they are so tasty the way they are.

Scoop the meringue onto the cupcakes, you can pipe them if you’re feeling fancy/getting to the piping nozzles wouldn’t involve the contents of your cupboard falling on your head.

Step nine

Return to the oven and turn it down to 140C/gas mark 1/275F. Bake for a further 30 minutes. Then turn the oven off but leave the door closed and allow to cool inside the oven for as long as you can resist them.

chocolate-meringue-brownie-cupcake-recipe-10

Step ten

You probably bought your chocolate in 200g bars, meaning that if you haven’t scoffed it already you will have 50g milk chocolate left over. Melt this down and drizzle on top.

If you’ve eaten it already, there’s no shame in that, and your cakes will still be delicious.

chocolate-meringue-brownie-cupcake-recipe-gif

I thought the gif this week should benefit me. So for the sake of the blog I just HAD to eat one.

chocolate-meringue-brownie-cupcake-recipe-11

chocolate-meringue-brownie-cupcake-recipe-13

chocolate-meringue-brownie-cupcake-recipe-12

See you next week pals.

Smelling of roses

Friends, I am sorry. I have definitely become a little lax on the blogging front. Too busy having fun recovering from the craziness of the last few weeks and, of course, the joys of job hunting.

So back to business as usual on fabrefaction this week, no more cupcakes for a while, and as far as I know, no more hen parties. I’m sure I will find something else to do a little series on soon though.

I actually did make this rose and vanilla sugar scrub from the left over flowers from Vicky’s hen party, so it’s not entirely true that we are leaving it behind. My advice is not to make this too far in advance if you’re gifting it as the petals did discolour a little.

homemade-rose-and-vanilla-body-scrub-01

You will need

500g/1lb 2 oz granulated sugar (3 cups)

120ml/4 fl oz baby oil (1/2 cup)

4 roses

1-2 vanilla pods

1tsp rose extract

homemade-rose-and-vanilla-body-scrub-gif

homemade-rose-and-vanilla-body-scrub-02

Step one

Remove the petals from the roses and spread them out over a surface you won’t need to use for a couple of days, maybe a tray or something so you can move them about with ease.

homemade-rose-and-vanilla-body-scrub-03

Step two

Allow the petals to dry for at least two days until the moisture has gone.

homemade-rose-and-vanilla-body-scrub-04

Step three

Using a sharp knife, chop the petals into small pieces.

homemade-rose-and-vanilla-body-scrub-05

Step four

Chop the vanilla pods up. Mine had hardened as they were fairly old so I just did it this way to add to the exfoliating feel and make it easier for myself. If yours are still soft you could slice them down the middle and scrape the beans out instead.

homemade-rose-and-vanilla-body-scrub-06

Step five

Stir together the sugar, petals and vanilla.

homemade-rose-and-vanilla-body-scrub-07

Step six

Add the rose extract/essence and the baby oil. Stir together until fully combined.

homemade-rose-and-vanilla-body-scrub-08

Step seven

Fill whatever pot you’re using and you’re ready to go!

homemade-rose-and-vanilla-body-scrub-09

homemade-rose-and-vanilla-body-scrub-10

homemade-rose-and-vanilla-body-scrub-11

Oh Iceland

Hi there, thanks for swinging by.

This week I went on my merry travels to visit some rather beloved friends. They’ve taken themselves off to Iceland to live for a while. Though I miss them a fair bit, it’s not such a terrible holiday destination for a person who loves photography, walking and general landscape (that’s me by the way).

We had ourselves a little road trip while I was there, naturally my stomach is my priority in all circumstances so we stocked up nicely in the snacks department. Having the luxury of doing none of the driving (Iceland is kinda wild, and my driving leaves a little to be desired), meant that I had plenty of time to consume, and became totally addicted to Hraun. Pronounced something along the lines of hhhhruin, these little guys are something I might have passed by if shopping alone, but are pretty darn yummy. I also saw a box at the airport called ‘Icelandic Mountain Bars’, which is significantly easier to say.

So to give you (me) a break from all that two tiered chocolate cake making you’ve (I’ve) been doing, here’s my recreation of my new favourite treat.

icelandic-mountain-bar-recipe-hraun

You will need

2 cups rice puff cereal

200g/7 oz milk chocolate

8 chocolate covered wafers (I used Blue Ribands)

icelandic-mountain-bar-recipe-hraun-1

Step one

Cut the wafers in half.

Not entirely necessary, you could just make bigger ones, but this way you get to eat a higher number.

icelandic-mountain-bar-recipe-hraun-2

Step two

Melt the chocolate in the microwave, start off with about 40 seconds and then use 10-20 second intervals to avoid burning it.

icelandic-mountain-bar-recipe-hraun-3

Step three

Add the rice crispies/rice puffs to the chocolate

icelandic-mountain-bar-recipe-hraun-4

Step four

Coat the wafers in puffs. Some of them took a bit of convincing for the mixture to stick, I’d imagine laying them on greaseproof paper and spoon the rice puffs and chocolate over the top would work too.

icelandic-mountain-bar-recipe-hraun-5

Step five

Pop onto greaseproof paper and leave to set. Place in the fridge after about 20 minutes.

icelandic-mountain-bar-recipe-hraun-7-1

icelandic-mountain-bar-recipe-hraun-6


cookie dough + chocolate brownie = yum

I used to make a cheat’s version of this recipe with two packet mixes, and recently I just thought to myself, ‘I wonder if this would taste better if I made the batters from scratch’. Oh boy does it.

You just have to find an excuse to make this and eat it warm from the oven with some ice cream. It’s very easy and quite a bit more impressive than regular brownies.

cookie-dough-brownie-recipe-0

You will need

For the brownie batter:

300g/10.5 oz Caster sugar (golden if you have it)

170g/6 oz Unsalted butter

170g/6 oz Plain flour

45g/1.5 oz Cocoa powder

3 Eggs

1/2 tsp Baking powder

For the cookie dough:

170g/6 oz Plain flour

100g/3.5 oz Soft light brown sugar

100g/3.5 oz Milk chocolate chips

60g/2 oz Unsalted butter

1 Egg

1 tbsp Golden syrup

1/2 tsp Baking powder

Extra

45g/1.5 oz Dark chocolate

cookie-dough-brownie-recipe

Step one

Starting with the brownie batter, mix together the baking powder, sugar, flour and cocoa powder.

cookie-dough-brownie-recipe-1

Step two

Make a well in the middle of your dry ingredients and add the eggs. Using a hand whisk, combine gradually using small circles in the centre of the batter.

Step three

Melt the butter in the microwave. Only until it has just about dissolved mind, or it will cook the eggs and this is not intended to be a recipe for scrambled egg brownie.

Step four

Add the butter into the mixture and continue with your little circles until most of the flour is combined, then use a spatula or wooden spoon to fold in the rest.

cookie-dough-brownie-recipe-2

Step five

Pour into a greased and lined brownie tray and gently spread into the corners.

Get a teaspoon and eat a bit. You know you want to.

Moving on to the cookie dough…

cookie-dough-brownie-recipe-3

Step six

Beat together the butter, soft brown sugar and golden syrup. You might find it easier/quicker to use an electric whisk.

Step seven

Beat in the egg until pale, light and fluffy.

cookie-dough-brownie-recipe-4

Step eight

Fold in the flour and baking powder until you have a smooth dough.

cookie-dough-brownie-recipe-5

Step nine

Add the chocolate chips.

Time for another little taste.

cookie-dough-brownie-recipe-7

Step ten

Using a pair of teaspoons drop blobs of the batter onto the surface of the brownie mixture.

cookie-dough-brownie-recipe-gif

cookie-dough-brownie-recipe-6

Step eleven

Push the cookie dough blobs down a bit with the back of a spoon and use a butter knife to make a marbled effect on top.

Step twelve

Bake in the oven for 30-35 minutes on 180C/350F/gas mark 4. You want there to still be a bit of fudgey chocolate between the brownie and cookie so be careful not to over do it.

Step thirteen

Melt the dark chocolate in the microwave and drizzle over with a spoon.

cookie-dough-brownie-recipe-8

cookie-dough-brownie-recipe-9

Yeah. You are so welcome.

Ta, Ma.

Apparently when I think Mother’s Day blogging I think fudge. It’s a good thing my mum likes fudge. What’s that? You didn’t realise Mother’s day was so soon? I know, right? Me neither. It’s this Sunday for those of you in GB, the rest of you should check your calendars, this is the sneakiest holiday of the year.

This is a super super easy way to make a treat for your Ma. It’s not like the last fudge recipe I posted, which while being totally delicious I’d wager none of you actually made. Well there’s no boiling sugar or a thermometer required for this one, and barely any cooking at all.

You might need to cut this recipe by half or even more, it makes quite a large batch for just one mummy to eat. It can be frozen.

white-chocolate-fudge-mothers-day-recipe-1

You will need

600g/1 lb 3 oz White chocolate (yeah, this is serious stuff)

397g Condensed milk (1 can basically)

125g/4.5 oz Cranberries

85g/3 oz Mini marshmallows

25g/1 oz Dark chocolate

Other decorations (I used silver balls and freeze dried raspberries because that’s what I had, but any manner of nuts and dried fruits would be acceptable, even as a substitute for the marshmallows and cranberries)

white-chocolate-fudge-mothers-day-recipe-2

Step one

Break the white chocolate into chunks and place in a pan with the tin of condensed milk.

Melt together on a low heat. Once you have a smooth fudge-like mixture, remove from the hob.

white-chocolate-fudge-mothers-day-recipe-7

Step two

Add two thirds of the cranberries and marshmallows, stir to combine.

white-chocolate-fudge-mothers-day-recipe-3

Step three

Drop the mixture into a brownie tin lined with greaseproof paper. Push into the corners with the back of a spoon and even the top out a bit.

white-chocolate-fudge-mothers-day-recipe-6

Step four

Sprinkle the remaining cranberries, the silver balls and freeze-dried raspberries on top and push down slightly so they stick.

The alternative would be to swap this step with the next one so they stick to the chocolate (this would probably also look nicer because you would actually be able to see them rather than hiding them with a load of dark chocolate…). I make the mistakes so you don’t have to.

white-chocolate-fudge-mothers-day-recipe-gif

Step five

Melt the dark chocolate in the microwave and drizzle over the fudge. Sprinkle the remaining marshmallows on top. I had a bit of dark chocolate left so did another layer on top of the marshmallows.

Place in the fridge to allow the whole thing to set.

white-chocolate-fudge-mothers-day-recipe-4

Step six

Using a cutter of your choice (this heart-shaped one was from Lakeland), cut the fudge into pieces. If you don’t have a cutter, then bars or chunks would look nice too.

white-chocolate-fudge-mothers-day-recipe-5

A bit of bread and butter

Hi there. Welcome back.

This week a cheap and cheerful bake was on the cards for everyone out there cutting costs this January. The perfect pudding to blast away those winter blues. I apologise in advance for laughing in the face of all your 2015 diets, but if you’re going to break them, this is a great way to do so.

This recipe is ideal for people who doubt their skills in the kitchen, I’ll be seriously impressed if you managed to mess this one up. Send me photos if you do.

bread-butter-banana-dulche-de-leche-chocolate-pudding-recipe-1

You will need

For the pudding:

500ml/17 fl oz Double cream

100ml/3.5 fl oz Condensed milk

2 Eggs

Vanilla pod/2 tsp Vanilla extract

100g/3.5 oz Dark/Milk chocolate

50g/2 oz Soft brown sugar

6 – 8 Slices white bread (let’s be honest, you will need to get a loaf anyway, and I wasn’t counting properly)

3 Bananas

Butter for spreading

Ramekins if you’re feeling a bit posh.

For the salted caramel:

100g/3.5 oz Salted butter

80g/3 oz Soft brown sugar

100ml/3.5 fl oz Double cream

2 tbsp Golden syrup

2 tsp Salt

(Makes 6)

bread-butter-banana-dulche-de-leche-chocolate-pudding-recipe-2

Step one

Whisk together the cream, condensed milk, vanilla and eggs. Set aside, and try not to think about how much cream that was.

bread-butter-banana-dulche-de-leche-chocolate-pudding-recipe-3

Step two

Butter the bread slices generously. I just used regular spreadable butter for this, but if you’re a purest you could buy unsalted.

Using a cutter that’s the same diameter as your ramekins, cut circles out of the bread. Chop the offcuts into small pieces and leave to one side.

bread-butter-banana-dulche-de-leche-chocolate-pudding-recipe-4

Step three

Slice the banana into thin pieces and chop the chocolate into small chunks (as if I haven’t said it enough – a bread knife is the best way to do this).

bread-butter-banana-dulche-de-leche-chocolate-pudding-recipe-gif


Step four

Assemble!

Butter the ramekins and layer up the puddings. Bread, banana, chocolate, sugar, repeat. Finish the last layer with bread using the offcuts and sprinkle some caster sugar on top, this will make a lovely crisp topping.

Step five

Once all the ramekins are layered up, pour the custard mixture on top, try to fill them evenly.

Leave to sit for 20 minutes to let the custard soak into the bread.

Step six

Bake in a pre-heated oven for 35 minutes on 180C/350F/gas mark 4.

autumn-mess-10

Step seven

While you are baking the puddings, place all the ingredients for the salted caramel into a saucepan (minus the cream).

Heat gently until melted and then bring to a simmer. Simmer for 10 minutes. Stir regularly so that it doesn’t catch and burn. Leave to cool for about half an hour.

autumn-mess-11

Step eight

Once cooled, stir in the 100ml double cream.

bread-butter-banana-dulche-de-leche-chocolate-pudding-recipe-6

bread-butter-banana-dulche-de-leche-chocolate-pudding-recipe-5

Not the prettiest things but they aren’t too shabby to eat. Bon apetit!